Tuesday, January 25, 2022

What’s New in WordPress 5.9 (Features and Screenshots)

WordPress 5.9 was released earlier today, and it is the first major release of 2022.

This new release contains significant updates, which include a whole new way to build websites.

In this article, we’ll show you what’s new in WordPress 5.9, and which features you should try after updating your websites.
New features in WordPress 5.9 with screenshots

WordPress 5.9 is a major release, and unless you are on a managed WordPress hosting service, you’ll have to manually initiate the update.

Important: Don’t forget to create a complete WordPress backup before updating.

That being said, here’s all that’s new in WordPress 5.9.

Block Themes Bring Full Site Editing in WordPress 5.9

WordPress 5.9 comes with Block Themes, which is a new way of building websites and customizing WordPress themes.

The new ‘Site Editor’ allows you to customize WordPress themes using the block editor. This way users can make a website with its own unique design without writing code.
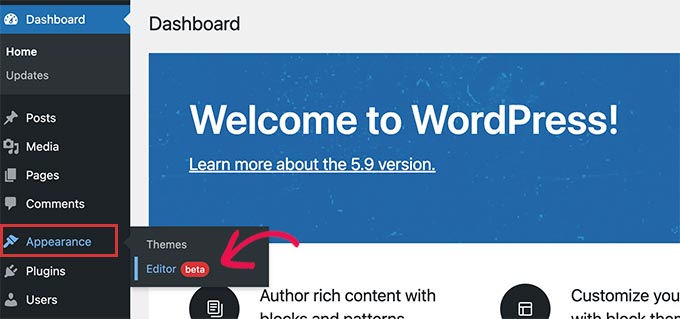
New site editor in WordPress 5.9
Note: Full site editing is only available for block-enabled themes that support this new feature. You can use it even when you have the classic editor plugin installed.

If you are using a new block-enabled theme, then you’ll see a new menu item, Appearance » Editor. You will not be able to see the old Theme Customizer and Menus option under the Appearance menu.

You’ll also be unable to preview a block-enabled theme from the Appearance » Themes page.

Full site editing in WordPress 5.9 still relies on your WordPress theme. You can use it to customize some parts of your existing theme, but not to create any designs from scratch.

You can use SeedProd to create a completely custom WordPress theme without writing any code. It is theme agnostic, meaning you have complete design freedom without being limited by your theme.

New Blocks for Full Site Editing

In order to help users create complete site-wide layouts, a bunch of new blocks have been added in WordPress 5.9.

You can find these blocks under the ‘Theme’ category in the add new block panel.
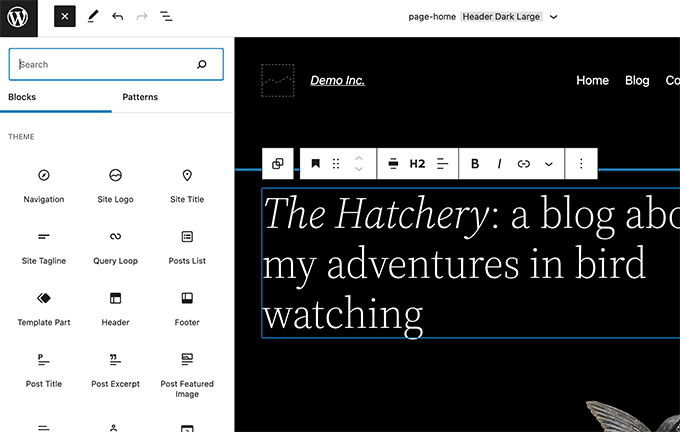
Site editing blocks in WordPress 5.9

Here is a list of new blocks available in WordPress 5.9:

  • Navigation
  • Template Part
  • Header
  • Footer
  • Post Author
  • Next Post
  • Previous Post
  • Post Comments
  • Term Description
  • Archive Title

You can use these blocks to create custom layouts with Theme Editor. However, you can also use these blocks inside a typical WordPress post or page if needed.

Create and Save Site Wide Styles

Previously you had to write custom CSS code if you wanted to change something in your WordPress theme.

Now a lot of such changes can be made with site-wide styles. Simply click on the Style icon on the top right corner of the screen when editing any template.
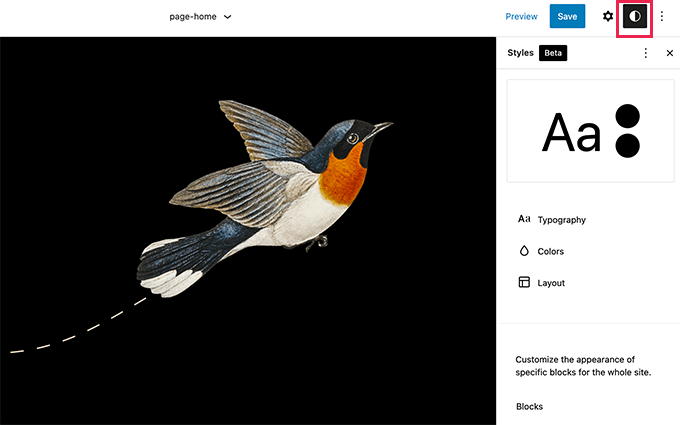
Editing theme styles

From here you can change a number of styling options like colors, typography, padding, and more.

You can also edit styles for individual blocks and apply the same styles to your template.
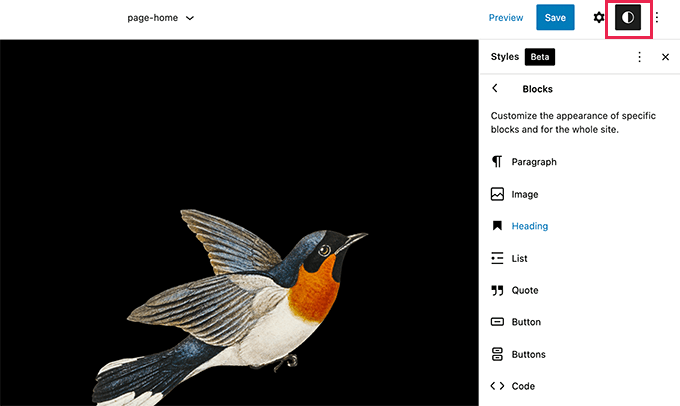
Edit block styles

New Ways To Manage Navigation Menus

If you are using a block enabled theme, then you will not have access to the old Menus page. Instead, you can add navigation menus by using the new navigation block.
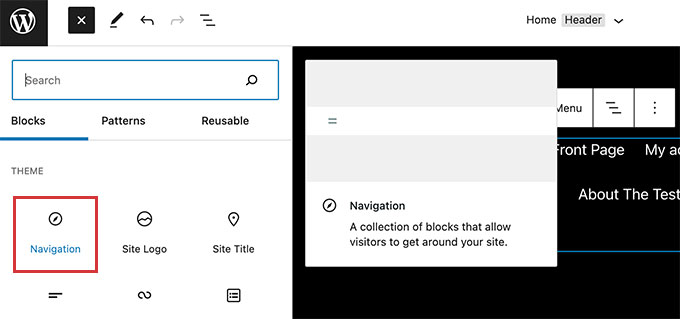
Navigation block

The new navigation block makes it easy to add menu items and edit them with a live preview.

You can change color of your links and adjust the menu size and dimensions.
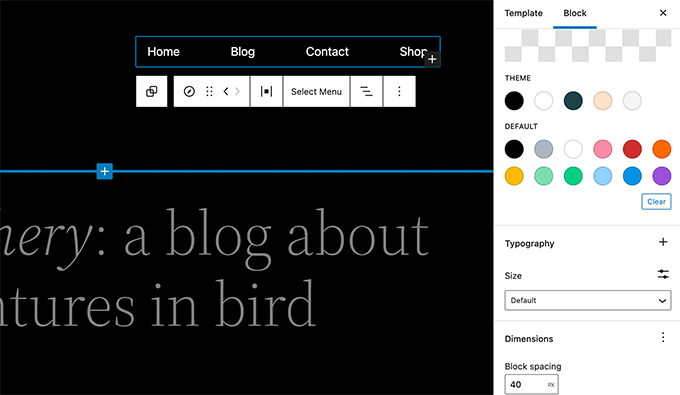
New navigation block in WordPress 5.9

Twenty Twenty-Two New Block Enabled Default Theme

WordPress 5.9 comes with Twenty Twenty-Two, the new block-enabled default theme.

Designed to take full advantage of the new full site editing experience, Twenty Twenty-Two offers a clean minimalist canvas so you can experiment with new site editing features.
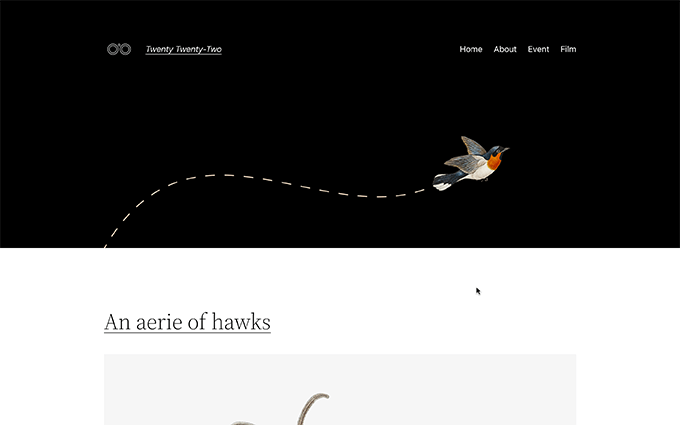
New default theme Twenty Twenty-Two

The theme also comes with a bunch of ready-made patterns that you can use in the site editor or the post editor when writing content.
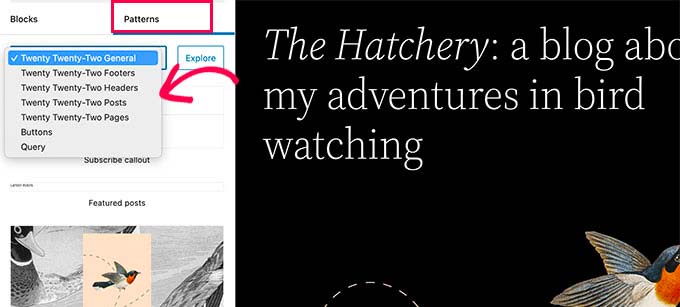
Patterns in Twenty Twenty-Two

Block Editor Changes in WordPress 5.9

Most WordPress users spend a lot of their time inside the block editor writing content and creating new posts and pages.

That’s why each WordPress release comes with new features and improvements for the post editor, and WordPress 5.9 is no different.

Following are a few major improvements to the block editor in WordPress 5.9.

Improved Typography Controls

WordPress 5.9 comes with improved typography controls for text blocks. For the paragraph block, you can change font size, line height, letter case, letter spacing, and colors.
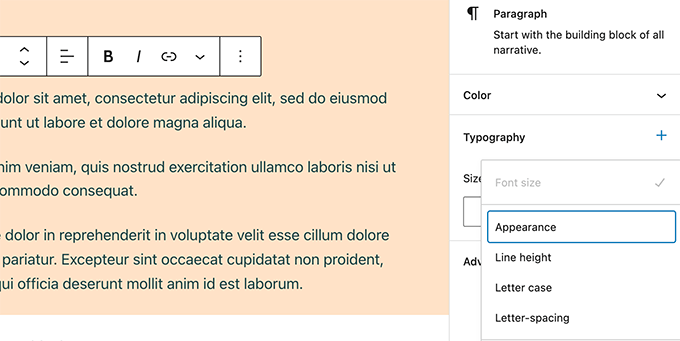
Typography controls

The heading block now allows you to select a heading level from a vertical dropdown menu.

You also have more typography, design, margin, and spacing options for your headings.
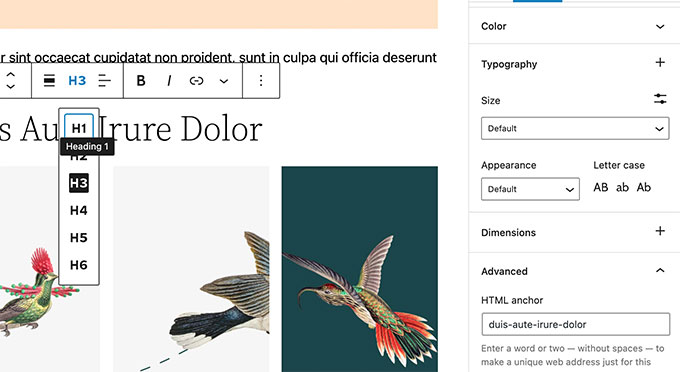
Headings block now has more controls

Rich URL Previews in Block Editor

Previously, when you hovered your mouse over a link in the post editor, you only saw the URL.

WordPress 5.9 now displays rich URL previews for links inside the post editor.
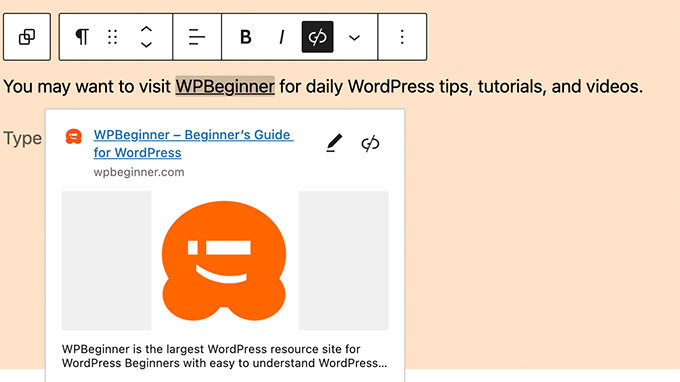
Rich URL previews

Improved Gallery Block

Previously, it was difficult to add links and styles to individual images inside a gallery block.

WordPress 5.9 ships with the revamped gallery block and now allows you to choose different styles for individual images in the gallery block. You can also easily link each image or the whole gallery block.
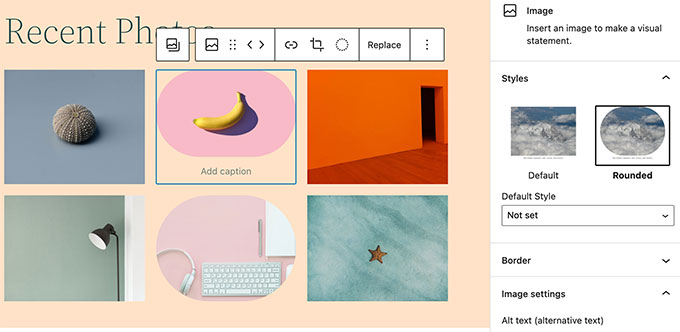
Revamped Gallery block in WordPress 5.9

Better Social Icons and Buttons

With previous versions of WordPress, it was a bit difficult to access controls of the parent and child blocks when working with social icons and buttons.

WordPress 5.9 now makes it easier by allowing child blocks to use the parent block’s toolbar.
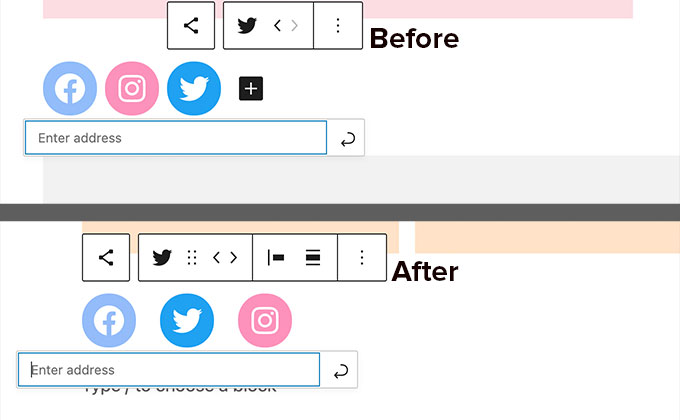
Social icon controls in WordPress 5.9

Effortlessly Navigate and Move Blocks

In the List View, you can now easily move blocks and sections with drag and drop.
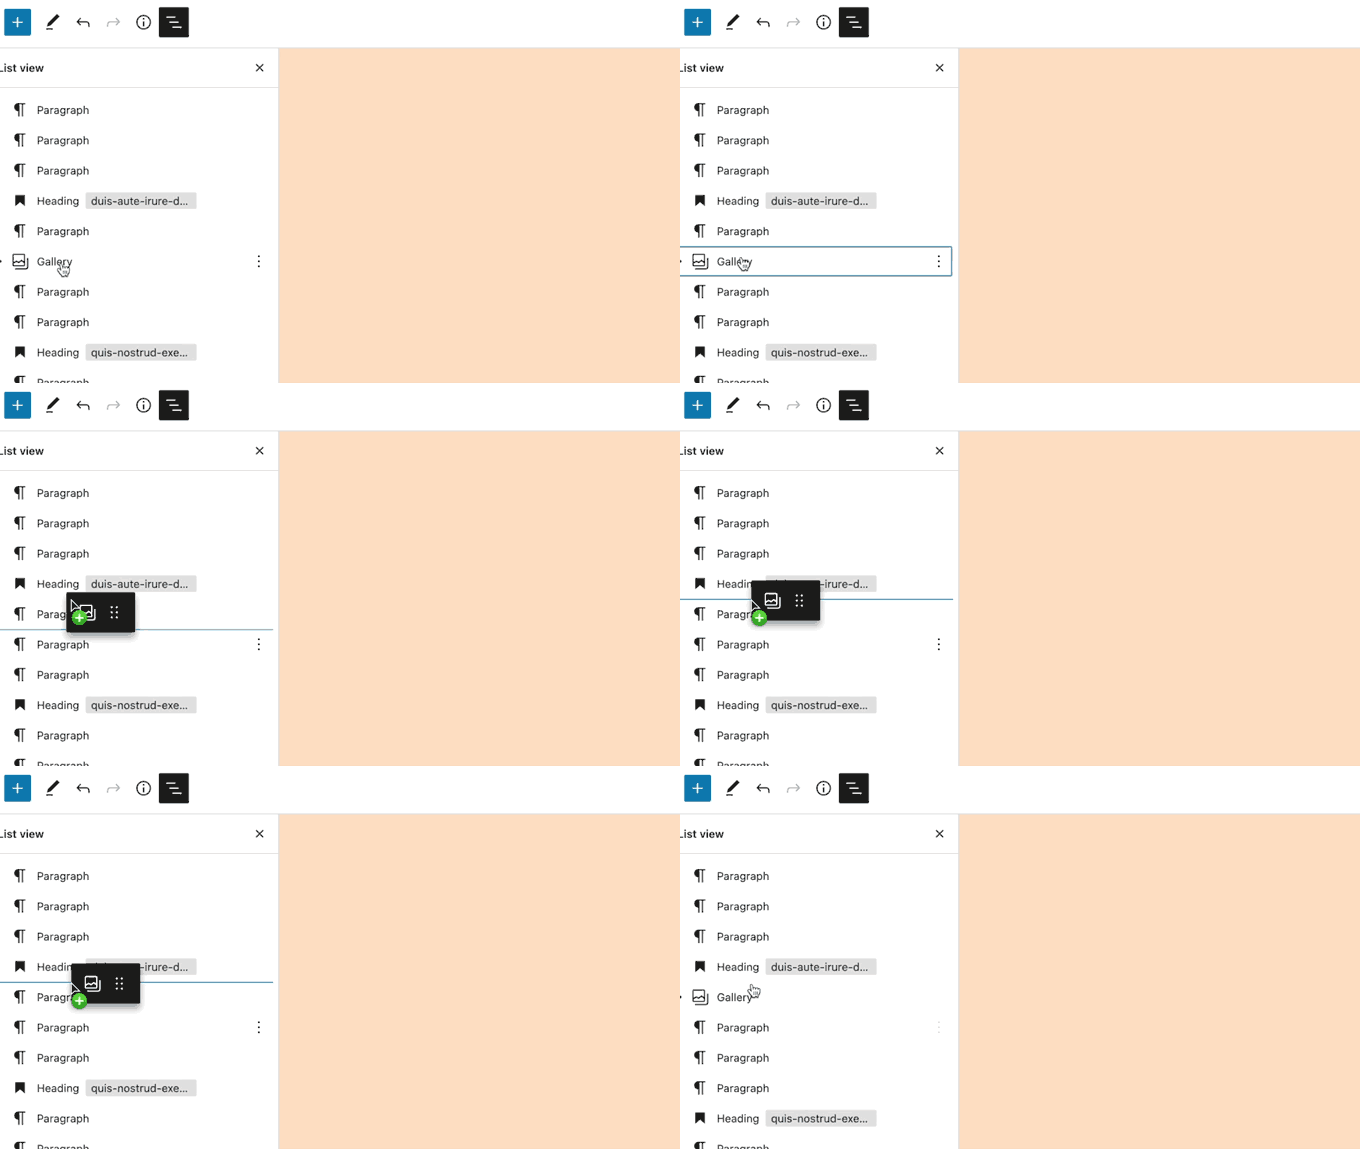
Moving items in the block editor

This allows you to easily jump to different parts of the content and move them around so you can quickly readjust your layout.

Choose Language During Login

If you have multiple languages installed on your WordPress website, then users can now choose their preferred language on the login screen.
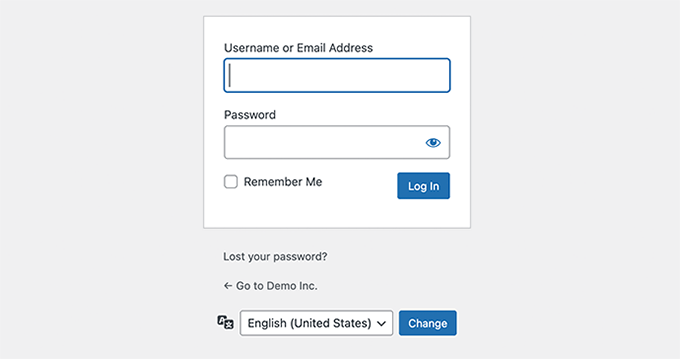
Choose language during login

Performance Improvements in WordPress 5.9

WordPress is used by nearly 43.2% of all websites on the internet. A faster WordPress means a faster online experience for millions of users every day.

Each WordPress release devotes significant development time to improving performance. Here are some major performance improvements in WordPress 5.9.

Improved Lazy Loading of Images

WordPress comes with lazy loading for images since WordPress 5.5. However, it added lazy loading to all images which increased the Largest Contentful Paint metric (LCP)

With WordPress 5.9, images that are viewable upon initial load will skip lazy loading, improving your Core Web Vitals.

Better Handling of Block Styles and CSS

Previously, WordPress loaded all stylesheets for all blocks in a single file. With WordPress 5.9, only the styles needed will be loaded.

Block Editor Improvements

Perhaps the most used part of the block editor is the inserter itself. WordPress 5.9 makes the inserter faster, allowing you to quickly find the block you need to add.

Under the Hood Changes in WordPress 5.9

WordPress 5.9 brings many changes for developers to explore and use in their own themes, plugins, and projects.

Following are some of these under the hood changes:

  • A new block level locking mechanism is introduced to facilitate development of patterns and templates. (See details)
  • New is_post_type_viewable filter allows developers to override the is_post_type_viewable() function. (#49628)
  • Similarly, the new is_post_status_viewable function allows developers to override the post status object. (#54375)
  • WordPress core PHP Test Suite now supports PHPUnit 8.x via PHPUnit Polyfills library (See details)
  • New function wp_get_post_revisions_url() to get URL for a post revision. (#39062)
  • New wp_list_users() template tag is introduced. (#15145)

We hope this article helped you explore new features in WordPress 5.9. We are particularly excited about the full site editing features.

What are you excited about? Let us know in the comments below.

If you liked this article, then please subscribe to our YouTube Channel for WordPress video tutorials. You can also find us on Twitter and Facebook.

The post What’s New in WordPress 5.9 (Features and Screenshots) first appeared on WPBeginner.


January 25, 2022 at 11:00PM
How to Create a Giveaway to Grow Your Email List by 150%

Do you want to start a giveaway and get more email subscribers?

Giveaways are one of the fastest ways to grow your email list, increase traffic, and boost sales. They help you reach new audiences and boost user engagement on your website.

In this article, we’ll show you how to use a giveaway to grow your email list faster.

Use a giveaway to grow your email list in WordPress

Why Use a Giveaway to Grow Your Email List?

Did you know that email marketing sees a 4300% return on investment (ROI) on average for businesses in the US?

People who sign up for your emails are already interested in your products and services, making them highly likely to convert into paying customers. However, the hardest part is getting more people to join your email list.

This is where running a contest or giveaway on your WordPress site comes in handy.

It helps you grow your email list while getting more social media subscribers and increasing traffic on your website.

Giveaways give you instant results. They create a sense of urgency, and the fear of missing out encourages your visitors to participate in the contest. Plus, you can reach new audiences using giveaways and get more email subscribers for your WordPress website.

This is why we regularly use giveaways on WPBeginner.

That being said, let’s look at how you can get started with your giveaway.

Select a Prize for Your Giveaway

Before creating a giveaway, you should choose an attractive prize for your giveaway. A good prize will incentivize your website visitors to participate in the giveaway and subscribe to your email list.

A good place to start is by offering a prize based on your business and target audience. For example, at WPBeginner, we usually award free licenses of WordPress plugins and themes to giveaway winners.

On the other hand, if you’re running an eCommerce store, then you can giveaway gift cards, free shipping, or free products as prizes. Similarly, you can also give free gadgets like laptops, smartphones, headphones, etc as rewards to attract more participants.

We run monthly giveaways offering new cool gadgets as giveaways to our WPForms subscribers.

That said, let’s find out how you can create a giveaway in WordPress.

Creating a Giveaway in WordPress

The easiest way to set up contests in WordPress is by using RafflePress. It’s the best WordPress giveaway plugin that’s beginner-friendly and lets you create giveaways in just a few clicks.

We’ll use the RafflePress Pro version for this tutorial because it lets you sync with popular email marketing services and offers more giveaway actions. There’s also a free version of RafflePress you can try.

First, you’ll need to install and activate the RafflePress plugin. If you need help, then please see our guide on how to install a WordPress plugin.

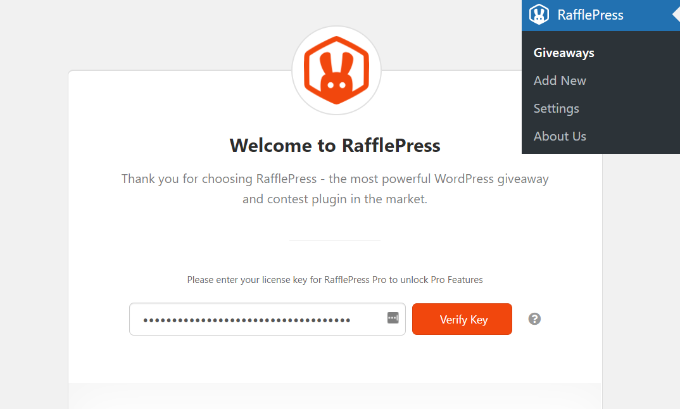
Upon activation, you’ll see the RafflePress welcome screen in the WordPress dashboard. Next, enter the license key and click the ‘Verify Key’ button. You can find the license key in your RafflePress account area.

Verify license key

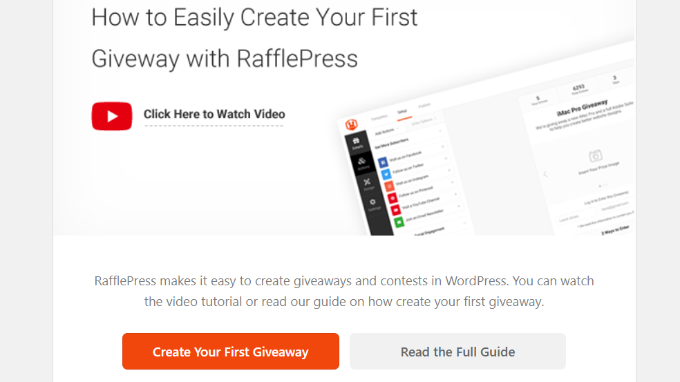
After that, you can scroll down and click the ‘Create Your First Giveaway’ button to launch the RafflePress giveaway builder.

Create your first giveaway

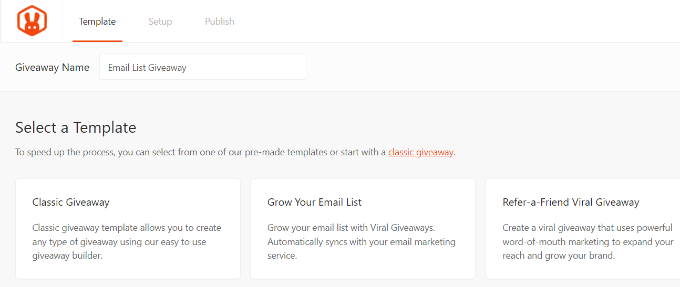
On the next screen, you’ll need to enter a name for your giveaway campaign and then select one of the templates.

Since your goal is to grow our email list, go ahead and click on the ‘Grow Your Email List’ template.

Select grow your email list

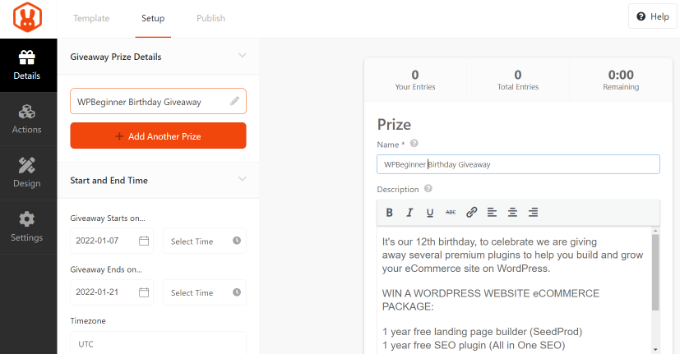
Now, you can add information about your giveaway under the ‘Details’ section that’s located in the left sidebar.

To start, go ahead and enter a name and description for your giveaway. You can also add an image, select the giveaway start and end time and date, and choose a timezone.

Customize your giveaway

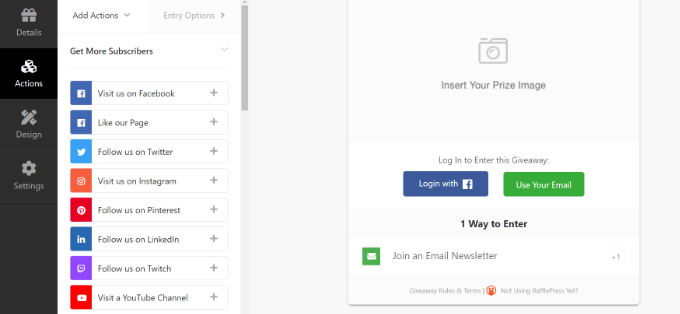
Next, head over to the ‘Actions’ section. Here you can select all the ways your users can participate in the giveaway.

RafflePress will add the ‘Join the Email Newsletter’ option by default in the Grow Your Email List template. However, you can choose more actions like getting users to follow you on Twitter or visiting your YouTube channel.

Add actions to your giveaway

Keep in mind that the more entry options people have, the better engagement you will get. To keep the focus on growing your email list, you can assign more entry points to the Join Newsletter action and make it a required option.

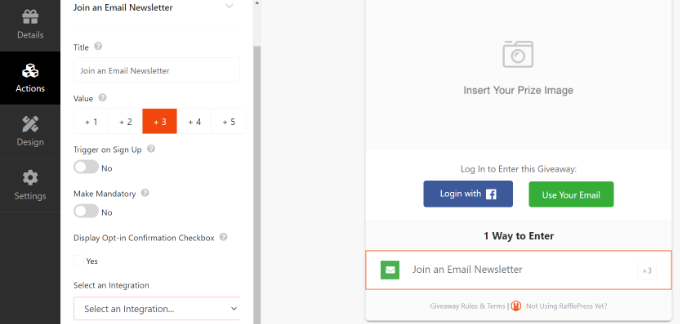
Simply click on the ‘Join an Email Newsletter’ action in the template to further customize it.

From here, RafflePress lets you choose the number of entries a user will get. You can also edit the title text, automatically add people to the email list when they signup for the giveaway, and make the action mandatory.

To encourage more people to sign up, you can assign a higher value. In our example giveaway, we’re assigning a ‘+3’ value so that users get 3 entries when they sign up for the newsletter.

Edit action settings

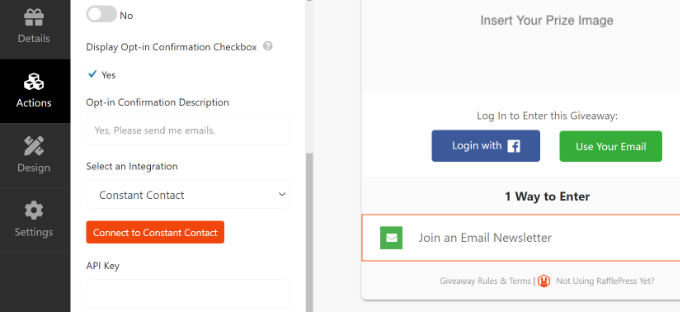
There is also an option to enable opt-in confirmation, which ensures that contestants give permission to add them to your email list. This helps in complying with data regulation laws like GDPR.

Next, you’ll need to select an email marketing service from the ‘Integration’ dropdown menu. RafflePress easily integrates with popular services like Mailchimp, AWeber, ActiveCampaign, Constant Contact, Drip, and SendinBlue, and more.

Once you’ve selected an email marketing service, the next step is to connect it with your giveaway.

Enter email marketing service details

Note: Each email platform will have different settings to connect with RafflePress. Simply follow the onscreen steps and provide any required information like API key, client ID, security keys, or authorization code.

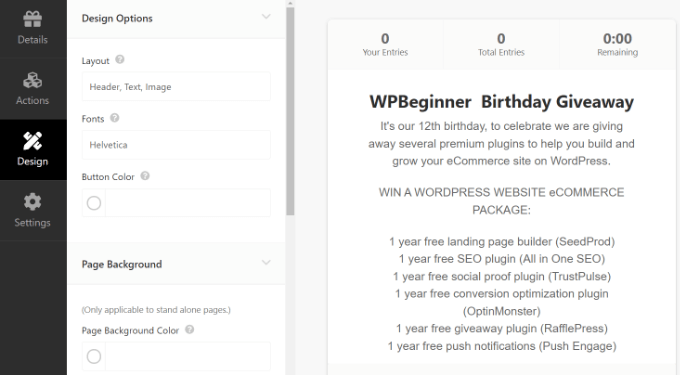
Next, you can switch to the ‘Design’ section from the menu on your left to customize the look of your giveaway.

RafflePress gives you options for changing the layout, fonts, button color, adding a page background, editing the background color, and entering custom CSS.

Change the design of your giveaway

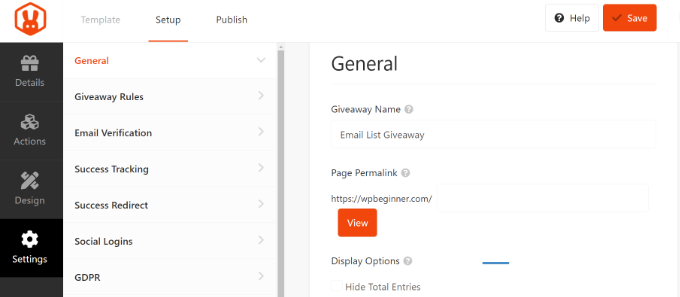
After that, you can go to the ‘Settings’ section from the menu on your left.

Here, you can edit the general settings of the giveaway like name, page permalink, and more.

Giveaway settings

Once you’ve made the changes, simply click the ‘Save’ button at the top.

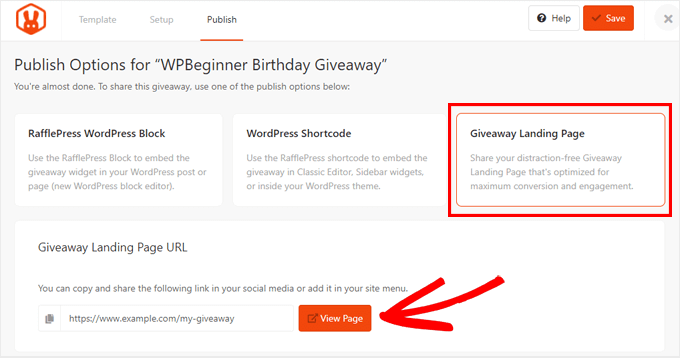
Next, you’ll need to publish your giveaway. To get started, click the ‘Publish’ tab at the top of the screen.

RafflePress gives you the option to publish your giveaway as a block in a page or post, as a widget, or as a standalone landing page.

We’ll choose the ‘Giveaway Landing Page’ option because it’s quick and easy.

Simply click the View Page button to see your live giveaway in action.

Publish RafflePress giveaway landing page

Promote your Giveaway

Once your giveaway is live, you should promote it so more people can participate and join your email list.

There are many ways you can spread the word about your giveaway contest. You can start by making your giveaway visible on the website and display it on the homepage, sidebar, and on your most important pages.

For example, displaying a floating bar on your homepage with a link to your giveaway helps improve the visibility of your contest. You can also add countdown timers to create urgency.

Promoting the giveaway on your social media profiles like Facebook, Twitter, and Instagram is also a great way of getting more participants. It lets you add followers to your email list who haven’t subscribed yet.

Besides that, another way of generating excitement around your giveaway is by sharing it in different online communities. You can also reach out to influencers from your industry to promote your giveaway.

Sending web push notifications can also boost engagement around your contest. You can ask your push notification subscribers to join your email list if they haven’t already, or to refer their friends and family members.

Choose a Giveaway Winner

When your giveaway reaches the end time, you can go ahead and choose a winner. RafflePress helps you automatically pick a winner at random.

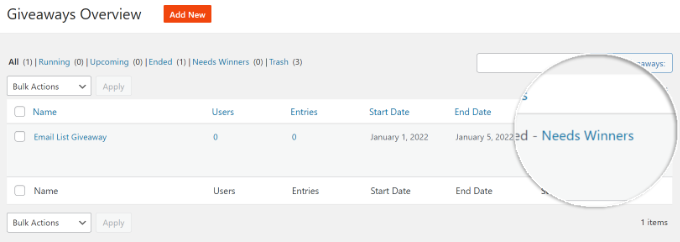
All you have to do is head over to RafflePress » Giveaways page from your WordPress admin area. Next, click the ‘Needs Winners’ option next to your giveaway.

Click needs winners

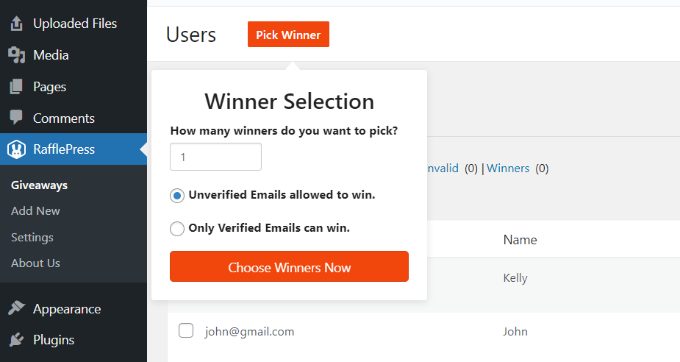
RafflePress will now ask you how many winners you want to pick for the giveaway and whether unverified emails can win. Once you’ve chosen your settings, click the ‘Choose Winners Now’ button.

Select how many winners

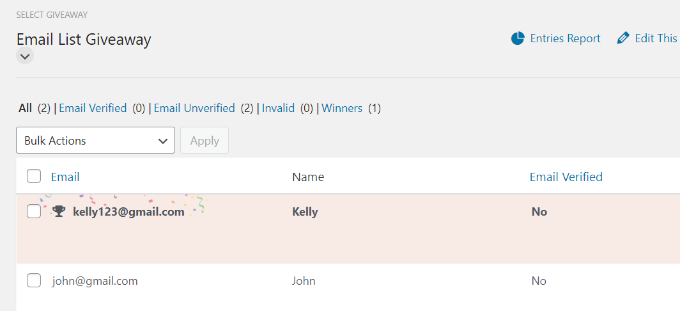
Next, RafflePress will randomly select a winner for the giveaway. You can then email the winner so that they can claim their prize.

See highlighted winner

That’s it! We hope this article helped you learn how to use a giveaway to grow your email list. You may also want to go through our guide on how to get a free email domain, and see our expert pick of the best identity theft protection services for small business.

If you liked this article, then please subscribe to our YouTube Channel for WordPress video tutorials. You can also find us on Twitter and Facebook.

The post How to Create a Giveaway to Grow Your Email List by 150% first appeared on WPBeginner.


January 25, 2022 at 04:00PM

Monday, January 24, 2022

How to Track Video Analytics in WordPress (Step by Step)

Do you want to know which videos your visitors watch the most on your WordPress website?

Videos are a great way to bring life to your website and boost engagement. By tracking video analytics, you can see how your videos are performing with metrics like total views, watch duration, and more.

In this article, we’ll show you how to track video analytics in WordPress using Google Analytics. This solution works for YouTube, Vimeo, and other HTML5 video embeds.

How to track video analytics in WordPress

Why Track Video Engagement in WordPress?

Adding videos to your content makes your articles more engaging and helps in getting people to spend more time on your site.

However, if you have multiple videos on your WordPress site, then how do you which type of content is performing the best and whether people are watching your videos or not?

Tracking video engagement in Google Analytics can help you uncover these insights.

You can see how many people are watching videos on your WordPress website, whether they are clicking the play button, how much of the video they’re watching (watch duration), and more.

This helps in figuring out the type of media content your audience likes. Then you can create more videos on similar topics, and use the same format and style to boost user engagement.

That said, let’s look at how you can track video analytics on your WordPress website.

Setting Up Video Analytics in WordPress

The easiest way to track videos on your WordPress website is by using MonsterInsights. It’s the best WordPress analytics solution that helps you set up Google Analytics in WordPress without editing code or hiring a developer.

By default, Google Analytics does not track detailed video analytics.

However, the MonsterInsights Media addon makes it very easy to track videos that you’ve embedded from YouTube and Vimeo. It also tracks HTML 5 videos that you’ve uploaded through the WordPress media library.

Editor’s Note: We typically don’t recommend uploading videos to WordPress because it can use up a lot of storage space and slow down your website. Instead we recommend using YouTube, Vimeo, or other best video hosting sites.

There’s no need to touch a single line of code. MonsterInsights automatically tracks videos in Google Analytics in just a few clicks.

MonsterInsights

For this tutorial, we’ll use the MonsterInsights Pro version because it includes the Media addon and other advanced tracking features. There is also a MonsterInsights Lite version that you can use to try it out and get started with analytics on your site.

First, you’ll need to install and activate the MonsterInsights plugin. For more details, please see our guide on how to install a WordPress plugin.

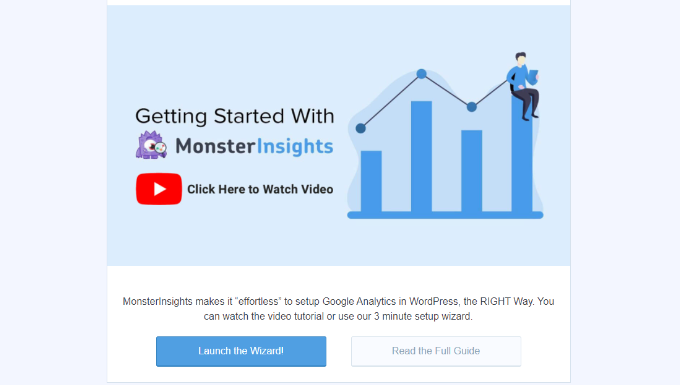
Upon activation, you’ll be taken to the MonsterInsights welcome screen inside your WordPress dashboard. Go ahead and click the ‘Launch the Wizard’ button to configure the plugin and connect Google Analytics with WordPress.

Launch setup wizard

You can follow our step-by-step guide on how to add Google Analytics to WordPress.

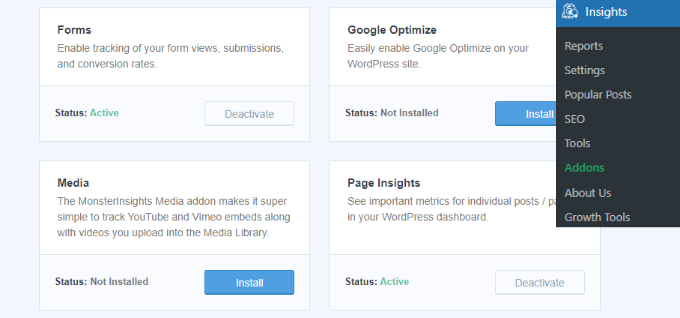
Next, you’ll need to head over to Insights » Addons from your WordPress admin area and then scroll down to the ‘Media’ addon.

Go ahead and click the ‘Install’ button and the addon will then install and activate. You will see the ‘Status’ change from Not Installed to Active.

Install media addon

Once the addon is active, simply navigate to Insights » Settings from the WordPress admin panel and then go to the ‘Publisher’ tab.

Publisher setting

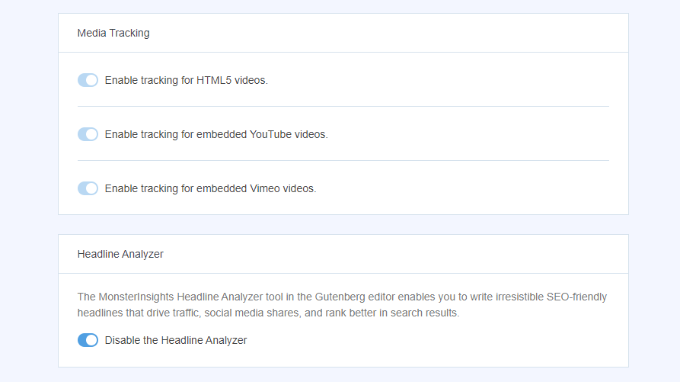
After that, you can scroll down to the Media Tracking section. You’ll notice that the toggles for tracking HTML 5, YouTube, and Vimeo videos will be enabled.

Enable media tracking

MonsterInsights will now start to track videos on your WordPress site. You can now visit your Google Analytics account to view the report.

Viewing Video Tracking Data in Google Analytics

To see how your videos are performing, you’ll need to go to the Google Analytics website and log in to your account.

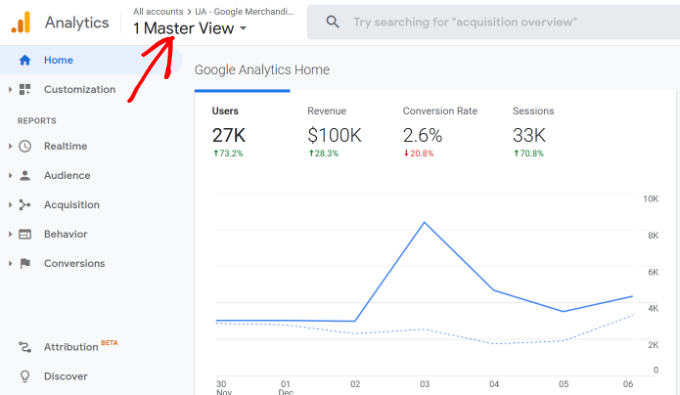
Next, you can choose your website (property) from the dropdown menu at the top.

Choose a website property

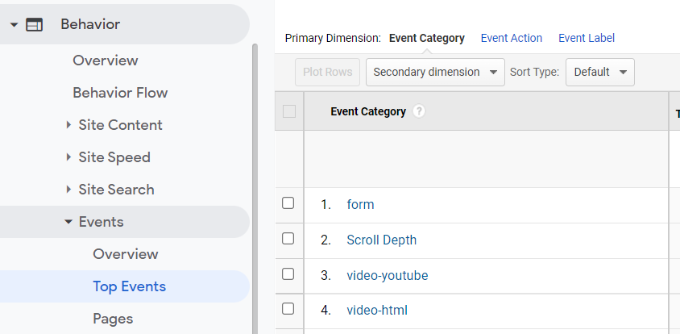
After that, you’ll need to head over to Behavior » Events » Top Events from the menu in the left column.

You’ll see separate Event Categories for video tracking such as video-youtube, video-vimeo, or video-html.

Top events

Now, go ahead and click on an video Event Category like ‘video-youtube’.

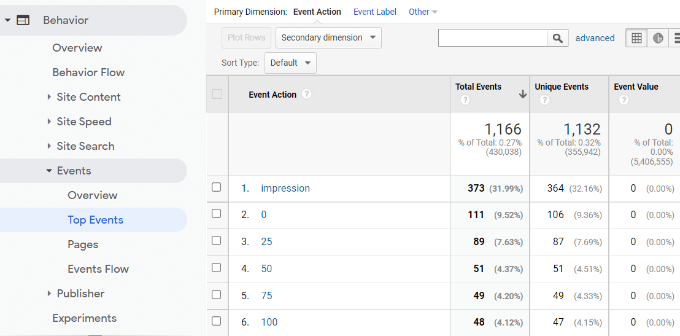
Here you can view the number of impressions, and what percentage of the video was watched.

Event action for video tracking

Impressions tell you how many users viewed your videos.

The numbers are the percentage of the video that was watched. For example, a 0 event action shows that viewers clicked the play button but watched less than 25% of the video.

Similarly, 50 shows that viewers watched at least half the video but less than 75%, while 100 means that users viewed the entire video.

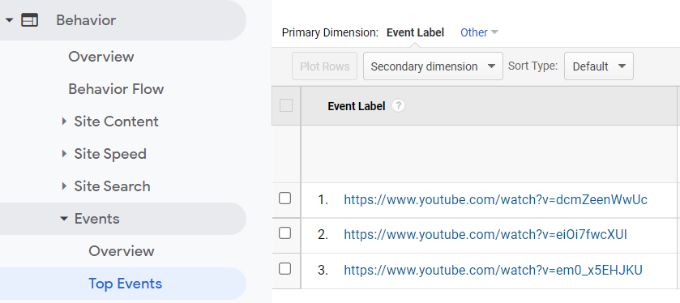
Next, if you click on an Event Action, you can then view the video URLs. For example, if you want to know which videos people watched till the end, then go ahead and click on the ‘100’.

On the next screen, you can see the links to the videos under the Event Label column.

View video URL

Now that you know which videos are getting the most engagement on your website, you can plan more similar content for your audience. You can also experiment to get more video views by embedding a YouTube channel on your website, or creating a video gallery.

We hope this article helped you learn how to track video analytics in WordPress. You can also see our guide on how to register a domain name and the best free website hosting compared.

If you liked this article, then please subscribe to our YouTube Channel for WordPress video tutorials. You can also find us on Twitter and Facebook.

The post How to Track Video Analytics in WordPress (Step by Step) first appeared on WPBeginner.


January 24, 2022 at 03:37PM