Certified WordPress Developer and SEO Specialist with 10+ years of experience on Fiverr. I provide expert solutions for WordPress error fixing, debugging, speed optimization, and security hardening. Services include hacked site recovery, malware removal, on-page SEO optimization, and full customization to ensure your website runs fast, secure, and ranks higher on Google.
Do you want to disable the language switcher on the WordPress login screen?
Disabling the language switcher makes your default language the only option on the log in page, but users will still be able to change the language in their profile settings.
In this article, we’ll show you how to disable the language switcher drop down on the WordPress login screen.
Why Disable the Language Switcher on the WordPress Login Screen?
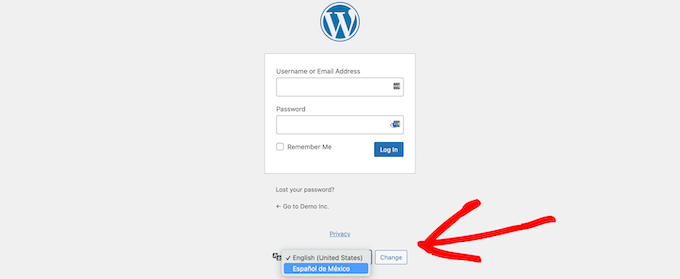
The release of WordPress 5.9 introduced a new drop down login option that lets users select a new language when logging into the website.
If there is more than one active language on the site, then this option will appear.
This works well for multilingual websites and teams with different users who might want to access the WordPress dashboard in a different language.
But if you want to keep your login page simple, and your users don’t need to frequently switch languages, then removing it can help to declutter the login page. It can also help you to keep control over your custom login page design.
Note: The language selector doesn’t make your WordPress website multilingual, it simply translates the WordPress login and password reset pages and the WordPress dashboard.
With that said, let’s show you how to disable the language switcher on your WordPress site. Simply use the quick links below to jump straight to the method you want to use.
Method 1. Disable the Language Switcher on WordPress Login Screen with a WordPress Plugin
The most beginner friendly way to remove the WordPress language switcher on the WordPress login screen is by using the Disable Login Language Switcher plugin.
The first thing you need to do is install and activate the plugin. For more details, see our step by step guide on how to install a WordPress plugin.
Upon activation, the language switcher option will automatically be removed. There are no additional settings for you to configure.
Now, when you go to your login screen, you’ll see the standard login screen without the language switcher option.
Method 2. Disable the WordPress Login Language Switcher Without a Plugin
Another way you can disable the language switcher is by adding code to WordPress. If you haven’t done this before, then see our guide on how to copy and paste code in WordPress.
This snippet will automatically disable the language switcher on your WordPress website. Now, when you visit the login page, the option to switch languages will be gone.
If you need to enable language switching in the future, then simply delete the line of code you added.
Do you want to create a landing page in WordPress for your Facebook ads?
The right landing page will motivate visitors from your Facebook ad campaign to take action, and convert them into leads and customers.
In this article, we’ll show you how to create a high-converting Facebook ads landing page in WordPress.
Why Create a Facebook Ads Landing Page in WordPress?
Are you running Facebook ads? When someone on Facebook clicks on one of your ads, you want to direct them to your WordPress website.
But if they land on your homepage, they may lose interest or not be able to find what they’re looking for. That’s why you want to link to a dedicated landing page instead.
A landing page, also known as a squeeze page, is designed for a specific purpose and high conversion rates. It’s where those who responded to your ad can learn more about what you’re promoting and take the next step.
An effective landing page will match the design, tone, and content of your ad. It will convey a sense of urgency that motivates the user to act now.
You might use images and video to explain detailed information quickly, and social proof such as testimonials and reviews to demonstrate why other people love your business.
With that being said, let’s look at how to create a Facebook ads landing page in WordPress.
How to Create a Facebook Ads Landing Page in WordPress
SeedProd is the best landing page plugin for WordPress and allows you to create any type of landing page quickly and easily without any coding or design skills. While there’s a free version of SeedProd, we’ll be using the Pro version since it offers more powerful features.
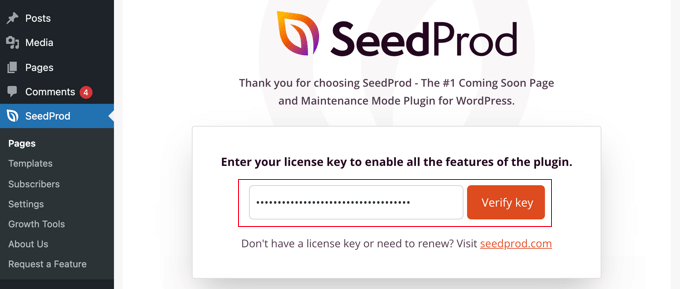
Upon activation, you’ll see a welcome screen where you can enter your license key. You can find this information under your account on the SeedProd website. After pasting your license key, you’ll need to click the ‘Verify key’ button.
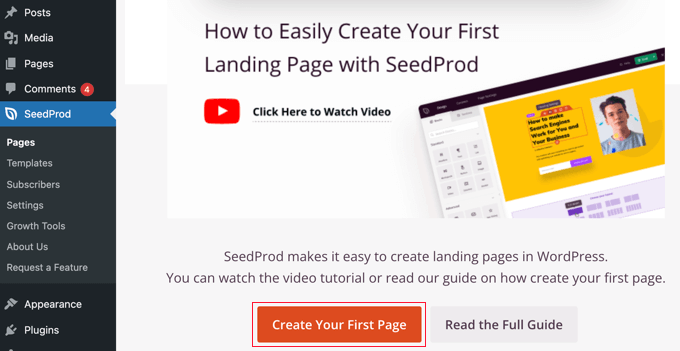
Next, you should scroll down until you see the ‘Create Your First Page’ button.
Simply click the button to get started.
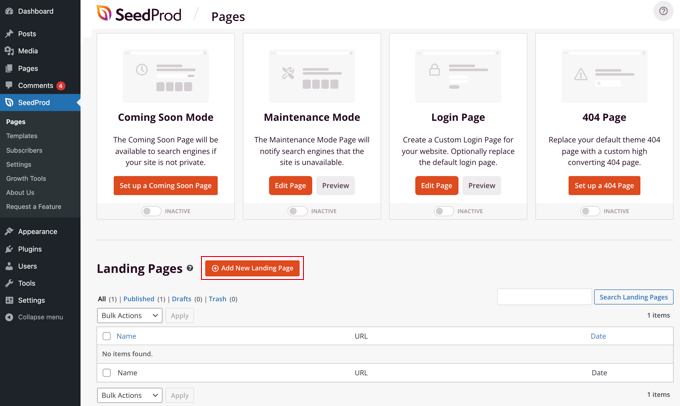
This will take you to SeedProd’s landing page dashboard where you can see landing page modes for different types of pages.
You need to click the button labeled ‘+ Add New Landing Page’ to get started.
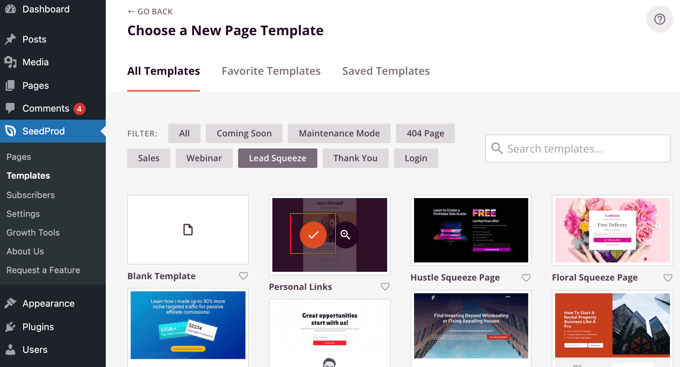
Next, you need to choose a template as a starting point for your page. SeedProd comes with dozens of beautiful landing page templates neatly organized for different campaign types.
You can filter the templates by clicking one of the tabs along the top, such as ‘Lead Squeeze’. When you hover your mouse over a template, you can preview it by clicking the magnifying glass icon, or select it by clicking the red tick icon.
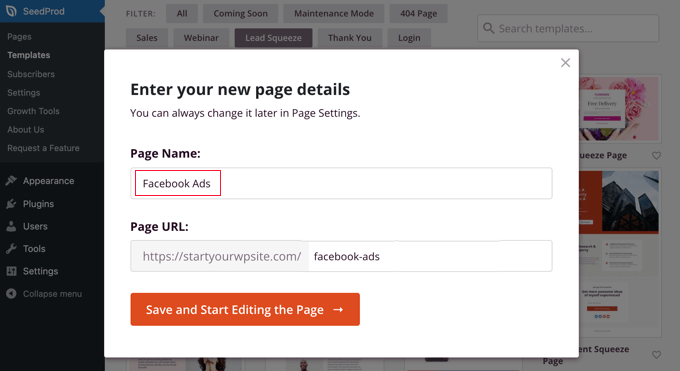
After selecting a template, you’ll be asked to give your new page a name.
The page URL will be filled in automatically, but you can change it if you wish. You will need to add this URL to your Facebook ad later on, so make a note of it.
Once you click the button labeled ‘Save and Start Editing the Page’, you’ll be taken to the SeedProd drag and drop page builder.
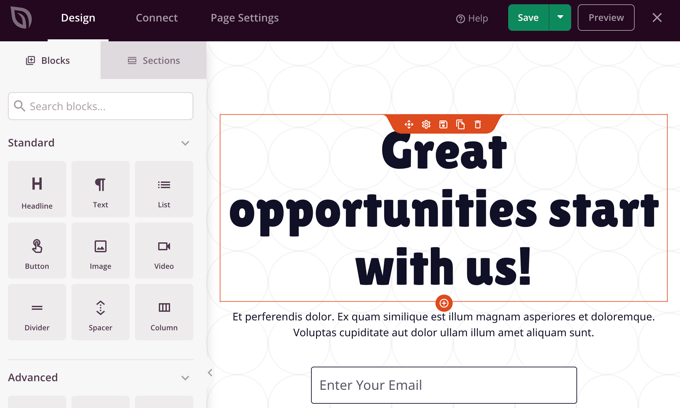
You’ll see blocks on the left that let you add content to your landing page, such as headlines, lists, images, or buttons, and a preview of how your page will look on the right.
To create an effective landing page, you’ll need to customize it to match your Facebook ad. You can change anything in the preview pane simply by clicking on it, and add additional blocks using drag and drop.
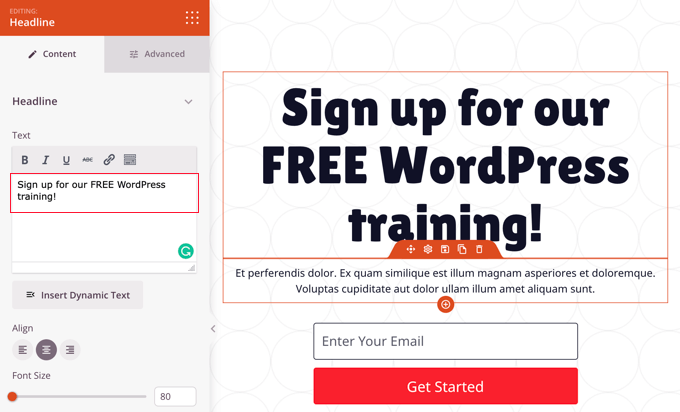
First, you need to click the headline so that you can see its contents on the left of the screen, where you can edit it to match your ad. Simply delete the existing text and type in your own.
You’ll see a formatting toolbar just above the text box, and underneath there are icons for text alignment, a slider to adjust the font size, and more. You’ll find more formatting options in the Advanced tab, such as typography, text color and shadow, spacing, and device visibility.
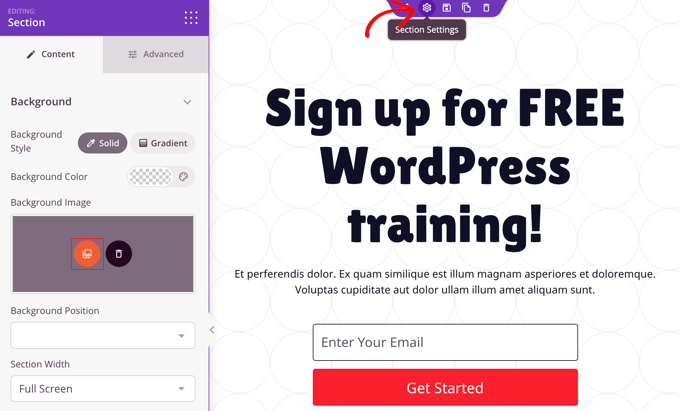
Next, we’ll add a different background image to the top of the page. To do that, move your mouse to the top of the preview pane until you see a purple toolbar. After that, you need to click the cog icon to display settings for that section.
Here you can change the background image to match your Facebook ad. You need to click the red background image icon to open your WordPress media library. Here you can select or upload the background image from your ad.
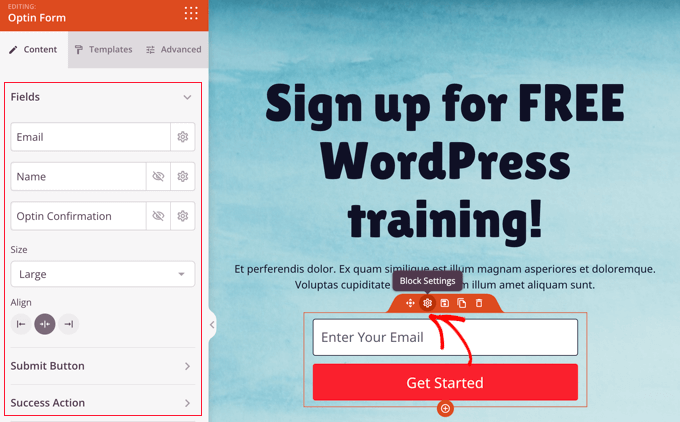
You can also customize the optin subscription box that came included in the template. To do that, you need to hover your mouse over the email address and then click the cog icon to display the settings for that block.
You can now customize the optin fields and the size and alignment of the box. You can also change the wording, size, and color of the ‘Submit’ button and customize the success action.
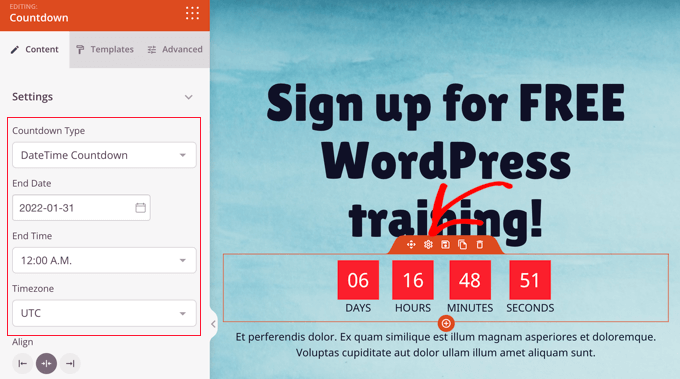
If your promotion is a limited time offer, then it’s smart to add a sense of urgency with a countdown timer. To do that, simply locate the ‘Countdown’ block and drag it onto your page.
Next, you need to set the expiration date and time.
Once you click the cog icon to access the block’s settings, you will be able to pick the date and time that the offer ends. Don’t forget to choose the correct time zone.
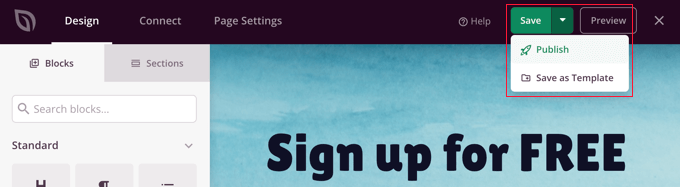
Once you’re happy that your landing page matches the Facebook ad and contains all of the necessary information, it’s time to publish it.
To do that, you should click the drop down menu button next to Save in the top right corner and then click ‘Publish’.
How to Link Your Facebook Ad to Your Landing Page
Now that your landing page is published, you can add the link to your Facebook ad.
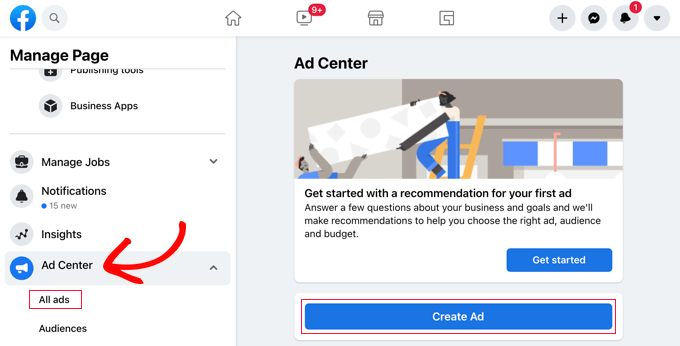
You should head over to your Facebook page where you can create or edit your ad. To create a new ad you need to navigate to ‘Ad Center’ and click on the ‘Create Ad’ button. Or you can access your existing ads by clicking on ‘All ads’.
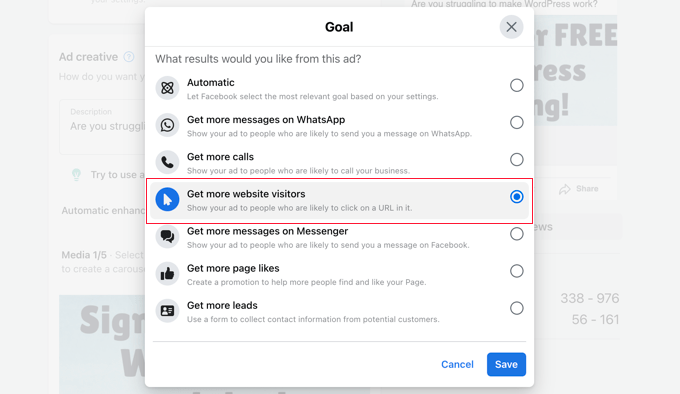
At the top of your ad, you will notice a section called ‘Goal’.
This should say ‘Get more website visitors‘. If it doesn’t, then you need to click the ‘Change’ button to adjust it.
You should then select ‘Get more website visitors’ from the list.
Then, click on the ‘Save’ button to store your choice.
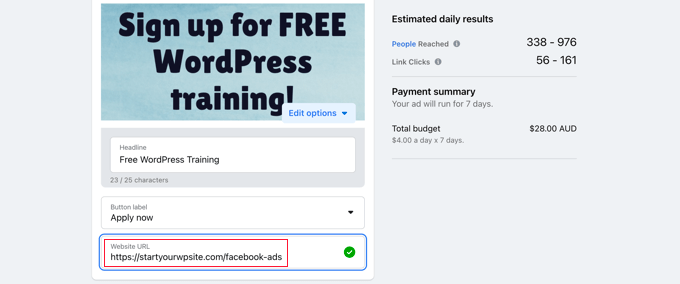
After that, you need to scroll down to the Website URL field and enter the landing page’s URL that you made note of earlier.
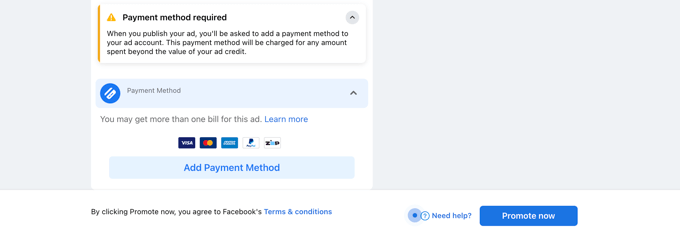
Once you are happy with your ad and have selected a payment method, you should click on the ‘Promote now’ button at the bottom of the page to push your Facebook ad live.
That’s it! Next, you may want to set up tracking in your website so you can measure the effectiveness of your Facebook ad landing page. You can learn how by following our step by step guide on WordPress conversion tracking made simple.
Would you like to create one-time personalized coupon codes for your WooCommerce store?
Coupon codes are great for promoting your online store, reducing cart abandonment, and increasing overall sales. Creating one-time coupons reduces the risk of abuse.
In this article, we’ll show you how to create one-time personalized coupon codes in WooCommerce.
Why Create One-Time Personalized Coupon Codes in WooCommerce?
Coupons are a great way to promote your online store and make more sales. They reduce shopping cart abandonment and are one of the best ways to thank a customer who joins your email list or leaves a product review.
However, some customers may use multi-use coupons again and again without ever paying full price. That’s why it’s a good idea to place limits on who can use a coupon and how many times they can use it.
With that being said, let’s take a look at how to create one-time personalized coupon codes for your WooCommerce store.
Creating a One-Time Personalized Coupon Codes in WooCommerce
Advanced Coupons is the best WooCommerce coupon code plugin on the market. In this tutorial, we will be using the free version, but Advanced Coupons Premium adds additional features such as the ability to reset a coupon after a set amount of time.
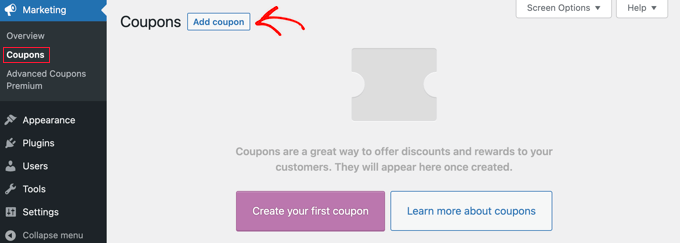
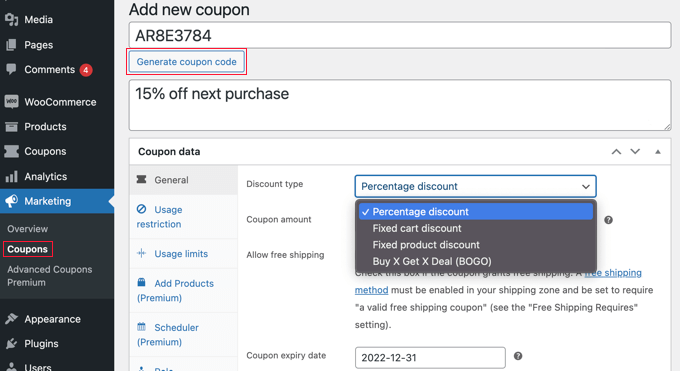
Upon activation, you need to visit the Marketing » Coupons page in your WordPress dashboard. Next, you need to click the ‘Add Coupon’ button to create a new coupon.
Note: If you are using an older version of WooCommerce, then you may need to navigate to WooCommerce » Coupons instead.
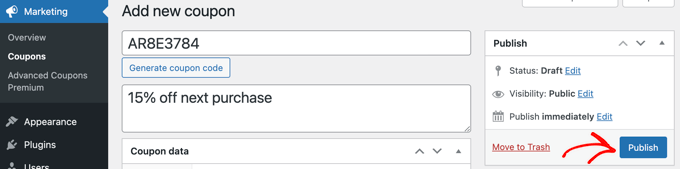
You will be asked to type the coupon code you want to use at the top of the screen. You can also generate a code automatically by clicking the ‘Generate coupon code’ button.
It’s also a good idea to type a clear description so you will remember the purpose of this coupon in the future.
After that, you need to decide what type of coupon you want to create. You need to choose the discount type and amount that you are offering. There are also options for free shipping and a coupon expiry date.
Once you are happy with your choices, you can place limits on who can use the coupon and how many times it can be used. We’ll cover three different methods:
Method 1: Creating a Single Use or Limited Use Coupon
This method is the best way to limit the coupon to a single use per user, or a limited number of uses in total.
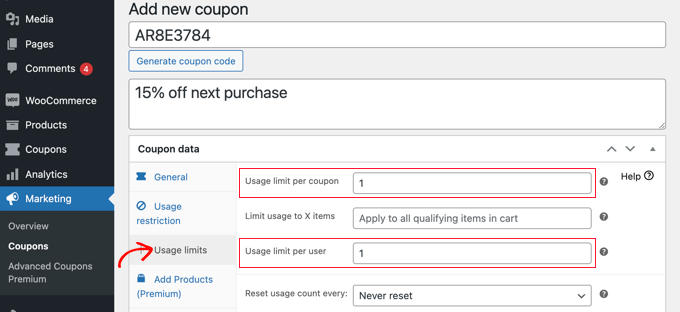
While still on the ‘Add new coupon’ page, you need to look at the ‘Coupon data’ section and then click on the ‘Usage limits’ tab.
You should now enter the number 1 in the ‘Usage limit per user’ field. This will make sure that each customer who receives the coupon code can only use it once.
Alternatively, you might prefer to enter a number in the ‘Usage limit per coupon’ field instead. This will place a limit on the number of times the code can be used in total by all users.
You can even enter a number in both fields. Let’s say you type 100 in the ‘Usage limit per coupon’ field and 1 in the ‘Usage limit per user field’. Then the first 100 customers will be able to use the code a single time.
Premium users can also reset the code so that it works again after a period of time, say monthly or yearly.
Method 2: Creating a Personalized Coupon
This method lets you personalize a coupon, so it’s only available to certain customers.
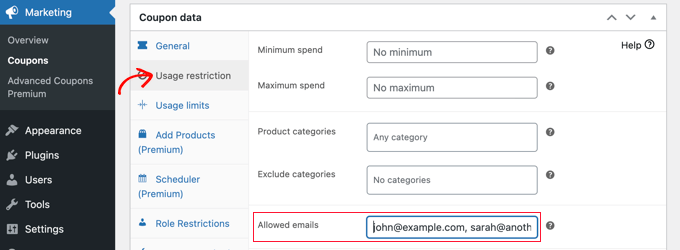
You should still be on the ‘Add new coupon’ page. In the ‘Coupon data’ section, you need to click on the ‘Usage restriction’ tab. Now you need to scroll down to the ‘Allowed emails’ field.
Here you can enter a single email address, or multiple email addresses separated by commas. Only those customers will be able to use the coupon.
You can match multiple emails addresses by using an asterisk as a wildcard. For example, if you enter *@gmail.com, then anyone with a Gmail address will be able to use the coupon.
However, these users will be able to use the coupon more than once. If you need to create a coupon that is both one-time and personalized, then you can combine Methods 1 and 2.
You first need to enter the number 1 in the ‘Usage limit per user’ field we covered in Method 1. After that, you enter the email addresses of allowed users as covered in Method 2.
Now only the users that you listed will have a single use of the coupon.
Method 3: Creating a Role-Restricted Coupon
This method restricts the use of the coupon to customers with a certain WordPress user role. In some cases, this can be simpler than typing a long list of email addresses as in Method 2.
Tip: This method can also be combined with Method 1 to make sure that each customer with that user role can use the coupon only once.
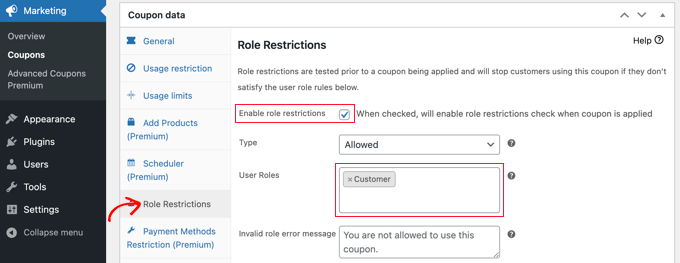
While on the ‘Add new coupon’ page, look at the ‘Coupon data’ section and then click on the ‘Role Restrictions’ tab. You can now check the box to enable role restrictions, and then select one or more user roles. A list of roles will pop up when you click inside the ‘User Roles’ box.
We recommend that you customize the ‘Invalid role error message’ to make it clear why users with other roles can’t access the promotion.
There are a few ways you might like to use this method. For example, you could simply set the user role to ‘Customer’ so that your users need to log in before they can use the code. This will let you keep better track of your customers.
Another idea is to assign your most loyal customers a special WordPress role so that you can offer them exclusive coupon codes.
You can also use this method to create members-only coupons for your membership site.
Publishing and Promoting the One-Time Personalized Coupon
Whichever method you use, once you have finished setting up the coupon, you will need to click the ‘Publish’ button at the top right of the page.
Your coupon is now ready for use and you can start to let your customers know about it. How you do that depends on the type of coupon you have created and who you want to use it.