Thursday, March 3, 2022

How to Use Multiple Search Forms In WordPress

Do you want to use multiple search forms in WordPress?

Adding multiple search forms to your site helps your visitors quickly find what they’re looking for and improves user experience.

In this article, we’ll show you how you can add multiple search forms to your WordPress site.

How to use multiple search forms in WordPress

Why Use Multiple Search Forms in WordPress?

WordPress search forms help your visitors find the content they’re looking for. Better content discoverability leads to users spending more time on your website which helps increase your pageviews and reduce your bounce rate.

Also when a user spends more time on your site, they’re more likely to join your email list, purchase a product, or become a subscriber. 

By using multiple search forms on your site, you make it easy for your visitors to search different areas of your website and find a search form at any time.

Multiple search forms example

Plus, you can customize these search forms so that they show different results depending on the location. For example, you can have a sitewide search bar in your header, and create a separate product search bar so visitors can search for a product in your online store.

That being said, let’s show you how to create multiple search forms in WordPress, step by step.

Create a New WordPress Search Algorithm with a WordPress Plugin

The easiest way to add multiple search forms to your WordPress website is by using the SearchWP plugin. It’s one of the best search plugins for WordPress used by over 30,000 sites.

SearchWP

It’s very easy to use, gives you complete control over your WordPress search results, and lets you use multiple different search forms on your site. 

Setting Up SearchWP

The first thing you need to do is install and activate the plugin. For more details, see our step by step guide on how to install a WordPress plugin.

Upon activation, you need to go to Settings » SearchWP and then click on the ‘License’ menu option.

Enter SearchWP license

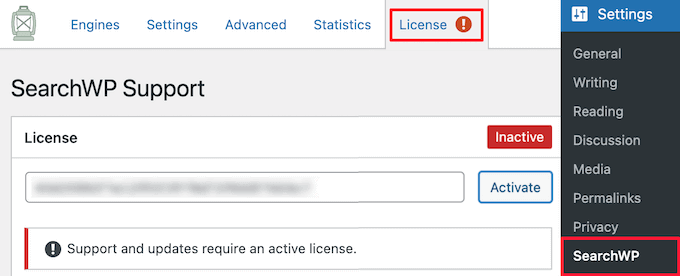
Here, you need to enter your license key into the ‘License’ box and click the ‘Activate’ button. You can find this information under your account on the SearchWP website

After that, you need to click on the ‘Engines’ menu option.

Set SearchWP default engine

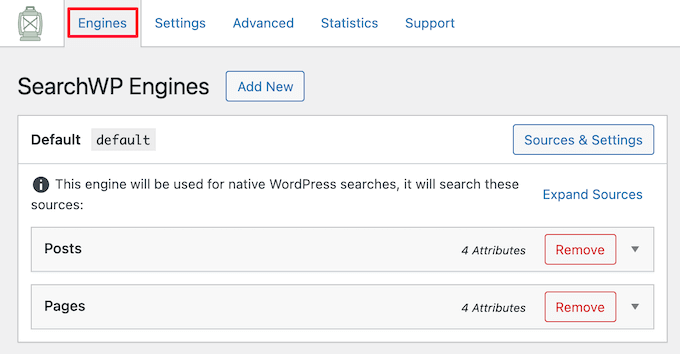
This brings up a screen where you need to set your search engine settings. Think of it like creating your very own Google search algorithm built specifically for your WordPress site and content. 

You need to create a sitewide search engine before you can create multiple custom search forms that show different results.

To adjust the search engine settings, simply click on ‘Posts’, ‘Pages’, ‘Library’, or other custom post type drop downs that are available.

Then, you can adjust the ‘Weight Multiplier’ up or down to change how your search engine will rank that type of content. 

If you want to value the title and page content more than the excerpt, then simply move the sliders accordingly.

Change SearchWP search algorithm sliders

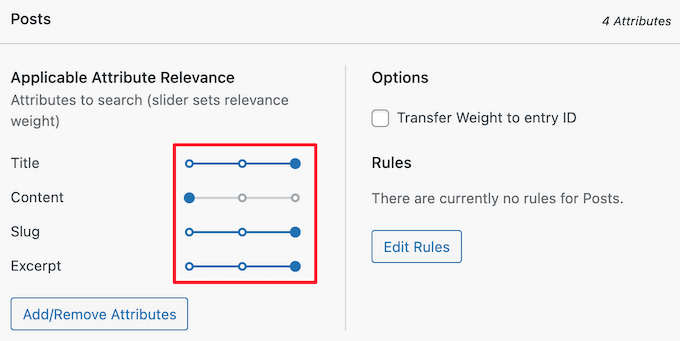
Once you’re done, make sure to click the ‘Save Engines’ button.

Now, it’s time to create multiple different search forms you can add to various locations across your site. 

Create Multiple Different Search Forms in WordPress

SearchWP is a very flexible search plugin and makes it easy to create a variety of different types of search forms.

Here are some of the most common types of custom search forms you can create.

Creating Custom Post Type Search Forms

Custom post type search forms are a great way to help your visitors find the most relevant content. For example, we use custom post types here at WPBeginner for our glossary and deals pages, so they’re separate from the rest of our content.

This type of search form is also common on review websites, where you want to separate your product review posts from the rest of the content on your site.

Using SearchWP, you can create individual search forms that only search for content within that specific post type. 

Custom post type search form

For more details, see our guide on how to create advanced search form in WordPress for custom post types.

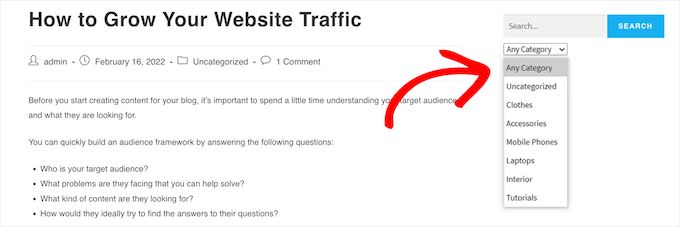
Creating Category Search Forms in WordPress

Search by category forms let your visitors search your website by specific categories. If you have a lot of content, then this can help your visitors find what they’re looking for quickly.

Instead of searching through all your articles, you’re giving your visitors control over the exact kind of content they’re looking for. 

Category search form

For more details, see our guide on how to search by category in WordPress.

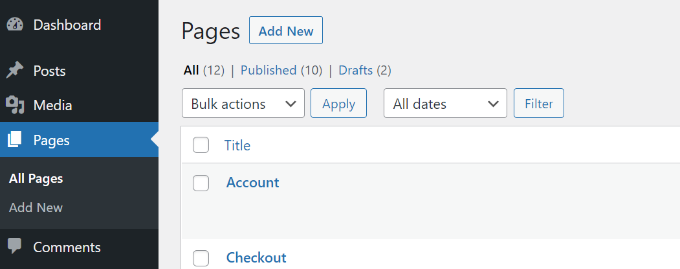
Creating Custom Page and Post Search Forms in WordPress

Your default search forms will show all of your pages, posts, and custom post types in the search results. However, there are times when you might want to stop certain pages and posts from appearing.

For example, if you run an online store, then you might want to hide your checkout page, cart page, thank you page, and account page.

Or those who have membership websites might want to hide your premium content and other members-only pages.

Some users might even want to prevent all WordPress pages from appearing in search.  

To learn more, see our step by step guide on how to exclude pages from the WordPress search results.

Add Multiple Search Forms to Your WordPress Site

Now that you’ve created multiple search forms, it’s time to add them to your WordPress site. 

You can add search forms wherever you like, even in the middle of a page or post. The most common places to add search forms are in your WordPress menu, sidebars and footers.

Let’s take a look at how to add your search forms in different areas.

Adding a Search Form to WordPress Menus

Nearly every popular WordPress blog has a simple search form or search bar in the WordPress navigation menu since it’s very noticeable and easy to find.

Navigation menu search form

Since this location is so common, many visitors are used to seeing a search bar in this location and will check here first. 

For more details, see our step by step guide on how to add a search bar to WordPress menus.

Adding Search Forms to WordPress Sidebars

Another common place for your search forms is your sidebar or footer.

When you create a new search algorithm with SearchWP it automatically replaces the default WordPress search, so you can easily add a search bar to your sidebar that shows these improved results.

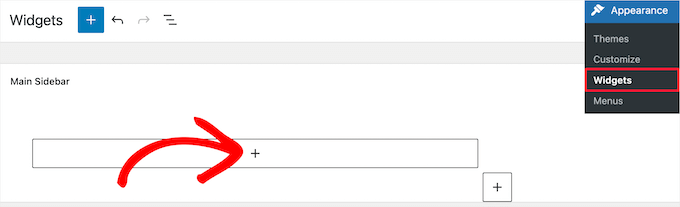
To do this, simply go to Appearance » Widgets to bring up the blocks based widget editor.

Each widget area of your WordPress theme will have a separate tab in the block editor.

On the Astra theme, the sidebar widget area is called ‘Main Sidebar’, but yours may have a different name depending on your theme.

Simply click the ‘Plus’ add block icon underneath the sidebar where you want to add your widget.

Add new block widget

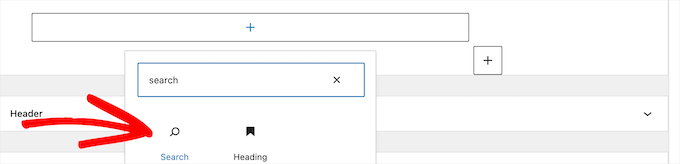
Then, type ‘Search’ into the search bar and click the ‘Search’ block icon.

This will automatically insert a search form into your sidebar.

Add search block

You can add a title and change the text inside the search box.

When you’re finished, click the ‘Update’ button to make your search form live.

Save search widget

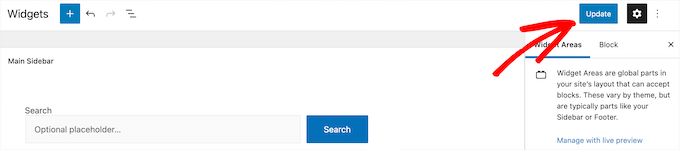
Now, you can visit your site to see your improved search form.

You can add the search block to any widget area of your site. To learn more, see our guide on how to add and use widgets in WordPress.

Sidebar search form example

You can also create a live Ajax search form, similar to the drop down autocomplete feature common to search engines like Google.

For more details, see our guide on how to add live Ajax search to your WordPress site.

Adding Search Forms to WordPress Posts and Pages

Next, you may want to add a custom search form to specific posts and pages. For example, we have a custom search form on our deals page that only searches for specific coupons and deals.

You can also use this for your help desk, knowledge base, FAQs, documentation, and more.

Search form in page example

This type of search form can be very helpful for your visitors since it only searches for a very specific kind of content. 

For more details, see our guide on how to add a search form in a WordPress post with a shortcode.

We hope this article helped you learn how to use multiple search forms in WordPress. You may also want to see our guide on how to get a free email domain, and our expert picks of the best GoDaddy alternatives that are cheaper and more reliable. 

If you liked this article, then please subscribe to our YouTube Channel for WordPress video tutorials. You can also find us on Twitter and Facebook.

The post How to Use Multiple Search Forms In WordPress first appeared on WPBeginner.


March 03, 2022 at 04:00PM

Wednesday, March 2, 2022

How to Add Categories and Tags for WordPress Pages

Do you want to set up categories and tags for your WordPress pages, but don’t know how to get started?

Categories and tags help you sort your blog posts and make it easier for users to find what they are looking for. However, they’re only available for posts by default, not for pages.

In this article, we will show you how to add categories and tags for WordPress pages.

How to add categories and tags for WordPress pages

Why Add Categories and Tags to WordPress Pages?

Categories and tags are default WordPress taxonomies for your blog posts. Categories are a broad grouping of content, while tags help describe specific details of your content. You can read more about the difference in our guide to categories vs tags.

By default, both categories and tags are only limited to blog posts in WordPress.

When you create a new page, you will notice that there is no option to add categories or tags to your WordPress page.

No categories or tags for pages

However, you may want to add categories and tags to your WordPress pages. It can help you to organize and sort your content if you have a lot of pages. It can also improve your site navigation and help your visitors to find related pages on your WordPress website more easily.

If you have multiple sales pages for different products in your online store, for example, then you can group them under broad categories.

You can do the same for different feature pages for your apps and software. For example, OptinMonster groups multiple feature pages under the ‘Features’ category.

Let’s see how you can add categories and tags to your WordPress pages.

Adding Categories and Tags to WordPress Pages

The easiest way of setting up categories and tags for your WordPress pages is by using the Pages with category and tag plugin. It’s a free WordPress plugin and works out of the box with no need for additional configuration.

The first thing you need to do is install and activate the plugin. For more details, please see our guide on how to install a WordPress plugin.

Once activated, go to Pages » Add New and you will find post categories and tags now available for your WordPress pages.

Categories and tags for pages

Next, you can create categories and tags for your pages.

To add a category, head over Pages » Categories from your WordPress dashboard and then enter a ‘Name’ and ‘Slug’ for your category.

Add name and slug for new page category

After that, you can scroll down and select a ‘Parent Category’ for your category.

Once you’ve entered these details, simply click the ‘Add New Category’ button.

Choose parent category and add new category

You can then view your newly added category for your pages.

If you want to delete a category, then simply click the checkbox next to it and select ‘Delete’ from the Bulk Action dropdown and click the ‘Apply’ button.

View your page category

Next, you can assign your WordPress pages to the categories you just created.

To start, simply edit or create a new page. From the WordPress content editor, you can now select the relevant category from the menu on your right. For instance, we created a feature page and marked it under the Features category.

Select your category and enter tags

Similarly, you can add tags for your WordPress page under the ‘Tags’ field. If you want to add multiple tags, then simply separate them using a comma.

For example, you can add keywords and phrases that help describe your content. In our case, we added the terms ‘exit intent’ and ‘OptinMonster’ as tags.

After selecting your category and adding tags, simply update or publish your WordPress page.

We hope this article helped you add post categories and tags to your WordPress pages. You may also want to look at your guide on how to create a business email address, and the best email marketing software.

If you liked this article, then please subscribe to our YouTube Channel for WordPress video tutorials. You can also find us on Twitter and Facebook.

The post How to Add Categories and Tags for WordPress Pages first appeared on WPBeginner.


March 02, 2022 at 05:00PM

Tuesday, March 1, 2022

How to Add IndexNow in WordPress to Speed Up SEO Results

Are you wondering what is IndexNow, and whether you should add IndexNow in WordPress?

IndexNow is a new SEO initiative created by Microsoft to help your website get indexed faster in search engines. This boosts new content discoverability and speed up your SEO results.

In this article, we will share how to add IndexNow in WordPress to speed up SEO results.

How to Add IndexNow in WordPress

What is IndexNow?

IndexNow is an automatic ping that lets search engines know when a post or page (URL) on your website has been added, updated, or deleted. This allows search engines to quickly update their search results speeding up overall SEO results. Simply put, it’s instant indexing!

This is a new initiative started by Microsoft, and it’s currently supported by both Microsoft Bing and Yandex. A Google spokeperson has also confirmed that they will be testing the IndexNow protocol due to environmental sustainability.

Currently, all search engines use XML sitemaps to discover new content and updates. The challenge is that it can sometimes take days to weeks for search engines to discover new content updates because they visit your website at random intervals.

Search engine bots are inefficient due to their legacy design, and they have a high carbon footprint.

When a search engine bot visits your sitemap, it attempts to visit every single link that it finds on the sitemap as well as every single link that’s inside of each page. This is a resource intensive process, and IndexNow protocol aims to solve that.

How Search Engine Crawl Bots Work

Instead of having search engine bots randomly scan every single page on your site to see what’s been updated, IndexNow allows your website to simply ping the search engine to let them know when you publish a new post or update an existing piece of content.

This way they can quickly update their search results while helping the environment.

IndexNow is a win for website owners, win for search engines, and a win for the world.

That being said, let’s take a look at how to add IndexNow in WordPress to speed up your SEO results.

Method 1. How to Add IndexNow in WordPress using AIOSEO

AIOSEO is the best WordPress SEO plugin used by over 3 million websites. We use AIOSEO on WPBeginner to improve our SEO rankings.

In their recent update, AIOSEO became the first WordPress SEO plugin to add IndexNow support for WordPress.

All in One SEO

First you need to install and activate the AIOSEO plugin. For more details, see our step by step guide on how to install a WordPress plugin.

For this tutorial, we will be using the premium version of AIOSEO because it includes IndexNow and other powerful SEO features. There is also a free version of AIOSEO that you can use to try it out.

Once activated, you need to go AIOSEO » Feature Manager from your WordPress dashboard to enable the IndexNow feature.

All in One SEO Enable IndexNow Feature

Once enabled, IndexNow is automatically configured and ready to go – no action is needed on your part.

AIOSEO partnered with Microsoft to build this integration, and they made the process beginner friendly. They automatically generate an IndexNow API key for your website and configure it for you, so you don’t have to do anything.

You can verify this by going to AIOSEO » General Settings and click on the Webmaster Tools tab. There you will see the IndexNow icon, and if you click it you’ll see that your website’s IndexNow API key is already pre-configured.

AIOSEO IndexNow WordPress

AIOSEO comes with many other powerful features to help you improve your WordPress SEO rankings including Link Assistant, redirection manager, and more.

We have a step by step guide on how to properly setup All in One SEO which also includes instructions how you can switch from Yoast, RankMath, and others to AIOSEO.

Method 2. How to Add IndexNow in WordPress using the IndexNow plugin

While other WordPress SEO plugins have begun to add IndexNow support, most don’t have it yet. If you don’t want to switch to AIOSEO, then you can use this option instead.

First you need to install and activate the IndexNow utility plugin.

For more details, see our guide on how to install a WordPress plugin.

Upon activation, you need to go Settings

» IndexNow in your WordPress dashboard. You will need to click on the Get Started now button, and it will automatically generate your API key and get everything configured.

After that, you will see a screen with IndexNow stats like successful URL submissions and more.

IndexNow WordPress plugin by Microsoft

That’s all, you have successfully added IndexNow to WordPress.

Final Thoughts on IndexNow and Future of SEO

IndexNow is a new initiative and it has already been adapted by Microsoft Bing and Yandex. Google is said to be testing support for this, and we really hope they adapt it as well.

We believe that all popular website builder platforms will add IndexNow integrations with AIOSEO leading the way for WordPress, but other companies like Duda, Cloudflare, etc have all added IndexNow integrations in the recent months.

IndexNow is a great solution for both small and large sites, and it’s a SEO professional’s dream come true since it finally speeds up SEO results with nearly instant indexing.

It’s important to emphasize that IndexNow does NOT replace sitemaps. You still should have XML sitemaps, video sitemap, news sitemap, and other advanced sitemaps to help improve your SEO rankings. You should use IndexNow alongside sitemaps to gain a competitive advantage.

We hope this article helped you learn how to add IndexNow in WordPress. You may also want to see our guide on how to do keyword research and our comparison of best push notification software to grow your traffic.

If you liked this article, then please subscribe to our YouTube Channel for WordPress video tutorials. You can also find us on Twitter and Facebook.

The post How to Add IndexNow in WordPress to Speed Up SEO Results first appeared on WPBeginner.


March 01, 2022 at 05:45PM