Tuesday, April 12, 2022

How to Create a Collapsible Sidebar Menu in WordPress (The Easy Way)

Do you want to create a collapsible sidebar menu in WordPress?

A collapsible menu can give your website visitors an easy way to access a lot of links, without cluttering up your sidebar. It’s perfect for large websites, eCommerce stores, or any site that has a more complex layout. 

In this article, we will show you how to easily create a collapsible sidebar menu in WordPress.

How to Create a Collapsible Sidebar Menu in WordPress (The Easy Way)

What is a Collapsible Sidebar Menu (And When to Use One)

The most user-friendly menus provide easy access to all the links that visitors need. However, this can be tricky for sites that have lots of pages, or a more complex layout. 

Think about a large eCommerce store that has lots of product categories and subcategories, such as Amazon. 

Displaying every single product category in a standard menu wouldn’t be a good idea. Shoppers would likely need to scroll through the menu to find the category they’re interested in. 

This is where collapsible menus come in. These menus organize their content in a parent-child relationship. If the visitor clicks on a parent item in a collapsible menu, then it will expand to display all of that parent’s child content. 

The Guardian news outlet uses a collapsible menu for its mobile site.

An example of a collapsible menu.

Collapsible menus are sometimes called expandable menus. This is because their different sections expand when a visitor clicks on them. 

By default, collapsible menus hide a lot of content and complexity from visitors. This is much more user-friendly than scrolling through a long list of categories and subcategories.

That said, let’s take a look at how you can easily create a collapsible sidebar menu on your WordPress site.

How to Create a Collapsible Sidebar Menu in WordPress

You can create a collapsible sidebar menu in WordPress using the Bellows Accordion Menu plugin.

Bellows Accordion Menu provides a handy shortcode so you can place your collapsible menu on any page, post, or widget area, including your sidebar.

A collapsible sidebar menu in WordPress.

First, you’ll need to install and activate the plugin. If you need help, then please see our guide on how to install a WordPress plugin

Upon activation, go to the Appearance » Menus page in your WordPress dashboard. 

Creating a menu in the WordPress dashboard.

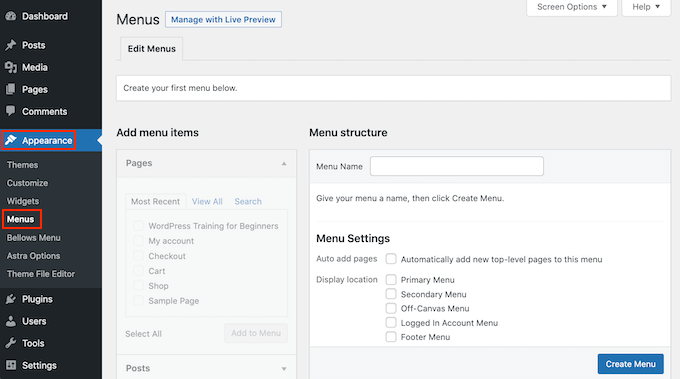
To start, type a name for your menu into the ‘Menu Name’ field. Your site visitors won’t see the name since it’s for your own reference only. You can then click on the Create Menu button. 

Next, you can choose the pages you want to add to the collapsible menu. By default, WordPress displays your most recent pages only. If you want to see a list of all your website’s pages, then click on the View All tab. 

Adding pages to your WordPress menu.

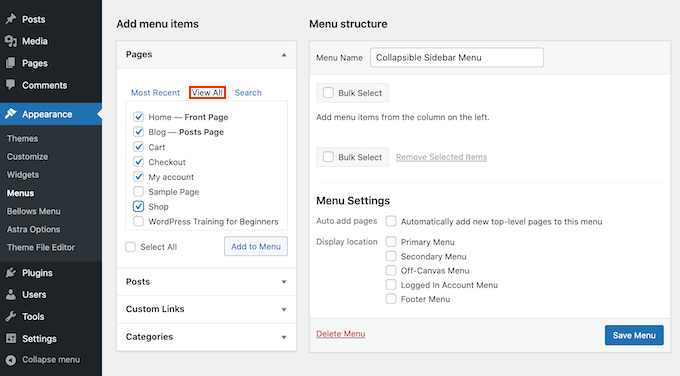
Alternatively, you can click on Select All. This will add all of your pages to the collapsible menu.

Once you’re happy with your selection, click on the ‘Add to Menu’ button. You can also select posts, blog categories, or add custom links. For more details, please see our guide on how to add a navigation menu in WordPress.

After adding all of your different webpages to the menu, you can move them around by dragging and dropping them. This will change the order these pages appear in your collapsible menu. 

Collapsible menus are all about parent-child relationships.

When a visitor clicks a parent item in your collapsible menu, it will expand to reveal all of the child content.

To create this relationship, simply use drag and drop to arrange all of your child pages beneath their parent.

Next, grab each child and drag it a little to the right. You can then release this page. This will indent the item and turn it into a child page. 

Adding posts to the WordPress menu.

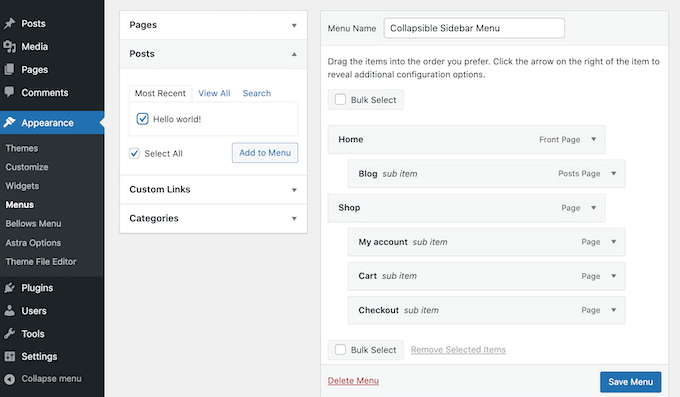
Don’t forget to click the Save Changes button when you’re finished.

Now we want to add this collapsible menu to the WordPress sidebar. To do this, we’ll use some shortcode that Bellows Accordion creates automatically. 

To grab the shortcode, go to Appearance » Bellows Menu. If it isn’t already selected, then make sure you select the Show All tab.

The collapsible menu shortcode in the WordPress dashboard.

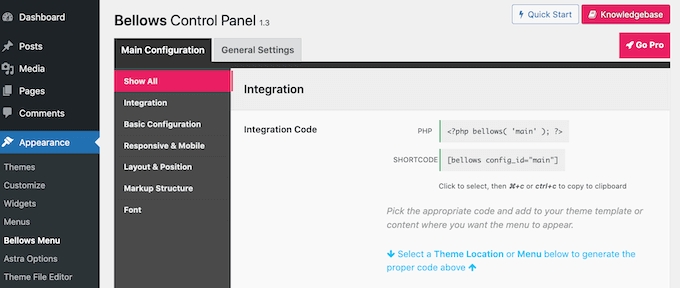
You can now click on the Shortcode box, which should highlight all of the code. Now, copy this code using either the Command + c or Ctrl + c keyboard shortcut. 

The next step is pasting this shortcode into a widget, so head over to Appearance » Widgets. This will display all of the widgetized areas within your current theme. The options you see may vary, but most modern WordPress themes feature a sidebar.

Configuring the collapsible sidebar menu.

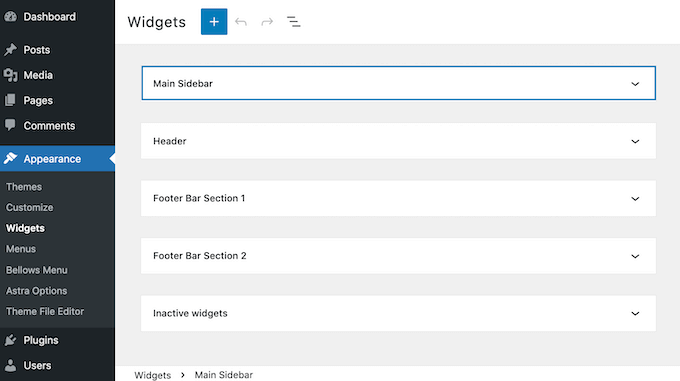
Once you’ve found the sidebar area, give it a click. This section will now expand.

To add a block, click on the + icon and start typing Shortcode. When it appears, select the Shortcode block. 

How to add a widget to the WordPress sidebar.

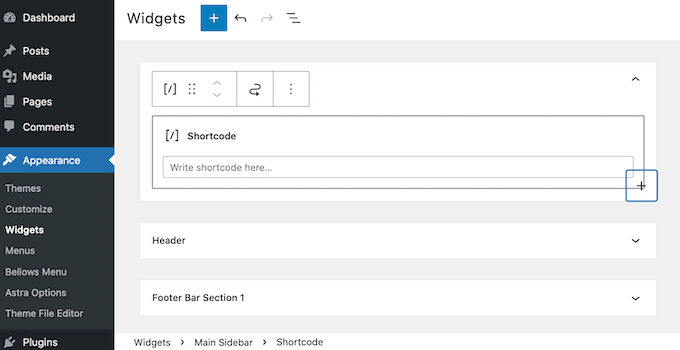
Now, simply paste your collapsible menu shortcode into this block. To publish your menu, you’ll need to click on the Update button at the top of your screen. 

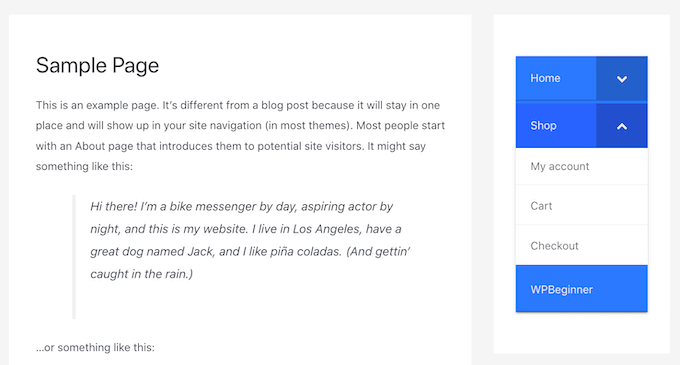
Now, when you visit your site you should see a new collapsible sidebar menu. 

Example of a working collapsible menu

The Bellows Accordion plugin makes it super easy to customize this default menu. For example, you might change its color scheme to better reflect your site’s branding. 

If you want to tweak the default menu, simply go to Appearance » Bellows Menu in your WordPress dashboard. 

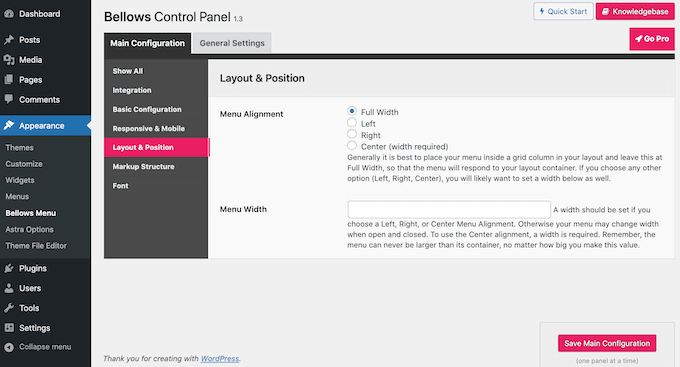
This menu has all the settings you need to customize your collapsible menu. There are a lot of settings to explore. However, you may want to start by going to Main Configuration » Basic Configuration.

Configuring the look and feel of your WordPress collapsible sidebar menu.

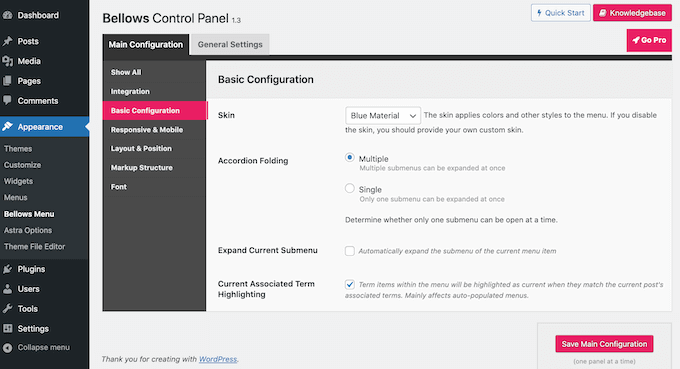
Here, you can switch between several different menu colors. You can also choose whether visitors can expand multiple submenus at once using the Accordion Folding settings. 

To change the menu’s alignment and width, click on the ‘Layout & Position’ tab.

Placing the collapsible menu on the WordPress website.

If you’d prefer to preview your changes in real time, then you can edit the collapsible sidebar menu in the WordPress Customizer. To do this, head over to Appearance » Customize

In the left-hand bar, select Bellows. 

Configuring your collapsible menu in the WordPress Customizer.

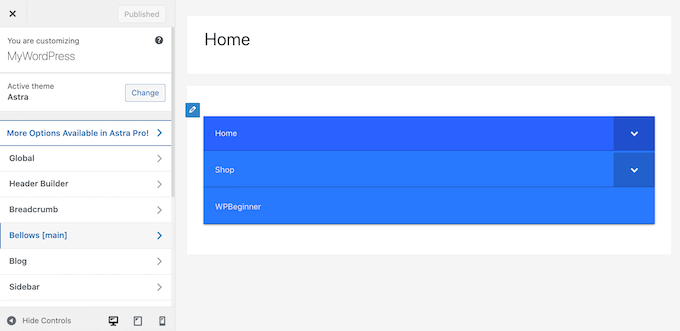
Here, you’ll find lots of different settings for your collapsible sidebar. This includes changing its width, alignment, and the color of your sidebar menu. 

We hope this article helped you learn how to create a collapsible sidebar menu in WordPress. You can also go through our guide on how to track your website visitors, and the best push notification software to grow your traffic. 

If you liked this article, then please subscribe to our YouTube Channel for WordPress video tutorials. You can also find us on Twitter and Facebook.

The post How to Create a Collapsible Sidebar Menu in WordPress (The Easy Way) first appeared on WPBeginner.


April 12, 2022 at 04:00PM

Monday, April 11, 2022

How to Preload Links in WordPress for Faster Loading Speeds

Do you want to preload links in WordPress and improve loading speeds?

Link preloading is a browser technology that will load links in the background before a site visitor clicks them, making your website seem faster.

In this article, we’ll show you how to preload WordPress links for faster loading speeds easily. 

How to preload links in WordPress for faster loading speeds (easy)

Why Preload Links in WordPress?

Link preloading is when your web browser will load the link in the background before the user clicks it. That way, the moment they get to the page, it’s already loaded. 

Improving your WordPress speed and performance is one of the most important things you can do for your site since it makes the user experience better.

Having a faster site can help to increase your blog traffic by improving your WordPress SEO. When your internal pages are preloaded, your visitors are more likely to stay on your website longer and view more pages.

Although there’s a lot more you can do to make your WordPress website faster, link preloading is very simple, and it can have big benefits for speed.

The only thing is, you’ll need to make sure you set up preloading the right way and not make the common mistakes. For example, if your settings are too aggressive and all your internal links are preloaded, then it could have the opposite effect and even crash your server altogether.

That being said, let’s show you how to preload links in WordPress the right way, step by step. 

Preloading WordPress Links and Making WordPress Faster

The easiest way to preload links is by using the Flying Pages plugin. It simply adds intelligent preloading to make sure preloading won’t crash your site or even slow it down.

If it detects any issues like that, then the plugin will stop all preloading. 

First thing you need to do is install and activate the plugin. For more details, see our guide on how to install a WordPress plugin.

Upon activation, navigate to Settings » Flying Pages in your WordPress admin panel to configure the plugin settings. 

Then, you need to set the ‘Delay to start preloading’ time in the drop down. This is the delay to start preloading links if your user’s mouse isn’t moving in the browser window.

You can change this, but we’ll keep the default recommended setting of ‘0 second’.

Flying Links settings set the preloader delay

Next, you can change the ‘Max requests per second’. The lower you set this number, the less impact it will have on your server. 

We’ll keep the default setting of ‘3 requests’ which should work for most WordPress hosting environments.

Set max requests per second

After that, you can check the box to ‘Preload only on mouse hover’. This will only preload links if a user hovers over it and will preload the page just before they click.

This technology makes the perceived load time nearly instant because there’s a 400ms delay between when the user brings their mouse over a link and clicking it.

You can also set the ‘Mouse hover delay’. This is the time that will pass after a user hovers over a link before preloading starts. 

Set preload time and hover delay

Below that, there’s a list of keywords that the plugin will ignore for preloading.

These are standard login pages and image files. You can leave the list as it is or add more keywords if you like.

Set keywords to ignore for preloading

If you’re running an online store, then you may want to add pages like /cart and other dynamic pages in this list, so they are not pre-loaded.

Similarly, if you’re using an affiliate marketing plugin like ThirstyAffiliates or PrettyLinks, then it’s important that you add your affiliate prefix like /refer/ or /go/ to this ignore keywords list. Otherwise, it can break affiliate link tracking.

The final option is to disable preloading for admins.

Overall, this will help to reduce your website server load. If you want to only preload for website visitors who aren’t logged-in admins, then simply check the box.

Disable preloading for admins and save

Once you’re finished, click the ‘Save Changes’ button at the bottom of the page.

That it, you’ve successfully enabled link preloading on your website.

Note: If you’re running a website speed test and you don’t see your score get better, that’s completely normal. Preloading links only improves the speed of link clicking, and it doesn’t speed up the first time your site loads. 

We hope this article helped you learn how to preload links in WordPress for faster loading speeds. You may also want to see our guide on how to create an email newsletter, and our expert picks of the must have WordPress plugins for your websites. 

If you liked this article, then please subscribe to our YouTube Channel for WordPress video tutorials. You can also find us on Twitter and Facebook.

The post How to Preload Links in WordPress for Faster Loading Speeds first appeared on WPBeginner.


April 11, 2022 at 04:00PM

Friday, April 8, 2022

How to Hide Featured Images on Individual Posts in WordPress

Do you want to hide the featured images on individual posts in WordPress?

There may be times when you have a featured image for a post, but instead of deleting it, you just want to hide it from your visitors.

In this article, we’ll show you how to hide featured images on individual posts in WordPress.

How to hide featured images on individual posts in WordPress

When and Why is Hiding Featured Images in WordPress Useful?

Almost every WordPress theme comes with built in support for displaying featured images in different areas of your website.

Some themes will even automatically use post attachments as the featured image if no image is specified. This means that it will still show a featured image even if you don’t set one.

However, you may find yourself wanting to hide the featured image in certain situations. 

For example, you might have a WordPress blog post that looks cluttered with the featured image. But, you still want the featured image to display when listed on your separate blog page.

In this case, you’ll want to hide it on your individual blog post without deleting or removing the image entirely. 

With that said, let’s show you how to hide the featured image on individual posts in WordPress, step by step.

Hiding Featured Image from Individual WordPress Posts

To easily hide featured images from WordPress posts, we recommend using the Conditionally Display Featured Image plugin. It gives you the option to hide individual featured images on WordPress posts. 

First thing you need to do is install and activate the plugin. For more details, see our step by step guide on how to install a WordPress plugin.

After that, the plugin works right out of the box, and there are no plugin settings for you to configure.

Simply go to Posts » All Posts and click on the post that you want to open.

Go to WordPress post dashboard and open post

Then, on the post edit screen, you’ll see a box that says ‘Display featured image in posts lists only, hide on singular views’ directly under the featured image.

To hide the featured image, simply check this box and then click the ‘Update’ button to save your changes. 

Check box to hide post featured image

After that, you can view your post, and you’ll notice the featured image is hidden. Even if there’s a featured image assigned to the post, it won’t display.

This plugin does not delete or unset the feature image. It only hides it on the front end of your WordPress website. If you ever want to show the featured image again, simply edit the post and uncheck the hide featured image box. 

If you happen to be using custom post types with featured image support, the plugin will let you hide those featured images too.

We hope this article helped you learn how to hide featured images on individual posts in WordPress. You may also want to see our step by step guide on how to create an email newsletter and our expert picks of the best AI chatbots software for your website.

If you liked this article, then please subscribe to our YouTube Channel for WordPress video tutorials. You can also find us on Twitter and Facebook.

The post How to Hide Featured Images on Individual Posts in WordPress first appeared on WPBeginner.


April 09, 2022