Thursday, May 19, 2022

How to Add a Blog Post Checklist to the WordPress Editor

Do you want to add a blog checklist to the WordPress editor?

A checklist can help you to make your posts the best they can possibly be. If you’ve added multiple authors to your site, then a checklist can also help everyone write in the same style and remember all the details.

In this article, we’ll show you how to add a blog post checklist to the WordPress editor.
How to add a blog post checklist to the WordPress editor

Why Add a Blog Post Checklist to the WordPress Editor

Writing a good blog post for your WordPress website is only the first step.

Once you’ve finished writing, you’ll want to edit, proofread, add categories and tags, optimize the post for search engines, and more.

This is where a checklist can help. Checklists show a list of tasks you need to do before publishing your post, such as adding internal links or alt text.

Some WordPress plugins such as AIOSEO use checklists to help site owners with search engine optimization.
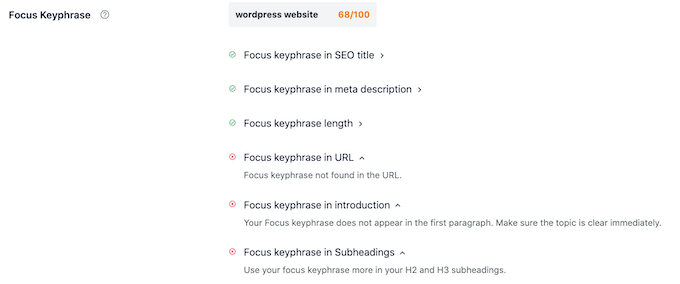
The AIOSEO plugin's SEO checklist

Checklists typically monitor your post as you’re writing and then check off each task as you finish it. This makes it easy to see what you’ve done well, and what you still need to work on.

But what if you wanted to create your own custom checklist in WordPress?

Perhaps you have a multi-author blog where you want to ensure a certain quality standard for your content. That’s where checklists come in handy.

With that in mind, let’s see how you can add a blog post checklist to the WordPress editor.

How to Add a Blog Post Checklist to the WordPress Editor

The easiest way to add a blog post checklist to the WordPress editor is by using PublishPress Checklists. This plugin adds a checklist to the right-hand menu of the WordPress editor.
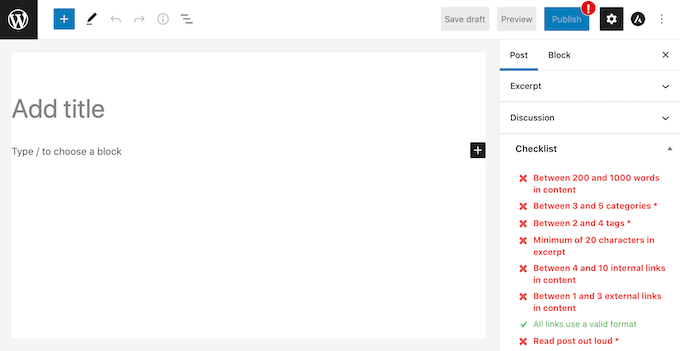
A blog post checklist created with PublishPress

PublishPress has a list of default tasks that you can add to your checklists. It also lets you create custom checklist tasks for your WordPress blog.

First, you’ll need to install and activate the plugin. If you need more instructions, then please see our guide on how to install a WordPress plugin.

Upon activation, head over to Checklists » Settings.
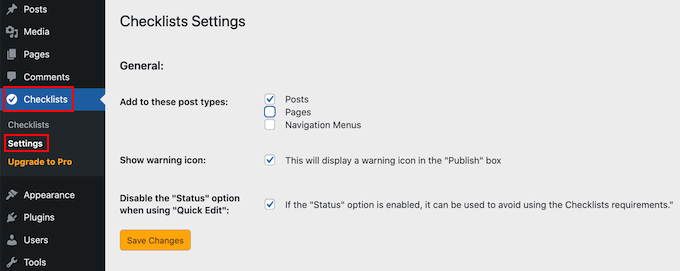
The PublishPress Checklist settings

Here you can choose where WordPress will show your checklist. To add a blog checklist to the WordPress editor, you’ll want to check the ‘Posts’ checkbox.

Once you’ve done that, click on the ‘Save Changes’ button.
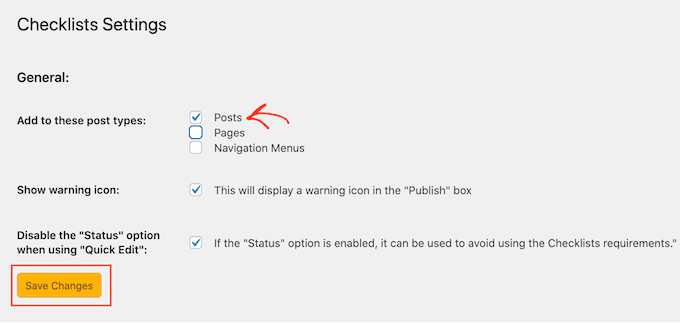
Adding a checklist to the WordPress post editor

You can then build your checklist by going to Checklists » Checklists.

Here you’ll see all of the default tasks that you can add to your blog post checklist. PublishPress is able to detect when these tasks are completed and check them off for you.
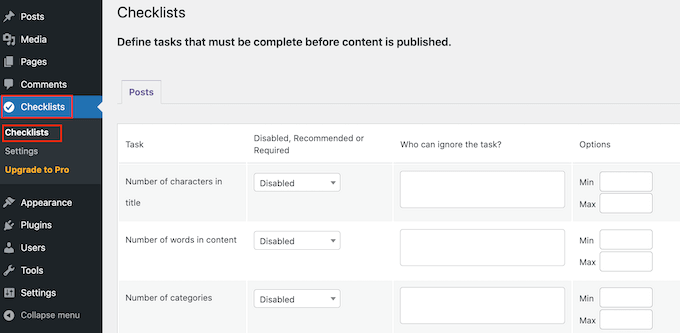
Tasks for your WordPress blog post checklist

All these tasks are disabled by default.

To add a task to your blog post checklist, simply open the ‘Disabled, Recommended or Required’ dropdown menu.
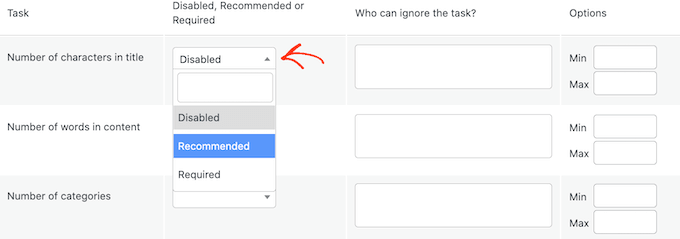
The Recommended and Required checklist dropdown

You can now choose between ‘Required’ or ‘Recommended.’

If you click on ‘Required,’ then authors won’t be able to publish their blog post without checking off this task first.

If the user clicks on the ‘Publish’ button without completing all ‘Required’ tasks, then WordPress will show a ‘Please complete the following tasks before publishing’ message.

A WordPress blog post checkbox

If you choose ‘Recommended’ instead, then the editor will show a message encouraging authors to complete any outstanding ‘Recommended’ tasks before publishing.

However, authors will be able to publish their post without completing these tasks.
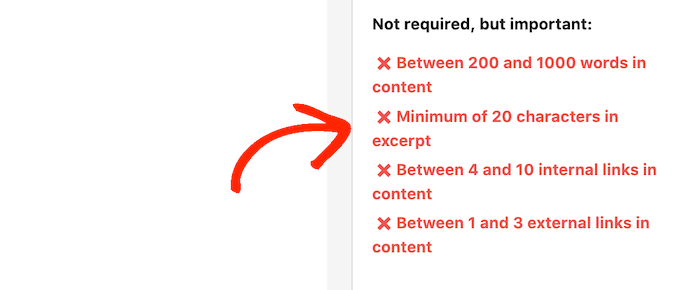
A list of recommended blog post tasks

After choosing between ‘Recommended’ and ‘Required,’ you can move onto ‘Who can ignore the task?’

Here, you can let certain user roles publish a post without completing the task, even if that task is ‘Required.’ For example, you may trust your site’s admins or editors to skip this task if they think it’s for the best.

To add a user role to your ‘ignore’ list, click on the ‘Who can ignore the task?’ box.
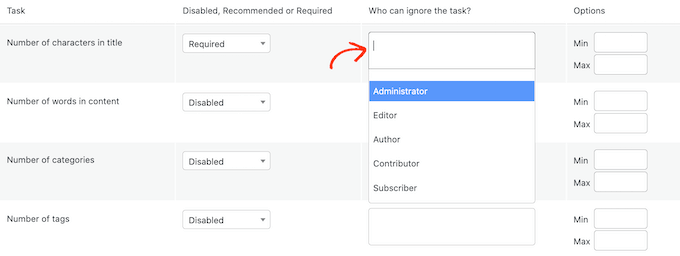
Creating an 'ignore' list for your WordPress checklist

This opens a dropdown showing all of the different user roles on your site.

You can now simply click on a role to add those users to your ‘ignore’ list.

Adding a blog post checklist to the WordPress editor

For some tasks, you may need to set a maximum and minimum value. For example, you can set a minimum number of categories that authors must add to a post. To learn more, please see our guide on how to add categories and subcategories in WordPress.

If the task has a ‘Min’ and ‘Max’ section, then you can type in the numbers you want to use.
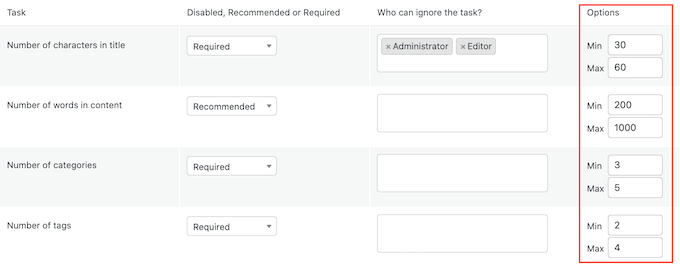
Setting maximum and minimum tasks

To add more tasks to your checklist simply repeat the process described above.

You can also add custom tasks to your blog post checklist.

The drawback is that PublishPress can’t check whether the author has completed custom tasks. This means the author will need to do this check manually.

For more information about custom tasks you may want to add, please see our guide on how to optimize your blog posts for SEO like a pro.

To create a custom task, simply scroll to the very bottom of your screen and then click on ‘Add custom task.’
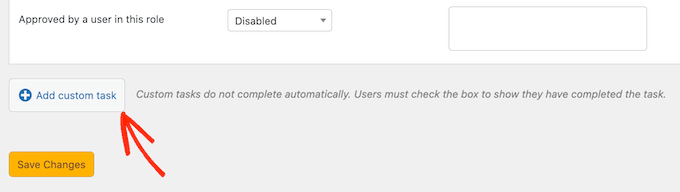
Creating custom blog list checklist tasks

This adds a new task ready for you to customize.

To start, type the task’s name into the ‘Enter name of custom task’ field. This text will be shown in your checklist, so make sure it lets authors know exactly what they need to do.
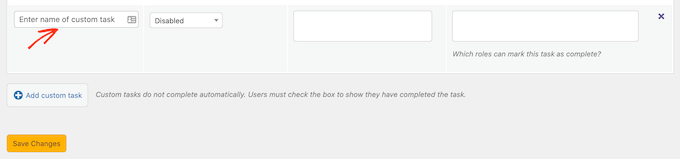
Adding a title to your custom checklist task

You can now make this task ‘Recommended’ or ‘Required,’ and give some users the option to ignore this task by following the process described above.

For custom tasks, you can specify the users who can mark this task as a complete. For example, you might use custom tasks to create a special ‘Editing’ checklist for users who have the Editor role.

How to add a blog post checklist to WordPress

To do this, click on the ‘Which roles can mark this task as complete’ box. This opens a dropdown where you can click to select any of your user roles.

Once you’ve added all the tasks to your checklist, click on the ‘Save Changes’ button. Now, you can visit the WordPress editor to see your blog post checklist live.

We hope this article helped you learn how to add a blog checklist to the WordPress editor. You may also want to check out our guide on how to create an email newsletter, and our expert pick of the best WordPress SEO plugins and tools you should use to improve your rankings.

If you liked this article, then please subscribe to our YouTube Channel for WordPress video tutorials. You can also find us on Twitter and Facebook.

The post How to Add a Blog Post Checklist to the WordPress Editor first appeared on WPBeginner.


May 19, 2022 at 04:00PM

Wednesday, May 18, 2022

How to Accept Google Pay in WordPress (The Easy Way)

Would you like to accept Google Pay on your WordPress site?

When you allow your customers to choose their preferred payment method, you’ll build trust and increase conversions on your website.

In this article, we’ll show you how to accept Google Pay in WordPress.

How to Accept Google Pay in WordPress

Why Accept Google Pay in WordPress?

If you’re selling products or services on your WordPress website or asking for donations, then it’s important to let your visitors pay using their preferred method.

Often they will want to pay by credit card or PayPal, but newer methods like Google Pay and Apple Pay are becoming more popular.

Google Pay is available in 40 countries around the world and makes online payments simple. However, your customers can only use it if they’re on an Android device running version Lollipop 5.0 or higher, so you’ll probably want to include additional payment options for people using other devices.

That being said, let’s take a look at how to accept Google Pay in your online store.

Note: We’ll cover how to add a Google Pay option in WordPress without adding a full eCommerce cart, but we will leave other helpful resources at the end of this article for those looking for full eCommerce solutions.

How to Accept Google Pay in WordPress

The first thing you need to do is install and activate the WP Simple Pay plugin. For more details, see our step by step guide on how to install a WordPress plugin.

WP Simple Pay is a simple yet powerful WordPress invoicing and payments plugin. The best part is that WP Simple Pay does not charge you any additional transaction fees, and you can set it up without the complexity of a cart system.

It lets you add Apple Pay, Google Pay, credit card as well as ACH bank payments, so you can give users multiple payment options which improves conversion.

While there is a free version of the plugin, you need the Pro plugin to accept Google Pay, create on-site payment forms, and more.

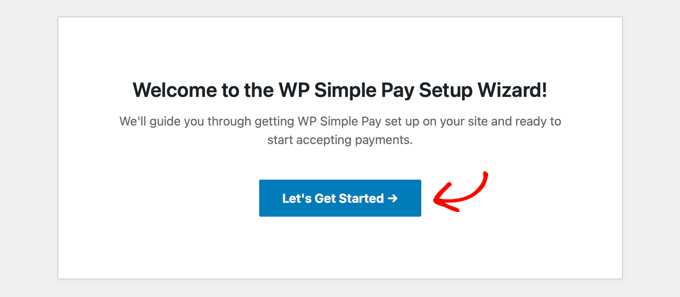
Upon activation, the WP Simple Pay setup wizard will start automatically. You simply need to click the ‘Let’s Get Started’ button to continue.

The WP Simple Pay Setup Wizard Will Start Automatically

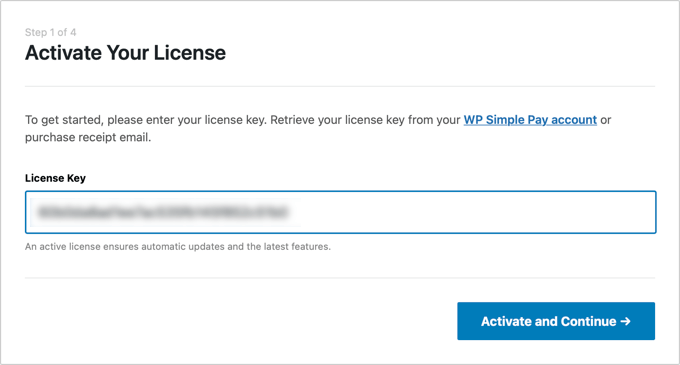
On the first page, you’ll be asked to enter your license key. You can find this information from your account on the WP Simple Pay website.

After that, you need to click the ‘Activate and Continue’ button to move to the next step.

You’ll Be Asked to Enter Your WP Simple Pay License Key

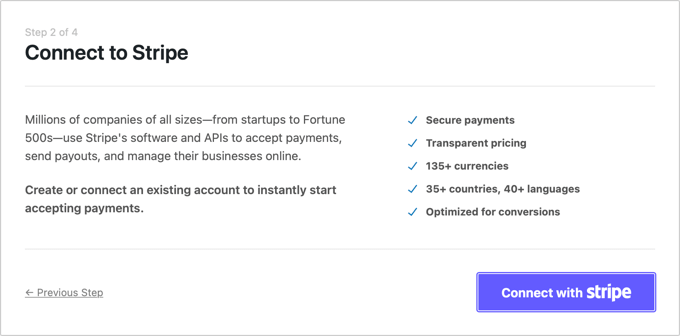
On the second page, you will need to connect WP Simple Pay to Stripe. Stripe is a popular payment gateway, and it’s the easiest way to add Google Pay to your website. It also supports all top credit and debit cards, Apple Pay, ACH payments, and more.

Simply click the ‘Connect with Stripe’ button, and from there you can log in to your Stripe account or create a new one. Anyone with a legitimate business can create a Stripe account and accept payments online.

You Need to Connect WP Simple Pay to Stripe
Note: Stripe requires your site to be using SSL/HTTPS encryption. If you don’t already have an SSL certificate for your website, then please see our step by step guide on how to add SSL in WordPress.

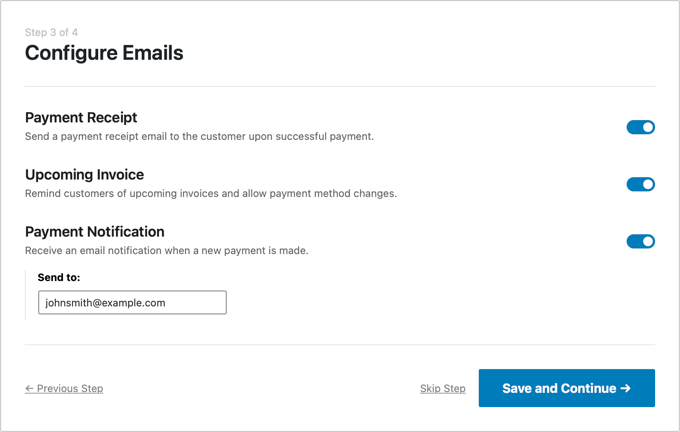
Once you’ve connected to Stripe, you’ll be asked to configure your WP Simple Pay emails.

The options for payment and invoice emails to your customers have already been enabled for you. So is the option for sending payment notification emails.

Configure Your WP Simple Pay Emails

You just need to enter the email address where the notifications should be sent.

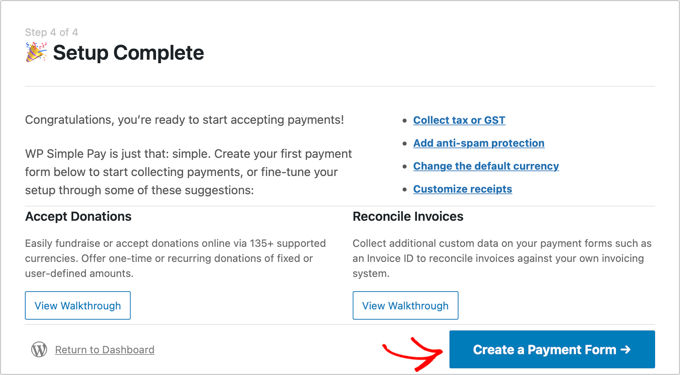
Once you’ve done that, you need to click the ‘Save and Continue’ button to complete your setup of WP Simple Pay.

WP Simple Pay Setup Is Complete

Google Pay is enabled by default when using Stripe Checkout, and will be automatically offered to Android users in participating countries.

If you decide to disable Google Pay in the future, then you will need to change the payment method settings in the Stripe Dashboard.

Creating a Payment Form in WordPress

Next, you need to create a payment form.

You can do that by clicking the ‘Create a Payment Form’ button on the last page of the setup wizard.

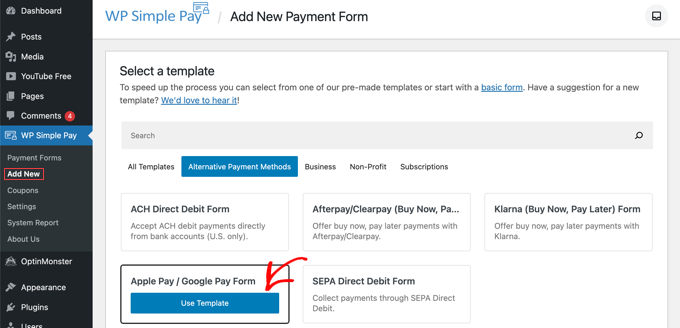
This will automatically take you to the WP Simple Pay » Add New page.

You’ll be shown a list of payment form templates. You need to scroll down until you locate the Apple Pay / Google Pay template.

Simply hover over the template and click the ‘Use Template’ button when it appears.

Select the Apple Pay / Google Pay Template

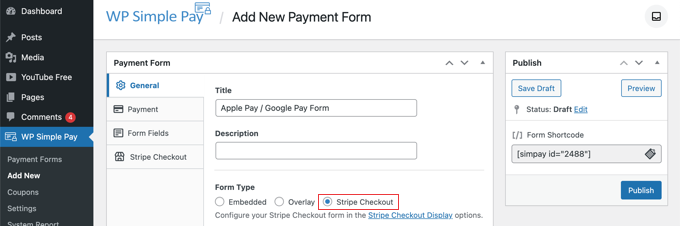
This will take you to the payment form editor.

If you like, you can rename the form and give it a description.

After that, you need to select the ‘Stripe Checkout’ option under Form Type.
Select the Stripe Checkout Option

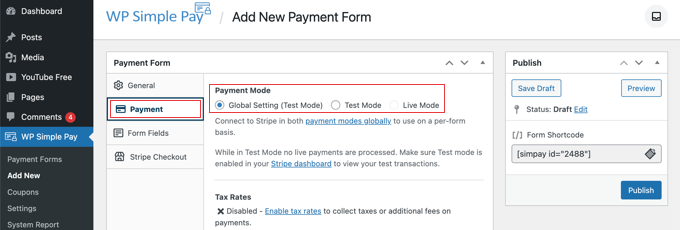
After you’ve done that, we’ll move on to the Payment tab.

Here you can set the payment mode to either live or testing. Testing mode will let you make payments that are not actually charged so you can make sure your form is working properly and emails are being sent.

Don’t forget to change this to ‘Live’ when you’ve finished testing and are ready to start receiving payments from your customers.

Set the Payment Mode to Either Live or Testing

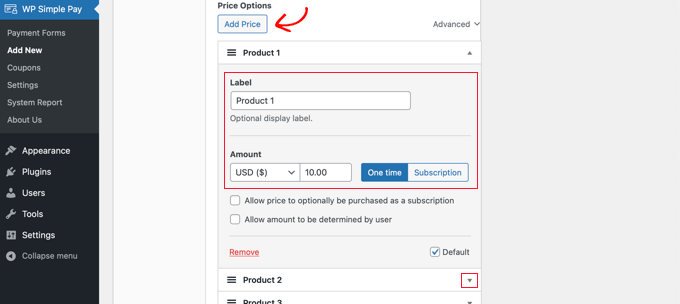
You can also add the products or services that you offer, along with their prices and whether they are a one-time payment or a subscription.

Simply click the ‘Add Price’ button until you have added as many prices as you need. After that, you will need to add a label and price for each one. You can also select other options, such as recurring payments, or the user can determine the price, as in a donation.

Add Your Products and Services to the Payment Form

You can show or hide a price by clicking the small arrow on the right.

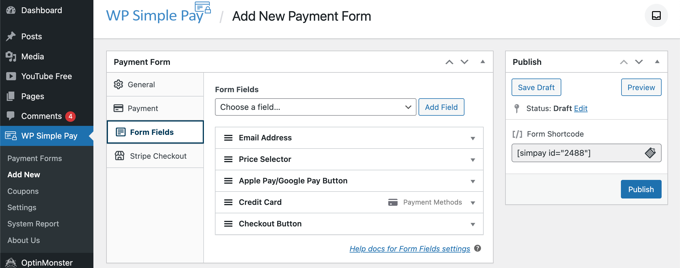
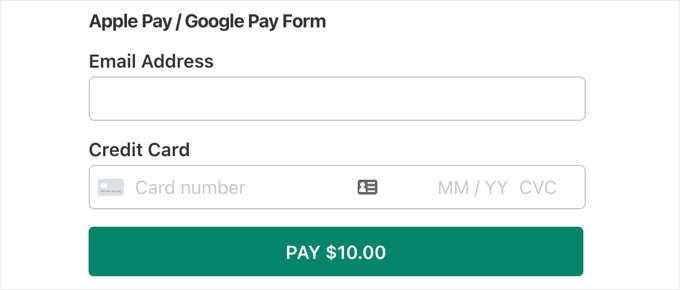
Next, we’ll move on to the ‘Form Fields’ tab. Notice that the essential fields have already been added to the form, including an ‘Apple Pay / Google Pay’ button, credit card details, and a checkout button.

The Essential Form Fields Have Been Added For You

Using the ‘Form Fields’ drop down, you can choose additional fields and add them by clicking the ‘Add Field’ button. Options include name, phone number, address, and much more.

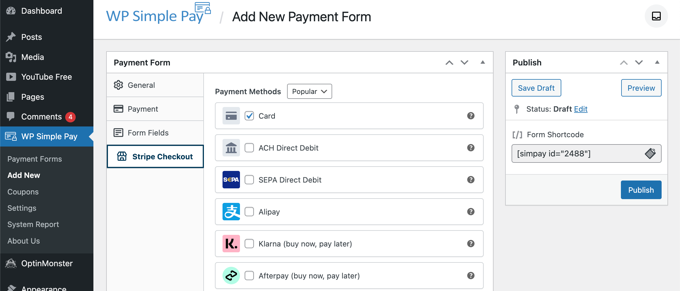
Finally, the ‘Stripe Checkout’ tab allows you to select additional payment methods and tweak the checkout form that is displayed after the user clicks the ‘Pay’ button.

For this tutorial, we’ll leave those settings as they are.

Select any Additional Payment Methods and Tweak the Checkout Form

When you are happy with your payment form, click on the ‘Publish’ button to store your settings and push the form live.

Now we can add the form to a post or page on your website.

Adding the Payment Form to Your Website

WP Simple Pay makes it super easy to add forms anywhere on your website.

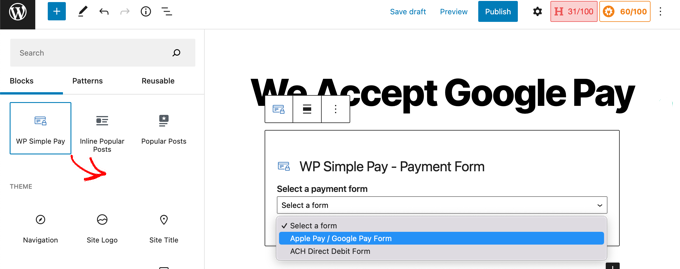
Simply create a new post or page, or edit an existing one. Then, click on the plus (+) sign at the top and add a WP Simple Pay block in the WordPress block editor.

Insert a WP Simple Pay Block and Choose the Correct Form

After that, select your order form from the dropdown menu in the WP Simple Pay block.

Once you’re finished, you can update or publish the post or page, and then click on the preview button to see your form in action.

WP Simple Pay Payment Form Preview

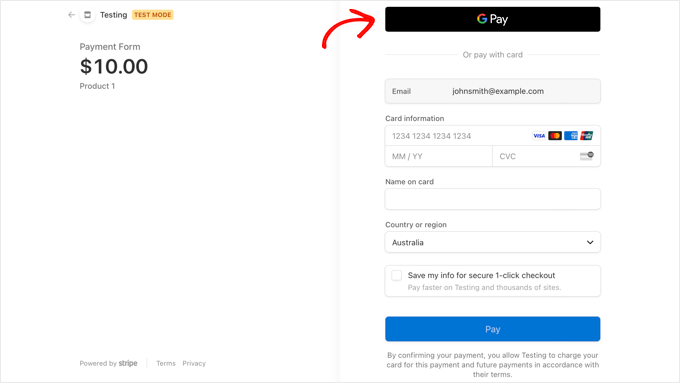
When your users click the Pay button, the Stripe checkout form will be displayed.

If they are using an Android device running Lollipop 5.0 or higher, then the Google Pay option will be displayed at the top of the form. Otherwise, the Google Pay option will be hidden, and your customers can pay using a credit card.

Stripe Checkout Preview With Google Pay

If you’re looking for other ways to add Google Pay in WordPress, then you can use full eCommerce solutions like Easy Digital Downloads or WooCommerce. Both of them have support for Apple Pay and Google Pay options.

We hope this tutorial helped you learn how to accept Google Pay in WordPress. You may also want to learn the right way to create an email newsletter, or check out our expert pick of the best contact form plugins for WordPress.

If you liked this article, then please subscribe to our YouTube Channel for WordPress video tutorials. You can also find us on Twitter and Facebook.

The post How to Accept Google Pay in WordPress (The Easy Way) first appeared on WPBeginner.


May 18, 2022 at 04:00PM
Tuesday, May 17, 2022

How to Create a Custom WordPress Block (Easy Way)

Do you want to create a custom Gutenberg block for your WordPress website?

While WordPress comes with a lot of basic blocks for creating content, you might need something more custom for your website.

In this article, we’ll show you an easy way to create custom Gutenberg blocks for your WordPress site.

Creating custom gutenberg blocks in WordPress

Why Create a Custom WordPress Block?

WordPress comes with an intuitive block editor that allows you to easily create your posts and pages by adding content and layout elements as blocks.

By default, WordPress ships with several commonly used blocks. WordPress plugins may also add their own blocks that you can use.

However, sometimes you may want to create your own custom block to do something specific, and can’t find a blocks plugin that works for you.

In this tutorial, we’ll show you how to create a completely custom block.

Note: This article is for intermediate users. You’ll need to be familiar with HTML and CSS to create custom Gutenberg blocks.

Step 1: Get Started with Your First Custom Block

First, you need to install and activate the Genesis Custom Blocks plugin. For more details, see our step by step guide on how to install a WordPress plugin.

Created by the folks behind the popular Genesis Theme Framework and StudioPress, this plugin provides developers easy tools to quickly create custom blocks for their projects.

For the sake of this tutorial, we will build a ‘testimonials’ block.

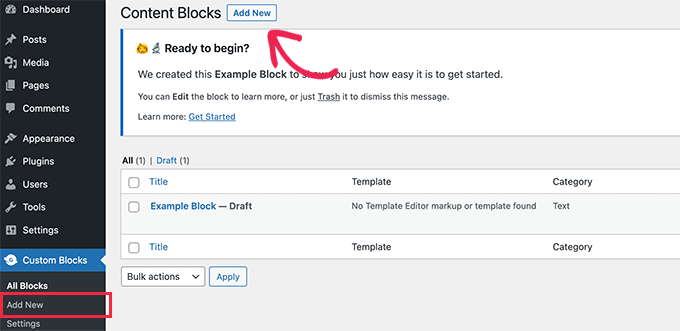
First, head over to Custom Blocks » Add New page from the left sidebar of your admin panel.

Creating a new custom block

This will bring you to the Block Editor page.

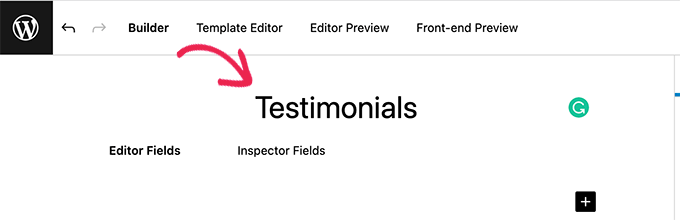
From here, you need to give a name to your block.

Block name

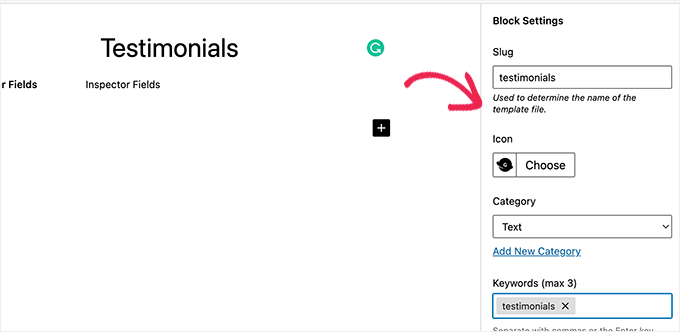
On the right side of the page, you’ll find the block properties.

Here you can choose an icon for your block, add a category, and add keywords.

Configure block settings

The slug will be auto-filled based on your block’s name, so you don’t have to change it. However, you may write up to 3 keywords in the Keywords text field so that your block can be easily found.

Now let’s add some fields to our block.

You can add different types of fields like text, numbers, email address, URL, color, image, checkbox, radio buttons, and much more.

We’ll add 3 fields to our custom testimonial block: an image field for the image of the reviewer, a textbox for the reviewer name, and a text area field for the testimonial text.

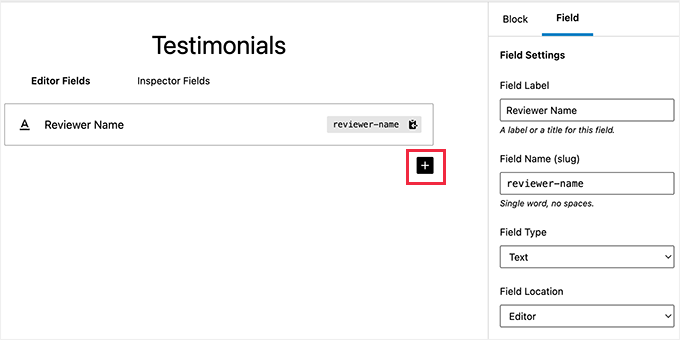
Click on the [+] Add Field button to insert the first field.

Add block field

This will open up some options for the field. Let’s take a look at each of them.

  • Field Label: You can use any name of your choice for the field label. Let’s name our first field ‘Reviewer Image’.
  • Field Name: The field name will be generated automatically based on the field label. We’ll use this field name in the next step, so make sure it’s unique for every field.
  • Field Type: Here you can select the type of field. We want our first field to be an image, so we’ll select Image from the dropdown menu.
  • Field Location: You can decide whether you want to add the field to the editor or the inspector.
  • Help Text: You can add some text to describe the field. This is not required if you’re creating this block for your personal use, but may be helpful for multi-author blogs.

You may also get some additional options based on the field type you choose. For example, if you select a text field, then you’ll get extra options like placeholder text and character limit.

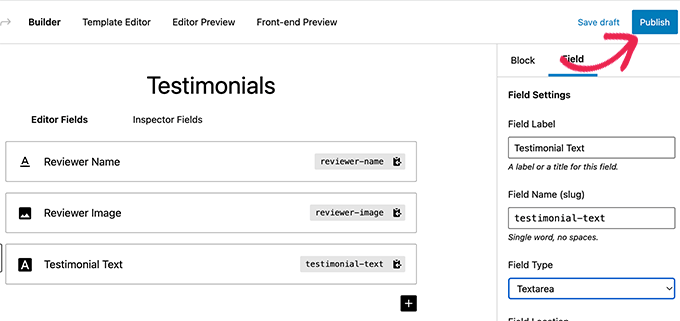
Following the above process, let’s add 2 other fields for our testimonials block by clicking the [+] Add Field button.

In case you want to reorder the fields, then you can do that by dragging them using the handle on the left side of each field label.

To edit or delete a particular field, you need to click the field label and edit the options in the right column.

Publish block

Once you’re done, click on the Publish button, present on the right side of the page, to save your custom Gutenberg block.

Step 2: Create a Custom Block Template

Although you’ve created the custom WordPress block in the last step, it won’t work until you create a block template.

The block template determines exactly how the information entered into the block is displayed on your website. You get to decide how it looks by using HTML and CSS, or even PHP code if you need to run functions or do other advanced things with the data.

There are two ways to create a block template. If your block output is in HTML/CSS, then you can use the built-in template editor.

On the other hand, if your block output requires some PHP to run in the background, then you’ll need to manually create a block template file and upload it to your theme folder.

Method 1. Using Built-in Template Editor

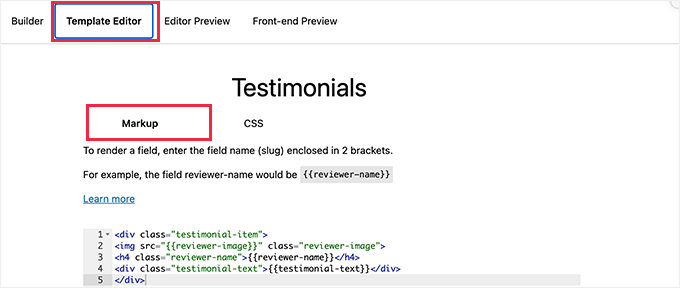
On the custom block edit screen simply switch to the Template Editor tab and enter your HTML under the markup tab.

Block template editor

You can write your HTML and use double curly brackets to insert block field values.

For instance, we used the following HTML for the sample block we created above.

<div class="testimonial-item">
<img src="" class="reviewer-image">
<h4 class="reviewer-name"></h4>
<div class="testimonial-text"></div>
</div>

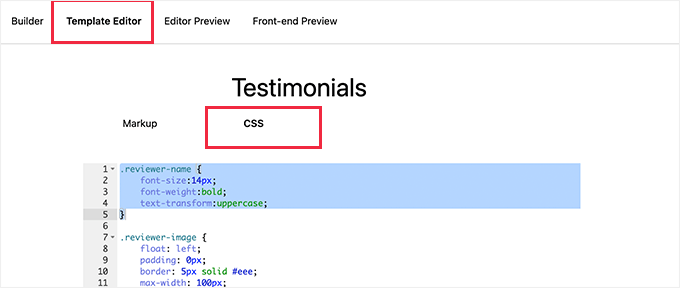
After that, switch to the CSS tab to style your block output markup.

Enter your block template CSS

Here is the sample CSS we used for our custom block.

.reviewer-name { 
    font-size:14px;
    font-weight:bold;
    text-transform:uppercase;
}

.reviewer-image {
    float: left;
    padding: 0px;
    border: 5px solid #eee;
    max-width: 100px;
    max-height: 100px;
    border-radius: 50%;
    margin: 10px;
}

.testimonial-text {
    font-size:14px;
}

.testimonial-item { 
 margin:10px;
 border-bottom:1px solid #eee;
 padding:10px;
}

Method 2. Manually Uploading Custom Block Templates

This method is recommended if you need to use PHP to interact with your custom block fields.

You’ll basically need to upload the editor template directly to your theme.

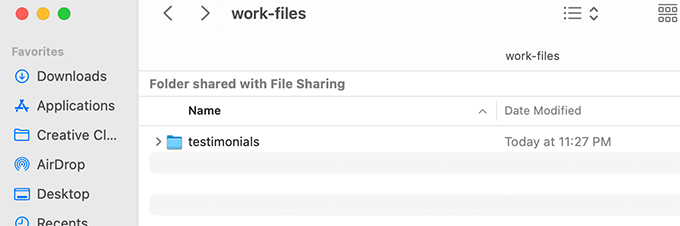
First, you need to create a folder on your computer name it with your custom block name slug. For instance, our demo block is called Testimonials so we’ll create a testimonials folder.

Block template folder

Next, you need to create a file called block.php using a plain text editor. This is where you’ll put the HTML / PHP part of your block template.

Here is the sample template we used for our example.

<div class="testimonial-item <?php block_field('className'); ?>">
<img class="reviewer-image" src="<?php block_field( 'reviewer-image' ); ?>" alt="<?php block_field( 'reviewer-name' ); ?>" />
<h4 class="reviewer-name"><?php block_field( 'reviewer-name' ); ?></h4>
<div class="testimonial-text"><?php block_field( 'testimonial-text' ); ?></div>
</div>

Notice how we used the block_field() function to fetch data from a block field.

We have wrapped our block fields in the HTML we want to use to display the block. We have also added CSS classes so that we can style the block properly.

Don’t forget to save the file inside the folder you created earlier.

Next, you need to create another file using the plain text editor on your computer and save it as block.css inside the folder you created.

We’ll use this file to add CSS needed to style our block display. Here is the sample CSS we used for this example.

.reviewer-name { 
    font-size:14px;
    font-weight:bold;
    text-transform:uppercase;
}

.reviewer-image {
    float: left;
    padding: 0px;
    border: 5px solid #eee;
    max-width: 100px;
    max-height: 100px;
    border-radius: 50%;
    margin: 10px;
}

.testimonial-text {
    font-size:14px;
}

.testimonial-item { 
 margin:10px;
 border-bottom:1px solid #eee;
 padding:10px;
}

Don’t forget to save your changes.

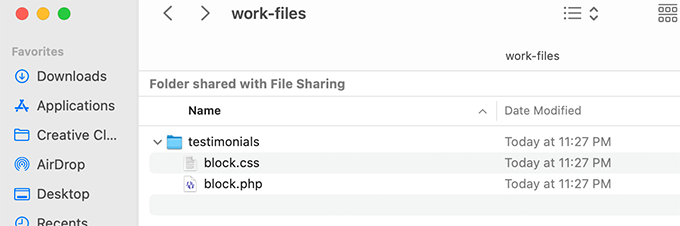
Your block template folder will now have two template files inside it.

block template files

After that, you need to upload your block folder to your website using an FTP client or the File Manager app inside your WordPress hosting account’s control panel.

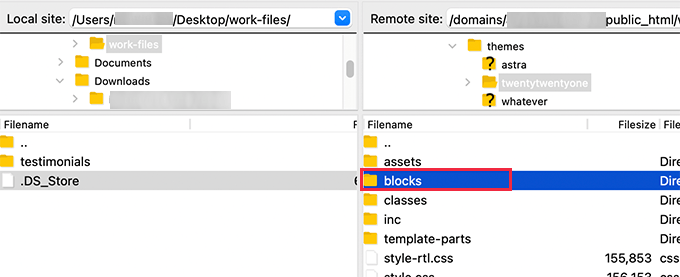
Once connected, navigate to the /wp-content/themes/your-current-theme/ folder.

If your theme folder doesn’t have a folder name blocks, then go ahead and create a new directory and name it blocks.

Create blocks folder inside your WordPress theme folder

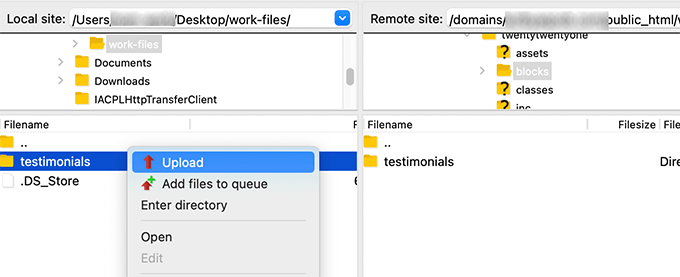
Now enter the blocks folder and upload the folder you created on your computer to the blocks folder.

Uploaad block template files

That’s all! You have successfully created manual template files for your custom block.

Step 3. Preview Your Custom Block

Now, before you can preview your HTML/CSS, you need to provide some test data that can be used to display a sample output.

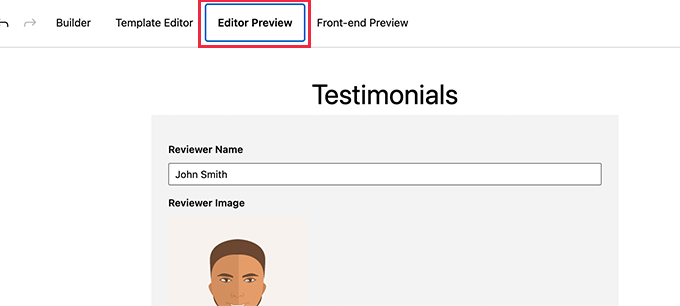
Inside the WordPress admin area edit your block and switch to the Editor Preview tab. Here, you need to enter some dummy data.

Editor preview

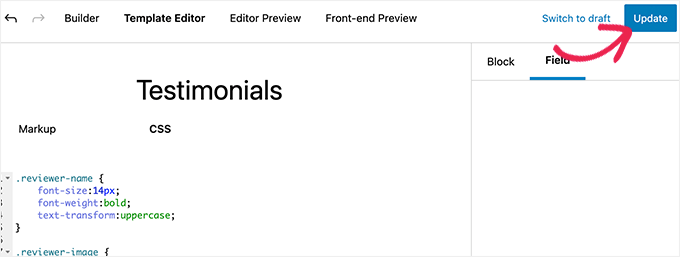
Don’t forget to click on the Update button to save your changes before your can preview.

Save your template changes

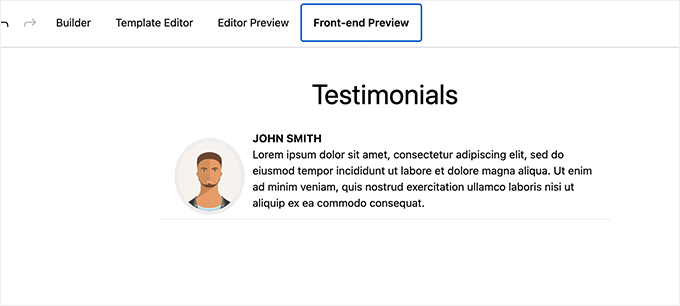
You can now switch to the Front-end Preview tab to see how your block will look on the front-end (public area of your WordPress website).

Front-end preview of your website

If everything looks good to you, then you can update your block to save any unsaved changes.

Step 4. Using Your Custom Block in WordPress

You can now use your custom block in WordPress like you would use any other blocks.

Simply edit any post or page where you want to use this block.

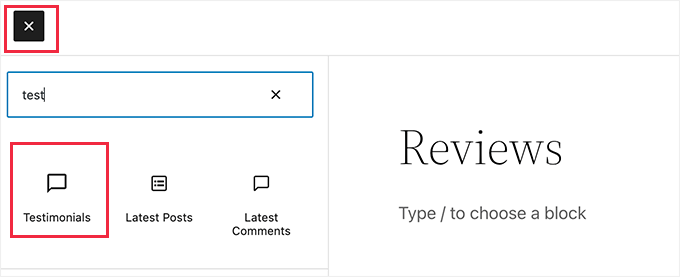
Click on the add new block button and search for your block by typing its name or keywords.

Inseting custom block in posts and pages

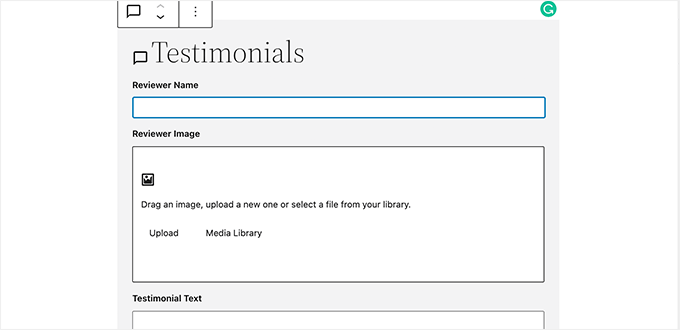
After you insert the block to the content area, you’ll see the block fields you created for this custom block.

Block fields preview

You can fill out the block fields as needed.

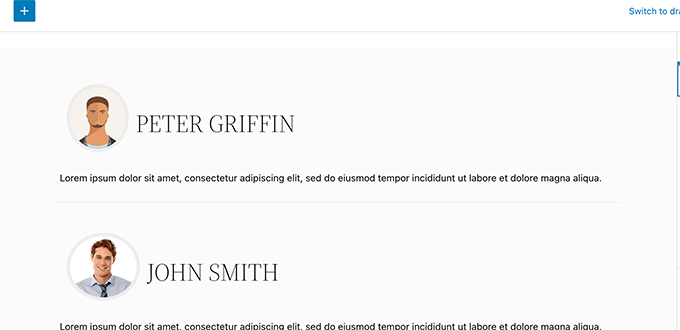
As you move away from the block to another block, the editor will automatically show a live preview of your block.

Block preview inside the block editor

You can now save your post and page and preview it to see your custom block in action on your website.

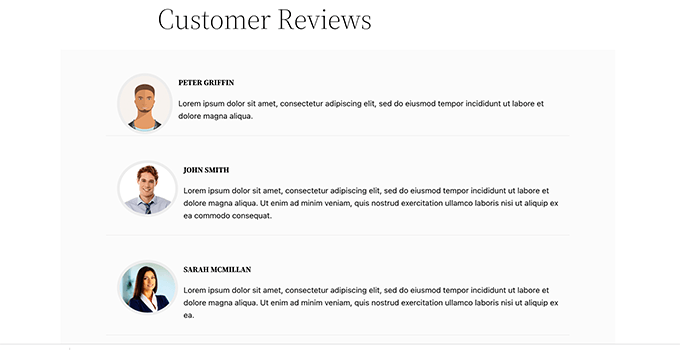
Here’s how the testimonials block looks on our test site.

Custom block live preview

We hope this article helped you learn how to easily create custom Gutenberg blocks for your WordPress website.

You may also want to see our guide on how to create a custom WordPress theme from scratch, or see our expert pick of the must have WordPress plugins for your website.

If you liked this article, then please subscribe to our YouTube Channel for WordPress video tutorials. You can also find us on Twitter and Facebook.

The post How to Create a Custom WordPress Block (Easy Way) first appeared on WPBeginner.


May 17, 2022 at 05:00PM