Tuesday, May 24, 2022

How to Include Custom Post Types in WordPress Search Results

Do you want to include custom post types in WordPress search?

By default, WordPress will never show custom post types in its search results. That means your visitors may miss out on some great content, and you’ll miss out on extra page views.

In this article, we will show you how to include custom post types in WordPress search.
How to include custom post types in WordPress search

How to Include Custom Post Types in WordPress Search

Although WordPress has a built-in search feature, its quite limited. If you create custom post types in WordPress, then WordPress won’t include these items in search results.

The easiest way to include custom post types in WordPress search is by using the SearchWP plugin.

SearchWP is the best custom search plugin for WordPress, used by over 30,000 websites. It’s easy to use and lets you search content that isn’t included in the default WordPress search.

To include custom post types in WordPress search, you’ll need to install and activate SearchWP. If you need help, then please see our guide on how to install a WordPress plugin.

Upon activation, click on the new ‘SearchWP’ button in your website’s toolbar. You can then go ahead and click on ‘Activate License.’
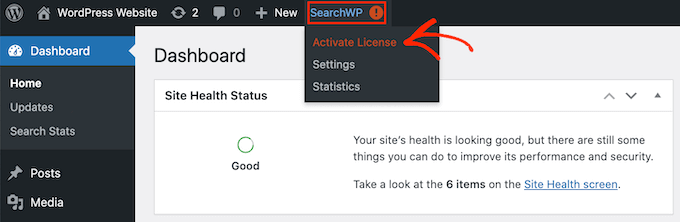
Activating the SearchWP WordPress plugin

After you’ve done that, click on the ‘License’ tab.

You can now paste your license key into the ‘License’ box. You’ll find this key in the email you got when you purchased SearchWP and in your account on the SearchWP site.
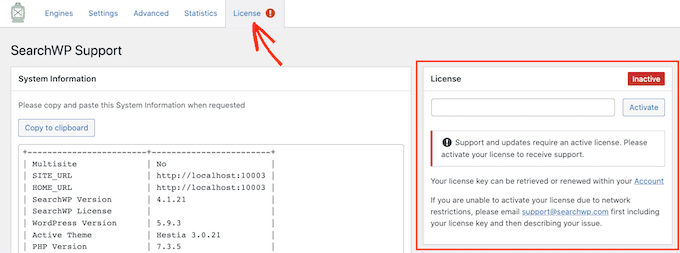
The SearchWP advanced search WordPress plugin

Once you’ve pasted this information into the ‘License’ field, go ahead and click on the ‘Activate’ button next to it.

You can now set up SearchWP to include custom post types in WordPress search results.

To start, simply click on the ‘Engines’ tab.
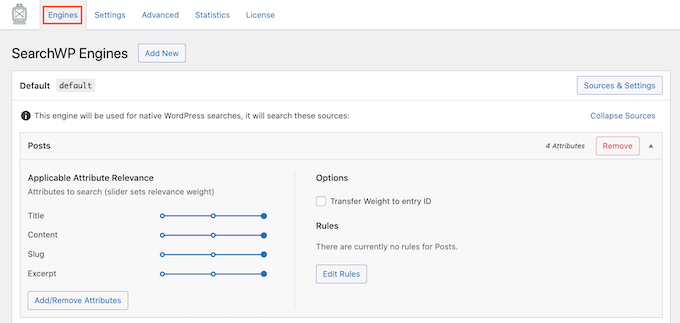
SearchWP's Engine tab

On this screen, you’ll see sections for the different types of content on your WordPress site that SearchWP includes in its search results.

By default, this plugin searches your website’s media, posts, and pages.

To include custom post types in your searches, click on the ‘Sources & Settings’ button.
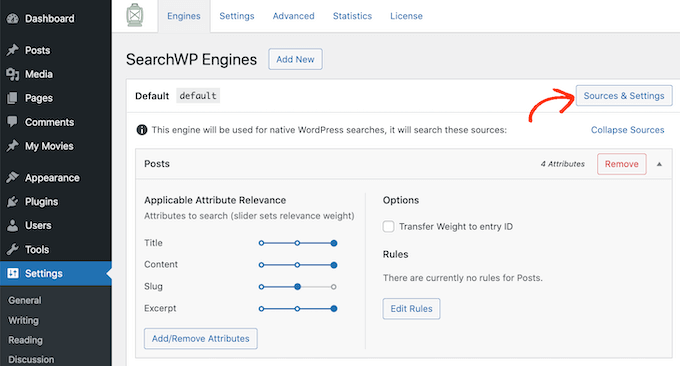
Configuring the SearchWP search plugin

Under ‘Sources,’ you’ll see all your post types listed along with comments, media, and more. Simply find all of the custom post types that you want to include in your search results, and check their boxes.

After that, click on the ‘Done’ button.
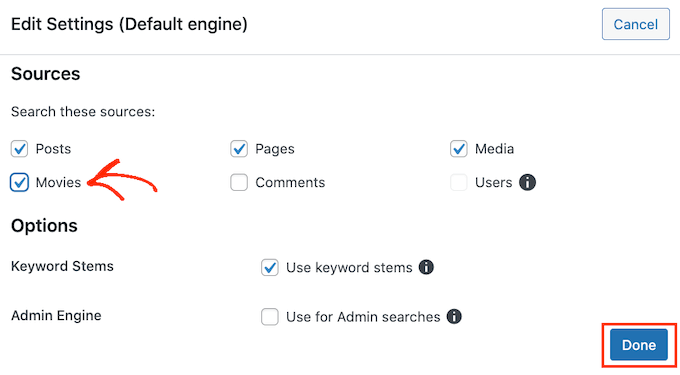
Including custom post types in WordPress search

You’ll now see a new section for each of your custom post types on your WordPress blog.

In each section, SearchWP shows all the attributes that it will look at when searching your custom post types.

For each attribute, SearchWP has an ‘Applicable Attribute Relevance’ scale. This is the weight that SearchWP gives to this attribute when searching your custom post types.

By default, the sliders for Title, Slug, and Excerpt are all the way to the right, so they have the most weight. The slider for Content is in the center, so it has less weight.
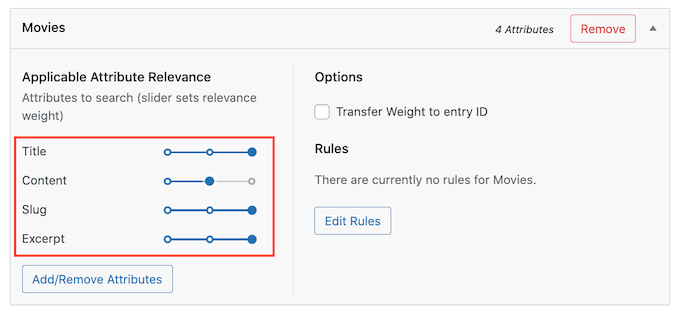
SearchWP's attribute weight settings

Want to change an attribute’s weight? Simply drag its slider.

You may want to try different relevancy settings to see what gives you the most accurate and helpful search results.

You can also remove attributes. For example, your custom post type may have attributes that you want SearchWP to ignore, like attributes that you added for your internal reference only.

To add or remove attributes, click on the ‘Add/Remove Attributes’ button.
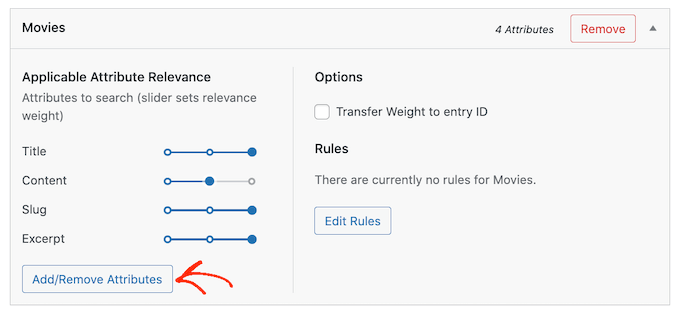
Adding custom post type attributes to WordPress search

To add an attribute, simply click to check its box.

If you want SearchWP to ignore an attribute, then go ahead and uncheck its box.
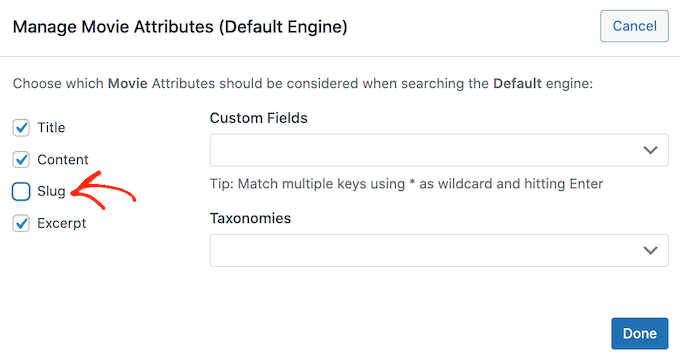
Removing custom post type attributes from WordPress search

If you’ve created any custom taxonomies or custom fields, then you might want SearchWP to look at this content when searching your custom post types.

To do this, simply click on either the ‘Custom Fields’ or ‘Taxonomies’ fields. You can then type in the name of the attribute that you want to add, and click on it when it appears.
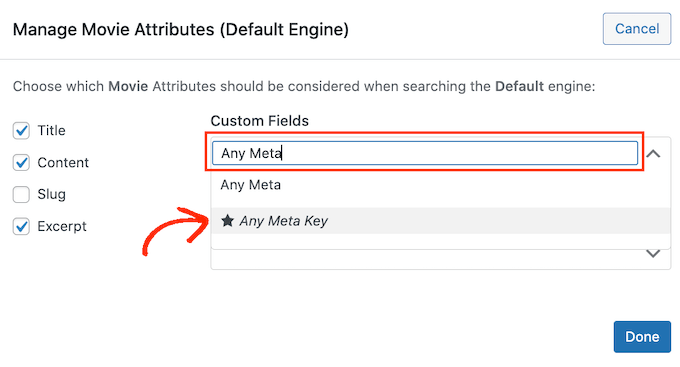
Adding custom post types in WordPress search

When you’re happy with your settings, click on the ‘Done’ button.

If you’ve added any attributes, custom fields or taxonomies, then you can change how much weight this content has. Just like we mentioned earlier, moving the slider to the right will give this attribute more weight which means it will have a bigger impact on the search results.
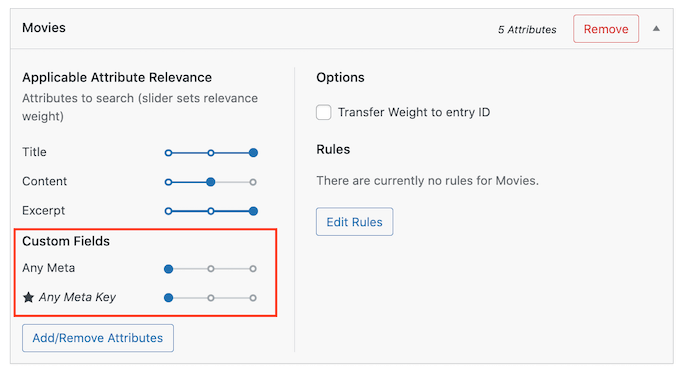
Changing the attribute relevancy for custom post types in WordPress search

Once you’ve finished customizing SearchWP’s settings, scroll to the top of the screen.

You can then click on the ‘Save Engines’ button to save your changes.
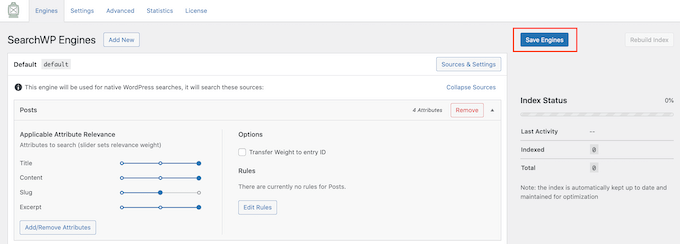
Saving your WordPress custom search settings

At this point, SearchWP may show you the message ‘The index needs to be rebuilt.’

If you see this message, then go ahead and click on the ‘Rebuild Index’ button. This will add your custom post types to your site’s search index, so they will show up in the search results.
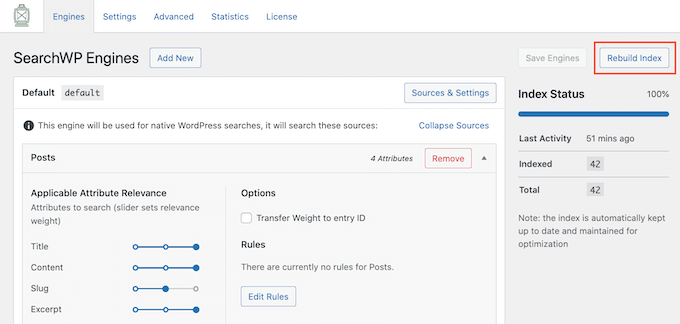
Rebuilding the WordPress search index

That’s it. WordPress will now include your custom post types in its search results.

Once you’ve done that, you may want to enable some advanced settings that will make it easier for visitors to find what they are looking for.

To take a look at these settings, click on the ‘Advanced’ tab.
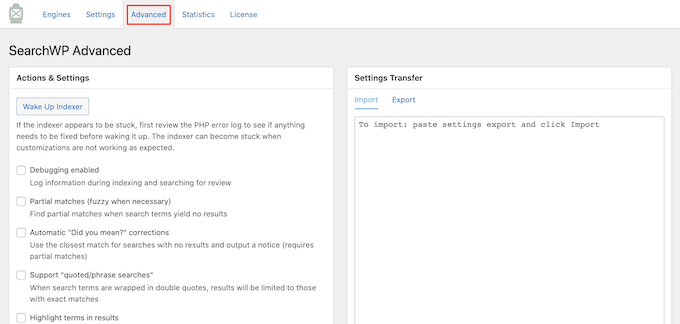
SearchWP's advanced search settings

This screen lists some of the more advanced settings that you may want to use.

For example, if you want to show results that don’t quite match the term that the visitor searched for, then you can check the ‘Partial matches (fuzzy when necessary)’ box.
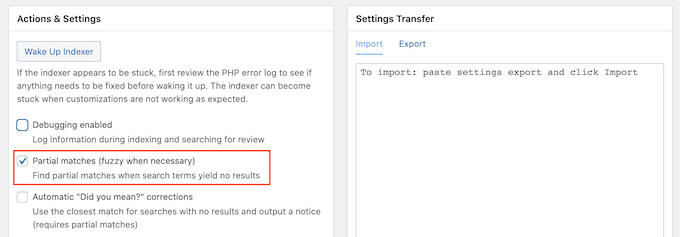
The 'fuzzy' partial search settings in SearchWP

For more tips on SearchWP’s advanced settings, please see our step by step guide on how to improve WordPress search with SearchWP.

After adding custom post types to WordPress search, you may want to create a search form that only show the search results from your custom post type category, which can make it easier for visitors to find what they’re looking for. For more details, see our step-by-step guide on how to create advanced search form in WordPress for custom post types.

We hope this article helped you learn how to include custom post types in WordPress search. You can also go through our guide on how to make money online blogging with WordPress, and see our expert pick of must have WordPress plugins for business sites.

If you liked this article, then please subscribe to our YouTube Channel for WordPress video tutorials. You can also find us on Twitter and Facebook.

The post How to Include Custom Post Types in WordPress Search Results first appeared on WPBeginner.


May 24, 2022 at 04:00PM
Monday, May 23, 2022

How to Add Advanced Gift Cards in WooCommerce (Easy Way)

Do you want to add advanced gift cards in WooCommerce?

Gift cards allow your customers to buy store credit and then either keep it for themselves, or give it away as a gift. Since they’re so popular with shoppers, gift cards can help you get more sales and boost profits.

In this article, we will show you how to easily add advanced gift cards in WooCommerce.

How to add advanced gift cards in WooCommerce

Why Add Advanced Gift Cards in WooCommerce?

Whether you sell physical items or you sell digital downloads in WordPress, gift cards give your customers an easy way to buy store credits in advance. Although some shoppers may buy a gift card for themselves, they also make a very convenient gift.

By selling gift cards, you can make your WooCommerce store the go-to place for shoppers who need to get a present but are unsure what to buy.

This means more sales and more profits for your online store.

Gift cards can also help spread the word about your brand, particularly if the shopper buys a gift card for someone who hasn’t heard of your online store yet.

Convincing a new customer to make their first purchase is often a challenge. However, if someone gets a gift card, then they’re almost guaranteed to use it, even if they’re not familiar with your store.

When this person uses their gift card, you will be able to collect their contact information to build your email list in WordPress and encourage first-time shoppers to become loyal repeat customers.

That being said, let’s take a look at how you can easily add advanced gift cards in your WooCommerce store.

How to Add Advanced Gift Cards in WooCommerce

The easiest way to add advanced gift cards in WooCommerce is by using the free Advanced Coupons plugin with the Advanced Gift Cards for WooCommerce premium addon.

You’ll need both plugins installed in order to create gift cards. That’s because the gift card addon needs the core Advanced Coupons plugin in order to work.

Advanced Coupons is the best WordPress coupon code plugin on the market. It allows you to create coupons to boost your sales and grow your business.

In this guide, we’ll be using the free Advanced Coupons plugin. However, there is an Advanced Coupons Premium plugin that adds extra features such as ​​BOGO coupons, cart conditions, and the option to auto-apply coupons. Both the free and premium versions are fully compatible with the Advanced Gift Cards for WooCommerce addon.

In the following image you can see an example of a gift card, created using Advanced Gift Cards for WooCommerce.

An advanced gift card created for WooCommerce

When the customer buys a gift card, WordPress will send them an email with a unique coupon code that they can use on your online store.

To create and sell gift cards, you’ll need to first install and activate the free Advanced Coupons plugin. If you need help, then please see our guide on how to install a WordPress plugin.

Then, you’ll need to install the Advanced Gift Cards for WooCommerce addon.

After activating this premium addon, your first task is entering your Advanced Gift Cards license key. You’ll find this key in the purchase confirmation email you got when you purchased the Advanced Gift Cards addon.

You can also get this key by logging into your Advanced Coupons account. In your account, click on ‘View Licenses.’

The Advanced Gift Cards for WooCommerce dashboard

Simply copy the key that appears in the ‘License key’ field. If you have bought other Advanced Coupons plugins and addons, then make sure you’re using the license key for the Advanced Gift Cards addon.

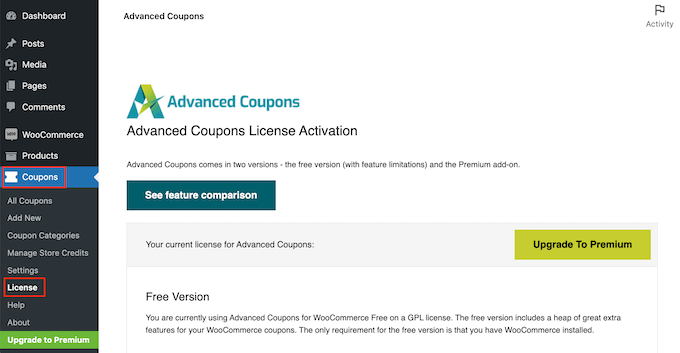
After you’ve done that, go to Coupons » License in your WordPress dashboard.

Adding your license key to the Advanced Gift Cards plugin

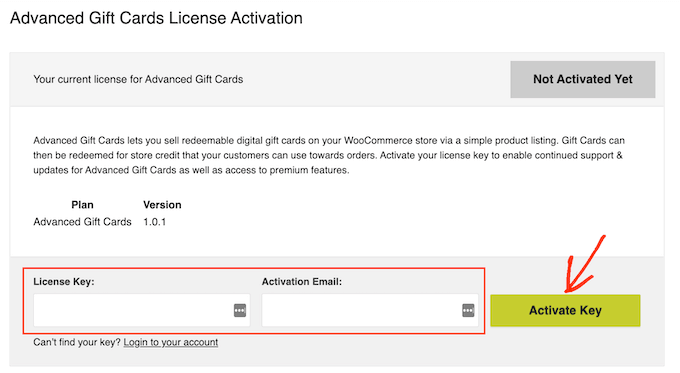
Next, scroll to the Advanced Gift Cards License Activation section. You can now go ahead and paste your key into the ‘License key’ field.

After that, type in the email address that you used to buy the Advanced Gift Cards addon. Then, just click on the Activate Key button.

Activating the Advanced Gift Cards for WooCommerce plugin

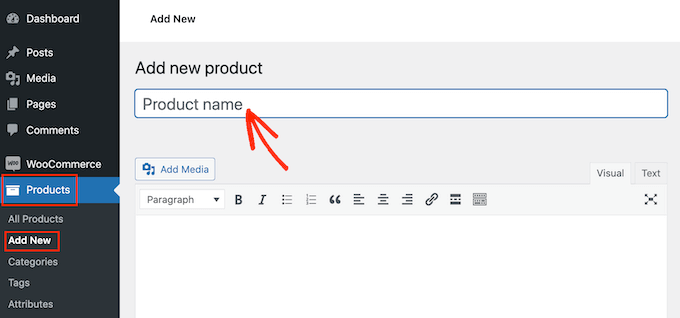
You’re now ready to create gift cards for your customers. To get started, go to Products » Add New.

First, you need to type in a title for your gift card in the ‘Product name’ field. Most WooCommerce themes show the product name at the top of the product’s page, so it’s one of the first things that shoppers will see.

WooCommerce's 'New Product' screen

Directly below the ‘Product Name,’ you can type in a description for your gift card. To get more sales, your description should be helpful, informative, and convincing.

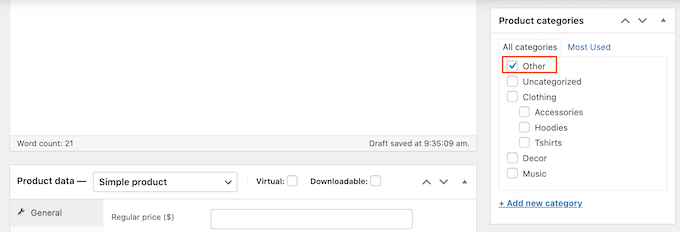
After that, scroll to the ‘Product Categories’ section. Product categories allow your customers to easily browse related products on your WordPress website. This can help you sell more products and make more money.

To add this gift card to a category, simply check the category’s box.

The WooCommerce product category settings

Another option is to create a new category, such as a special Gift Card category where shoppers can browse through all of your different cards. You can see our guide on how to add categories in WordPress for detailed steps.

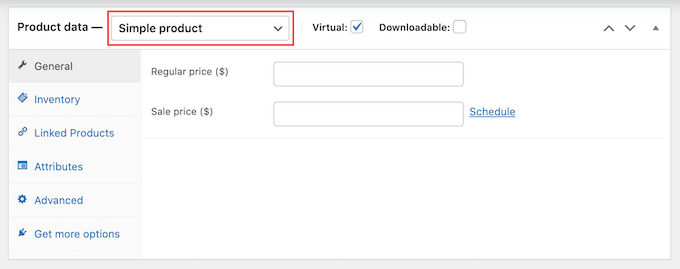
Once you’re done selecting a category, scroll to the Product Data section and open the dropdown that shows ‘Simple product’ by default.

WooCommerce's Product Data settings

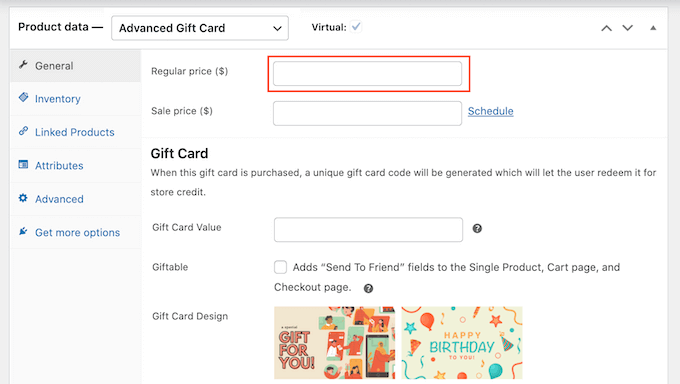
Then, go ahead and click on the new ‘Advanced Gift Card’ option. WooCommerce will now show all the settings you can use to create your gift card.

In the ‘Regular price’ field, go ahead and type in how much this card will cost to buy.

Setting a price for your WooCommerce gift card

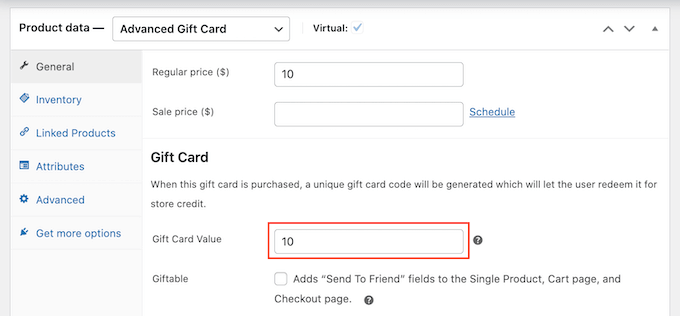
When a customer buys this gift card, your store will create a unique coupon code. The customer can then enter this code at your store’s checkout, similar to any other smart coupon in WooCommerce.

In Gift Card Value, type the amount that will be credited to the customer’s account when they use this coupon. This will usually be the same as the gift card’s Regular Price.

How to add advanced gift cards in WooCommerce

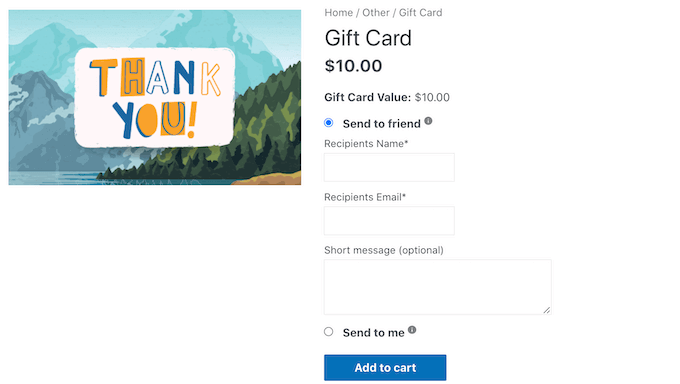
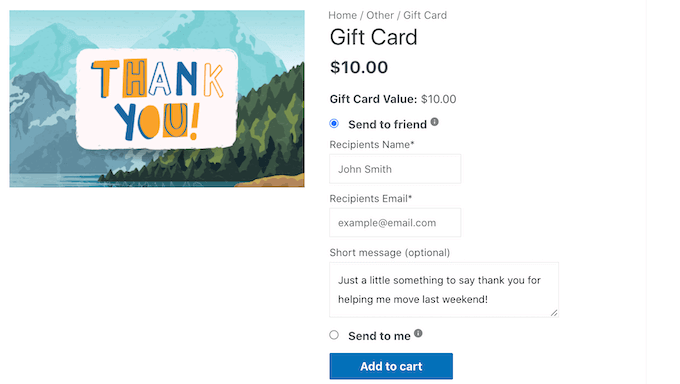
By default, Advanced Gift Cards will send the card to the buyer’s email address. However, gift cards are usually meant for other people such as a friend or family member.

With that in mind, you may want to give customers the option to send this card to a different email address, as you can see in the following image.

A gift card created using Advanced Gift Cards for WooCommerce

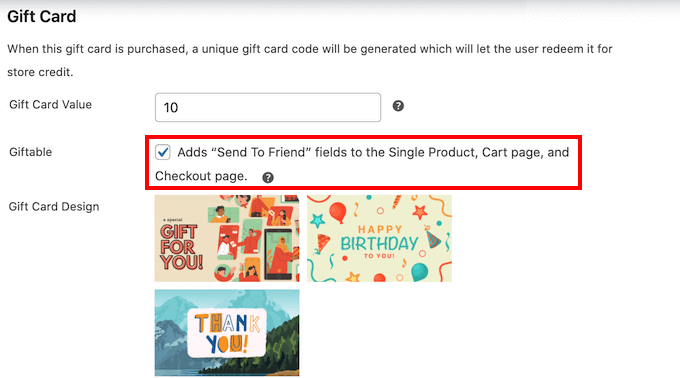
To give your customers this choice, check the ‘Giftable’ box.

Now, your customers can choose whether to send the gift card to their own email address, or a different address.

Making a gift card giftable

When a customer buys a gift card, the plugin will send them an email with their coupon code plus some information about your store.

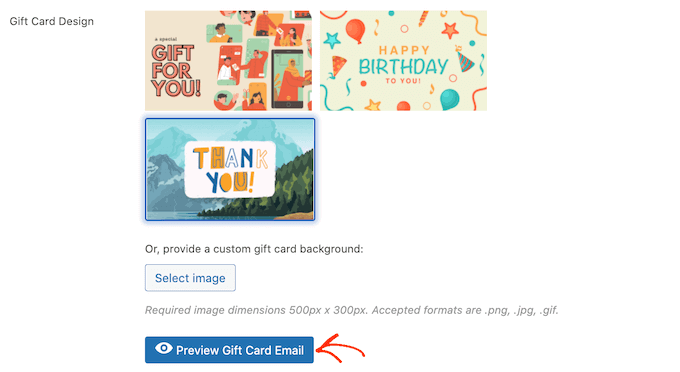
Advanced Gift Cards has several ready-made designs that you can add to these emails, as you can see in the following screenshot.

A sample gift created created using WordPress and WooCommerce

To use one of these designs, scroll to the Gift Card Design section and then click on any of the ready-made designs.

To preview how your emails will look, simply click on the Preview Gift Card Email button.

Ready-made designs for your WooCommerce gift card

This will open a popup showing how your email will look with your chosen design.

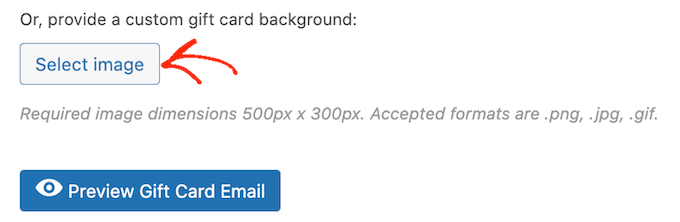
Another option is uploading an image of your choice. For example, you might use web design software to create a Thank You image that features your store’s unique branding.

To use your own image, click on the ‘Select image’ button.

Adding a custom image to your coupon

This will open the WordPress media library where you can either choose an image or upload a new image to your WordPress blog from your computer.

There are few other settings that you may want to take a look through. However, this is all you need to create an advanced gift card in WooCommerce.

Before you publish your gift card, you may want to customize the email that’s sent to every customer who buys this product.

With that in mind, click on the Save Draft button to save your gift card without publishing it to your online store.

How to Customize the Advanced Gift Cards Email

Whenever a customer buys a gift card, they’ll get an email with instructions on how to use their card.

You may want to customize this email, so it better aligns with your brand and has the messaging you need. You may also want to add any information that you feel is missing from the default email.

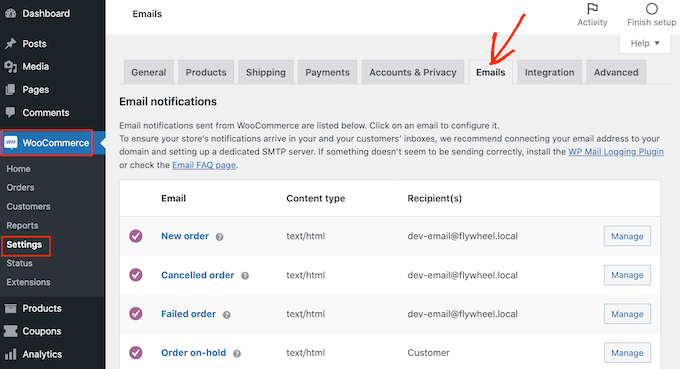
To edit this email, go to WooCommerce » Settings. Once you’ve done that, click on the ‘Emails’ tab.

Editing the gift card email

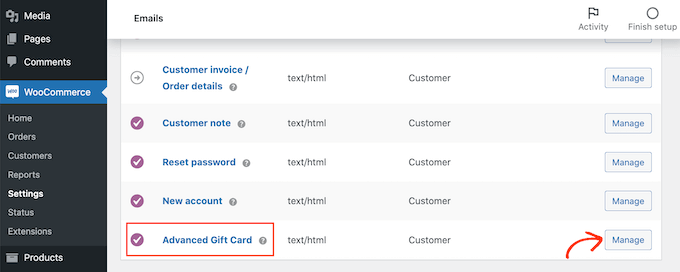
On this screen, scroll to find the ‘Advanced Gift Card’ email.

Then, click on its ‘Manage’ button.

The Advanced Gift Cards email

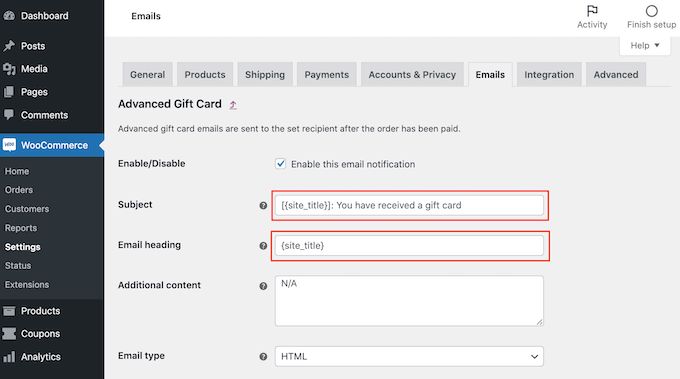
You will now see the template that Advanced Gift Cards uses for all of its emails.

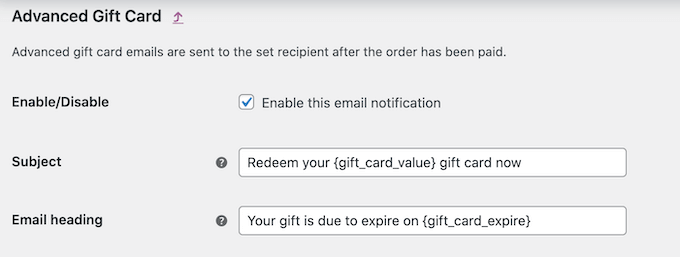
You may want to start by editing the email heading and subject.

The WooCommerce email templates

One option is to simply type in plain text into these fields. WooCommerce will then use this text for all of its gift card emails.

You can also add dynamic text. This is text that will update automatically based on factors such as the value of the gift card or the date when it is due to expire.

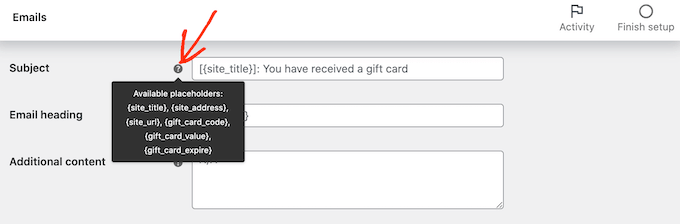
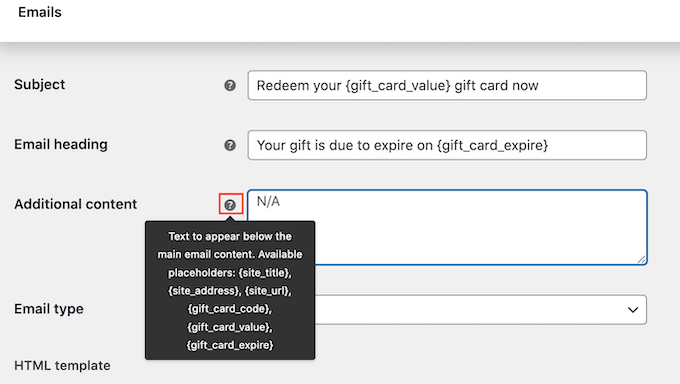
Dynamic text can help you create more helpful and engaging emails. To see all the dynamic text that you can use, simply hover your mouse over a field’s ‘?’ icon.

You will then see a popup that shows all the different dynamic text you can use in this field.

A choice of dynamic text

Now, you can simply type this dynamic text into the field, and WooCommerce will handle the rest.

You can even use a mix of plain text and dynamic text, as you can see in the following image.

Customizing the gift card email template

Want to add some more text to the default email? Then you can type it into the ‘Additional content’ box. This text will appear beneath the main email content.

As before, the ‘Additional content’ box supports both plain and dynamic text. To see the different dynamic text that you can use for your additional content, just hover your mouse over its ‘?’ icon.

Editing the WooCommerce eCommerce emails

When you’re happy with your email, click on the ‘Save changes’ button.

You’ll want to make sure all of the emails sent from your WooCommerce store go to the recipient’s email inbox and not to the spam folder.

The best way to do this is by using an SMTP service provider to improve email deliverability. For more details, see our guide on how to fix WordPress not sending email issue.

We recommend using the free WP Mail SMTP plugin to get started.

Once you’ve set up your emails, you’re ready to start selling your gift card.

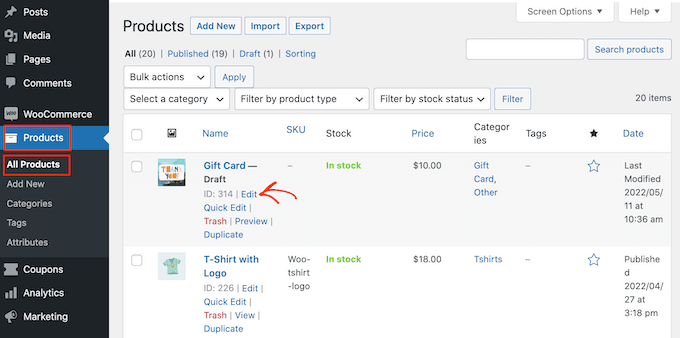
To publish your gift card product, simply go to Products » All Products. On this screen, find the gift card that we created earlier, and click on its ‘Edit’ button.

How to add an advanced gift card in WooCommerce

After that, go ahead and publish your gift card by clicking on the ‘Publish’ button. This gift card will now appear on your WooCommerce store, ready for shoppers to buy.

We hope this article helped you learn how to easily add advanced gift cards in WooCommerce. You may also want to check out our guide on how to create a WooCommerce popup to increase sales and the best WooCommerce plugins for your store.

If you liked this article, then please subscribe to our YouTube Channel for WordPress video tutorials. You can also find us on Twitter and Facebook.

The post How to Add Advanced Gift Cards in WooCommerce (Easy Way) first appeared on WPBeginner.


May 23, 2022 at 02:30PM

Sunday, May 22, 2022

How to Add a Reading Progress Bar in WordPress Posts

Have you noticed how some popular sites show a reading progress bar indicator at the top of their articles?

This little bar shows users how much more of the article is left to scroll and encourages them to continue reading. It can help keep visitors on your website reading your content and improve the overall user experience.

In this article, we will show you how to add a reading progress bar in WordPress posts.

How to Add reading progress bar in WordPress

Why and When You Should Add Reading Progress Bar in WordPress

Users spend only a couple of seconds on a webpage before deciding whether to stay or leave. Keeping users engaged becomes a little more challenging if you publish long-form articles, as they require users to scroll down.

Some site owners add inline related posts, while others use videos or image galleries to keep users on the page.

A reading progress bar adds a little user-interface enhancement that encourages users to scroll down. It also motivates users to finish the article they are reading.

Many popular websites like to use the reading progress indicators to engage their readers. However, you also need to make sure that the reading progress indicator is subtle and does not distract from the content itself.

Having said that, let’s see how you can easily add a reading progress indicator for your WordPress posts.

Adding Reading Progress Bar in WordPress Posts

The easiest way of showing a reading progress bar in blog posts and pages is through a plugin like Worth The Read.

It’s a free WordPress plugin that’s lightweight and helps add a reading progress bar to your website. The plugin offers multiple customization options and lets you change its style to fit your website theme. You can even use it to show the reading time for your articles.

The first thing you need to do is install and activate the Worth The Read plugin. For more details, see our step-by-step guide on how to install a WordPress plugin.

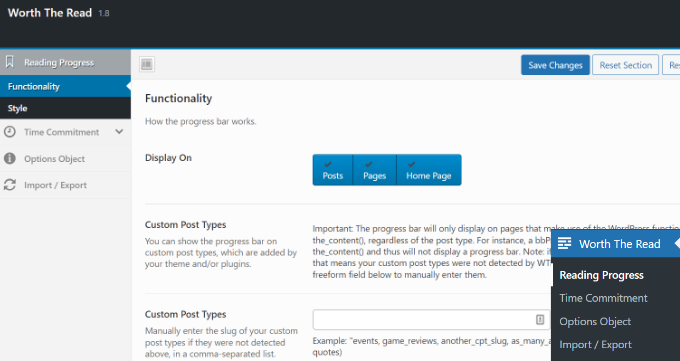
Upon activation, you need to visit the Worth The Read Reading » Progress page from the WordPress admin panel and go to the ‘Functionality’ tab to set up your progress bar indicator.

Next, you can choose whether to show the progress bar on your posts, pages, and homepage. There’s also an option to display the reading bar on custom post types.

Enable worth the read on posts and pages

If you scroll down, you’ll find more customization options.

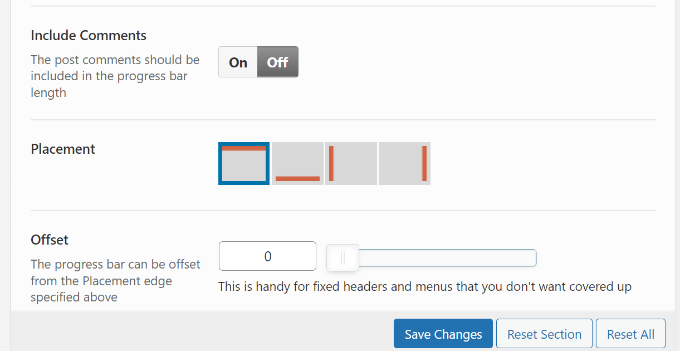
You can include comments in the total length of the progress bar by enabling the ‘Include Comments’ option. If you are including comments, then you can also choose a different background color for the comments progress area.

The plugin also lets you select the placement of the reading progress bar. The default option is on the top which is used by most sites. You can change it to display the progress bar on right, left, or bottom of the page.

Change the placement of the bar

Other than that, there are more options for customizing the reading progress bar.

For instance, you can move the bar from right to left, use fixed opacity, enable the progress bar for touch devices like mobiles and tablets, enable the debug mode, and more.

When you’re done, don’t forget to click the ‘Save Changes’ button.

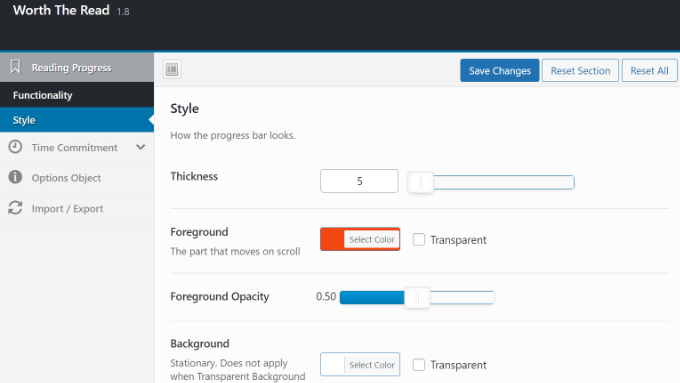
Next, head over to the ‘Style’ tab under Reading Progress to edit the appearance of the reading progress bar.

Edit the style of the bar

The plugin allows you to choose the thickness of the progress bar and select foreground and background colors to match your WordPress theme.

The background color is used to fill the empty progress bar and the foreground color will be used to show progress as a user scrolls down.

It even allows you to use a transparent background for the progress bar. Checking this option will override background color options and only the foreground color will be displayed as users scroll down an article.

After editing the style, don’t forget to save the changes to store your settings.

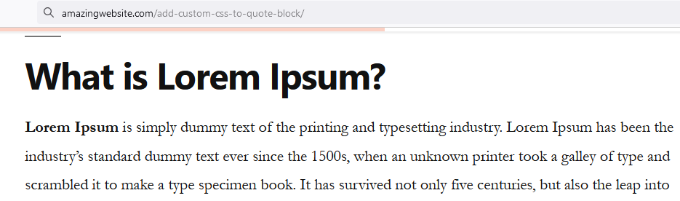
You can now visit any blog post or landing page on your website to see the progress bar in action.

Reading progress bar preview

We hope this article helped you add a reading progress bar in WordPress. You may also want to see our list of best WooCommerce plugins and how to choose the best web design software.

If you liked this article, then please subscribe to our YouTube Channel for WordPress video tutorials. You can also find us on Twitter and Facebook.

The post How to Add a Reading Progress Bar in WordPress Posts first appeared on WPBeginner.


May 22, 2022 at 04:00PM