Wednesday, June 8, 2022

How to Preview Your WordPress Website Before Going Live

Do you want to preview your WordPress website before going live?

Previewing your website before publishing it allows you to catch any errors, design issues, missing items, and spelling or grammar mistakes.

In this article, we’ll show you how to preview your website before going live and without hurting the user experience.

Preview your WordPress website including theme, posts, pages, and more

Here is a quick overview of the topics we’ll cover in this guide. Feel free to use the links below to jump to specific sections.

Ready? Let’s get started.

Preview WordPress Site Before Launch with Coming Soon Mode

If you are creating a new WordPress website, then it’s always recommended to enable a coming soon mode while you work on your site.

This allows you to display a proper coming soon page to website visitors. You’ll still be able to login to the WordPress admin area and work on your website, but your visitors won’t be able to see it.

The best part is that you’ll be able to preview your website and do all the necessary testing before making it live.

To do this, you’ll need SeedProd. It is the best WordPress website builder on the market and allows you to easily show a beautiful coming soon page.

In this tutorial, we’ll be using the pro version of SeedProd, so we can use all the templates and advanced features, but there’s also a free version that you can use to easily create simple coming soon pages.

First, you need to install and activate the SeedProd plugin. For more details, see our step by step guide on how to install a WordPress plugin.

Upon activation, you need to visit the SeedProd » Settings page to enter your license key. You can find this information under your account on the SeedProd website.
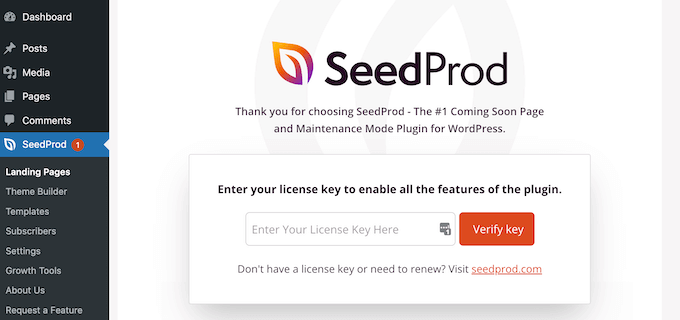
SeedProd license key

Next, you need to visit SeedProd » Landing Pages.

From here, simply click on the ‘Set up a Coming Soon page’ button.
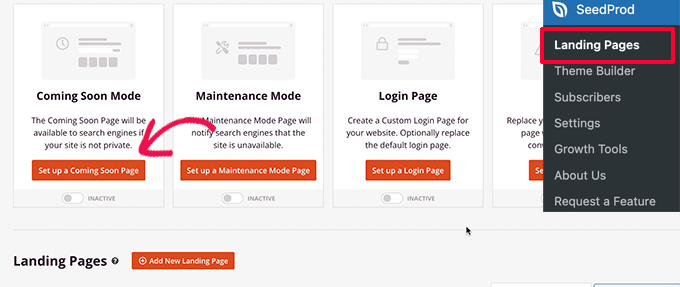
Set up coming soon page

After that, the plugin will ask you to choose a template for your coming soon page.

SeedProd comes with several beautiful coming soon templates that are professionally designed to increase conversions.
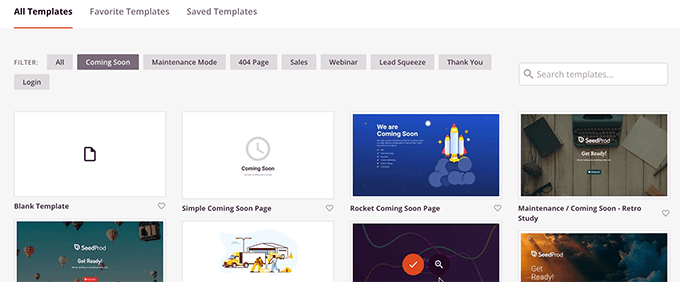
Choose template

Choosing a template will launch the SeedProd’s page builder interface.

The page builder is an intuitive design tool where you can simply point and click to edit any item or drag and drop new items to your layout.
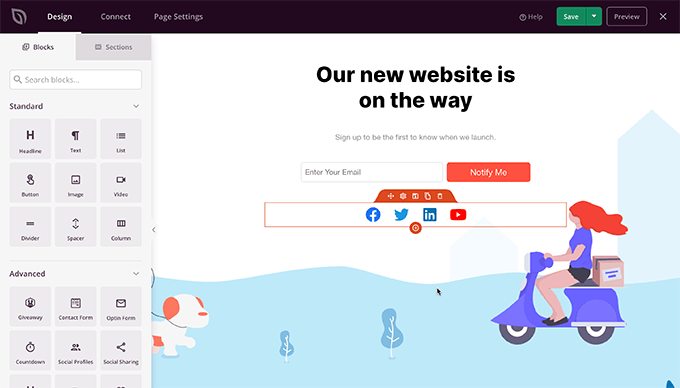
Page builder interface

You can add an email signup form and social media buttons to your coming soon page, so your users can follow your brand even before launch.

Once you’re finished with the page design, you need to switch to the connect tab. From here, you can integrate with your email marketing service to grow your list and notify people when your site goes live.
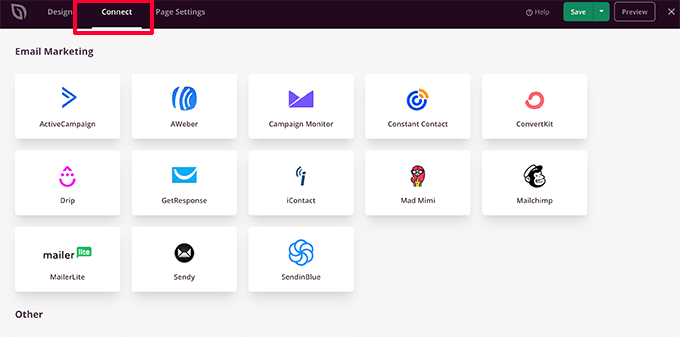
Connect email marketing service

Once you are finished, you can click on the Save button to store your changes.

Then, select Publish to make your coming soon page ready to use. Don’t worry, it’s not active on your website yet. We’ll do that in the next step.
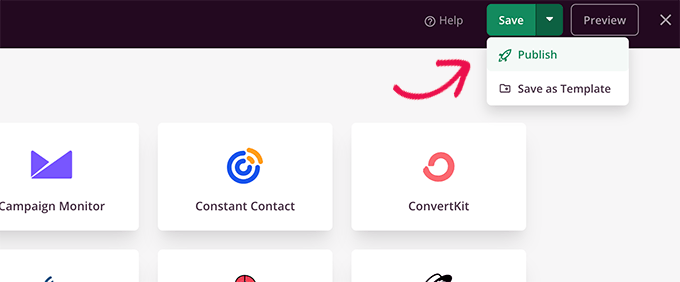
Publish your coming soon page

You can now close the page builder interface which will take you back to the SeedProd » Landing Pages page.

From here, you need to click on the Toggle below coming soon page box to Active. This will make sure that all your website visitors will see your new coming soon page instead of your actual website.
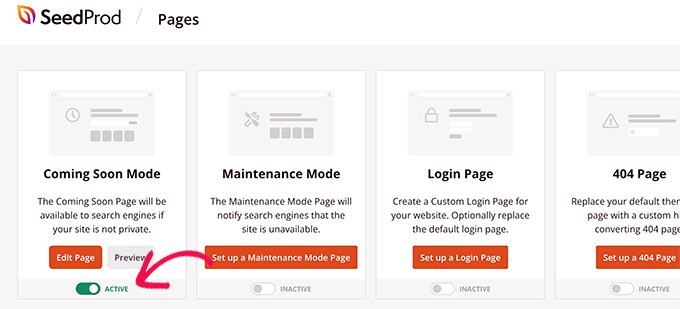
Turn on coming soon mode

You can now log out of WordPress admin area or visit your website in Incognito mode.

You’ll see your coming soon page live on your website.

Coming soon mode

You can still login to your WordPress admin area and continue working on your website.

You’ll also be able to preview your live website when logged in.
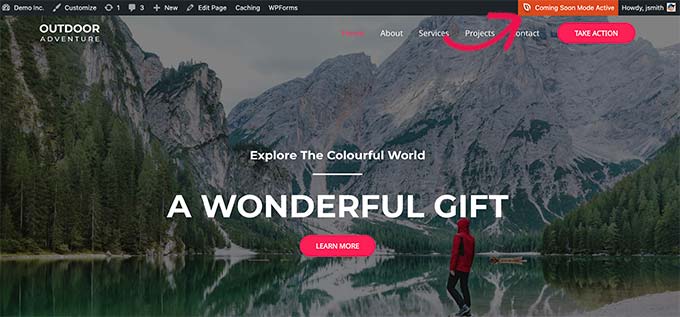
Preview your website

Once you are finished working on your website, you can simply go to the SeedProd » Landing Pages page to turn off your coming soon page.

Simply click the ‘Active’ slider to set it back to inactive.
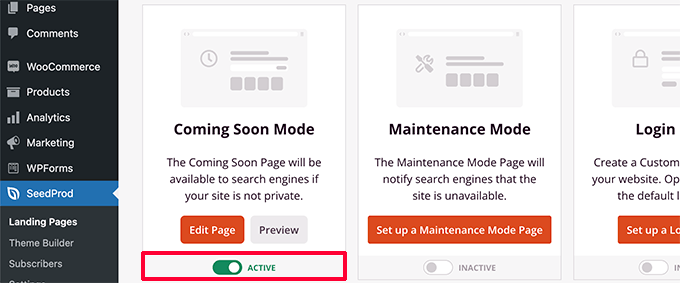
Turn off coming soon page

SeedProd also allows you to easily put your website under maintenance mode while working on your website with live preview.

Allow Clients to Preview WordPress Site Before Going Live

If you are working on client websites, then there are several ways to easily allow clients to preview changes on a WordPress website before going live.

However, the easiest way is by using a Coming Soon Page created with SeedProd as we just showed above.

Once you have turned on Coming Soon Mode to active, you need to click the ‘Edit Page’ button.
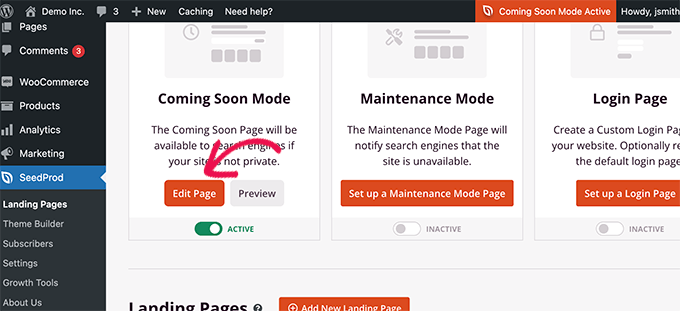
Edit coming soon page

On the page builder screen you need to switch to the Page Settings tab.

Then, click on the Access Control section.
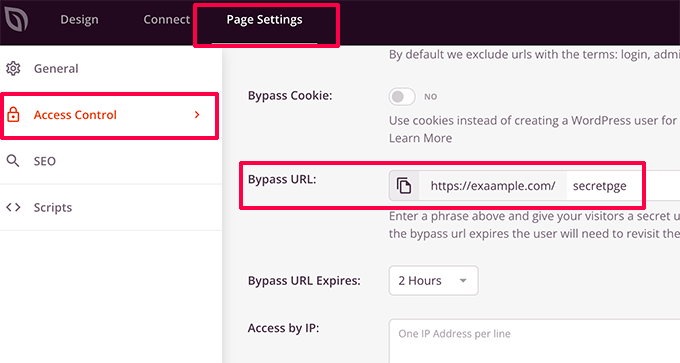
Allowing clients to preview a website

From here, you can create a Bypass URL and choose the URL expiration duration. Don’t forget to Save your changes.

Your clients can now use the secret URL to bypass the coming soon page and preview the website.

If your website is already live, and you want to share changes with your clients before going live, then we’ll cover that in the next step.

Create a WordPress Staging Website to Preview Changes

It is standard best practice among web professionals to create staging website, so you can test and preview any changes before applying them to a live website.

A staging website is a private clone of your website. It is hidden from the main public, so it gives you the advantage of testing and previewing your changes on your live server.

Many of the top WordPress hosting companies offer a 1-click staging website. You can simply click a button to create a staging website and easily sync any changes you make with your live site.

For the sake of this article, we’ll show you how to create a staging website on Bluehost.

Bluehost is one of the largest hosting companies in the world and an officially recommended WordPress hosting provider. They offer 1-click staging sites feature to all their WordPress customers.

First, you need to make sure you have the Bluehost plugin installed and activated on your website. If it is already activated, then you’ll see a Bluehost menu item at the top of the WordPress admin menu.
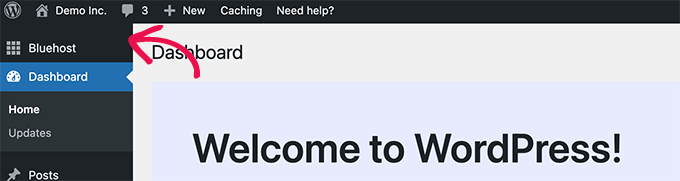
Bluehost plugin installed

If you cannot see the Bluehost menu, then you can log in to your Bluehost hosting account control panel and click on the Manage Site button.

Under the site management area, simply switch to the Plugins tab and activate The Bluehost Plugin.
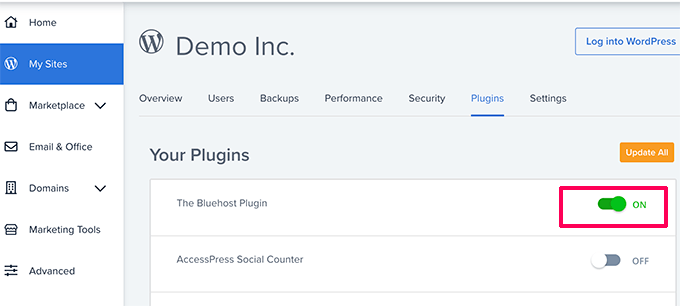
Turn on Bluehost plugin

Once you’ve made sure you have the Bluehost plugin installed, you’re ready to create your staging site.

From the WordPress admin area, go to the Bluehost » Staging page and click on the Create Staging Site button.
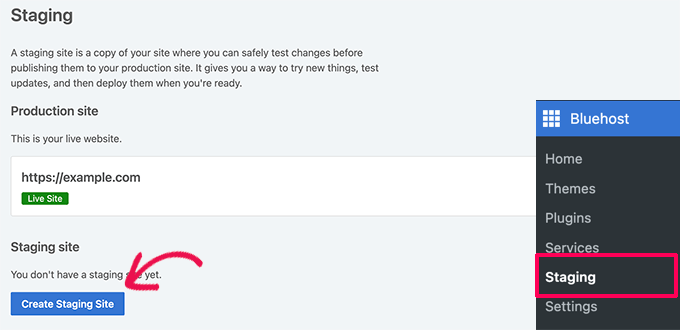
Create staging website

The plugin will then generate your staging website.

Once finished, you can simply click on your staging site to switch to it and start working on it.
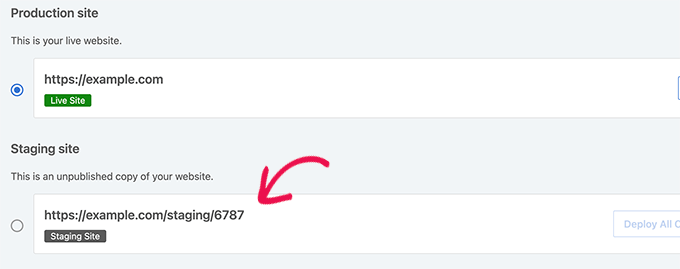
Switch to staging website

You can now work on your staging website and see your changes on a live preview of your website.

To help you tell the difference from your live site, you’ll see a red ‘Staging Environment’ notice in the WordPress admin bar.
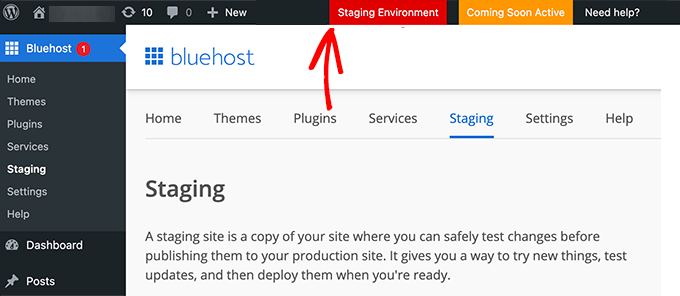
Working on staging environment

Once you are finished previewing your changes on staging website, you can go to Bluehost » Staging page on the staging site.

From here, you need to click on the Deploy All Changes button.
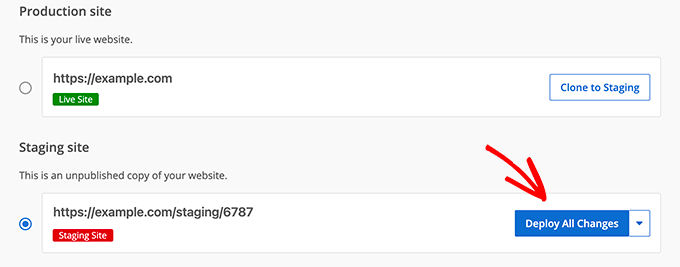
Deploy all changes

For more details and instructions for other hosting environments, see our detailed guide on how to create a staging site for WordPress.

Preview WordPress Posts and Pages Before Publishing

WordPress uses an intuitive block editor that automatically uses your theme’s styling to show a live preview of your posts and pages.
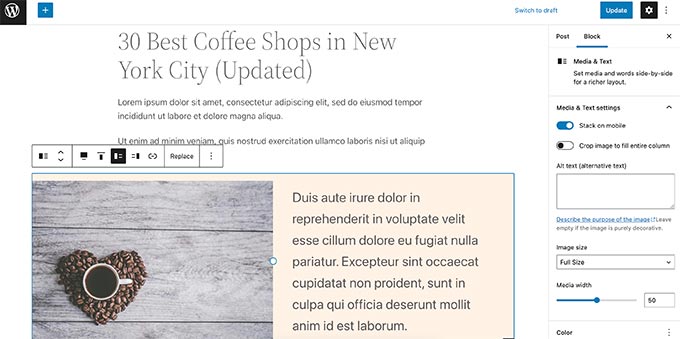
Block editor preview

However, it may not give you a clear idea of how a post or page may look on your website with your headers, sidebars, and everything else on the page.

Luckily, the block editor also allows you to preview a post or page without publishing it.

Simply click on the Preview button in the top-right corner.
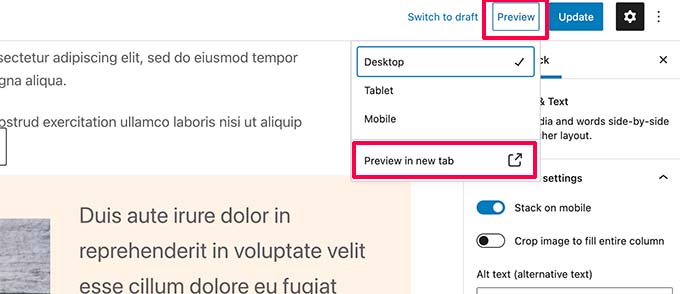
Preview options for post and pages

You can choose between Desktop, Tablet, and Mobile preview options, but these will only show you the preview inside the content editor.

After choosing a device type, you need to click on the ‘Preview in the new tab’ option to view the full preview on your website.

WordPress will then show you a preview of your post or page before going live.

If you want to allow someone else an exclusive access to preview one of your unpublished posts, then see our guide on how to allow public post preview in WordPress.

Preview a WordPress Theme Before Switching

Normally, if you activate a WordPress theme, then it immediately goes live on your website.

If you are not using a staging website, then your users will see the new theme without any customizations.

Wouldn’t it be nice if you could preview a WordPress theme before activating it on your website?

Luckily, WordPress allows you to preview a theme before activating it.

Simply install the WordPress theme that you want to preview. For more details, see our guide on how to install a WordPress theme.

After installing the theme, you simply need to click on the Live Preview link.
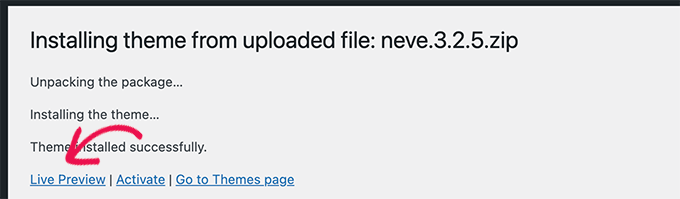
Live preview option after installing a theme

Alternately, you can go to Appearance » Themes page and take your mouse over a installed theme.

You’ll see a button to launch the Live Preview.
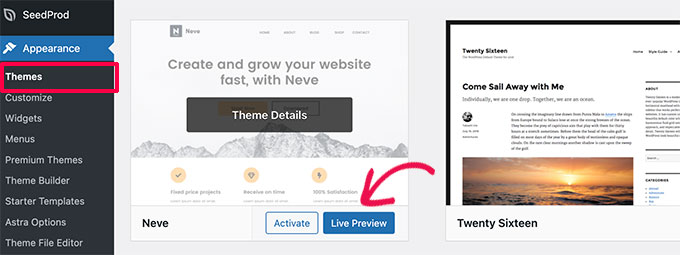
Live preview theme

WordPress will then launch Theme Customizer.

Here you’ll see a live preview of the theme with your current content.
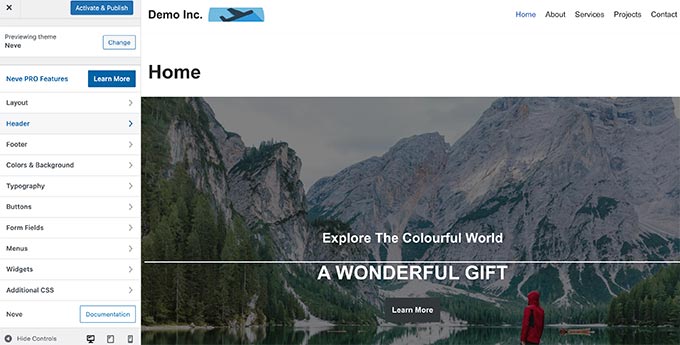
Live preview WordPress theme

The theme customizer will use your existing content and navigation menu. You can try out different theme settings from the left panel.

You can exit the theme customizer without activating the theme. However, it won’t save any of your customizations.

If you are satisfied with how the theme looks, then you can go ahead and activate it by clicking on the ‘Activate & Publish’ button at the top of the menu.

Need help switching themes? See our tutorial on how to properly switch your WordPress theme.

Preview WordPress Theme Customizations

Want to make changes to your WordPress theme but not sure how they would look on your live site?

WordPress comes with different ways to preview your WordPress theme before applying those changes.

For most WordPress themes, you can preview your changes by using the theme customizer. Simply go to the Appearance » Customize page to launch the theme customizer.
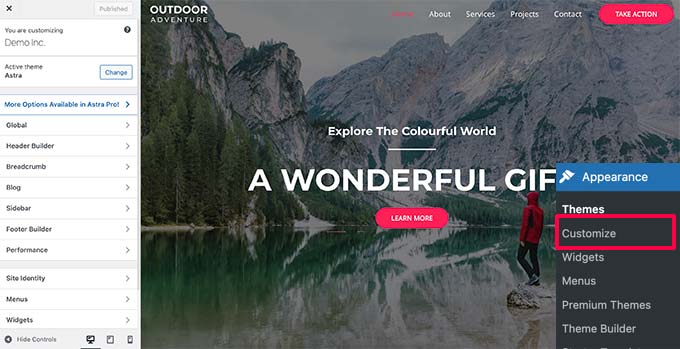
Customize theme preview

From here you can try different theme options, change menus, customize widgets, add custom CSS, and more.

This allows you to preview theme changes without actually applying them to your website.

Once you are satisfied with the changes you made, you can click on the Publish button to apply those changes. Optionally, you can also click the gear icon to save your changes as a draft, schedule your changes, and share a preview link with clients.
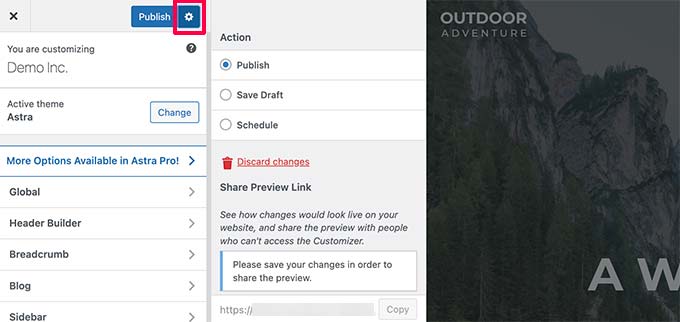
Save and publish your changes

Now, this method may not be available for some newer WordPress themes using the Full Site Editor.

If you’re using a full site editor theme, then you’ll be able to launch the editor by visiting the Appearance » Editor menu.
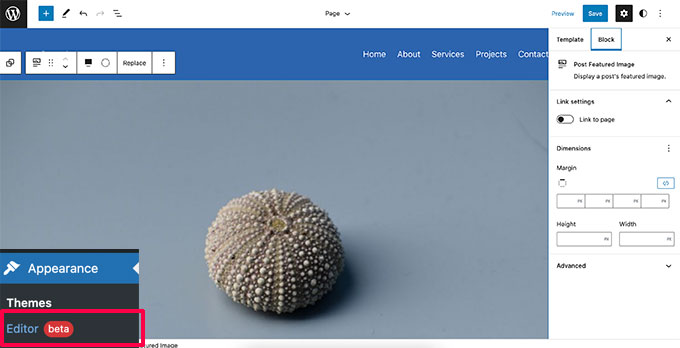
Full site editor preview

The full site editor allows you to edit your WordPress theme using blocks. You can edit individual template files with a live preview of your website.

However, unlike the Theme Customizer you will not be able to save your changes as a draft. These changes will go live when you save your changes, or be lost if you exit without saving.

Preview Your Custom WordPress Theme

Do you want to create a completely custom WordPress theme with a live preview?

SeedProd is the best WordPress site builder that allows you to create a custom WordPress theme using a drag and drop interface with live preview.

First, you need to install and activate SeedProd plugin. For more details, see our step by step guide on how to install a WordPress plugin.

Upon activation, you need to visit SeedProd » Settings to enter your license key. You can find this information under your account on the SeedProd website.

SeedProd license key

Next, you need to visit SeedProd » Theme Builder page.

From here, click on the Themes button.
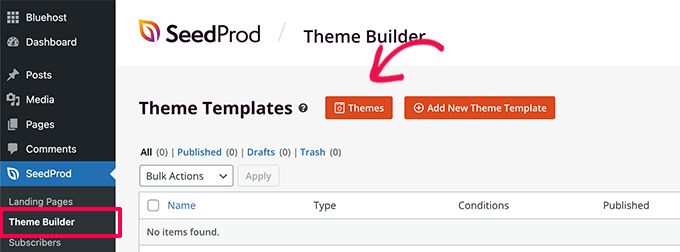
Theme builder

This will bring up a popup where you can choose a theme to use as a starting point.

SeedProd comes with a bunch of beautiful themes that you can customize.
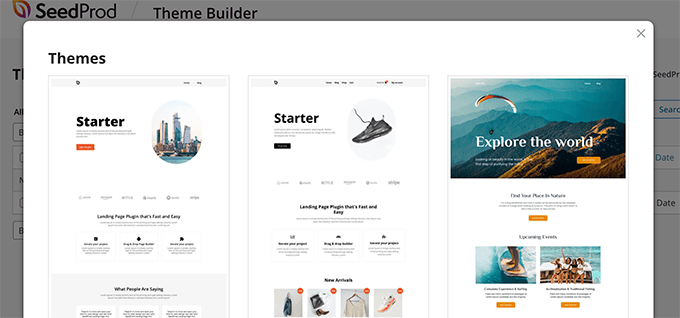
Choose a starter theme

Simply click to select a theme and SeedProd will generate all the theme template files for you.

You can now click on any of these theme files to edit them in the theme builder.
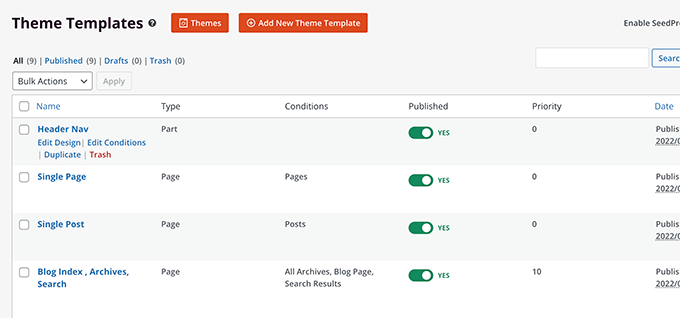
Theme templates

SeedProd comes with an intuitive drag and drop builder that uses blocks and sections to create beautiful layouts.

You can add blocks to your design from the left column. To your right, you’ll see a live editable preview of your theme template.
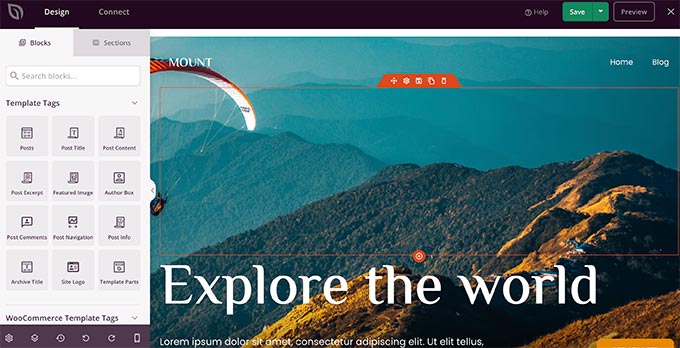
Build your theme with live preview

SeedProd also comes with full support for WooCommerce.

That means you can design and preview your online store, including product pages, checkout page, and more.
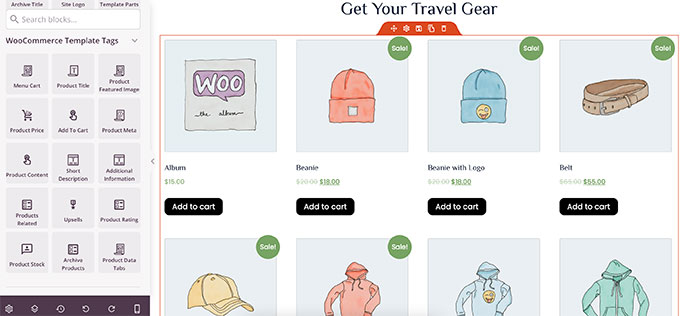
WooCommerce store preview

Want to preview your theme for mobile devices?

Simply click on the mobile icon at the bottom bar, and SeedProd will show the mobile preview of your theme.
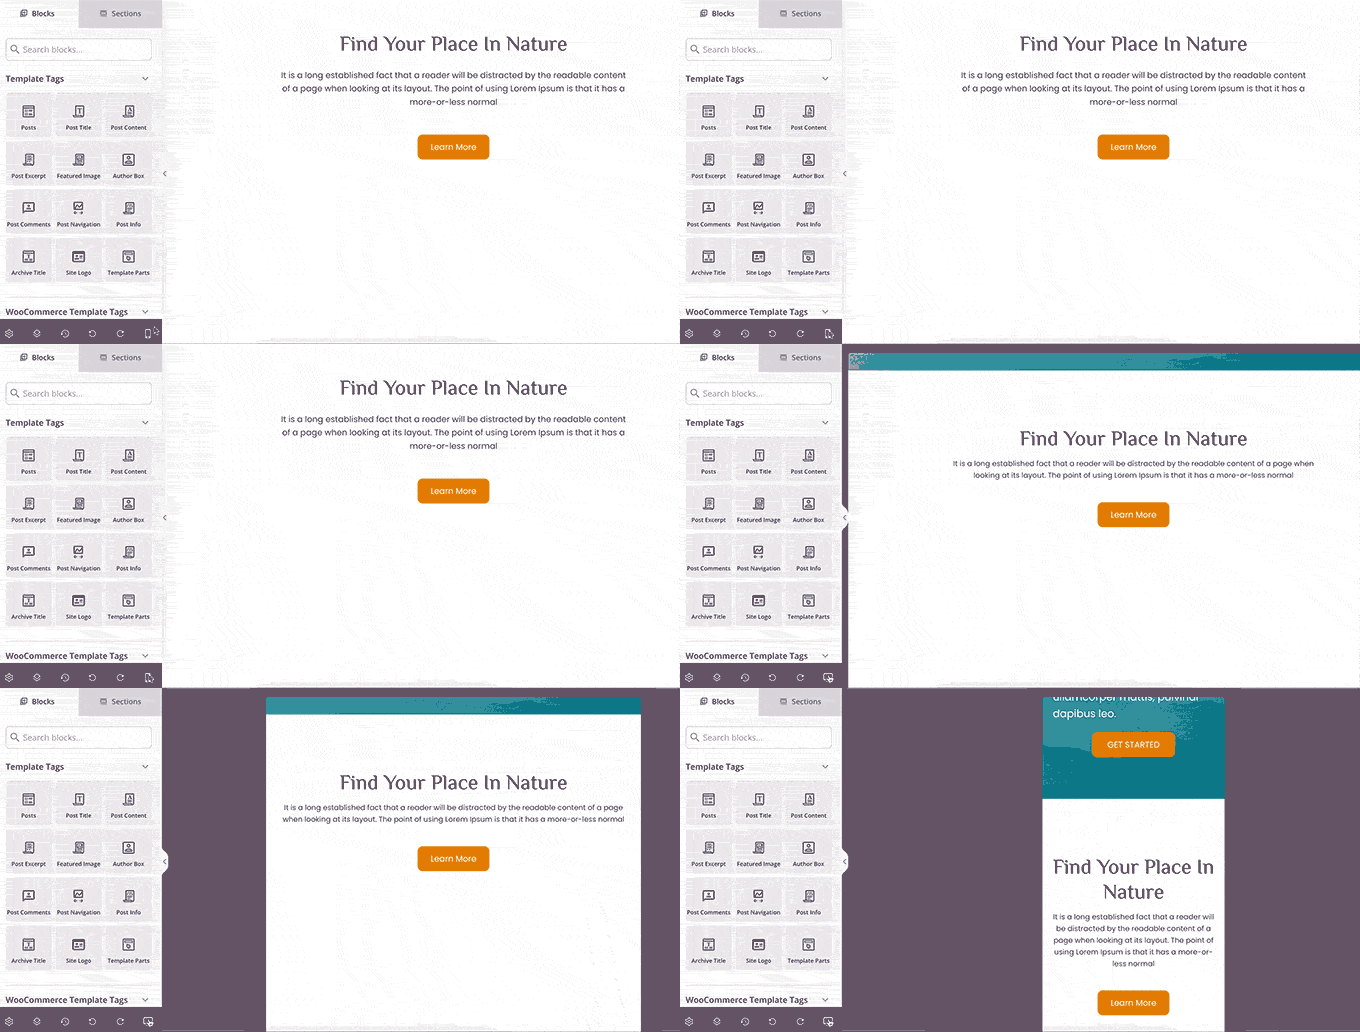
Mobile preview of your theme

Once you are finished editing your theme, you can click on the Save button at the top-right and exit the builder. You can then edit other templates if necessary.

When you are ready to deploy your custom theme, simply turn on the ‘Enable SeedProd Theme’ toggle on the theme builder page.
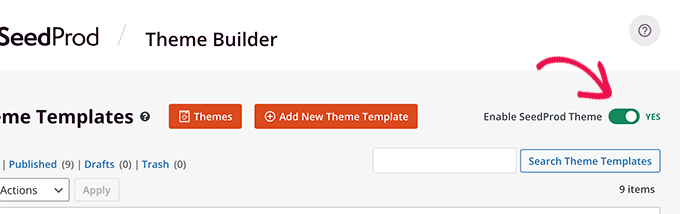
Enable custom theme

Your custom theme will now go live. That means it will replace your existing WordPress theme.

To learn more about the SeedProd custom theme builder, see our tutorial on how to create a custom WordPress theme without writing any code.

Preview WordPress Landing Pages Before Launch

Landing pages are specialized pages used in marketing campaigns. These pages are highly optimized for conversions and sales.

Some WordPress themes come with landing page templates that you can customize using the block editor.

However, if you need more design options, then you’ll need SeedProd. It is the best WordPress landing page builder and allows you to easily create beautiful landing pages for your website.

SeedProd comes with dozens of professionally designed landing page templates to get you started. Plus, your landing pages will look equally great on all screen sizes.

First, you need to install and activate the SeedProd plugin. Upon activation, you need to visit SeedProd » Settings page to enter your license key. You can find this information under your account on SeedProd website.

SeedProd license key

Next, head over to the SeedProd » Landing Pages page.

To get started designing your page, click on the Add New Landing Page button.
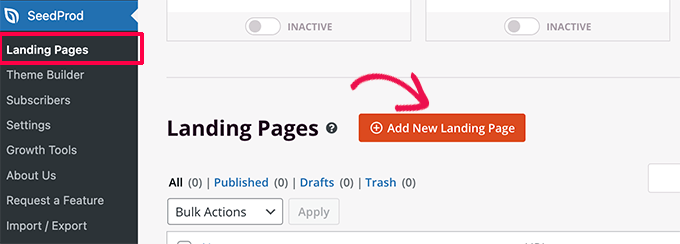
Add new landing page

Next, you need to choose a template.

There are several highly optimized templates that you can use as a starting point, or you can start with a blank template.
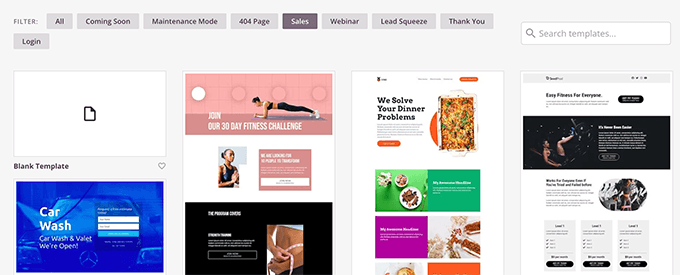
Choose landing page template

This will bring up a popup where you need to enter a name for your landing page and choose a URL slug.

Then click on the ‘Save and Start Editing the Page’ button to continue.
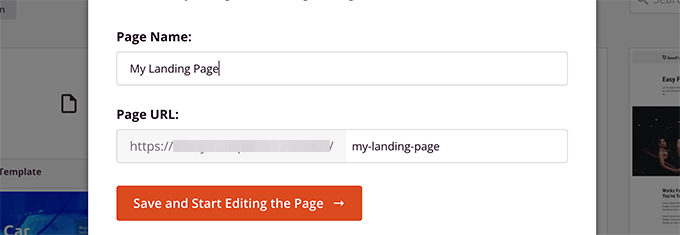
Landing page name

This will launch the page builder interface.

It is a drag and drop design tool where you can design your page with a live preview.
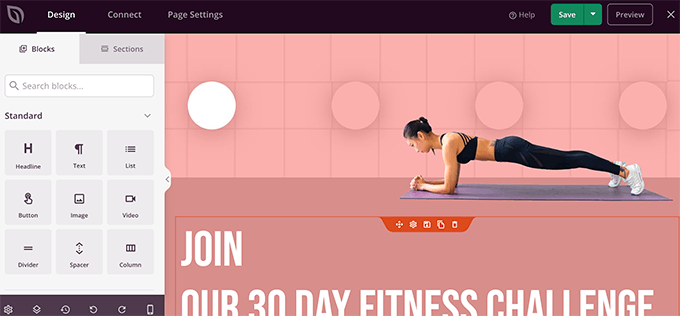
Landing page preview

Once you are done editing your landing page, you can click on the Save button and select publish to make it live on your website.

To learn more, see our tutorial on how to create landing pages in WordPress.

We hope this article helped you learn how to preview your WordPress website before going live. You may also want to see our guide on using using WordPress block patterns or see our complete WordPress SEO guide to promote your website.

If you liked this article, then please subscribe to our YouTube Channel for WordPress video tutorials. You can also find us on Twitter and Facebook.

The post How to Preview Your WordPress Website Before Going Live first appeared on WPBeginner.


June 08, 2022 at 04:00PM
Tuesday, June 7, 2022

How to Make a Gym Website in WordPress (Step by Step)

Do you want to make a gym website in WordPress?

Making a gym website on WordPress is the easiest way to promote your business online and get more customers.

In this step-by-step guide, we’ll show you how to easily make a gym website using WordPress.

Step by step guide on making a gym website

Here is a quick overview of the topics we’ll cover in this guide.

Ready? Let’s get started.

Step 1: Deciding on a Gym Website Platform

There are many different website platforms that you can use to create a gym website, but your success entirely depends on choosing the right one.

WordPress is the world’s most popular website builder. It powers more than 43% of all websites on the internet including thousands of gyms, health and fitness-related businesses.

Now, there are two types of WordPress available.

First, there is WordPress.com which is a blog hosting service, and then you have the free WordPress.org software which is also called self-hosted WordPress.

We recommend the WordPress.org software because it gives you full freedom and flexibility to build and grow your gym website. For more details, see our guide on the difference between WordPress.com vs WordPress.org.

To get started with WordPress, you’ll need a domain name and a website hosting account.

A domain name is what your users will type in their browser to find your website (e.g. wpbeginner.com), and a hosting account is where your website files will be stored.

Normally, a domain name costs $14.99 per year and web hosting starts from $7.99 per month (usually paid yearly).

Now, that’s a significant investment, particularly when you are just starting out.

Luckily, the folks at Bluehost have agreed to offer WPBeginner users a free domain name with a generous discount on hosting.

Basically, you can get started for $2.75 per month.

Simply visit the Bluehost website and click on the green get started button.

The Bluehost web hosting plan

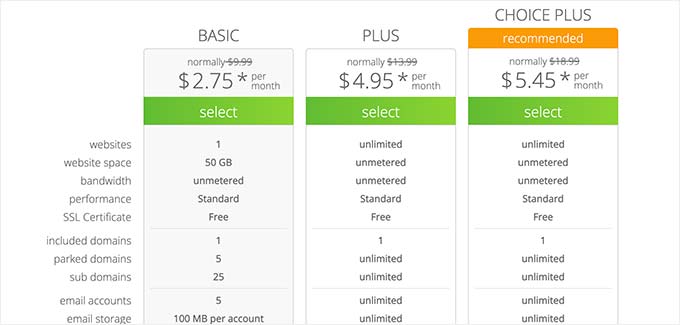
This will bring you to the pricing plans. The Basic and Plus plans are the most popular among our users.

Choose plan

Simply click select on a plan to move on to the next screen.

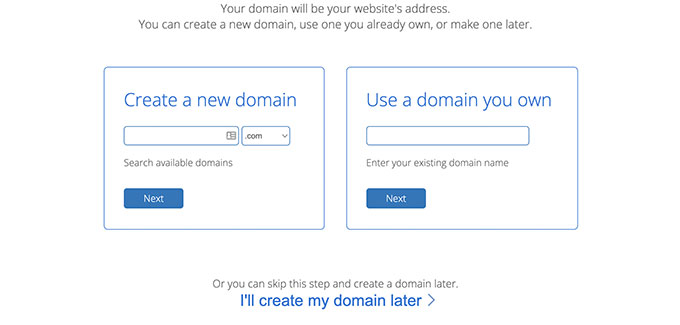
From here, you’ll be asked to choose a domain name for your website.

Enter domain name

If you need help, take a look at our tips on how to choose the best domain name.

Click on the Next button to continue.

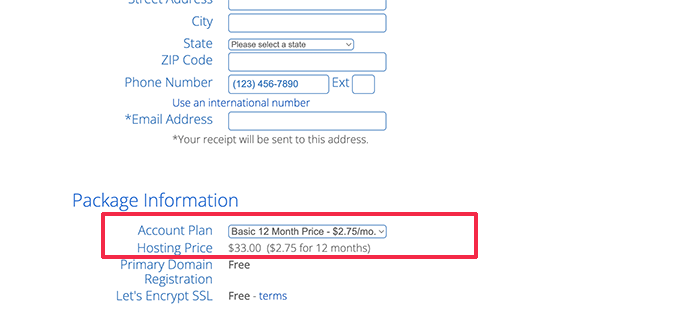
From here, you need to provide your personal information such as address and phone number, and choose your plan duration.

Choose plan duration

Below that, you’ll see some package extras. We recommend unchecking all of them to save extra costs. You can always add them later if needed.

Uncheck package extras

Finally, enter your payment details to complete the purchase.

Bluehost will now send you an email to the address you provided during signup. This email will have login details to access your web hosting control panel.

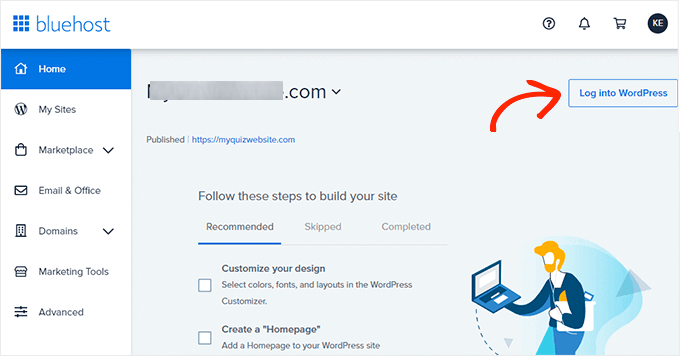
Bluehost control panel

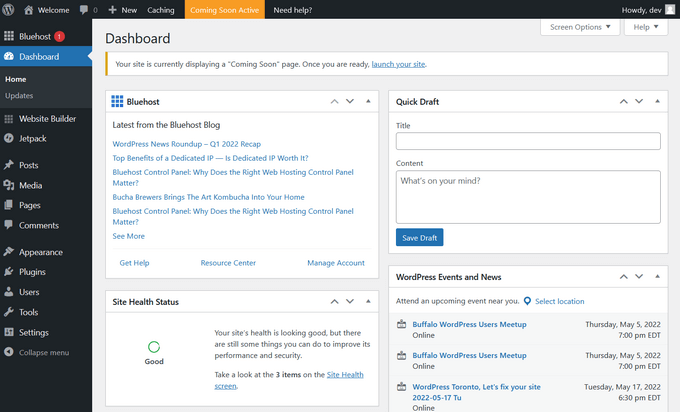
Once logged in, you’ll. notice that Bluehost has automatically installed WordPress for you. You can simply click on the Log into WordPress button to access your new WordPress website dashboard.

It will look something like this:

wordpress dashboard

Congratulations, you have successfully set up WordPress and are now ready to customize your gym website!

Step 2. Choosing a Design for Your Gym Website

The next step is to choose a design and layout for your gym website.

We’ll show you two ways to customize the design of your gym website. You can choose one that works best for you.

Method 1. Choose a WordPress Theme For Your Gym Website

WordPress themes control the design and layout of your website, and there are thousands of free and paid themes to choose from.

However, this abundance of choices make it a bit overwhelming for beginners to pick a theme for their gym website.

A good starting point would be our showcase of the best WordPress themes for gym websites.

WordPress themes for gym websites

You can also look at our pick of the most popular WordPress themes. All of them can be easily used for a gym website.

Now here are a few tips that will help you pick the best design for your website.

  • Go for a simple design. Simplicity makes your design more versatile and easy to adapt to your requirements.
  • Test the theme demo for website speed to make sure that it won’t slow down your website.
  • Look at the theme demo on mobile devices to make sure it looks equally good on smaller screens.

For more tips, see our tutorial on how to choose the perfect theme for your website.

After choosing a theme, you will need to customize your WordPress theme to make it fit your gym website.

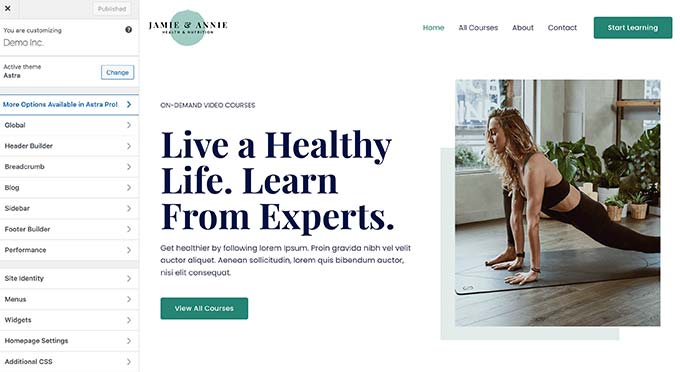
For most themes, you can simply go to the Appearance » Customize page to start setting up your WordPress theme. The available customization options will be different depending on the theme.

Customize your WordPress theme

Method 2. Make Your Own Custom Theme for Your Gym Website (No Coding)

For this method, you’ll need the SeedProd plugin. It is the best WordPress page builder and theme builder plugin for WordPress and allows you easily create a completely custom gym website theme.

Over 1 million websites use SeedProd to build better looking websites. There is a free version of SeedProd, but to get full features you’ll need the Pro version.

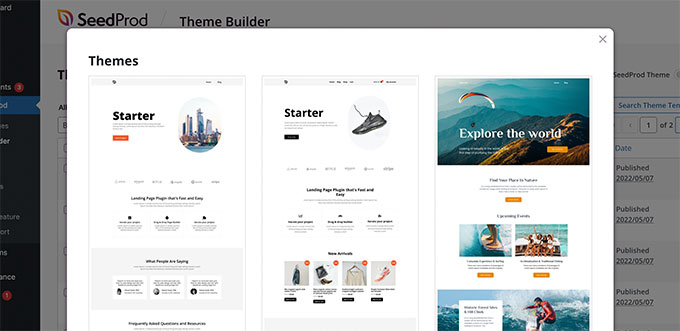
SeedProd comes with a bunch of starter themes that you can use as starting point, or you can start with a blank canvas and create a theme from scratch.

SeedProd starter themes

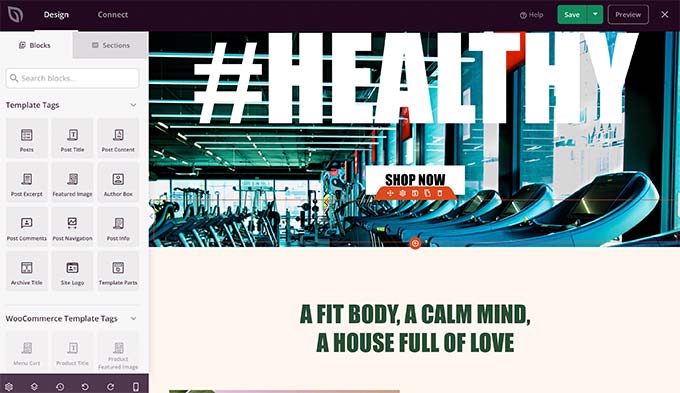
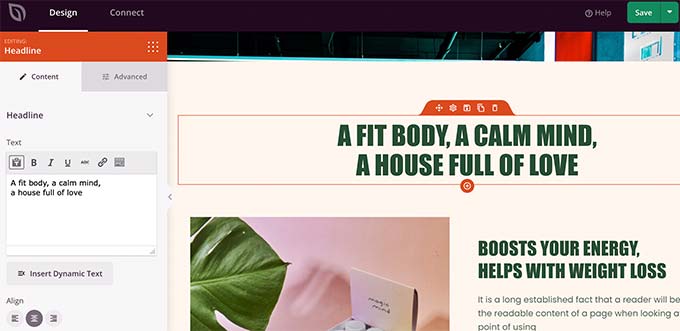
It comes with an intuitive drag and drop builder.

You can drag blocks from the left column onto the page to add common web design elements to your layouts.

SeedProd theme builder

Every block is easy to customize by simply clicking on it.

You can change colors, background, height, width, and other properties of any element on your website.

Edit theme

For more details, see our tutorial on how to create a custom WordPress theme from scratch.

Step 3. Adding Features to Your Gym Website

The best thing about WordPress is the ability to install plugins.

Think of plugins as apps for your website. You can add them to your website to extend its functionality and add new features.

Depending on how you want to run your gym business online, there are plenty of plugins to help you get more new customers and even sell merchandise or memberships online.

Let’s check out some of the common features most gym websites use to run their business online.

Add a Gym Membership Form to Your Website

As a gym website, you may want users to be able to sign up and register for their gym membership online.

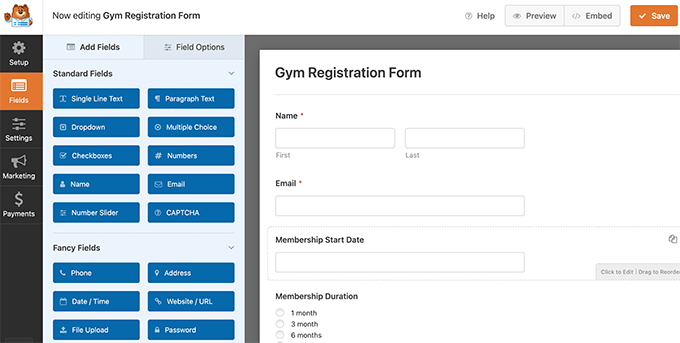
To do that, you’ll need WPForms which is the best WordPress form builder on the market.

It allows you to easily create any kind of form using a simple drag and drop tool. You can create a membership registration form and accept online payments using PayPal, Stripe, or Authorize.net.

Gym registration form

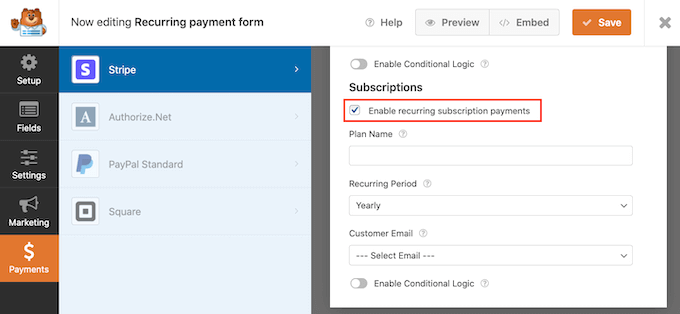
You can even turn on recurring payments to automatically charge members when their membership expires.

Enable recurring payments

Plus, WPForms connects to popular email marketing platforms which allows you to easily send email newsletters to your members.

There’s also a free version of WPForms available that you can use to create simple online forms. Over 5 million websites use WPForms.

Make a Gym Membership Website with MemberPress

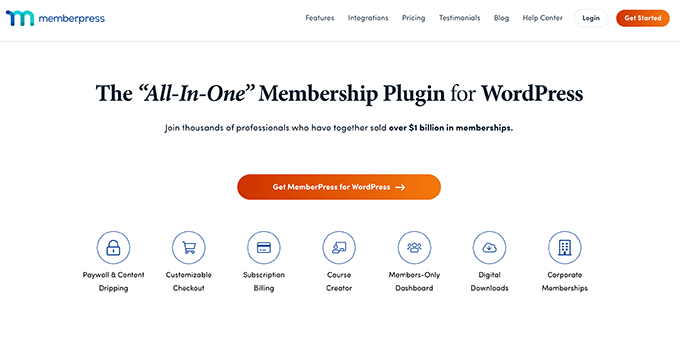
MemberPress is the best WordPress membership plugin. It allows you to easily sell online memberships with recurring payments.

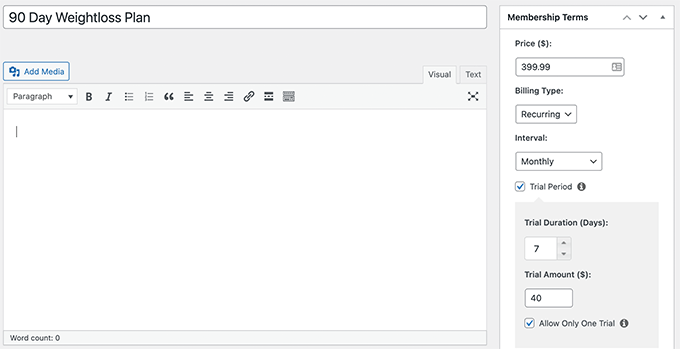
It gives you more flexible membership options, like discounts, trial memberships, different subscription levels, and more.

MemberPress Website

You can add educational resources to your gym website as well.

For example, you can sell online courses for your fitness plans, allow fitness coaches to sell classes online, and offer members-only content like video lessons, workout sheets, and more.

Creating subscription plans for gym membership

MemberPress works with all top email marketing services, payment gateways, and other WordPress plugins that you may already be using.

For more details, see our tutorial on how to make a membership website with WordPress.

Install WooCommerce to Sell Gym Merchandise

Want to add an online store to your gym website?

WooCommerce is the world’s biggest eCommerce platform and it runs on top of WordPress.

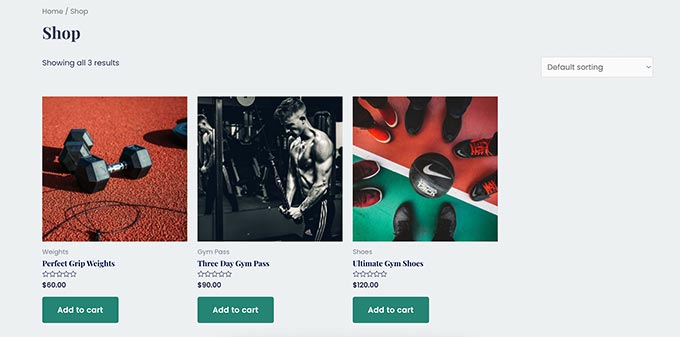
With WooCommerce, you can easily sell merchandise like gym clothing, accessories, health & fitness equipment, and more.

Selling gym merchandise online

WooCommerce supports PayPal, Stripe, and dozens of other payment services. It also has features to help you with inventory management, shipping, taxes, and more.

For more detailed instructions, see our tutorial on how to start an online store for beginners.

This brings us to the next step in our tutorial.

Step 4. Promoting Your Gym Website

Now that you have set up your gym website and everything is put in place, the next step is to start promoting your website.

Luckily, WordPress gives you access to all the best tools to easily grow your business by promoting your website.

Following are a few tools that will quickly put you on the right track to success.

  • All in One SEO for WordPress – For most websites, search engines are the major source of traffic. All in One SEO is the best WordPress SEO plugin on the market and helps you get more free traffic to your website from search engines. Here’s a link to the free version of AIOSEO.
  • OptinMonster – Once the users are on your website, you want them to become a gym member, sign up, or get in touch. This is where OptinMonster comes in. It helps you convert website visitors into subscribers and customers.
  • PushEngage – It is the best web push notification platform on the market. It allows you to show targeted push notifications to your users on mobile and desktop devices even when they are not currently visiting your website.
  • Smash Balloon – For many gym websites, social media platforms like Instagram, YouTube, Twitter, and Facebook quickly help you build a large following. Smash Balloon’s social feeds help you built strong social media following using your WordPress website.
  • MonsterInsights – It is the best Google Analytics plugin for WordPress and allows you to see where your users are coming from and what they do on your website. This way, you can see what’s working and improve your conversions and sales. Here’s a link to the free version of MonsterInsights.

Need more plugin recommendations? See our full list of essential WordPress plugins for any business website.

Examples of Gym Websites Made With WordPress

As you work on your gym website, you may want to draw some inspiration from other gym websites.

You can check what strategies they are using to sell more memberships and grow their business. After that, you can try similar strategies for your own gym business.

1. Healthworks Fitness

Healthworks Fitness

Healthworks Fitness runs 20+ fitness centers for women. Their website uses a minimalist design with clear call-to-action buttons.

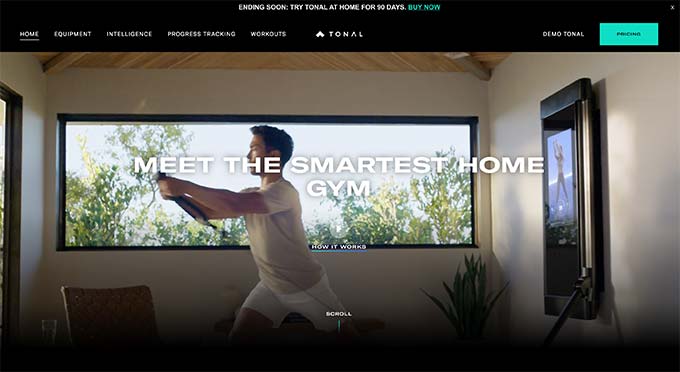
2. Tonal

Tonal

Tonal is a smart home gym company. Their website showcases a large video header showcasing their flagship product in action.

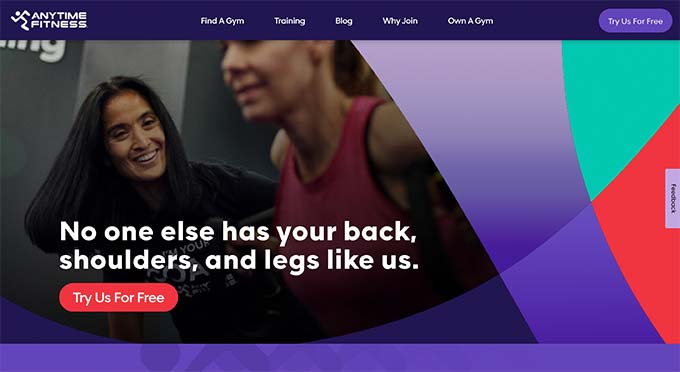
3. Anytime Fitness

Anytime Fitness runs gyms at several locations. Their website uses a clean layout with lots of bold colors, fonts, and calls to action.

We hope this guide helped you easily make a gym website in WordPress. You may also want to see our tips on getting more traffic to your new site or follow our complete WordPress SEO guide to improve your content.

If you liked this article, then please subscribe to our YouTube Channel for WordPress video tutorials. You can also find us on Twitter and Facebook.

The post How to Make a Gym Website in WordPress (Step by Step) first appeared on WPBeginner.


June 07, 2022 at 05:00PM
Monday, June 6, 2022

How to Customize Your WordPress Header (Beginner’s Guide)

Do you want to show a custom header for your WordPress website?

Many WordPress themes come with a built-in header that sits at the top of each page. You may need to customize it to add important links, social icons, site search, or other elements to make a good first impression.

In this article, we’ll show you how to customize your WordPress header and even create a fully custom header for your entire site or specific pages.

How to Customize Your WordPress Header (Beginner's Guide)

What Is the Header in WordPress?

Your website header is the top section of every page on your WordPress website, and probably the first thing your visitors will see.

It often displays your website logo and title, navigation menus, and other important elements that you want users to see first.

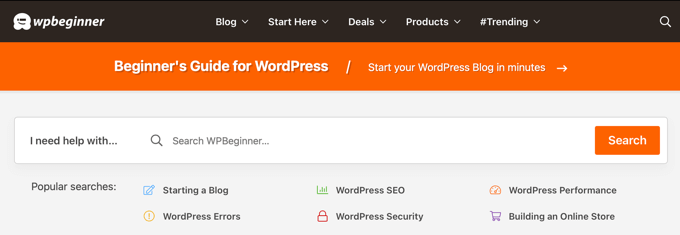
For example, here’s our header area on WPBeginner that millions of readers see every month.

The WPBeginner Header

By customizing your site’s header, you can give it a unique design and make it more useful for your visitors. You can link to your most popular pages, display social icons or your business phone number, and show call to action buttons for more conversions.

With that being said, let’s take a look at how to easily customize your WordPress header. You can use the following links to jump to the section you want to read.

Customize Header by Using the WordPress Theme Customizer

Many popular WordPress themes let you use the WordPress theme customizer to make changes to the header area of your WordPress layout. This feature is sometimes called a custom header, but not all themes support it.

You should start by navigating to Appearance » Customize in your WordPress admin area.

Note: If you don’t see Appearance » Customize in your WordPress admin menu, but only see Appearance » Editor (Beta), then that means your theme has enabled full-site editing. In that case, you should skip to the next section.

Your theme may add a ‘Header’ section to the customizer, or add header options under the ‘Color’ section, but this varies from theme to theme. Here are a few examples.

Some themes, like Twenty Twenty-One, do not offer header customization options at all. In this case, we recommend you use a drag & drop theme builder plugin like SeedProd that we cover below.

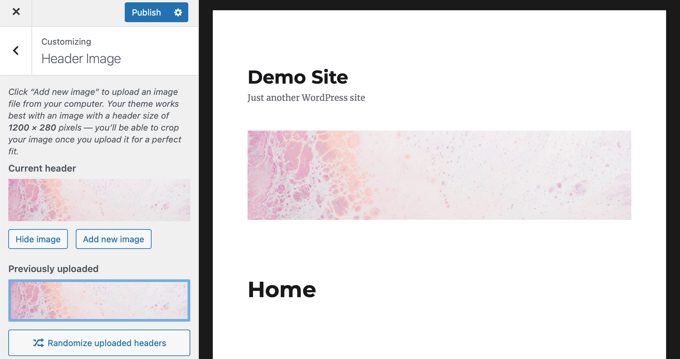
The Twenty Sixteen theme allows you to add a background image to the header, and even add random header images.

The Twenty Sixteen Theme Lets You Add Random Header Images

Some free and premium WordPress themes offer even more theme customization options. For example, you may be able to change your header’s font style, layout, colors, and much more. But you are limited to what the theme developer allows you to do.

For example, you can create a custom header using the theme customizer with the Astra theme.

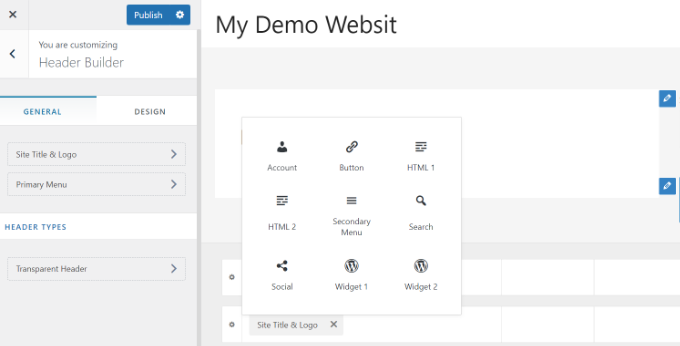
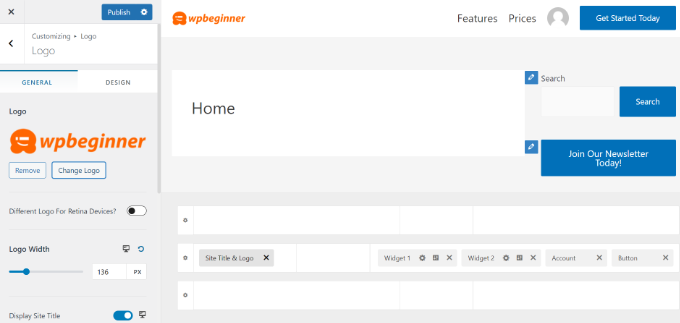
Astra has a dedicated ‘Header Builder’ option in the panel on your left. Here you’ll find different settings to edit the appearance and style of the header. You can build a custom header by adding blocks, just like when editing a blog post or page in the WordPress content editor.

To start, simply hover over an empty area in the header and click the ‘+’ icon to add a header block.

Click plus icon

Next, you can select any block you’d like to add to your custom header. For example, you can add widget block, account block, search block, and more.

Plus, the header builder also lets you drag and drop the blocks and place them above or below the header.

Add header blocks in theme customizer

You can further customize each block that you add to the header.

For instance, selecting the Site Title & Logo block will give you options to upload a site title and logo, change the logo’s width, display a site tagline, and more.

Customize each header block

Besides that, you can also change the background color of the header or add a background image to appear in the header.

When you’re done editing the custom header, simply click the ‘Publish’ button.

For more details, see our ultimate guide on how to use the WordPress theme customizer.

Customize Header by Using the WordPress Full Site Editor

WordPress added full-site editing to WordPress in version 5.9. If your theme supports the new feature, then it replaces the theme customizer. However, at this time there are only a few themes that work with the full site editor.

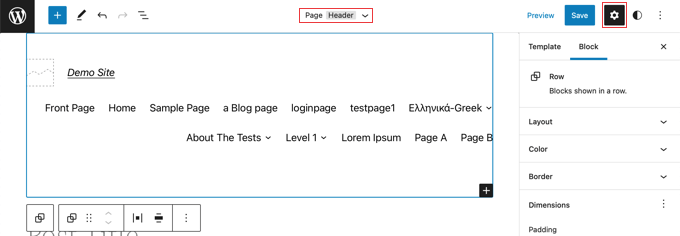
When you use a compatible theme, you can customize your header by navigating to Appearance » Editor. This will launch the full site editor, which is just like the block editor you use to write WordPress posts and pages.

When you click the header, you will notice the name of the template at the top of the page changes to ‘Page Header’.

Change the Full Site Editor Template to 'Page Header'

Now when you click the ‘Settings’ icon on the toolbar, you will see options to customize the header’s layout, color, border, and dimensions.

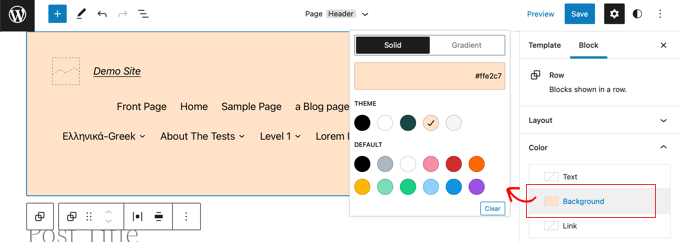
As an example, we’ll change the header’s background color. First, you need to click on the ‘Color’ section to expand it. After that, you should click on the ‘Background’ option.

Changing the Header's Background Color

A popup will appear that allows you to select a solid color or gradient. There will also be a number of colors that you can select. When you click on a color, the background of your header will be changed immediately.

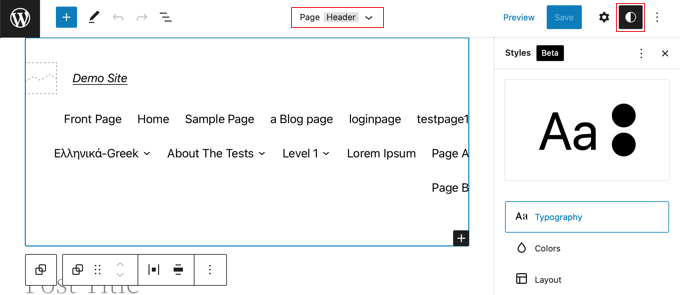
You can find more customization options by clicking the ‘Styles’ icon at the top right of the page. This will let you change the header’s font, colors, and layout.

You'll Find Additional Customization Options by Clicking the ‘Styles’ Icon

To learn more about how the full site editor works, see our beginner’s guide on how to customize your WordPress theme.

Create Custom Header and Page Layouts with SeedProd

If you want to have total control over your headers, footers, and sidebars to give your website a unique design, then we recommend using SeedProd.

SeedProd is the best WordPress theme builder plugin that allows you to easily create a custom WordPress theme without writing any code. This includes creating headers, footers, and everything else needed for an attractive WordPress theme.

You can even create multiple custom header styles for different pages and sections of your website.

SeedProd Offers an Easy to Use Theme Builder

Note: You can use the free version of SeedProd to create custom landing pages including custom headers, but you will need the Pro version to create fully custom themes which include sitewide header layouts.

First, we recommend following our guide on how to easily create a custom WordPress theme without any code. Once you’ve done this, SeedProd makes it simple to customize your header.

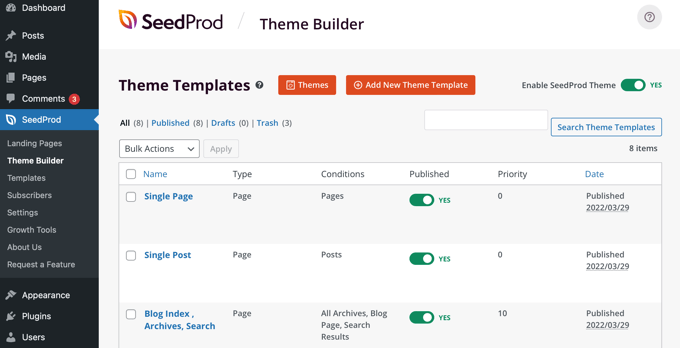
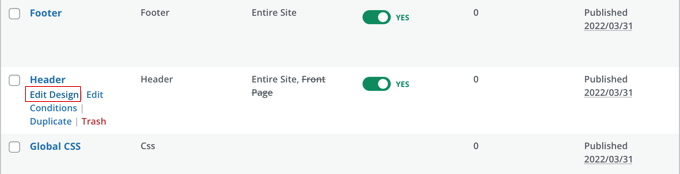
All you need to do is click the ‘Edit Design’ link found under the header.

The SeedProd Theme Builder Lets You Edit the Design of Your Header

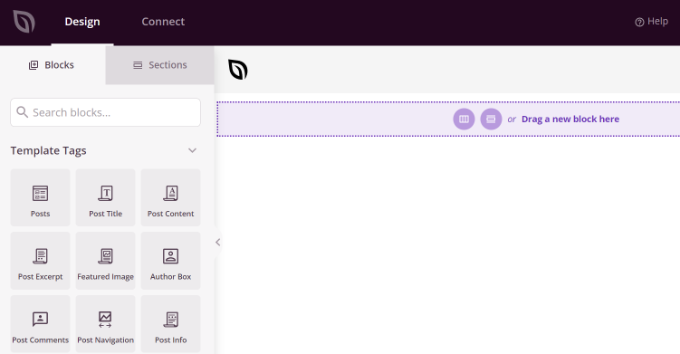
This will open the header in SeedProd’s drag and drop editor.

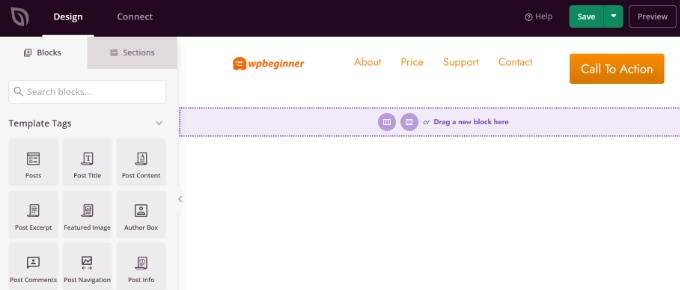
From here, you can easily customize your header by adding new blocks.

SeedProd theme builder

There are blocks for template tags like a site logo, any of your WordPress widgets, and advanced blocks such as a countdown timer, navigation menu, or social sharing buttons.

The best part is that you can further customize each block using the theme builder. For instance, you can change the size and alignment of your logo or choose which pages to show in the navigational menu. It even allows you to add an image in the header.

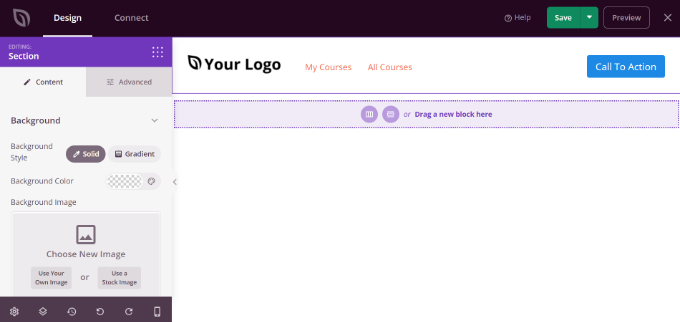
With SeedProd, you can also add a complete section to your theme’s header template.

Sections are a group of blocks, and you can use them for different areas on your website. This includes headers, footers, features, testimonials, call to action, and more.

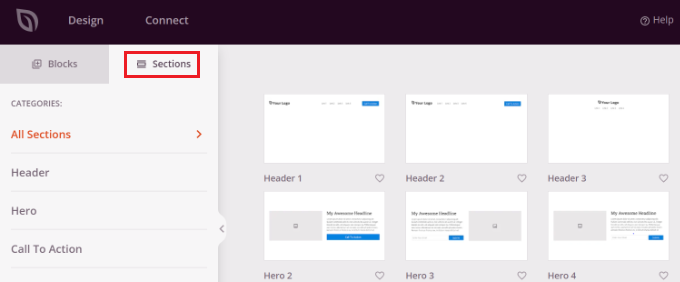
To use a header section, first switch to the ‘Sections’ tab in the Design panel.

Switch to the sections panel

After that, choose a header section you’d like to use for your website. SeedProd offers multiple section templates that you can use.

Next, go ahead and customize the header section.

Customize your header section

Once you’re happy with your custom header, make sure you click the ‘Save’ button to store your changes.

Now, you’re ready to publish your custom header.

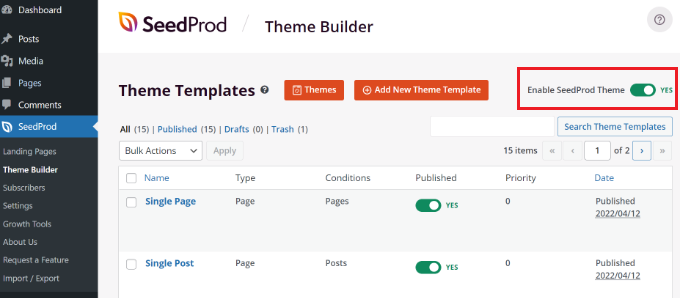
Simply go to SeedProd » Theme Builder page from your WordPress dashboard and click the toggle next to the ‘Enable SeedProd Theme’ option to Yes.

Enable SeedProd theme

Once you enable the option, SeedProd will replace your default WordPress theme with a new custom theme and header.

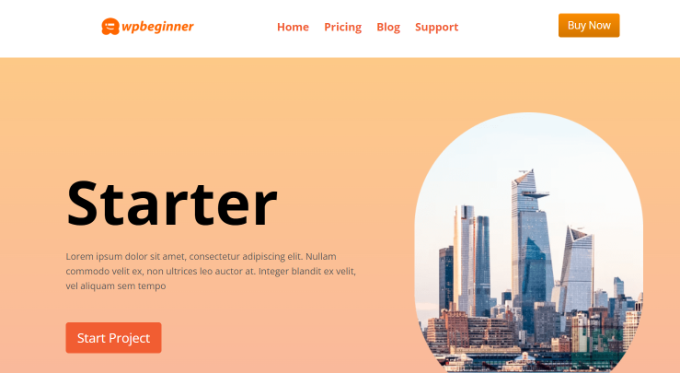
You can now visit your website to see the new custom header in action.

Custom header preview

Create Different Custom Headers for Each Page

Did you know that using SeedProd, you can create custom headers for different pages?

The theme builder lets you add custom headers for each page on your WordPress website. This way, you can show a customized header for different categories, tags, post types, page types, and more.

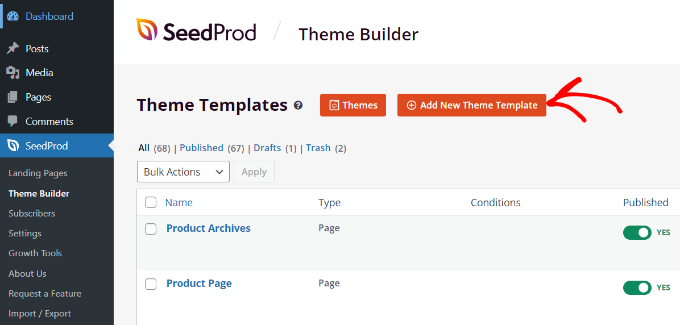
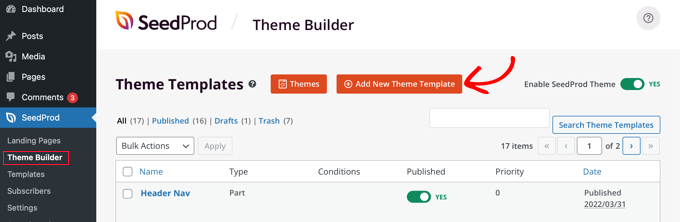
To start, you’ll need to go to SeedProd » Theme Builder from your WordPress dashboard and click the ‘Add New Theme Template’ button.

Add a new theme template

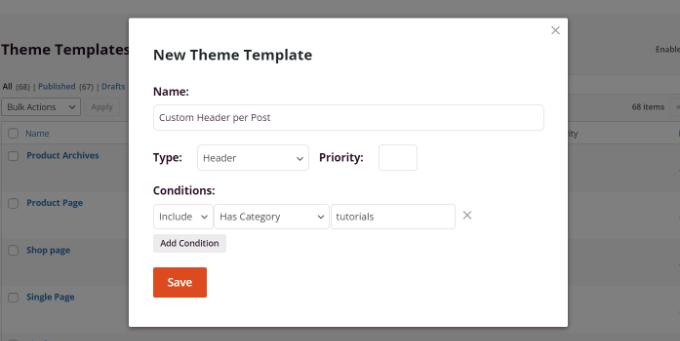
A new popup window will appear where you’ll need to enter the theme template details.

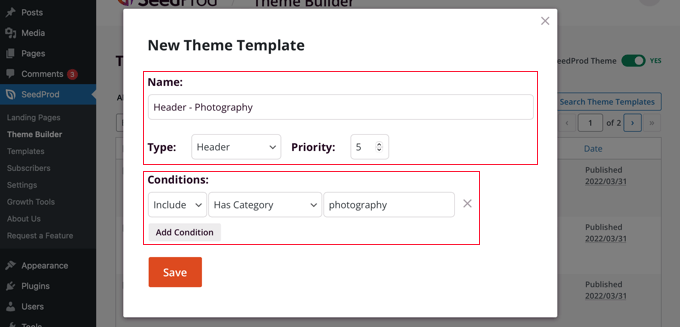
Go ahead and enter a name for your theme template. After that, choose ‘Header’ as the template type from the dropdown menu. You can leave the ‘Priority’ field blank.

Next, you’ll need to enter the display conditions for your custom header. For example, we used the conditions where it will show on all posts and pages that are in the tutorials category.

Enter new theme template details

Don’t forget to click the ‘Save’ button when you’re done.

After that, you can go ahead and edit the custom header using the SeedProd drag and drop theme builder.

Customize your custom header per page

When you’ve finished editing the custom header, simply click the ‘Save’ button at the top.

You can see more ideas on how to customize your header using SeedProd in our beginner’s guide on how to easily create a custom WordPress theme using the SeedProd theme builder.

Adding a Custom Header for Each Category

Most websites display the same header on all posts, pages, categories, and archive pages. However, you can display a different header for each WordPress category.

This can be done by adding code to your theme files, but you will have more control by using a theme builder.

We showed you earlier how to customize your header using the SeedProd theme builder plugin. SeedProd also allows you to create multiple custom headers and display them for different categories using conditional logic.

To create a new header, you need to navigate to SeedProd » Theme Builder and click the orange ‘Add New Theme Template’ button. Alternatively, you can duplicate your current header and use it as a starting point.

Add a New SeedProd Theme Template

A popup will be displayed where you can give the theme template a name and select ‘Header’ from the Type drop down menu.

You also need to enter a priority. This is used if more than one header meets the conditions for a certain page, and the header with the largest priority will be displayed. The default header has a priority of 0, so make sure you enter 1 or higher.

Make the Custom Header Visible Only for Certain Categories

After that, you’ll need to set up one or more conditions. This lets SeedProd know when to display a certain header. You simply select the conditions from drop down menus.

On the first two menus, you need to select ‘Include’ and then ‘Has Category’. In the last field, you should type the name of the category where you want the header to be displayed.

You can easily display the same header for multiple categories by clicking the ‘Add Condition’ button and including another category. When you’re finished, make sure you click the ‘Save’ button to save the new header.

Now you can customize the design of each new header using SeedProd’s drag and drop editor as we showed you earlier.

To learn more, including how to do this using code, see our guide on how to add custom header, footer, or sidebar for each category.

Add a Widget Area to Your WordPress Header

If you’re building a custom theme from scratch using code, then you might be looking to add a WordPress widget to your header to capture the attention of your visitors. Widgets allow you to add content blocks to specific sections of your theme easily, but not every theme includes a header widget area.

We mentioned earlier how simple it is to add widgets to your header using the SeedProd theme builder. But what if you wish to add a widget to a normal WordPress theme’s header?

Some themes, like the Astra theme, let you do this using the WordPress theme customizer. For example, Astra adds an option called ‘Header Builder’ that lets you completely customize the header, including adding widgets.

If your WordPress theme doesn’t currently have a WordPress widget area in the header, then you’ll need to add it manually by adding the following code to your functions.php file, in a site-specific plugin, or by using a code snippets plugin.

This is a more advanced option, since you’ll need to know where to place the code and how to style it using CSS.

function wpb_widgets_init() {
 
    register_sidebar( array(
        'name'          => 'Custom Header Widget Area',
        'id'            => 'custom-header-widget',
        'before_widget' => '<div class="chw-widget">',
        'after_widget'  => '</div>',
        'before_title'  => '<h2 class="chw-title">',
        'after_title'   => '</h2>',
    ) );
 
}
add_action( 'widgets_init', 'wpb_widgets_init' );

This code registers a new sidebar or a widget ready area for your theme.

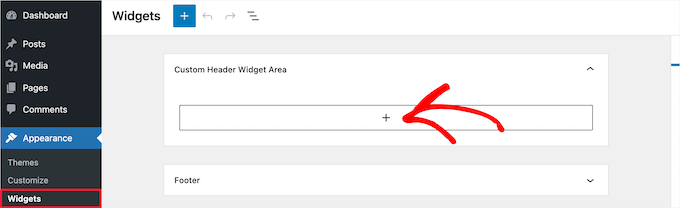
If you go to Appearance » Widgets, then you will see a new widget area labeled ‘Custom Header Widget Area’. Now, you can add your widgets to this new area.

Custom header widget area

Finally, you need to add some code to your theme’s header template located in the header.php file of your theme. This will add the widget area you created earlier to your header so that the widgets will be displayed on your website.

You need to copy this code snippet and paste it where you want the widget to display.

<?php
 
if ( is_active_sidebar( 'custom-header-widget' ) ) : ?>
    <div id="header-widget-area" class="chw-widget-area widget-area" role="complementary">
    <?php dynamic_sidebar( 'custom-header-widget' ); ?>
    </div>
 
<?php endif; ?>

Depending on your theme, you may also need to add CSS to WordPress to control how the widget area is displayed.

For more details, see our guide on how to add a WordPress widget to your website header.

Add Random Header Images to Your WordPress Blog

Another way you can make your WordPress headers more attractive is by adding random images to the header section.

Showing images that randomly change helps capture your visitors’ attention and make your content more engaging.

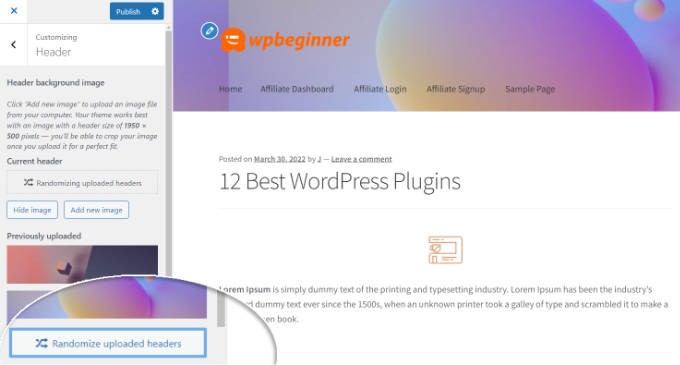
To add random header images to your WordPress blog, you can use the theme customizer and upload images to the header section. This option may vary depending on the WordPress theme you’re using.

Next, go ahead and select the ‘Randomize uploaded headers’ option.

Randomize uploaded header images

If you want more control and flexibility in showing random images in the header section, then you can also use a WordPress plugin.

For more details, see our guide on how to add random header images to your WordPress blog.

Add Code to Your Website’s Header (Advanced)

Finally, if you’re wanting to add custom code to your website’s header section, you can do that easily from your WordPress dashboard. This method is recommended for advanced users and not suitable for beginners because it includes editing code and requires technical knowledge.

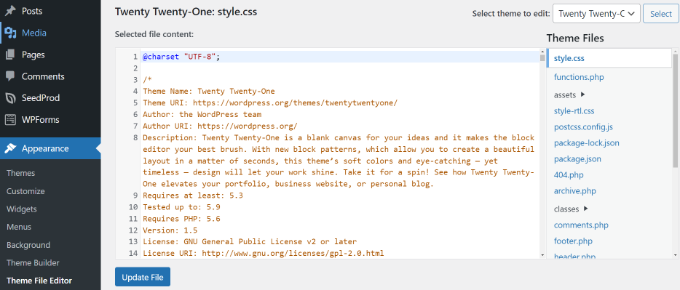
You can find your theme’s header files by going to Appearance » Theme File Editor from the WordPress admin panel. In the ‘style.css’ theme files, you can scroll down to the site header section and add or remove code.

Add custom code to theme files

Note: We don’t recommend that you directly edit the theme files because the slightest mistake can break your website and mess up the design.

An easier way of adding custom code to edit your site’s header is by using the Insert Headers and Footers plugin.

First, install and activate the Insert Headers and Footers plugin. For more details, please see our guide on how to install a WordPress plugin.

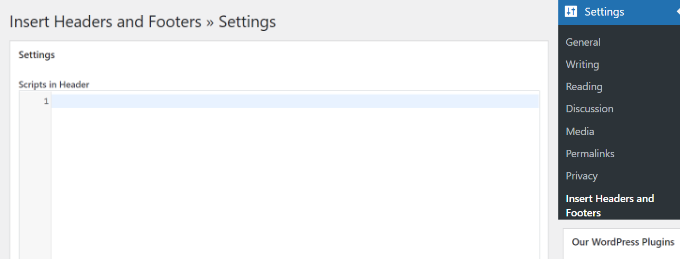
Upon activation, you can go to Settings » Insert Headers and Footers from your WordPress dashboard. Next, enter the custom code in the ‘Scripts in Header’ section.

Insert headers and footers

After entering the code, save your changes.

For more details, you can see our guide on how to add header and footer code in WordPress.

We hope this tutorial helped you learn how to customize your WordPress header. You may also want to learn how to choose the best web design software, or check out our list of must have plugins to grow your site.

If you liked this article, then please subscribe to our YouTube Channel for WordPress video tutorials. You can also find us on Twitter and Facebook.

The post How to Customize Your WordPress Header (Beginner’s Guide) first appeared on WPBeginner.


June 06, 2022 at 03:00PM