Thursday, June 30, 2022

How to Add a Wishlist to Your WooCommerce Store

Do you want to add a wishlist feature to your WooCommerce store?

A wishlist allows visitors to save their favorite products, so they can quickly find them later in your store and complete their purchase. It also makes it easy for your visitors to share their favorite items with friends and family as part of their wedding registry or another gift registry.

In this article, we’ll show you how to add a wishlist to your WooCommerce store.

Add a wishlist to your WooCommerce store

What Are Wishlists and Why Add Them in WooCommerce?

A wishlist lets your customers and guests save their favorite products on a list. It helps them to remember which products they want to buy in the future, so they can quickly find them later on your WooCommerce store.

Plus, customers can share their wishlists with their friends and family. This helps build brand awareness and increases traffic to your online store so you can boost sales.

Another benefit is that you get to see which products people add the most to their wishlists. To increase sales, you can then run promotional offers and discounts on popular wishlist products.

That said, let’s see how you can easily add a wishlist to the WooCommerce store.

Adding a Wishlist to Your WooCommerce Store

The best way of adding a wishlist to your WooCommerce store is by using a WordPress plugin like YITH WooCommerce Wishlist.

It’s a free WooCommerce plugin that lets your visitors save their favorite products to a wishlist and share them with their friends and family.

First, you’ll need to install and activate the YITH WooCommerce Wishlist plugin. For more details, please see our guide on how to install a WordPress plugin.

Upon activation, you can head over to YITH » Wishlist from your WordPress dashboard and click on the ‘Add to wishlist options’ tab to configure the plugin.

After a product is added to your wishlist

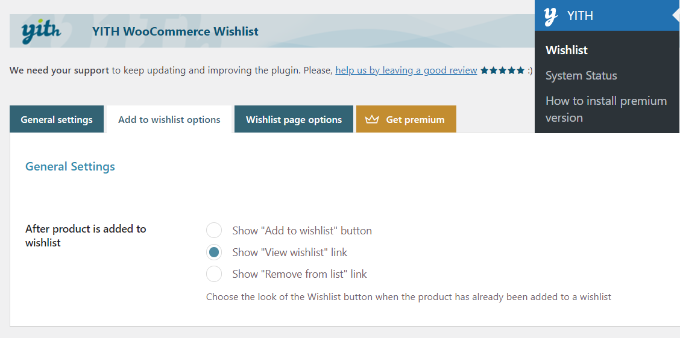
The plugin will automatically add a ‘Add to wishlist’ link to each product that shoppers can click on to save items.

In the settings, you can select which link to show after a user adds a product to the wishlist. For instance, you can still display the ‘Add to wishlist’ button, or you can change the link to show the ‘View wishlist’ or ‘Remove from list’ options instead.

Next, you’ll see the Loop settings and Product page settings. You can choose where you’d like the ‘Add to wishlist’ button appear on the product page.

Wishlist loop settings

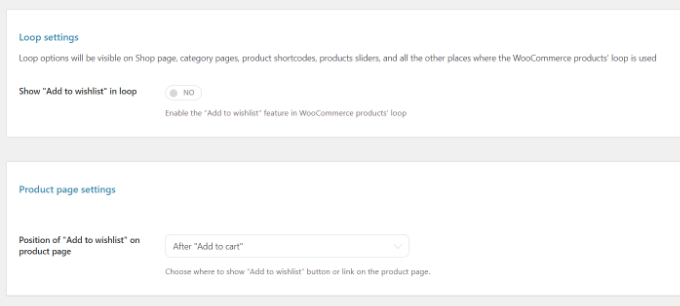
By default, it will be shown after the add to cart button. However, you can choose a different position by clicking the dropdown menu in front of the Position of “Add to wishlist” on product page option.

After that, simply scroll down and customize the text for your wishlist and edit the color and style of the add to wishlist button.

Change the text for add to wishlist button

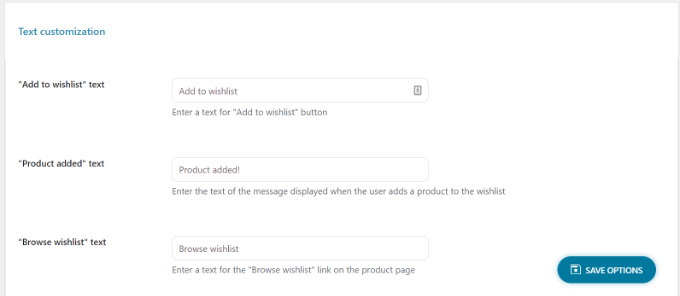
Don’t forget to click the ‘Save Options’ button at the bottom of the page when you’re done.

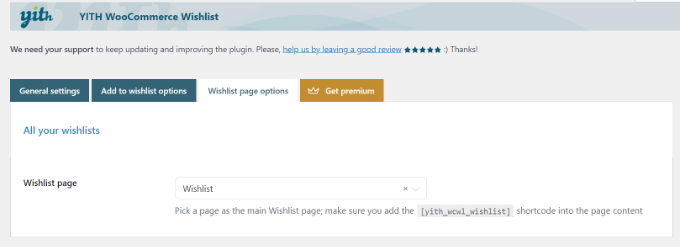
Next, you can head to the ‘Wishlist page options’ tab.

The plugin will create a new page for wishlists on your WooCommerce store. If you prefer, you can select a different page from the Wishlist page dropdown menu instead or show wishlists on any page using the [yith_wcwl_wishlist] shortcode.

Wishlist page options

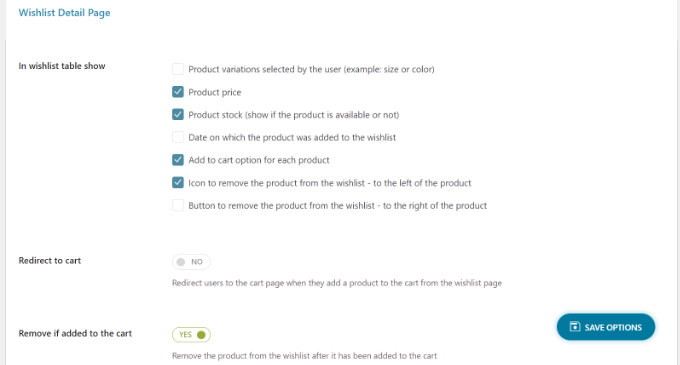
Next, you can now scroll down and select which details to show in the wishlist table.

For example, there are options to display product variations, the date on which the product was added to the wishlist, price, and more.

Details on wishlist page

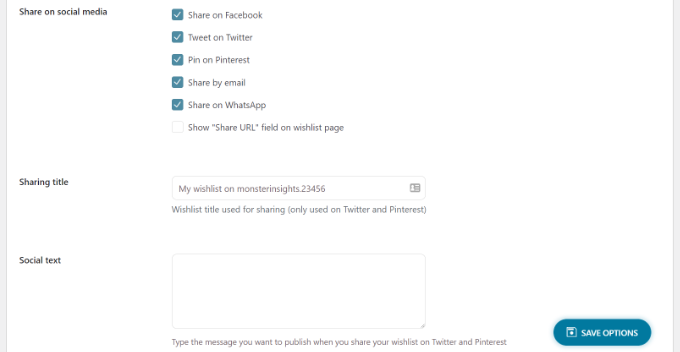
You can even select social media channels on which people can share their wishlists, add custom text when the list is shared on social media, and more.

The plugin also offers settings to change the text and edit the style and color of the sharing button, social media channel buttons, and more.

Share on social media options

When you’ve customized the wishlist page settings, don’t forget to click the ‘Save Options’ button to store your changes.

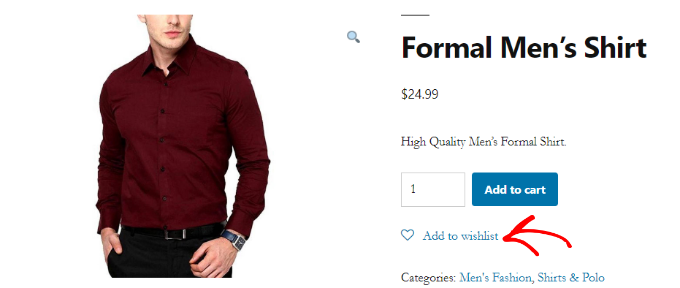
You can now visit your WooCommerce store and see the ‘Add to wishlist’ option on the product page under the Add to cart button.

Preview of add to wishlist button

When a user clicks the Add to wishlist link, they can then browse their wishlist and remove items or add to cart products from the list.

Besides that, the plugin also shows options to share the wishlist on social media platforms like Facebook, Twitter, and Pinterest or send the list via email and WhatsApp.

Browse your wishlist

Going Beyond Wishlists to Grow WooCommerce Sales

Now that you have added the wishlist feature to your WooCommerce store, you may want to further optimize it to boost sales and conversions.

We recommend using the WooFunnels plugin to optimize your WooCommerce checkout, add one-click upsells, and other marketing automation features.

WooFunnels Template Library

For more details, see our step by step guide on how to create high converting funnels in WooCommerce.

Aside from that, here are five other plugins that we recommend to help grow your WooCommerce store:

  • Advanced Coupons for WooCommerce – helps you add smart coupons to offer free shipping discounts above certain $ amount, buy one get one free offers, and more.
  • WooCommerce Gift Cards – lets you sell gift cards for your WooCommerce store. This is a great addition alongside wishlist to boost revenue.
  • PushEngage – helps you stay connected with visitors after they leave your website. This technology is used by many smart eCommerce retailers like 1800-flowers, Harrys and Davids, and others to boost sales.
  • Uncanny Automator – this tool helps you automate your routine workflows to save you time. Simply the best task automation plugin for WooCommerce.
  • WP Mail SMTP – ensures that your WooCommerce emails actually get delivered in your user’s inbox. This is an absolute must have tool for all WordPress sites. See more details in our guide on how to fix WordPress not sending email issue.

We hope this article helped you learn how to add a wishlist to your WooCommerce store. You may also want to see our expert pick of the best WooCommerce plugins to grow your store, and the best WooCommerce hosting companies that scales with your growth.

If you liked this article, then please subscribe to our YouTube Channel for WordPress video tutorials. You can also find us on Twitter and Facebook.

The post How to Add a Wishlist to Your WooCommerce Store first appeared on WPBeginner.


June 30, 2022 at 04:00PM

Wednesday, June 29, 2022

How to Import External Images in WordPress

Do you want to import external images in WordPress?

If you have recently moved your website from one platform or host to another, then there is a good chance that you may have external images embedded on your pages.

In this article, we will explain how to properly import those external images in WordPress.

How to Import External Images in WordPress

Why Import External Images in WordPress?

External images are images embedded in your content that load from another website or URL different from your main WordPress website.

Most commonly, WordPress users come across external images issue after migrating their website from other platforms like Blogger, Weebly, Joomla, or WordPress.com.

By default, if you use one of the WordPress importers, then it will try to import images. You can see the imported images by visiting Media » Library page in your WordPress admin area.

If you see that all your images are already in the Media Library, but the image URLs in your posts still point to your old website, then you don’t need this article. Instead, you should follow our guide on how to easily update URLs when moving your WordPress site.

However, if you don’t see images imported to your WordPress media library, then continue reading and we will show you how to import those external images.

How to Import External Images in WordPress

The first thing you need to do is to install and activate the Auto Upload Images plugin. For more details, see our step by step guide on how to install a WordPress plugin.

Upon activation, you need to visit the Settings » Auto Upload Images page to review the plugin settings.

The Auto Upload Images Settings Page

The default settings would work for most users, but you can change them as needed.

For example, the plugin will import images to your default WordPress media uploads folder. You can change that by providing a different base URL. Other than that, it also allows you to set filename, image alt tag, image size, and exclude post types.

If you do make some changes, then don’t forget to click on the ‘Save Changes’ button at the bottom of the page to store the new settings.

Next, you will need to update the posts or pages containing the external images. Since this is a manual process, it can be tedious if you have a lot of content.

Luckily, there’s a quick way to update all posts with external images. Simply go to Posts » All Posts page and then click on the Screen Options button at the top.

Use Screen Options to Display 999 Posts at a Time

You need to increase the number in the ‘Number of items per page field’ field to ‘999’ and click the ‘Apply’ button.

WordPress will reload the page, and this time it will show up to 999 posts at a time.

Note: If you have slow web hosting, your server may not be able to handle updating so many posts at once. In that case, you would want to do smaller batches of posts at a time, or consider switching to better WordPress hosting.

Next, you can select all of your posts on this page by clicking the checkbox next to ‘Title’. After that, you should select ‘Edit’ under the bulk actions menu and click the ‘Apply’ button.

Editing All Posts in Bulk

WordPress will now show you a ‘Bulk Edit’ box with all selected posts.

You just need to click on the ‘Update’ button, and WordPress will update all your posts.

Updating All Posts in Bulk

Remember, don’t change any of the settings in the bulk edit settings that you see. You just need to click the ‘Update’ button.

This will trigger the plugin to check all selected posts and import external images as it finds them.

If you have more than 999 posts, then you will need to visit the next page to select the remaining posts.

We hope this tutorial helped you learn how to import external images in WordPress. You may also want to learn how to create a custom Instagram photo feed, or check out our list of must have plugins to grow your site.

If you liked this article, then please subscribe to our YouTube Channel for WordPress video tutorials. You can also find us on Twitter and Facebook.

The post How to Import External Images in WordPress first appeared on WPBeginner.


June 30, 2022 at 02:00AM

How to Make a Google Ad Landing Page in WordPress (The Easy Way)

Do you want to make a landing page for your Google Ads campaign in WordPress?

A Google Ads landing page is optimized to help you reach your campaign’s goals. Creating the right landing page is crucial for getting maximum sales and leads from your Google Ads.

In this article, we will show you how you can make a Google Ad landing page in WordPress including the ability to dynamically change content.

How to make a Google Ad landing page in WordPress

Why Make a Google Ad Landing Page in WordPress?

When someone clicks on your Google Ad, you can redirect them to any page on your WordPress website. This might be a page that already exists on your site, such as your request a quote page, product page, etc.

However, sending those visitors to a generic page could confuse them if it’s not closely related to the ad they clicked on. This can cause visitors to leave your site, and you’ll miss out on those sales.

That’s why many successful website owners create customized landing pages for their Google Ads.

This gives you the freedom to fine-tune the page to help you reach your Google Ad campaign goals. For example, if you want to get more sales then you might add a call to action (CTA) button, a form that accepts credit card payments, and powerful social proof such as customer reviews and testimonials.

No matter whether you want to get more sales, generate leads, or reach some other goal, an effective Google Ad landing page will give you a higher conversion rate.

With that in mind, let’s see how you can easily make a Google Ad landing page in WordPress.

How to Make a Google Ad Landing Page in WordPress

The easiest way to make a Google Ad landing page in WordPress is by using SeedProd. It is the best landing page builder for WordPress.

SeedProd allows you to easily create beautiful landing pages that you can show to anyone who clicks on your Google Ads.

The SeedProd plugin works with many popular third-party tools that you may already be using to get sales and capture leads. This includes top email marketing services, Google Analytics, and more.

The first thing you need to do is install and activate the SeedProd plugin. For more details, see our step by step guide on how to install a WordPress plugin.

Note: There is a free version of SeedProd plugin available on WordPress.org, but we will be using the Pro version since it has more powerful features. It also includes a selection of professionally-designed landing templates that you can use in your Google Ad campaigns.

After activating the plugin, SeedProd will ask for your license key.

SeedProd license key

You can find this information under your account on the SeedProd website and in the purchase confirmation email you got when you bought SeedProd.

After entering your key, go to SeedProd » Landing Pages in your WordPress dashboard.

Create a Google Ad landing page with SeedProd

SeedProd comes with 150 professionally designed templates which are grouped into categories. Along the top you’ll see categories that let you create beautiful coming soon pages, activate maintenance mode, create a custom login page for WordPress, and more.

We want to design a Google Ad landing page, so go ahead and click on the ‘Add New Landing Page’ button.

Making a Google Ad landing page in WordPress

All of SeedProd’s templates are easy to customize, so you can use any of the designs for your Google Ad landing page.

However, many WordPress blog and website owners use Google Ads to get sales, so you may want to click on the ‘Sales’ tab.

SeedProd's ready-made templates

SeedProd will now show all the templates that are designed to help you sell more products and services.

To take a closer look at any design, simply hover your mouse over that template. Then, click on the magnifying glass icon.

SeedProd's landing page templates

This will open the template in a new tab.

When you find a design that you want to use for your Google Ad landing page, simply click on ‘Choose This Template.’

A SeedProd landing page template

You can now type in a name for your landing page into the ‘Page Name’ feld.

SeedProd will automatically create a ‘Page URL’ using the page name. This is the web address where your Google Ad landing page will appear.

Customizing the landing page URL

Even though we’re making a landing page for a Google Ad campaign, it’s still a good idea to fine-tune this page for the search engines.

By optimizing your landing page for SEO, you may get some extra visitors from relevant search engine result pages. To learn more, you can see our ultimate WordPress SEO guide.

With that said, it’s a good idea to include relevant keywords in your URL. You can change the page’s automatically-generated URL by typing into the ‘Page URL’ field.

When you’re happy with the information you’ve typed in, click on ‘Save and Start Editing the Page.’ This will load the SeedProd page builder interface.

This simple drag and drop builder shows a live preview of your landing page to the right. On the left is a menu that shows the different blocks and sections that you can add to your Google Ad landing page.

The SeedProd page builder

SeedProd comes with lots of ready-made blocks that can help you get more conversions, including pricing tables, countdowns, and customer testimonials. You can build an entire Google Ad landing page within minutes using these ready-made blocks.

You can also use SeedProd blocks like spacers, columns, and dividers to help organize and structure your Google Ad landing page. This can help visitors navigate your landing page and find the information they want.

When you find a block that you want to add to the Google Ad landing page, simply drag and drop it onto your template.

SeedProd's Testimonial block

To customize a block, go ahead and click to select the block in the SeedProd editor. The left-hand menu will now update to show all the settings that you can use to customize the block.

For example, if you click on a Testimonials block you’ll be able to change the name of the person quoted and add some new testimonial text.

Creating a Google Ad landing page in WordPress

Images are a great way to catch the visitor’s attention and communicate more of information. For this reason, many of SeedProd’s landing page templates come with placeholder images.

To replace the placeholder content with your own image, simply click on the Image block.

Next, in the left-hand menu simply hover your mouse over the image and then click on the Trashcan icon to delete it.

Creating a Google Ad landing page with SeedProd

Once you’ve done that, there are a few different ways to add a new image to your Google Ad landing page.

Once option is to click on ‘Use Your Own Image.’ You can then either choose an image from the WordPress media library, or upload a new file from your computer.

Adding an image to your SeedProd design

Don’t have an image that you want to use? SeedProd comes with a built-in library of thousands of royalty free stock images that you can add to your Google Ad landing pages.

To see SeedProd’s stock image library, simply click on ‘Use a Stock Image.’

Next, just type in a word or phrase that describes the image you’re looking for and then click on the ‘Search’ button.

SeedProd's stock photo library

SeedProd will now show all the stock images that match your search term.

When you find an image that you want to use, simply give it a click to add the image to your Google Ad landing page.

Adding stock photos with SeedProd's library

Many online store owners use Google Ad campaigns to advertise their products and services.

If you created an online store using WooCommerce, then SeedProd has a number of special WooCommerce blocks that you can add to your landing page, including Add To Cart and Checkout blocks.

These blocks make it easier for customers to make a purchase, which is great for your conversion rates. It also lets you design a Google Ad landing page without being restricted by your WooCommerce theme.

To take a look at these eCommerce blocks, scroll to the ‘WooCommerce’ section in SeedProd’s left-hand menu.

You can now add any of these blocks to your Google Ad landing page.

Adding WooCommerce blocks to a Google Ad landing page

As you’re building your landing page, you can move blocks around your layout by dragging and dropping them. This makes it easy to create a Google Ad landing page with a totally custom layout.

SeedProd comes with ‘Sections’ too. These are rows and block templates that can help you quickly create a nicely organized Google Ad landing page.

You can see all of these sections by clicking on the ‘Sections’ tab.

SeedProd's 'section' templates

From here, you can preview any section by hovering over it. When the magnifying glass icon appears, give it a click. To get more sales, you may want to take a look at sections such as Hero, Call To Action, Features, and Testimonial.

To add a section to your page, click on ‘Choose This Section.’ SeedProd will now add the section to the very end of your Google Ad landing page.

A 'features' section template in SeedProd

Color can be a great way to catch the visitor’s attention, and help reinforce your WordPress website’s branding.

To change the background color of any section, simply click to select that section. Then, click on the little cog icon that appears.

Once you’ve done that, click on the Background Color field and choose a new background color using the popup settings.

Changing your landing page's background color

People typically pay more attention to personalized content. With that in mind, you may get more sales by showing personalized content on your Google Ad landing page.

SeedProd has full support for dynamic text replacement, so different visitors see a different message based on the search term they used to find your ad. For example, if you’re targeting the keywords ‘summer offers’ or ‘Black Friday’ with your ad campaign, then you might dynamically change your heading to include those terms.

To add dynamic text to your Google Ad landing page, simply click on any Heading or Text block. Then, go ahead and click on the Insert Dynamic Text button.

SeedProd's dynamic text settings

In the popup that appears, click on ‘Query Parameter.’

This lets you pass data via the query parameter on your page. For example, you might pass in the phrase ‘Black Friday’ and then show that text in your headline.

SeedProd's query parameter settings

To learn more, please see SeedProd’s guide to dynamic text.

As you’re working on your Google Ad landing page, you can preview your design by clicking on the Preview button. This launches your landing page in a new tab.

SeedProd's 'preview' feature

When you’re happy with how your landing page looks, it’s a good idea to optimize the page’s settings, as this can get you more conversions.

Many landing pages use forms to capture leads and potential new customers.

SeedProd integrates with all of the top email marketing services including Constant Contact, Sendinblue, and Drip.

To connect your landing page to your email marketing service, simply click on the ‘Connect’ tab. You can then hover your mouse over the email marketing service that you use on your website, and click on the ‘Connect’ button when it shows up.

Connecting SeedProd to your email marketing service

SeedProd will now walk you through the process of connecting your Google Ad landing page to your email marketing service.

When you’re happy with how your Google ad landing page is set up, you can click on the ‘Save’ button and then choose ‘Publish.’

Now you simply need to open the ad campaign inside your Google Ads account, and add the URL for the landing page you just created. Once you’ve done that, anyone who clicks on your Google Ad will be redirected to your landing page.

A beautiful, professionally-designed Google Ad landing page can help you reach your campaign goals. However, there is always room to improve your conversion rates.

With that in mind, it’s a good idea to monitor your landing page’s stats to see what’s working and not working. You can then use SeedProd to tweak your landing page’s design, and fine-tune it to get even more conversions.

The easiest way to measure important metrics in WordPress is using MonsterInsights.

It’s the best WordPress analytics plugin and is used by over 3 million websites. To learn more, please see our step by step guide on how to install Google Analytics in WordPress.

We hope this article helped you learn how to make a Google Ad landing page in WordPress. You can also go through our guide on how to add push notifications on your website, or our expert picks of the must have WordPress plugins for business websites.

If you liked this article, then please subscribe to our YouTube Channel for WordPress video tutorials. You can also find us on Twitter and Facebook.

The post How to Make a Google Ad Landing Page in WordPress (The Easy Way) first appeared on WPBeginner.


June 29, 2022 at 04:00PM