Friday, July 29, 2022

How to Make Blog Post Comments Searchable in WordPress

Do you want to make blog post comments show up in WordPress search results?

By default, WordPress search doesn’t include comments. This can make it difficult for your visitors to find interesting conversations and engage with other users.

In this article, we will show you how you can make blog comments searchable on your WordPress website.

How to make blog post comments searchable in WordPress

Why Make Blog Post Comments Searchable in WordPress?

A lively and interesting comment section can keep people on your WordPress website longer and create a sense of community around your site.

Because of that, comments are valuable content, and you’ll want to do everything you can to get more comments on your WordPress blog posts.

However, since WordPress doesn’t include comments in its search results by default, visitors may struggle to find interesting discussions and connect with other users or revisit a specific comment thread on your WordPress blog.

You might even be using the comment section for your visitors to submit reviews or testimonials. Having searchable reviews can help to boost sales on your online store, since people will be more likely to find the exact product they’re searching for.

That being said, let’s see how you can fix these problems by making blog post comments searchable in WordPress.

How to Make Blog Post Comments Searchable in WordPress

The easiest way to make blog post comments searchable in WordPress is by using the SearchWP plugin.

SearchWP is the best custom search plugin for WordPress, used by over 30,000 websites. It’s easy to use and lets you improve the built-in WordPress search.

You can also easily configure the plugin to include custom post types in WordPress search results, as well as registered users.

To make your blog post comments searchable, you’ll need to install and activate SearchWP. If you need more details, please see our guide on how to install a WordPress plugin.

Upon activation, you will see a popup telling you that SearchWP has already created an engine for you to use. The first step is customizing this engine.

We’ll show you how to change the default engine in this guide, so you can go ahead and click on the ‘Close’ button to exit the popup.
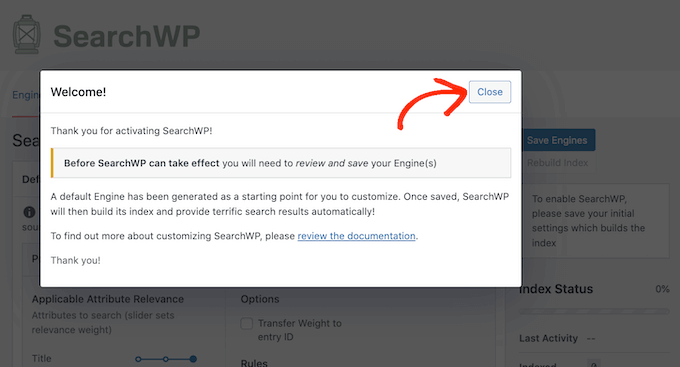
SearchWP's welcome popup

You will now be taken to the SearchWP » Settings page automatically.

On this screen, click on the ‘License’ tab. You can now paste your key into the ‘License’ box.
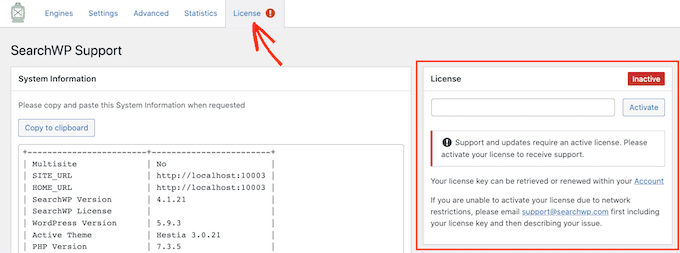
The SearchWP advanced search WordPress plugin

You’ll find this information in the email you got when you purchased SearchWP and in your account on the SearchWP site.

Once you’ve pasted the license key, click on the ‘Activate’ button next to it.

Next, just click on the ‘Engines’ tab so that you can customize everything that the plugin will display in search results.
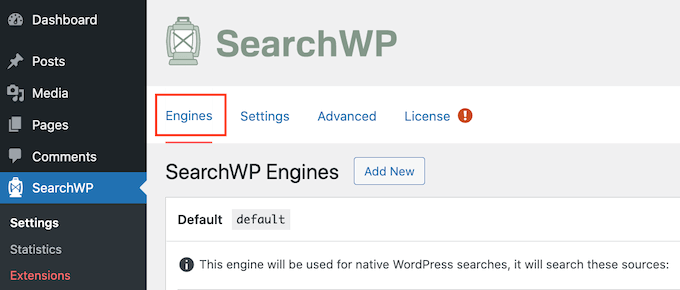
The SearchWP Engines tab

You will see here that by default, posts are searchable and are broken into title, content, slug, and excerpt.

To allow comments to be searchable on your site, you want to click on the ‘Sources & Settings’ button near the top-right part of the screen.
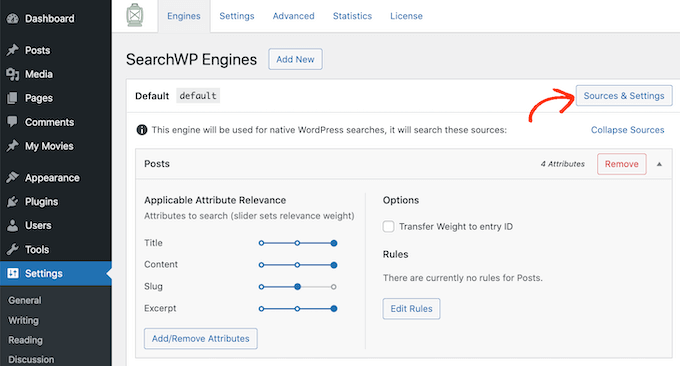
Configuring the SearchWP search plugin

A popup will appear in the middle of your screen. Under the ‘Sources’ heading, you’ll see all the different types of content that SearchWP is capable of searching.

By default, the plugin searches your site’s posts, pages, and media.
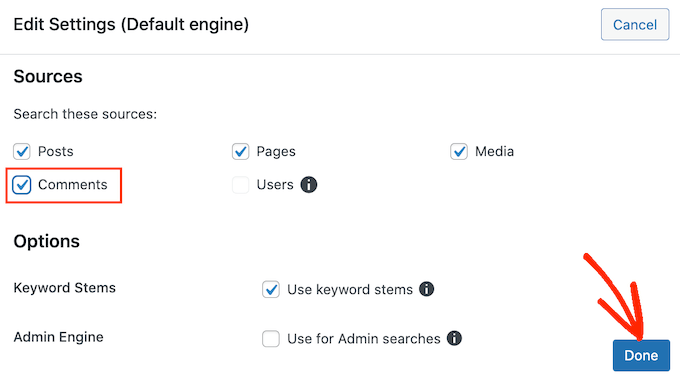
How to make your WordPress blog comments searchable

Go ahead and check the ‘Comments’ box. You can then click on ‘Done.’

This includes all comments in the search results on your site.

You can further customize how your blog comments are searched by scrolling to the bottom of the ‘Engines’ tab. You’ll see a new section where you can configure how your comments will be searched.

To get started, click on the ‘Add/Remove Attributes’ button.
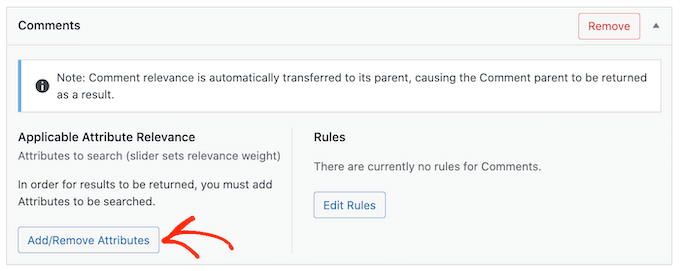
Configuring your searchable WordPress comments

On this screen, you’ll see sections for the different parts of the comments that SearchWP includes in its search results, such as author name, email, and comment text itself.

SearchWP can search the comment’s author name and email address, plus the content of the comment itself.

In the following image, we’re telling SearchWP to look at the comment’s content by checking the ‘Comment’ box, as well as the name and email address of the person who posted it.

After making your selection, click on the ‘Done’ button.
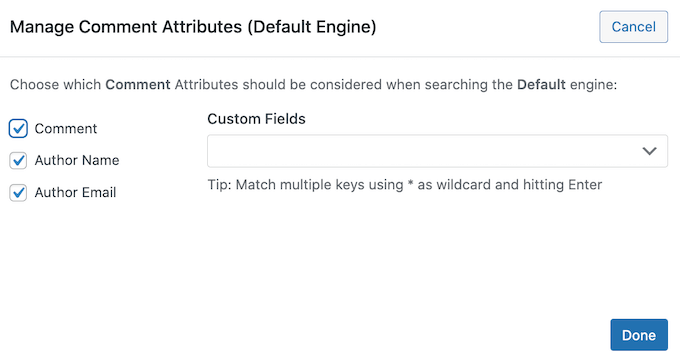
Searching your WordPress comments

Whatever options you checked will now appear under the ‘Comments’ section of the ‘Engines’ tab.

For each one, SearchWP has an ‘Applicable Attribute Relevance’ scale. This is the weight that SearchWP will give to each attribute when searching the comments on your blog.
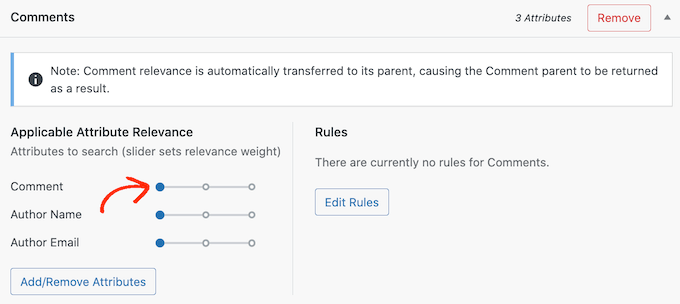
Configuring your searchable WordPress comments

Content that matches an attribute with high relevancy will appear higher in the search results. By contrast, content that matches an attribute that has less relevancy will appear lower in the user’s search results.

By default, all the attribute sliders are set to ‘low,’ but you can change that by simply dragging the slider to the right.

Every site is unique, so you may want to try different relevancy settings to see what gives you the most accurate and helpful search results.
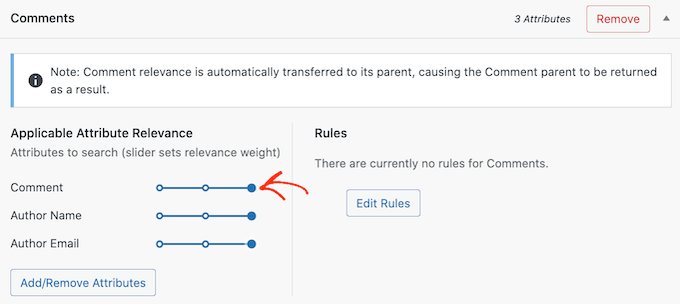
Changing the SearchWP relevancy settings

If you decide later that want to remove an attribute from your search, you can simply repeat the steps above, but uncheck the box next to it.

Once you’re happy with how the search feature is set up, you can go ahead and click on the ‘Save Engines’ button.
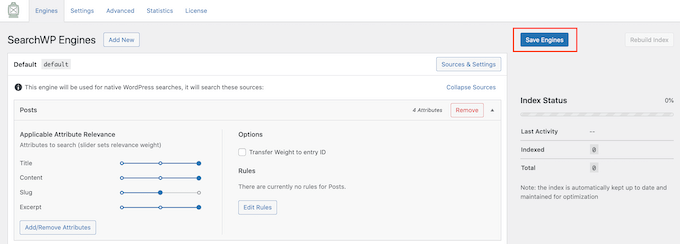
Saving your WordPress custom search settings

After a few moments, SearchWP will show a message ‘The index needs to be rebuilt.’

If you do get this message, then go ahead and click on the ‘Rebuild Index’ button. This will add all of your site’s comments to the search index, so they appear in relevant results.
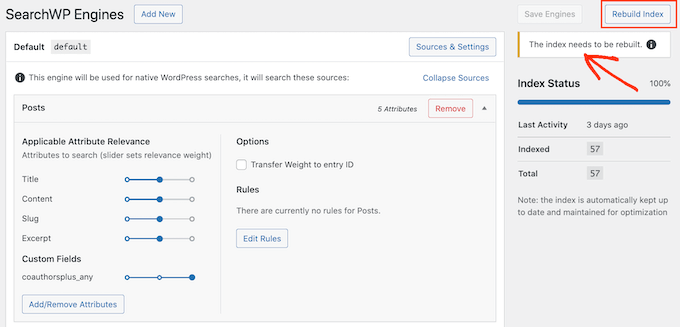
Rebuilding the SearchWP search index

Once you’ve done that, SearchWP will look at your WordPress site’s comments when creating its search results.

How to Change SearchWP Settings

Now that your blog post comments are searchable, you may want to enable some advanced settings that will make it easier for visitors to find what they’re looking for.

To take a look at these advanced search settings, click on the ‘Advanced’ tab.
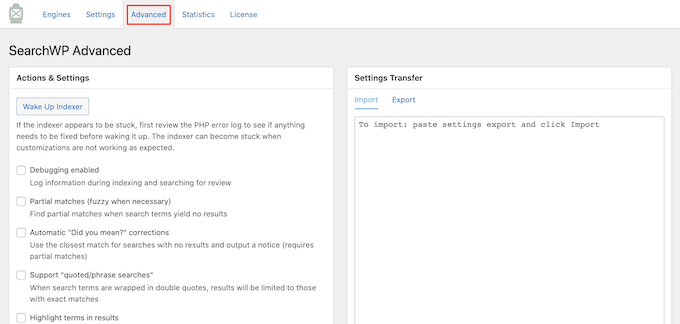
SearchWP's advanced search settings

On this screen, you can change a lot of the plugin’s behavior such as making adjustments for misspellings.

For example, if someone makes a spelling mistake when typing in their search term, then SearchWP can show a ‘Did you mean?’ correction box with results that are similar to what the search query should have been.

The following image shows an example of how this might look on your website.
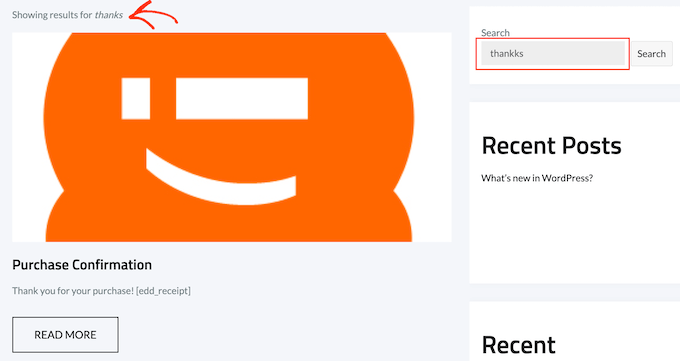
The SearchWP 'did you mean' feature

To use this feature in your searches, go ahead and check the ‘Automatic “Did you mean?” corrections’ box.

You’ll also need to check the ‘Partial matches (fuzzy when necessary)’ box, since the ‘Did You Mean?’ feature uses partial matches.
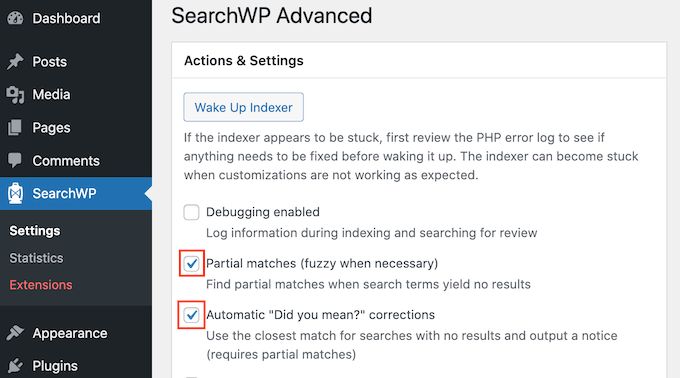
Enabling fuzzy search in SearchWP

For more tips on SearchWP’s advanced settings, please see our step-by-step guide on how to improve WordPress search with SearchWP.

We hope this article helped you learn how to make blog comments searchable in WordPress. You may also want to see our picks of the best live chat software for small businesses and the ultimate guide to creating a WordPress membership site.

If you liked this article, then please subscribe to our YouTube Channel for WordPress video tutorials. You can also find us on Twitter and Facebook.

The post How to Make Blog Post Comments Searchable in WordPress first appeared on WPBeginner.


July 29, 2022 at 05:24PM
Thursday, July 28, 2022

How to Backup Your WordPress Site to Google Drive (Free and Easy)

Did you know that you can make a backup of your WordPress site on Google Drive?

If you have a Google account, then you already have 15GB of cloud storage for free. You can use this storage to keep a copy of your site in reserve, just in case something bad happens, and you need a reset.

In this article, we will show you how you can automatically backup your WordPress site to Google Drive.

How to backup your WordPress site to Google Drive

Why Backup Your WordPress Site to Google Drive?

A backup is a copy of your website that’s stored separately, and it’s one of the most important ways to keep your site safe. If something goes wrong with your website, then you can restore a backup with just a few clicks to get it working again.

Even in the worst-case scenario where a hacker breaks into your WordPress website and deletes your data, you can simply restore a backup and get your site back.

Many website owners also create a backup before making a big change to their site, such as editing their WordPress homepage or installing a new theme. If the change breaks their website, they can simply restore a working version of their site from a backup.

By backing up your site to a cloud storage service such as Google Drive, you can restore your site even if your main hosting account got hacked. Also, it won’t take up precious storage space on your WordPress hosting plan.

By creating a Google account, you’ll automatically get 15GB of free cloud storage that you can use for backups and file storage. If you need more space, then prices start at $1.99 per month for an additional 100GB.

How to Backup Your WordPress Site to Google Drive

WordPress does not come with a built-in backup solution. However, there are several great WordPress backup plugins that make it easy to backup and restore your site.

UpdraftPlus is the best backup plugin for WordPress. This free plugin lets you create scheduled backups, so you can automatically back up your WordPress site to Google Drive.

First, you’ll need to install and activate the UpdraftPlus plugin. For more details, see our step-by-step guide on how to install a WordPress plugin.

Once you’ve activated UpdraftPlus, you can configure your backup settings and choose Google Drive as a storage destination.

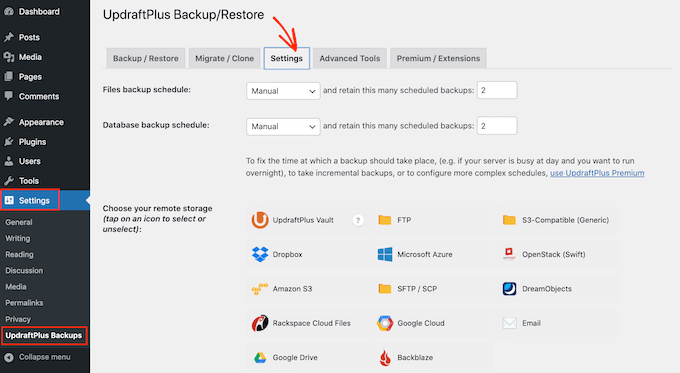
To do this, head over to Settings » UpdraftPlus Backups in your WordPress dashboard. Then, simply click on the ‘Settings’ tab.

Backup WordPress website to Google Drive

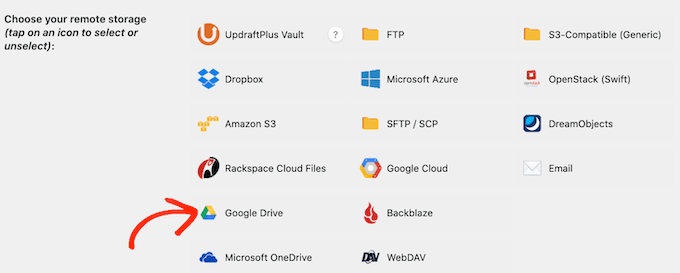
UpdraftPlus makes it easy to save your backups to different online storage services including Dropbox, Amazon S3, Microsoft OneDrive, and many others.

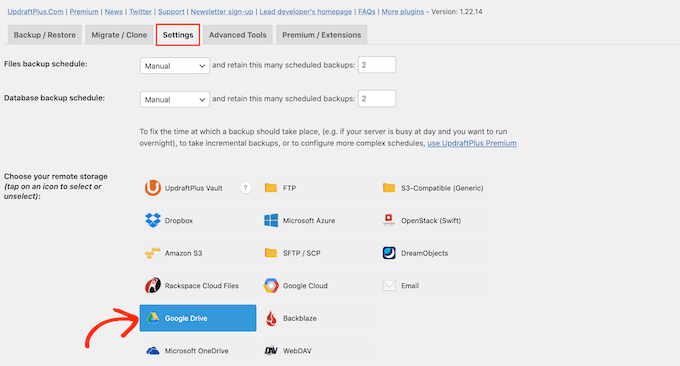
Since you want to backup your WordPress site to Google Drive, go ahead and click on ‘Google Drive’ in the section titled ‘Choose your remote storage.’

UpdraftPlus' supported cloud storage platforms

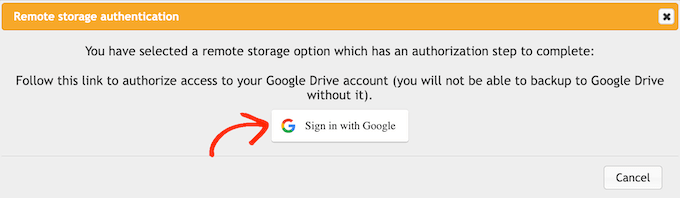
After choosing Google Drive as your storage location, you’ll need to give UpdraftPlus access to your Google account.

To get started, click on the ‘Sign in with Google’ button.

Connecting UpdraftPlus to Google Drive

Now follow the onscreen instructions to give UpdraftPlus access to your Google account.

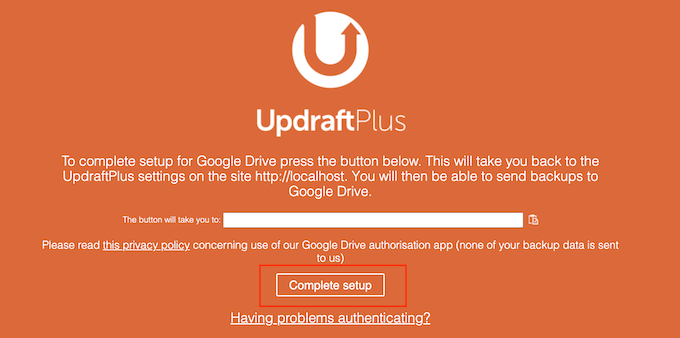
After reading the disclaimer, you can click on ‘Complete setup’ if you’re happy to go ahead and authorize UpdraftPlus access to your Google Drive.

How to backup your WordPress site to Google Drive

Once you’ve done that, UpdraftPlus will take you back to its main settings page in the WordPress dashboard.

How to Create an Automatic WordPress Backup Schedule

After choosing Google Drive as your storage location, you’re ready to create an automatic backup schedule.

Still in the ‘Settings’ tab, scroll to the bottom of the page and click on the Save Changes button. UpdraftPlus will now automatically backup your site based on your schedule.

UpdraftPlus breaks WordPress backups into two parts: files and database.

Let’s start with files. As part of this backup, UpdraftPlus will create a copy of your site’s code files, plugin and theme files, and images. 

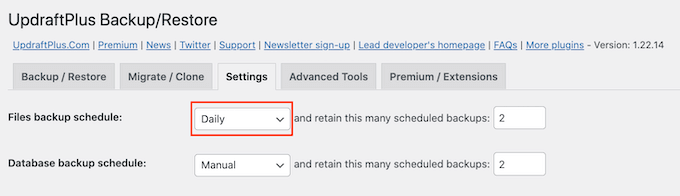
To get started, simply open the ‘Files backup schedule’ dropdown and choose how frequently UpdraftPlus should backup your WordPress website.

You can choose from once every month, right through to once every 2 hours.

Create an automated backup schedule for Google Drive

When creating a schedule, think about how often you update or add new content to your site. For example, if you publish two blog posts each week, then you may want to backup your WordPress blog once a week instead of daily.

If you update your site more frequently, then you’ll need to backup more frequently.

In particular, if you run an online store then you’ll typically want to backup your site as often as possible. In this way, you can avoid losing important information such as new orders or a customer’s payment details.

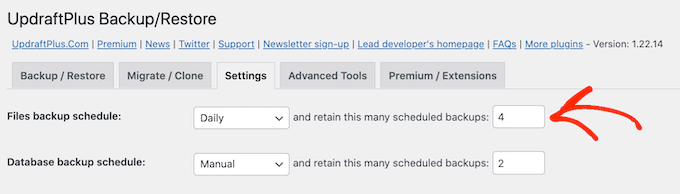
After choosing a frequency for your backups, you’ll need to choose how many different backups UpdraftPlus should keep. This will help you optimize the storage space you use.

You can do this by entering that number into the text field next to ‘…retain this many scheduled backups.’

UpdraftPlus' WordPress backup settings

You can change these settings at any point, so if you’re unsure then you can start by saving a larger number and then reduce it if the backups are using too much space.

Once UpdraftPlus reaches your set number, the plugin will replace the oldest copy with newer WordPress backups.

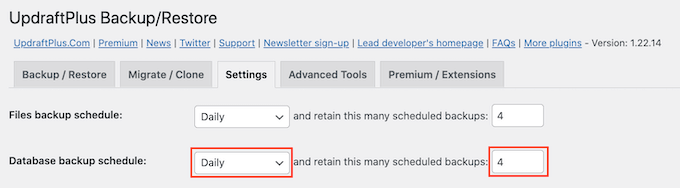
Next, you need to create a backup schedule for your WordPress database in the ‘Database backup schedule’ section.

WordPress stores all of its posts and pages, comments, links, and website settings in the database, so it’s just as important to create backups of the database regularly as it is the files.

You can tell UpdraftPlus how frequently it should make backups of your database, and how many of them it should keep by following the same process described above.

An automated WordPress backup schedule

How to Choose What is in UpdraftPlus Backups on Google Drive

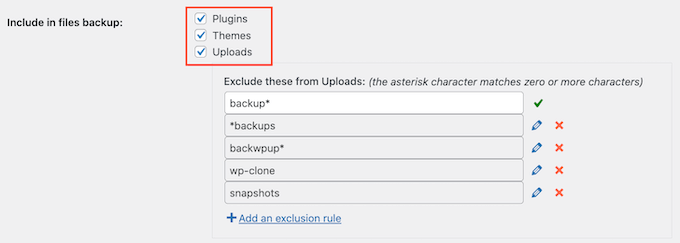
By default, UpdraftPlus will include all your WordPress plugins, themes, and uploads in your Google Drive backups.

In the ‘Settings’ tab, scroll down to the ‘Include in files backup’ section. Here, you can choose whether to include plugins, themes, or uploads in your backup.

To create a complete copy of your WordPress website, you’ll want to leave the default 3 checkboxes selected.

Excluding files from a Google Drive WordPress backup

If you don’t need to include plugins, themes, or uploads in your backups, then you can just uncheck the box next to that setting. Doing so can reduce the size of your backups and take up less space on your Google Drive.

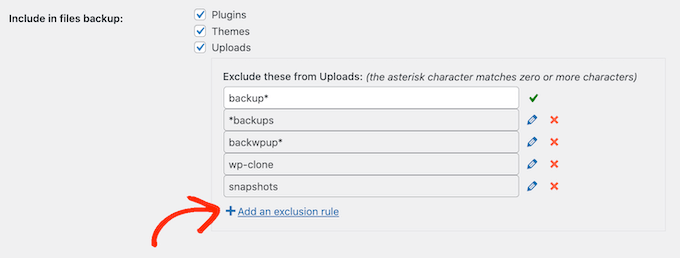
If you leave the ‘Uploads’ box checked, then you can create some rules about the kind of uploads that UpdraftPlus will exclude from its backups.

There are already some exclusion rules. For example, the plugin defaults to excluding all files that have the word ‘backup’ in their file name. To create more rules about the kind of content UpdraftPlus will exclude, simply click on ‘Add an exclusion rule.’

Creating exclusion rules for a WordPress backup

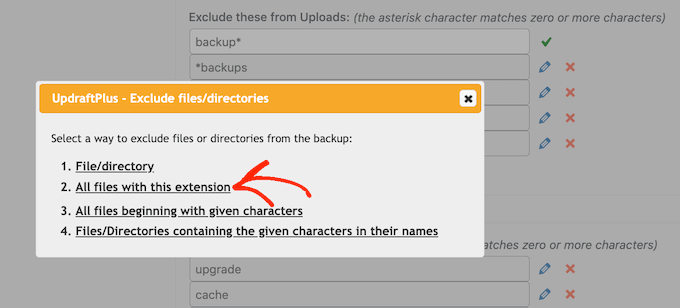
You can then follow the onscreen instructions to create your exclusion rule.

For example, if you wanted UpdraftPlus to ignore all PDF files, then you would start by clicking on ‘All files with this extension’ and type ‘PDF’ in the field that appears.

Adding exclusion rules to your WordPress backup

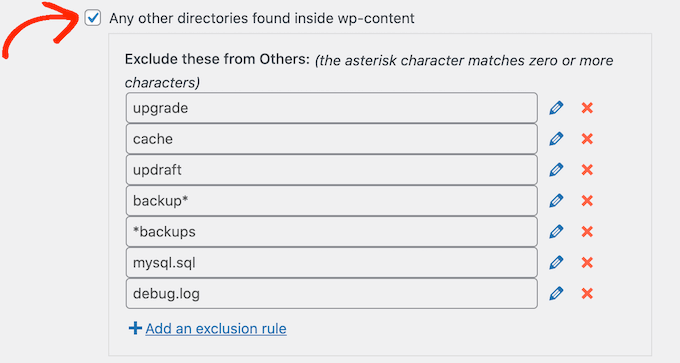
By default, UpdraftPlus also excludes some files from the wp-content folder.

You can see all of UpdraftPlus’ default exclusion rules in the ‘Any other directories found inside wp-content’ section.

Creating an exclusion rule for the wp content directory

Do you need UpdraftPlus to exclude even more content from the wp-content folder? Simply click ‘Add an exclusion rule’ in this section and repeat the same process described above.

If you’re not sure about what to exclude, then we recommend sticking to the default settings. They are a good fit for most websites.

How to Know if an UpdraftPlus Backup to Google Drive was Successful?

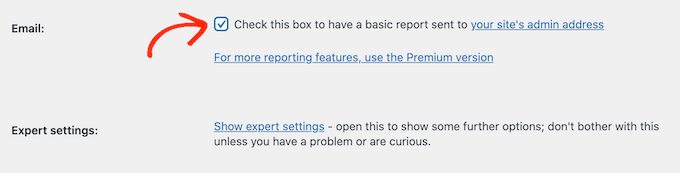
Every time UpdraftPlus successfully creates a backup, it can send an email notification to your site’s admin email address that confirms the backup has been completed. If a backup fails, then you won’t get an email.

In the ‘Settings’ tab, scroll to the ‘Email’ section. You can now enable these notifications by checking the box in this section.

Enabling UpdraftPlus' email notifications

Now, every time UpdraftPlus creates a backup it will send you an email notification.

Once you’ve done all that, click on ‘Save Changes.’ UpdraftPlus will now backup your site to Google Drive automatically.

If you don’t get any emails from UpdraftPlus, then it’s a good idea to check that the plugin is successfully creating backups in your Google Drive.

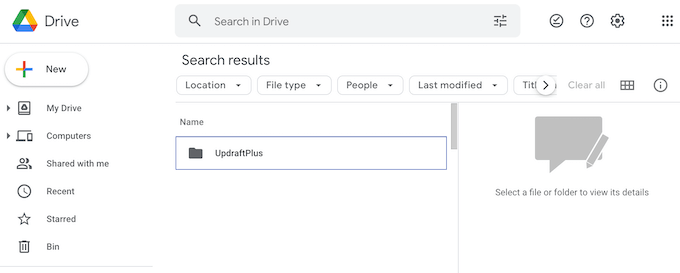
If you’re using the free version of UpdraftPlus, then you should find a new ‘UpdraftPlus’ folder in your Google account.

The UpdraftPlus folder

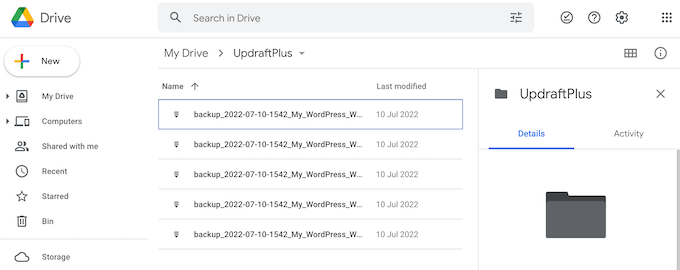
Simply open this folder to see whether it contains any WordPress backups.

In the following image, you can see an example of how a few backups may look in your Google Drive account.

A list of backup files in Google Drive

If UpdraftPlus is creating its backups successfully, but you’re not receiving the email notifications, then there is most likely a problem with how your emails are configured on your WordPress site.

You can see our guide on how to fix WordPress not sending emails to ensure they are sent correctly.

How to Backup Your WordPress Site to Google Drive Manually

Automated backups are a great way to protect your site. However, even after creating an automatic schedule you may sometimes still need to create a manual backup.

It’s a good idea to create a manual backup before making any big changes, such as updating your version of WordPress. You might also create a manual backup after publishing lots of new content.

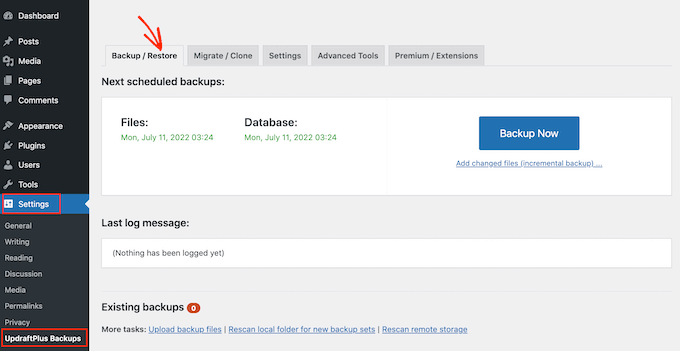
To create a backup your WordPress site on Google Drive manually, go to Settings » UpdraftPlus Backups. You can then simply click on the ‘Backup/Restore’ tab.

Backup your site from Google Drive

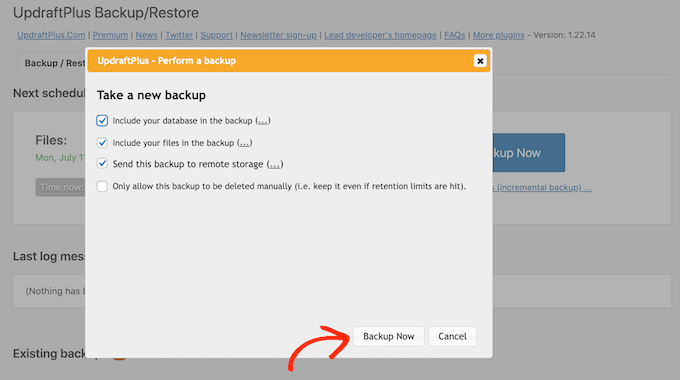
To go ahead and create a manual backup now, you just need to click on the ‘Backup Now’ button. UpdraftPlus will show some basic settings that you can use to configure the manual Google Drive backup.

As with an automated backup, UpdraftPlus defaults to backing up all of your files and the WordPress database. It will also use the same remote storage location that you use for your automated backups. For us, this is Google Drive.

The default settings should be good enough for most websites, so when you’re ready click on the ‘Backup Now’ button.

Creating a manual Google Drive backup for WordPress

Restoring Your WordPress Backup with UpdraftPlus

Creating backups with UpdraftPlus is easy, but the really useful part is the ability to restore them from Google Drive with the same ease.

If your WordPress site was hacked or you just want to start fresh, then the first step is deleting everything and installing WordPress again.

Once you’ve done that, you will need to install and activate the UpdraftPlus plugin again on your new WordPress website. If you need help, then please see our guide on how to install a WordPress plugin.

Upon activation, head over to Settings » UpdraftPlus Backups page and click on the ‘Settings’ tab.

In the ‘Choose your remote storage’ section, click on Google Drive.

The different remote storage choices for a backup

You can now follow the onscreen instructions to give UpdraftPlus access to the Google account where you saved all of your website’s backups in Drive.

After connecting UpdraftPlus to your Google account, click on the ‘Backup/Restore’ tab.

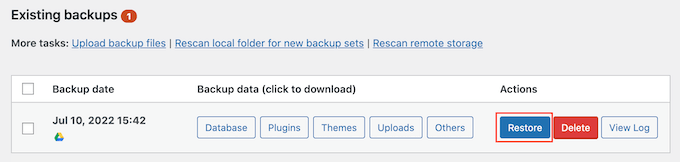
UpdraftPlus will now scan your Google Drive and list all the backups that it discovers. Once complete, you can simply find the backup that you want to restore and click on ‘Restore.’

Restoring your site from Google Drive

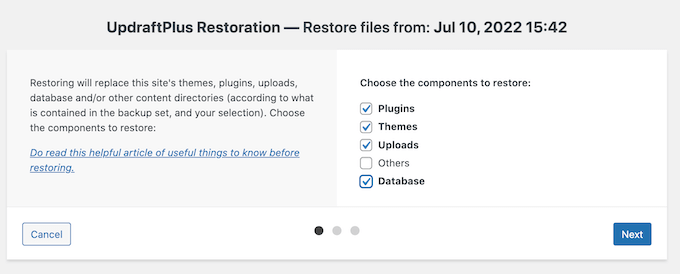
After that, choose the components that you want to restore. If you are restoring to a fresh WordPress installation, checking all the boxes is probably the best idea.

After choosing your components, go ahead and click on the ‘Next’ button.

Restoring your WordPress site from Google Drive

UpdraftPlus will now get all the files that it needs to restore the WordPress backup from your Google Drive.

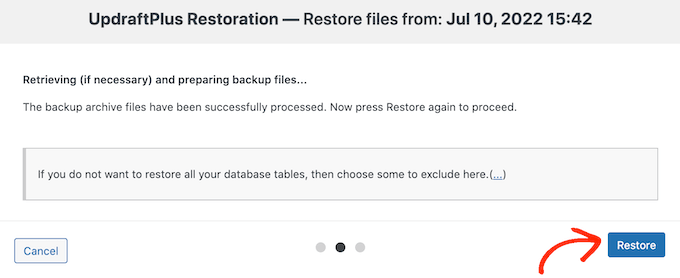
Once it’s successfully imported all the files it needs, you just need to click the ‘Restore’ button. UpdraftPlus will now restore your backup from Google Drive.

Restoring a Google Drive backup

This may take a few minutes depending on the size of your backup, and the speed of your Internet connection.

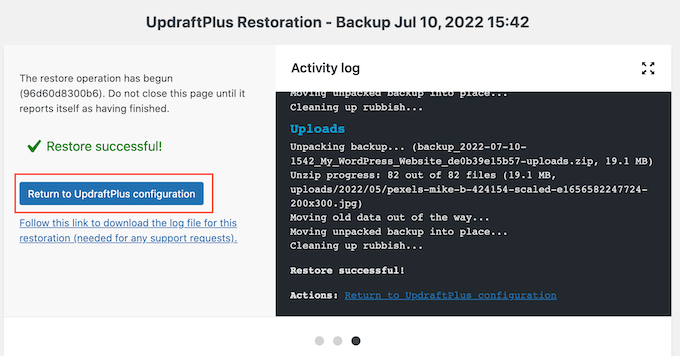
Once it’s finished, you’ll see a ‘Restore Successful’ message at the end of an Activity log. At this point, you can click the ‘Return to UpdraftPlus configuration’ button to return to the settings and finish things up.

The UpdraftPlus settings page

That’s it! You’ve now successfully restored your WordPress website from Google Drive.

We hope this article helped you learn how to backup your WordPress site to Google Drive. You can also go through our ultimate WordPress security guide and the most common WordPress errors and how to fix them.

If you liked this article, then please subscribe to our YouTube Channel for WordPress video tutorials. You can also find us on Twitter and Facebook.

The post How to Backup Your WordPress Site to Google Drive (Free and Easy) first appeared on WPBeginner.


July 28, 2022 at 04:00PM

Wednesday, July 27, 2022

How to Add Conditional Logic to Menus in WordPress

Do you want to show different navigation menu items for different pages in WordPress? Or display a different menu for logged in users?

WordPress allows you to show a navigation menu in a specific location in your theme, but by default, it will always show the same menu.

In this article, we will show you how to add conditional logic to menus in WordPress.

How to Add Conditional Logic to Menus in WordPress

Why Add Conditional Logic to Menus in WordPress?

Navigation menus give your WordPress website structure and help visitors find what they’re looking for. By default, your WordPress website will display the same navigation menu to all users and on all posts and pages.

However, there may be times when you wish to display different menus to different users, or on different pages on your website.

Websites like an online store, a WordPress membership site community, or an online learning platform can all benefit from personalized navigation menus.

Using conditional logic, you could add extra menu items for logged in users so they can manage their accounts, renew their subscriptions, or view the online courses they purchased. You can think of it as WordPress menu access control.

With that being said, let’s take a look at how to add conditional logic to menus in WordPress. Here are the topics we’ll cover in this tutorial:

Creating New Navigation Menus in WordPress

The first step is to create the additional navigation menus you wish to display in WordPress. After that, you can use conditional logic to decide when each menu will be displayed.

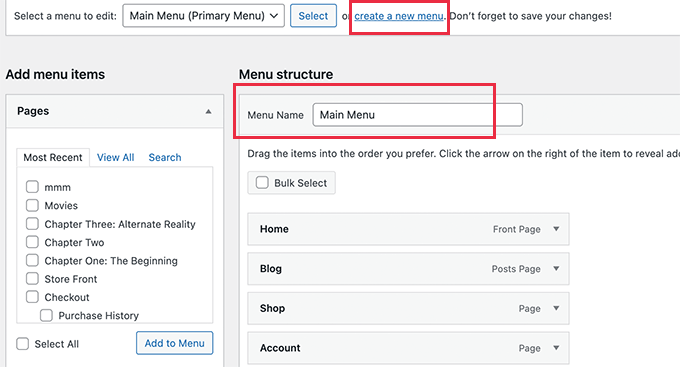
Simply head over to the Appearance » Menus page in the WordPress dashboard. If you already have a navigation menu that you use on your website for all users, then this can be your default menu.

Main menu

Next, you need to click the ‘create a new menu’ link to create a new menu. For example, you could create one menu to show to logged in users, and another to display on a certain WordPress page or category.

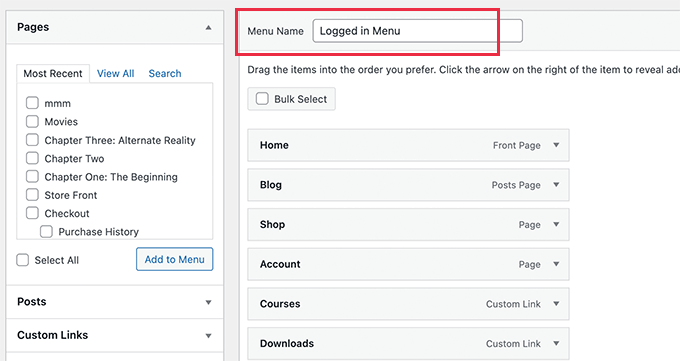
On the left-hand side of the screen, you can see a list of your website pages. Simply check the box next to any page you want to add to your menu and click the ‘Add to Menu’ button.

Logged in menu

You can also drag and drop the menu items on the right side of the screen to rearrange them.

Further down the page, you can choose a location to display your menu. But, you don’t need to assign a location to this menu now. We’ll do that in the next step.

Don’t forget to click on the ‘Save Menu’ button to store your changes.

For more details on creating menus, you can take a look at our beginner’s guide on how to add a navigation menu in WordPress.

Showing a Different Menu to Logged In Users in WordPress

It’s often useful to display different navigation menus to users depending on whether they have logged in to your site or not.

For example, you can include login and registration links for logged out users and add a logout link to your menu for your logged in menu.

Or if you are running a WooCommerce store, then you could include items for your customers that are hidden from the general public.

First, you need to install and activate the Conditional Menus plugin. For more details, see our step-by-step guide on how to install a WordPress plugin.

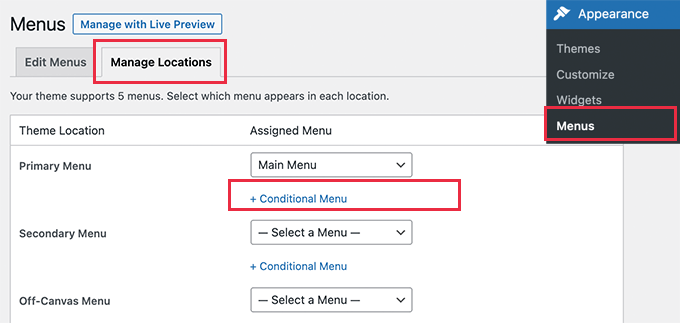
Upon activation, you need to visit the Appearance » Menus page and switch to the ‘Manage Locations’ tab.

Manage menu locations

From here, you will see the list of available menu locations and the menus that are currently displayed. These will vary depending on the WordPress theme you are using.

For example, on our demo website, it is showing that our Primary Menu location is showing a navigation menu titled ‘Main Menu’.

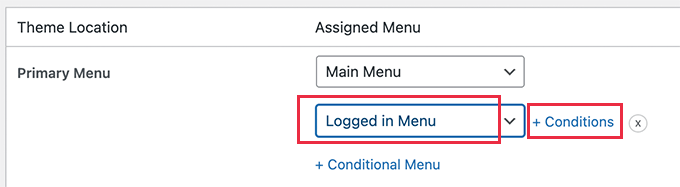
We can tell the plugin to show a different menu when a certain condition is matched by clicking on the ‘+ Conditional Menu’ link and selecting another menu from the drop down menu. For this tutorial, we’ll select ‘Logged in Menu’.

Select logged in menu

Next, you need to click on the ‘+ Conditions’ link.

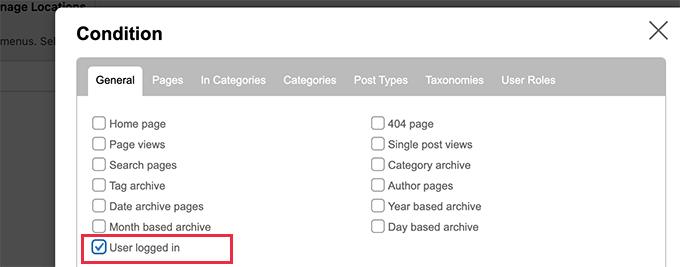
This will bring up a popup where you’ll see a bunch of conditions to choose from.

Select logged in user aa the condition

Simply check the box next to the ‘User logged in’ option, and then click on the ‘Save’ button.

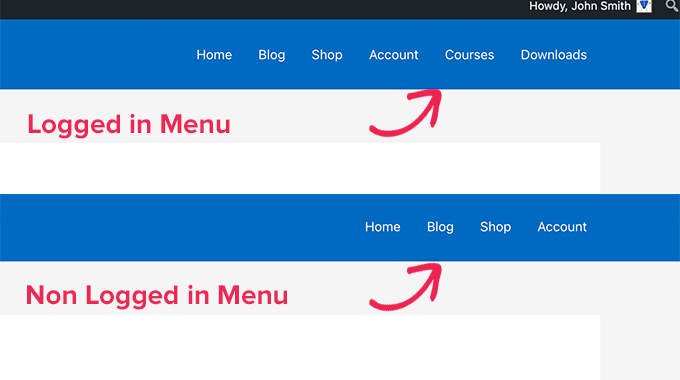
You can now visit your website to see the logged in user menu in action. You can log out of your website to see the navigation menu that is shown to all other users.

Different menu for logged in users

For more detailed instructions and to learn how to do this using code, take a look at our guide on how to show different menus to logged in users in WordPress.

Showing a Different WordPress Menu Depending on User Role

Once a user has logged in, you can also display a different navigation menu depending on the user role you have assigned to them.

For example, you could include extra menu items for an administrator and more limited items for a contributor. Or on a membership site, you could grant different levels of access to different membership levels.

As in the previous section, you need to install and activate the Conditional Menus plugin, then visit the Appearance » Menus page and switch to the ‘Manage Locations’ tab.

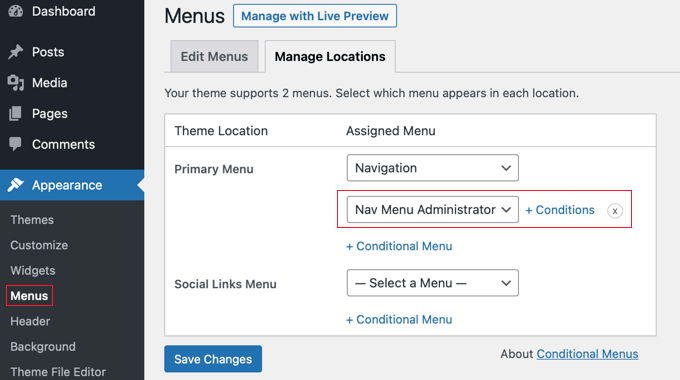
Select the Conditional Menu

You should add the appropriate conditional menu for the user role you will select. For this tutorial, we’ve selected the ‘Nav Menu Administrator’ menu.

After that, you need to click the ‘+ Conditions’ link so you can choose the user role.

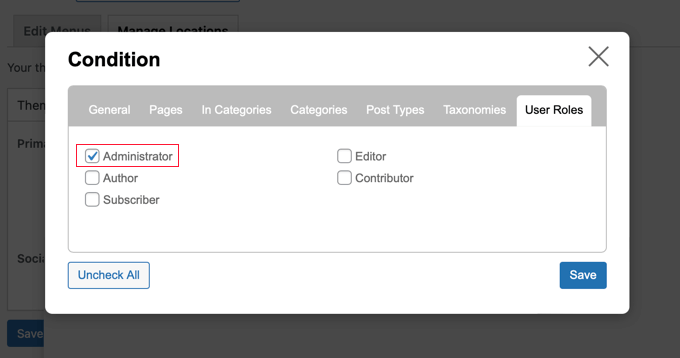
Select the Roles That Should See the Menu

You will need to click on the ‘User Roles’ tab to see checkboxes for each user role on your website. Simply click the user roles that will see this menu, and then click the ‘Save’ button.

Showing a Different Menu for Different Pages in WordPress

You can display a different menu for different pages in WordPress. For example, you could display extra menu items on your privacy policy page, such as a link to your cookie notice.

To do this, you need to install and activate the Conditional Menus plugin, as shown above, then choose the appropriate navigation menu and click the ‘+ Conditions’ link.

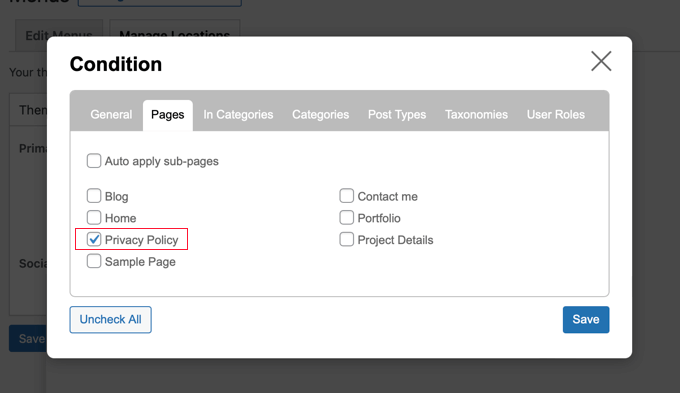
This time you should click the ‘Pages’ tab. You will see a list of every page on your website.

Select the Pages Where the Menu Should Be Displayed

You need to place a checkmark next to each page where you wish to display the navigation menu, then click the ‘Save’ button.

Hiding the Navigation Menu on Landing Pages in WordPress

There may be pages on your website where you don’t want to display a navigation menu at all, such as your landing pages.

A landing page is designed to increase sales or generate leads for a business. On these pages, you will want to minimize distractions and provide users with all the information they need to take a specific action.

In our guide on how to increase your landing page conversions by 300%, we suggest that you can minimize distractions by removing navigation menus and other links from the page.

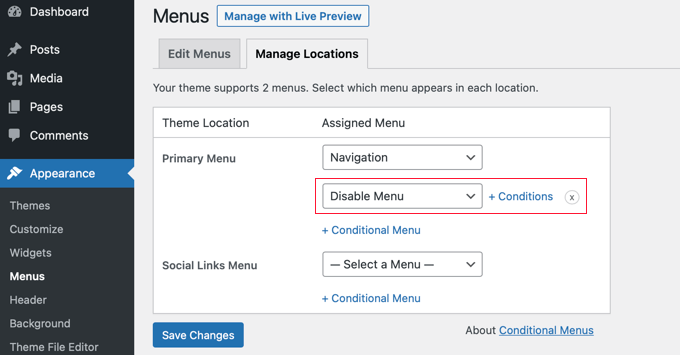
You can do that using the Conditional Menus plugin. When selecting the conditional menu, this time you need to choose ‘Disable Menu’ from the drop down menu.

Select Disable Menu From the Drop Down

Next, you need to click the ‘+ Conditions’ link to choose when to display the menu.

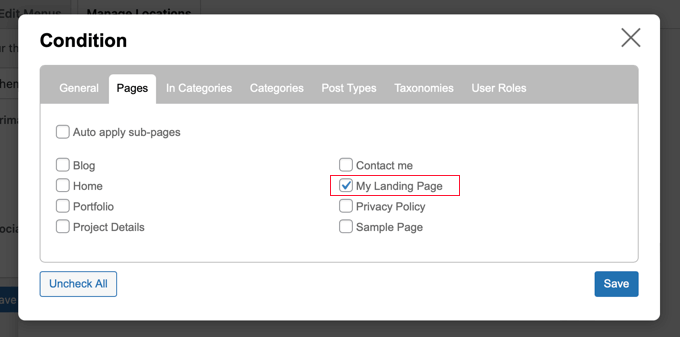
You should click on the ‘Pages’ tab and place checkmarks next to your landing pages.

Select the Pages Where the Navigation Menu Should Be Hidden

Don’t forget to click the ‘Save’ button to store your settings.

Doing More With WordPress Navigation Menus

Navigation menus are a powerful web design tool. They allow you to point users to the most important sections of your website.

Now that you are showing different navigation menus on different pages and for different users, you may be wondering how you can customize them further.

Try these useful tutorials to extend the functionality of the navigation menus on your WordPress website.

We hope this tutorial helped you learn how to add conditional logic to menus in WordPress. You may also want to learn how to create automated workflows, or check out our list of the best social proof plugins for WordPress and WooCommerce.

If you liked this article, then please subscribe to our YouTube Channel for WordPress video tutorials. You can also find us on Twitter and Facebook.

The post How to Add Conditional Logic to Menus in WordPress first appeared on WPBeginner.


July 27, 2022 at 02:00PM