Certified WordPress Developer and SEO Specialist with 10+ years of experience on Fiverr. I provide expert solutions for WordPress error fixing, debugging, speed optimization, and security hardening. Services include hacked site recovery, malware removal, on-page SEO optimization, and full customization to ensure your website runs fast, secure, and ranks higher on Google.
Do you want to add emoji support to your WordPress blog?
Using emojis in WordPress is super easy because WordPress has built-in emoji support. You can use emojis in WordPress anywhere without installing any separate plugins.
In this article, we’ll show you how to easily use emojis in WordPress on different devices.
What are Emojis?
Emojis are tiny image icons that can be used in line with text to express emotions and other expressions.
Emojis came from the textual representation of facial expressions in online communications. In the early days of the internet, text and punctuation were used to represent facial expressions, and these were called smileys.
Gradually, this evolved into graphical representations of those expressions. They were called several names Emoticons, Emojis, Twemojis, and more.
They have been around since the late 90s and were gradually adapted by different platforms on the web and mobile devices.
WordPress added support for modern emoji characters in WordPress 4.2. Before that, you needed a separate WordPress emoji plugin to add emoji on your WordPress website.
That being said, let’s look at how to add emojis in WordPress.
Using Emojis in WordPress on Windows
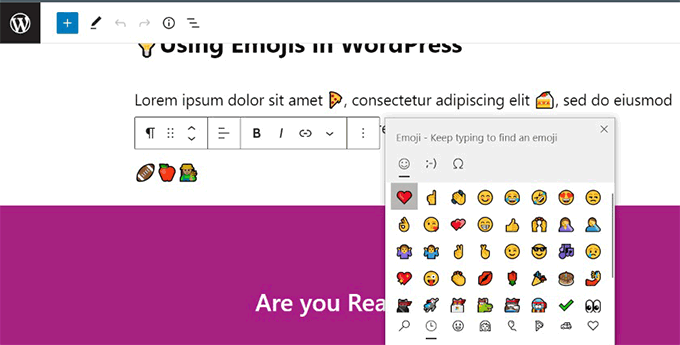
Simply edit the post or page where you want to insert emojis. In the WordPress content editor, click on a text area and then press the Windows + . (Period) shortcut keys on your keyboard.
This will bring up a popup showing emojis. You can search for emojis you want to use or browse them.
Once you have found the Emoji that you want to use, click to insert it into the text area.
Using Emojis in WordPress on Mac
Once again, you need to edit the post, page, or any other text edit area on your WordPress blog.
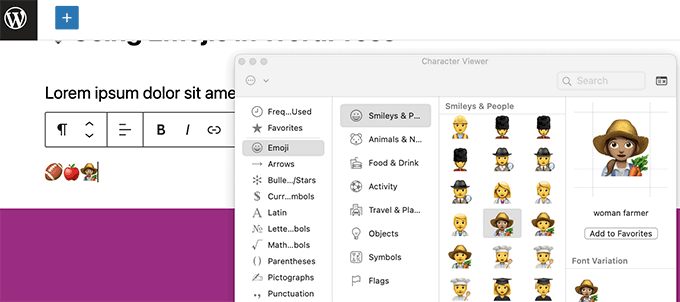
Click to ensure the cursor is inside a text area, and then press the Command + Control + Space keys together.
This will bring up a popup where you can browse and look for emojis. Once you find the emoji you want to use, you’ll need to double-click to insert it into your text.
Using Emojis in WordPress on iOS and iPadOS
If you are working on your WordPress website using iPhone or iPad, then you can easily switch to the emoji keyboard on your device to add emojis.
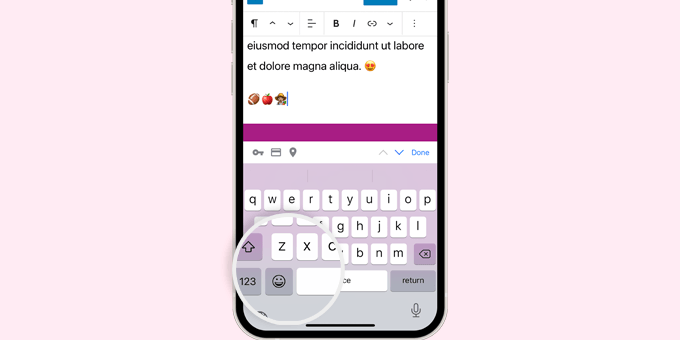
Simply login to WordPress on your iOS or iPad device. Edit the post or page where you want to use emojis and tap on a text area. You’ll now see the native keyboard appear on screen.
Now tap the Emoji button to switch to the Emoji keyboard. Your device will show emojis that you can add.
You can browse emojis by category or search for an emoji icon. Once you have found the emoji, simply tap to insert it into your post.
You can then tap on the ABC button to switch back to the text keyboard.
Using Emojis in WordPress on Android
Android phones and tablets also come with built-in support for emojis.
Simply edit the WordPress post or page where you want to use emojis. On the edit screen, tap on a text area and your device’s native keyboard will appear.
On the keyboard, tap on the Emoji button to switch to the Emoji keyboard.
You’ll now see the emoji keyboard where you can search or browse to find the emoji that you want to add.
Simply tap on the emoji to add it to your WordPress post.
You can switch back to the text keyboard by taping on the ABC button.
Disable Emojis plugin disables Emoji functionality in WordPress. However, you can still add emojis in all modern web browsers.
The plugin only disables the DNS prefetching of emojis within WordPress. This is done to improve privacy and make a WordPress website more GDPR compliant.
One of our readers recently asked if it was possible to integrate Shopify in your WordPress website?
Using Shopify with WordPress allows you to combine the eCommerce features of Shopify with the powerful website platform on the planet, WordPress. This gives you more flexibility and freedom to grow your business.
In this article, we’ll show you how to easily connect Shopify with WordPress to grow your business.
Here is a quick overview of the topics we’ll cover in this article.
WordPress is the best website builder in the world powering more than 43% of all websites on the internet.
It is incredibly easy to use and gives you access to thousands of free and paid WordPress themes and plugins (apps for your WordPress website).
On the other hand, Shopify is a popular eCommerce platform that helps you easily sell products online.
You can use WordPress with WooCommerce to create your online store, but some users may want to use Shopify for their online store and WordPress for their website.
For more details, see our comparison of Shopify vs WooCommerce with the pros and cons of both platforms.
Combining Shopify and WordPress gives you the advantages of both platforms. You can sell products with Shopify while enjoying the flexibility and freedom of WordPress to manage your website.
That being said, let’s take a look at how to easily use Shopify with WordPress.
What Do You Need to Get Started?
If you don’t have a Shopify store, then you can go ahead now and create your Shopify store. You can quickly add a few products and then come back here.
There are two types of WordPress. First, there is WordPress.com which is a website hosting service. Then you have WordPress.org also called self-hosted WordPress.
You’ll need WordPress.org because it gives you instant access to all WordPress features out of the box. For more details, see our comparison of WordPress.com vs WordPress.org.
To make a WordPress.org website, you’ll need a domain name (like wpbeginner.com) and a web hosting account.
A domain name costs around $14.99 per year, and website hosting plans start at $7.99 per month (usually paid yearly).
Our friends at Bluehost have agreed to offer WPBeginner users a free domain name with a generous discount on hosting. Basically, you can get started for $2.75 per month.
Once you have signed up for Bluehost, they’ll automatically install WordPress for you.
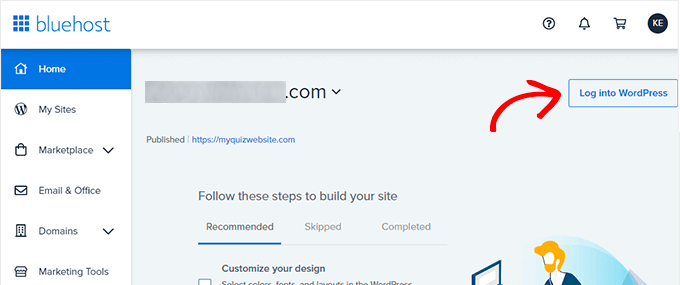
You’ll see your WordPress site under the My Sites section in your Bluehost account.
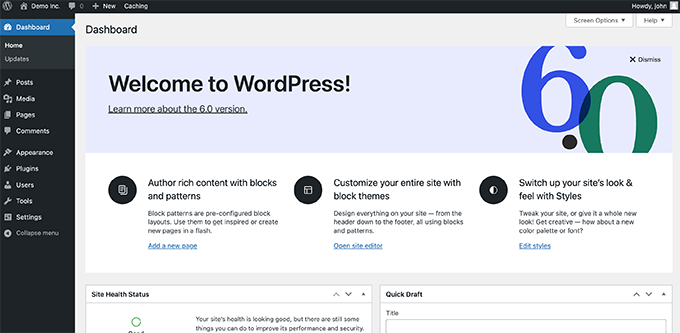
Simply click on the ‘Log into WordPress’ button to access your WordPress admin dashboard.
It would look something like this:
Connecting WordPress to Your Shopify Store
Now, the next step is to connect your WordPress website to your Shopify store.
For that, you’ll need the ShopWP plugin. It is a Shopify plugin for WordPress that allows you to easily connect WordPress to your Shopify account.
First, you need to install and activate the ShopWP plugin on your WordPress site. For more details, see our step by step guide on how to install a WordPress plugin.
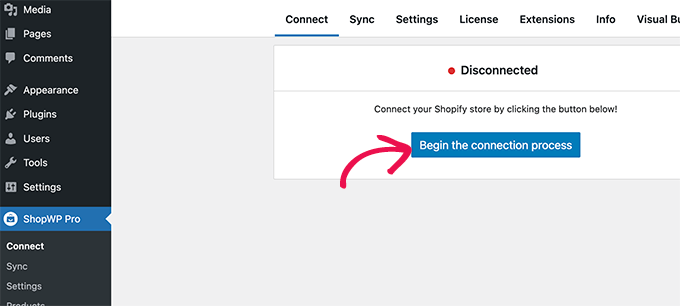
Upon activation, you need to visit the ShopWP Pro » Connect page and click on the ‘Begin the connection process’ button to launch connection wizard.
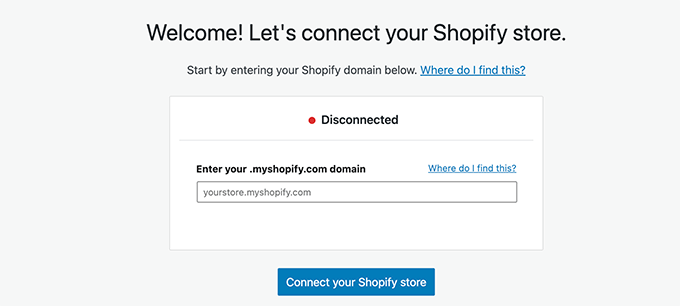
This will launch the connection wizard.
First, you’ll be asked to enter your myshopify.com domain name.
Click on the ‘Connect your Shopify store’ button to continue.
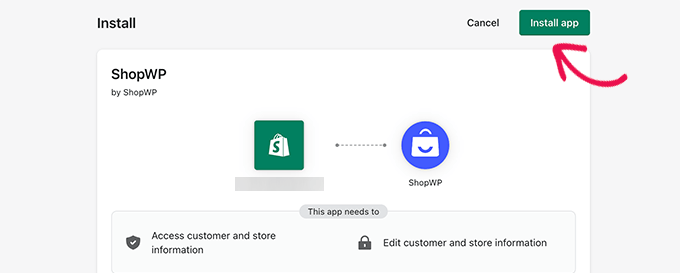
Next, you’ll be asked to allow ShopWP app access to your Shopify store. Simply click on the Install App button to start the connection process.
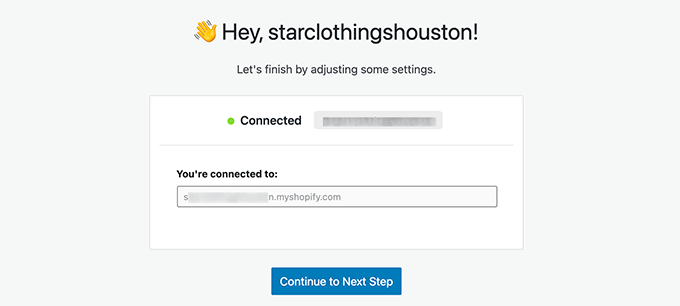
This will take you back to your WordPress website.
The plugin will confirm that your website is connected to the Shopify store.
Click on the Next button to continue.
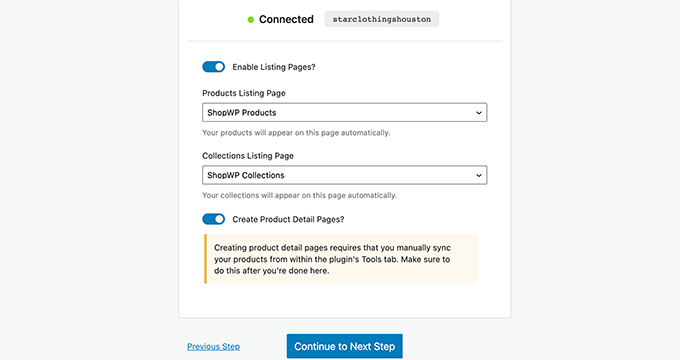
Now, you’ll be asked to configure different settings for your store, starting with the pages you want to use for your Shopify products.
You can turn on listing pages and then choose a WordPress page or use the default ShopWP Products page.
Similarly, you can turn on collection pages and individual product detail pages.
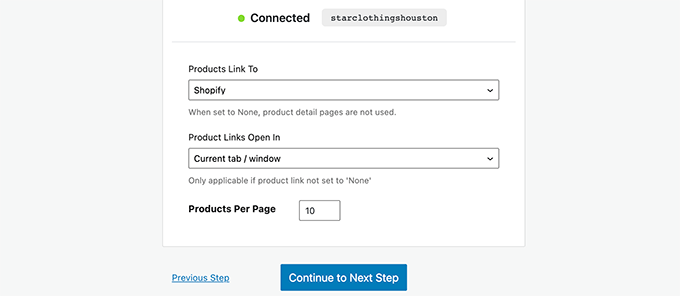
In the next step, you can choose what happens when users click on the products. You can show the product in a modal, or redirect users to Shopify or the WordPress product detail page.
Next, you can choose how you want to display the cart. ShopWP comes with a custom cart experience that shows the cart in a slide-in modal. You can turn it off if you are using individual product detail pages in WordPress.
Click on the Save and Finish Setup button to exit the wizard.
Next, you need to sync products between your WordPress website, and your Shopify store.
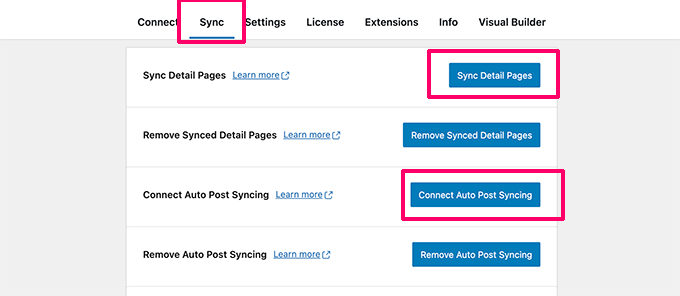
Simply switch to the Sync tab under plugin settings.
From here, you need to click on the Sync Detail Pages and Connect Auto Post Syncing buttons. This will allow the plugin to fetch any product details as you add new products to your Shopify store.
That’s all! You have successfully connected your Shopify store to WordPress.
Displaying Shopify Products in WordPress
ShopWP allows you to easily display your Shopify products anywhere on your WordPress blog.
If you are using the default settings, then the plugin will create a ShopWP Products page for you which will display your Shopify products.
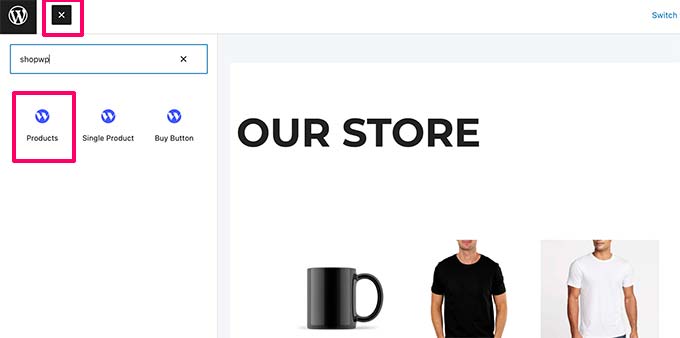
You can also display products on any WordPress post or page by simply editing it and adding the Products block.
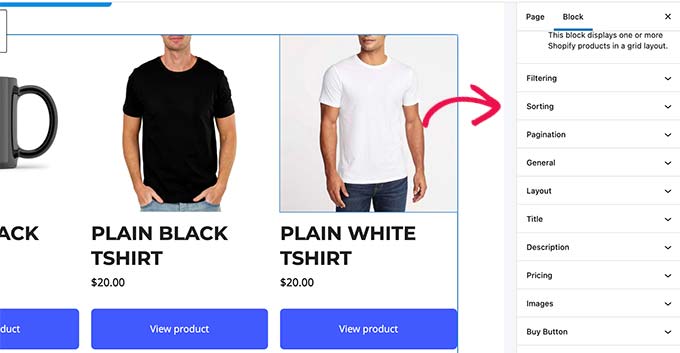
The block comes with a bunch of settings that you can configure to change the appearance of products.
The settings include the layout, colors, product details to display, and more.
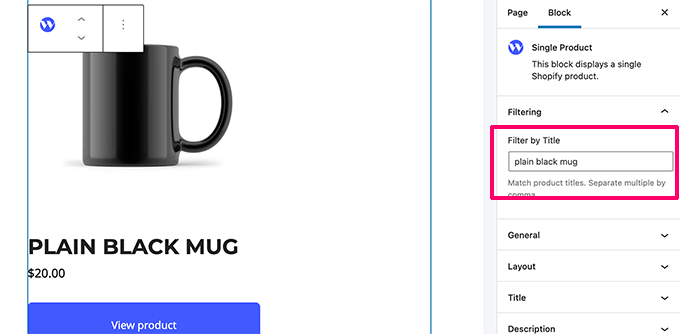
Similarly, you can also add a Single product block to display a single product.
You’ll be able to find the product you want to display by typing product title in the block settings.
The plugin comes with powerful display options that you can control in block settings or under the plugin settings page.
Customizing Your WordPress Website
Now that you have connected your Shopify store to your WordPress website, the next step is to continue setting up your WordPress site properly.
First, you would want to choose a theme for your WordPress site. Your WordPress theme controls your site’s overall design and layout.
There are thousands of premium and free WordPress themes to choose from. To get started, you can take a look at our roundup of the most popular WordPress themes. We’ve also hand-picked a list of of the best clothing store themes.
Want to design your own theme layout? You can do that with SeedProd. It’s a drag-and-drop WordPress site builder that allows you to create your own custom theme without writing any code.
Next, you would want to create content for your WordPress website.
You can use pages to create your website structure by adding home, blog, shop, contact, and about pages. See our list of important pages to create in WordPress.
The best part about using WordPress is that it comes with thousands of plugins and works with all the marketing tools that you’ll need to grow your business.
Following are a few essential tools and plugins that you may want to install right away.
1. OptinMonster – The best conversion optimization software, OptinMonster allows you to convert website visitors into customers. It comes with tools like sticky banners, countdown timers, lightbox popups, and more. The best thing is that OptinMonster works with both WordPress and Shopify, so you can use one plugin for both platforms.
2. WPForms – The best WordPress form builder plugin that allows you to easily create contact forms, surveys, polls, and basically any kind of forms you need for your website.
3. All in One SEO for WordPress – The best WordPress SEO plugin on the market, it allows you to easily optimize your website for search engines. This helps you bring more traffic to your website. The one feature you absolutely need from this plugin is the ability to add your Shopify store to your WordPress sitemap.
4. MonsterInsights – Want to see where your traffic is coming from? MonsterInsights helps you install Google Analytics and easily setup enhanced eCommerce tracking.
5. TrustPulse – Adds social proof to your eCommerce store by displaying targeted messages to users with real time user actions on your website. TrustPulse works with both WordPress and Shopify.
We hope this article helped you learn how to easily integrate Shopify with WordPress. You may also want to see our expert pick of the best email marketing services and best live chat software to grow your business.
If you liked this article, then please subscribe to our YouTube Channel for WordPress video tutorials. You can also find us on Twitter and Facebook.
Do you want to make a volunteer application form in WordPress?
By adding an application form to your website, you can recruit more volunteers and automatically collect the information you need from them. This can save you time and allow you to build a network of people who are willing to help out.
In this article, we will show you how to make a great volunteer application form in WordPress, even if you’ve never created a form before.
Why Create a Volunteer Application Form in WordPress?
Many organizations rely on volunteers, especially charities and nonprofits. However, going back and forth with potential new volunteers over email can take a lot of time. Many nonprofits still use paper forms to recruit new helpers, which can take even more time to process.
By adding a volunteer application form to your WordPress website, you can easily reach more people who may be browsing your site and decide to help you out.
A volunteer application form also tells visitors exactly what information you need, such as their email address or phone number and any previous volunteering experience. This means you don’t have to spend time on follow-up emails and phone calls, trying to get all of the information you need from a new volunteer.
A good form builder plugin will also show all of its data in the WordPress dashboard in a nicely organized way, and send email notifications to the right people for follow-up.
With that said, let’s show you how to easily create a great volunteer application form in WordPress, step by step.
Creating Your Volunteer Application Form in WordPress
The easiest way to create a great volunteer application form in WordPress is by using the WPForms plugin.
WPForms is the best WordPress form builder plugin on the market. It is beginner-friendly and is used by over 5 million websites. With WPForms you can quickly create any kind of online form you need with their drag-and-drop builder.
Note: In this guide we’ll be using the WPForms Pro version because it has hundreds of pre-made form templates including a ready-made volunteer application template. If you’re on a budget, then there is also a free WPForms Lite version that you can use.
First thing you’ll need to do is install and activate the WPForms plugin. For more details, please see our step by step guide on how to install a WordPress plugin.
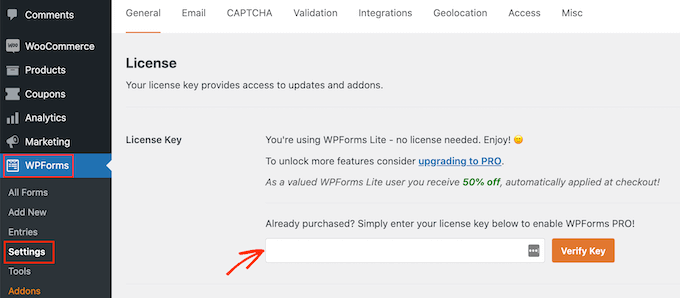
Upon activating the plugin, you need to visit WPForms » Settings page in your WordPress dashboard to enter your license key. You can find this information under your account on WPForms website.
If you’re using the free version, then you can skip this step.
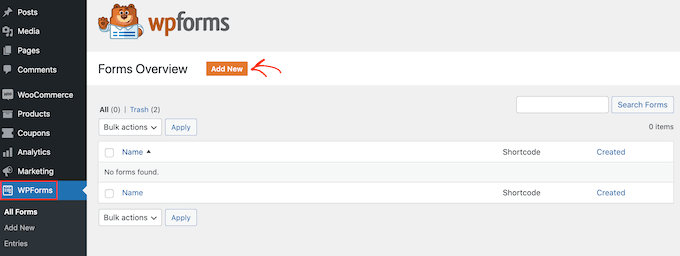
Next, you need to click on WPForms » Add New page to create your Volunteer Application Form in WordPress.
This will open the WPForms drag & drop form builder where you need to start by typing a name for your form and then select your form template.
WPForms comes with
hundreds of pre-made form templates to help you quickly build any type of forms
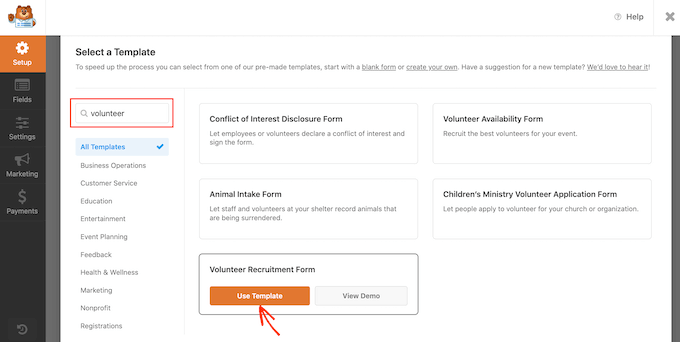
such as a contact form, online order form, etc. Since we want to create a volunteer application form, simply type “Volunteer” in the template search bar.
You will now see several volunteer form templates to choose from. We will select “Volunteer Recruitment Form” by clicking on the ‘Use Template’ button.
WPForms will now create a volunteer application form for you.
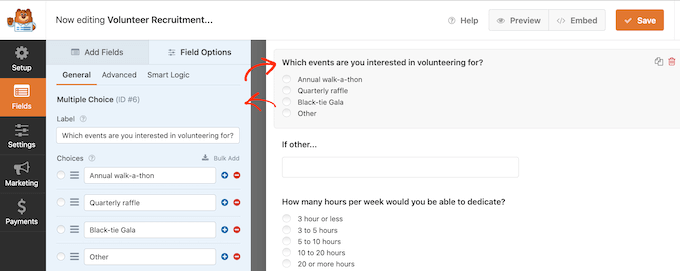
You can then easily customize this form to better fit your needs. To edit or change anything, simply click on the form field that you want to change.
WPForms will now show all of the settings that you can customize on this field.
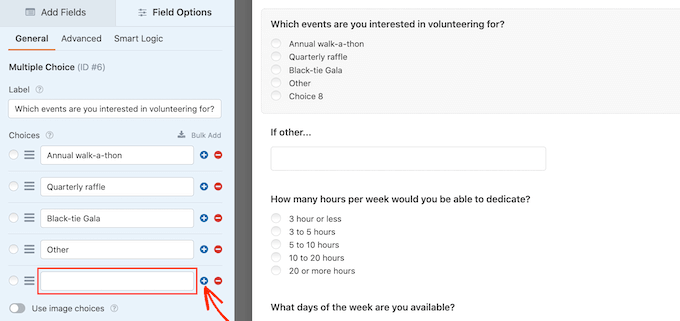
Want to change the text that appears in this form field? Then simply edit the text in the left-hand menu.
To customize existing multiple choice options, just click on any of the + buttons. This will let you add more options.
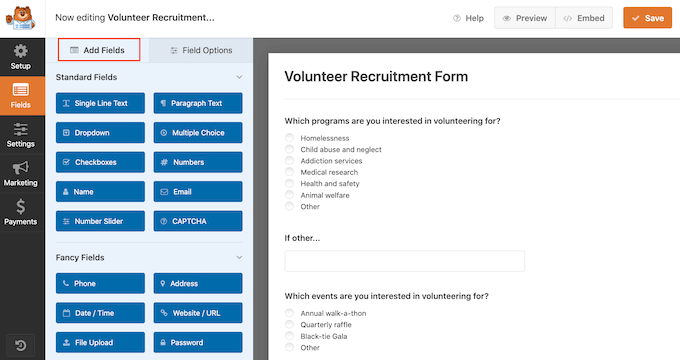
You can easily add more questions or options to your volunteer application form by clicking the Add Fields tab in the left-hand menu.
This shows all the fields that you can add including some more advanced options such as the ‘File Upload’ field.
The ‘File Upload’ field lets volunteers submit a file alongside their application. For example, you might ask for a copy of their CV or resume. To learn more, see our step by step guide on how to create a file upload form in WordPress.
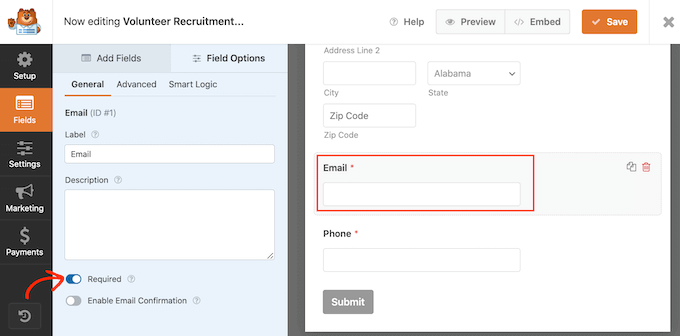
You may want to make some fields required, such as the field where applicants can type in their email address. If you make a field mandatory, then visitors cannot submit the form without filling in this field.
To make a field mandatory, simply click to select that field. Then in the left-hand menu click on the ‘Required’ slider to turn it from grey to blue.
You and your volunteers can easily see which fields are required because they’ll have a small red asterisk next to the field label.
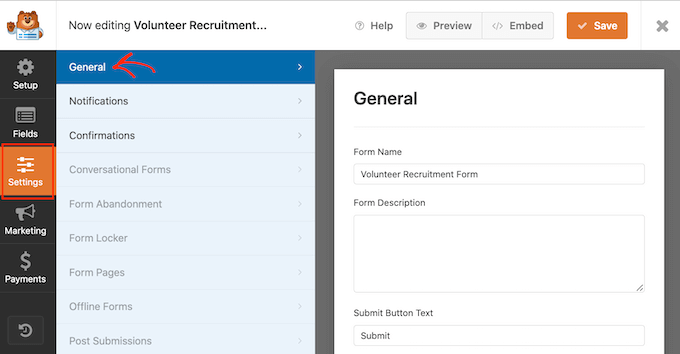
When you’re happy with how your volunteer application form looks, click on ‘Settings’ in the left-hand menu.
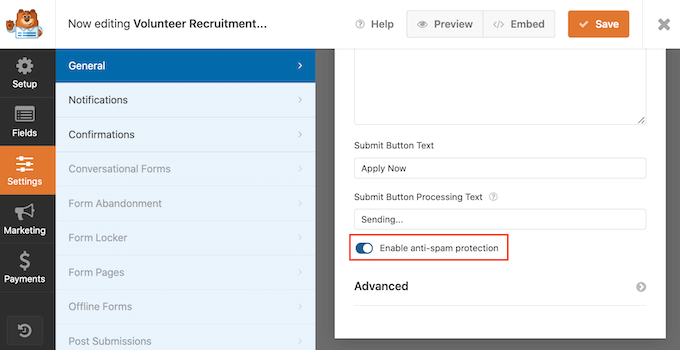
On the ‘General’ settings tab, you can change various form related settings such as the submit button text, setup spam protection, and more.
As the leading WordPress form building solution, WPForms comes with advanced anti-spam settings to help you reduce form spam.
You can see that it’s automatically enabled by default under the ‘Enable anti-spam protection’ slider. Unless you’re going to use a different form of spam prevention instead, we recommend keeping this honeypot enabled.
Even if you do send a notification email, it’s still a good idea to show an on-screen confirmation every time someone successfully submits a form.
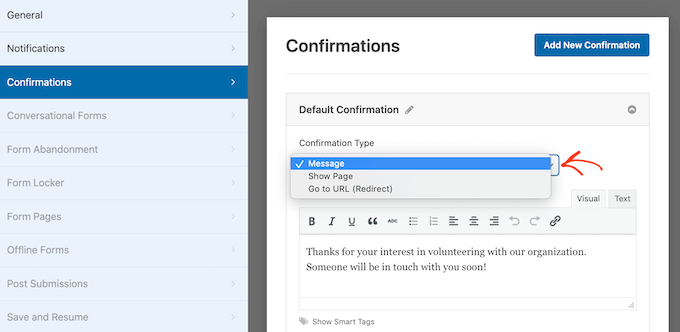
There are a few different ways to do this. WPForms allows you to either show a confirmation message on the same page, or you can redirect the user to a custom Thank You page on your site.
You can configure these settings by going to the Confirmation tab on the Settings panel and then choose from the Confirmation type options.
Most organizations will just use the default Message, but some may create a custom thank you page, or even redirect the visitor to your events calendar, so they can start learning about your upcoming fundraising events.
When you’re happy with how your confirmation message is set up, click on the ‘Save’ button to save your changes.
Bonus Tip: WPForms integrates will all the best email marketing services. If you have an email newsletter, then WPForms makes it easy to add your new volunteers to this newsletter.
Adding Your Volunteer Application Form to Your Site
Now you’re ready to add your form to your WordPress website, so people can start applying to become a volunteer.
With WPForms, it’s easy to add your form to any page, post, or widget-ready area on your site.
Most of the time you’ll want to show your form on a page or post. To do this, either create a new page or post, or open an existing one in the WordPress editor.
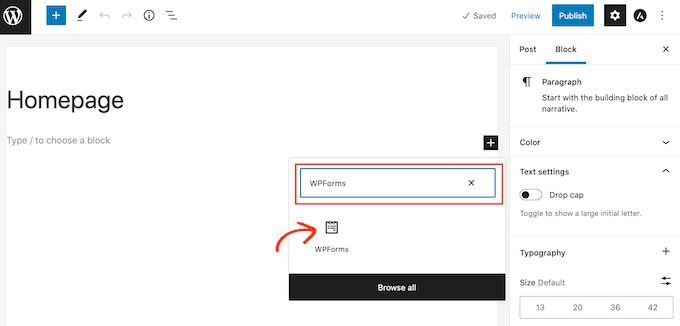
In the WordPress block editor, click on the + button to create a new block. In the popup that appears, type ‘WPForms’ to find the right block.
Then just click on the ‘WPForms’ block to add it to your page.
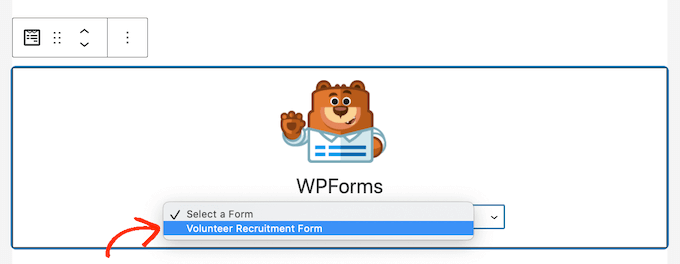
Next, open the dropdown menu in the WPForms block.
You’ll now see a list of all the forms you’ve created. Simply go ahead and click on the volunteer application form to add it to your page.
If you’re happy with how the form looks, then you can publish or update the page. Now you can visit your website to see your volunteer application form live.
It’s also a good idea to test your form to make sure it’s working. Simply fill out and submit the form, and check that you see a confirmation message. You should also get an email notification that the form has been filled in.
If you don’t get an email, then there could be an issue with how your emails are set up in WordPress. To learn more, see our guide on how to fix the WordPress not sending email issue.
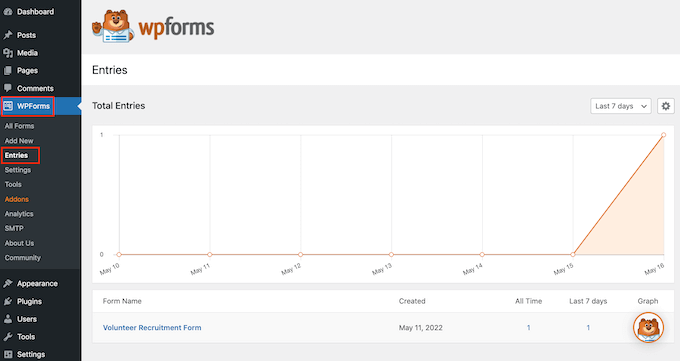
Once you’ve published your form, you can go to WPForms » Entries to see all of your volunteer applications.
You’ll see ‘Abandoned’ as the status for the entries where a visitor decided to leave the form without submitting. For more information, please see our guide on how to track and reduce form abandonment in WordPress.