Thursday, August 4, 2022

How to Display Your WordPress Posts in a Grid Layout

Do you want to display WordPress posts in a grid layout?

A grid layout gives you more flexibility when displaying your posts in WordPress. This can be helpful when creating custom pages.

In this article, we’ll show you how to easily display your WordPress posts in a grid layout anywhere on your site. 
How to display your WordPress posts in a grid layout (4 ways)

When Do You Need a Grid Layout for WordPress?

Every WordPress theme supports the traditional vertical layout of blog posts, and this works well for most kinds of websites. However, this layout can take up a lot of space, especially if you have a lot of posts.

If you’re creating a custom homepage for your site, then you may want to use the grid layout to display your recent posts.

This will give you more space to add other elements to your home page.

Plus, your post grid will highlight your featured images, so it’s visually appealing and clickable. You can also use the post grid to show off your creative portfolio and other types of custom content.

Many magazine themes and photography themes already use the grid-based layout to display posts. However, if your theme doesn’t support this functionality, then you’ll need to add it. 

With that said, let’s show you how to display your WordPress posts in a grid layout. Simply use the quick links below to jump straight to the method you want to use.

Method 1. Create a WordPress Post Grid Layout with Block Editor

This method lets you simply display your posts and thumbnails in a post grid layout using the WordPress block editor. There’s a built-in post grid block that lets you create your own grid. 

To do this, open up the page you want to edit, then click the ‘Plus’ add block button and search for ‘Query Loop’, then click the block to add it.
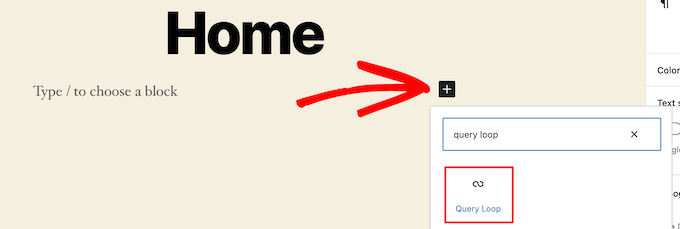
Add query loop block

This block adds your post loop to your page. 

Then, click the ‘Start Blank’ option at the top of the block to create a post grid. 
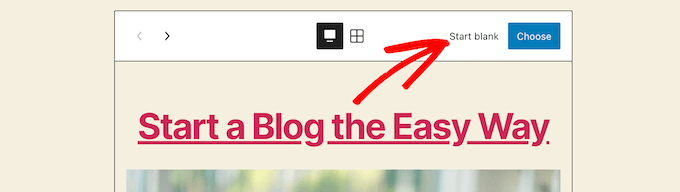
Click start blank option

This gives a few different choices depending on the type of information you want to display with your post grid.

We’ll select the ‘Image, Date, & Title’ option, but you can choose whatever you like.
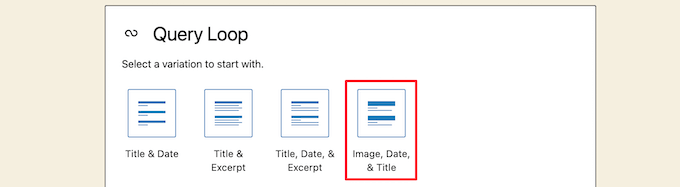
Select the type of query loop

After that, hover over the image and select the ‘Grid View’ option.

This turns your list into a post grid.

Click on grid view option

Next, you can customize the information you want to display.

First, we’re going to delete the pagination at the bottom of the block. To do this, simply click on it, and click the ‘Three Dots’ options menu.

Then, click on ‘Remove Pagination’.
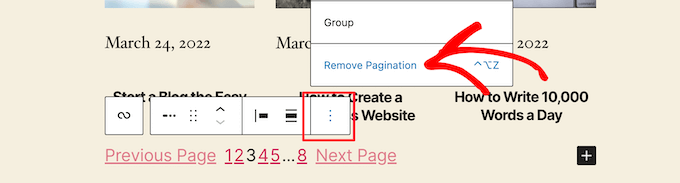
Click on delete pagination

This will automatically remove the element from the block.

You can delete the dates from the posts the same way or leave more post information for your visitors.

Next, we’ll add links to both the post thumbnail and post title.

Simply click on your post thumbnail and turn on the ‘Link to Post’ toggle in the right-hand options panel.
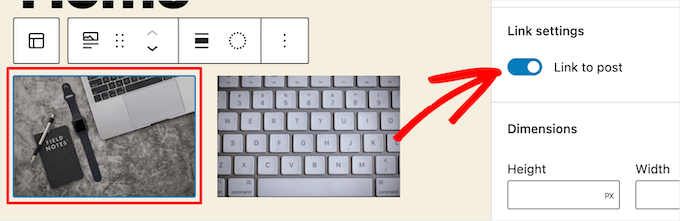
Turn on link to post toggle

Then, do the same thing for your post title.

Once you’re finished, click the ‘Update’ or ‘Publish’ button to make your post grid live.

Now, you can visit your WordPress website to see your new WordPress post grid.

Block editor post grid example

You can add this block to any page or post. If you’d like to use this as your blog archive page, then you can see our guide on how to create a separate page for blog posts in WordPress.

Method 2. Create a WordPress Post Grid Layout With the Post Grid Plugin

This method offers a simple way to add a customizable post grid that you can add anywhere on your website.

First thing you need to do is install and activate the Post Grid plugin. For more details, see our guide on how to install a WordPress plugin.

Upon activation, you need to visit Post Grid » Add New to create your first post grid.

Then, give your post grid a title. This won’t appear anywhere on your page it’s just to help you remember. 
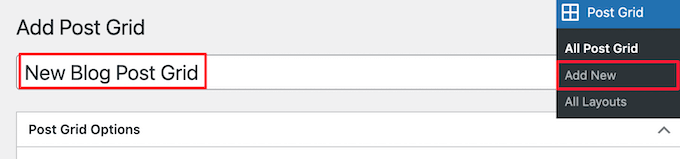
Post Grid plugin create new layout

Below this, you’ll find the post grid settings divided into different sections with multiple tabs. 

First, you need to click on the ‘Query Post’ tab. This is where you’ll define the post types that you want to display in the ‘Post types’ box.

By default, it will only display posts, but you can add pages and even custom post types.
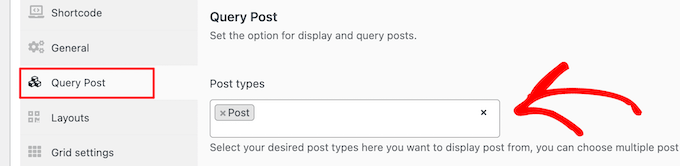
Set post query type settings

After that, you need to click on the ‘Layouts’ tab.

Then, click the ‘Create layout’ button. This will open in a new window.
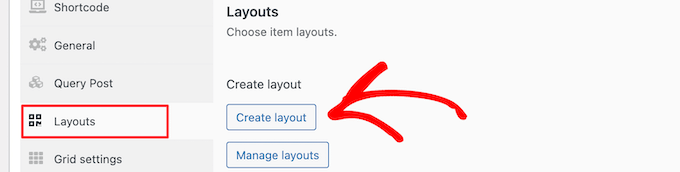
Click create layout button

You need to name your layout. Then, click on the ‘General’ option, and it will open up a list of tags. 

These tags are the information that will display in your post grid. 
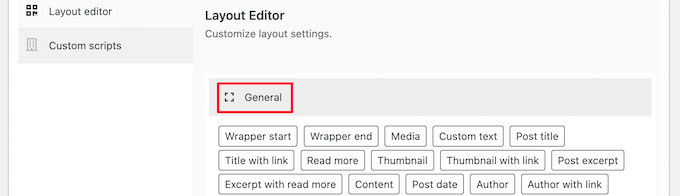
Layout editor screen

We’ll select the ‘Thumbnail with link’ option and the ‘Post title with link’ option. 

Then, click ‘Publish’ or ‘Update’ to save your layout.
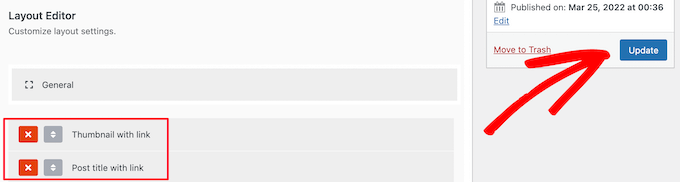
Choose tags and save layout

Now, go back to the original post grid editor in the previous tab, and there will be a new layout option available that you can select.

Simply click on the new layout in the ‘Item layouts’ section at the bottom of the screen.
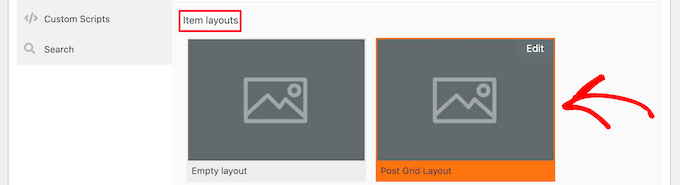
Click new item layout

Next, click the ‘Item style’ tab. Here you can set the size of your grid. 

The default settings should work for most sites, but if not, then you can change them here.
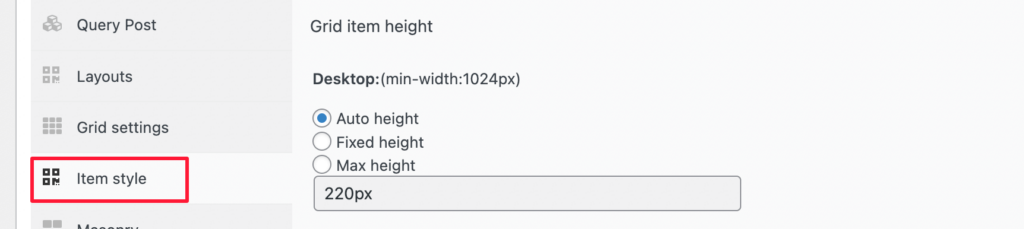
Change item style size

Once you’re finished, click the ‘Publish’ button at the top of the page, and your grid will be ready to add to your WordPress blog.

Now, you need to click the ‘Shortcode’ tab and then copy the shortcode in the ‘Post Grid Shortcode’ box.
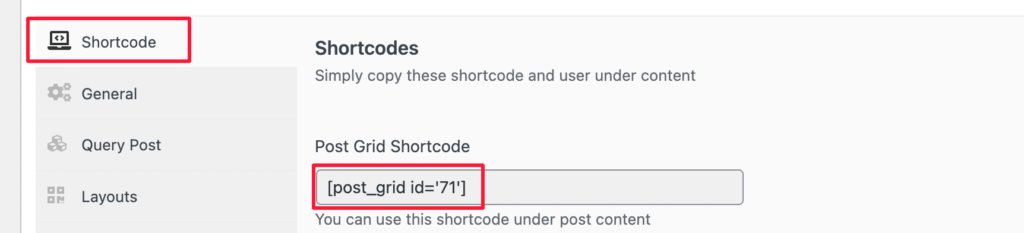
Copy post grid shortcode

After that, open up the page where you want to display your post list and click the ‘Plus’ add block button.

Then, search for ‘Shortcode’ and select the ‘Shortcode’ block.
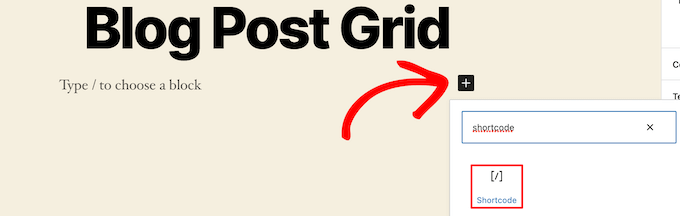
Add shortcode block

Next, paste the shortcode you copied earlier into the box.

Then, click the ‘Update’ or ‘Publish’ button.
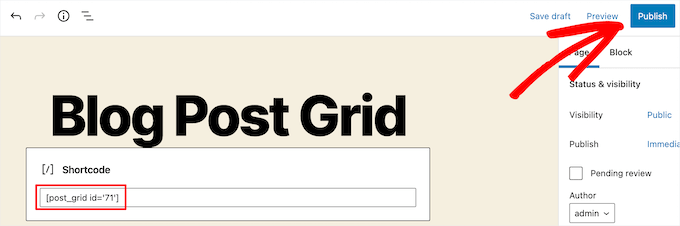
Paste shortcode and save

Now, you can view your page to see your WordPress post grid layout live. 

Post Grid plugin example

Method 3. Create a WordPress Post Grid Layout With the SeedProd Page Builder Plugin

Another way to create a post grid layout is using the SeedProd page builder plugin. It’s the best drag and drop WordPress page builder in the market used by over 1 million websites.
SeedProd

SeedProd helps you easily create custom pages and even completely custom WordPress themes without writing any code. You can use the plugin to create any kind of page you want, like 404 pages, coming soon pages, landing pages, and more.

To learn more, see our guide on how to create a custom page in WordPress.

In the SeedProd builder, as you’re customizing your page, simply click the plus ‘Add Section’ button anywhere on the page.
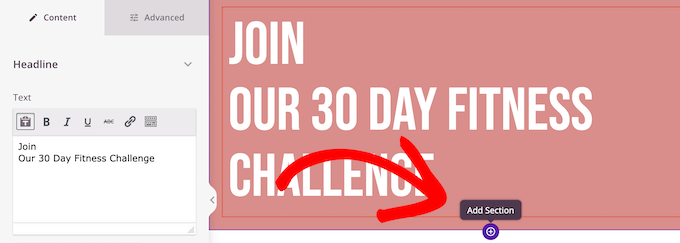
Click to add a new section

This will bring up an option to add a new block.

Next, drag the ‘Posts’ block over to your page, and it will automatically add a list of posts to your page. 
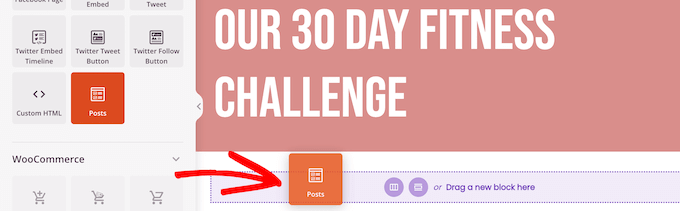
Drag over blog post block

Now, you can customize this block with the left-hand options panel.

First, scroll down to the ‘Layout’ section. Here you can set the number of columns for your blog post grid and turn on the ‘Show Feature Image’ and ‘Show Title’ toggles.
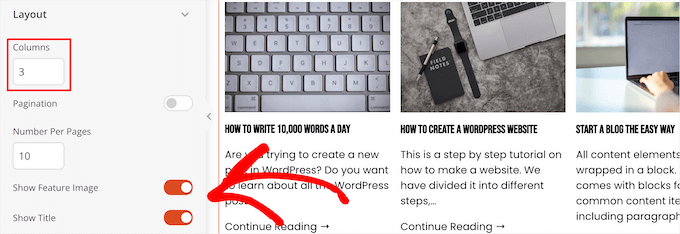
Set number of columns, title, and image

Next, scroll down to the ‘Show Excerpt’ toggle and the ‘Show Read More’ toggles and turn them off to create a simple blog post grid layout.
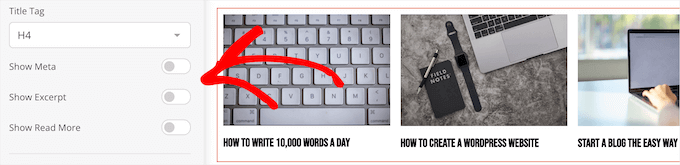
Turn off read more and excerpt toggles

If you want to customize the color scheme, text, and more, then click the ‘Advanced’ tab at the top of the left-hand column. 

Then, click the ‘Text’ drop down and make your changes.
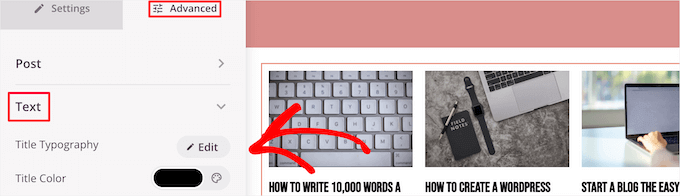
Customize post grid text

You can continue customizing your page and blog post grid layout as much as you’d like. 

Once you’re done, click the ‘Save’ button and select the ‘Publish’ drop down at the top of the page to make your changes live.

Now, you can view your new post grid on your website. 

SeedProd post grid example

Method 4. Create a WordPress Post Grid Layout by Adding Code to WordPress 

This method requires some basic understanding of how to add code to WordPress. If you haven’t done this before, then see our guide on how to copy and paste code in WordPress.

Before you add code, you need to create a new image size that you’ll be using for your post grid. To learn more, see our guide on how to create additional image sizes in WordPress.

Next, you’ll need to find the right WordPress theme file where you’ll be adding the code snippet. For example, you can add it to your single.php, so it appears at the bottom of all of your posts. 

You can also create a custom page template and use it to display your blog post grid layout with thumbnails.

To learn more, see our WordPress template hierarchy cheat sheet to help find the right theme template file.

Once you’ve done that, you can start adding code to WordPress. Since the code snippet is quite long, we’ll break it down section by section.

First, add the following code snippet to your theme template file.

<?php
$counter = 1; //start counter
 
$grids = 2; //Grids per row
 
global $query_string; //Need this to make pagination work
 
/*Setting up our custom query (In here we are setting it to show 12 posts per page and eliminate all sticky posts*/
query_posts($query_string . '&caller_get_posts=1&posts_per_page=12');
 
if(have_posts()) :  while(have_posts()) :  the_post();
?>

This code snippet sets up the post loop query. You can change the ‘posts_per_page’ variable to display more posts per page if you’d like.

Then, add the following code snippet to your theme template file.

<?php
//Show the left hand side column
if($counter == 1) :
?>
            <div class="griditemleft">
                <div class="postimage">
                    <a href="<?php the_permalink(); ?>" title="<?php the_title_attribute(); ?>"><?php the_post_thumbnail('category-thumbnail'); ?></a>
                </div>
                <h2><a href="<?php the_permalink(); ?>" title="<?php the_title_attribute(); ?>"><?php the_title(); ?></a></h2>
            </div>
<?php
//Show the right hand side column
elseif($counter == $grids) :
?>
<div class="griditemright">
                <div class="postimage">
                    <a href="<?php the_permalink(); ?>" title="<?php the_title_attribute(); ?>"><?php the_post_thumbnail('category-thumbnail'); ?></a>
                </div>
                <h2><a href="<?php the_permalink(); ?>" title="<?php the_title_attribute(); ?>"><?php the_title(); ?></a></h2>
            </div>
<div class="clear"></div>
<?php
$counter = 0;
endif;
?>

This code snippet creates two columns for our posts and will display the title and post image. It also creates a CSS class that we’ll show you how to style later. 

It also references ‘postimage’, so you’ll need to change this to the name of the image size you created earlier. 

After that, add the following code snippet at the end.

<?php
$counter++;
endwhile;
//Post Navigation code goes here
endif;
?>

This code snippet simply closes the loop. It also gives the option to add post navigation, but most website owners use a different plugin for this, so we didn’t include it to avoid code conflicts. 

Here’s how the final code snippet looks altogether.

<div id="gridcontainer">
<?php
$counter = 1; //start counter
 
$grids = 2; //Grids per row
 
global $query_string; //Need this to make pagination work
 
 
/*Setting up our custom query (In here we are setting it to show 12 posts per page and eliminate all sticky posts) */
query_posts($query_string . '&caller_get_posts=1&posts_per_page=12');
 
 
if(have_posts()) :  while(have_posts()) :  the_post(); 
?>
<?php
//Show the left hand side column
if($counter == 1) :
?>
            <div class="griditemleft">
                <div class="postimage">
                    <a href="<?php the_permalink(); ?>" title="<?php the_title_attribute(); ?>"><?php the_post_thumbnail('category-thumbnail'); ?></a>
                </div>
                <h2><a href="<?php the_permalink(); ?>" title="<?php the_title_attribute(); ?>"><?php the_title(); ?></a></h2>
            </div>
<?php
//Show the right hand side column
elseif($counter == $grids) :
?>
<div class="griditemright">
                <div class="postimage">
                    <a href="<?php the_permalink(); ?>" title="<?php the_title_attribute(); ?>"><?php the_post_thumbnail('category-thumbnail'); ?></a>
                </div>
                <h2><a href="<?php the_permalink(); ?>" title="<?php the_title_attribute(); ?>"><?php the_title(); ?></a></h2>
            </div>
<div class="clear"></div>
<?php
$counter = 0;
endif;
?>
<?php
$counter++;
endwhile;
//Pagination can go here if you want it.
endif;
?>
</div>

Now, you’ll need to add the following CSS to your site to make sure your post grid displays nicely. 

If you haven’t done this before, then see our guide on how to easily add custom CSS to your WordPress site.

#gridcontainer{
     margin: 20px 0; 
     width: 100%; 
}
#gridcontainer h2 a{
     color: #77787a; 
     font-size: 13px;
}
#gridcontainer .griditemleft{
     float: left; 
     width: 278px; 
     margin: 0 40px 40px 0;
}
#gridcontainer .griditemright{
     float: left; 
     width: 278px;
}
#gridcontainer .postimage{
     margin: 0 0 10px 0;
}

You can modify the different CSS selectors to see how they change different elements of your post loop.

We hope this article helped you learn how to display your WordPress posts in a grid layout. You may also want to see our guide on how to choose the best web design software and our expert picks of the best live chat software for small businesses.

If you liked this article, then please subscribe to our YouTube Channel for WordPress video tutorials. You can also find us on Twitter and Facebook.

The post How to Display Your WordPress Posts in a Grid Layout first appeared on WPBeginner.


August 04, 2022 at 03:00PM
Wednesday, August 3, 2022

How to Set Up Automated Drip Notifications in WordPress

Do you want to send a series of automated drip notifications to your subscribers?

Automated drip campaigns are great for welcoming new users and boosting engagement on your WordPress site. You can use them to guide your users along a specific journey.

In this article, we’ll show you how to setup automated drip notifications in WordPress using both push notifications and email notifications.

Setup drip notifications in WordPress

When Should You Use Automated Drip Notifications in WordPress?

Drip notifications are automated messages that are sent to your subscribers, usually in the form of a push notification or an email.

These messages are part of a series, and they are automatically triggered to send at a predefined interval. In other words, they are ‘dripped’ to your subscribers over time rather than ‘poured out’ all at once.

You can use drip campaigns to promote a product, get more pageviews to your WordPress blog, build a relationship with your users, increase sales, and even teach a course over a specific period of time.

Here are a few use-cases to get the most out of automated drip campaigns in WordPress:

  • You can send an automatic welcome drip notification to new subscribers and customers. This way, you can educate users about your products and services and build brand trust.
  • If you’re running an eCommerce store, then having automated drip notifications setup can help upsell and cross-sell different products upon purchase.
  • You can promote your most important content and get people to revisit your website.
  • Using drip notifications, you can show targeted messages to people from different regions. This helps get more conversions based on geographic segmentation.
  • You can get people to register for your webinars and upcoming events using automated drip notifications.

In this guide, we’ll cover push notifications and email drip campaigns:

That said, let’s see how you can set up drip notifications in WordPress.

How to Set Up an Automated Push Notification Drip Campaign

The easiest way to setup automated push notifications is through PushEngage. It’s the best web push notification software for WordPress, and over 10,000 businesses use it to send targeted messages.

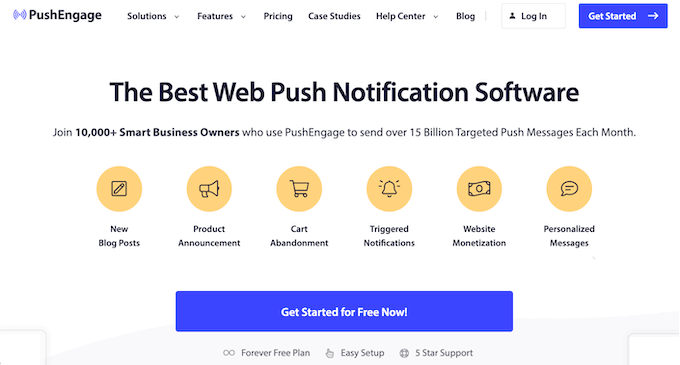
First, you’ll need to visit the PushEngage website and click the ‘Get Started for Free Now’ button.

The PushEngage push notification software

Next, you’ll need to select a pricing plan that meets your needs. PushEngage offers a free plan that includes 30 campaigns and up to 200 subscribers.

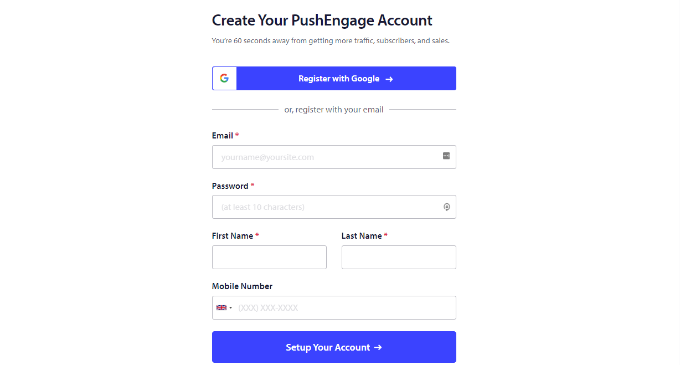
After selecting a pricing plan, you can create an account or register with a Google account.

Create an account on PushEngage

Upon signing in to your account, you’ll see the PushEngage dashboard.

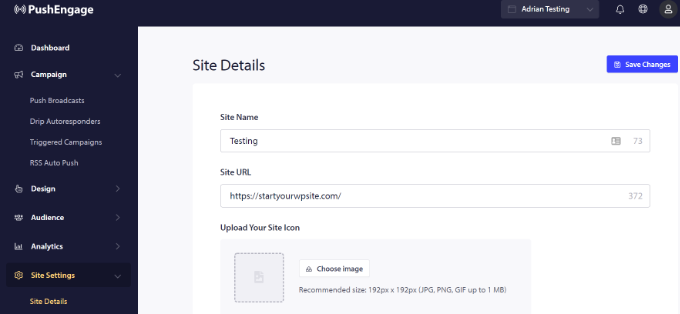
The tool will then take you to Site Settings » Site Details and ask you to enter your website details, like site name, domain name, site icon, and more.

Enter website details

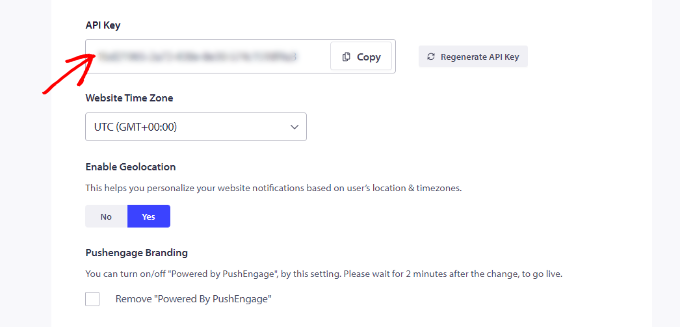
If you scroll down further in the ‘Site Details’ section, you can generate the API key for connecting your WordPress site with PushEngage.

Go ahead and copy the API key and paste it into a Notepad file for safekeeping. You’ll need it in the next step.

Copy the API key

Next, you’ll need to connect your WordPress website with PushEngage.

First, you’ll need to install and activate the PushEngage WordPress plugin. If you need help, then please see our guide on how to install a WordPress plugin.

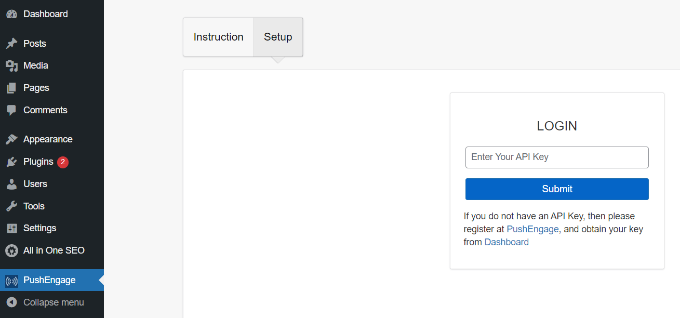
Upon activation, look for PushEngage in your WordPress dashboard menu and click the ‘Setup’ tab.

Go to PushEngage plugin

Next, you’ll need to enter the API key you just copied into the field labeled ‘LOGIN.’

After entering the API key, simply click the ‘Submit’ button.

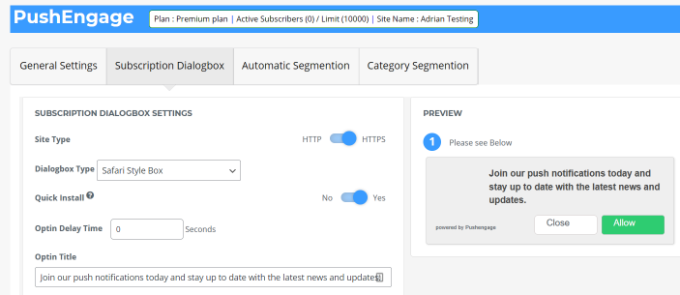
You should now see more settings in the PushEngage section of the WordPress dashboard.

Subscription box settings

You’ll see options to automatically send push notifications whenever a new post is published, set up UTM parameters, customize the subscription dialog box text, and more.

You can follow our detailed guide on how to add web push notifications to your WordPress site for more details.

Next, you can setup automated drip notifications using PushEngage. For this example, we’ll create a welcome campaign for new subscribers.

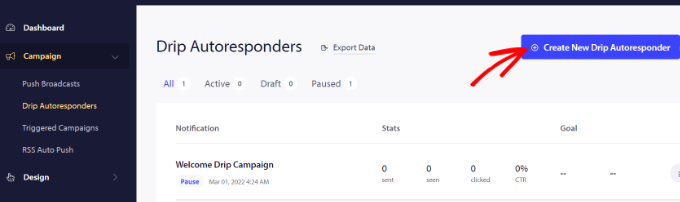
To start, you will need to head to your PushEngage dashboard, not the WordPress admin dashboard. Find Campaigns » Drip Autoresponders and then click the ‘Create New Drip Autoresponder’ button.

Create a new drip autoresponder

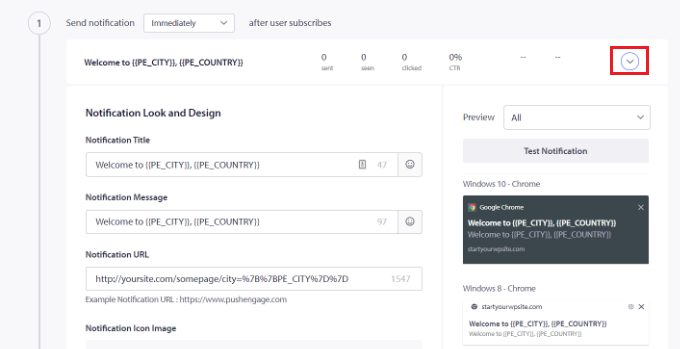
After that, you can add different push notifications and edit the content you want to display.

Go ahead and click the arrow at the end of the notification to see more options.

For each notification, you can change the notification title, message, URL, icon image, and more by expanding each notification. There’s also a preview of how your notifications will look in the browser.

Edit your push notifications

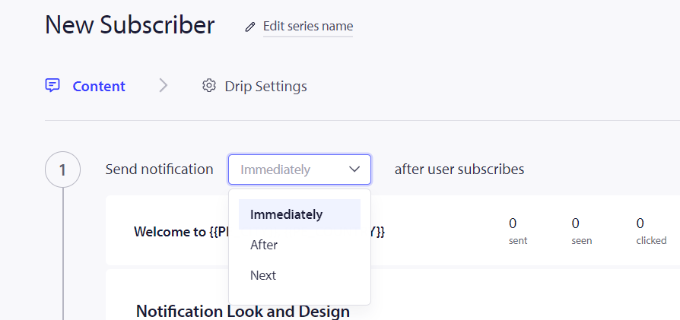
PushEngage also lets you choose when to send each notification. For example, you can send the first notification immediately and select a different time for the following notification.

To select when you’d like to send the push notification, simply click the ‘Send notification’ dropdown menu.

Select when to send the notification

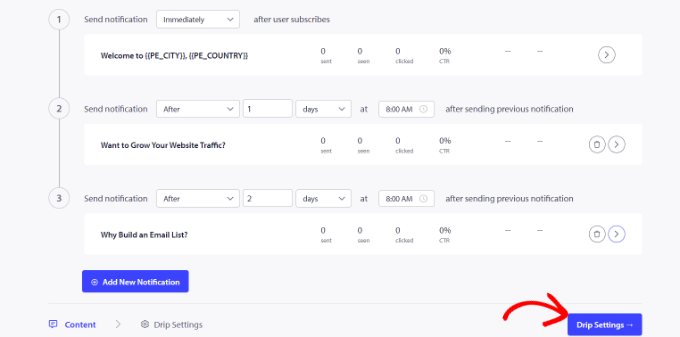
To add another notification to the drip campaign, simply click the ‘Add New Notification’ button.

Once you’ve added all the notifications, simply click the ‘Drip Settings’ button.

Edit drip settings

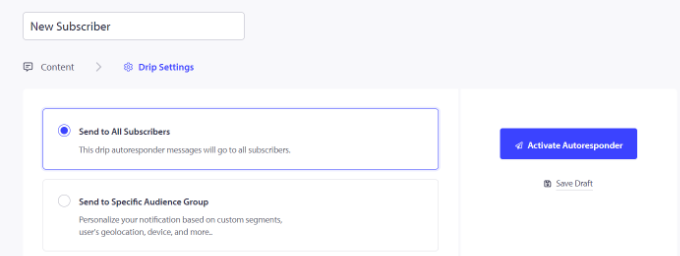
Next, you can choose whether you’d like to send the notifications to all your subscribers or a specific audience group that you create.

PushEngage lets you segment your subscribers and create different groups. For this tutorial, we choose the ‘Send to All Subscribers’ option.

Select user segment and activate autoresponder

After that, you can simply click the ‘Activate Autoresponder’ button to enable automated push notifications for your WordPress website.

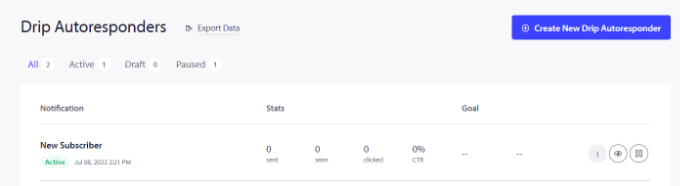
You can then go to Campaigns » Drip Autoresponders from your PushEngage dashboard and see the drip notifications as ‘Active’.

See active status

That’s it! You’ve set up an automated push notification drip campaign for your site.

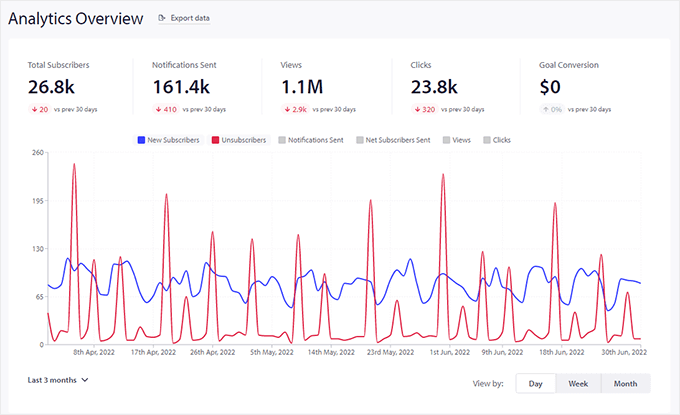
Now you’ll be able to get detailed stats on its performance in the Analytics section of your PushEngage account.

PushEngage analytics overview

Set Up Automated Drip Notifications Using an Email Marketing Tool

Another way you can create automated drip notifications in WordPress is by using an email marketing tool.

We recommend using Constant Contact because it’s the best email marketing service on the market. It’s super easy to use and offers a drag-and-drop email builder.

However the drip email notification functionality exists in all major email marketing platforms including Sendinblue, HubSpot, and others.

You can set up email automation in just a few clicks and send email series to your subscribers with ease. Plus, Constant Contact integrates with WordPress plugins like WPForms and OptinMonster.

It even works with eCommerce platforms like WooCommerce and Shopify, so you can automate emails for new customers or help recover abandoned carts.

To start, you can visit the Constant Contact website and create an account. The best part about using this software is that you get a 60-day free trial. This way, you can try out the tool before committing to a premium plan.

Constant Contact Website

If you use our Constant Contact coupon code, then you can also get 20% off by purchasing upfront.

After creating an account, you can visit the Constant Contact dashboard to create a contact list.

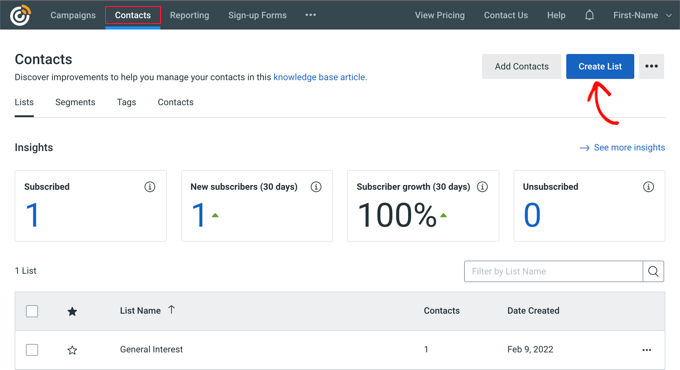
Constant Contact will have already created a default list for you. However, you can create your own list by going to the ‘Contacts’ tab in the top menu, and then clicking the ‘Create List’ button.

Creating a New Email List

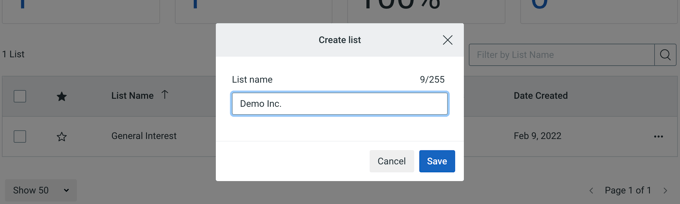
Next, a popup window will appear where you’ll need to enter a name for your list.

Simply click the ‘Save’ button after entering a name.

Choose a Name for Your Email List

After that, you can add contacts to your email list.

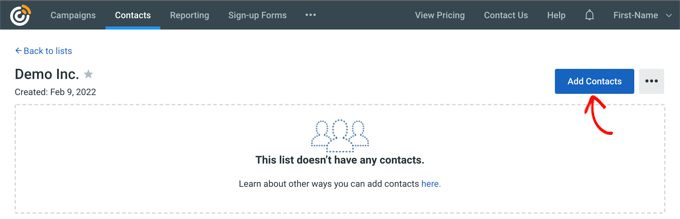
You can manually add contacts by going to the ‘Contacts’ tab and clicking the ‘Add Contacts’ button.

Email List Created

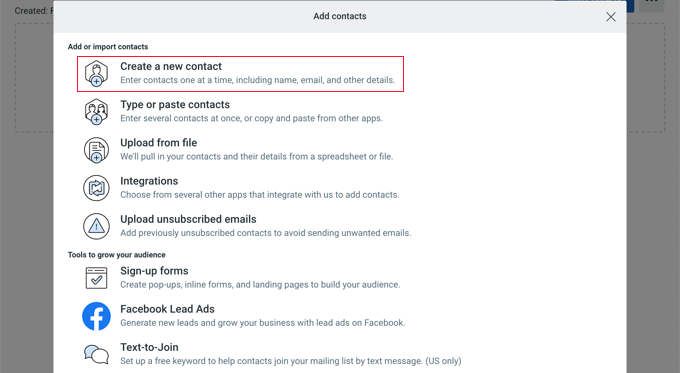
A popup window will open with multiple options for adding new contacts.

You can connect your WordPress newsletter form with Constant Contact and start building an email list. For more details, see our guide on how to add email subscriptions to your WordPress blog.

Alternatively, you can manually create new contacts, upload a spreadsheet or CSV file, or integrate with lots of other platforms to import saved email addresses.

Add Contact to Your Email List

Now that you’ve added subscribers to your Constant Contact list, the next step is to create an automated drip campaign.

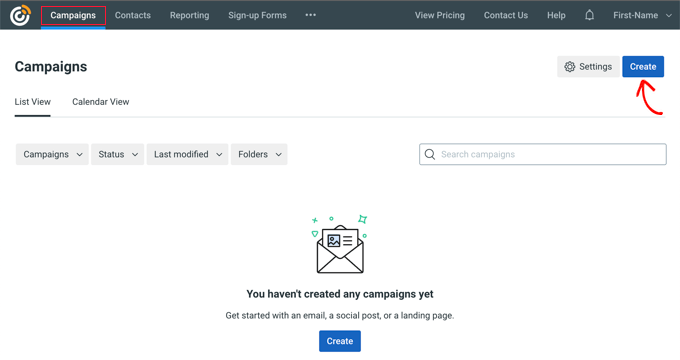
To do that, head over to the ‘Campaigns’ tab and then click the ‘Create’ button.

Create Welcome Email Campaign

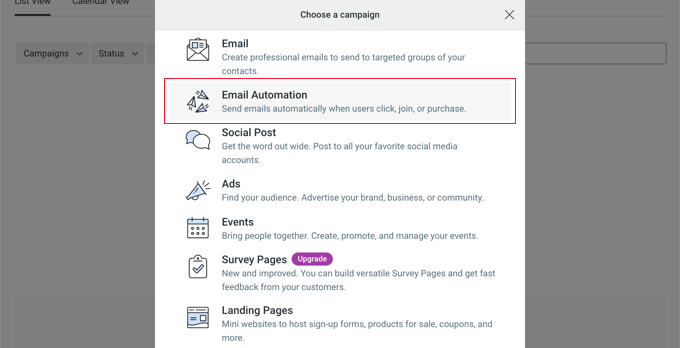
Next, Constant Contact will show you multiple options for creating a campaign.

Go ahead and select the ‘Email Automation’ campaign.

Email Automation Campaign

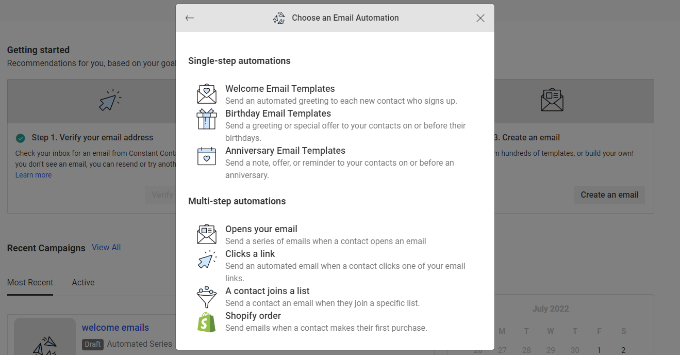
From here, you can select single-step automations or multi-step automation.

In single-step automation, you can only send 1 email to your subscribers and not drip more emails. For instance, you can send a welcome email or a special offer to new subscribers.

On the other hand, multi-step automation lets you create a series of emails that are automatically sent to your subscribers. This way, you can educate users about your products and services or send special offers over a period of time.

Let’s create multi-step automation when new subscribers join your email list. Go ahead and select the ‘A contact joins a list’ option.

Choose an email automation

Next, you will have to enter a name for your campaign.

Once that’s done, simply click the ‘Save’ button.

Name the Automated Series

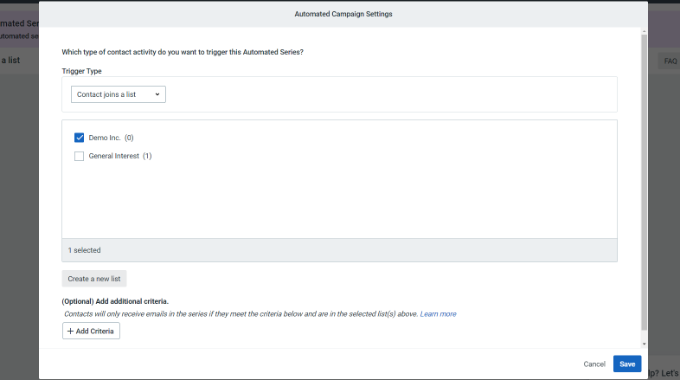
Constant Contact will then ask you to choose what activity will trigger the email. For example, the drip series is automatically triggered when a user joins your email list, opens an email, clicks a link, or buys a product.

You can use the default ‘Contact joins a list’ option as the trigger type. Then you can choose the email list you created earlier.

Choose contact list

Go ahead and click the ‘Save’ button when you’re done.

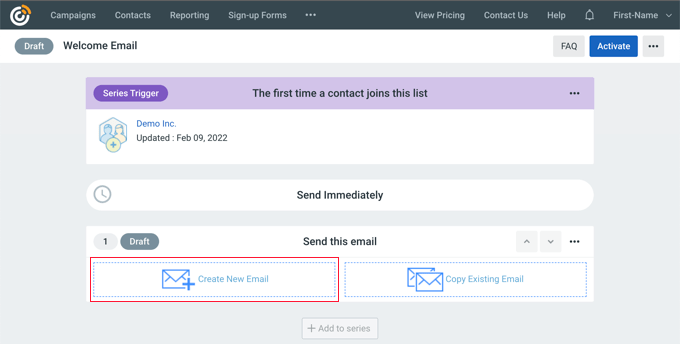
Next, you’ll need to create the emails to send in your automated drip campaign. The first one you create will send automatically to the user upon sign-up.

To begin, simply click the ‘Create New Email’ option.

Create a New Email

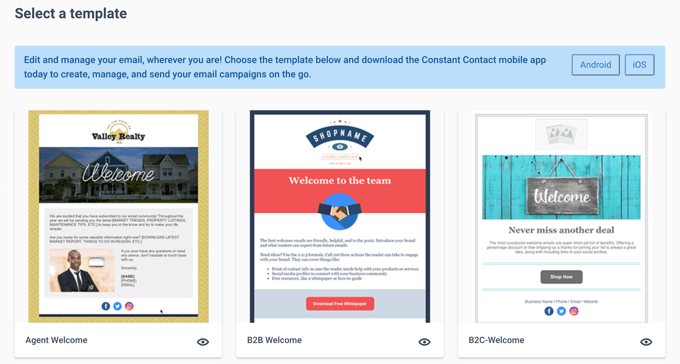
Constant Contact will now show different email templates to choose from.

Go ahead and select a template for your email. We’ll use the ‘Agent Welcome’ template for this tutorial.

Select Welcome Email Template

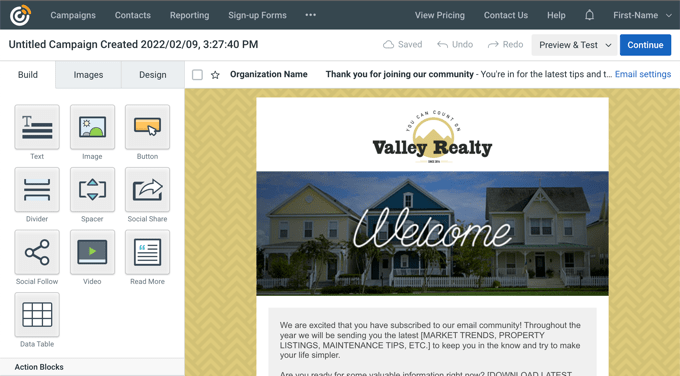
Next, you can customize the email template using the drag-and-drop email builder.

You can choose multiple elements from the menu on your left and place them on the template. If you have ever used a page builder like SeedProd, then you will feel right at home.

You can also click the ‘Untitled Campaign’ in the top left corner to rename your campaign.

Creating Welcome Email

At this point, you will not only style and customize the template, but you will also add the content to the email for the drip campaign. Be sure to check over the entire message and remove placeholder content and replace it with your own.

After you’re done, simply click the ‘Continue’ button at the top right of the editor.

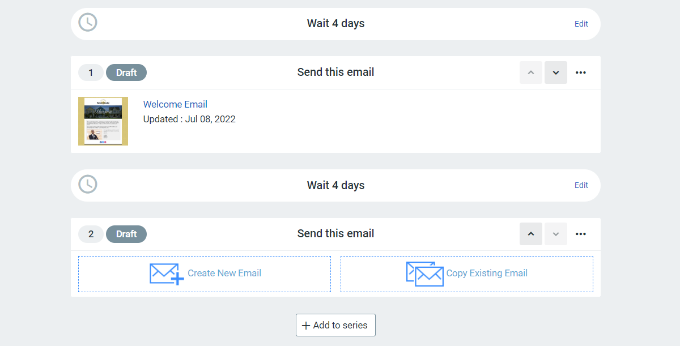
Your email will now be added to the automated series. Simply click the ‘+ Add to series’ button to add another email to the drip campaign.

Now, click the ‘Create New Email’ button once again.

Add another email to series

After that, you can select a new template and customize this new email as you did in the step above.

After you have customized that email to your liking, you can set the delay before the drip campaign sends its next email.

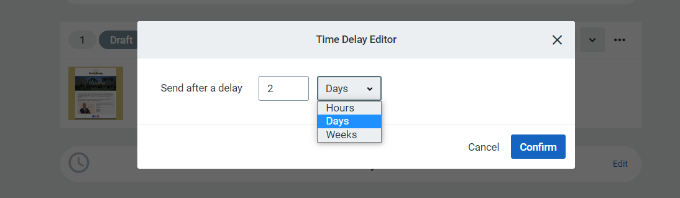
By default, this value is set to 4 days. To change this, just click the ‘Edit’ button in front of the section titled ‘Wait 4 days.’ This will open the ‘Time Delay Editor’ where you can choose when the next email in the drip campaign will be delivered.

The tool lets you choose intervals of days, hours, or weeks. You can click the ‘Confirm’ button when you’re done.

Change time delay

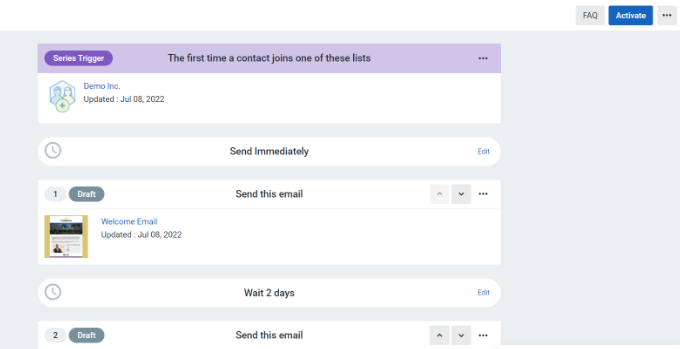
Now, you should see all your emails in the campaign summary area.

Go ahead and click the ‘Activate’ button in the upper-right corner to launch your campaign.

Activate your campaign

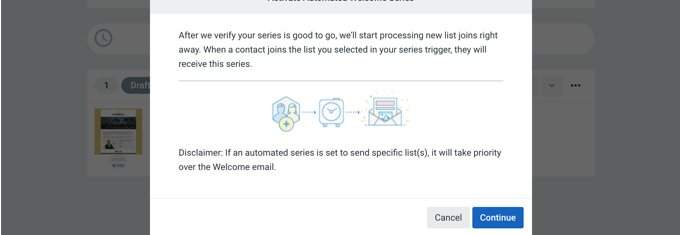
Constant Contact will then show a prompt to verify if you want to activate your campaign.

Simply click the ‘Continue’ button, and the tool will check if everything is working properly and activate your campaign.

Verify and launch your campaign

You’ve now successfully launched an automated drip notification campaign using an email marketing tool.

You can also follow our step-by-step guide on how to create an email newsletter in WordPress. If you need help getting more subscribers, then see our guide on how to grow your email list.

We hope this article helped you learn how to setup automated drip notifications in WordPress. You may also want check out our expert pick of the best WordPress plugins, and our ultimate WordPress SEO guide to improve your SEO rankings.

If you liked this article, then please subscribe to our YouTube Channel for WordPress video tutorials. You can also find us on Twitter and Facebook.

The post How to Set Up Automated Drip Notifications in WordPress first appeared on WPBeginner.


August 03, 2022 at 03:11PM