Wednesday, August 10, 2022

How to Customize WooCommerce Emails (2 Easy Ways)

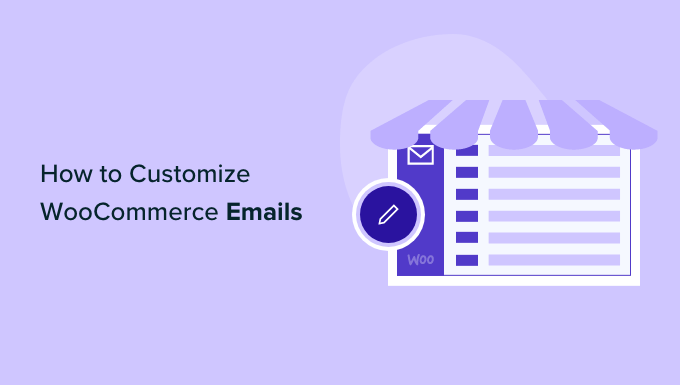
Do you want to customize the layout and design of your WooCommerce emails?

WooCommerce emails help customers get information about their order status, time of delivery, and more. Customizing these emails can get more conversions and help build your brand.

In this article, we’ll show you how to customize WooCommerce emails, and even create WooCommerce email automation to grow your sales.

How to customize WooCommerce emails

Why Customize Your WooCommerce Emails?

When running a WooCommerce store, your customers will receive different transactional emails. These emails help them get order confirmations, track their order status, get invoices, learn about how to return a product, and find more information about your online store.

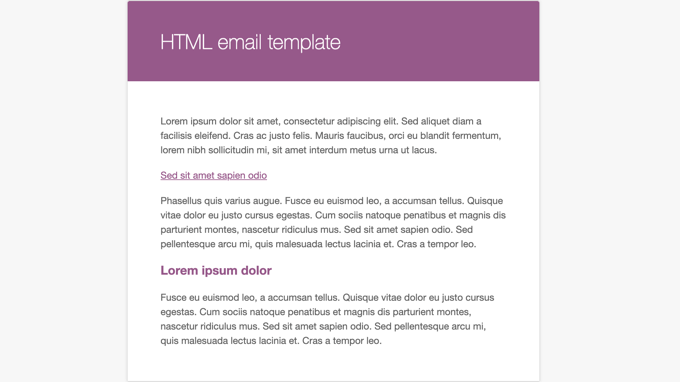
By default, the design and layout of emails sent by WooCommerce are plain and generic. Most business owners don’t customize them and use the standard template, which looks like this:

WooCommerce Allows You to Preview the Email Template Containing Dummy Text

Customizing your WooCommerce email opens up a lot of opportunities. When your emails match your brand, it helps build trust with your customers, boost brand awareness, and get them to return to your store.

You can even include discount coupons, show popular products, or announce an upcoming sale in your WooCommerce emails. As a result, you’ll get more sales by encouraging people to purchase more products.

That said, let’s see how to customize your WooCommerce emails. We will cover two methods: default WooCommerce email settings, and a powerful email automation plugin for WooCommerce with drag & drop email customizer and workflow builder.

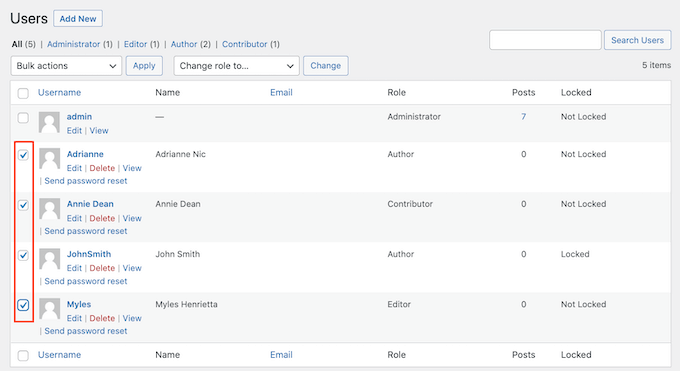
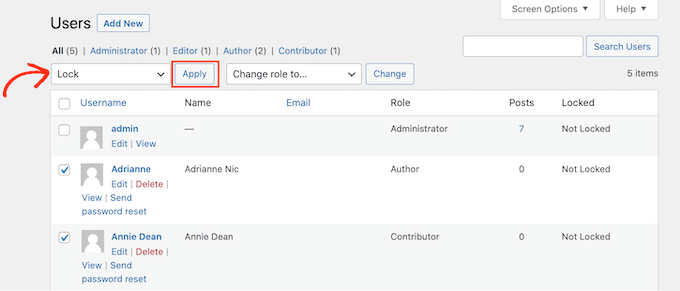
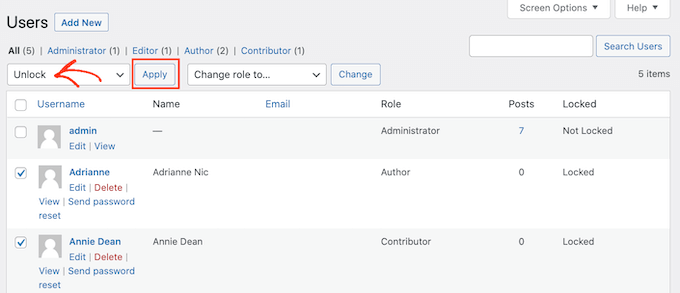
Customizing WooCommerce Emails using Global Settings

To edit the text and basic colors of your WooCommerce emails, you can use the default global settings in WooCommerce.

Simply head to WooCommerce » Settings from your WordPress admin panel and then click the ‘Email’ tab.

Go to email settings in WooCommerce

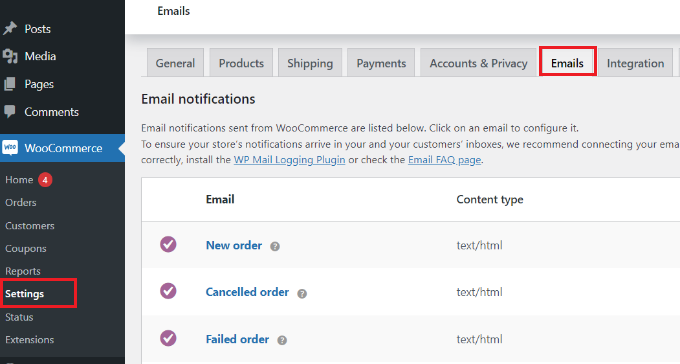
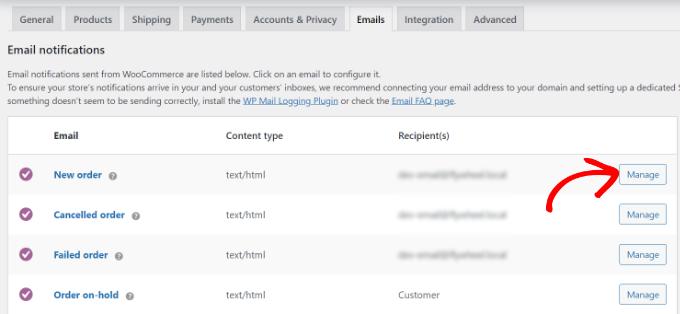
Here you’ll see all the emails WooCommerce sends to your customers, including emails for new orders, canceled orders, failed orders, orders refunded, password reset, new accounts, and more.

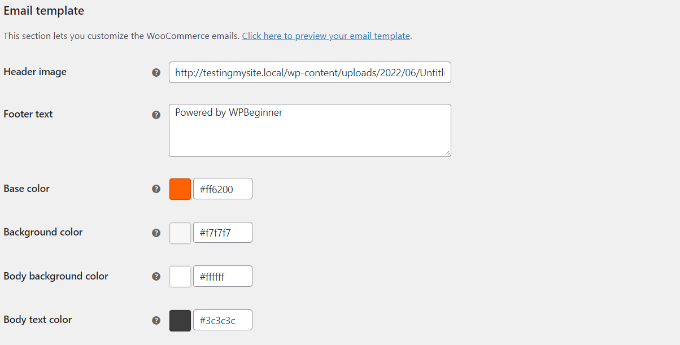
Next, you can scroll down to the Email sender options and Email template section. Under these sections, you’ll have options to edit the from name and email address.

Plus, you can customize your WooCommerce emails by adding a header image, footer text, changing the base color, background color, and body text color to match your brand.

Edit email template in WooCommerce

When you’re done, don’t forget to save your changes. Do note that these changes are global and will affect all your WooCommerce emails.

You can even preview the changes by clicking the ‘Click here to preview your email template’ link.

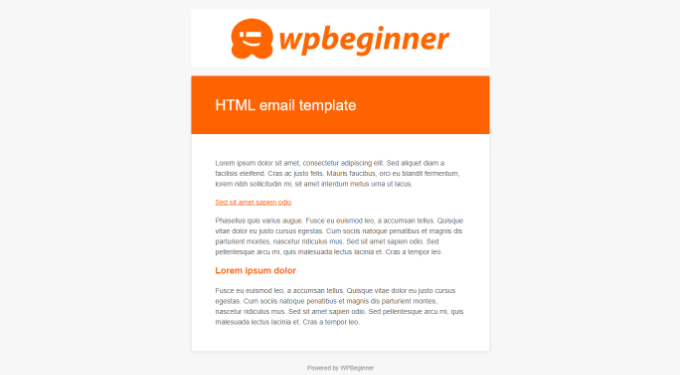
Here’s a preview of a customized WooCommerce email on our demo website:

Edited WooCommerce email template

WooCommerce also lets you customize each individual email.

In the Email tab in WooCommerce settings, you can click on any of the emails or click the ‘Manage’ button to see settings for a specific email.

Manage specific emails

After that, you can customize different elements of the email.

For example, enter a new email subject line, content, email heading, and email type.

Customize each email

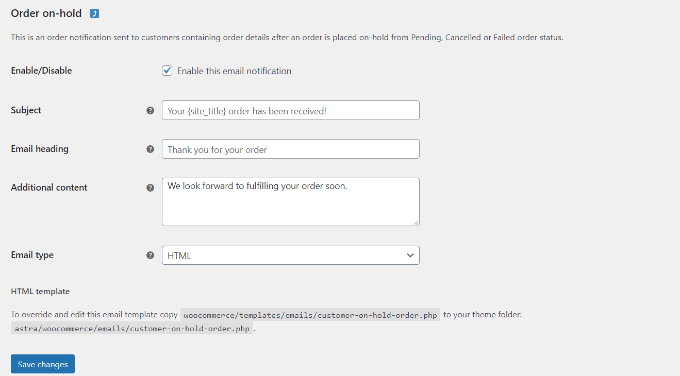
Go ahead and click the ‘Save change’ button when you’re done.

Customizing WooCommerce Emails using Autonami

Another way you can customize your WooCommerce emails is by using Autonami which is a popular WooCommerce plugin for marketing automation.

Aside from letting you fully customize your WooCommerce emails, it also lets you setup smart automated follow up emails and workflows to boost your sales.

First, you’ll need to install and activate the Autonami plugin. For more details, please see our guide on how to install a WordPress plugin. Upon activation, you can go to Autonami » Automations from your WordPress dashboard to see their ever-growing pre-built WooCommerce email library that’s proven to get results.
Autonami Email Library for WooCommerce

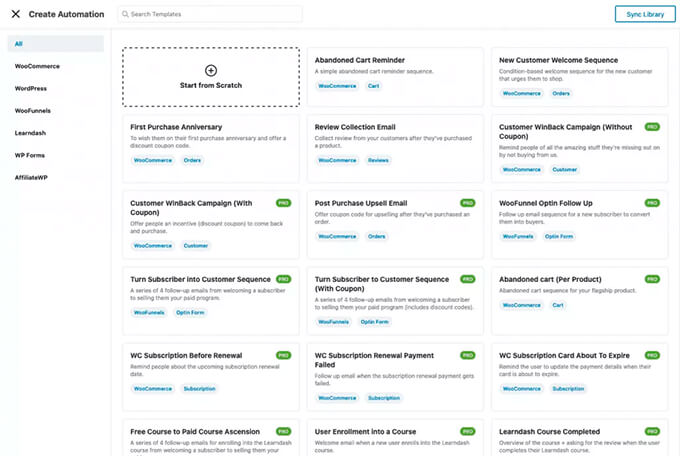
With a single click, you can import the entire email automation workflow with pre-written email copy, delay intervals, goals, and more.

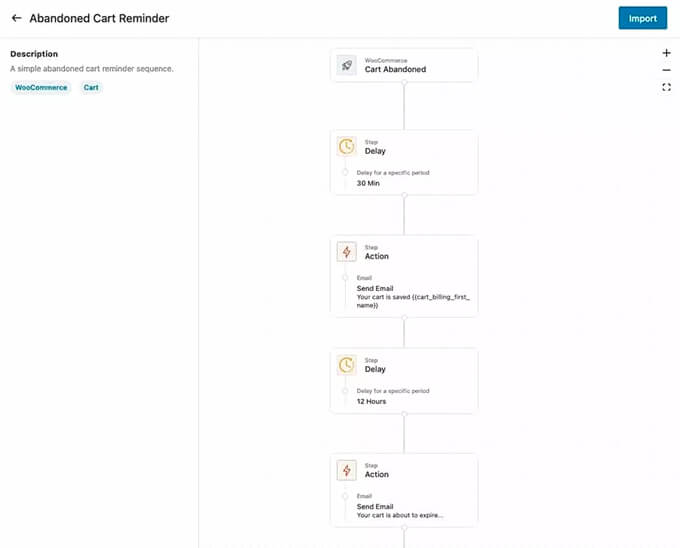
Then you can use the visual email automation builder to make any customizations that you need. For example, here’s the workflow for the abandoned cart recovery email in WooCommerce.

Autonami - Abandoned Cart Email Workflow for WooCommerce

Autonami lets you customize any WooCommerce email and even create custom WooCommerce emails by using a drag & drop email builder inside WordPress.

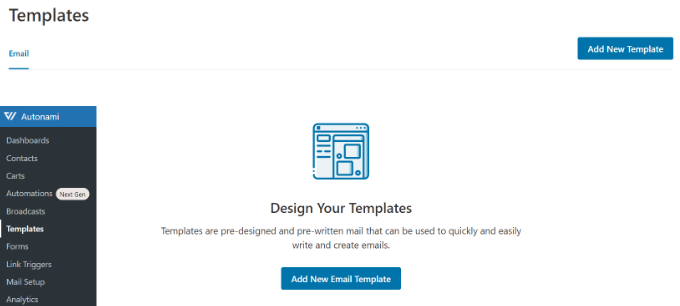
You can go to Autonami » Templates from your WordPress dashboard and click the ‘Add New Email Template’ button.

Add new email template

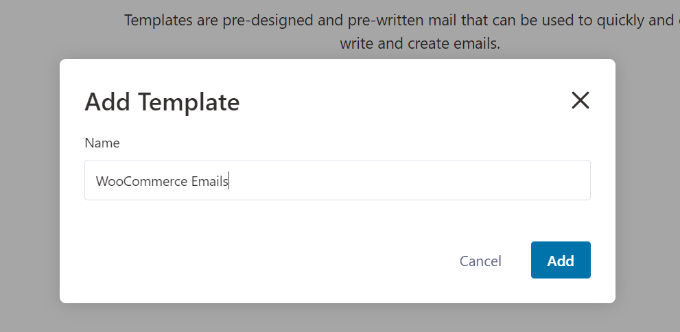
Next, you can enter a name for your email template.

Simply click the ‘Add’ button to continue.

Enter a name for template

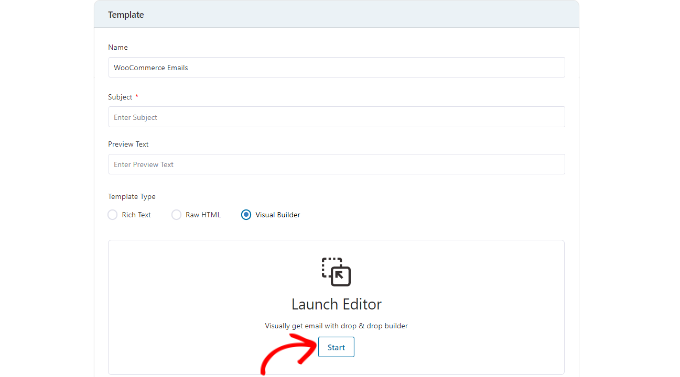
After that, the plugin will let you select a subject line for your email and a preview text.

Besides that, you can customize the content of your WooCommerce emails using 3 methods, including Rick Text, Raw HTML, or Visual Builder.

Go ahead and select the ‘Visual Builder’ option and click the ‘Start’ button.

Launch the visual builder

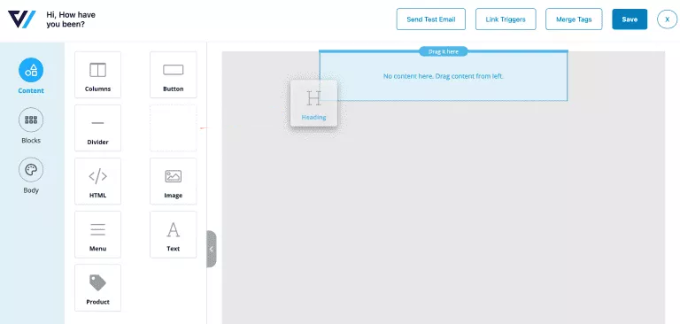
This will launch the drag and drop email builder.

You can simply select different elements from the menu on your left and place them on the template.

For instance, in the ‘Content’ tab, you can add columns, buttons, heading, menu, text, and more.

Add a heading block to email template

If you go to the ‘Body’ tab, then you can then further customize each element, like edit the text color, its alignment, font, size, and more.

Once you’re done, you can click the ‘Save’ button at the top.

Edit body of email

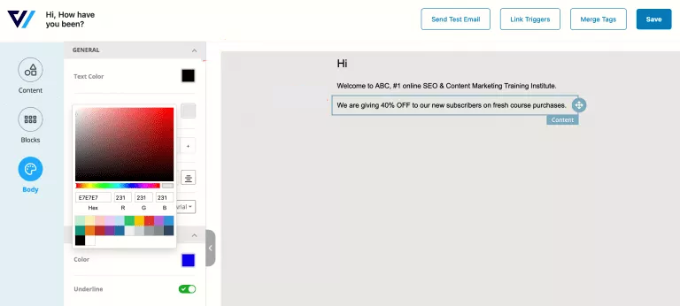
There’s even an option to send a test email to a given address and see what your WooCommerce emails will look like.

You can now repeat these steps and create as many custom WooCommerce emails as you want.

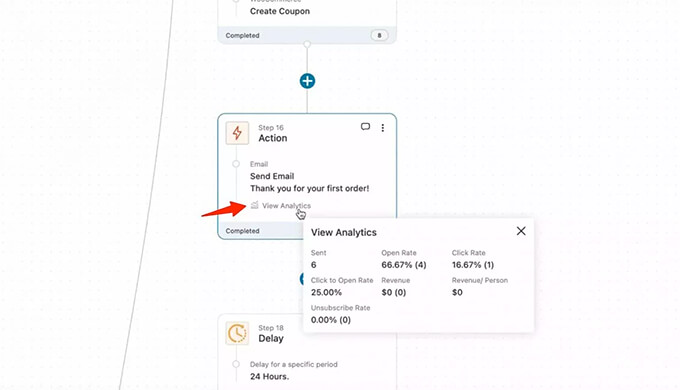
What makes Autonami really powerful is the custom goals driven email automation builder that shows you in-line analytics for each email.

Autonami Marketing Automation Email Analytics for WooCommerce

Autonami is a sister product to WooFunnels which is a powerful sales funnel builder for WooCommerce. You can use it to create a full sales funnel from start to finish and maximize your sales. It comes with

prebuilt templates for custom checkout pages, order bumps, one-click upsells, and more.
WooFunnels Checkout Example

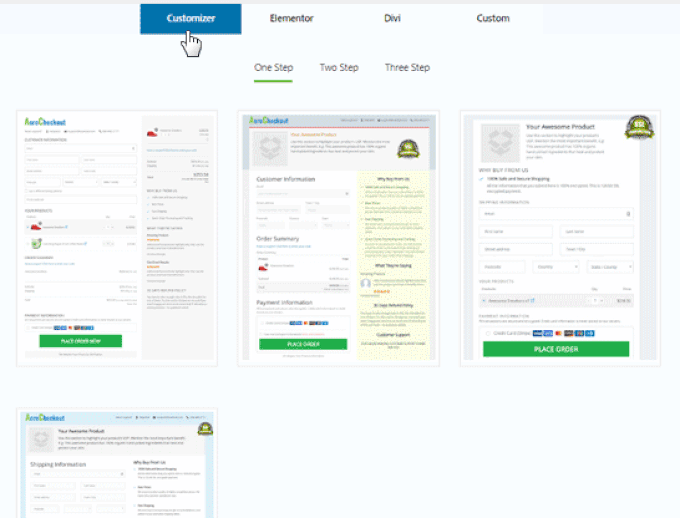
If you’re serious about growing your WooCommerce store, then Autonami is a must-have solution.

Bonus: Fix WooCommerce Email Not Sending Issue

Sending email directly from WordPress can lead to deliverability issues. That is because WordPress uses PHP mail() function to send an email and most web hosting companies don’t have it properly configured.

As a result, your WooCommerce emails don’t reach the recipients or end up in the spam folder. To fix this issue, you can use an SMTP service. SMTP or secure mail transfer protocol is a standard way to send emails and ensures that emails reach your customer’s inbox.

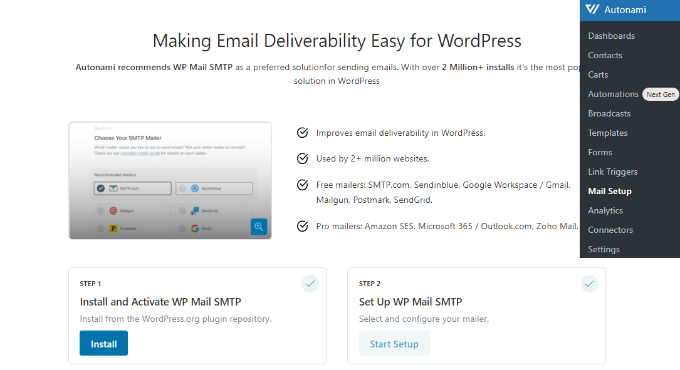
WP Mail SMTP is the best SMTP service for WordPress. It dramatically improves email deliverability and solves the problem of emails going missing or ending up in spam folders.

WP Mail SMTP is compatible with different mailers like Sendinblue, Amazon SES, Microsoft Outlook, Gmail, and more. Plus, it easily integrates with WooFunnels.

To connect WP Mail SMTP with WooFunnels, simply go to Autonami » Mail Setup from your WordPress dashboard.

After that, click the ‘Install’ button to install and activate WP Mail SMTP. Once installed, simply click the ‘Start Setup’ button and follow the onscreen instructions to configure the plugin.

Connect Autonami with WP Mail SMTP

You can follow our detailed guide on how to set up WP Mail SMTP with any host to get started.

We hope that this article helped you learn how to customize WooCommerce emails. You may also want to see our guide on the best business phone services and the best WooCommerce hosting for your store.

If you liked this article, then please subscribe to our YouTube Channel for WordPress video tutorials. You can also find us on Twitter and Facebook.

The post How to Customize WooCommerce Emails (2 Easy Ways) first appeared on WPBeginner.


August 10, 2022 at 02:00PM

Tuesday, August 9, 2022

How to Put WordPress in a Read Only Mode for Migrations and Maintenance

Do you want your WordPress site to be in a read only mode?

By freezing your site’s content, you can make sure that no one changes anything on your website, even if they normally have edit access. This can help you avoid errors, conflicts, and confusion when you’re making changes to your website.

In this article, we will show you how you can put your WordPress site in a read only mode for site migrations and maintenance.

how to put your wordpress website in read-only mode

Why Put Your WordPress Site in a Read Only State for Site Migrations and Maintenance

You can tweak a lot of settings on your WordPress website without stopping visitors from accessing the site. However, when you’re making a big change to your website, it’s a good idea to put your site into a read only state. 

For example, if you’re moving WordPress to a new host or server, upgrading to a new version of WordPress, or installing a new theme, then it can affect the user experience and stop your site from working normally.

Setting up read only mode can help you avoid losing any data or content that’s added to your site while you’re making the change. You also prevent frustration from a poor user experience when features don’t work right.

For example, if someone is writing a new post in the WordPress dashboard while you’re migrating to a new server, then all of their hard work may be lost. Or perhaps a user can’t add products to their cart or checkout, so they leave your site.

That said, let’s take a look at the best way to put your WordPress site in read-only mode to prevent those issues.

How to Put Your WordPress Site in a Read Only State for Site Migrations and Maintenance

There are a few dedicated content freeze or read-only mode plugins available, but they are all currently outdated and not actively maintained by their developers.

That’s why we recommend using the Lock User Account plugin instead.

This is perfect for membership sites, online stores, or any other type of site that allows user registration.

This plugin lets you temporarily lock any user out of their WordPress account. Anyone who is locked out of their account won’t be able to edit the site’s content or add any new content, although visitors will still be able to see the website.

If a user tries to log into a locked account, then they’ll see a message simply stating ‘Your account has been locked.’ You can customize this message to give your users more information.

A locked WordPress user account

Now, using this plugin doesn’t actually freeze your site or prevent database changes. That’s why we also recommend temporarily disabling your comments and any contact forms on your site as well. We’ll show you how to do that below.

First, you’ll need to install and activate the Lock User Account plugin. If you need help, then please see our guide on how to install a WordPress plugin.

Before starting the content freeze, you can change the message that users will see if they try to log into a locked account. For example, you might want to explain that you’re changing your domain name or doing essential maintenance.

To change the default ‘Your account has been locked’ error message, simply head over to Settings » General.

The WordPress general settings page

Towards the bottom of the screen, you’ll see a new ‘Lock User Account’ section.

You can now simply type a new message into the ‘Locked User Message’ field. Once you’re happy with the message, just click on the ‘Save Changes’ button.

Creating a custom WordPress login message

After that, you’re ready to put your site into read-only mode.

To go ahead and start locking users out of their account, head over to Users » All Users.

A list of WordPress user accounts

On this screen, you’ll see all the people who have an account on the site.

The ‘Locked’ column shows whether each user currently has access to their account (unlocked) or not (locked).

A locked WordPress user account

To go ahead and temporarily lock a user out of their account, just click to check the box next to their profile picture.

If you want to lock multiple people out of their accounts, then click to select multiple boxes.

Note: It’s very important to make sure you leave your own user account unlocked. If you accidentally get locked out, see our guide on how to deactivate all plugins without wp-admin access so you can deactivate the Lock User Account plugin from your WordPress hosting panel.

Adding a content freeze to multiple WordPress user accounts

After selecting one or more usernames, click on the ‘Bulk actions’ dropdown and then select ‘Lock.’

When you’re ready to go ahead and lock these people out of their accounts, click on the ‘Apply’ button.

Putting a WordPress site into a read only state

Now, the site is essentially in read only mode for your users, and if anyone with a locked account who tries to log in will get an error message.

Once you’ve finished your work, you can unlock the user accounts. Simply go back to Users » All Users and repeat the process above. Only this time, be sure to select ‘Unlock’ from the ‘Bulk Actions’ dropdown.

After that, you can click the ‘Apply’ button to reactivate these accounts.

Unfreezing WordPress user accounts

How to Temporarily Disable Comments and Form Entries

Before you start your site migration or other big changes, you’ll also want to temporarily disable comments and form entries on your site. If someone submits a comment or form in the middle of your changes, that data would be lost.

To temporarily disable comments quickly and easily on your whole site, we recommend using WPCode.

Simply install and activate the free WPCode snippets plugin and then navigate to Code Snippets » Add Snippet.

From here, you can click on the Comments category in the left menu and then click on ‘Use snippet’ under ‘Completely Disable Comments’.

WPCode snippet to completely disable comments on your WordPress site

On the next screen, all you need to do is set the toggle from Inactive to Active.

Then, click the Update button and your snippet will be live.

WPCode activate snippet

If you’d prefer to disable comments manually without a plugin, you can see our step by step guide on how to completely disable comments in WordPress.

We also recommend temporarily disabling any contact forms or other forms on your website. You can simply remove the form and replace it with your business email address temporarily so that you don’t miss out on any important messages.

At this point, you are ready to migrate your site or do essential maintenance work without worrying about conflicts and errors.

BONUS: How to Create Beautiful Maintenance Pages in WordPress

In addition to locking user accounts and securing forms and comments, you can also put your site into maintenance mode, so no one can access the primary content.

A well-designed maintenance page can explain exactly why your site is is in a read only state, and when visitors can expect it to come back online.

This is where SeedProd comes in. It is the best drag-and-drop page builder for WordPress, and it allows you to create a completely custom maintenance page.

You can use the free version of SeedProd to create a beautiful maintenance mode page.

The SeedProd Pro homepage

For more details, you can see our guide on how to put your WordPress site in maintenance mode.

We hope this article helped you learn how to put your WordPress site in read only mode for site migrations and maintenance. You can also go through our guide on the best live chat software for small businesses and how to allow user registration on your WordPress site.

If you liked this article, then please subscribe to our YouTube Channel for WordPress video tutorials. You can also find us on Twitter and Facebook.

The post How to Put WordPress in a Read Only Mode for Migrations and Maintenance first appeared on WPBeginner.


August 09, 2022 at 02:05PM

Monday, August 8, 2022

How to Accept Square Payments in WordPress (Step by Step)

Do you want to accept Square payments to your WordPress site?

By default, WordPress does not come with credit card payment options. Square is an excellent payment gateway that can be connected to your site using several popular WordPress plugins.

In this article, we’ll show you how to integrate Square payments in WordPress, so you can easily accept credit card payments on your website.

How to Connect Square Payments in WordPress

Why Connect Square Payments in WordPress?

Square is a popular payment gateway that makes credit card payments easy. You can use Square on your

WordPress website to securely accept payments through a simple payment form or a full-featured eCommerce store.

Like the Stripe payment gateway, it provides a flexible option to accept payments by credit card online or in person.

Credit card acceptance is available in USA, Canada, Australia, Japan, the United Kingdom, the Republic of Ireland, France, and Spain. Square offers a fixed transaction rate, and this varies for each country.

Note: You will need to enable HTTPS/SSL on your website so that you can securely accept credit card payments. For more details, you can follow our guide on how to get a free SSL certificate for your WordPress site.

With that being said, let’s take a look at how to connect Square payments in WordPress.

We’ll show you how to add a Square payment form using WPForms, and then cover other methods, such as accepting Square payments in an online store using WooCommerce.

Connecting Square to WordPress Using WPForms

The simplest way to create a form for Square payments is by using WPForms. It is the best WordPress form builder plugin used by over 5 million websites. You can use their drag & drop builder to quickly create any kind of form, including payment forms, to your WordPress website.

For this tutorial, we’ll be using the WPForms Pro version because it gives you access to the Square addon that will allow you to accept credit card payments without writing code.

You can also use WPForms to accept credit card payments using Stripe, Authorize.net, and PayPal.

Installing and Activating WPForms

The first thing you need to do is install and activate the WPForms Pro plugin. If you need help, then please see our guide on how to install a WordPress plugin.

After activating WPForms, head over to WPForms » Settings in your WordPress dashboard.

WPForms' pro settings

On this screen, you need to enter your license key into the ‘License Key’ field. You’ll find this key in your WPForms Account.

After that, make sure you click the ‘Verify Key’ button to activate your license. This will allow you to easily enable the Square addon for WordPress.

Connecting WPForms to Square

After activating the core plugin, it’s time to install the Square addon.

In your WordPress dashboard, head over to the WPForms » Addons page and then

scroll until you find the Square Addon. Next, you need click the ‘Install Addon’ button.
Install the WPForms Square Addon

Once the addon is installed and activated, go to the WPForms » Settings page and click on the Payments tab.

By default, WPForms will collect payments in American dollars. If you need to accept payments in a different currency, just open the Currency dropdown and choose from the list.

Set Your Currency in WPForms Payments Settings

The next step is connecting WPForms to your Square account.

To make this connection, scroll down the page to the Connection Status section. Then just click on the ‘Connect with Square’ button.

Click the Connect With Square Button

You can now follow the onscreen instructions to either create a new Square account or connect WPForms to your existing Square account.

If you wish to test your payment form, then you should check the Test Mode option. This allows you to make dummy payments to make sure that the form is working correctly. Don’t forget to uncheck the box when you have finished testing.

Make sure you click the ‘Save Settings’ button at the bottom to store your settings.

Creating a Square Payment Form in WordPress

Once you’re successfully connected to Square, you’ll need to create a payment form. To do that, head over to WPForms » Add New in your WordPress admin area.

First, you’ll have to provide a title for your form. Then you should scroll down to the ‘Billing / Order Form’ template and click the ‘Use Template’ button.

Select the Billing Order Form Template in WPForms

WPForms will now automatically load your form template in the drag and drop builder. It includes most of the fields you will need and makes it easy to add, remove, or change the fields on your form.

For example, a Multiple Items list has been added to the form, so your visitors can select the product or service they wish to pay for. Once you click on this field, you will be able to customize the field’s label along with the name and price of each item.

Customize the Multiple Items List

If you are only offering a single item, then you should delete the Multiple Items field by clicking the trash icon in the top right corner of the field.

Next, you can scroll down to the Single Item field and drag it onto your form.

Add a Single Item Field to Your Form

You can click on this field to customize it.

For instance, you can change the field’s label, description, and price. The preview of your form on the right will be updated automatically.

Configure the Single Item Field

If you are only offering a single item, then the Total field is unnecessary. Feel free to delete it.

Next, you need to add the Square field to your form to collect the customer’s payment information. Simply click on the ‘Add Fields’ tab and scroll to the Payment Field section.

Add the Square Field to Your Form

You can now go ahead and drag the Square field into place on your payment form.

As soon as you do that, a notification will pop up letting you know that you need to enable Square payments for this form.

Notification to Enable Square Payments

Once you click the OK button, head over to Payments » Square in the WPForms editor. Once there, you’ll have to toggle the ‘Enable Square Payments’ setting to the on position.

After that, you can type a description in the ‘Payment Description’ field. This text will appear on the customer’s credit card statement.

Toggle the Enable Square Payments Setting to the On Position

It’s a good idea to also complete the other optional settings. These let Square know where to find the customer’s email address, name, and billing address in the form you have created so that an email receipt can be sent.

Finally, WPForms also allows you to set up smart conditional logic for your forms. This is useful when you want to allow your customers to choose from several payment methods, such as credit cards or PayPal.

When you’re happy with how your credit card payment form looks, it’s time to save your changes. To do this, just click on the Save button at the top of the screen.

Configuring Notification Emails for Square Payments

Next, you can configure the email notification that is sent to you when the form is submitted. You can also set up notification emails to your customers after they make an order.

Every time a customer completes the payment form, WPForms will send an email to your WordPress admin by default. However, you may want to send these emails to a different address or even notify multiple people.

This is easy to do using WPForms. To customize your email notifications, simply click on the Settings tab then select Notifications.

Creating credit card payment notifications

On this screen, find the ‘Send To Email Address’ field. By default, this is set to {admin_email} and tells WordPress to use the WordPress admin email.

You can delete this dynamic text and replace it with any other email address. Simply type the new address into the ‘Send To Email Address’ field. If you want to email multiple people, just separate each address with a comma.

Creating email notifications

You can also edit the email’s subject line, message, and more.

Next, we’ll set up an email notification for your customers, confirming their purchase and thanking them. To do that, you need to click on the ‘Add New Notification’ button.

Creating a new WPForms notification

WPForms will ask you to provide a name for this notification. For this tutorial, we’ll call it ‘Customer Notification.’

After that, WPForms will show all of the notification fields that you can customize.

How to easily accept credit card payments in WordPress

You can enter a smart tag so the notification email is sent to your customer’s email address. Simply click on the ‘Show Smart Tags’ link next to the ‘Send To Email Address’ option.

After that, you need to select the form’s ‘Email’ field. This allows WPForms to use the email address the customer provided when submitting their payment.

Adding smart tags to your credit card payment emails

You can now customize the rest of the notification email, such as the subject line or email message. For example, you might personalize the email content using smart tags for the customer’s name or some information about the product they bought.

WPForms will also display an onscreen notification when they place an order. You can customize this by clicking the ‘Confirmations’ tab and editing the confirmation message.

Creating a payment confirmation message

Instead of showing a message, you might prefer to show a specific page or redirect customers to another URL.

To make this change, simply open the ‘Confirmation Type’ dropdown. You can now choose from the available options.

Changing the payment confirmation settings

Finally, you will want to make sure that these email notifications are delivered to the recipient’s email inbox and not to the spam folder. The best way to do this is by using an SMTP service provider to improve email deliverability.

For more details, see our guide on how to fix WordPress not sending email issue.

Adding the Payment Form to Your WordPress Website

The final step is adding your new Square payment form to your WordPress website. WPForms makes it super easy to add forms anywhere.

Simply create a new post or page, or edit an existing one. Then, click on the plus (+) sign at the top and add a WPForms block in the WordPress editor.

Drag the WPForms Block Onto Your Post or Page

After that, select your payment form from the dropdown menu in the WPForms block.

Once you’re finished, you can save or publish your page and click on the preview button to see your form in action.

Preview of Square Payment Form

Congratulations, you’ve now connected Square payments in WordPress.

You can connect your Square payment form with email marketing services, Google Sheets, and other apps to further streamline your workflow using WPForms native integrations.

Bonus Ways to Connect Square to WordPress

WPForms offers a simple way to create a payment form that connects Square payments with your WordPress site. However, some users may have different needs.

For example, you may want to start a membership site or online store to sell physical products, sell ebooks, sell online courses, or even accept donations.

Square is not always the best choice. That’s because Stripe has much better plugin support than Square in WordPress, making it a better choice if you are looking to add a credit card option.

Many popular plugins like MemberPress, WP Simple Pay, and Easy Digital Downloads offer built-in Stripe integrations.

However, if you are running a WooCommerce store, then you can easily add Square support using the official Square for WooCommerce extension.

Square WooCommerce Extension

This extension syncs products between your website and your Square account. That means that when you add products to your Square account, they will be automatically added to your WooCommerce store as well.

Besides that, it supports recurring payments when used alongside the WooCommerce Subscriptions extension.

We hope this tutorial helped you learn how to connect Square payments in WordPress. You may also want to learn how to run a giveaway or contest in WordPress, or check out our list of the best social media plugins.

If you liked this article, then please subscribe to our YouTube Channel for WordPress video tutorials. You can also find us on Twitter and Facebook.

The post How to Accept Square Payments in WordPress (Step by Step) first appeared on WPBeginner.


August 08, 2022 at 03:00PM