Tuesday, August 16, 2022

How to Limit Access by IP to Your wp-login.php file in WordPress

Do you want to limit access by IP address to your wp-login.php file in WordPress?

The WordPress login page is often attacked by DDoS attacks and hackers to gain access to your website. Limiting access to specific IP addresses can effectively block such attempts.

In this article, we’ll show you how to easily limit access by IP to your wp-login.php file in WordPress.

Limit access to WordPress login page by IP Address

Why Limit Access to wp-login.php by IP Address?

The login page for a WordPress website (typically, wp-login.php), is where users go to log in to your site.

As a website owner, it gives you access to the WordPress admin area where you can perform website maintenance, write content, and manage your website.

However, common brute force attacks on the internet are known to target the wp-login.php page to gain access to websites. Even if they fail to get in, they may still be able to slow down your website or even crash it.

One way to deal with this situation is to block the IP addresses where attacks are coming from (We’ll talk about this later in the article).

An IP address is like a phone number that identifies a specific computer on the internet. Hackers can use software to change their IP addresses.

However, more sophisticated attacks use a larger pool of IP addresses and it may not be possible to block all of them.

In that case, you can limit the access to specific IP addresses used by yourself and other users on your website.

That being said, let’s take a look at how to easily limit access to wp-login.php file by specific IP addresses using 3 different ways including cloud security firewall.

1. Limit Access to WordPress Login Page by IP Address

For this method, you’ll need to add some code to the .htaccess file.

The .htaccess file is a special server configuration file that is in the root folder of your website and can be accessed using FTP or the File Manager app on your WordPress hosting control panel.

Simply connect to your WordPress site using an FTP client and edit your .htaccess file by adding the following code at the top.

<Files wp-login.php>
        order deny,allow
        Deny from all
 
# whitelist Your own IP address
allow from xx.xxx.xx.xx
 
#whitelist some other user's IP Address
allow from xx.xxx.xx.xx
 
</Files>

Don’t forget to replace XXs with your own IP addresses. You can easily find your IP address by visiting the SupportAlly page.
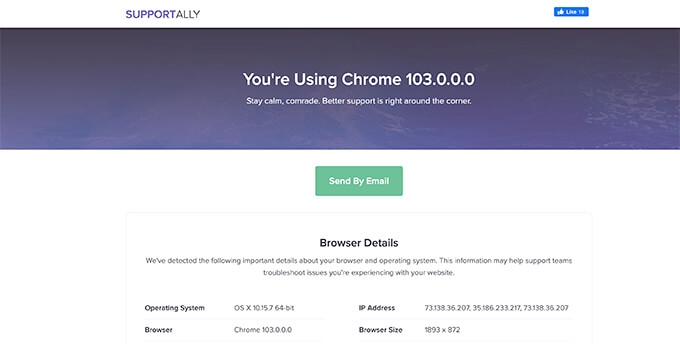
SupportAlly

If you have other users who also need to log in to your website, then you can ask them to provide their IP addresses. You can then add those to the .htaccess file as well.

Here is another example of the above-mentioned code.

<Files wp-login.php>
        order deny,allow
        Deny from all
 
# Whitelist John as website administrator
allow from 35.199.128.0
 
#Whitelist Tina as Editor 
allow from 108.59.80.0

# Whitelist Ali as moderator
allow from 216.239.32.0
 
</Files>

Now, users with these IP addresses will be able to view the wp-login.php file and login to your website. Other users will see the following error message:
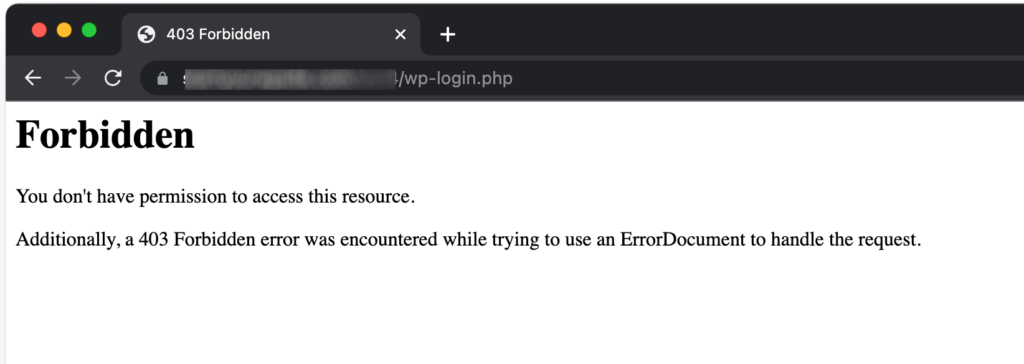
Forbidden error

2. Blocking Specific IP Addresses from Accessing Your Website

This method is totally the opposite of the first method.

Instead of limiting WordPress login page access to specific IP addresses, you’ll be able to block IP addresses used to attack your website.

This method is particularly useful for WordPress membership websites, eCommerce stores, or other websites where multiple users need to login in order to access their accounts.

The disadvantage of this method is that hackers can change their IP addresses and continue attacking your website.

Fortunately, many of the common WordPress hacking attempts use a fixed set of IP addresses which makes this method effective in most cases.

Step 1: Finding the Offending IP Addresses You Want to Block

First, you need to find the IP addresses used to attack your website.

The easiest way to find the offending IP addresses is by looking at your server logs. Simply head over to your hosting account control panel and click on the Raw Access logs icon.
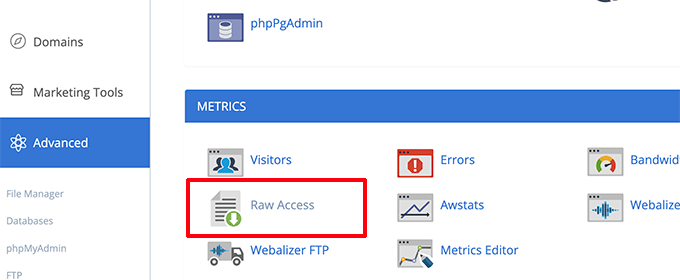
Raw access logs

On the next page, click on your domain name to download the access logs. This will download a file with gz extension.

You will need to extract the file and open it with a text editor like Notepad or TextEdit.

From here you will find the IP addresses that are repeatedly hitting the wp-login.php page.

Finding IP addresses attacking your website

Copy and paste the IP addresses into a separate text file on your computer.

Step 2. Blocking Suspicious IP Addresses

Next, you need to log in to your WordPress hosting control panel and click on the IP Blocker icon.
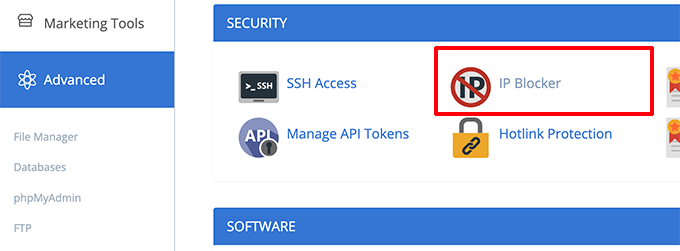
IP blocker app in hosting control panel

On the next screen, simply copy and paste the IP addresses you want to block and click on the Add button.
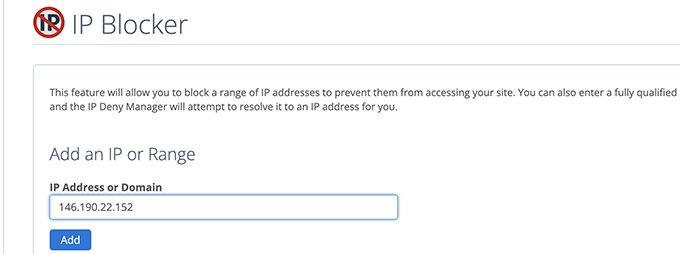
Block IP address

Repeat the process to block any other suspicious IP addresses you want.

That’s all! You have successfully blocked suspicious IP addresses from accessing your website completely.

Later on, if you need to unblock one of these IP addresses, you can simply do so from the IP blocker app.
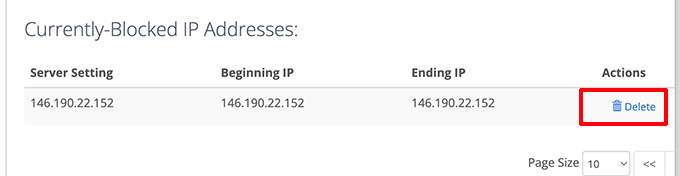
Unblock IP addresses

3. Protecting WordPress Login with Website Firewall

As a website administrator, you may not want to spend too much time managing IP addresses that can access your WordPress login page.

The easiest way to protect your WordPress login pages is by using Sucuri. It is the best WordPress firewall that accompanies a comprehensive WordPress security plugin.

Sucuri’s website firewall automatically filters suspicious IP addresses from accessing important WordPress core files without them ever reaching your website.

How website firewall blocks attacks

This method also improves your WordPress performance and speed as it blocks suspicious activities from slowing down your server.

On top of that, Sucuri also comes with a built-in CDN network. It would automatically serve static files like images, stylesheets, and JavaScript from a server closer to your users.

You can easily whitelist the IP addresses of users if they are unable to access WordPress login pages.

Whitelist IP address

Alternative: Cloudflare Free CDN

We hope this article helped you learn how to limit access by IP address to your wp-login.php file. You may also want to see our complete WordPress security guide or see these additional tips for protecting the WordPress admin area.

If you liked this article, then please subscribe to our YouTube Channel for WordPress video tutorials. You can also find us on Twitter and Facebook.

The post How to Limit Access by IP to Your wp-login.php file in WordPress first appeared on WPBeginner.


August 16, 2022 at 02:10PM
Monday, August 15, 2022

How to Export WordPress Form Entries to CSV and Excel

Do you want to export your form responses to a spreadsheet?

If you have a lot of form entries, then exporting them to a CSV or Excel file helps you analyze them. You can even use the form data in other applications.

In this article, we’ll show you how to export WordPress form entries to CSV and Excel formats.

How to Export WordPress form entries to CSV and Excel

Why Export WordPress Form Entries to CSV and Excel?

WordPress forms are a great way of staying connected with your audience. They help you collect customer leads, get valuable feedback, resolve customer queries, find new product suggestions, conduct surveys, and more.

However, analyzing the data can be difficult if you have a lot of form entries. This is where exporting your data in the form of CSV (comma-separated values) and Excel files comes in handy.

For example, you can find out which products or features your users want the most or uncover common issues people face while using your WordPress site.

Another benefit of exporting WordPress form entries to CSV and Excel is that you can use the data with other applications.

Besides spreadsheet software like Google Sheets and Microsoft Excel, you can upload your form entries to analytics software. For instance, you can use Microsoft Power BI with a CSV or Excel file to create dashboards and other visualizations for your form entries.

That being said, let’s look at how you can create a WordPress form and export form entries to CSV and Excel.

Creating a WordPress Form to Collect Data

Before you can export form entries to CSV and Excel, you’ll need a WordPress form.

The best way of creating a WordPress form is by using WPForms. It’s the best contact form plugin for WordPress and is used by over 5 million websites.

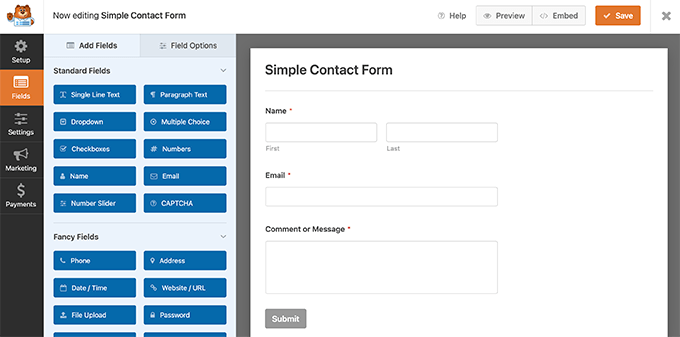
WPForms offers a drag and drop form builder, which makes it effortless to create and customize WordPress forms. Plus, you get pre-built form templates to start quickly and customize the form according to your needs.

Contact form builder

You can follow our step-by-step guide on how to create a contact form in WordPress.

WPForms also comes with powerful addons that help you collect online payments, integrate with email marketing services, store users’ geolocation, reduce form abandonment, and more.

For this tutorial, we’ll use the WPForms Pro version because it includes the option to export form entries and offers more features. There’s also a WPForms Lite version that you can try for free.

Exporting WordPress Form Entries to CSV and Excel

Once you’ve added a contact form on your WordPress blog and started getting form submissions, the next step is to export your form entries.

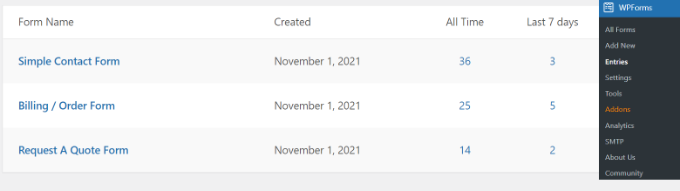
To start, simply head to WPForms » Entries in your WordPress admin panel, and then select a WordPress form to export its entries.

View form entries in WPForms

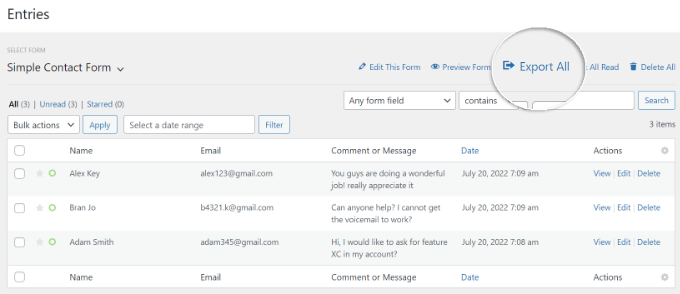
After that, you will see all the entries for the form you selected.

Go ahead and click the ‘Export All’ option.

Click export all option

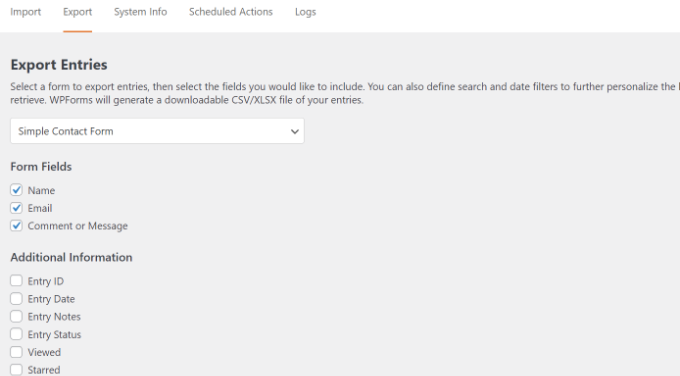
Next, WPForms will show you different export options for your form entries.

You can choose which form fields to export, as well. By default, the export will include name, email address, and message fields.

However, there are also options to export additional information such as entry ID, date, user agent, user IP, payment status, and more.

Choose export options in WPForms

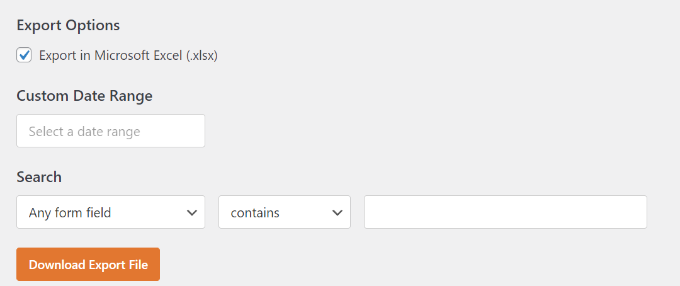
From here, simply scroll down to the ‘Export Options’ section.

You can click the ‘Export in Microsoft Excel (.xlsx)’ checkbox to export the data in Excel format. If the box is left unchecked, WPForms will export as a CSV file.

Download export file

There’s also a custom date range selector to help you export data from a specific time.

Plus, you can use the search feature to filter form entries. For example, you can export forms that only contain or don’t contain a specific name, email, message, ID, and more.

Next, go ahead and click the ‘Download Export File’ button and save the file to your computer.

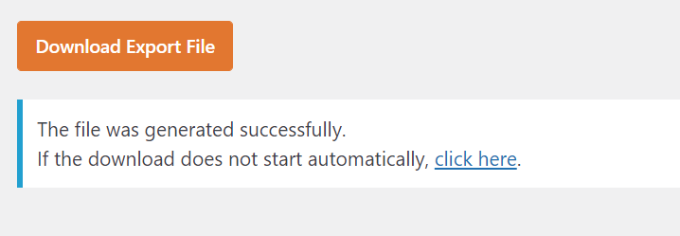
You’ll now see a message that your export file was successfully generated.

Export file generated success message

How to Export a Single WordPress Form Entry

WPForms also lets you export a single form entry instead of downloading all the submissions. This is helpful if you have a multi-step form and only require information about a particular lead.

To start, simply go to WPForms » Entries from your WordPress dashboard and select a form to view its entries.

View form entries in WPForms

You should now be able to see all your forms. From here, click on the form that contains the single entry you need.

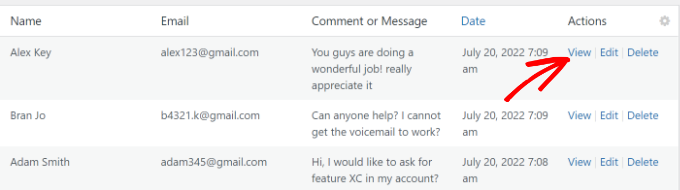
On the next screen, find the entry you want to export, and then go ahead and click the ‘View’ button.

View a specific form entry

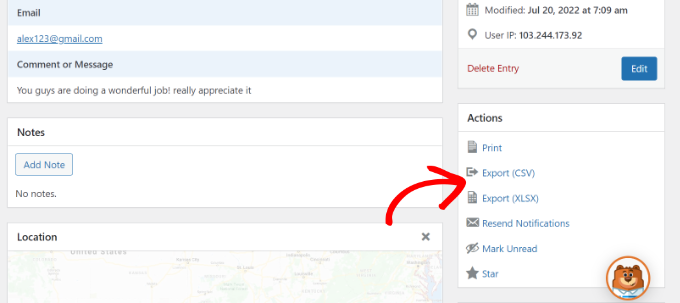
After that, you’ll see details of your form entry.

Simply click the ‘Export (CSV)’ or ‘Export (XLSX)’ options in the Actions metabox on the right-hand side to download the file.

Export specific form entry

You can now save the CSV or Excel file on your computer and open it in spreadsheet software.

Bonus: Connect WordPress Forms to Google Sheets

Did you know that you can automate the process of gathering form entries and showing them in Google Sheets?

Connecting your WordPress forms with Google Sheets automatically collects the data in a spreadsheet. This makes it easier for team members to access form entries without creating a new WordPress login.

Plus, you don’t have to manually export form entries or collect data to share it with other people. It helps save time and reduces any errors that may occur when manually exporting data.

The best way to set up automation is by using Uncanny Automator. It is the best WordPress automation plugin and helps connect WordPress plugins and third-party apps.

Uncanny Automator

You can follow our detailed guide on how to connect any WordPress forms to Google Sheets for more information.

We hope this article helped you learn how to export WordPress form entries to CSV and Excel. You may also want to see our ultimate guide on WordPress SEO, and our expert pick of the best WooCommerce plugins.

If you liked this article, then please subscribe to our YouTube Channel for WordPress video tutorials. You can also find us on Twitter and Facebook.

The post How to Export WordPress Form Entries to CSV and Excel first appeared on WPBeginner.


August 15, 2022 at 04:30PM

Sunday, August 14, 2022

How to Easily Add Custom Code in WordPress (Without Breaking Your Site)

Often while reading WordPress tutorials, you may be asked to add custom code snippets in your theme’s functions.php file or in a site-specific plugin.

The problem is that even the slightest mistake can break your website.

In this article, we will show you an easy way to add custom code in WordPress without breaking your site.

How to easily add custom code in WordPress

The Problem with Custom Code Snippets (And How to Fix It)

Often you’ll find code snippets in WordPress tutorials with instructions to add them into your theme’s functions.php file or a site-specific plugin.

The biggest problem is that even a tiny mistake in the custom code snippet can break your WordPress site and make it inaccessible.

Not to mention, if you update your WordPress theme, then all your customizations get removed.

The other problem is that if you add multiple code snippets in a site-specific plugin, it can become hard to manage the file.

Luckily, there is an easier way for users to add and manage custom code snippets in WordPress.

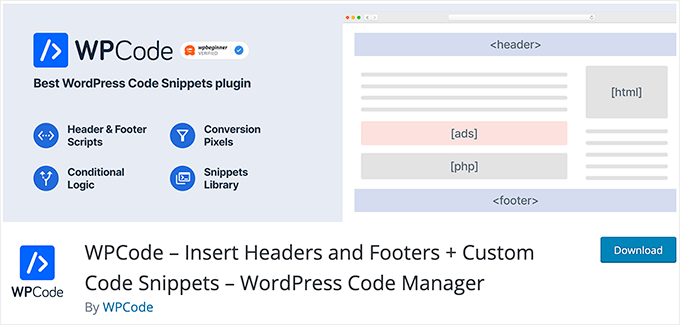
WPCode is the most popular code snippets plugin used by over 1 million WordPress websites. It makes it easy to add code snippets in WordPress without having to edit your theme’s functions.php file.

WPCode Code Snippets Plugin

WPCode also makes it simple to add tracking codes for Google Analytics, Facebook Pixel, Google AdSense, and more to your site’s header and footer areas.

You’ll never have to worry about breaking your site because the smart code snippet validation helps you prevent common code errors.

In addition, WPCode comes with a built-in snippets library where you can find all of the most popular WordPress code snippets like disable REST API, disable comments, disable Gutenberg, allow SVG file uploads, and much more. This eliminates the need to install separate plugins for each feature request.

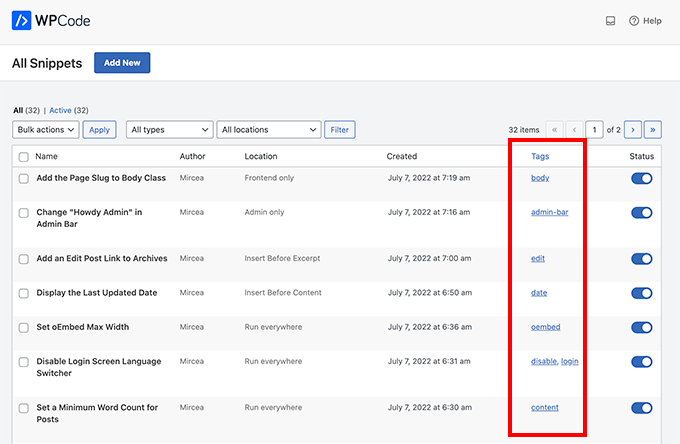
The best part is that you can manage all your code snippets from one central screen and add tags to organize them.

With that said, let’s take a look at how to easily add custom code snippets in WordPress with WPCode.

Adding Custom Code Snippets in WordPress

The first thing you need to do is install and activate the WPCode plugin on your website.

For more details, see our step by step guide on how to install a WordPress plugin.

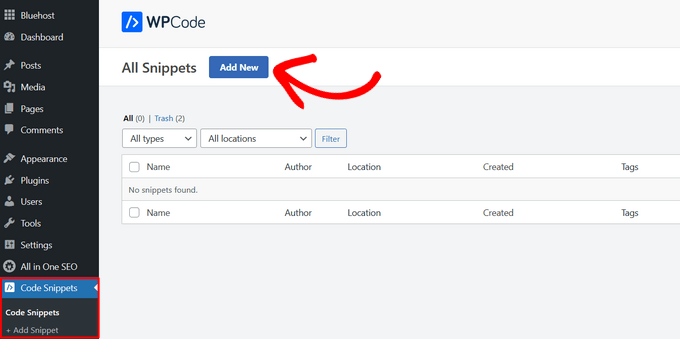
Upon activation, the plugin will add a new menu item labeled ‘Code Snippets’ to your WordPress admin bar. Clicking on it will show you a list of all the custom code snippets you have saved on your site.

Since you just installed the plugin, your list will be empty.

Go ahead and click on the ‘Add New’ button to add your first custom code snippet in WordPress.

Click 'Add New' in WPCode to create a new custom snippet

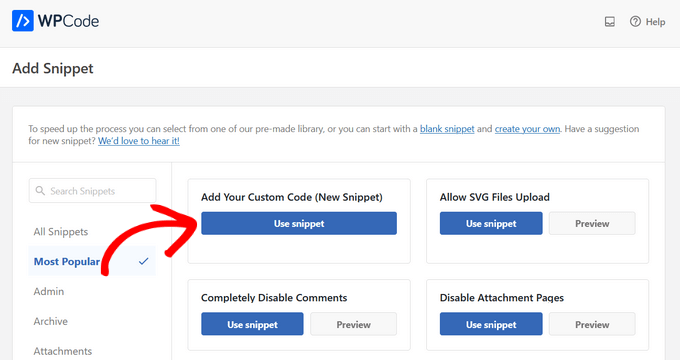
This will bring you to the ‘Add Snippet’ page. Here you can choose a code snippet from the pre-made library or add your custom code.

To add custom code, click on the ‘Use snippet’ button underneath the ‘Add Your Custom Code (New Snippet)’ option.

Add custom code in WPCode

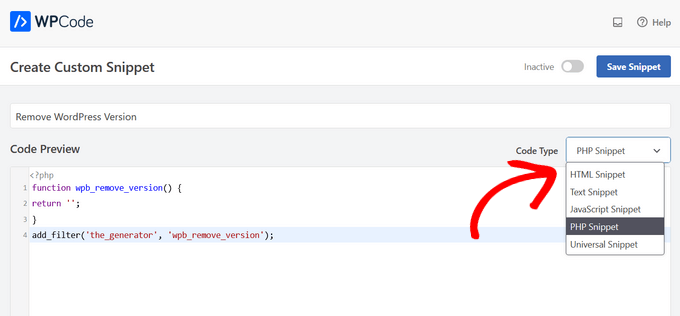
You need to start by entering a title for your custom code snippet. This could be anything that helps you identify the code.

After that, you can copy and paste your code snippet into the code box. Be sure to also select the correct code type from the drop-down menu on the right.

Adding your first code snippet

In the screenshot above, we have added a custom code snippet to remove the WordPress version number from our test site.

function wpb_remove_version() {
return '';
}
add_filter('the_generator', 'wpb_remove_version');

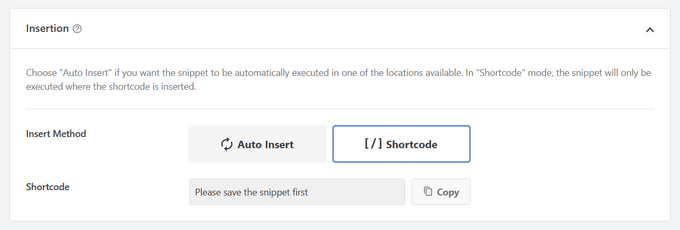
Below the code box, you will see insertion options. There are two main insertion options: Auto Insert and Shortcode (Default).

Choose insertion option for code snippet

If you chose the ‘Auto Insert’ method, the snippet will be automatically inserted and executed on your site.

You can automatically run the snippet only in the WordPress admin area, on the front-end of your site, or everywhere. If you are unsure, then select the default ‘Run snippet everywhere’ option.

With the ‘Shortcode’ method, the snippet is not automatically inserted. Once you save the snippet, you’ll get a shortcode specific to the snippet that you can use anywhere on your site.

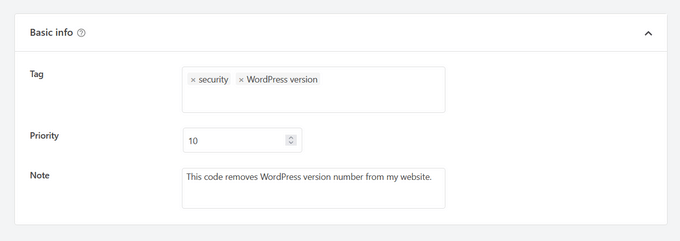
When you scroll further down, you will see a ‘Basic info’ area. You can add anything here that helps you understand what this code does, where you found it, and why you are adding it to your website.

Add code description and tags

You can also assign tags to your code snippet. This will help you sort your code snippets by topic and functionality.

The priority field allows you to control the order in which the snippets are executed when you want to display multiple snippets in the same location. By default, all snippets get a priority of 10. If you want a snippet to display earlier than others, simply set the snippet priority to a lower number, like 5.

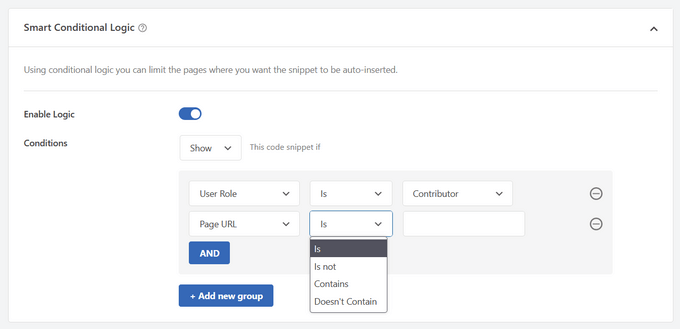
Lastly, you can use the powerful ‘Smart Conditional Logic’ section to either show or hide auto-inserted snippets based on a set of rules.

Use smart conditional logic to show or hide snippets

For example, you can show code snippets to logged-in users only, load code snippets only on specific page URLs, and more.

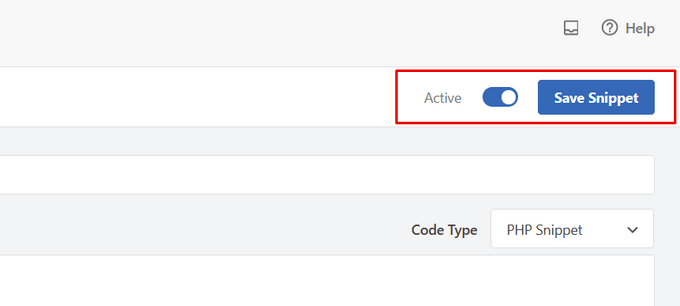
When you’re finished choosing options, you can click the ‘Save Snippet’ button in the top-right corner of the screen and toggle the switch from ‘Inactive’ to ‘Active.’

Save and activate code snippet

If you want to save the code snippet and not activate it, then simply click on the ‘Save Snippet’ button.

Once you have saved and activated the code snippet, it will be added to your site automatically, if that’s the insertion method you chose, or displayed as a shortcode.

Handling Errors in Custom Code

Often, if you make a mistake in adding the custom code in your site-specific plugin or theme file, then it would immediately make your site inaccessible.

You would start seeing a syntax error or a 500 internal server error on your site. To fix this you’ll need to manually undo your code using an FTP client.

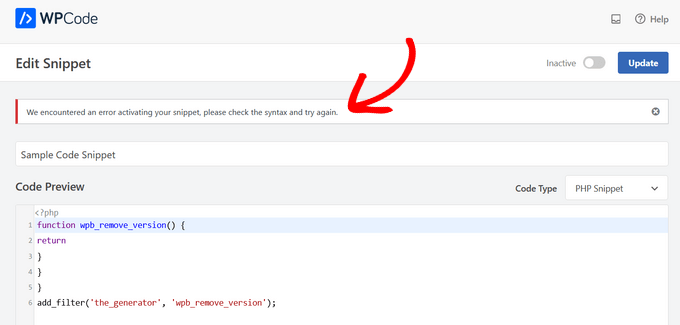
The neat part about the WPCode plugin is that it will automatically detect a syntax error in the code and immediately deactivate it.

Error handling in your custom code snippet

It will also show you a helpful error message, so you can debug the error.

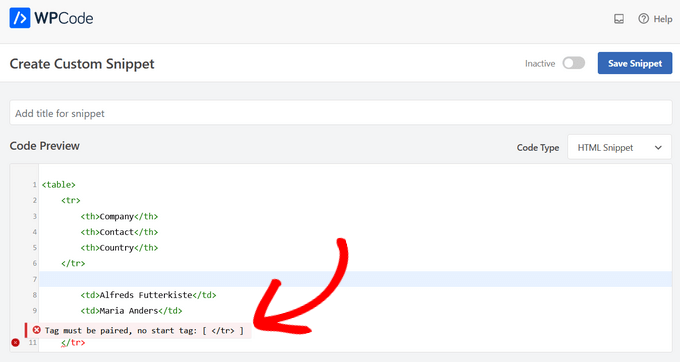
WPCode’s smart code snippet validation will also detect any errors as you’re adding your custom code.

Smart code snippet validation to find code errors

Hovering over the error will bring up instructions to help you fix it.

Managing Your Custom Code Snippets

WPCode plugin provides an easy user interface to manage your custom code snippets in WordPress.

You can save code snippets without activating them on your site, and then activate or deactivate the snippet at any time you want. It’s also possible to filter code snippets by type and location, and use tags to organize your code snippets easily.

WPCode - WordPress Snippets Organized by Tags

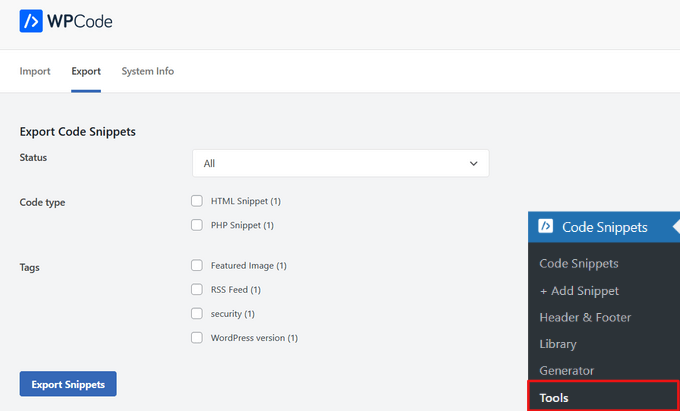
You can also export specific code snippets or bulk export all of them.

Simply go to Code Snippets » Tools and click on the ‘Export’ tab.

Export your custom code snippets

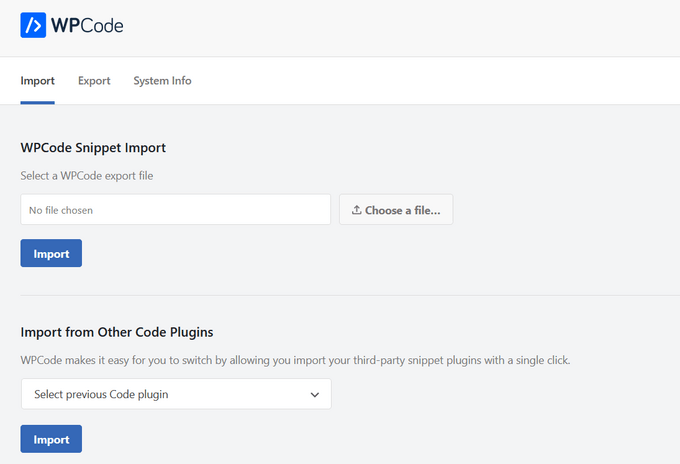
If you’re moving websites to a different server, you can easily import your code snippets to the new site.

Just visit the Code Snippets » Tools » Import page and upload the export file.

Import code snippets with WPCode

We hope this article helped you learn how to easily add custom code in WordPress. Want to experiment with some code snippets on your website? Check out our list of extremely useful tricks for the WordPress functions file, and don’t forget to see our ultimate guide to speeding up your WordPress site.

If you liked this article, then please subscribe to our YouTube Channel for WordPress video tutorials. You can also find us on Twitter and Facebook.

The post How to Easily Add Custom Code in WordPress (Without Breaking Your Site) first appeared on WPBeginner.


August 14, 2022 at 04:00PM