Wednesday, August 17, 2022

How to Customize WooCommerce Login Page (3 Methods)

Do you want to customize your WooCommerce customer login page?

The default WordPress login page is plain and doesn’t match your store branding. Customizing your WooCommerce customer login page helps you provide a better user experience.

In this article, we’ll show you how to create a completely custom WooCommerce login page and also share tips on how to customize the checkout login page as well.
How to create a custom WooCommerce customer login page

Why Create a Custom WooCommerce Customer Login Page?

When customers log in to your WooCommerce store, they’ll see the default WordPress login page with only the WordPress logo and branding.
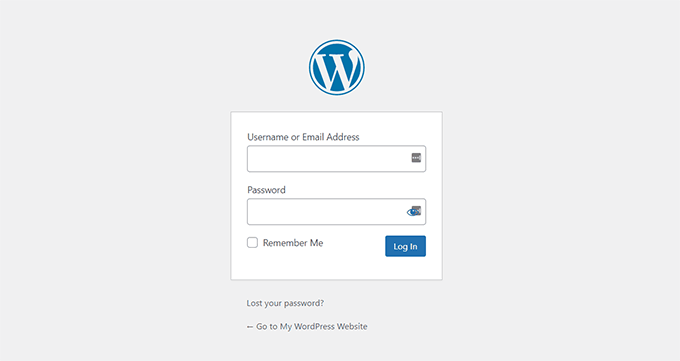
Standard WordPress login screen example

This page is fine if you just want to access your site’s dashboard. However, customers may be put off by the plain design and find it suspicious that the login page doesn’t match your website’s appearance.

Customizing the WooCommerce login pages lets you add your logo and change the design to match your website. This makes your site look more professional and provides a better user experience.

It also allows you to add more form fields, and it even allows you to promote specific products or show special offers to customers.

That being said, let’s see how you can create a custom customer login page in WooCommerce.

Create Completely Custom WooCommerce Login Page Using SeedProd

The best way to create a custom WooCommerce customer login page is by using SeedProd. It’s the best WordPress landing page and theme builder for WordPress, and it’s incredibly easy to use.

You can use SeedProd’s drag-and-drop builder to customize the design and layout of a page or your WordPress theme without touching a single line of code.

For this tutorial, we’ll use the SeedProd Pro license because it includes the Login Page template and other advanced customization options. There is also a SeedProd Lite version you can use for free.

First, you’ll need to install and activate the SeedProd plugin. If you need help, then please see our guide on how to install a WordPress plugin.

Upon activation, you will see the SeedProd welcome screen. Go ahead and enter your license key and click the ‘Verify key’ button. You can find the license key in the SeedProd account area.
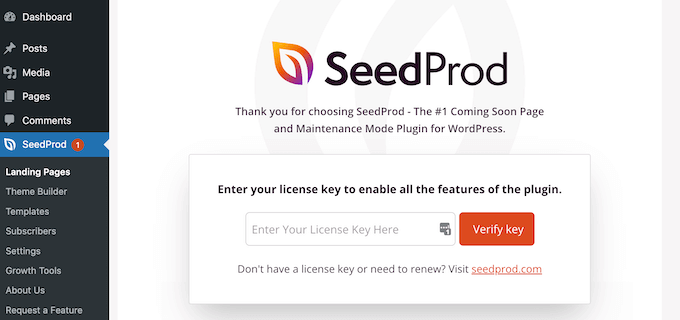
SeedProd license key

Next, you can create a custom login page for your WooCommerce store.

Simply head to SeedProd » Landing Pages from your WordPress dashboard and click the ‘Set up a Login Page’ button.
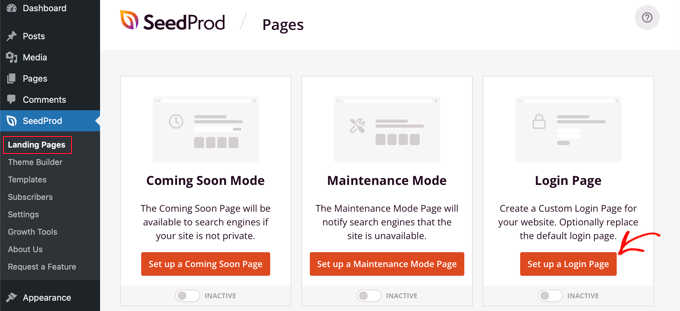
Select Login Page

After that, SeedProd will show you multiple templates. You can quickly select one and customize it according to your needs. This helps save time and you can use an existing design to create your own WooCommerce login page.

The plugin also lets you create a login page from scratch using a blank template.
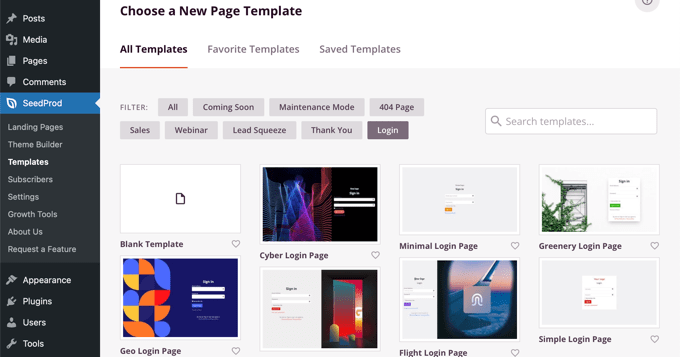
Choose a Template for Your SeedProd Login Page

Once you select a template, a popup window will open.

Go ahead and enter a name for your page and click the ‘Save and Start Editing the Page’ button.
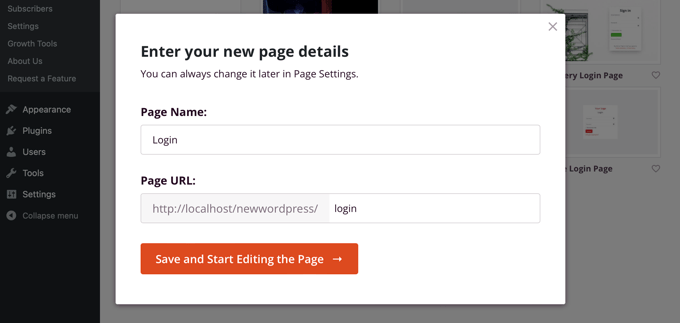
Enter a Page Name and Page URL

Next, you’ll see the drag-and-drop page builder.

You can now customize the login page by adding new blocks to the template from the menu on your left.

SeedProd offers standard blocks like headline, text, image, button, and more.
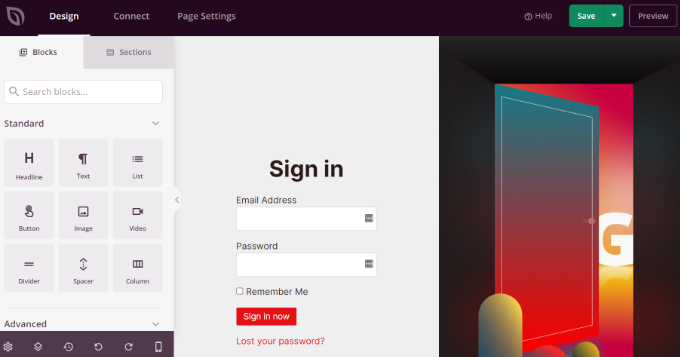
Customize your WooCommerce login page

Besides those, you can add advanced blocks like a giveaway, contact form, social sharing buttons, optin form, and more. There are also WooCommerce blocks like recent products, featured products, and best-selling products that you can add to your login page template.

Using the WooCommerce blocks, you can easily recommend your top products and promote discount offers to get more conversions.

Aside from that, SeedProd also lets you further customize any section on the login page. Simply click on the section, and you’ll see more options like editing the label, color, font, and spacing.
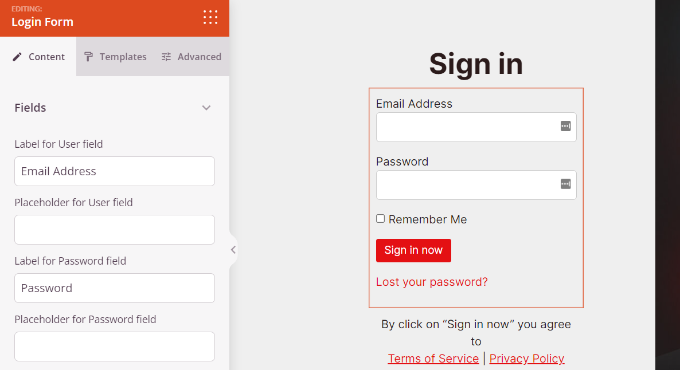
More customization options

Once you’re done customizing the WooCommerce login page, don’t forget to click the ‘Save’ button at the top.

After that, you can head to the ‘Page Settings’ tab and click the ‘Page Status’ toggle to change it from Draft to Publish. Then, you can go ahead and click the ‘Save’ button and close the page builder.
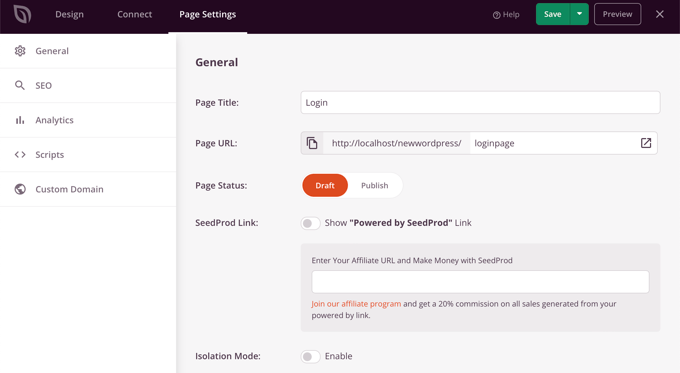
SeedProd Page Settings

From here, all that’s left is to make your new custom WooCommerce login page show up for users. To do this, go to SeedProd » Landing Pages in your WordPress dashboard.

Simply click the switch under ‘Login Page’ so that it’s green and says ‘Active.’
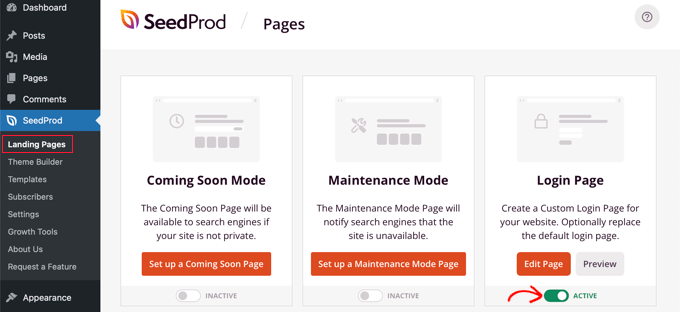
Make Your SeedProd Login Page Active

Once that’s toggled on, your new login page will appear on your site!

You can visit your eCommerce store to see it in action.

WooCommerce login page preview

Customize WooCommerce Customer Login Form Using WPForms

Do you want to create a login form that also matches your website theme and offers more form fields?

The default WordPress login form only allows users to enter their email address or username along with a password. With a custom login form, you can add more fields and let customers sign in with their names or phone number.

The best way to do that is by using WPForms. It’s the best WordPress form builder that’s beginner-friendly to use. Over 5 million websites use WPForms to build smarter forms.

You can easily create a custom WooCommerce login form and display it anywhere on your online store, like the sidebar or product page.

For this tutorial, we’ll use the WPForms Pro plan because it includes the User Registration addon. You can also try the free version of WPForms to get started.

First, you’ll need to install and activate the WPForms plugin. If you need help, then please see our guide on how to install a WordPress plugin.

Upon activation, you can go to WPForms » Settings from your WordPress dashboard and enter the license key. You can find the license key in the WPForms account area.
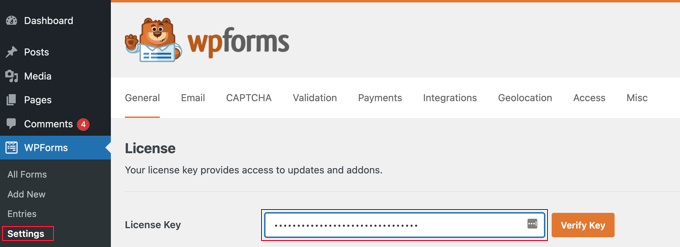
Enter Your WPForms License Key

Next, you will need to head over to WPForms » Addons in the WordPress admin panel.

After that, scroll down to the ‘User Registration Addon’ and then click the ‘Install Addon’ button.
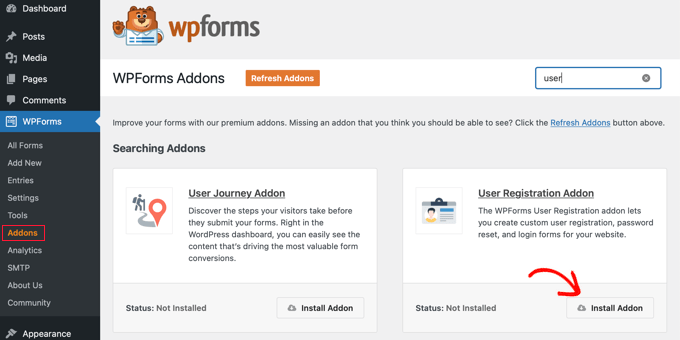
Install WPForms User Registration Addon

Now, you’re ready to create a custom login form for WooCommerce. Simply go to WPForms » Add New to launch the form builder.

On the next screen, you can enter a name for your form at the top. Then, search for the ‘User Login Form’ template and click the ‘Use Template’ button.
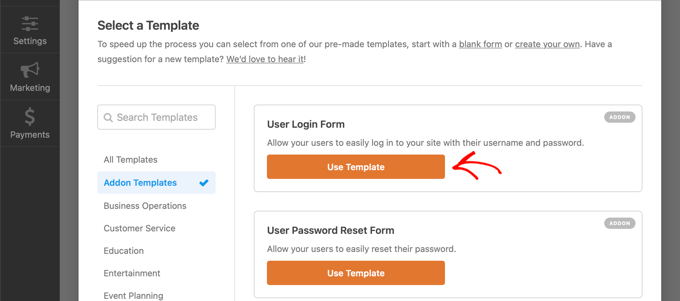
Select the WPForms User Login Form Template

After that, you can customize your user login form template using the drag and drop builder. WPForms makes it very easy to add different fields to the form or rearrange the existing fields on the template.

For example, you can add advanced fields like phone numbers by dragging them from the menu on your left and dropping it onto the template.
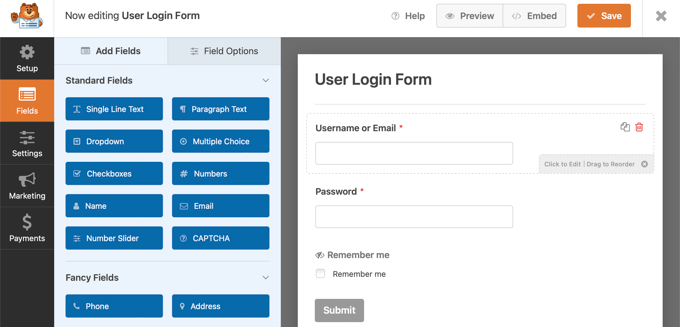
WPForms Form Builder

You can further customize each form field in the template. Simply click on any field and edit its label, add a description, and make it a required field in the form.

After that, you can head to the ‘Settings’ tab in the form builder. Under the General settings, you can change the ‘Submit Button Text’ to ‘Login.’
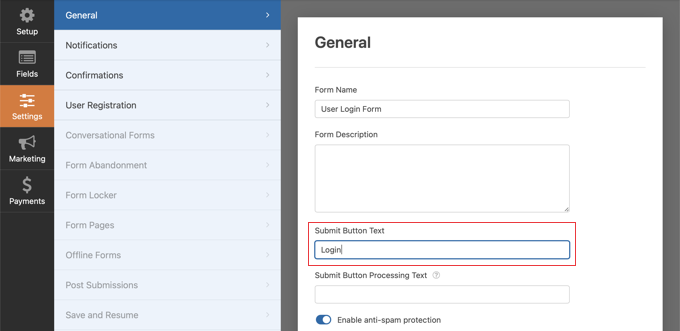
Customizing the WPForms Button Text

Next, you can go to the ‘Confirmations’ tab to change what will happen when a user successfully logs in.

Simply click the ‘Confirmation Type’ dropdown menu and select an option. You can show customers a message, display a page, or redirect them to a specific URL.

For instance, you can add your WooCommerce login form on a product page and allow customers to quickly sign in to purchase your product.
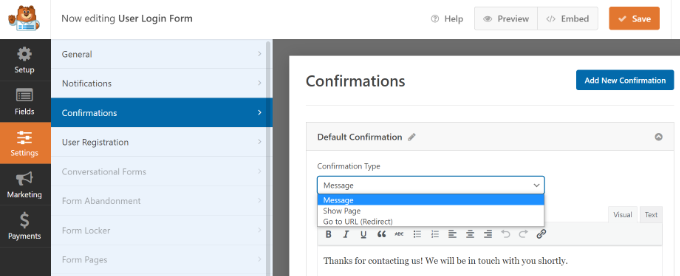
Edit confirmation settings in WPForms

When you’re done, simply click the ‘Save’ button at the top.

Next, you’ll need to add the WooCommerce customer login form to a page on your site.

Simply click the ‘Embed’ button at the top of the builder. You can then choose whether you will put the form on an existing page or create a new one for it.
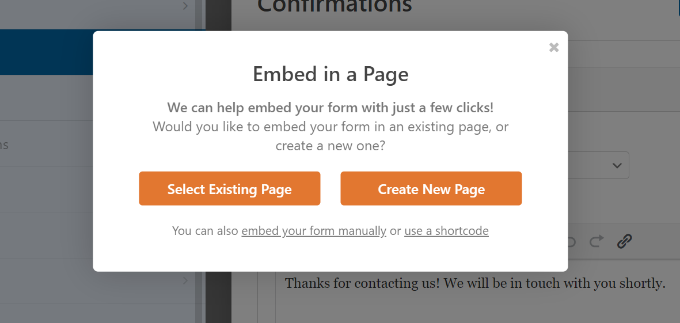
Embed a form in page

Let’s choose the ‘Create New Page’ option for now.

Next, you’ll need to enter a name for your page and click the ‘Let’s Go!’ button.
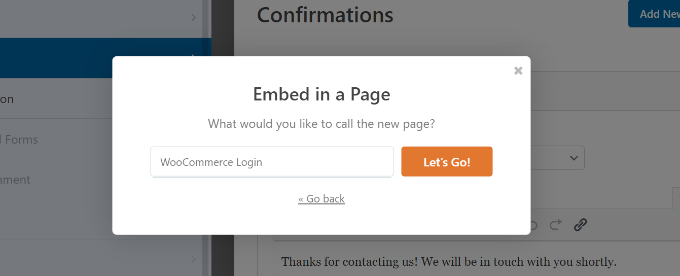
Enter a name for new login page

After that, you’ll see the WPForms login form inside the WordPress content area.

Now, you can preview your form, publish the new page, and display the custom WooCommerce login for your customers.
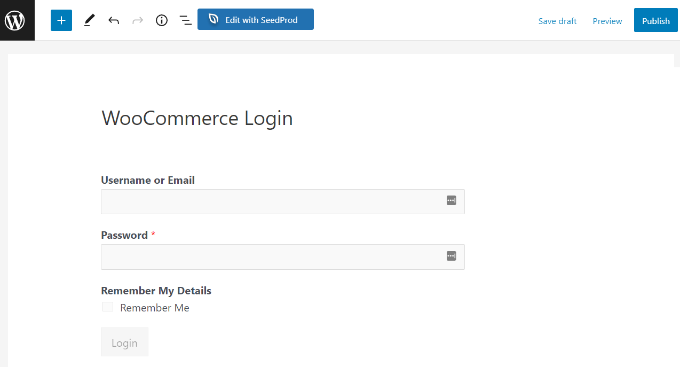
WooCommerce login page preview using WPForms

On the other hand, you can also add your WooCommerce login form to your store’s sidebar. This way, your form will appear on every product page and allow customers to sign in quickly.

Simply, head to Appearance » Widgets from your WordPress dashboard. Next, click the ‘+’ button and add a WPForms widget block.

After that, you can choose your login form from the dropdown menu and enter a title.
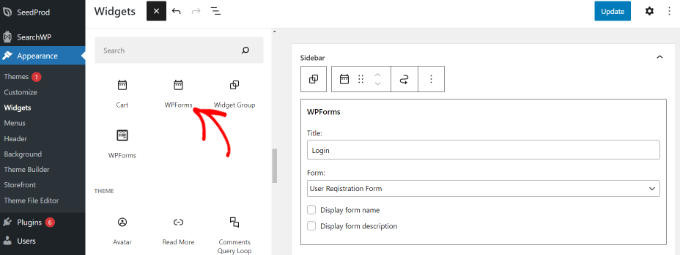
Add your login form in the sidebar

When you’re done, click the ‘Update’ button.

You can now visit your online store to see the login form in the sidebar.
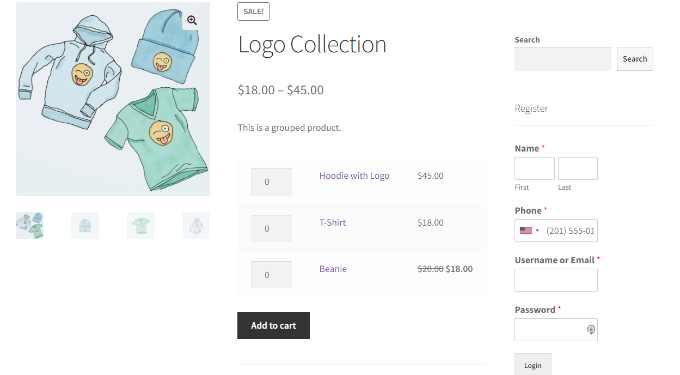
Login form in sidebar preview

For more ways to create a customized WooCommerce customer login page, you may want to see our guide on how to create a custom WordPress login page.

Plus, you can also see our tutorial on how to add a navigation menu in WordPress so that you can add your WooCommerce login page to your website navigation.

Bonus: Customize WooCommerce Checkout Login Page

WooCommerce allows returning visitors to login during the checkout page. If you’re looking to customize the WooCommerce checkout login page, then the best way to do that is by using a powerful funnel builder plugin like WooFunnels.

WooFunnels lets you customize your WooCommerce checkout page, add multi-step checkout, add one-click upsells, and so much more.

You can select from dozens of pre-made checkout templates that are highly optimized for conversions, and the best part is that you can customize them using any of the popular WordPress page builders.
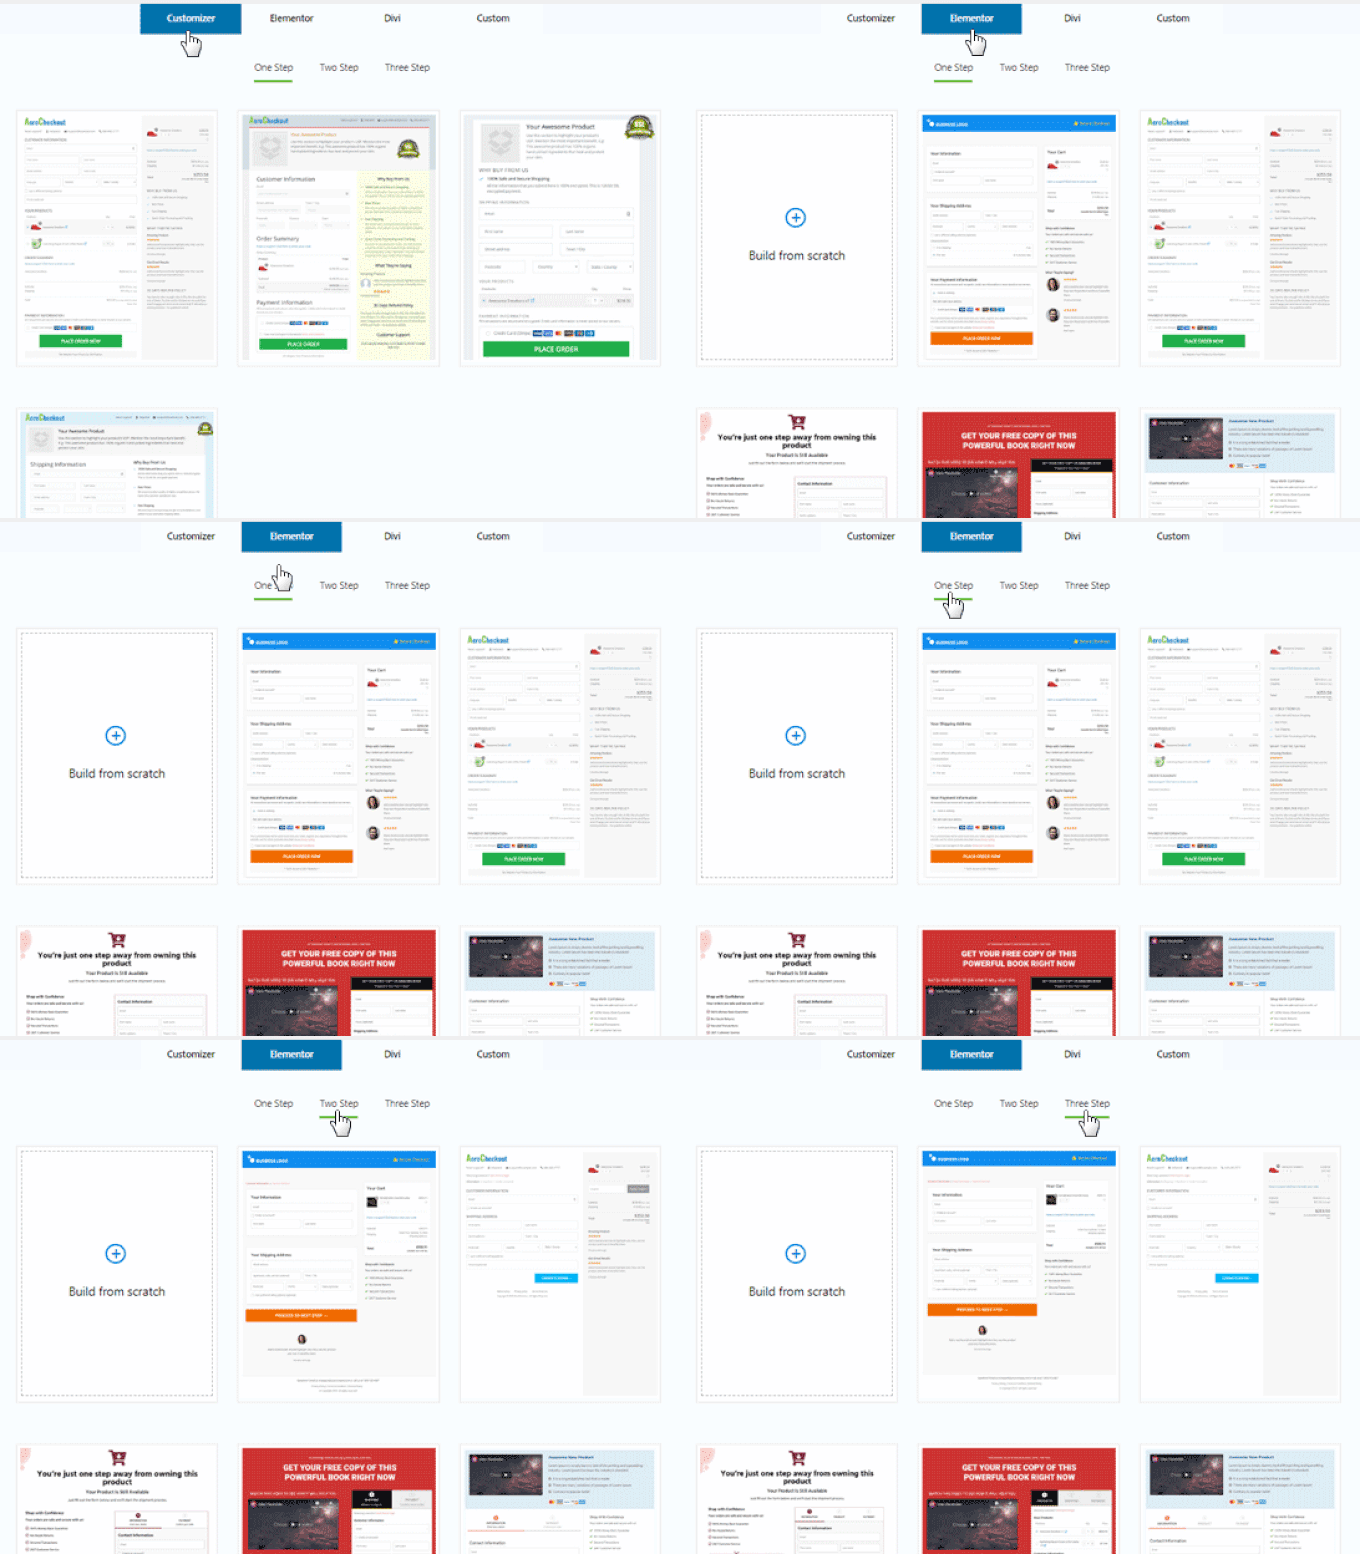
WooFunnels Checkout Example

You have the option to A/B test the multiple funnels, sales pages, and upsell offers.

WooFunnels give you detailed analytics on each step of your WooCommerce funnel.
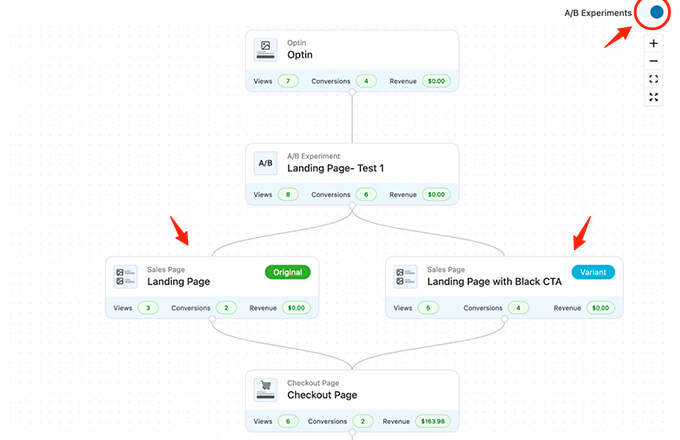
WooFunnels A/B Testing for WooCommerce

It also comes with a powerful marketing automation addon, Autonami, which lets you customize WooCommerce emails, send drip email notification in WooCommerce for cart abandonment, welcome series, and more.
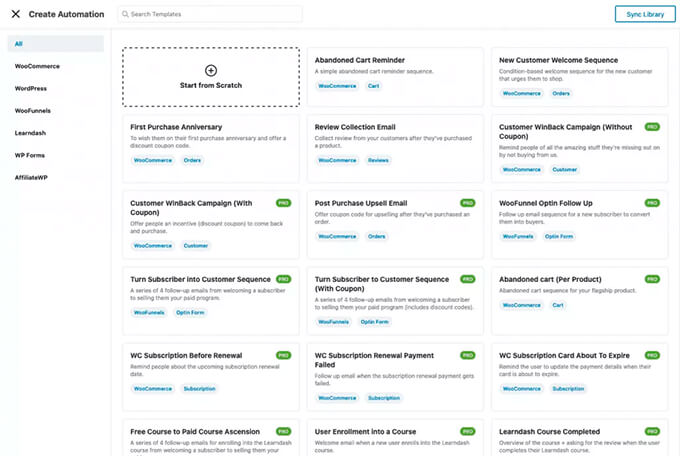
Autonami Email Library for WooCommerce

If you’re serious about growing your WooCommerce store, then this is one of the must have tool that we recommend.

We hope this article helped you learn how to create a custom WooCommerce customer login page. You can also see our expert pick on the best WooCommerce plugins, and our ultimate guide on how to fix WordPress not sending email issue.

If you liked this article, then please subscribe to our YouTube Channel for WordPress video tutorials. You can also find us on Twitter and Facebook.

The post How to Customize WooCommerce Login Page (3 Methods) first appeared on WPBeginner.


August 17, 2022 at 04:00PM

Tuesday, August 16, 2022

How to Limit Access by IP to Your wp-login.php file in WordPress

Do you want to limit access by IP address to your wp-login.php file in WordPress?

The WordPress login page is often attacked by DDoS attacks and hackers to gain access to your website. Limiting access to specific IP addresses can effectively block such attempts.

In this article, we’ll show you how to easily limit access by IP to your wp-login.php file in WordPress.

Limit access to WordPress login page by IP Address

Why Limit Access to wp-login.php by IP Address?

The login page for a WordPress website (typically, wp-login.php), is where users go to log in to your site.

As a website owner, it gives you access to the WordPress admin area where you can perform website maintenance, write content, and manage your website.

However, common brute force attacks on the internet are known to target the wp-login.php page to gain access to websites. Even if they fail to get in, they may still be able to slow down your website or even crash it.

One way to deal with this situation is to block the IP addresses where attacks are coming from (We’ll talk about this later in the article).

An IP address is like a phone number that identifies a specific computer on the internet. Hackers can use software to change their IP addresses.

However, more sophisticated attacks use a larger pool of IP addresses and it may not be possible to block all of them.

In that case, you can limit the access to specific IP addresses used by yourself and other users on your website.

That being said, let’s take a look at how to easily limit access to wp-login.php file by specific IP addresses using 3 different ways including cloud security firewall.

1. Limit Access to WordPress Login Page by IP Address

For this method, you’ll need to add some code to the .htaccess file.

The .htaccess file is a special server configuration file that is in the root folder of your website and can be accessed using FTP or the File Manager app on your WordPress hosting control panel.

Simply connect to your WordPress site using an FTP client and edit your .htaccess file by adding the following code at the top.

<Files wp-login.php>
        order deny,allow
        Deny from all
 
# whitelist Your own IP address
allow from xx.xxx.xx.xx
 
#whitelist some other user's IP Address
allow from xx.xxx.xx.xx
 
</Files>

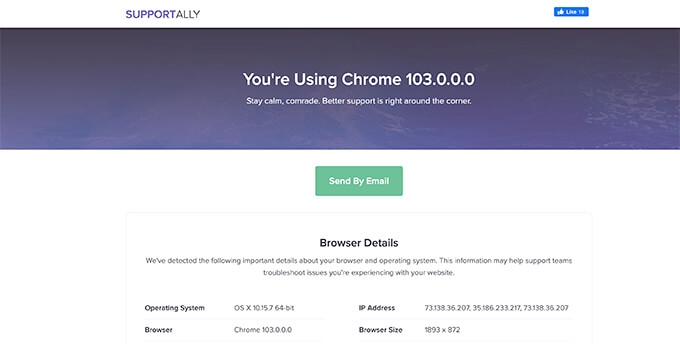
Don’t forget to replace XXs with your own IP addresses. You can easily find your IP address by visiting the SupportAlly page.

SupportAlly

If you have other users who also need to log in to your website, then you can ask them to provide their IP addresses. You can then add those to the .htaccess file as well.

Here is another example of the above-mentioned code.

<Files wp-login.php>
        order deny,allow
        Deny from all
 
# Whitelist John as website administrator
allow from 35.199.128.0
 
#Whitelist Tina as Editor 
allow from 108.59.80.0

# Whitelist Ali as moderator
allow from 216.239.32.0
 
</Files>

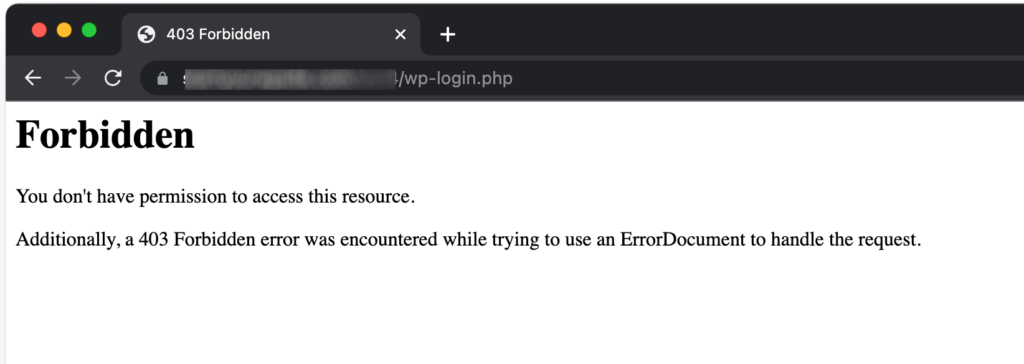
Now, users with these IP addresses will be able to view the wp-login.php file and login to your website. Other users will see the following error message:

Forbidden error

2. Blocking Specific IP Addresses from Accessing Your Website

This method is totally the opposite of the first method.

Instead of limiting WordPress login page access to specific IP addresses, you’ll be able to block IP addresses used to attack your website.

This method is particularly useful for WordPress membership websites, eCommerce stores, or other websites where multiple users need to login in order to access their accounts.

The disadvantage of this method is that hackers can change their IP addresses and continue attacking your website.

Fortunately, many of the common WordPress hacking attempts use a fixed set of IP addresses which makes this method effective in most cases.

Step 1: Finding the Offending IP Addresses You Want to Block

First, you need to find the IP addresses used to attack your website.

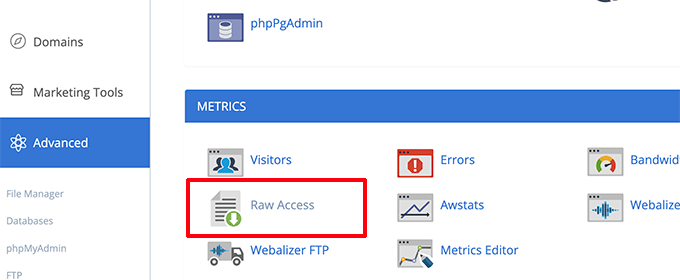
The easiest way to find the offending IP addresses is by looking at your server logs. Simply head over to your hosting account control panel and click on the Raw Access logs icon.

Raw access logs

On the next page, click on your domain name to download the access logs. This will download a file with gz extension.

You will need to extract the file and open it with a text editor like Notepad or TextEdit.

From here you will find the IP addresses that are repeatedly hitting the wp-login.php page.

Finding IP addresses attacking your website

Copy and paste the IP addresses into a separate text file on your computer.

Step 2. Blocking Suspicious IP Addresses

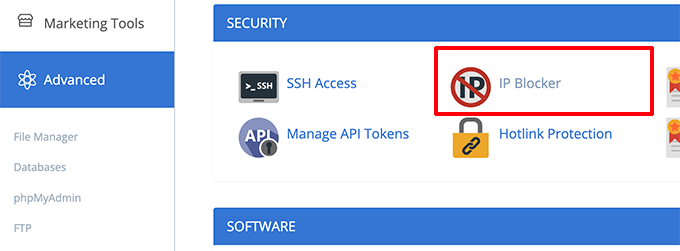
Next, you need to log in to your WordPress hosting control panel and click on the IP Blocker icon.

IP blocker app in hosting control panel

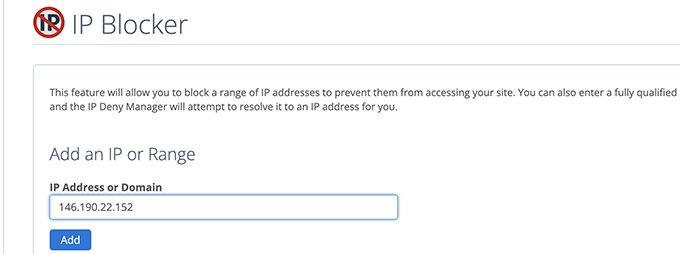
On the next screen, simply copy and paste the IP addresses you want to block and click on the Add button.

Block IP address

Repeat the process to block any other suspicious IP addresses you want.

That’s all! You have successfully blocked suspicious IP addresses from accessing your website completely.

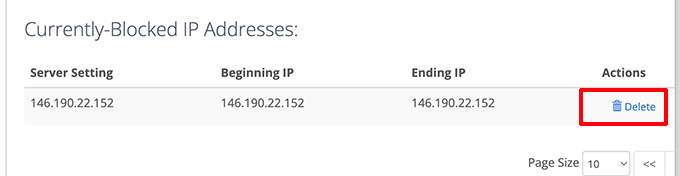
Later on, if you need to unblock one of these IP addresses, you can simply do so from the IP blocker app.

Unblock IP addresses

3. Protecting WordPress Login with Website Firewall

As a website administrator, you may not want to spend too much time managing IP addresses that can access your WordPress login page.

The easiest way to protect your WordPress login pages is by using Sucuri. It is the best WordPress firewall that accompanies a comprehensive WordPress security plugin.

Sucuri’s website firewall automatically filters suspicious IP addresses from accessing important WordPress core files without them ever reaching your website.

How website firewall blocks attacks

This method also improves your WordPress performance and speed as it blocks suspicious activities from slowing down your server.

On top of that, Sucuri also comes with a built-in CDN network. It would automatically serve static files like images, stylesheets, and JavaScript from a server closer to your users.

You can easily whitelist the IP addresses of users if they are unable to access WordPress login pages.

Whitelist IP address

Alternative: Cloudflare Free CDN

We hope this article helped you learn how to limit access by IP address to your wp-login.php file. You may also want to see our complete WordPress security guide or see these additional tips for protecting the WordPress admin area.

If you liked this article, then please subscribe to our YouTube Channel for WordPress video tutorials. You can also find us on Twitter and Facebook.

The post How to Limit Access by IP to Your wp-login.php file in WordPress first appeared on WPBeginner.


August 16, 2022 at 02:10PM

Monday, August 15, 2022

How to Export WordPress Form Entries to CSV and Excel

Do you want to export your form responses to a spreadsheet?

If you have a lot of form entries, then exporting them to a CSV or Excel file helps you analyze them. You can even use the form data in other applications.

In this article, we’ll show you how to export WordPress form entries to CSV and Excel formats.

How to Export WordPress form entries to CSV and Excel

Why Export WordPress Form Entries to CSV and Excel?

WordPress forms are a great way of staying connected with your audience. They help you collect customer leads, get valuable feedback, resolve customer queries, find new product suggestions, conduct surveys, and more.

However, analyzing the data can be difficult if you have a lot of form entries. This is where exporting your data in the form of CSV (comma-separated values) and Excel files comes in handy.

For example, you can find out which products or features your users want the most or uncover common issues people face while using your WordPress site.

Another benefit of exporting WordPress form entries to CSV and Excel is that you can use the data with other applications.

Besides spreadsheet software like Google Sheets and Microsoft Excel, you can upload your form entries to analytics software. For instance, you can use Microsoft Power BI with a CSV or Excel file to create dashboards and other visualizations for your form entries.

That being said, let’s look at how you can create a WordPress form and export form entries to CSV and Excel.

Creating a WordPress Form to Collect Data

Before you can export form entries to CSV and Excel, you’ll need a WordPress form.

The best way of creating a WordPress form is by using WPForms. It’s the best contact form plugin for WordPress and is used by over 5 million websites.

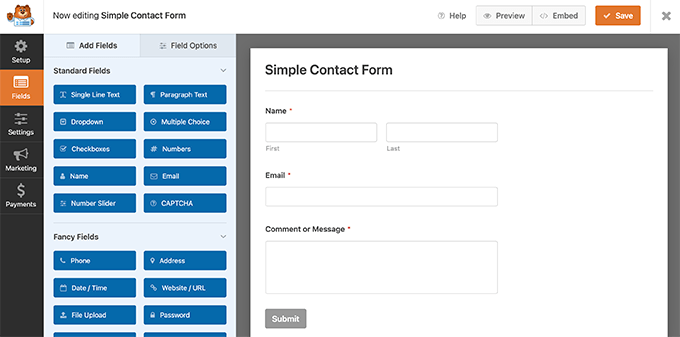
WPForms offers a drag and drop form builder, which makes it effortless to create and customize WordPress forms. Plus, you get pre-built form templates to start quickly and customize the form according to your needs.

Contact form builder

You can follow our step-by-step guide on how to create a contact form in WordPress.

WPForms also comes with powerful addons that help you collect online payments, integrate with email marketing services, store users’ geolocation, reduce form abandonment, and more.

For this tutorial, we’ll use the WPForms Pro version because it includes the option to export form entries and offers more features. There’s also a WPForms Lite version that you can try for free.

Exporting WordPress Form Entries to CSV and Excel

Once you’ve added a contact form on your WordPress blog and started getting form submissions, the next step is to export your form entries.

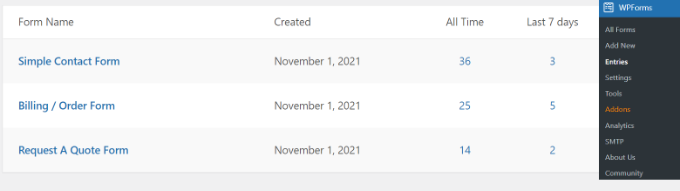
To start, simply head to WPForms » Entries in your WordPress admin panel, and then select a WordPress form to export its entries.

View form entries in WPForms

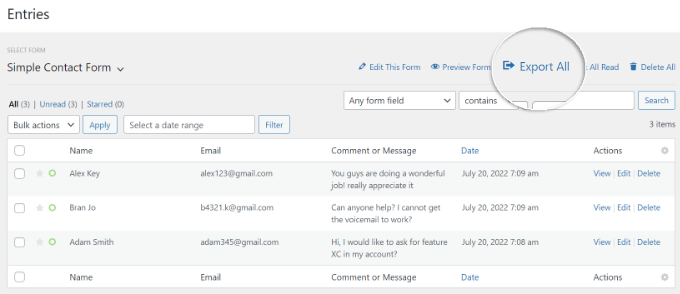
After that, you will see all the entries for the form you selected.

Go ahead and click the ‘Export All’ option.

Click export all option

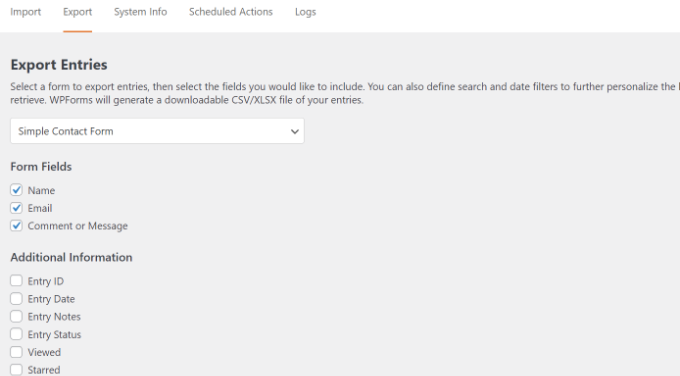
Next, WPForms will show you different export options for your form entries.

You can choose which form fields to export, as well. By default, the export will include name, email address, and message fields.

However, there are also options to export additional information such as entry ID, date, user agent, user IP, payment status, and more.

Choose export options in WPForms

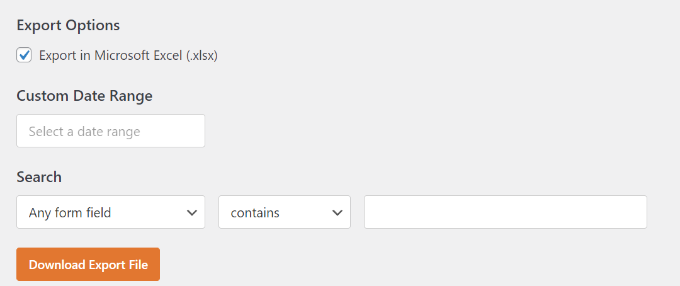
From here, simply scroll down to the ‘Export Options’ section.

You can click the ‘Export in Microsoft Excel (.xlsx)’ checkbox to export the data in Excel format. If the box is left unchecked, WPForms will export as a CSV file.

Download export file

There’s also a custom date range selector to help you export data from a specific time.

Plus, you can use the search feature to filter form entries. For example, you can export forms that only contain or don’t contain a specific name, email, message, ID, and more.

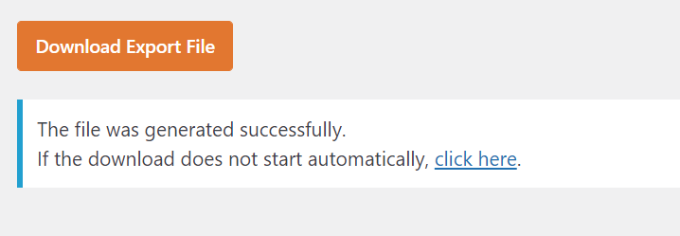
Next, go ahead and click the ‘Download Export File’ button and save the file to your computer.

You’ll now see a message that your export file was successfully generated.

Export file generated success message

How to Export a Single WordPress Form Entry

WPForms also lets you export a single form entry instead of downloading all the submissions. This is helpful if you have a multi-step form and only require information about a particular lead.

To start, simply go to WPForms » Entries from your WordPress dashboard and select a form to view its entries.

View form entries in WPForms

You should now be able to see all your forms. From here, click on the form that contains the single entry you need.

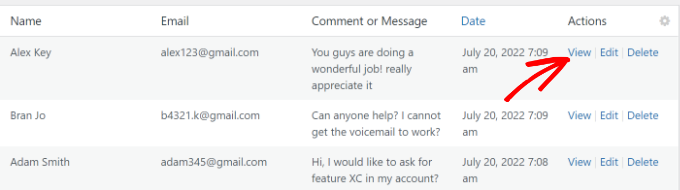
On the next screen, find the entry you want to export, and then go ahead and click the ‘View’ button.

View a specific form entry

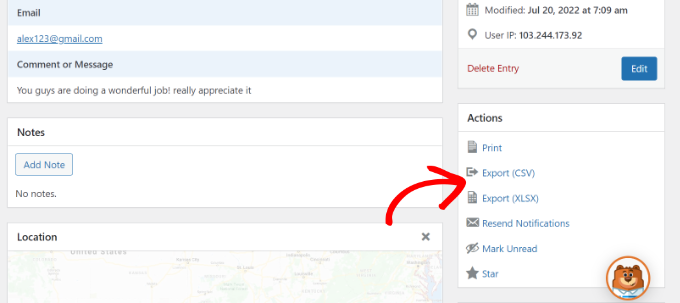
After that, you’ll see details of your form entry.

Simply click the ‘Export (CSV)’ or ‘Export (XLSX)’ options in the Actions metabox on the right-hand side to download the file.

Export specific form entry

You can now save the CSV or Excel file on your computer and open it in spreadsheet software.

Bonus: Connect WordPress Forms to Google Sheets

Did you know that you can automate the process of gathering form entries and showing them in Google Sheets?

Connecting your WordPress forms with Google Sheets automatically collects the data in a spreadsheet. This makes it easier for team members to access form entries without creating a new WordPress login.

Plus, you don’t have to manually export form entries or collect data to share it with other people. It helps save time and reduces any errors that may occur when manually exporting data.

The best way to set up automation is by using Uncanny Automator. It is the best WordPress automation plugin and helps connect WordPress plugins and third-party apps.

Uncanny Automator

You can follow our detailed guide on how to connect any WordPress forms to Google Sheets for more information.

We hope this article helped you learn how to export WordPress form entries to CSV and Excel. You may also want to see our ultimate guide on WordPress SEO, and our expert pick of the best WooCommerce plugins.

If you liked this article, then please subscribe to our YouTube Channel for WordPress video tutorials. You can also find us on Twitter and Facebook.

The post How to Export WordPress Form Entries to CSV and Excel first appeared on WPBeginner.


August 15, 2022 at 04:30PM