Monday, August 22, 2022

How to Automatically Tag Your WordPress Posts and Save Time

Do you want to save time by automatically tagging your WordPress posts?

Tags help websites visitors easily find the content on your website. However, making sure all your content is properly tagged can be time-consuming, especially if you’ve already published lots of content without adding tags.

In this article, we will show you how you can automatically tag your WordPress posts.
How to automatically tag your WordPress posts and save time

Why Automatically Tag Your WordPress Posts?

Tags are one of the easiest ways to organize posts on your WordPress website.

While categories are meant to group your posts broadly, you can use tags to describe the specific details of a post.

For example, your WordPress blog might have a ‘Sports’ category. You can add detailed tags such as ‘football,’ ‘UEFA Champions League,’ and ‘European cup’ to help users find specific topics in that category.

To learn more, see our in-depth comparison of categories vs tags.

Adding tags to your posts can take a lot of time, especially if you use lots of different tags on your website.

You may also miss opportunities to add a relevant tag, which can stop visitors from finding what they’re looking for on your site.

With that in mind, let’s see how you can tag your posts automatically.

How to Automatically Tag Your WordPress Posts and Save Time

The easiest way to tag your WordPress posts automatically is by using TaxoPress.

If a word or phrase in a new blog post’s title or content matches one of your tags, TaxoPress will add that tag to the post.

Let’s look at an example. On your website, imagine you have several tags including recipe, chocolate, and pasta.

If you publish a new post with the title ‘Best Chocolate Cake Recipe,’ then TaxoPress will see two matches in the title and automatically add the tags ‘recipe’ and ‘chocolate.’

To get started with automatically tagging your posts, you’ll need to install and activate the

TaxoPress plugin. If you need more help, then please see our guide on how to install a WordPress plugin for more details.

In this tutorial, we’re using the free version of TaxoPress which limits you to a single rule for tagging posts. This is enough to automatically tag all your WordPress posts. However, if you want to create multiple rules to use in different ways, then you’ll need to upgrade to TaxoPress Pro.

With that said, your first task upon activation is to create a rule that will automatically tag your WordPress posts. This rule is called an ‘Auto Term.’

To get started, go to TaxoPress » Auto Terms in your WordPress admin area. After that, you need to click on the ‘Add New Auto Terms’ button.
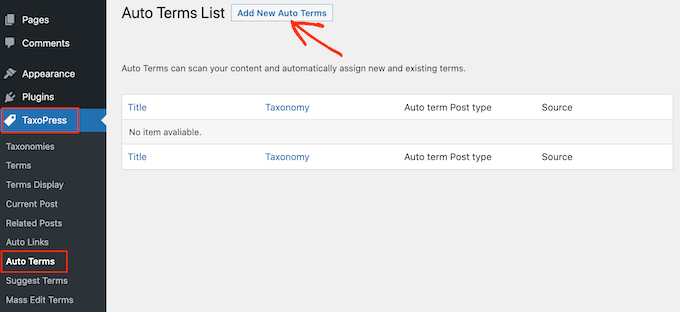
Adding a new auto term with TaxoPress

Next, you will need to type in a title for the new auto term.

The title is just for your reference, so you can use anything you want.
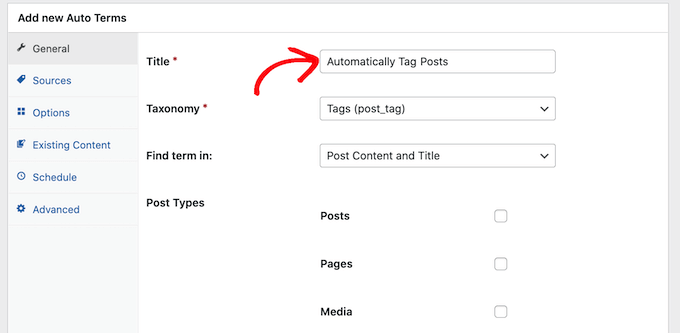
Adding new auto terms to TaxoPress

TaxoPress can automatically tag more than just posts. It can also tag images and pages.

For this article, we will only automatically tag WordPress posts, so just check the ‘Posts’ box.
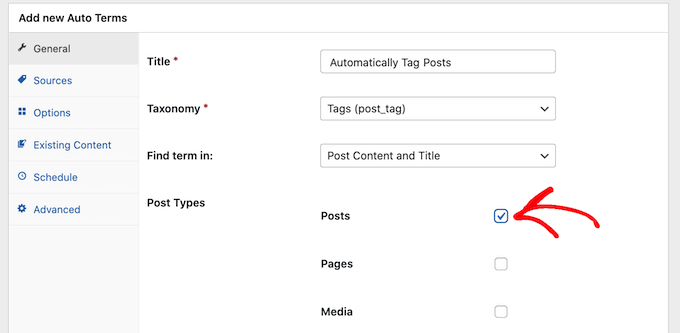
Tagging WordPress posts automatically

Next, you can open the ‘Taxonomy’ dropdown.

In the list that appears, click on ‘Tags (post_tag).’
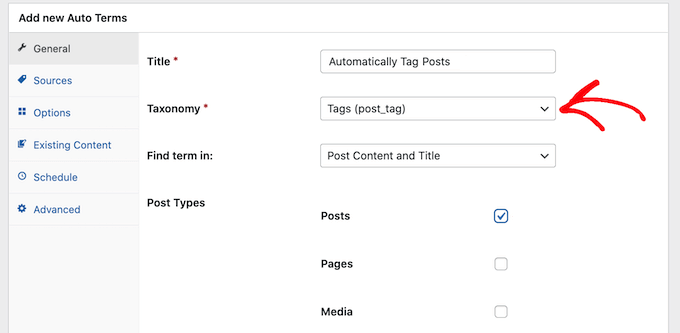
Automatically tagging posts in WordPress

When searching for content to tag, TaxoPress will scan a post’s title and content by default. You can change that in the ‘Find term in:’ dropdown and select ‘Post Content’ or ‘Post Title’ only.

Once you’re done selecting options, go ahead and click on the ‘Sources’ tab.

This is where we’ll select the tags that we want to use in this auto term.
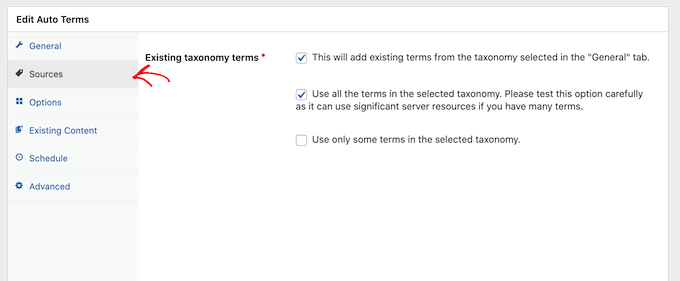
Setting a source for your automatic tags

By default, TaxoPress will pull from every tag you’ve ever created on your site. For some sites, that will be way too many.

You can set which ones the plugin has access to by checking the ‘Use only some terms in the selected taxonomy’ box.
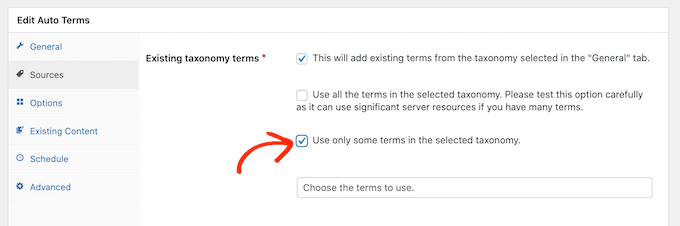
Use specific WordPress tags only

Now, in the ‘Choose the terms to use’ field, start typing in the name of a tag.

When the right tag shows up, click on it. Repeat this for all the tags you want to include in this auto term.
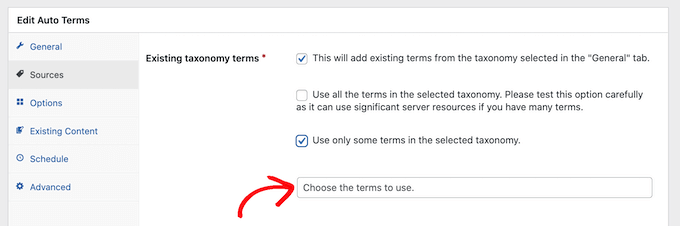
Automatically add tags to your WordPress posts

Once you’ve done all that, click on the ‘Options’ tab.

This screen is where you can fine-tune the automatic tagging process.
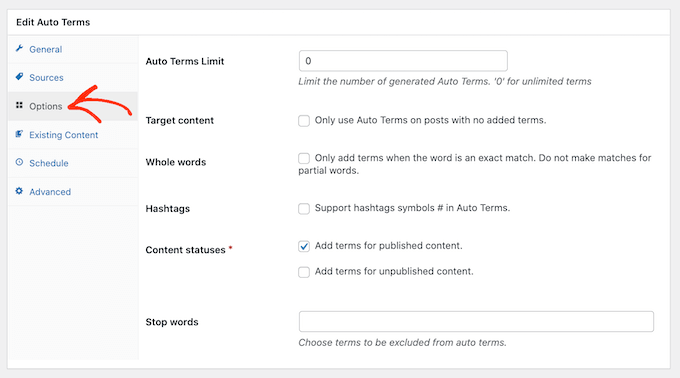
The TaxoPress 'Options' tab

By default, TaxoPress will add tags for partial matches. This means that if you have a post on your food blog called ‘The best chocolate cake recipes’, then the ‘recipe’ tag will be added even though ‘recipes’ is not an exact match.

If you only want TaxoPress to add tags when there’s an exact match, go ahead and check the ‘Whole words’ box.
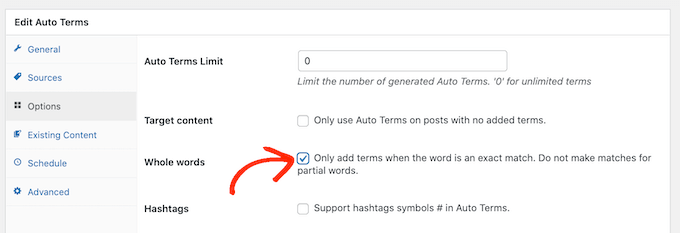
Enabling matches for whole words

When you’re happy with the settings, click on the ‘Save Auto Terms’ button.

Now, every time you publish a new post in WordPress, TaxoPress will check the post’s content and title. If it finds a match, then it will add one or more tags to the post automatically.
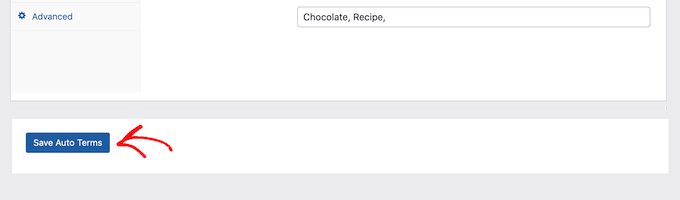
Save your TaxoPress auto terms

How to Automatically Tag Your Published WordPress Posts

By default, TaxoPress will tag new posts as you publish them. Additionally, the plugin will try to add missing tags when you update an existing post.

TaxoPress can also tag posts that you’ve already published on your site, using the same auto terms you’ve created using the process above.

To get started, go to TaxoPress » Auto Terms. You can then click on the auto term we created earlier.
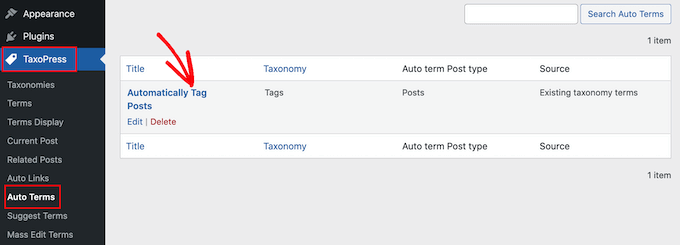
Editing your TaxoPress auto terms

Once you’ve done that, click on the ‘Existing Content’ tab.

You will now see all of the settings and rules that you previously created.
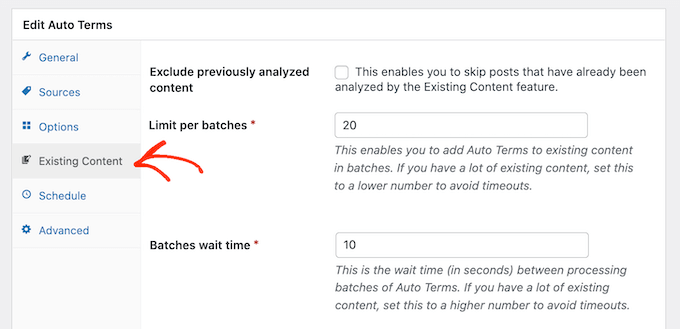
Automatically tag your published posts

If you have lots of content on your site, then it may take TaxoPress a long time to process it all. While the plugin is tagging existing posts, your site may run slower.

To speed up WordPress performance, it’s a good idea to configure TaxoPress to scan your posts in smaller batches with a longer interval between them.

By default, TaxoPress will scan your content in batches of 20 posts every 10 seconds. You can decrease the number of posts in a batch by simply typing a lower number into the ‘Limit per batches’ field.
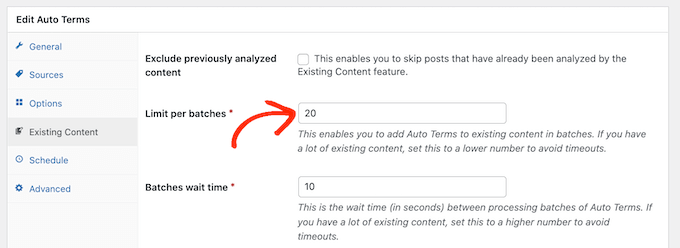
Changing TaxoPress' batch settings

You can then increase the time between batches by typing a higher number into the ‘Batches wait time’ field.

Another option is to only scan posts that were published within a certain timeframe.

For example, to only tag posts that were published within the last 6 months, simply open the ‘Limit Auto Terms, based on published date’ dropdown and select ‘6 months ago.’

When you’re happy with these settings, you’re ready to scan the content that’s already live on your website.

To start the process, simply click on the ‘Add Auto Terms to existing content’ button.
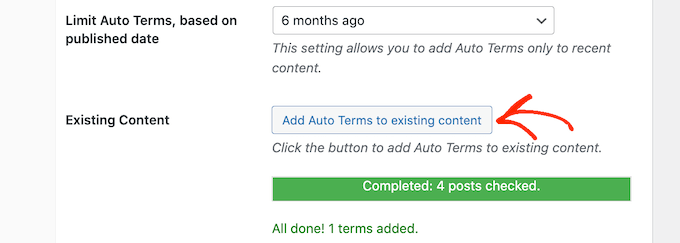
How to automatically tag published posts

Once the plugin has finished automatically tagging existing content, you’ll see an ‘All done’ message onscreen. Below that, TaxoPress will show how many posts it checked and how many tags it added to your WordPress posts.

We hope this article helped you learn how to automatically tag your WordPress posts and save time. You can also go through our guide on the best contact form plugins for WordPress and how to create automated workflows with Uncanny Automator.

If you liked this article, then please subscribe to our YouTube Channel for WordPress video tutorials. You can also find us on Twitter and Facebook.

The post How to Automatically Tag Your WordPress Posts and Save Time first appeared on WPBeginner.


August 22, 2022 at 04:30PM

Saturday, August 20, 2022

How to Add Underline and Justify Text Buttons in WordPress

Do you need to underline or justify text in WordPress?

WordPress used to have both justify and underline text buttons in the visual editor. However, they have been removed and are no longer available.

In this article, we’ll show you how to add underline and justify text buttons in WordPress.

How to Add Underline and Justify Text Buttons in WordPress

Why Add Underline and Justify Text Buttons in WordPress?

Would you like to restore the missing underline and justify buttons when editing posts and pages on your WordPress website? These buttons were removed from the post editor in WordPress 4.7, but luckily there’s a way to bring them back.

However, there are a few reasons you should consider not underlining and justifying text on your website.

First, underlined text can look like links, and your users may become frustrated when what they think is a link doesn’t work. Also, justified text can make your content harder to read, especially on small screens.

With that being said, let’s take a look at how to add underline and justify text buttons in WordPress. We’ll show you how to do this for the block and classic editor. We’ll also show you how to underline and justify text using keyboard shortcuts, without the need for a button.

Underlining and Justifying Text Using Keyboard Shortcuts

You don’t need a plugin or toolbar icons to underline or justify text in WordPress. Instead, you can simply use a keyboard shortcut.

To underline text, just select the text you want to underline in WordPress and press Ctrl+U on Windows or Command+U on Mac. That’s it. This keyboard shortcut will work with both the block and classic editor.

There’s another keyboard shortcut for justifying text. Simply select the text and press Shift+Alt+J in Windows or Command+Option+J on Mac and your text will be justified.

However, the keyboard combination for justifying text will only work with the classic editor. If you use the block editor, then you will not be able to justify text with a keyboard shortcut and should use the plugin method below.

Adding Underline and Justify Text Buttons to the Block Editor

First, you’ll need to install and activate the Gutenberg Block Editor Toolkit – EditorsKit plugin. For more details, see our step by step guide on how to install a WordPress plugin.

Upon activation, the plugin will make underline, justify, and other formatting features available when using the WordPress block editor.

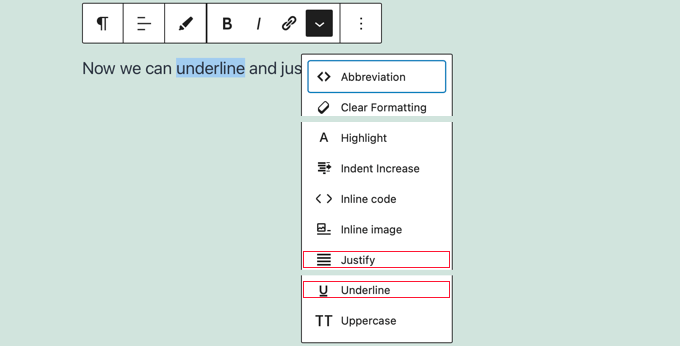
These additional icons can’t be added directly to the block editor’s toolbar, but you will find the extra options when clicking the ‘Displays more block tools’ down arrow on the toolbar.

Access Underline and Justify from the 'Displays More Block Tools' Icon

To underline text, you should first select the text, then click the ‘Displays more block tools’ down arrow, and then click on ‘Underline’ from the drop down menu.

To justify a paragraph, first make sure that your cursor is in that paragraph. Then click the ‘Displays more block tools’ down arrow and select ‘Justify’ from the drop down menu.

Adding Underline and Justify Text Buttons to the Classic Editor

If you are using the classic editor, then you should start by installing and activating the Advanced Editor Tools plugin. For more details, see our step by step guide on how to install a WordPress plugin.

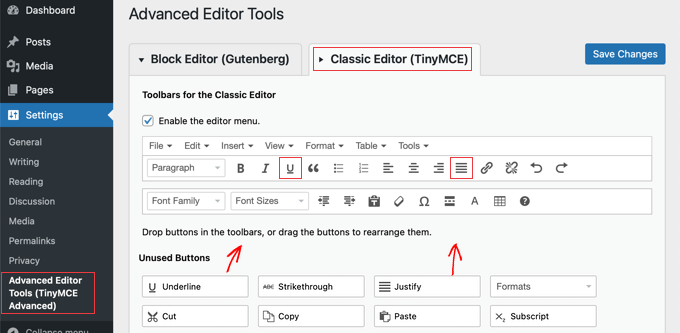
Upon activation, you will need to navigate to Settings » Advanced Editor Tools (TinyMCE Advanced) in your admin menu. Next, you need to click on the ‘Classic Editor (TinyMCE)’ tab at the top of the page.

You will notice a preview of the WordPress classic editor. Below the preview, it will show you all the unused buttons.

Now you need to drag and drop underline and justify text buttons from ‘Unused Buttons’ box to the post editor.

Drag the Unused Buttons You Need to the Classic Editor's Toolbar

When you have finished, make sure you click the ‘Save Changes’ button at the top of the screen to store the new settings.

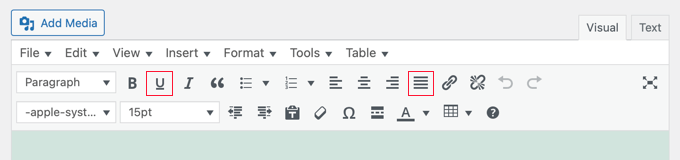
Now when you are creating or editing a WordPress blog post or page, the new formatting buttons will be available on the classic editor’s toolbar.

Underline and Justify Buttons Are Now Available on the Classic Editor's Toolbar

We hope this tutorial helped you learn how to add underline and justify text buttons in WordPress. You may also want to learn why WordPress is free, or check out our list of must have plugins to grow your site.

If you liked this article, then please subscribe to our YouTube Channel for WordPress video tutorials. You can also find us on Twitter and Facebook.

The post How to Add Underline and Justify Text Buttons in WordPress first appeared on WPBeginner.


August 20, 2022 at 04:03PM

Friday, August 19, 2022

How To Efficiently Manage Post Series in WordPress

Are you looking for a better way to manage post series in WordPress?

If you’re working on an online novel or simply want to cover a broad industry topic, then creating a long post may not work for you. A post series allows you to dig deep into a particular topic and encourage readers to keep coming back for more.

In this article, we’ll show you how to efficiently manage post series in WordPress.

How To Efficiently Manage Post Series in WordPress

Why Publish Post Series in WordPress?

If you are writing about a complex topic on your WordPress website, then it is often better to write a series of posts that break the topic up into smaller chunks than to write one long post.

For example, our ultimate guide to speed up WordPress is a roundup of a series of posts we published on different ways to improve your site’s performance.

When you write a big series of posts like that, it can be tough to help your readers navigate the series and find all the information in the right order.

You could simply add a paragraph before each post telling your users that the post is part of a series and then list the rest of the posts at the bottom. But then you would have to manually update every post each time you publish a new article in the series.

Another solution would be to create a custom taxonomy called ‘Series’, but this also creates more work, such as creating or customizing template files.

Luckily, there is a WordPress plugin that will help you manage a series of articles. Let’s take a look at how to efficiently manage post series in WordPress.

How to Efficiently Manage Post Series in WordPress

The first thing you need to do is install and activate the Issues and Series plugin. For more details, see our step by step guide on how to install a WordPress plugin.

There is a premium version with more features, but for this tutorial, we’ll use the free plugin.

As soon as the plugin is activated, you will be able to create new series and add posts to it.

Creating a New Series

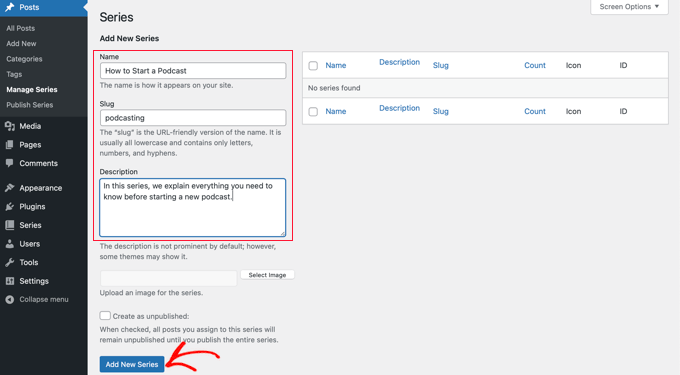
To create your first series, you’ll need to head over to the Posts » Manage Series page. This looks similar to the page you see when adding new categories.

Once there, you will need to type a name, slug, and description for the series. When you’re finished, you’ll need to click the ‘Add New Series’ button at the bottom of the page.

Add a New Series in WordPress

You’ll notice that the new series is added to the list on the left.

Adding Posts to the Series

Now you can add some blog posts to the series. To start, simply create a new post or edit an old one.

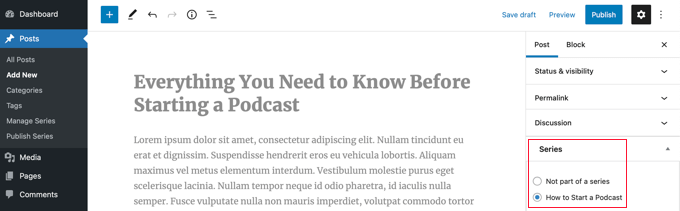
In the settings panel on the right of the screen, you’ll notice a new section called ‘Series’. Simply click the button next to the series you created to add this post.

Add a New Post to Your Series

Make sure you click the ‘Publish’ or ‘Update’ button at the top of the page to push the post live as part of the series.

Next, you should add any other existing posts to the series. As you continue to write new articles, simply repeat this step to add them to the series.

Customizing the Order of Posts in the Series

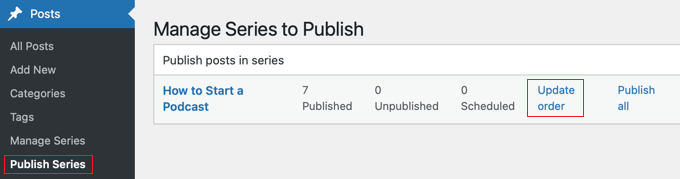
By default, your articles will be displayed in the order you add them to the series. However, you can customize the post order by visiting the Posts » Publish Series page in your WordPress admin area.

Here you will see all the series you have created, with columns to show how many articles are published, unpublished, and scheduled in each. You will also see links to update the post order, publish or unpublish all, and view the series.

Click the 'Update Order' Link to Reorder Your Posts

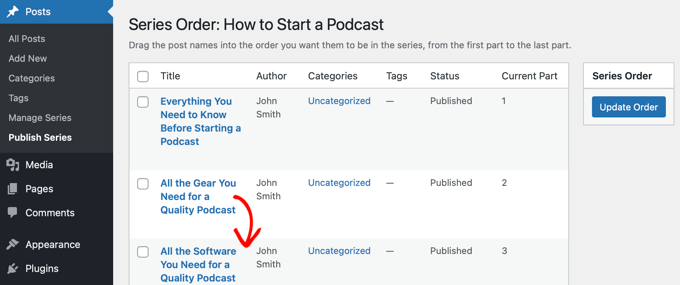
To change the order of the posts, you will need to click the ‘Update order’ link. You will now see a list of all the posts in that series.

You can reorder the articles by dragging the post names up or down the list. When you move a post, the ‘Current Part’ number will be updated automatically to reflect the new order.

Drag and Drop Your Posts to Place Them in the Right Order

When you’re happy with the order of the posts, make sure you click the ‘Update Order’ button to store your settings.

Previewing Your Post Series

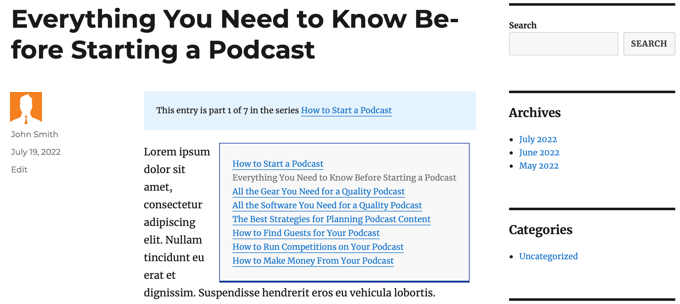
Now you can visit your WordPress blog to see how your new post series looks. Simply view a post that is part of the series.

At the top of the article, there will be a message that the post is part of a series. You will also see a list of all posts in the series and can easily navigate between them by clicking a link.

Post Order Preview

You will also find links at the bottom of the article to navigate to the next and previous article in the series.

We hope this tutorial helped you learn how to efficiently manage post series in WordPress. You may also want to learn how to track visitors to your WordPress site, or check out our list of must have plugins to grow your site.

If you liked this article, then please subscribe to our YouTube Channel for WordPress video tutorials. You can also find us on Twitter and Facebook.

The post How To Efficiently Manage Post Series in WordPress first appeared on WPBeginner.


August 19, 2022 at 02:03PM