Wednesday, August 24, 2022

How to Integrate Your WordPress Site with Telegram

Are you looking to integrate Telegram with your WordPress website?

Telegram is a powerful messenger app with robust security and privacy features. You can easily integrate it with WordPress to share posts and receive notifications.

In this article, we will show you how to properly integrate your WordPress site with Telegram.
How to Integrate Your WordPress Site with Telegram

Why Integrate Your WordPress Site with Telegram?

Telegram is a popular cloud-based messaging app like WhatsApp, only more secure. It also comes with features that are similar to Slack, a popular collaboration platform for teams.

It’s easy to integrate Telegram into your WordPress website using a plugin. This is an ideal way to keep your users and team up to date with what’s happening on your site.

For example, you can use automatically share your blog posts on a Telegram channel.

Also, you can send WordPress notifications to Telegram to keep up to date with everything that needs your attention on your site.

With that being said, let’s take a look at how to integrate your WordPress site with Telegram. Here’s what we’ll cover in this article:

Connecting WordPress and Telegram: Initial Set Up

The first thing you need to do is install and activate the WP Telegram (Auto Post and Notifications) plugin. For more details, see our step-by-step guide on how to install a WordPress plugin.

Upon activation, the plugin will add a new menu item labeled WP Telegram to your WordPress admin dashboard. Clicking on it will take you to the plugin’s settings page.

On the page’s ‘Basics’ tab, you’ll find a simple summary on how to set up Telegram for WordPress integration. We’ll walk you through these steps.
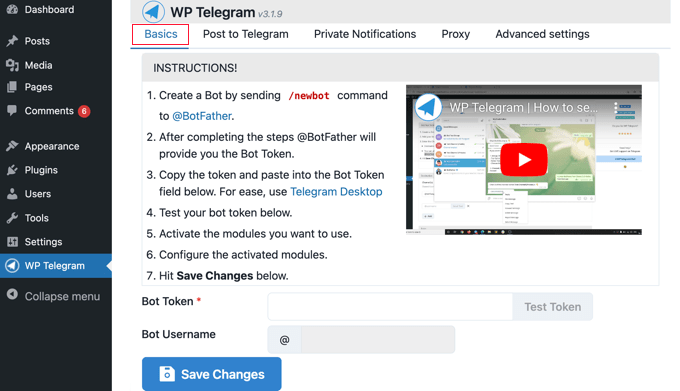
WP Telegram's Basic Settings

If you are not already running Telegram, then your first job is to install it on your mobile device, and then sign up for an account. This must be done on mobile because each account is linked to a phone number.

Simply go to the Telegram apps page to download and install the app for Android or iOS.

After you sign up, you can also run Telegram on your computer. Versions are available for macOS, Windows, Linux, and the web.

You’ll be integrating WordPress and Telegram using a bot. To create a bot, simply search Telegram for @BotFather and then click on that user to start a chat.
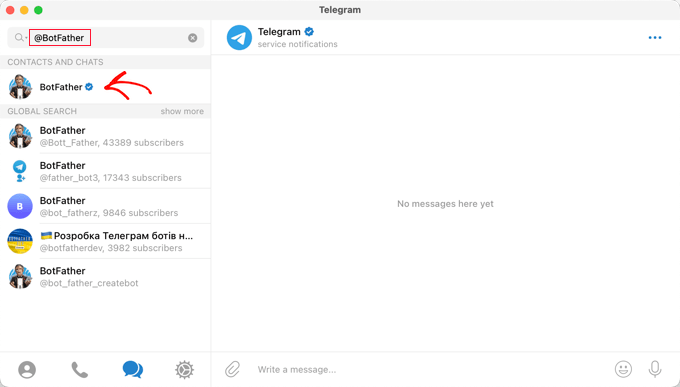
Search for the @BotFather Bot

You’ll see a list of Telegram commands you can use when chatting with this bot.

You need to type the command /newbot inside the chat.
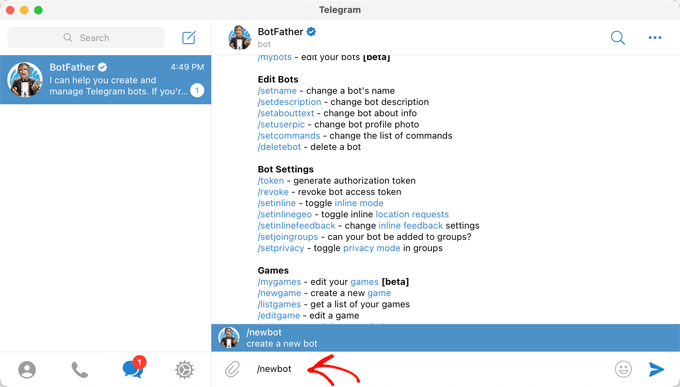
Use the /newbot Command to Create a New Bot

A new bot is created, and you’ll be asked to give it a name. This can be anything you like.

For this tutorial, you should type ‘Bot for WP Telegram.’
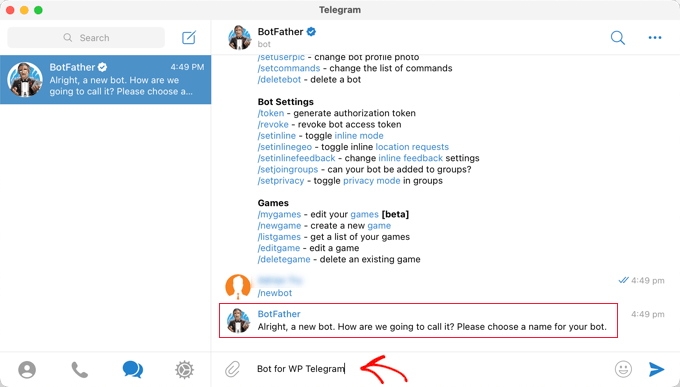
Choose a Name for the Bot

Next, you need to choose a username for the bot. It needs to be unique and end in ‘bot’.

For this tutorial, we’ll type XYZ_wptelegram_bot.
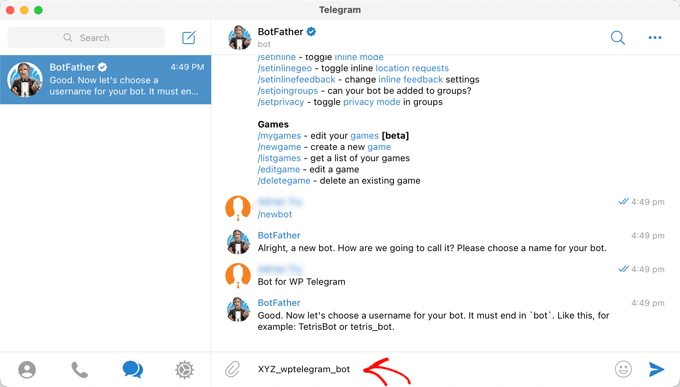
Choose a Username for the Bot

You’ve now successfully created a Telegram bot.

A token will then be displayed in the chat window. Make sure you don’t share this with anyone because it is used to control your bot.
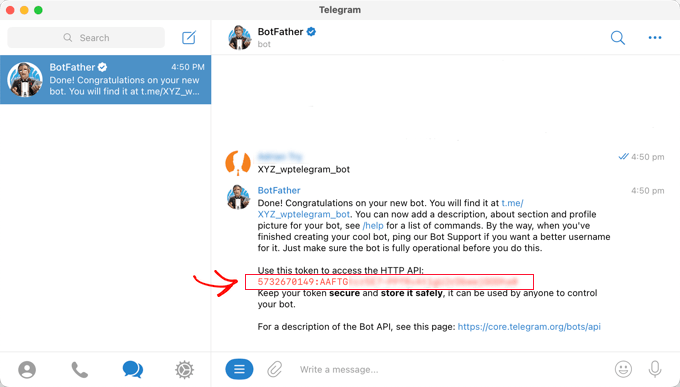
Copy the Bot's Token

You need to copy the token to the clipboard.

After that, you should return to your website and then paste the token into the Bot Token field under WP Telegram.
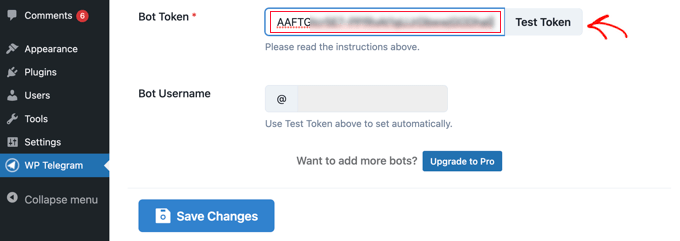
Paste the Token Into the Plugin's Settings

Once you’ve done that, you should click the ‘Test Token’ button.

The token is connected to this specific bot, so the Bot Username field fills in automatically.
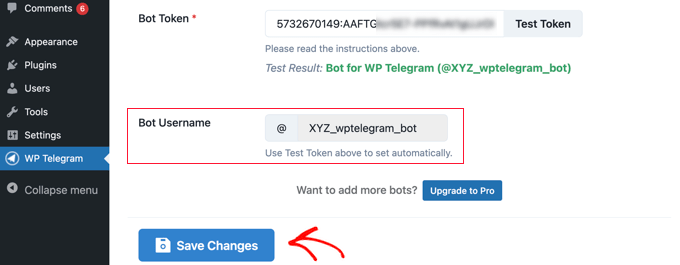
Click Test Token and the Bot's Username Will Be Filled In Automatically

Don’t forget to click the ‘Save Changes’ button to store your settings.

Congratulations, you have finished the initial setup of Telegram and the WP Telegram plugin.

Next, you can configure the plugin to send WordPress posts to Telegram or send yourself WordPress notifications.

Sending WordPress Posts to Telegram

Make sure you’re on the ‘Post to Telegram’ tab in the plugin dashboard.

This page will let you configure the plugin to automatically send your posts to Telegram when they are published.

First, you need to toggle the ‘Active’ switch to the ‘On’ position.
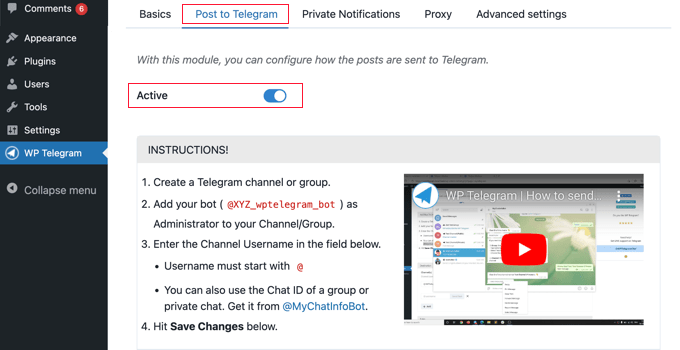
Toggle the Active Switch on the Post to Telegram Tab

You will now see instructions on how to send your WordPress posts to Telegram.

Creating a Channel on Telegram

First, if you don’t already have a public Telegram channel, then you’ll have to create one.

To do this, you need to switch back to the Telegram app.

Then you should click the ‘New’ icon at the top of the screen, then click ‘New Channel’ from the dropdown menu.
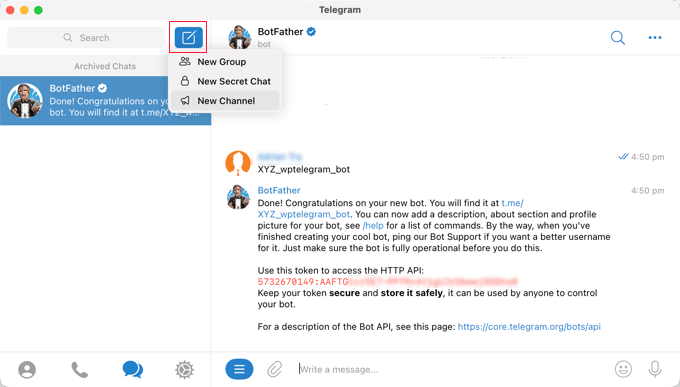
Choose New Channel or New Group From the Drop Down Menu

On the next screen, you’ll see a description of what a Telegram channel is.

You’ll need to click the ‘Create Channel’ link at the bottom of the page.
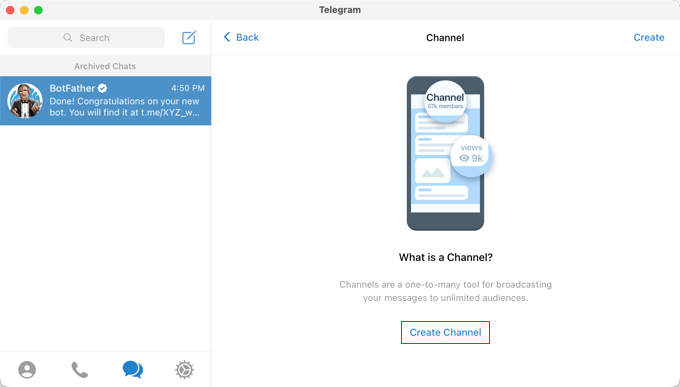
Click on Create Channel

Now you need to give your channel a name and description. Remember that this will be a public channel, so name it appropriately.

After that, you should click ‘Next’ at the top right of the page.
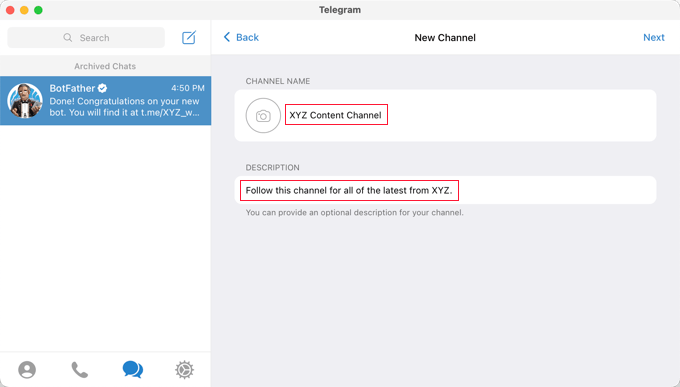
Give Your Group or Channel a Name

Finally, make sure that your channel is public so that your users can subscribe.

You should also create a public link to make it easy to find and join. Simply type a unique ID after https://t.me/. Make a note of the ID because you will need it later when setting up the plugin in WordPress.
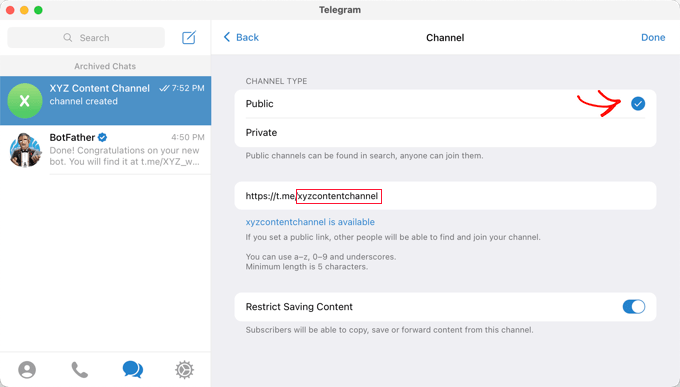
Add a Public Link to Your Group or Channel

When you click ‘Done,’ your Telegram channel will be created, and you will now need to add your bot as an administrator.

With your channel selected in Telegram, you need to click the ‘…’ menu at the top right of the screen and select ‘Info’ from the dropdown menu.
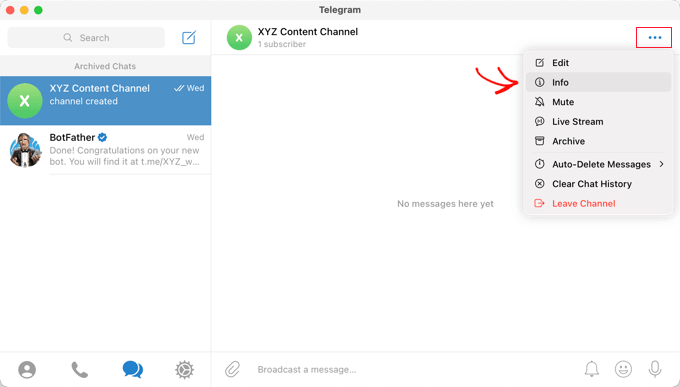
Go to the Info Page for Your Channel or Group

This screen displays information about your channel and provides buttons and menus so you can configure it.

You need to click on the ‘Administrators’ menu.
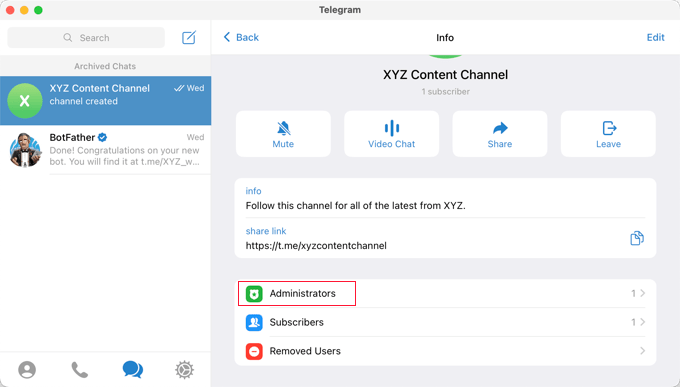
Click on the Administrators Menu

Here you can add a new administrator by clicking the ‘Add Admin’ link.

On the popup, enter the username of the bot you created earlier, and then click on the bot’s name in the list below.
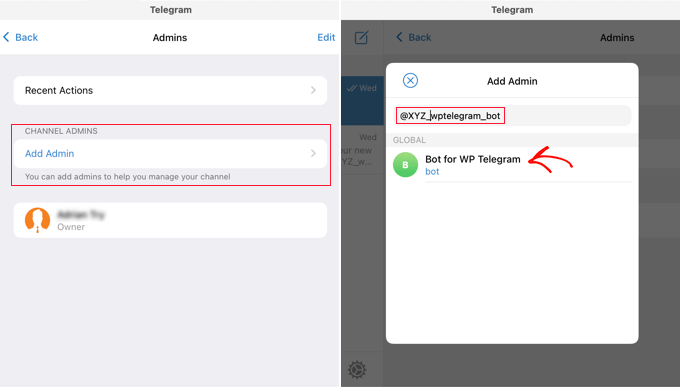
Add Your Bot as an Administrator

The next screen will show you the bot’s permissions.

You can leave them as they are, but make sure that ‘Post Messages’ is enabled.
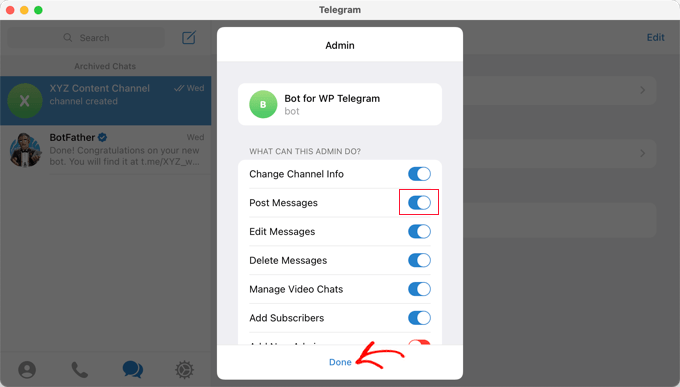
Make Sure Your Bot Has Permission to Post

When you click ‘Done’ at the bottom of the popup, your bot will be added as an administrator of your channel.
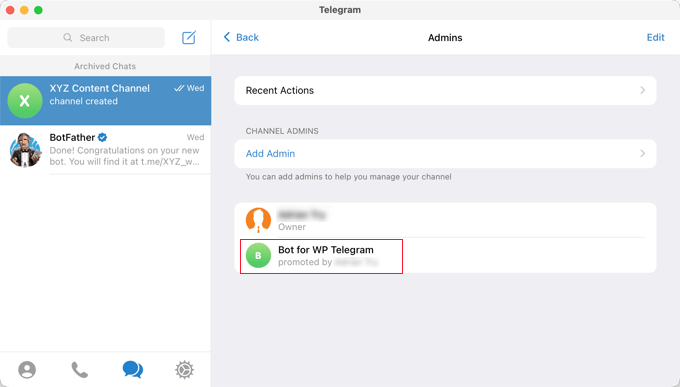
Your Bot Is Now an Administrator of Your Channel or Group

Adding Your Telegram Channel or Group to WordPress

Now you’ll need to return to your WordPress website to finish setting up the plugin. You should still be on the ‘Post to Telegram’ tab.

In the ‘Destination’ section, you need to click the ‘+Add’ button.
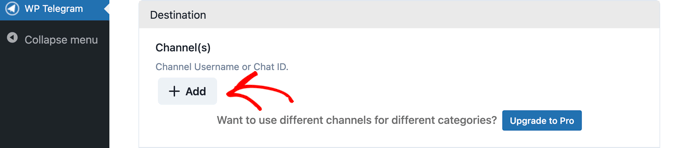
Click the +Add Button in the Destinations Section

You can now enter the channel or group ID you created earlier. That’s the last part of the public link you created, and we asked you to make a note of it.

You can then click the ‘Send Test’ button to send a test message to your group or channel to make sure the connection is working.
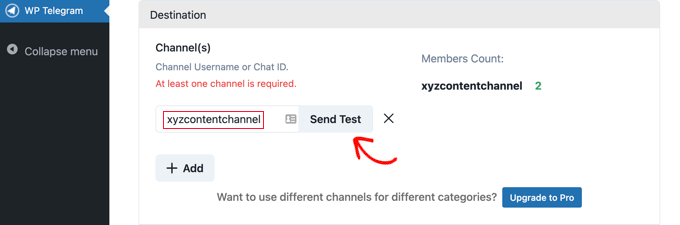
Click the Send Test Button to Make Sure Your Bot Can Post

You’ll see a popup with the default message, ‘This is a test message.’ If you like, you can customize it to say whatever you want, and then click the OK button.

If you set up the plugin successfully, then you should see the test message in your channel or group in Telegram.
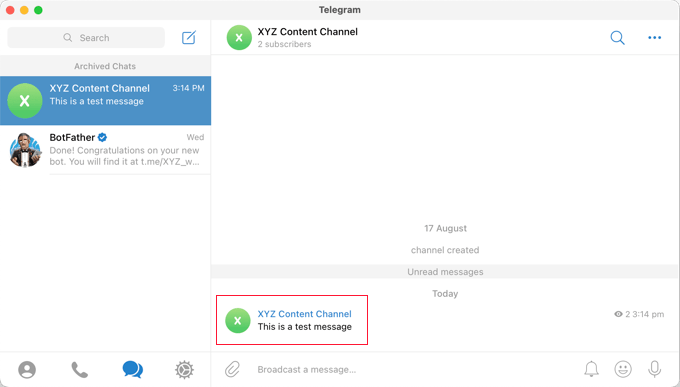
Make Sure the Test Message Was Successfully Posted in Telegram

Other Settings for Sending WordPress Posts to Telegram

Now you can return to your site and finish setting up the plugin.

In the ‘Rules’ section, make sure the box is checked for sending new posts when they are published. If you like, you can check the second box as well, which will post to Telegram when you update an existing post.

After that, check the boxes for the post types you wish to broadcast on Telegram. The ‘Post’ box is checked by default, and if you like you can also check the ‘Page’ box.

If you have custom post types, then you may have additional checkboxes, such as for WooCommerce products or Envira Gallery.
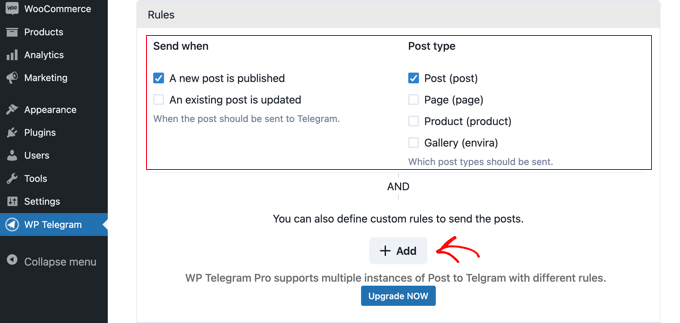
Choose Which Post Types to Send and When to When to Send Them

You can add custom rules to further customize which posts are sent to Telegram.

For example, the screenshot below shows a rule that will only send posts to Telegram if they are in the Top Posts category.
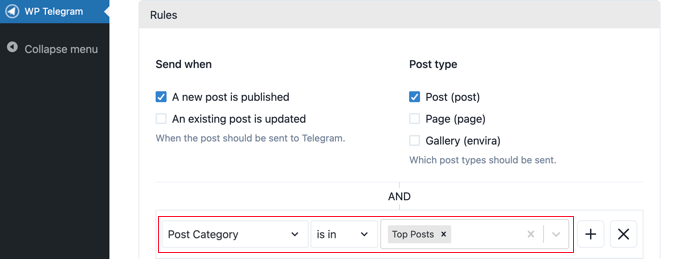
Example of a Custom Rule

The WP Telegram plugin comes with many other options that let you customize the way your posts are sent. You can check and adjust them as needed. However, the default settings will work fine on most websites.

Once you’re happy with the settings, scroll to the bottom of the page and click the ‘Save Changes’ button to store your settings.

Now when you are creating or editing a post, you will see a new ‘Send to Telegram’ setting in the WordPress editor.
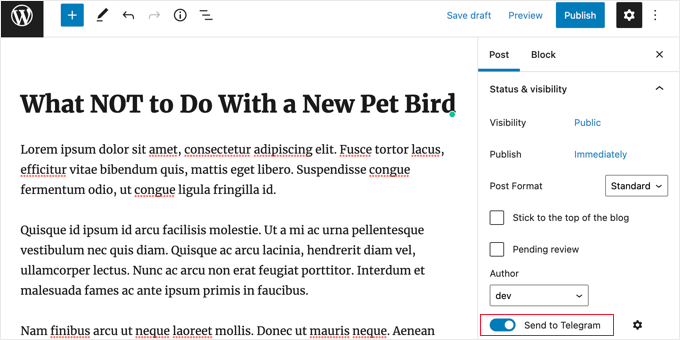
The WordPress Editor Now Has a Post to Telegram Setting

This is switched on by default. Simply switch it off if you don’t wish to send the post to Telegram.

The next time you publish a post that matches the rules you set, it will be automatically sent to your Telegram channel or group.
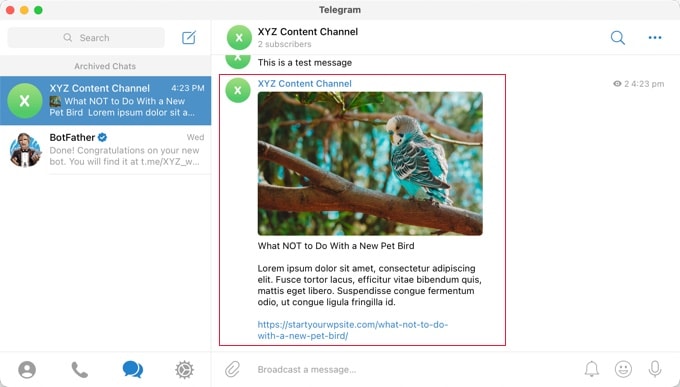
Preview of a WordPress Post Sent to Telegram

Sending WordPress Notifications to Telegram

Make sure you’re on the ‘Private Notifications’ tab on the WP Telegram page.

This page will let you configure the plugin to automatically send WordPress notifications to an individual privately or group on Telegram.

First, you need to toggle the ‘Active’ switch to the ‘On’ position.
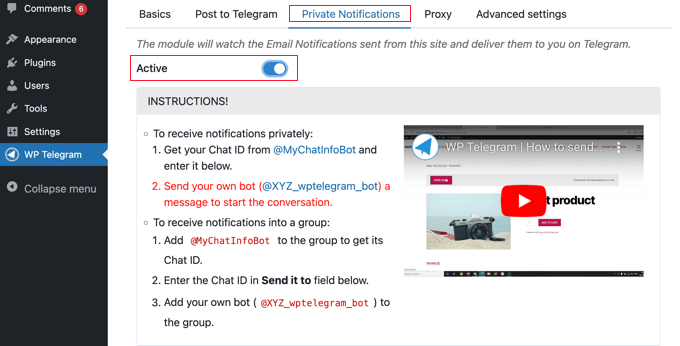
Toggle the Active Switch on the Private Notifications Tab

You will now see instructions for two different methods on how to send your WordPress posts to Telegram.

Sending Notifications From WordPress to an Individual on Telegram

This method is best if you’d like WordPress to send notifications to just one person.

You will have to give the WP Telegram plugin your User Chat ID on Telegram.

To learn your ID, you need to search for @MyChatInfoBot on Telegram and then click on the first search result under ‘Contacts and Chats.’
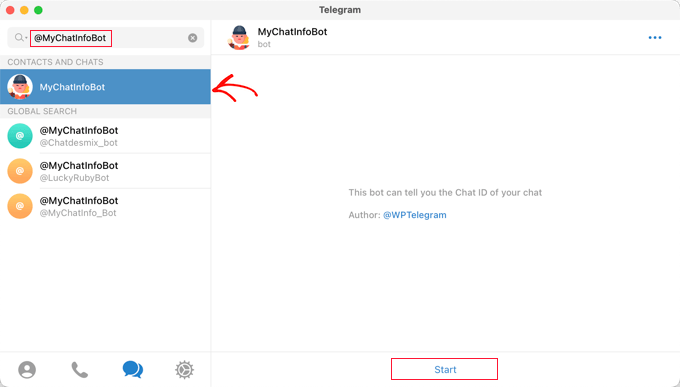
Search for @MyChatInfoBot on Telegram

After that, click ‘Start’ at the bottom of the screen to start a chat with the bot.

In its first message, the bot will display your Chat ID in red.
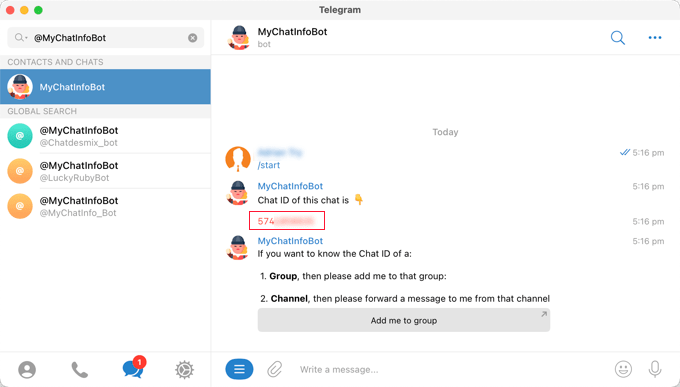
The Bot Will Post Your Chat ID

You need to copy the Chat ID to the clipboard, and then return to your website.

In the ‘Notification Settings’ section in the screenshot below, you will find your admin email address. This is where WordPress admin notifications are sent by email.

Each time a notification is sent to this address, WordPress will also send it to the Telegram user you will enter in the plugin settings.

If you need to, you can use a different email address. To receive notifications sent to all email addresses, simply type ‘any’ in the ‘if email goes to’ field.
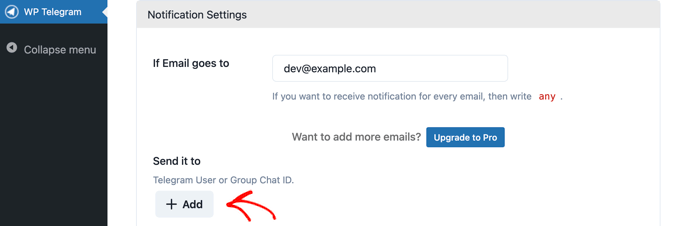
Click the +Add Button so You Can Add the Chat ID

Next, you’ll need to enter the User Chat ID you copied. Simply click the ‘+Add’ button.

This will show a new field under ‘Send it to.’ This is where you should paste your ID.
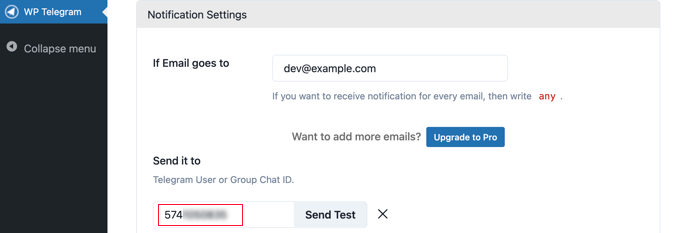
Paste the Chat ID Into the Field

Don’t click the ‘Send Test’ button yet.

First, you need to start a conversation with the bot you created earlier. You need to do that because bots can’t initiate a chat on Telegram.

You’ll have to switch back to Telegram and search for the name of the bot you created during the setup stage. Once you click on the bot, you can start a conversation by clicking ‘Start’ at the bottom of the screen.
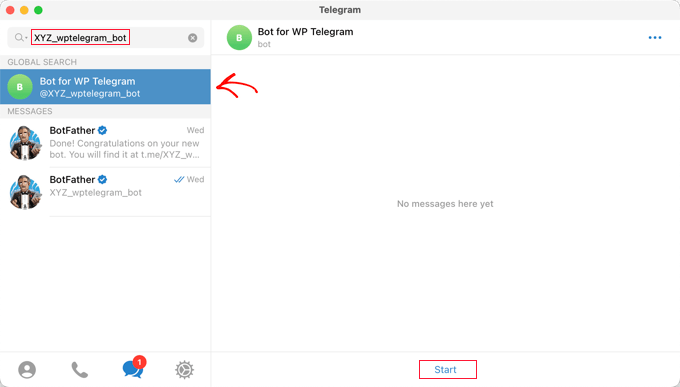
Start a Chat With Your Bot in Telegram

Now, you can return to WordPress and click the ‘Send Test’ button. You should then click OK on the popup message that appears.

A confirmation will be displayed next to the ‘User Chat ID’ in WordPress, letting you know if the message was successful. You should also check Telegram to make sure the message is actually posted there.
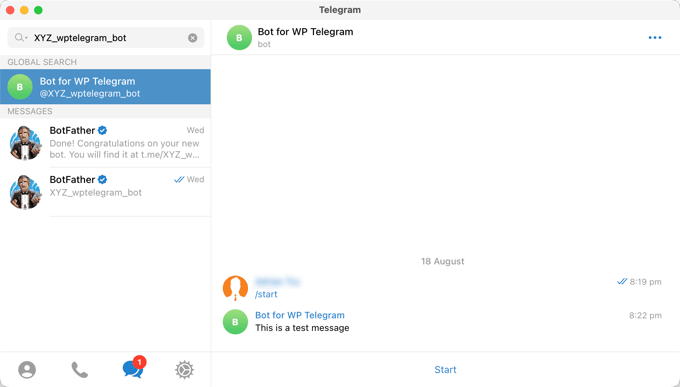
Test Message Successfully Sent to Telegram

Now, back on your WordPress site, scroll down to the bottom of the page, and click the ‘Save Changes’ button to store your settings.

Congratulations, you will now receive a Telegram message each time there is an admin notification on your site.

Sending Notifications From WordPress to a Group on Telegram

This method is best if you work with a team on your WordPress website and want some or all of them to see the admin notifications on Telegram.

The steps for this method are similar to the ones above for sending notifications to a single user on Telegram. However, instead of pasting a ‘User Chat ID’ into WordPress, you will need to paste the ‘Group Chat ID.’

If you don’t already have a Telegram group for your team, then you need to create one.

While a Telegram channel is simply for posting information, members of a group are able to communicate with one another. You can also control who belongs to the group.

You should click the ‘New’ icon at the top of the Telegram screen and select ‘New Group’ from the drop down menu. The group will be private by default.
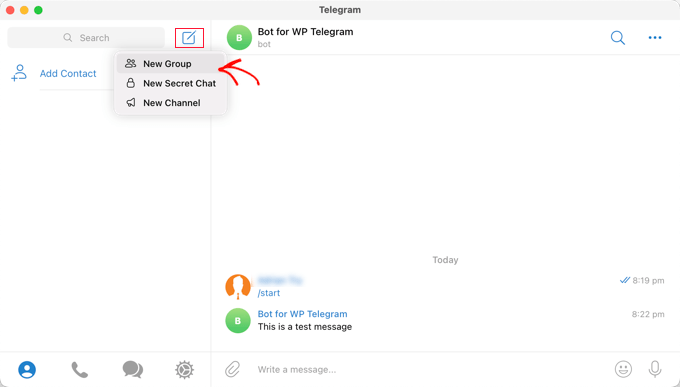
Create a New Group in Telegram

After that, you need to add any other members you wish to be part of the group.

You will be automatically added to the group, and you will need to add at least one additional member.
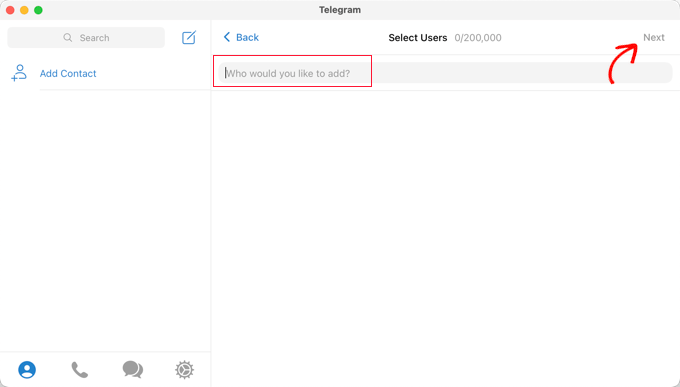
Select the Users You Wish to Add to the Group

After adding your team members, you should click ‘Next’ at the top of the screen.

Finally, clicking ‘Create’ at the top of the screen will create the group.
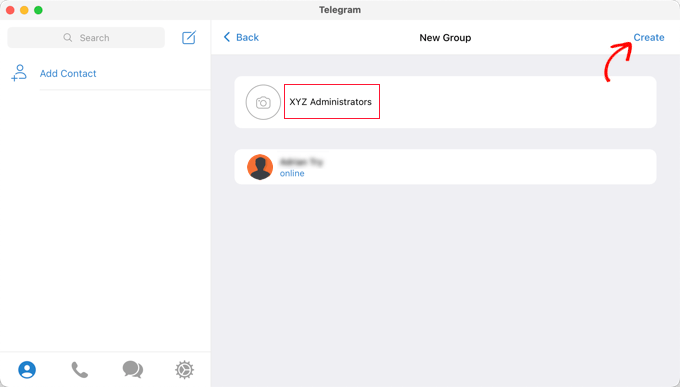
Name Your Group and Then Click Create

Now that you’ve created a group and added your team members, you will need to add two bots.

First, you should add @MyChatInfoBot so that you can find out the Group ID to paste into the plugin settings in WordPress.

Second, you need to add your own bot so that the plugin can send WordPress notifications.

You can open the group’s ‘Info’ page by clicking on the group name at the top of the screen. Once there, you need to click the ‘Add’ button to add new members.
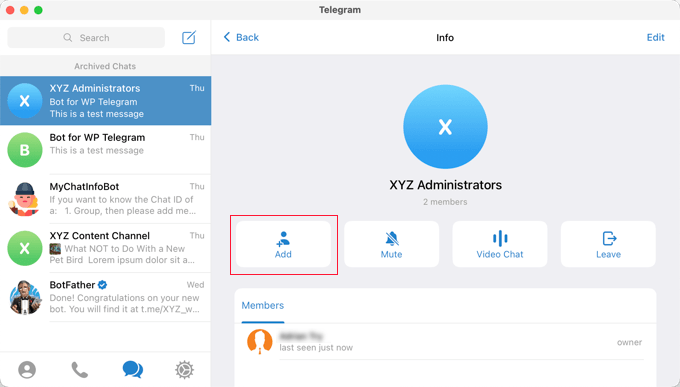
Click the Add Button to Add the Bots to the Group

Next, you need to type @MyChatInfoBot into the ‘Add Members’ field and then click on it in the search results.

You will need to do the same with the bot you created during the initial Telegram setup.
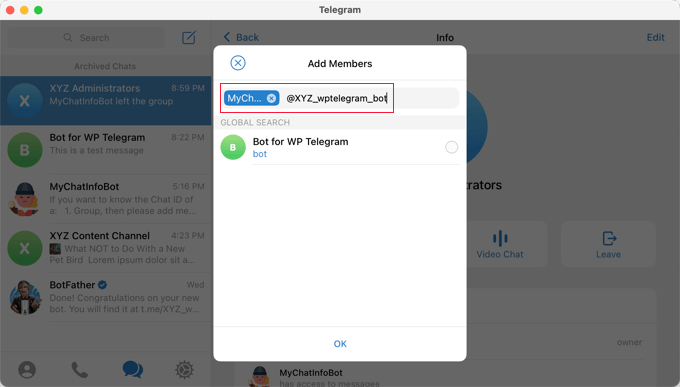
Add 2 Bots to Your Group

Make sure you click ‘OK’ to add the two bots as group members.

Notice that the @MyChatInfoBot bot has automatically added your Group ID to the chat.
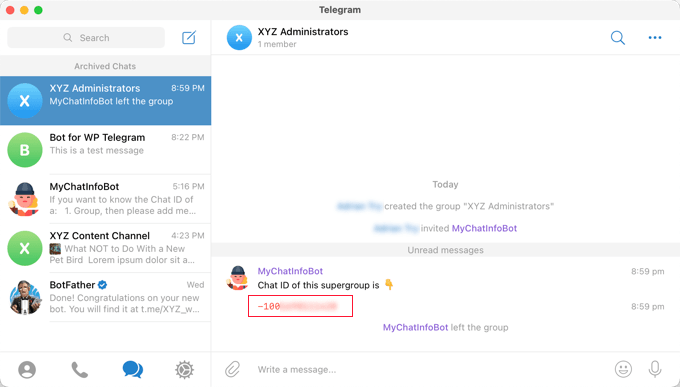
Copy the Chat ID of Your Group

Next, paste this ID into the ‘Send it to’ section back on your WordPress site.

Now, you can click the ‘Send Test’ button to make sure that everything is set up correctly.
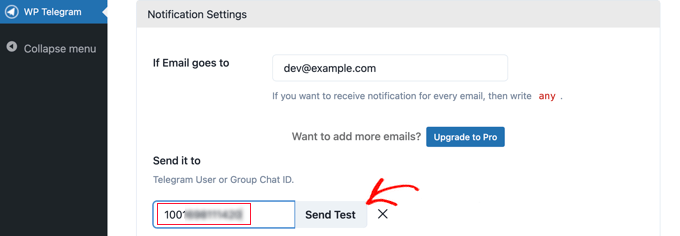
Paste Your Group Chat ID Into the Plugin's Field

The plugin will pop up a default message that you can change if you like. After that, you should click the ‘OK’ button.

Now go ahead and switch to the Telegram app and make sure the test message was posted.
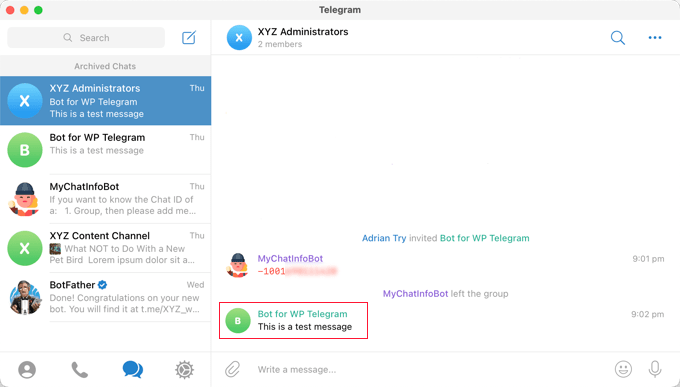
Test Message Successfully Posted to Telegram

Congratulations, now your WordPress notifications will be sent to your Telegram group.

We hope this tutorial helped you learn how to integrate your WordPress site with Telegram. You may also want to learn how to create a contact form in WordPress, or check out our list of email marketing services for small business.

If you liked this article, then please subscribe to our YouTube Channel for WordPress video tutorials. You can also find us on Twitter and Facebook.

The post How to Integrate Your WordPress Site with Telegram first appeared on WPBeginner.


August 24, 2022 at 09:46PM

How to Automatically Curate Content in WordPress

Do you want to curate content in WordPress automatically?

Content curation allows you to share content from third-party sources on your WordPress website.

In this article, we’ll show you how to curate content in WordPress automatically.

Automating WordPress content curation

What Is Content Curation and How Can You Do It Correctly?

Content curation simply means collecting and sharing select content from different sources.

This lets users see the best content on a specific topic in one location.

For instance, if you run a membership website, then you can curate a section where users see industry news from third-party sources.

Or perhaps you just want to show the top sports highlights from various social media accounts on your site.

Another scenario could be a WordPress multisite where you want to curate content from all the different sites on the network.

A lot of websites are made specifically for content curation using auto-blogging tools.

Curating Content While Avoiding Copyright Infringements and SEO Penalties

Content curation is done with the intent of sharing content. It does so by giving credit to the original source and not stealing the entire copy of their work.

Basically, you can share an article with a small excerpt and an image. It should link to the original source where users can read the full article.

On the other hand, if you decide to publish an entire article with no attribution to original source, then that would be considered stealing content.

Search engines may decide not to rank your website or consider it low quality due to a lack of original content.

Sources you copy from may file a copyright infringement complaint and get those articles removed from search engines.

It may also lead to serious legal troubles, which may cost you financially.

The Internet is full of spam blogs that use content curation tools to set up auto-blogs and make money through ads. That’s not a great idea considering the potential financial and legal costs, and how unsustainable it is in the long run.

That being said, let’s take a look at how to properly set up automatic content curation in WordPress while avoiding copyright and SEO issues.

Properly Setting up Automatic Content Curation in WordPress

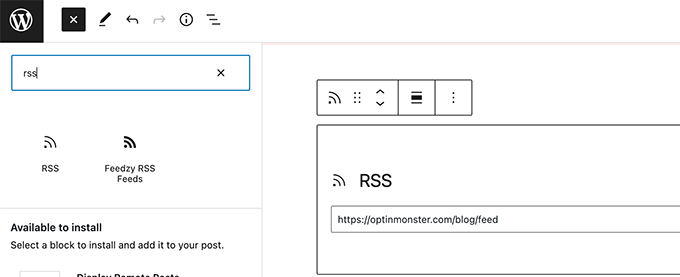
The easiest way to curate content on your WordPress website is to simply use the RSS feeds block.

To use this method, start by editing a post or page where you want to display curated content and adding the RSS block to your content area.

Add RSS feed

In the block settings, you need to enter the RSS feed URL of the content source that you want to display.

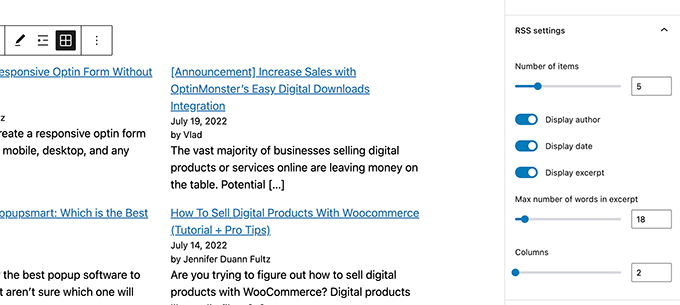
WordPress will then fetch that feed and display it on screen. You can use block settings to change its style, display excerpt, author, and date information.

RSS block settings

The downside of this method is that you’ll have to add RSS feed for each source separately.

It will be time-consuming and doesn’t look very pretty to the users.

What if you could automate the whole process, combine different sources, and even categorize / sort them?

Let’s take a look at how to properly automate the whole content curation process.

Using RSS Feeds to Automatically Curate Content in WordPress

First, you need to install and activate the Feedzy plugin. For more details, see our step by step guide on how to install a WordPress plugin.

There’s also a premium version of Feedzy with more features, but for the sake of this tutorial, we will use the free version.

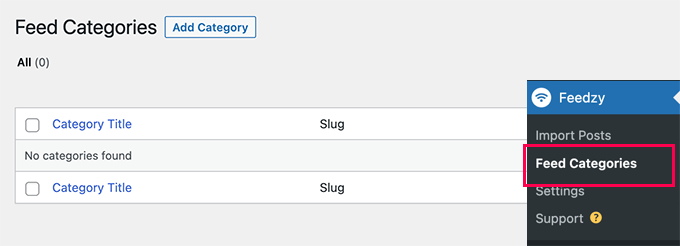
Once the plugin is activated, you need to visit Feedzy » Feed Categories page and click on the Add Feed Category button at the top.

Add feed category

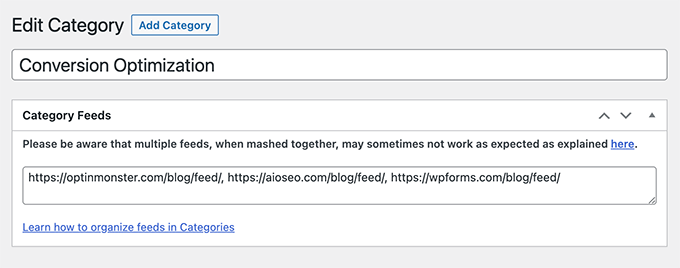
One the next screen, you need to provide a title for this category.

Below that, add the URLs of RSS feeds that you want to include. Use commas between each URL to separate them.

Add feed URLs

After that, click on the Publish button to store your feed category.

Repeat the process if you need to create more categories.

Import Curated Content From Feeds to Your WordPress Website

Feedzy can import blog posts from the feeds to your WordPress blog posts.

This way they will be stored in your WordPress database like regular posts and give you flexibility to do different things with the curated content.

However, if you don’t want to import them to your WordPress website, then you can skip this step.

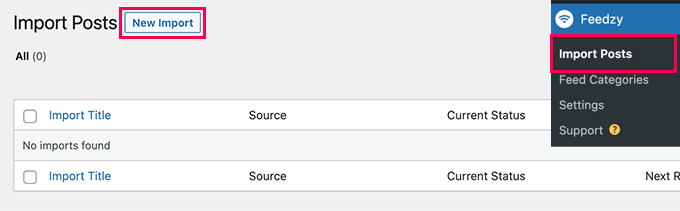
To import blog posts, simply visit the Feedzy » Import Posts page and click on the New Import button at the top.

Importing posts

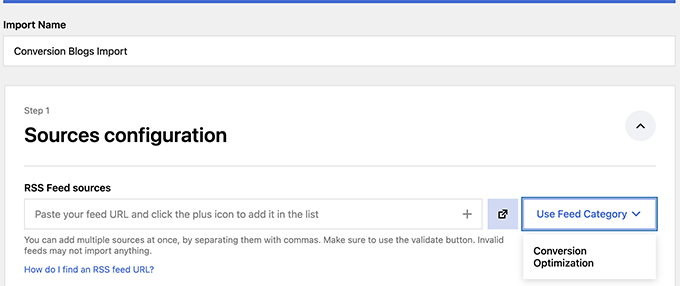
First, you need to provide a name for this import. This could be anything that helps you identify this import.

Below that, you can add individual RSS Feeds, or choose one of the feed categories you created earlier.

Prepare to import feeds

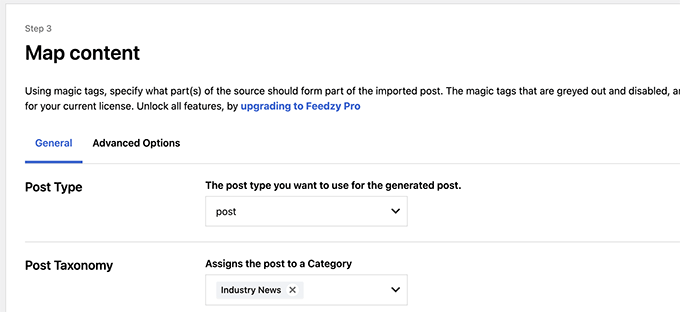
Next, scroll down a little to the ‘Map Content’ section.

From here, you can map RSS feed items to WordPress blog post settings.

Map content

For instance, you can choose which category to assign for all imported posts.

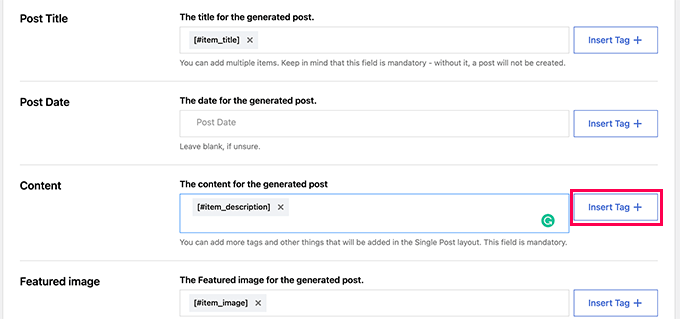
You can click on the Insert Tag button to map a Feed element to post element. For instance, you can set Item Description to be used as Post content.

Use item tags to map post settings

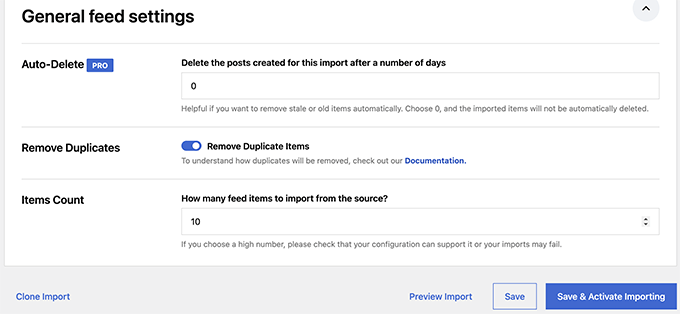
Next, scroll down to the General Settings section.

From here, you can choose how many posts you want to import.

General import settings

Finally, click on the Save & Activate Importing button to save your changes.

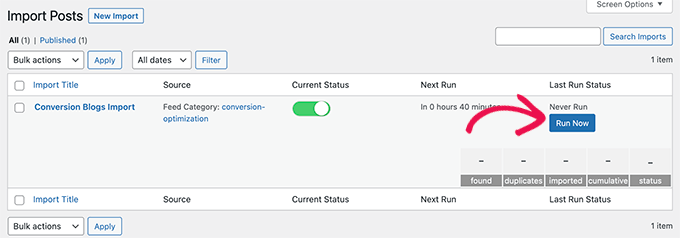
You will now be redirected to the imports page where you will see the import you just created. Simply click on the Run Now button to start importing posts.

Run import

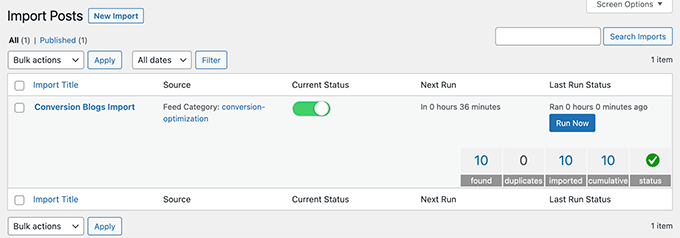
The plugin will now fetch and import posts and add them to your WordPress website in the background.

Once finished, you’ll need to refresh the page to see the import stats.

Import Finished

Feedzy will now automatically fetch new posts from your content sources and import them to your WordPress website.

Displaying Curated Content in WordPress

Now that you have set up and automated import mechanism for the content you want to curate, the next step is to display it on your website.

There are different ways to display curated content in WordPress via Feedzy feeds.

Method 1. Fetch Content via Feedzy RSS Feeds Block

This method is recommended if you decided not to import content to your WordPress website.

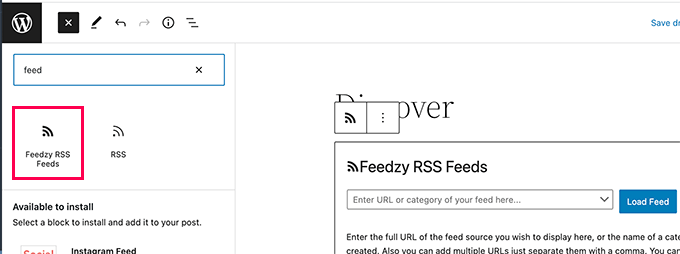
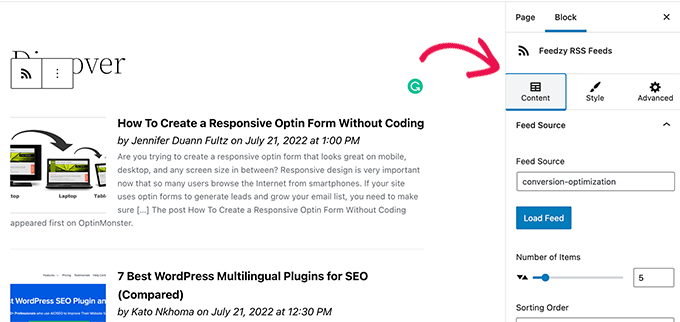
Simply edit the post or page where you want to display the curated content and add the Feedzy RSS Feeds block to your content area.

Display Feedzy RSS Feeds

You can then enter a feed URL that you want to display or choose one of the feed categories you created earlier.

You can then use the block settings panel to choose the number of items, style, and other settings for the feed.

Feedzy feeds block settings

Once you are finished, don’t forget to Save or Publish the post and page.

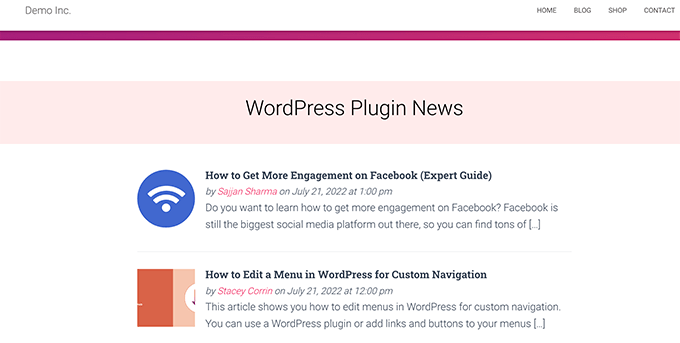
You can now preview it to see your curated content in action.

Feedzy Feeds block preview

Method 2. Display Imported Content in WordPress

This method is more flexible but would only work if you decided to import content directly into your WordPress website.

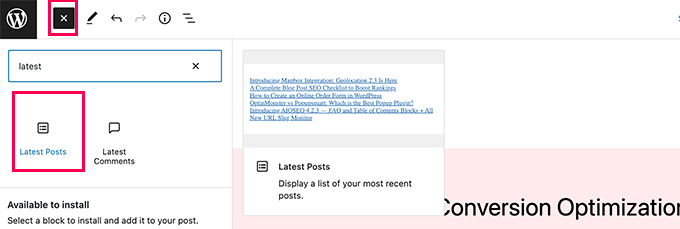
Simply edit the post or page where you want to display the curated content. On the post edit screen, add the Latest Posts block to your content area.

Add latest posts block

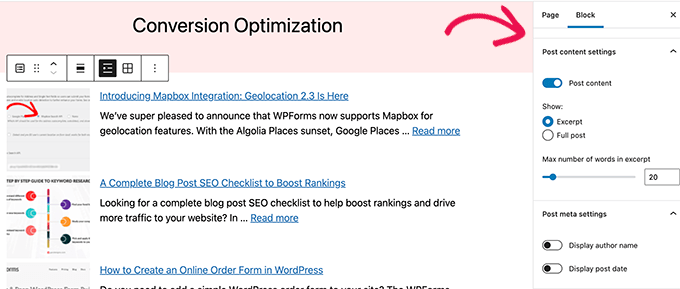
By default, the block will display your most recent articles in a plain list. You can change that under block settings.

From here, you can choose to show excerpt, featured image, number of items, and more.

Latest Posts block settings

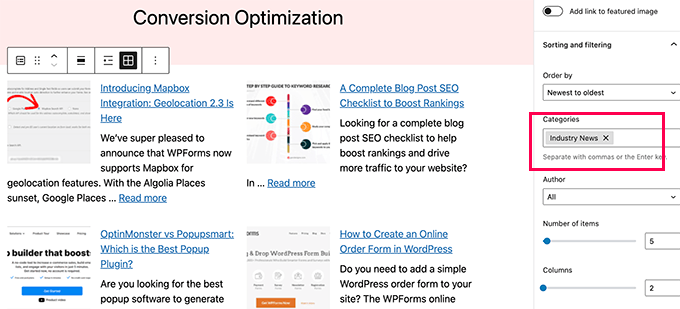
You can also switch from list to gallery view, choose number of columns, or only display posts from a specific category.

For instance, let’s say you mapped all imported content to be added to ‘Industry News’ category. Now you can just display that particular category as your curated content.

Style and sort curated content

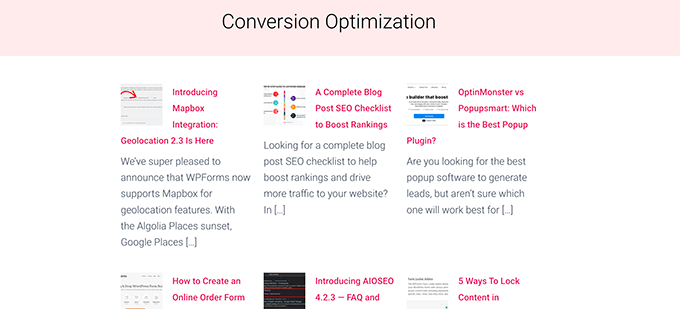
Once you are finished, you can Save or Publish your post/page and preview it in a new browser tab.

Here is how it looked on our demo website.

Curated content in gallery view

Using either of these methods will automatically display latest posts from your content sources.

Social Media Content Curation in WordPress

What if you wanted to curate content from social media platforms like YouTube, Twitter, Instagram, and Facebook?

The easiest way to curate social media content in WordPress is by using Smash Balloon.

Smash Balloon is the best social media plugin for WordPress. It allows you to display social media feeds on your WordPress website beautifully.

First, you need to install and activate the Smash Balloon plugin. For more details, see our step by step guide on how to install a WordPress plugin.

Smash Balloon comes with separate plugins for different social media feeds.

You can also buy the ‘All Access Bundle’, which includes all their plugins + social wall plugin that can combine different social feeds into one.

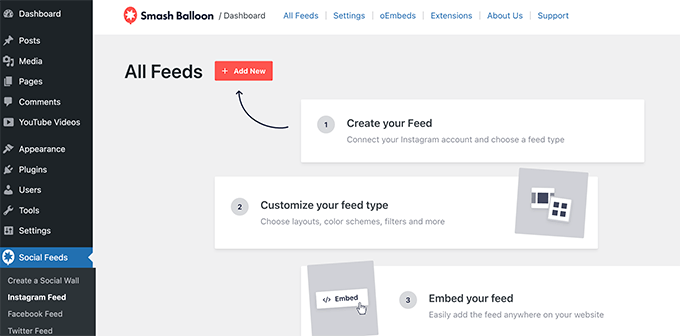
Upon activation, you can go ahead and start connecting your social media accounts and setting up feeds you would like to display.

Adding social feeds

Follow the on-screen instructions to set up each feed.

You can connect to your social media profiles, third-party sources, search terms, hashtags, playlists, and more.

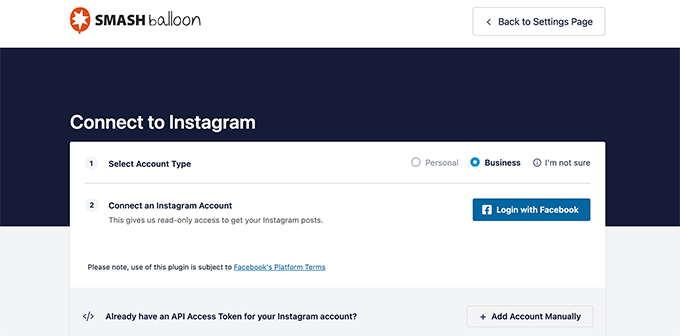
Depending on what you are trying to fetch, you may be asked to connect to your social media account and give Smash Balloon permission to access your data.

Connect social media profile

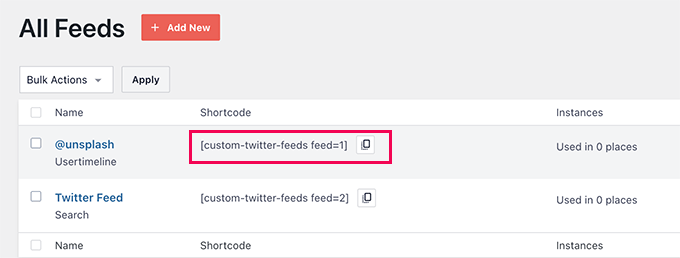
Once you have set up your social media feed, you can copy the shortcode from the feeds page.

Copy shortcode

Next, you need to add the shortcode to a post, page, or sidebar widget.

You can now visit your website to see your social feed in action.

Single feed displayed

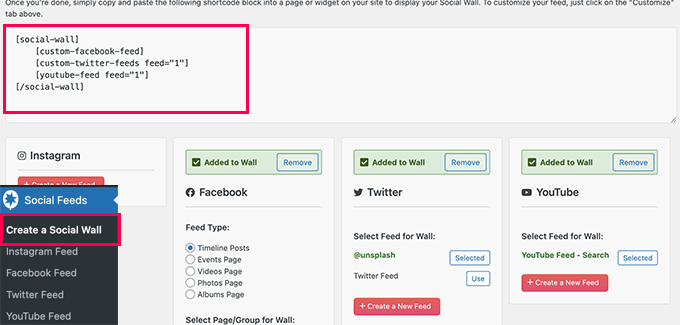
You can also create a social wall to combine different feeds and display them as one.

Simply go to the Smash Balloon » Create a Social Wall page and copy the shortcode shown on screen.

Copy the social wall shortcode

You can now add this shortcode to any WordPress post, page, or sidebar widget where you want to display your curated social feed.

Here is how it looked on our test website.

Combined social wall preview

For more details, see our tutorial on how to add social media feeds in WordPress.

We hope this article helped you learn how to curate content in WordPress. You may also want to see our guide on ways to make money online from your curated content blog or see our WordPress SEO guide to optimize your website.

If you liked this article, then please subscribe to our YouTube Channel for WordPress video tutorials. You can also find us on Twitter and Facebook.

The post How to Automatically Curate Content in WordPress first appeared on WPBeginner.


August 24, 2022 at 04:05PM
Tuesday, August 23, 2022

How to Build an Amazon Affiliate Store Using WordPress

Do you want to build an Amazon affiliate store using WordPress?

An Amazon affiliate store allows you to sell products from Amazon as an affiliate and earn money on each sale. Due to the low startup and running costs, an Amazon affiliate store is one of the easiest ways to start a new business and make money online.

In this article, we will show you how to easily build an Amazon affiliate store using WordPress. We will also share our expert tips on how to increase your Amazon affiliate earnings.

How to build an Amazon affiliate store using WordPress

What is an Amazon Affiliate Store?

An Amazon affiliate store is an online store that promotes products that are available to buy on Amazon.

Creating an Amazon affiliate store is very different to running your own online store, where you’ll need to source products, manage orders and refunds, ship products, and keep track of inventory. This can take a lot of time, effort, and money.

When you build an affiliate store, you don’t have to worry about any of these things. You can simply add some affiliate links to your website, and Amazon will handle the rest.

When visitors arrive at your website, they’ll see all the different products they can buy on Amazon using your unique affiliate links.

If a visitor clicks on one of your affiliate links and then buys this product on the Amazon website, you’ll earn money from that sale. This is known as an affiliate commission and it’s a great way to make money online blogging with WordPress.

Amazon affiliate stores are popular because of the low startup and running costs.

Amazon also sells a huge range of products. By creating an Amazon affiliate store, you’ll get access to over 75 million different products.

With that in mind, you should have no problems finding products that your visitors will be interested in buying, no matter whether you start a food blog, a photography website, a fashion blog, or any other kind of site.

However, you can’t add Amazon affiliate links to any sites that are mainly aimed at children under 13.

With that being said, let’s see how you can build an Amazon affiliate store using WordPress. If you prefer to jump straight to a particular step then you can use the links below.

Step 1. Getting Started With WooCommerce and WordPress

There are lots of different WordPress eCommerce plugins that you can use to build an Amazon affiliate store, but we recommend using WooCommerce because it’s powerful, flexible, and free.

WooCommerce is also the most popular eCommerce plugin on the market and powers millions of online stores all around the world.

Before you start building your WordPress website, just be aware that there are two types of WordPress software. To get started, you will need to be using the WordPress.org platform (see the difference between WordPress.com vs WordPress.org).

You will also need a WordPress hosting account and a domain name.

When you promote Amazon products on your affiliate site, Amazon is responsible for processing the customer’s credit card details. However, at some point you may want to expand your business and start selling your own products. These can be physical products or even digital downloads such as ebooks.

With that in mind, it’s a good idea to buy a SSL certificate, so you can securely accept credit card payments on your WordPress site in the future.

A domain name typically costs $14.99 per year and hosting costs start from $7.99 per month.

The price of an SSL certificate can vary depending on where you buy the certificate. However, as an estimate you can expect to pay anywhere between $50-200/year for an SSL certificate.

That is a lot of expense for a new affiliate business.

Thankfully, Bluehost, an official WordPress and WooCommerce recommended hosting provider, has agreed to offer our readers a free domain name, a free SSL certificate, and over 60% off web hosting.

Basically, you can start an Amazon affiliate business for $2.75 / month.

Note: Bluehost’s starter plan is a great choice for any Amazon affiliate store. However, if you want to sell your own products and services as well, then you want to take a look at our pick of the best WooCommerce hosting providers.

After buying your Bluehost package, you’ll need to install WordPress and choose a theme. For step by step instructions, see our guide on how to start a WordPress blog.

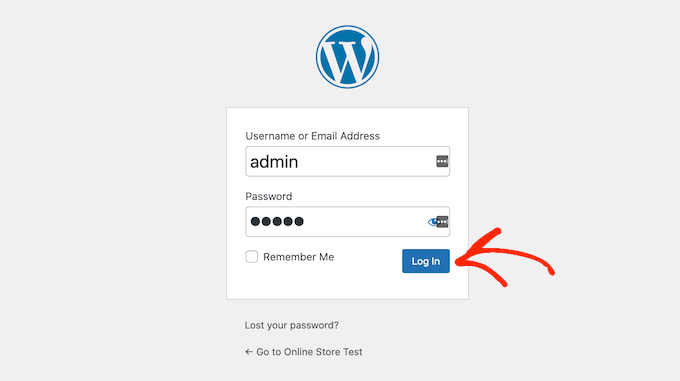
Once you’ve installed WordPress, you can log into the WordPress dashboard by going to example.com/wp-admin/ in your browser. Just replace “example.com” with your own domain.

Here, simply type in the username and password you created, and then click on ‘Log In.’

The WordPress login page

You’re now in your WordPress dashboard, ready to start building your Amazon affiliate store.

The first thing you’ll want to do is install and activate the WooCommerce plugin. For more details, see our step by step guide on how to install a WordPress plugin.

As soon as you activate WooCommerce, it will launch a setup wizard where you can type in an address for your store, the industry where your store operates, and the type of products you plan to sell.

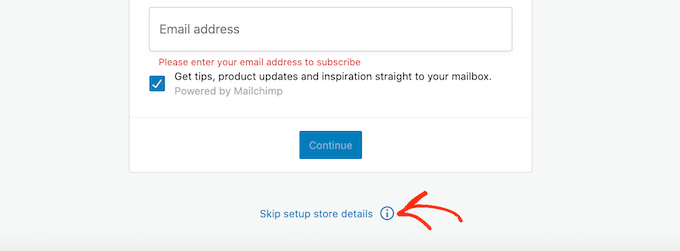
Since we want to create an Amazon affiliate store, you don’t need to worry about configuring your WooCommerce settings. With that in mind, you can close the setup wizard by clicking on the ‘Skip setup store details’ link.

Setting up your WooCommerce eCommerce plugin

For step by step instructions on how to configure the WooCommerce settings, see our guide to WooCommerce.

Step 2. Sign up to the Amazon Associates Program

Now you’ve installed WordPress and WooCommerce, you’ll need to sign up to the Amazon Associates program.

Amazon automatically accepts everyone who applies to their affiliate program. However, the Amazon guidelines state that you must drive at least three qualified sales in the first 180 days of your application.

This means that at least three people need to click on your affiliate links and then make a purchase on the Amazon website. If you don’t meet this target within 180 days, then Amazon will remove you from their program and you will no longer earn money from your Amazon affiliate links.

With that in mind, you may want to spend some time increasing your blog traffic and fine-tuning your website’s SEO before applying to the Amazon affiliate program. If you need help, then please see our ultimate SEO guide for beginners.

When you’re ready to become an Amazon affiliate, simply head over to the Amazon Affiliate program website and click on the ‘Sign Up’ button.

The Amazon Associates affiliate program

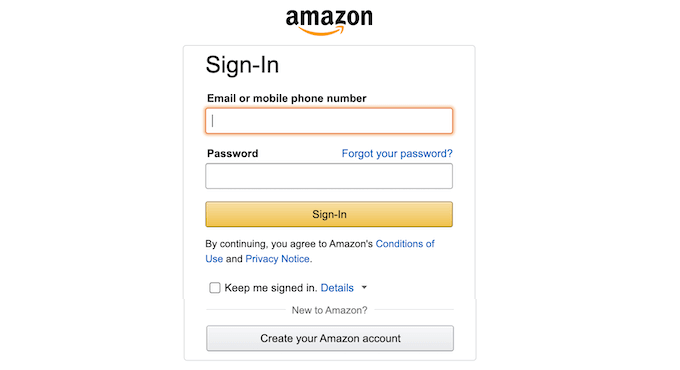
At this point, you’ll be asked to log into your Amazon account.

There’s no need to create a special Amazon affiliate account, so you can go ahead and type in the email address and password for your existing Amazon account.

Registering for Amazon associates

If you don’t have an Amazon account, then click on ‘Create your Amazon account.’ Amazon will now guide you through the process of creating an account, step by step.

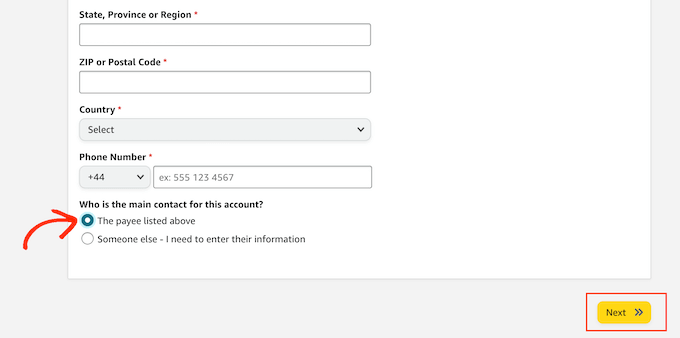
By default, Amazon will send all payments to the primary address for this account. If you’re happy to go ahead and use the default payee, then make sure that ‘The payee listed above’ is selected and then click on the ‘Next’ button.

Becoming an Amazon affiliate

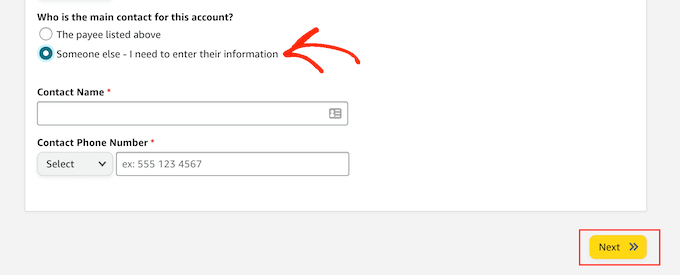
If you want to use a different payee, then click on the ‘Someone else’ radio button.

You can then type in the name and contact phone number for this new payee, and click on the ‘Next’ button.

Adding a new payee to your Amazon associates account

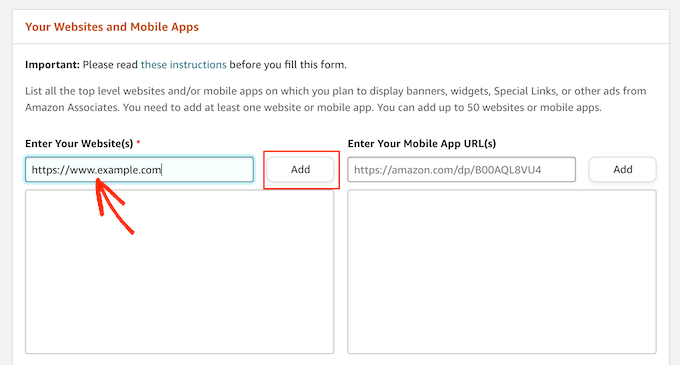
On the next screen, you can type in the website domain where you plan to use your Amazon affiliate links, and then click on ‘Add.’

If you plan to advertise Amazon’s products on more than one domain, then simply repeat the same process described above.

Registering a domain with Amazon associates

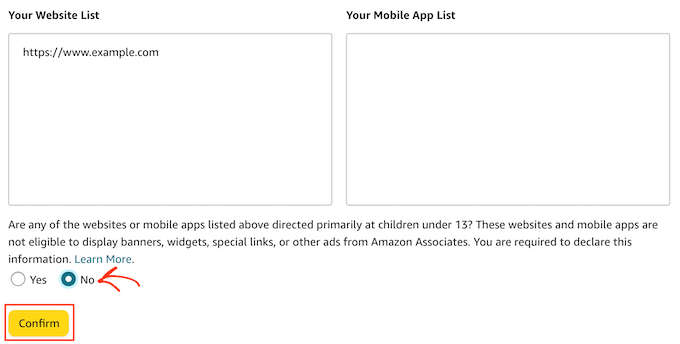
After adding all the domains where you plan to use Amazon’s affiliate links, click on ‘Next.’

On the next screen, you’ll need to confirm that your website isn’t mainly aimed at children under 13.

Assuming this is the case, click to select the ‘No’ radio button and then click on ‘Confirm.’

Signing up to the Amazon Associates program

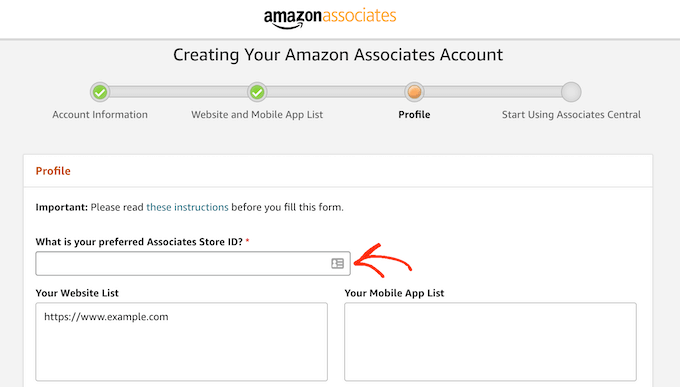
The next step is creating your Amazon Associates profile. To start, type the ID that you would like to use into the ‘What is your preferred Associates Store ID?’ field.

Amazon uses this ID to track and record your commissions. The ID will also be included in your Amazon affiliate links. With that in mind, it’s a good idea to type in the name of your website or company.

Registering as an Amazon affiliate

Amazon will then automatically create an ID based on your preferred ID.

After typing in this information, check that the ‘Your Website List’ box is showing all the domains where you plan to add your Amazon affiliate links.

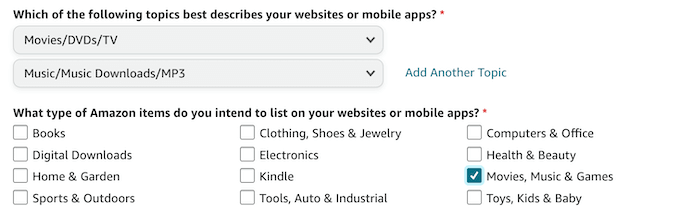
Once you’ve done that, you’ll need to enter some information about your site. This includes the topics you cover on your website, and the kind of products you plan to promote on your Amazon affiliate store.

Choosing products for your Amazon affiliate store

Amazon will also ask for some basic analytics information such as how many people visit your site every month.

If you’re not already using Google Analytics to record this information, then see our step by step guide on how to install Google Analytics in WordPress for beginners.

Once you’ve entered all this information, click on the ‘Finish’ button.

That’s it. You’re now registered as an Amazon affiliate.

Step 3. How to Find the Best Products for Your Amazon Affiliate Site

Once you’ve signed up to the Amazon Associates program, you’re ready to start creating affiliate links.

You can get affiliate links for most of the physical and digital products sold on the Amazon store. However, there are some products that you can’t get affiliate links for, such as any products sold by Amazon Pharmacy.

Let’s find some products to promote on your new Amazon affiliate store.

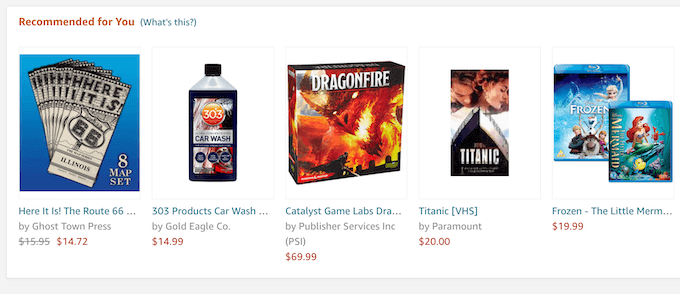
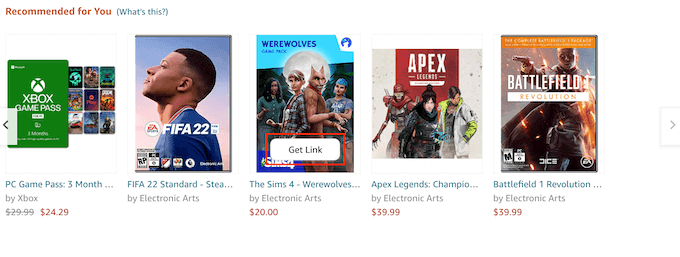
To start, sign into your Amazon Associates account. If you scroll to the bottom of the screen, you’ll see some products that Amazon recommends you add to your website.

These recommendations are based on the products your site’s visitors have previously purchased or shown an interest in purchasing.

Amazon Affiliate's recommended products

To add one of these products to your site, simply hover your mouse over the product’s image.

Then, click on the Get Link button when it appears.

How to get an Amazon affiliates link

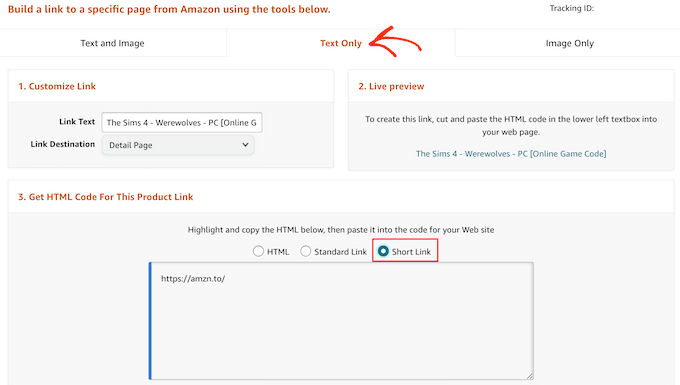
On the next page, click on the Text Only tab.

Once you’ve done that, click on the ‘Short link’ radio button. Amazon will now show the affiliate link that you can use to add this product to your website.

How to get an Amazon affiliate link for WordPress

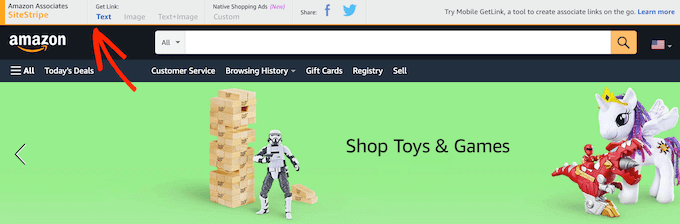
Another option is to simply visit the normal Amazon store while logged into your Amazon affiliate account.

Along the top of the screen, you’ll see a new Amazon Associates SiteStripe banner.

How to get an Amazon affiliate link for your website

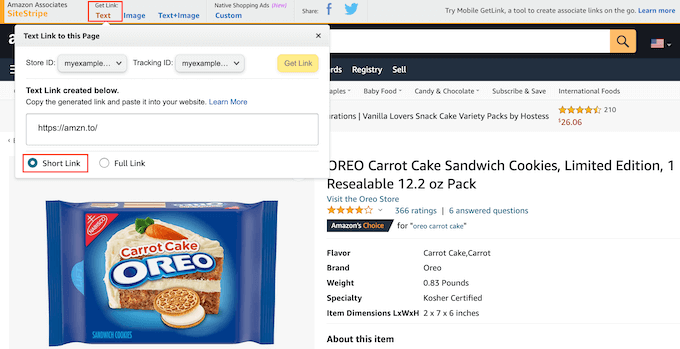
You can now simply browse the Amazon store as normal. When you find a product that you want to add to your Amazon affiliate store, simply click on the ‘Get Link: Text’ button in the SiteStripe banner.

In the popup that appears, click on the ‘Short link’ radio button. You will now see an affiliate URL for this product.

Getting an Amazon affiliate link for your online store

To help you get sales, it’s important to find products that your visitors will be interested in buying. Here, a good analytics solution for WordPress can help you learn more about the people visit your site, so you can identify the products they may want to buy.

It’s also a good idea to to think about the kind of content you’re publishing, and the content you plan to publish. For example, if you’re creating a fitness blog, then your target audience might be interested in buying gym equipment or health supplements.

Meanwhile, if you’re building an animals and pet related website then you may want to promote products from Amazon’s ‘Pet Supplies’ category.

No matter what products you choose, once you have an affiliate link you’re ready to start adding products to your Amazon affiliate store.

Step 4. Adding Amazon Affiliate Products in WooCommerce

WooCommerce is the best Amazon affiliate store plugin for WordPress. It allows you to import products that are for sale on third-party websites, and then show these products as part of your own online store.

In this way, you can deliver a seamless experience to the people who visit your website.

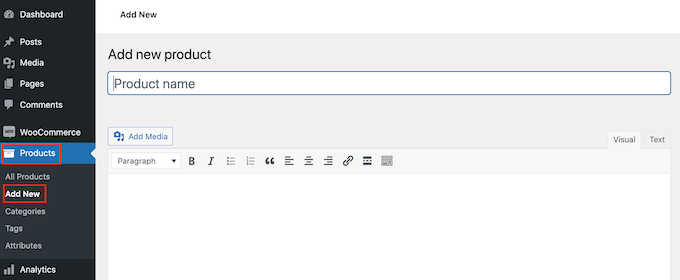
To start importing products from Amazon, go to the Products » Add New page.

Creating a new WooCommerce product

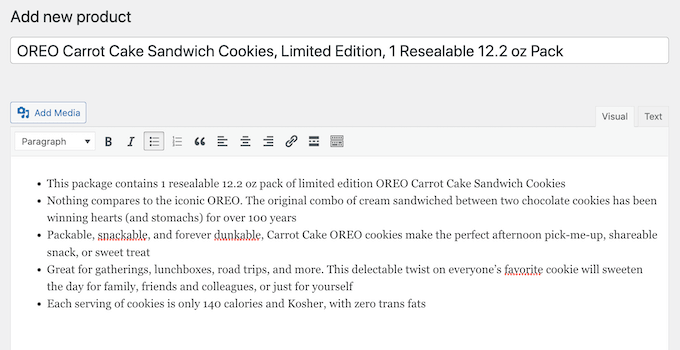
First, you need to type in a title for the product that you want to promote on your website.

Then, type a detailed description into the post editor.

Adding a product title and description

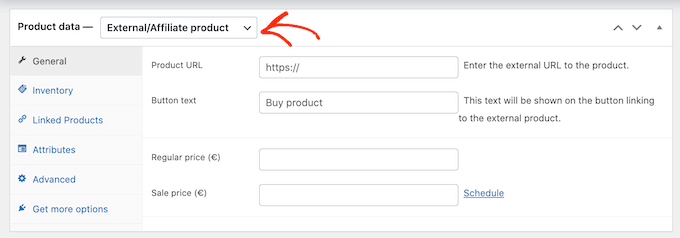
Once you’ve done that, scroll to the ‘Product data’ box.

Here, open the dropdown that shows ‘Simple product’ by default and click on ‘External/Affiliate product.’

Adding an affiliate product in WooCommerce

You can now either type in or paste the Amazon affiliate URL for this product.

Just because a product costs $10 now, doesn’t mean it will cost $10 forever. Amazon can change the price of its products at any point.

With that in mind, you’ll want to leave both the ‘Regular price’ and ‘Sale price’ fields blank. Your visitors can then check Amazon for the current price.

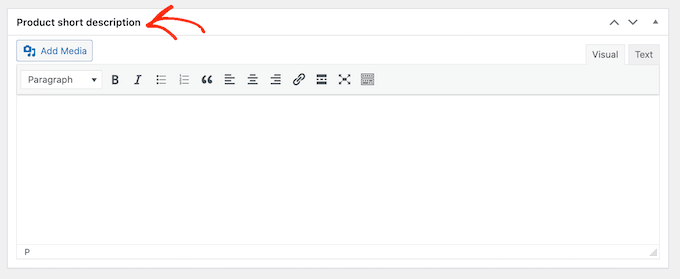
Next, scroll to the ‘Product short description’ section. Here, you can type in a short description that will appear on your affiliate store’s front page, product category pages, and in the search results.

Adding a short product description in WooCommerce

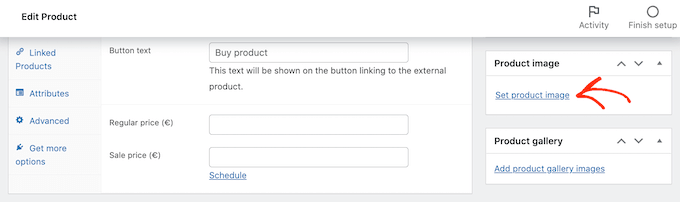
To encourage visitors to click your link and buy the product, it’s a good idea to add an engaging product image.

To do this, click on the ‘Set product image’ link.

Adding a product image to your Amazon affiliate store

You can then either choose an image from the WordPress media library or upload a file from your computer.

Another option is to create an image gallery by clicking on ‘Add product gallery images.’

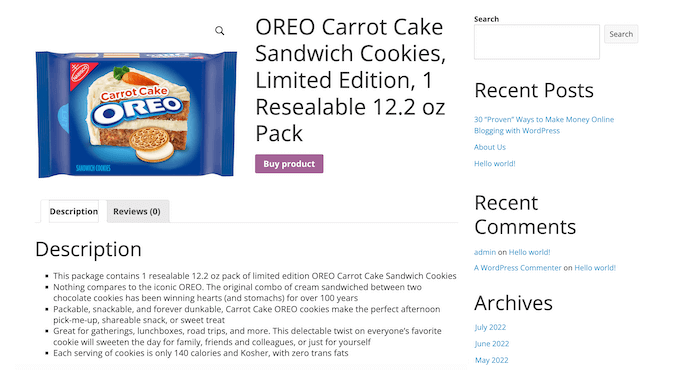
When you’re happy with all the information you’ve entered, it’s time to click on ‘Publish.’ Now if you visit the shop page of your affiliate store, you’ll see your Amazon product live.

An Amazon affiliate store built with WooCommerce and WordPress

If you click on the ‘Buy product’ button then the affiliate link will take you to the product’s page on Amazon’s website.

You can now add more Amazon products to your affiliate store by following the same process described above.

Step 5. Customizing Your WordPress Amazon Affiliate Store

Themes control how your Amazon affiliate store looks including the colors, layout, and fonts. Your theme is the face of your online store and can encourage visitors to click on your affiliate links.

By default, WordPress comes with a basic design that has limited WooCommerce support.

The good news is that there are lots of different free and premium WooCommerce-ready themes that you can choose from. To get more sales, you’ll want to choose a theme that looks good, compliments your products, and has exactly the features you need.

To help you make the right choice, we’ve put together a list of the best WooCommerce WordPress themes. You may also want to look at our expert pick of the best WordPress themes for affiliate marketing.

Once you’ve chosen a theme, you can see our guide on how to install a WordPress theme.

Another option is to create your own custom theme using SeedProd. It’s the best page builder plugin for WooCommerce and is used by over 100 million websites.

You can use SeedProd to create a completely custom WordPress theme for your store without having to write a single line of code.

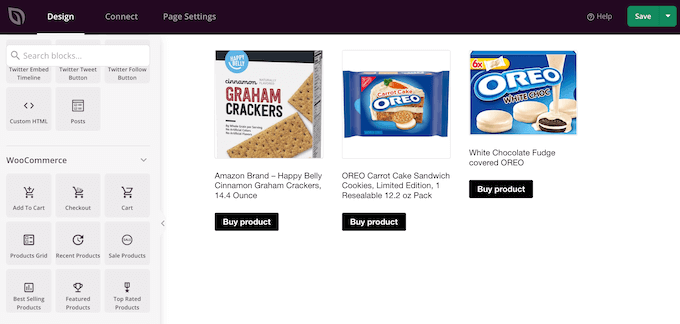
SeedProd even comes with special WooCommerce blocks that you can use to show off your Amazon affiliate products. For example, you can use the Products Grid block to show multiple affiliate products on any page in a nice layout.

SeedProd's WooCommerce blocks

As well as these special WooCommerce blocks, SeedProd also comes with ready-made templates including designs that you can use to create a landing page with WordPress.

For more details, check out our guide on how to create a custom WordPress theme.

You can also add powerful new features to your eCommerce site using plugins.

There are tons of free and premium WooCommerce plugins that you can choose from. To help you find the best plugins for your Amazon affiliate store, check out our expert pick of the best WooCommerce plugins.

Resources to Grow Your Amazon Affiliate Store

Now that you have set up your Amazon affiliate store, it’s time to focus on growing your new affiliate business.

Fortunately, there are many tools, plugins, and resources that can help you get more sales and make money from your Amazon affiliate store.

Let’s start with SEO. As a general rule, the higher your content appears in relevant search engine results, the more visitors you’ll get to your website. This means more potential clicks on your affiliate links.

For a step by step guide on how to fine-tune your Amazon affiliate store for the search engines, please see our WooCommerce SEO guide.

You may also want to install AIOSEO. AIl in One SEO is the best SEO plugin for WordPress and can help you optimize your affiliate site for the search engines.

Once you’re getting more visitors from search engines such as Google, you can check out the best affiliate marketing tools and plugins for WordPress.

By tracking your visitors you can understand what’s working on your Amazon affiliate store, and the areas that you can fine-tune to get more sales.

MonsterInsights is the best Google Analytics plugin for WordPress. It helps you find your best selling Amazon affiliate products as well as products that aren’t doing so well.

You can then make changes to your store based on real data. For more information, see our tutorial on how to track WooCommerce users in WordPress.

Abandoned carts are a huge problem for eCommerce stores. For an affiliate store, this means people will look at the products you’re promoting, but they won’t buy them. In this way, abandoned carts directly affect your affiliate earnings.

To help reduce your cart abandonment rates, we have a detailed guide on how to recover abandoned carts and boost your commissions.

Above all, make sure you continue to add new products to your Amazon affiliate store, post helpful reviews, and use content marketing tools to get more people to visit your website.

FAQs About Running an Amazon Affiliate Store Using WordPress

Since we first published this guide, we have got lots of questions from our readers about how to run a successful Amazon affiliate store using WordPress.

Here are the answers to some of those most frequently asked questions.

1. Can I add products from other affiliate networks?

Yes, you can add products from other affiliate networks to your website. This can be a great way to earn more money, and create a more diverse and robust affiliate business.

2. I live outside the United States, can I join Amazon Affiliate program?

Yes, you can. Currently, the Amazon Associates program is available in over 17 countries. However, every country has its own program and you’ll need to apply separately to each program that you want to join.

3. Do I need to disclose my affiliate partnership?

Yes, you do. Amazon’s program policies and the US laws require you to disclose that you’ll earn a commission when users buy a product.

It is not just limited to Amazon, all websites that use advertising or affiliate marketing to make money need to show a disclaimer. For an example, see our WPBeginner’s disclaimer page.

To meet Amazon’s requirements, you must include a legally compliant disclosure along with your affiliate links, and identify your site as an Amazon associate.

You must also include the following statement on your website:

“As an Amazon Associate I earn from qualifying purchases.”

4. Can I promote Amazon products without creating an affiliate store?

Yes, you can. For example, if you run a blog, then you can add affiliate links to your blog posts. If you do this, then you won’t need to install WooCommerce.

5. What are the Amazon affiliate commission rates?

The amount of commission you get changes depending on the product category. Commission rates can also vary depending on your location.

For a detailed look at the commission rates, you can see the Associates Program Standard Commission Income Statement for your location. For example, the Income Statement for the United States shows that you can expect to earn between 20% and 1% commission depending on the product category.

6. Can I promote Amazon services?

Yes. You’ll typically get a fixed fee every time someone signs up to an Amazon service using your affiliate link. This includes services such as the Prime Video Free Trial.

7. What is the difference between Amazon Associates and Amazon Affiliates?

While they’re very similar, the Amazon Associates program and Amazon Affiliates are two slightly different things.

You become an Amazon Affiliate by signing up to the Amazon Associates program. If you’ve been following along with this guide, then you’re now enrolled in the Amazon Associates program, which makes you an Amazon Affiliate.

8. How much does the Amazon Affiliate program cost?

It’s free to join the Amazon Associates program.

There is no minimum number of sales you need to make before you can start earning commission. However, you will need to refer at least three qualified sales within the first 180 days of becoming an Amazon affiliate.

9. How much does it cost to build an Amazon Affiliate store?

You can start with Bluehost for $2.75 per month and use the free WooCommerce plugin to limit your costs. There are also plenty of free WooCommerce-ready themes that can help you create a professional-looking Amazon affiliate website for minimum cost.

For more information, see our article on how much it costs to build a WordPress website.

We hope this article helped you start an Amazon affiliate store using WordPress. You may also want to see our ultimate step by step WordPress security guide and our expert pick of the best live chat software for small businesses.

If you liked this article, then please subscribe to our YouTube Channel for WordPress video tutorials. You can also find us on Twitter and Facebook.

The post How to Build an Amazon Affiliate Store Using WordPress first appeared on WPBeginner.


August 23, 2022 at 03:14PM