Thursday, September 8, 2022

How to Add an Admin User to the WordPress Database via MySQL

Have you been locked out of your WordPress website?

Sometimes hackers will lock you out of your own website by deleting your admin account from the database.

In this article, we’ll show you how to add an admin user to the WordPress database via MySQL, so you can get your access back.
How to Add an Admin User to the WordPress Database via MySQL

Why Add an Admin User to the WordPress Database via MySQL?

We once ran into an issue where a user’s site was hacked, and their admin account was deleted from the database. This locked them out of their WordPress website without any other entry.

We were able to help them get access to their website by creating a new admin user directly to the WordPress website. We did that using phpMyAdmin, a web-based tool that allows you to manage MySQL databases using your web browser.

If you find yourself locked out of your WordPress admin area due to hackers, or simply because you forgot your password, then you can do the same.

However, you should always make a backup of your database before performing any MySQL edits. Then once you can log back into your website, you may need to follow our beginner’s guide to fixing your hacked WordPress site.

With that being said, let’s take a look at how to add an admin user to the WordPress database via MySQL.

Adding an Admin User to the WordPress Database With phpMyAdmin

PhpMyAdmin comes pre-installed with most top WordPress hosting companies. You can find it under the Databases section of your hosting account’s cPanel dashboard.

Here is a screenshot from the Bluehost control panel:
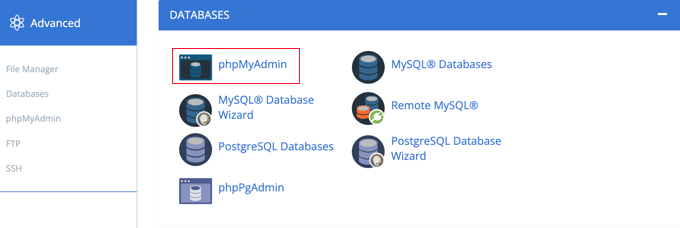
Opening phpMyAdmin from CPanel

Clicking on the icon will open the phpMyAdmin interface. You need to select your WordPress database from the left column.

After, that phpMyAdmin will display all tables in your WordPress database. You will be making changes to the wp_users and wp_usermeta tables.
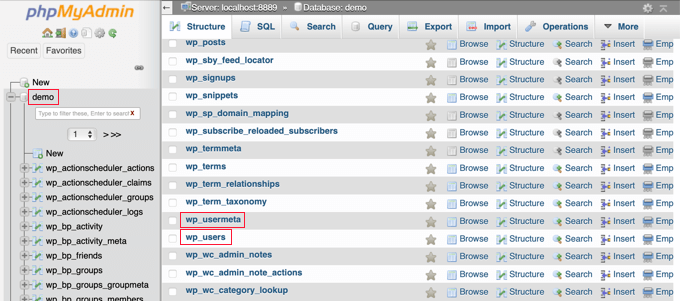
You Will Be Making Changes to the wp_users and wp_usermeta Tables

Adding a User to the wp_users Table

First, you need to find the wp_users table and click it. This will show the users currently listed in the table.

Notice in the screenshot below that there are two user IDs in our demo website’s table, 1 and 2. When we create a new user for our demo site, we’ll give it the ID 3.

You need to click the ‘Insert’ tab at the top of the screen so you can insert the information for a new admin user.
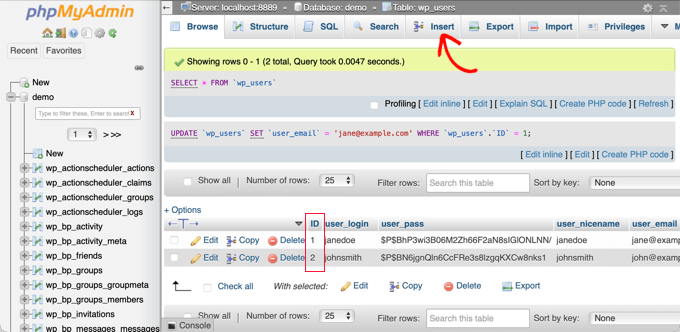
Click the Insert Tab

Add the following information to the fields on the Insert form:

  • ID: pick a unique number (in our example, we’ll use 3)
  • user_login: the username that will be used when logging in
  • user_pass: add a password, and make sure to select MD5 in the function menu (see the screenshot below)
  • user_nicename: the user’s full name or nickname
  • user_email: the user’s email address
  • user_url: your website address
  • user_registered: select the date and time the user was registered using the calendar
  • user_activation_key: leave blank
  • user_status: set this to 0
  • display_name: the user’s full name or display name
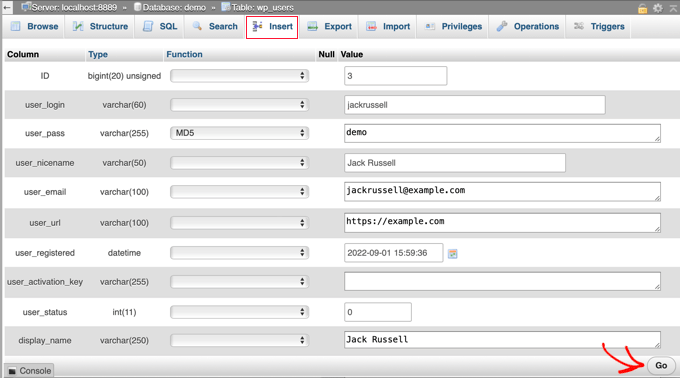
Fill In the Fields for the New User

Once you have finished, make sure you click on the ‘Go’ button to store the new user.

Adding a User to the wp_usermeta Table

Now you need to find the wp_usermeta table and click it. After that, you should click on the ‘Insert’ tab as you did in the previous step.

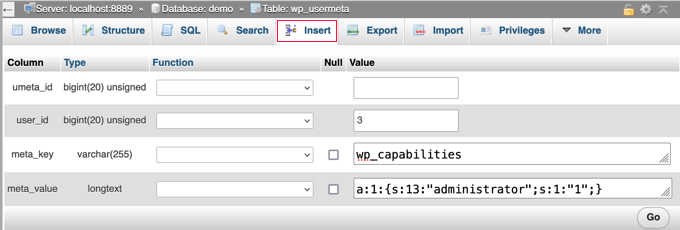
Next, you need to add the following information to the Insert form:

  • unmeta_id: leave this blank (it will be auto-generated)
  • user_id: the user ID you used in the previous step
  • meta_key: this should be wp_capabilities
  • meta_value: insert this: a:1:{s:13:"administrator";s:1:"1";}
Fill In the Fields for the New User

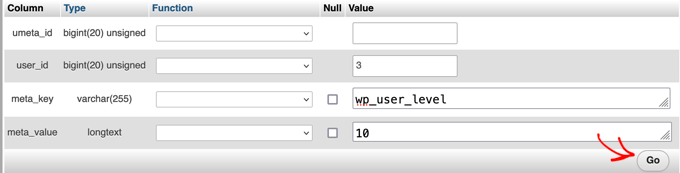
After that, when you scroll down you should find fields for a second row. You need to add the following information:

  • unmeta_id: leave this blank (it will be auto-generated)
  • user_id: the user ID you used in the previous steps
  • meta_key: you need to enter wp_user_level
  • meta_value: 10
Fill In the Fields for the New User

When you have finished entering the information into the fields, you need to click the ‘Go’ button. Congratulations, you have created a new admin username.

Now you should be able to log in to your WordPress admin area using the username and password you specified for this user.

As soon as you log in, you need to navigate to Users » All Users, then click on the username you just created.
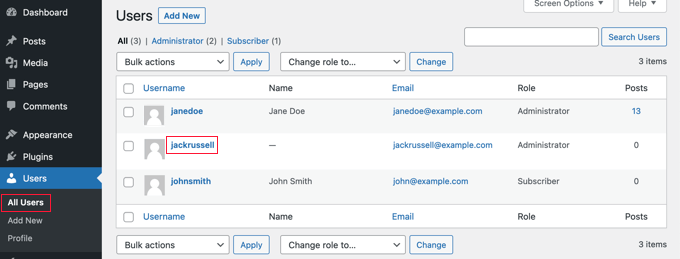
Navigate to Users » All Users and Edit the New User

Now, without changing anything, scroll to the bottom of the page and click the ‘Save’ button.

This will allow WordPress to clean up the user you just created and add some needed information.

Adding an Admin User to the WordPress Database Using a SQL Query

If you are a developer, then you can speed up the process using code.

Simply drop this SQL query into your database:

INSERT INTO `databasename`.`wp_users` (`ID`, `user_login`, `user_pass`, `user_nicename`, `user_email`, `user_url`, `user_registered`, `user_activation_key`, `user_status`, `display_name`) VALUES ('3', 'demo', MD5('demo'), 'Your Name', 'test@example.com', 'http://www.example.com/', '2022-09-01 00:00:00', '', '0', 'Your Name');
 
 
INSERT INTO `databasename`.`wp_usermeta` (`umeta_id`, `user_id`, `meta_key`, `meta_value`) VALUES (NULL, '3', 'wp_capabilities', 'a:1:{s:13:"administrator";s:1:"1";}');
 
 
INSERT INTO `databasename`.`wp_usermeta` (`umeta_id`, `user_id`, `meta_key`, `meta_value`) VALUES (NULL, '3', 'wp_user_level', '10');

Make sure you change ‘databasename’ to the database you are working with. Also, don’t forget to change the other values to those you want for the new user, as we explained in the first method.
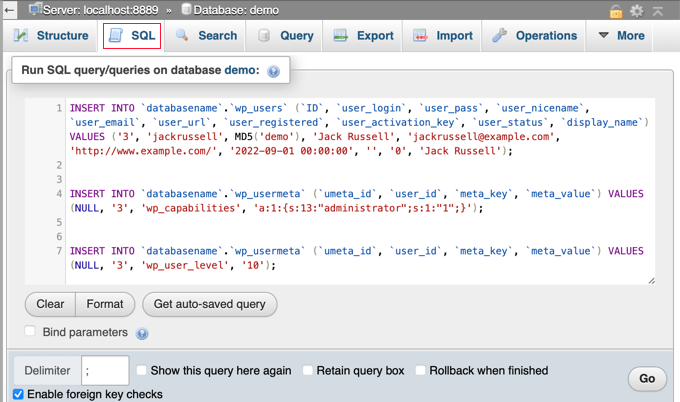
Drop This SQL Query Into Your Database

We hope this tutorial helped you learn how to add an admin user to the WordPress database via MySQL. You may also want to see our ultimate WordPress security guide, or check out our list of common WordPress errors and how to fix them.

If you liked this article, then please subscribe to our YouTube Channel for WordPress video tutorials. You can also find us on Twitter and Facebook.

The post How to Add an Admin User to the WordPress Database via MySQL first appeared on WPBeginner.


September 08, 2022 at 02:12PM
Wednesday, September 7, 2022

How to Properly Use the More Block in WordPress

Do you want to use the More block on your WordPress website?

WordPress gives you several different ways to show a preview of your posts on the archive and homepage. This can help catch the visitor’s attention and get them to read the full post.

In this article, we will show you how you can properly use the More block in WordPress. We’ll also show you how to create an excerpt, just in case you’re using a theme that ignores the More block.

How to properly use the More block in WordPress

When to Use the More Block in WordPress

Many websites use post previews to encourage visitors to check out the full version.

As a WordPress user, you can create post previews in a few different ways. For example, you might use a WordPress accordion plugin or show and hide content using the toggle effect.

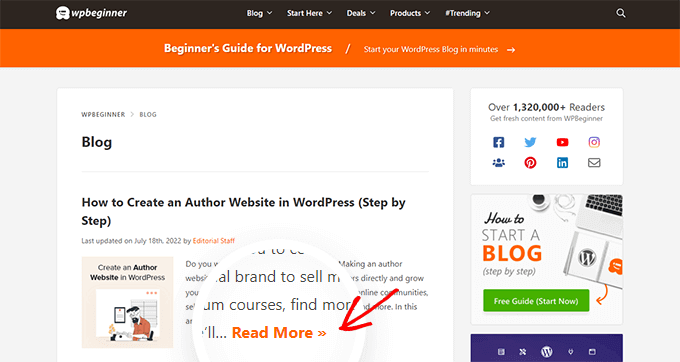
By default, most modern WordPress themes automatically show a preview of your posts on the homepage and blog archives instead of the full post. For example, on our blog page we show a few words and then a ‘Read More’ link to see the full blog post.

A WordPress blog archive with Read More buttons

This preview text helps visitors to see more of what topics are available on your blog without having to scroll through every post. It also helps to increase pageviews since your visitors will have to click through to finish reading a post.

You can control exactly what WordPress shows in these previews by using either the More block or an excerpt.

The best choice for your site will vary depending on your WordPress theme. Some themes will ignore any More blocks you create, so you’ll need to use an excerpt instead.

To help you show an engaging preview no matter what theme you’re using, we’ll be covering both More blocks and excerpts.

If you prefer to jump straight to a particular method then you can use the links below.

How to Properly Use the More Block in WordPress

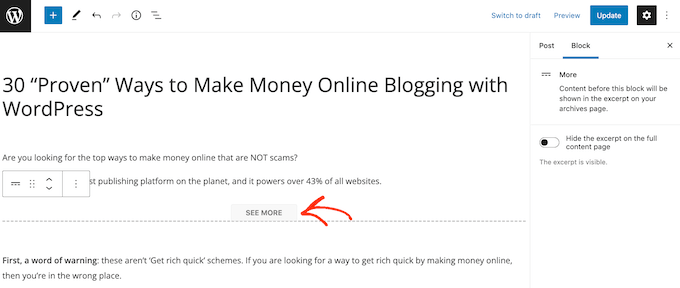
The WordPress block editor has a built-in More block that allows you to specify the exact cut off point for the preview text of any WordPress post. In the classic editor, it was previously known as the More tag.

You can add the More block anywhere in the post, including mid sentence or in the middle of a paragraph.

All of the content above the More block will appear on your blog archive pages and wherever else your posts are listed on your WordPress site. WordPress will also add a ‘Read More’ link to the preview, so visitors can click to read the full version of the post.

The WordPress More block

Note: Every WordPress theme is different and some may override the default ‘Read More’ label. With that in mind, you may see different text on your ‘Read More’ button.

Before you add a More block to your post, it’s important to check that your site is set up to show the latest posts on the homepage. If you are using a static page as your custom homepage, then your theme may ignore the More blocks and use its own settings instead.

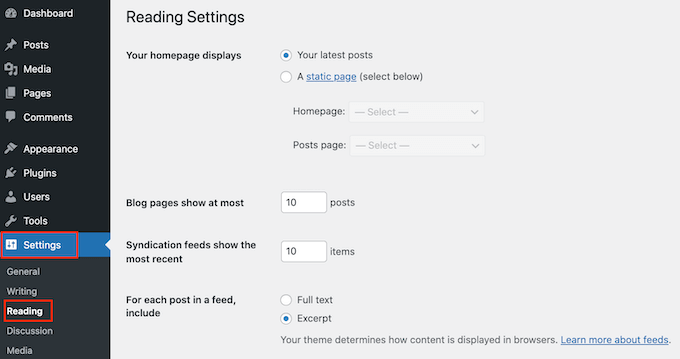
Not sure if you’re using a static front page as your homepage? To check, simply go to Settings » Reading in the WordPress dashboard.

The WordPress Settings page

At the top of this screen, you’ll see a ‘Your homepage displays’ section. If ‘Your latest posts’ is selected, then you should have no problems using the More block.

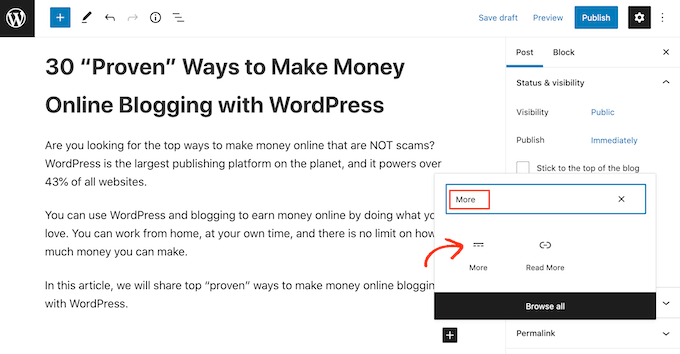
To get started, simply open the post where you want to add a More block. Then, find the spot where you want to create the cut off point for your preview, and click on the + icon to add a new block.

You can then type in ‘More’ and select the right block to add it to your page.

The WordPress More block, formerly the More tag

Some themes have a limit on how many words they will show on their homepage and archive pages. There’s a chance your theme may override the More block if you try to include a very large number of words in your preview. With that in mind, it’s a good idea to create the cut off point early in the post.

You can now carry on writing the rest of your post as normal.

You’ll be able to see the More block when editing your post in the block editor, but your visitors won’t see it when they’re reading the post on your WordPress blog.

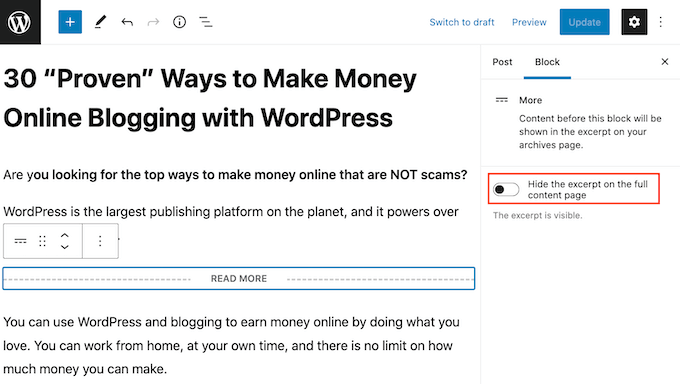
Just like any other block, WordPress has some settings that you can use to configure the More block. To see these settings, simply click to select your More block.

In the right-hand menu, you can now choose whether to hide or show the excerpt on the full content page, which is the page you’re currently looking at.

By default, all of the content above the More block will appear on the full content page, as you can see in the following image.

Customizing the WordPress More block

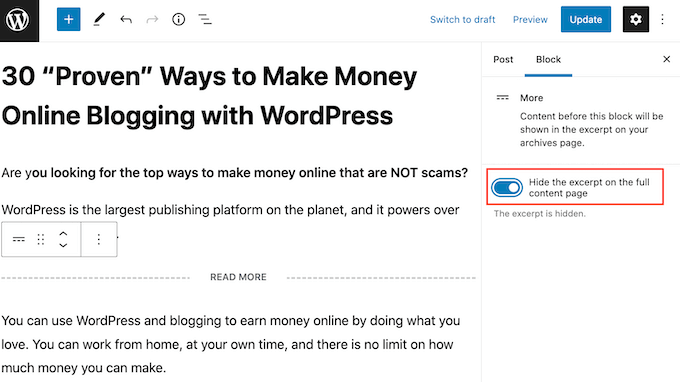
However, you may want to write a custom excerpt that will only appear on your homepage and archive page, and not in the full post itself.

To do this, simply click the ‘Hide the excerpt….’ slider to turn it from white to blue.

Hide the WordPress More block content

Now, everything above the More block will appear on the archive page and homepage only.

Once you’re finished, you can go ahead and save your changes by clicking on the Update or Publish button.

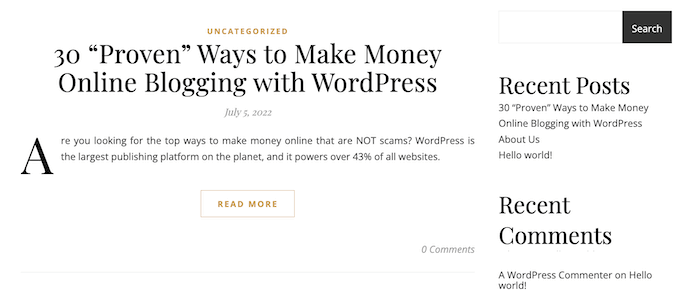
Now if you visit your homepage or blog archive page, you’ll see the preview you just created for this post.

Are you seeing something different?

Then your WordPress theme may be ignoring your More blocks.

Some themes are designed to show excerpts and will override all of your More blocks. If your homepage and blog archives aren’t showing the preview you created using the More block, then you may need to use excerpts instead.

How to Change the More Block’s ‘Read More’ text

By default, the More block will show a Read More link on your archive and homepage.

There are a few different ways to change this text, but you may get slightly different results depending on your WordPress theme. Some themes will override your changes with their own default settings.

To start, it’s worth checking whether you can change the Read More text using the WordPress post editor.

To do this, simply open any post that has a More block. You can then click on the default ‘READ MORE’ text and type in the text that you want to use instead.

Changing the text on the Read More label

After that, either update or publish the page as normal. You can then visit your homepage or blog archive to see whether the Read More text has changed.

If you’re still seeing the original Read More link, then you may need to override your theme’s settings using code.

You can either create a site-specific plugin or use a code snippets plugin like WPCode, and then add the following code to your site:

function modify_read_more_link() {
    return '<a class="more-link" href="' . get_permalink() . '">Check out the full post</a>';
}
add_filter( 'the_content_more_link', 'modify_read_more_link', 999 );

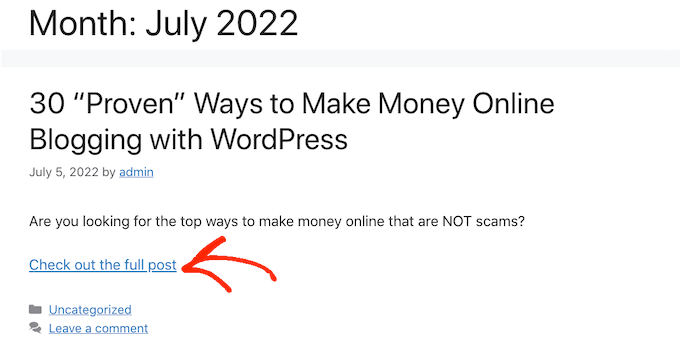
This replaces the default ‘Read More’ text with ‘Check out the full post,’ as you can see in the following image.

You can use any text you want by replacing ‘Check out the full post’ in the code snippet.

An example of a More block with custom text

How to Properly Use Excerpts in WordPress

WordPress has two different ways to show a post preview. We’ve already covered the More block, but you can also create a preview using excerpts.

For the people who visit your WordPress blog or website, previews created using excerpts and the More block look exactly the same. However, some themes are coded to use excerpts, which means they will ignore your More blocks and show an excerpt instead.

If you don’t add an excerpt to a post manually, then WordPress will create one automatically based on the excerpt length defined by your theme. This can lead to previews that cut off mid sentence.

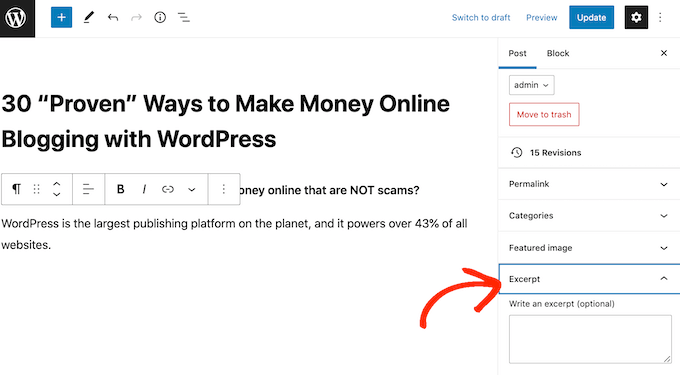
With that in mind, you can choose to create an excerpt manually instead. To do this, simply open a post and then click to expand the ‘Excerpt’ section in the right-hand menu.

Adding an excerpt to a WordPress post

In the ‘Write an excerpt box’ you can then either type in or paste the excerpt that you want to use for the post.

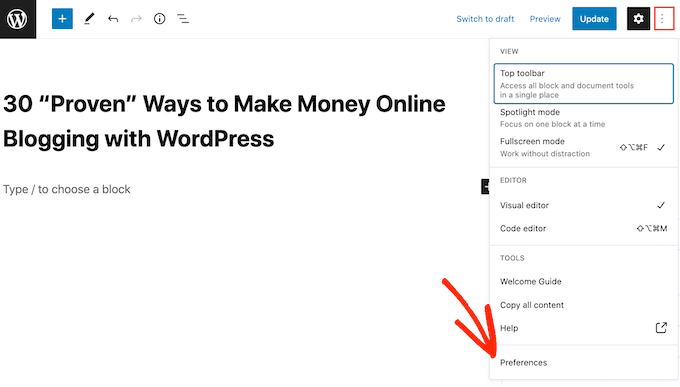
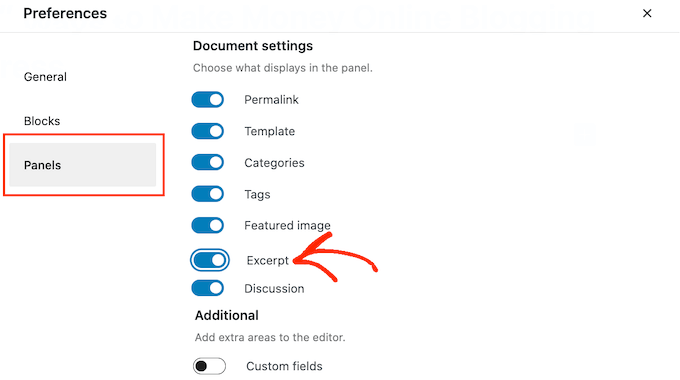
Don’t see an ‘Excerpt’ box in the right-hand menu? Then you can enable this setting by clicking on the three-dotted icon in the upper-right corner.

Once you’ve done that, click on Preferences.

Enabling the WordPress excerpt settings

In the popup that appears, simply click on ‘Panels.’

You’ll now see all the settings that you can add to the right-hand menu. Simply find ‘Excerpt’ and give it a click to turn it from white (disabled) to blue (enabled).

Activating the WordPress excerpts feature

Then, simply close this popup. You should now have access to the ‘Excerpt’ settings in your right-hand menu.

Now, you can create an excerpt following the same process described above.

Once you’ve done that, simply save your changes and visit your site. You will now see your custom excerpt on the homepage and blog archive.

We hope this article helped you learn how to properly use the More tag in WordPress. You may also want to check out our ultimate SEO guide for beginners and the best WordPress landing page plugins.

If you liked this article, then please subscribe to our YouTube Channel for WordPress video tutorials. You can also find us on Twitter and Facebook.

The post How to Properly Use the More Block in WordPress first appeared on WPBeginner.


September 08, 2022

Should I Update WordPress or Plugins First? (Proper Update Order)

Not sure about whether to update WordPress core, or your plugins first?

Often beginners don’t install updates because they are afraid of breaking their site. Updating your WordPress site in the correct order will help you prevent common errors and troubleshoot more easily.

In this article, we’ll show you the proper order for updating WordPress core, plugins, and themes.

Should You Update WordPress or Plugins First? Proper Update Order

Why Keep WordPress Up to Date?

It’s important to always use the latest version of WordPress. This will make sure your website has the latest security patches, newest features, and the best speed and performance.

Unfortunately, on rare occasions, updating WordPress or a plugin can break your website. This can happen if there’s a bug in the code or if the update introduces some kind of conflict with a theme or plugin.

That’s why we always recommend that you create a complete WordPress backup before performing any updates. You can also create a staging site where you can test the updates and catch any errors without risking your live website.

It’s also helpful to use the proper WordPress update order. You may be wondering whether it’s best to update WordPress core or your plugins first.

Our expert team recommends updating WordPress in this order:

  1. First, update WordPress core
  2. Then update your plugins
  3. Finally, update your theme last

Let’s take a look at the best order to update your WordPress website.

Before You Start, Make a Complete WordPress Backup

Before you update anything, it’s important to perform a full backup of your WordPress website. You should store the backup on your computer or in cloud storage, not just on your hosting server.

That’s because there is always some risk that an update may break your site, no matter how careful you are or which order you perform the updates.

A complete WordPress backup includes everything:

  • Your WordPress database
  • All your images and media uploads
  • Your WordPress plugins and themes
  • Core WordPress files

UpdraftPlus is the best WordPress backup plugin and is used by more than 3 million websites. You can use it to create a complete backup of your WordPress site and store it on the cloud or download it to your computer.

Back Up Your Website With UpdraftPlus

You can learn the best way to use UpdraftPlus to back up your website step by step by visiting our guide on how to back up and restore your WordPress site.

First, Update WordPress Core

If a new version of WordPress core is available, then you should update that first. This follows the update order as it is listed on the Dashboard » Updates page and helps minimize the risk to your site.

Because plugin and theme updates are tested to work with the latest WordPress version, you are less likely to have conflicts by updating your plugins and themes after the latest version of WordPress is installed.

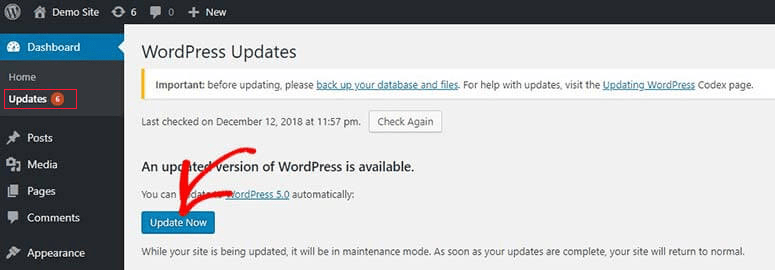
The simplest way to update WordPress core is to navigate to the Dashboard » Updates page and then click the ‘Update Now’ button.

Updating WordPress Core From the Dashboard

When you press ‘Update Now,’ WordPress will automatically put your site in maintenance mode, then fetch the latest version of the software and install it for you. You will see the update progress on your screen.

Advanced users can also update WordPress manually by downloading the latest version from the WordPress download page, and then logging into their WordPress hosting account and using FTP to upload the new WordPress files.

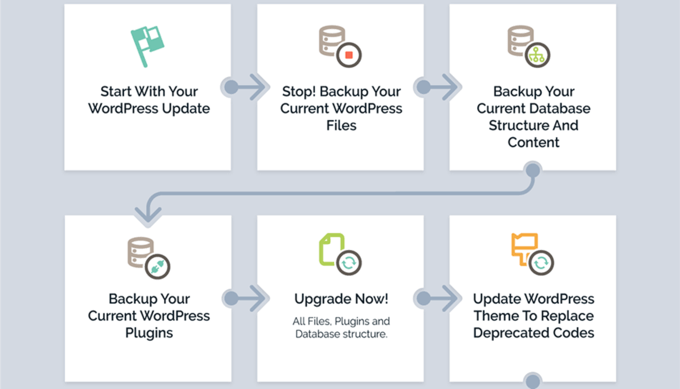
To learn how to update WordPress core using either of these methods, see our beginner’s guide and infographic on how to safely update WordPress.

WordPress Update Flowchart

Troubleshooting a WordPress Core Update

Before you move on to update your plugins, you should first make sure that there are no problems with your website now that it is running the latest version of WordPress.

Simply visit your website in a new browser window to see if anything isn’t working or looks out of place. You should also review the settings in your WordPress admin area.

If you come across any issues, then take a look at our list of common WordPress errors and how to fix them.

If the problem you are facing is not listed there, then you should follow the steps in our WordPress troubleshooting guide to figure out the problem and apply a solution.

After That, Update Your Plugins

Once you have upgraded WordPress on your website, then you can update your plugins.

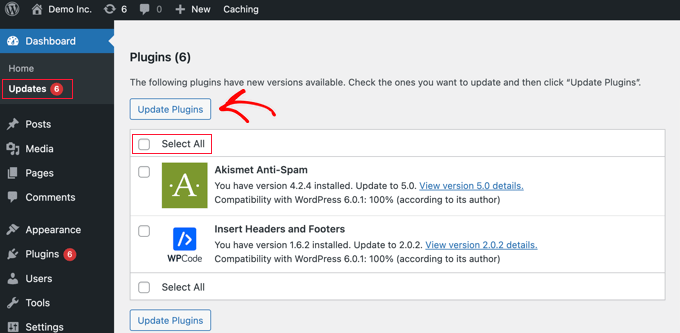
An easy way to do that is to scroll further down the Dashboard » Updates page to the ‘Plugins’ section.

Simply select the specific plugins you wish to update and click the ‘Update Plugins’ button. You can select all of the plugins listed by checking the ‘Select All’ box at the top of the list.

Updating WordPress Plugins From the Updates Page

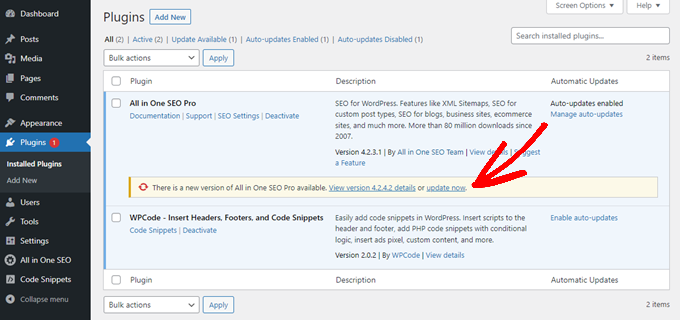
You may also notice a red number beside Plugins in the admin dashboard. Clicking inside will show you a yellow notice under each plugin that needs to be updated.

Then, all you have to do is click the ‘Update now’ link under any plugin you want to update without having to leave the page.

How to update plugins in WordPress

For more detailed information, see our step-by-step guide on how to properly update WordPress plugins.

Troubleshooting a Plugin Update

As you did after updating WordPress core, you should visit your website in a new browser window to see if you encounter any error messages or other problems.

You may sometimes discover that one of your plugins is not compatible with the latest WordPress version.

When that happens, you should follow the steps in our WordPress troubleshooting guide to see if you can find a solution to the problem.

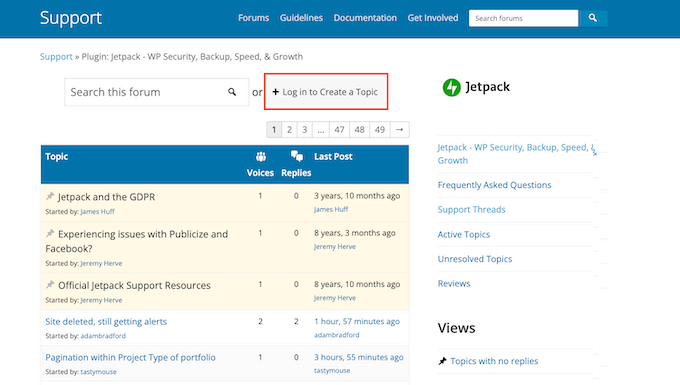
If you can’t, then reach out to the developer and see if they plan to release an update. If the plugin is from the WordPress Plugin Directory, then you can contact the developer using the site’s support forum. Otherwise, check the official website for support information.

How to get WordPress support in the official support forums

If no further development is planned, then you will need to look for a different plugin that performs the same task. You might like to take a look at our beginner’s guide on how to choose the best WordPress plugin.

If you’re not ready to move on to a different plugin, or if there are other issues with the update that you can’t resolve, then you may need to restore your WordPress site from the backup you made before you began the update process.

Alternatively, you can roll back WordPress to the previous version.

Finally, Update Your Theme

After you have updated WordPress core and your plugins, and you have checked that your website is working, you can update your theme, if an update is available.

However, when you update a theme, you will overwrite the existing theme files with new ones and lose any changes you made. If you added any code to your theme, then you should carefully check our guide on how to update a WordPress theme without losing customization.

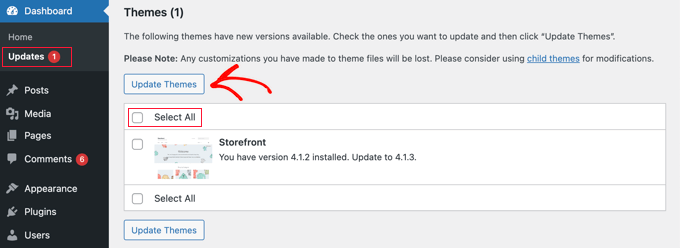
Once you are ready to update your theme, you can simply scroll to the ‘Themes’ section at the bottom of the Dashboard » Updates page.

Once there, you can select the themes you want to update, then click the ‘Update Themes’ button. The ‘Select All’ checkbox will automatically select all available theme updates.

Updating Themes From the Dashboard » Updates Page

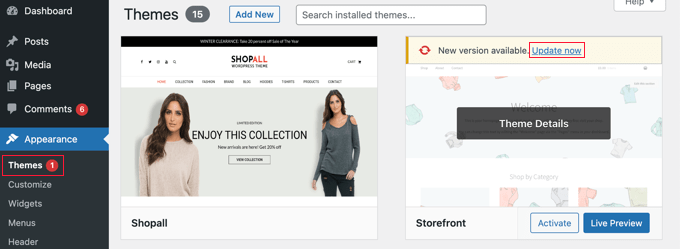
Alternatively, you can navigate to Appearance » Themes in your admin area. If any updates are available, you will notice a red number next to ‘Themes’ in the admin sidebar.

Updating Themes From the Appearance » Themes Page

Simply click the ‘Update now’ link above any theme you wish to update.

Troubleshooting Your Theme Update

Troubleshooting a theme update is similar to troubleshooting a plugin update. You should start by visiting your website in a new browser window to see if there are error messages or other problems.

If there are, you can follow our WordPress troubleshooting guide to find a solution, or reach out to the developer for help.

If the theme is from the WordPress Theme Directory, then you can contact the developer using the support forum for that theme. Otherwise, check the official website for support information.

What Is the Proper WordPress Update Order?

In conclusion, let’s summarize the proper order to update your WordPress website:

  • First, you should back up your website
  • Then, update the core WordPress files
  • Next, update your plugins
  • Finally, update your theme

Always make sure your website is working properly before moving on to the next step.

Of course, if there is no update for WordPress core, then you can update your plugins or theme whenever new versions become available.

We hope this tutorial helped you learn the correct order to use when updating WordPress core and plugins. You may also want to learn how to properly install Google analytics in WordPress, or check out our list of must-have WordPress plugins to grow your site.

If you liked this article, then please subscribe to our YouTube Channel for WordPress video tutorials. You can also find us on Twitter and Facebook.

The post Should I Update WordPress or Plugins First? (Proper Update Order) first appeared on WPBeginner.


September 07, 2022 at 04:01PM