Tuesday, September 13, 2022

How to Allow Users to Invite Their Friends to Register in WordPress

Would you like for users to invite their friends to become members of your WordPress site?

People trust recommendations from people they know. That makes personal invitations a great way to increase the number of registered users of your social network or membership site.

In this article, we will show you how to allow your users to invite their friends to register in WordPress.

How to Allow Users to Invite Their Friends to Register in WordPress

Why Allow Users to Invite Their Friends?

If you are looking for an easy and cost-effective way to add new users to your membership site or WordPress social network, then allowing your existing users to invite their friends is one of the most effective strategy.

This kind of word-of-mouth advertising works really well because it uses social proof, so it’s very common on almost all popular registration sites.

For example, Twitter users can invite their followers to join a community, and on Facebook, they can invite friends to join a group.
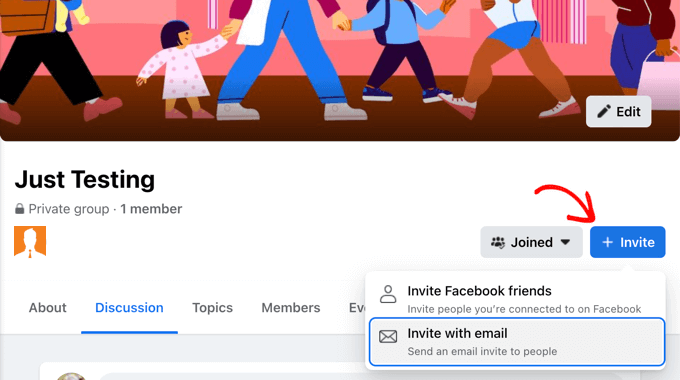
Facebook Allows Users to Invite Friends to a Group

If you make money from your website, such as offering paid memberships or selling products in an online store, then you can also pay your users to promote your website by creating a referral or affiliate program.

With that being said, let’s take a look at how to allow your users to invite their friends to register in WordPress.

This is what we’ll cover in this article:

Method 1: Adding a Simple Invitation Form to Any WordPress Site

The easiest way to allow your users to invite their friends to your website is to add a simple invitation form to your sidebar. However, this method will not allow you to track which invitations were responded to.

What if you need to track invitations? If you have a BuddyPress site, then you should follow Method 2 below. If you have an online store or membership site, then we recommend you create a referral or affiliate program instead.

For the simple invitation form, we’ll use WPForms Lite because it’s free and easy to use. However, the premium version of WPForms will store all form entries in your WordPress dashboard after they are submitted. This will let you more easily see how many invitations have been sent and who they were sent to.

The first thing you need to do is install the Contact Forms by WPForms plugin. For more details, see our step by step guide on how to install a WordPress plugin.

Creating the Invitation Form

Once the plugin is activated, you can create your invitation form by navigating to the WPForms » Add New page. Here you can give your form a name, and then click the ‘Create Blank Form’ button.
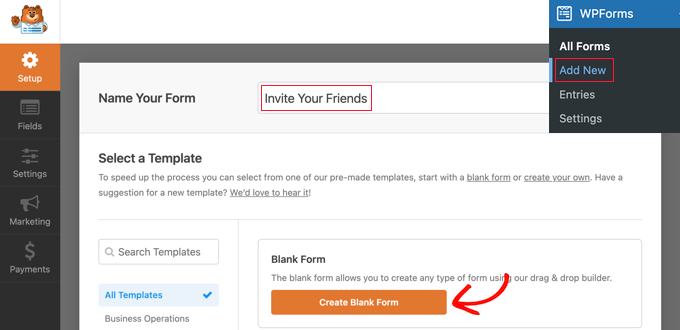
Add a New Blank Form in WPForms

This will open the WPForms drag and drop form builder. You will see a preview of the form on the right, and this is currently blank. You’ll also see a list of form fields on the left.

You need to locate the Email form field and drag it onto the form.
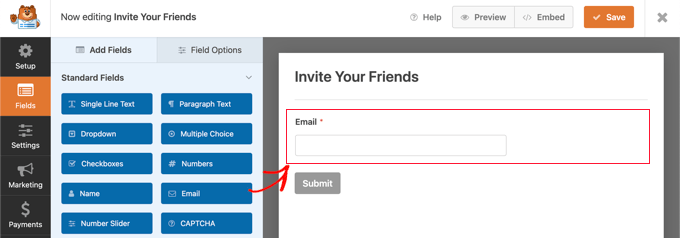
Drag an Email Field Onto the Blank Form

Next, you need to configure the Email field.

When you click on the field, its settings will be displayed on the left.
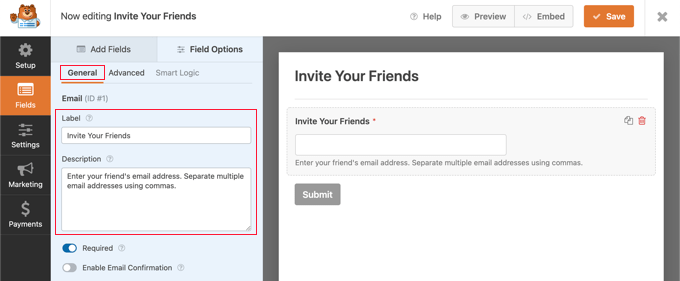
Configure the Email Field

Here you should change the label to ‘Invite Your Friends.’ After that, you can add a description that will be displayed under the field. This should let your users know what to enter, such as, ‘Enter your friend’s email address. Separate multiple email addresses using commas.’

Now you can configure the field so that it’s displayed across the full width of the sidebar. Simply click on the Advanced tab and then select ‘Large’ from the Field Size dropdown menu.
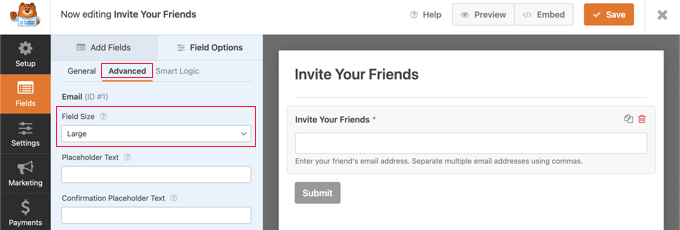
Make the Field Size Large

You’ll find more settings by navigating to Settings » General. For example, you can also change the label on the button to something more helpful.

In the Submit Button Text field, simply type ‘Send Invitation.’
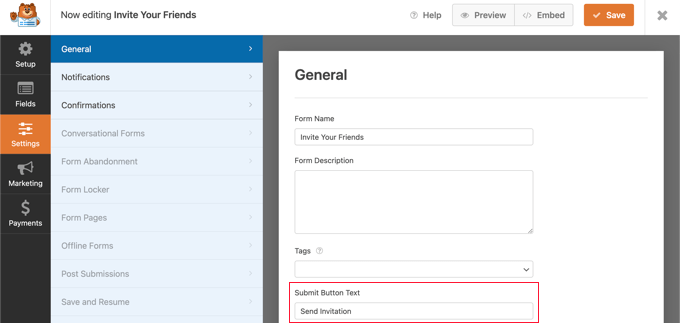
Rename the Button Text

Composing the Invitation Email

Next, you’ll need to head over to Settings » Notifications and set up the invitation email. This will be a confirmation email sent after form submission.

You can use smart tags to automatically fill in the details of the user filling in the form as well as the information they submitted on the form. You’ll find a complete list of smart tags on the WPForms website.

In the ‘Send To Email Address’ field, you need to enter the email address that was submitted in the form. When you click the ‘Show Smart Tags’ link, a list of available fields will be displayed. Simply click on the ‘Invite Your Friends’ field.
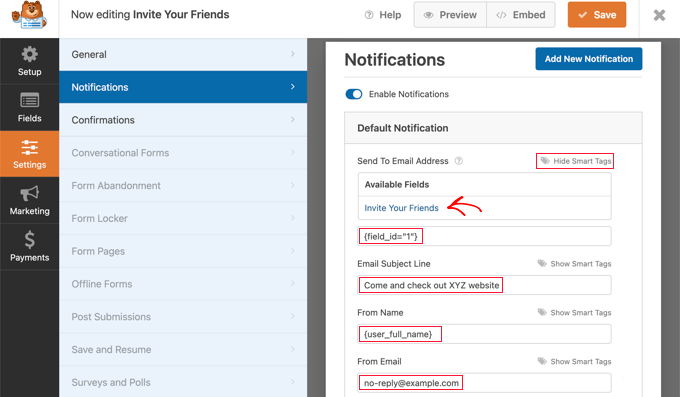
Fill in the Email Settings

You should type in the email subject line you wish to use. After that, you can enter the user’s full name in the ‘From Name’ field by entering the smart tag {user_full_name}.

It’s important that you choose the correct ‘From Email’, or your invitations may be sent to the spam folder. Make sure that

the domain name used in the email address matches your WordPress blog.

For example, if your website’s URL is www.example.com, then the email address should look like john@example.com.

That means you shouldn’t enter the user’s email address in the ‘From Email’ field. Instead, you can use

{admin_email}, which is the default setting. Alternatively, if you are concerned about your admin email receiving spam, then you can use an email address that doesn’t exist, such as no-reply@example.com.

Next, you should scroll down to the ‘Reply-To Email Address.’ Here you can enter the user’s email address using the smart tag

{user_email}. Then, if the person who was invited replies to the email, it will be sent to the user who invited them.
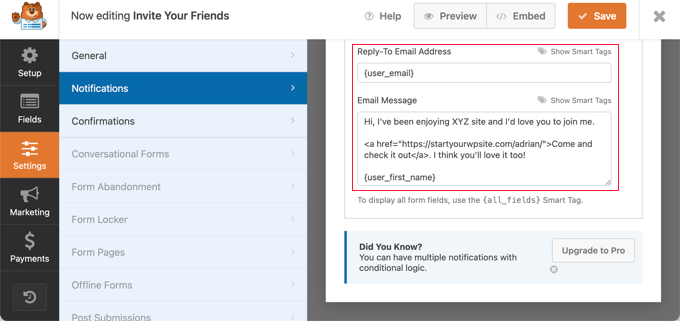
Compose Your Invitation Email Using HTML and Smart Fields

Finally, you need to compose the invitation message you wish to send in the ‘Email Message’ field. We recommend you keep it short and casual. You can use smart tags in the message, such as ending the email with the user’s name by entering {user_first_name}.

You will need to add a link to your website. This link could take the invited person to your home page or a user registration page.

Better still, you can link to a landing page that clearly explains the features and benefits of your website.

Creating a Confirmation Message for Form Submission

Now you should navigate to Settings » Confirmations. Here you can compose a brief message that’s displayed to the user after they invite their friends.

You should leave the Confirmation Type as ‘Message’ and then type a brief thank you message in the Confirmation Message field.
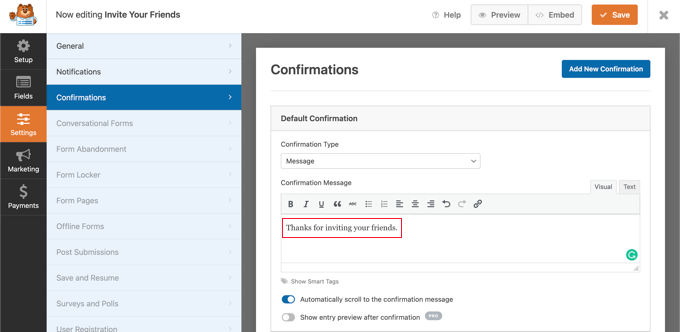
Create a Confirmation Message for Form Submission

Now that you have finished the setup of your invitation form, make sure you click the orange Save button at the top of the screen to store the settings. Once you’ve done that, you can click the ‘X’ button to close the WPForms editor.

Adding the Invitation Form to Your WordPress Site

All you need to do now is add the form to your website’s sidebar or another widget-ready area. You’ll need to head over to the Appearance » Widgets page in the WordPress admin area.
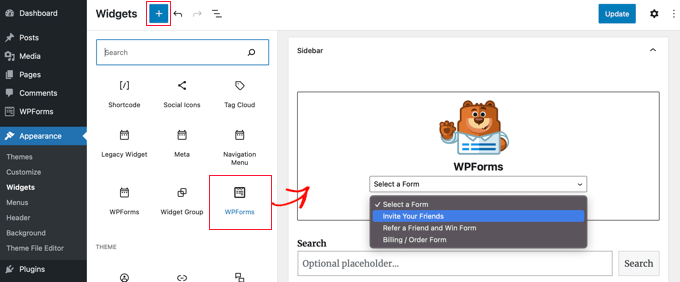
Add the Invitation Form to Your Sidebar

Once there, you should locate the WPForms block and drag it onto your sidebar. For more details, see our guide on how to add and use widgets in WordPress.

After that, you need to select the ‘Invite Your Friends’ form from the Select a Form dropdown. Don’t forget to click the Update button to store your settings.

Now you can visit your website to see the simple invitation form in action.
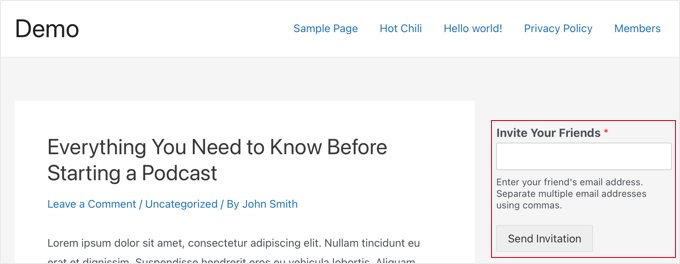
Invitation Form Preview

When a user sends an invitation using the form, the thank you confirmation message is displayed in place of the form.
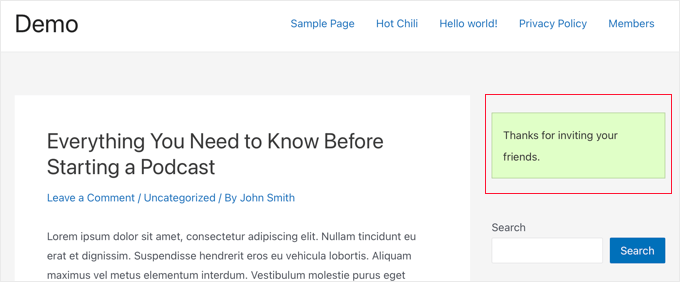
Confirmation Message Preview
Note: If the invitation emails are not received, then see our guide on how to fix WordPress not sending email.

Method 2: Allowing Users to Invite Friends to Your BuddyPress Site

BuddyPress is a sister project of WordPress.org that turns your WordPress site into a social network, allowing you to build your own online community.

It allows you and your users to create groups, and each group can have its own members and activity streams. Users can join these groups and invite others, but only if they are already members of your site.

If you use BuddyPress and want to let your users send invitations to their friends who haven’t yet signed up, then you’ll need to install the Invite Anyone plugin. For more details, see our step-by-step guide on how to install a WordPress plugin.

Upon activation, you should navigate to Settings » Invite Anyone to configure the plugin. On the ‘General Settings’ tab, you can customize the email message that is sent when someone is invited to register on your site.
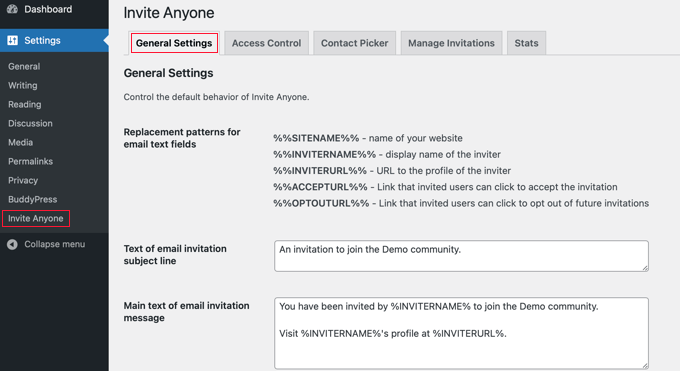
Invite Anyone Plugin General Settings

There are plenty of customization options for the email subject, body, and footer. You can also allow your users to customize the email before it is sent, limit the number of emails that can be sent at one time, and more.

If you like, you can also place limits on who can send invitations to your site. For example, you may not want new users to be able to invite their friends right away. This will discourage spammers who want to set up fake accounts.

To set up these limits, you need to click the ‘Access Control’ tab at the top of the page, and then select the ‘A limited set of users’ option.
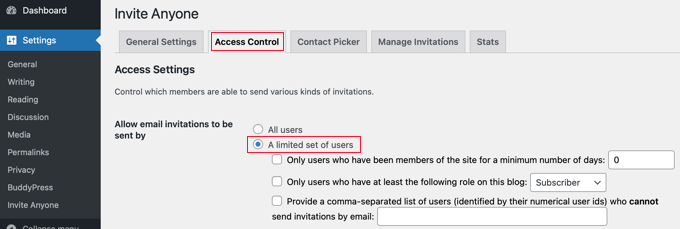
Invite Anyone Plugin Access Control

Now you will see three checkboxes that let you decide which users can send invitations.

You can limit invitations to users who have been members of your site for a minimum number of days, or to those who have a certain member role. You can also ban specific users from being able to send invitations by typing a list of user IDs separated by commas.

Once you are happy with these settings, you will need to scroll to the bottom of the page and click the ‘Save Changes’ button to store your settings.

Now your users will be able to send invitations to their friends, directly from their own profile page just by clicking the ‘Send Invites’ tab.

Users Can Invite Their Friends From Their Profile Page

After that, they simply type up to five email addresses in the first text box, and if you allow them, they can customize the email message that will be sent.

If the user belongs to any BuddyPress groups, then they can also check any groups they think their friends might be interested in once they join your site.
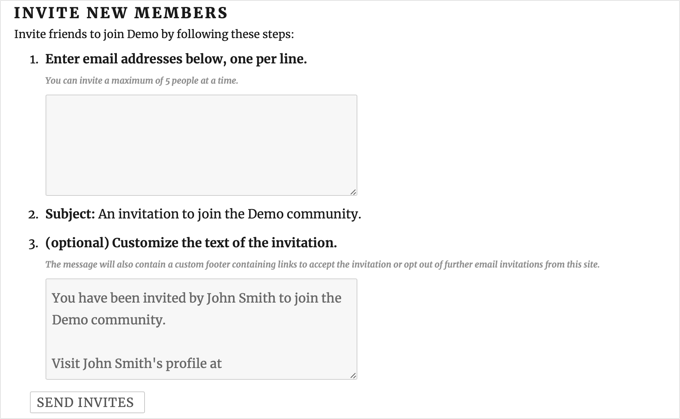
The Invite New Members Page

Finally, your users need to click the ‘Send Invites’ button at the bottom of the page. After that, the plugin will send the invitations to their friends to register on your website.

Note: If your website is having trouble sending emails from your website, then see our guide on how to fix WordPress not sending email issue.

Once the invitations are sent, the user can see the status of all of their sent invitations.
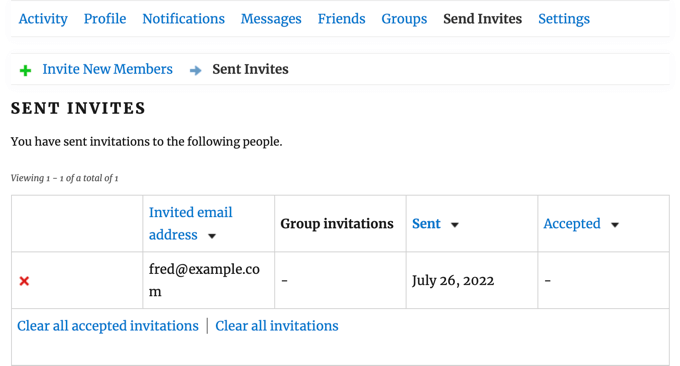
Users See a List of Invites They Have Sent

They can clear individual invitations from the list by clicking the red ‘X’ button. They can also clear accepted invitations or all invitations by clicking the links at the bottom of the list. These actions will not cancel the invitations, but simply clear them from the list.

As the site administrator, you can keep track of invitations sent by all users by navigating to the BuddyPress Invitations » BuddyPress Invitations page in your WordPress admin area.
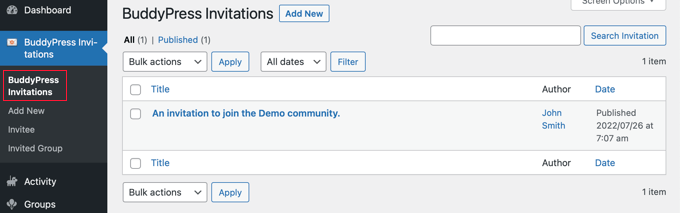
You Can See a List of Invitations Sent by All Users

Other Ways to Grow Your Registered Users

Now that your users can invite their friends, let’s have a look at some other ways you can encourage more users to visit your website and sign up.

Luckily, using WordPress gives you access to incredibly powerful tools to grow your business.

  1. OptinMonster is the best lead generation and conversion optimization tool on the market. It allows you to easily increase your email subscribers, create mobile popups, and make a high converting sales funnel.
  2. All in One SEO is the best WordPress SEO plugin. It allows you to optimize your content for search engines without any technical skills.
  3. SeedProd is the best WordPress page builder and theme builder plugin. It lets you easily create a beautiful landing page or custom theme.
  4. WPForms is the best WordPress form builder on the market. Besides creating an invitation form, you can use it to add a custom login page and sign-up form to your site.
  5. MonsterInsights allows you to easily track your website performance using Google Analytics. It shows beginner friendly reports so you can track website visitors and set up eCommerce tracking.

Need more recommendations? See our list of must have WordPress plugins for all websites.

We hope this tutorial helped you learn how to allow users to invite their friends to register on your WordPress website. You may also want to learn how to create an email newsletter the right way, or check out our list of the best GoDaddy alternatives.

If you liked this article, then please subscribe to our YouTube Channel for WordPress video tutorials. You can also find us on Twitter and Facebook.

The post How to Allow Users to Invite Their Friends to Register in WordPress first appeared on WPBeginner.


September 13, 2022 at 04:07PM

Monday, September 12, 2022

How to Disable Google Fonts on Your WordPress Website

Are you looking to disable Google Fonts in WordPress?

Loading too many third-party fonts can slow down your website. Visitors with a slow internet connection will have a better user experience if you use just a few system fonts. Plus, using Google Fonts can potentially make your site GDPR non-compliant, and no one wants that.

In this article, we’ll show you how to disable Google Fonts on your WordPress website.

How to Disable Google Fonts on Your WordPress Website

Why Disable Google Fonts on Your WordPress Website?

The typography you choose for your WordPress website plays an important role in its design and brand identity. That’s why many website owners customize their typography by using Google Fonts.

However, loading too many fonts will have a negative impact on WordPress performance. That’s why we recommend you choose just two fonts and use them across your website.

Alternatively, you can disable Google Fonts entirely and simply use the system fonts that come with user’s computer. They look great and load much faster, especially for users with a slow connection.

That’s why we decided to disable Google Fonts when we redesigned the WPBeginner website. We wanted to make it easy for everyone to learn WordPress and grow their online presence, even if your internet connection isn’t the best.

Disabling Google Fonts may not be the right decision for all business websites or blogs. However, if you have visitors from areas with poor internet quality, then this is one way you can provide a better user experience.

Also, there are privacy issues with Google Fonts that may make your website non-compliant with laws like GDPR. Disabling Google Fonts lowers the risk your site will be caught in violation of any international privacy laws.

With that being said, let’s take a look at how to disable Google Fonts in WordPress.

Disabling Google Fonts in WordPress With a Plugin

The first thing you need to do is install and activate the Disable and Remove Google Fonts plugin. For more details, see our step-by-step guide on how to install a WordPress plugin.

Upon activation, the plugin will automatically disable all Google Fonts used by your theme and plugins. It doesn’t need to be configured.

Now WordPress will automatically use a default font in place of any Google Fonts that were being used. You should carefully check your website to make sure you are happy with the fonts that are now being used.

If you would like to choose different fonts, then see our guide on how to change fonts in your WordPress theme.

Disabling Google Fonts in OptinMonster

OptinMonster is the best lead-generation plugin for WordPress, and over 1.2 million websites use the software to grow their email list, increase sales, and get more leads.

However, OptinMonster uses Google Fonts by default. Luckily, it’s easy to disable them.

Disabling Google Fonts in Individual OptinMonster Campaigns

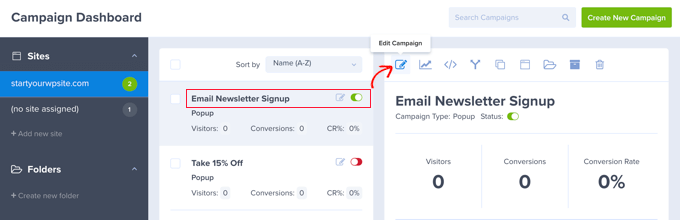
First, you should visit the OptinMonster website and log in to your Campaign Dashboard. After that, you need to click on a campaign and then click the Edit Campaign button.

The OptinMonster Campaign Dashboard

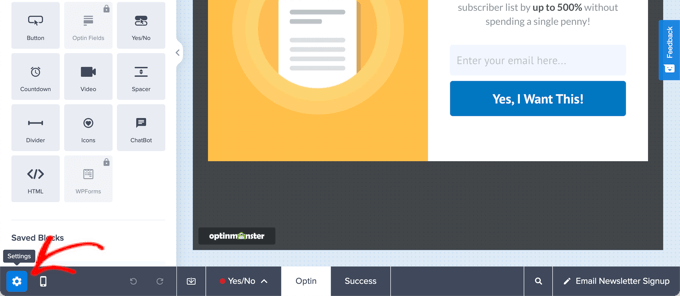
This will open the OptinMonster Campaign Builder.

Next, you need to click the Settings icon at the bottom left corner of the footer bar.

Click the OptinMonster Settings Button

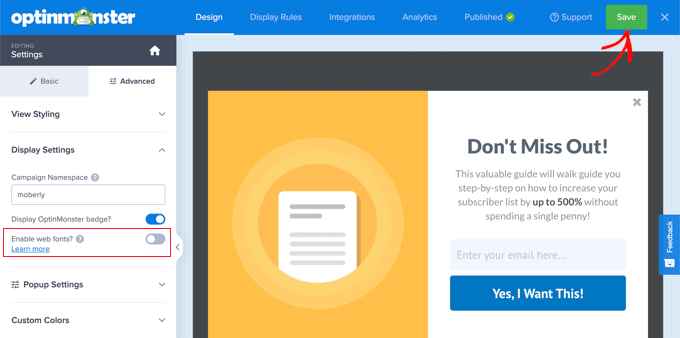
In the sidebar panel, you need to select the Advanced tab.

Now you can scroll down to the ‘Display Settings’ section and toggle ‘Enable web fonts?’ to the off position.

Toggle the Enable Web Fonts Toggle Off

Once you click the ‘Save’ button at the top of the screen, third-party fonts will be disabled for that campaign.

You will need to repeat these steps for each other campaign you want to remove Google Fonts from.

Disabling Google Fonts For All OptinMonster Campaigns

If you are comfortable with adding JavaScript code snippets to your site, then you can disable Google Fonts on all OptinMonster campaigns at once.

To disable Google Fonts in every campaign, you need to add this snippet in your website’s header or footer:

<script type="text/javascript">
        document.addEventListener('om.Scripts.init', function(event) {
        event.detail.Scripts.enabled.fonts.googleFonts = false;
});
</script>

If you want to disable all web fonts, including Google Fonts and FontAwesome, then you should add this code snippet:

<script type="text/javascript">
        document.addEventListener('om.Scripts.init', function(event) {
        event.detail.Scripts.enabled.fonts = false;
});
</script>

The easiest way to add those code snippets is with WPCode, the most powerful code snippet plugin available for WordPress. It lets you easily add custom code to any area of your site, and best of all, it’s free.

First, you need to install and activate the free WPCode plugin. For more details, see our step-by-step guide on how to install a WordPress plugin.

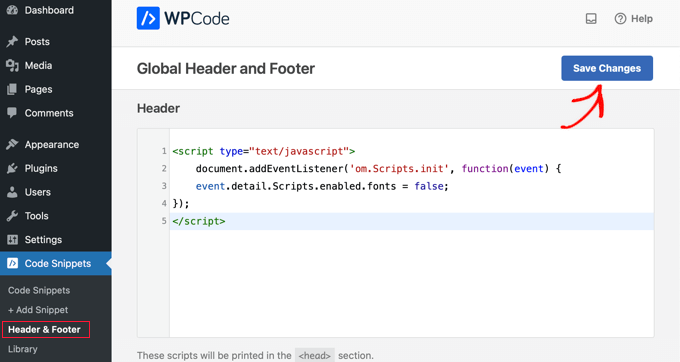
Once activated, you need to go to Code Snippets » Headers & Footer.

Simply paste the code snippet in the Header field and then click the ‘Save Changes’ button.

Adding a JavaScript Snippet Using WPCode

We hope this tutorial helped you learn how to disable Google Fonts on your WordPress website. You may also want to see our ultimate WordPress security guide, or check out our list of ways to make money online blogging with WordPress.

If you liked this article, then please subscribe to our YouTube Channel for WordPress video tutorials. You can also find us on Twitter and Facebook.

The post How to Disable Google Fonts on Your WordPress Website first appeared on WPBeginner.


September 12, 2022 at 04:12PM

Friday, September 9, 2022

6 Best WooCommerce Email Customizer Plugins (Free + Paid)

Are you looking for an easy way to customize your WooCommerce store emails?

A WooCommerce email customizer allows you to easily adjust and personalize the emails your website send to your customers. This includes receipt emails, subscription renewal emails, and more.

In this article, we’ll show you the best WooCommerce email customizer plugins to help you improve your website emails.

Best WooCommerce email customizer plugin

Why Use a WooCommerce Email Customizer Plugin?

WooCommerce is the #1 most popular eCommerce platform for WordPress, and it comes with built-in settings to edit the emails that you send to your customers. However, these customization options are very limited and basic.

For instance, you can only change the font and background colors, edit the email content, and add a logo. These minimal customization options make your emails look generic and unattractive.

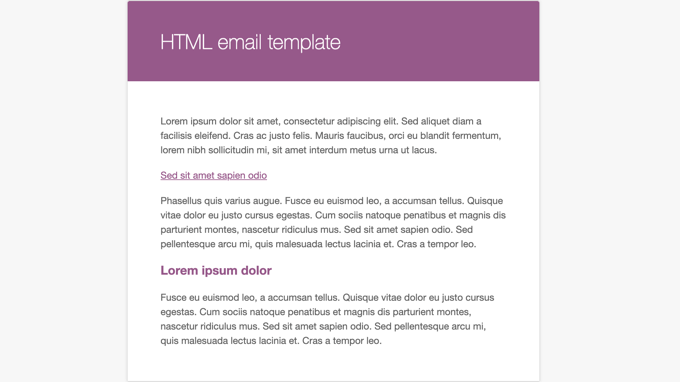
Here’s what default WooCommerce emails will look like:

WooCommerce Allows You to Preview the Email Template Containing Dummy Text

A WooCommerce email customizer gives you more options and flexibility to customize your email notifications.

You can upsell products, offer coupons, or even direct users to relevant posts on your WordPress blog. A plugin can also help you to customize the email notifications that are sent when a customer creates a new account, resets a password, and more.

Some tools even let you create automation workflows for your online store. For instance, you can automatically send pre-written emails when a customer buys a new product, subscribes to your newsletter, books an appointment, or abandons a cart.

That said, let’s look at some of the best WooCommerce email customizer plugins in the market.

1. Autonami

Autonami

Autonami is the best WooCommerce email customizer plugin that’s very easy to use.

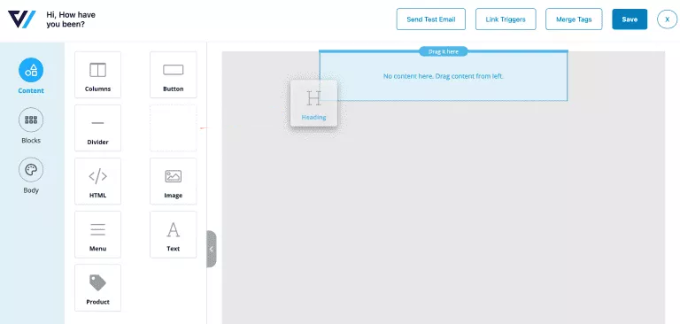
It comes with a drag-and-drop email builder with lots of customization options. You can add different elements by dragging them from the menu on your left and dropping it onto the template to customize your WooCommerce emails.

Plus, you get to further customize each element, like changing its color, font, alignment, and more. This gives you complete control over the appearance of your WooCommerce emails.

Add a heading block to email template

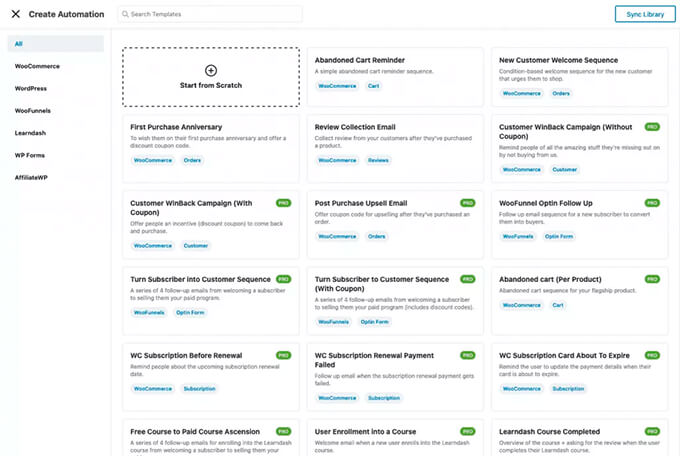
Autonami also offers a pre-built WooCommerce email library. You can create an email sequence for your eCommerce store with a single click.

Autonami Email Library for WooCommerce

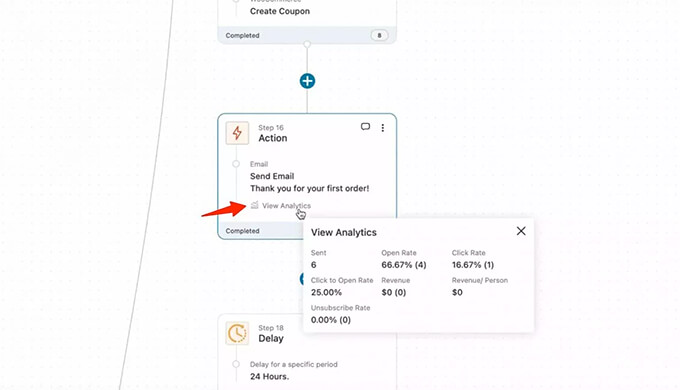
Besides that, it also offers a visual email automation builder, where you get to customize your workflows. This makes it effortless to set up automated emails, as you can choose which emails to show based on the user’s action and when to show them.

Autonami Marketing Automation Email Analytics for WooCommerce

Autonami is a sister product to WooFunnels, which is a powerful sale funnel builder for WooCommerce. You can set up a complete sales funnel and use pre-built templates for custom checkout pages, upsells, discount offers, and more.

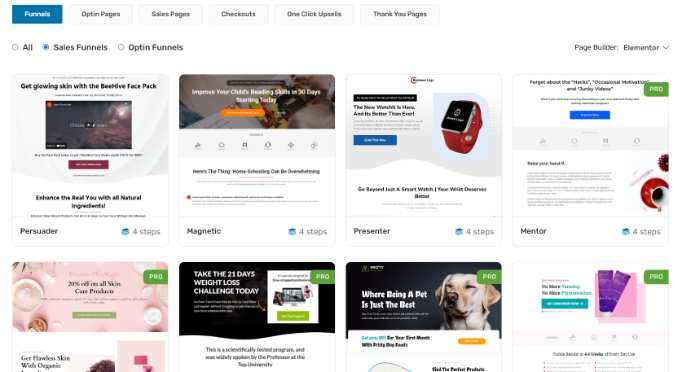
Funnel templates in Woofunnels

Pricing: To use Autonami, you’ll need to purchase the Funnel Builder + Autonami plan, which will cost you $249 per year. That said, there is also a free version of Autonami with limited features that you can get started with.

2. Email Customizer for WooCommerce

Email customizer for WooCommerce

Email Customizer for WooCommerce by ThemeHigh is a WordPress plugin that offers a beginner-friendly email builder.

You can drag and drop different elements into your transactional emails. For instance, you can add text, images, social icons, buttons, GIFs, billing information, shipping details, and more.

When customizing the emails, the builder shows a live preview of your changes. This way, you can see what your emails will look like on the customer’s screen.

The plugin also offers 11 pre-built custom email templates, so you can quickly select any email type and customize it according to your needs.

It also offers WPML compatibility, allowing you to create emails in multiple languages. You can also integrate it with other plugins like WooCommerce Order Status Manager and YITH WooCommerce Gift Cards.

On the downside, you don’t get any automation features like Autonami offers. The plugin doesn’t offer a workflow builder or an option to set up automated email series.

Pricing: Email Customizer for WooCommerce pricing starts from $39 per year. There is also a free version of Email Customizer for WooCommerce available.

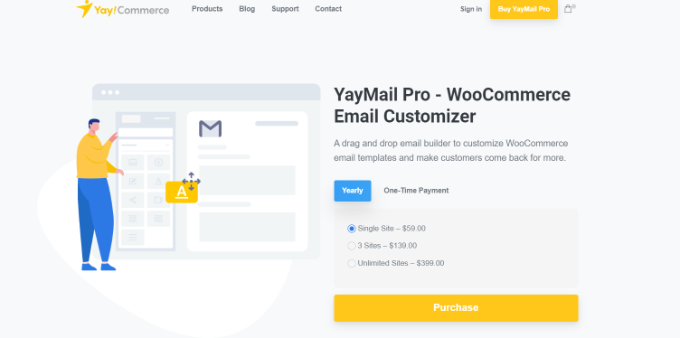
3. YayMail

YayMail

YayMail is another popular WooCommerce email customizer plugin. You can easily design and edit your emails in its drag-and-drop builder. Its interface is easy to use and is similar to Elementor or the WordPress block editor.

The plugin comes with different widgets and dynamic blocks that you can use to add elements to the WooCommerce transactional email template. The visual builder also gives a real-time preview of your changes.

Besides that, the premium version of YayMail offers features like shipment tracking, custom order status, checkout field editor, and more. You also get powerful add-ons and WooCommerce extension support with YayMail Pro.

Pricing: YayMail is a premium email customizer plugin for WooCommerce, with prices starting from $59 per year for a single WordPress site.

4. Flycart Email Customizer Plus for WooCommerce

Flycart email customizer plus

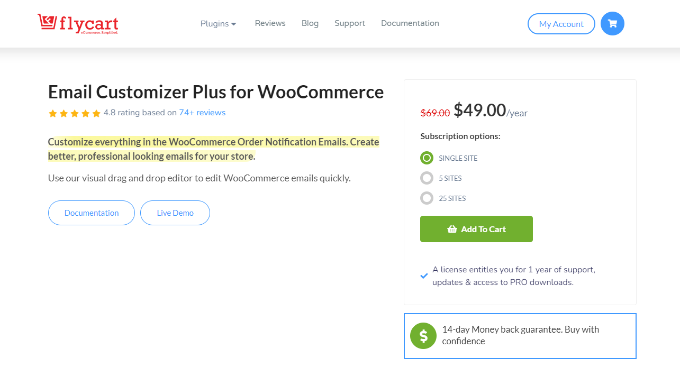
Flycart Email Customizer Plus for WooCommerce is a premium WooCommerce plugin that you can use to create custom transactional emails.

Its drag-and-drop builder allows you to change the layout and customize your emails the way you want. You can add a logo, edit email content, add social icons, and more.

There’s no need to manually edit HTML, CSS, or PHP code to change the look and feel of your emails. The plugin offers basic elements and WooCommerce elements that you can add to the template.

The plugin comes with pre-built templates, so you don’t have to start from scratch. There is also an option to send test emails and make sure they are delivered to your customers.

Pricing: Flycart Email Customizer Plus for WooCommerce prices start from $49 per year for a single site. You also get a 14-day money-back guarantee with each plan.

5. Decorator

Decorator

Decorator is a WooCommerce plugin that lets you customize your emails using the WordPress theme customizer.

The plugin offers different options to edit the look and style of your emails. For instance, you can edit the email content, heading, color, email header and footer, add a logo, enter social media links to your Facebook, Twitter, or LinkedIn pages, and more.

The Decorator plugin also lets you add shortcodes and placeholders to show additional information in the emails, like customer name, order details, company name, order date, and more.

While the theme customizer offers a real-time preview of your changes, it doesn’t provide the flexibility of a drag-and-drop builder like you’d get in Autonami and other plugins on our list. There are also no pre-built WooCommerce email templates you can use to get started quickly.

Pricing: Decorator is a free plugin that you can use on your WooCommerce store.

6. Kadence WooCommerce Email Designer

Kadence WooCommerce Email Designer

Kadence WooCommerce Email Designer is a free plugin that also uses the WordPress customizer to create custom emails for your online store.

The plugin shows a live preview of your WooCommerce emails in the theme customizer and offers different options for customization. For example, you can easily customize headings, subtitles, and body text using the plugin.

However, Kadence WooCommerce Email Designer lets you import pre-built email templates, which isn’t possible in the Decorator plugin. On the downside, you don’t get the flexibility or customization options that other drag-and-drop email builders provide, like Autonami.

Pricing: You can use Kadence WooCommerce Email Designer for free.

Bonus: WP Mail SMTP

WP Mail SMTP

WP Mail SMTP is the best WordPress SMTP plugin in the market. It ensures that your WordPress emails are delivered to your customer’s email inbox and don’t end up in spam.

Many WordPress hosting companies don’t support the default method WordPress uses for sending emails from your site. As a result, you’ll notice that many emails simply vanish and never reach your customers. WP Mail SMTP solves the issue of WooCommerce not sending emails and improves deliverability.

The best part is that WP Mail SMTP easily integrates with WooFunnels and offers multiple mailers, including Gmail, Outlook, Sendinblue, Amazon SES, and more.

For more details, you can see our detailed guide on how to set up WP Mail SMTP with any host.

Pricing: WP Mail SMTP prices start from $49 per year. There is also WP Mail SMTP free version you can use for your site.

Which is the Best WooCommerce Email Customizer?

If you’re looking for a complete tool that offers WooCommerce email customization and automation, then we highly recommend using Autonami.

The plugin is super easy to use and offers a drag-and-drop email builder along with different email templates. You can create stunning WooCommerce emails in just a few clicks and don’t need coding knowledge.

Autonami also lets you set up automated email workflows for your WooCommerce site. It helps save time, as you can automatically send an email series to new customers, recover abandoned carts, send promotional emails to selected audiences, and more.

You can even combine Autonami with an SMTP service like WP Mail SMTP. Doing so will ensure that your emails are delivered to your customers and won’t get lost or end up in the spam folder.

We hope that this article helped you learn about the best WooCommerce email customizer plugins. You may also want to see our guide on the best free business name generators and how to move WordPress from HTTP to HTTPS.

If you liked this article, then please subscribe to our YouTube Channel for WordPress video tutorials. You can also find us on Twitter and Facebook.

The post 6 Best WooCommerce Email Customizer Plugins (Free + Paid) first appeared on WPBeginner.


September 09, 2022 at 04:00PM