Tuesday, September 20, 2022

How to Add Google Maps Store Locator in WordPress

Do you want to add a Google Maps store locator to your WordPress website?

A store locator is a map pointing to your business location. If you run a local business, it will help your users to find you on the map, get driving directions, and share your location.

In this article, we will show you how to easily add a Google Maps store locator in WordPress.
How to Add Google Maps Store Locator in WordPress (Free Option)

Why Add Google Maps Store Locator in WordPress?

A lot of WordPress users run small business websites that serve a particular town or region. This includes businesses like restaurants, real estate agents, plumbers, maintenance service providers, small stores, salons, and more.

Adding a Google Maps store locator to your site will help your users to find you. They will be able to get driving directions to your store and share the location with their friends.

It can also help improve your site’s search engine visibility and attract more website visitors.

Let’s take a look at how to add a Google Maps store locator on your WordPress site. We’ll show you both free and paid methods with their pros and cons, then you can choose the one that best suits your needs.

Method 1: Adding a Simple Store Locator to WordPress (Free)

This method is free and easy because it doesn’t require the extra effort of creating a Google Maps API key. It’s recommended for users who want to add a simple map of their store location.

First, you need to visit the Google Maps website on your computer. Next, enter your store’s address in the search field and Google Maps will show it on the map with a pinned marker.
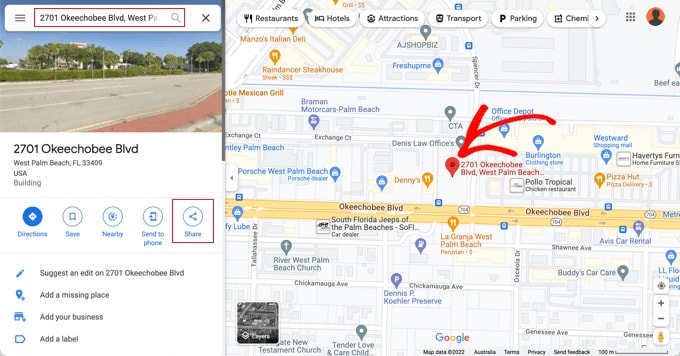
Search for Your Store Location in Google Maps

Make sure that the marker is placed in the correct location. You can select a zoom level by clicking the zoom buttons in the bottom right corner.

Once you are satisfied with how the map looks, you need to click on the share button from the left column. This will bring up a popup where you need to switch to the ‘Embed a Map’ tab.
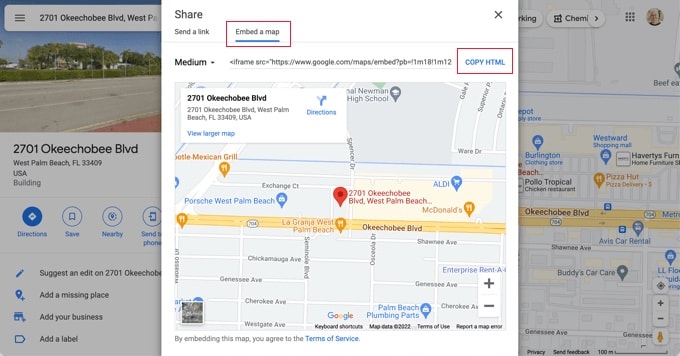
Select Google Map's Embed a Map Option

You will now see your searched location on the map with HTML code. You should click the ‘Copy HTML’ link to get the embed code.

Now head over to the admin area of your WordPress website and edit the post or page where you want to display the store locator map.

Normally, users add a store locator map on their contact form page with their business phone number and open hours.

On the post edit screen, you need to add a ‘Custom HTML’ block.
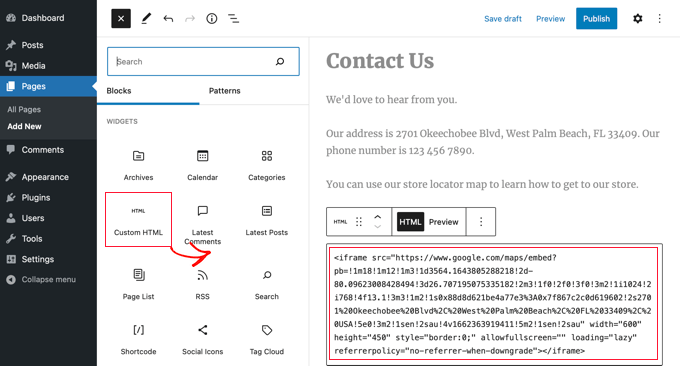
Add a Custom HTML Block to Your Page

You should paste the code you copied from Google Maps into the text area of the ‘Custom HTML’ block.

You can now preview the page to see Google Maps embedded into your page. It will show your store location marked on the map with links to get directions there or to save the location.
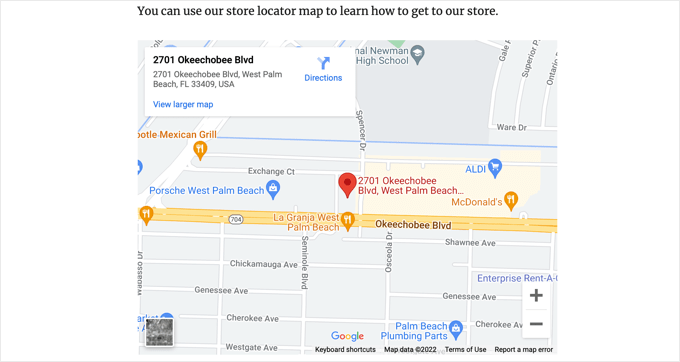
Preview of Embedded Google Map

This method works for quickly embedding Google maps, but it doesn’t give you maximum SEO benefits. In other words, it won’t help you to rank higher and get more traffic from search engines or Google map searches.

If you’re a small business, restaurant, or online store in one or more physical locations, then we recommend using the next solution to improve your local SEO rankings.

Method 2: Adding a Store Locator With Local SEO (Recommended)

Nearly 46% of all searches on Google have local intent. All in One SEO (AIOSEO) is the best WordPress SEO plugin on the market and helps you bring more free traffic from search engines to your website.

With AIOSEO, you can enter your store locations, contact details, and business hours using

schema markup so that information is displayed on search engine results pages.

For example, when you search Google for ‘Mcdonald’s locations in Florida,’ you will be shown a featured snippet with the different destinations and a map with pinned locations.

Multiple location map preview on Google

This will help improve your website’s SEO rankings and increase your click rate in search

Note: You’ll need at least the AIOSEO Plus plan to access the Local SEO feature needed for this tutorial.

First, you need to install and activate the AIOSEO for WordPress plugin. For more details, see our step-by-step guide on how to install a WordPress plugin.

Upon activation, the plugin will run a setup wizard. If you need help configuring the plugin, then please take a look at our guide on how to set up AIOSEO for WordPress.
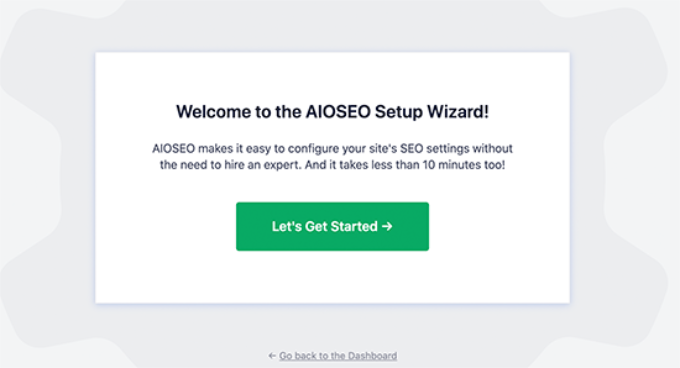
AIOSEO setup wizard

Once the setup process is complete, you’ll need to head over to All in One SEO » Local SEO on your WordPress dashboard.

You can click the ‘Activate Local SEO’ button to get started configuring the local settings.
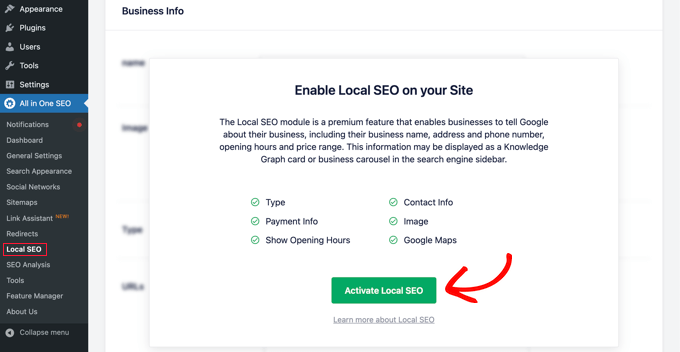
Activate Local SEO in AIOSEO

Next, you need to click the ‘Maps’ tab at the top Local SEO page.

On the Maps page, you should see the ‘API Key’ field.
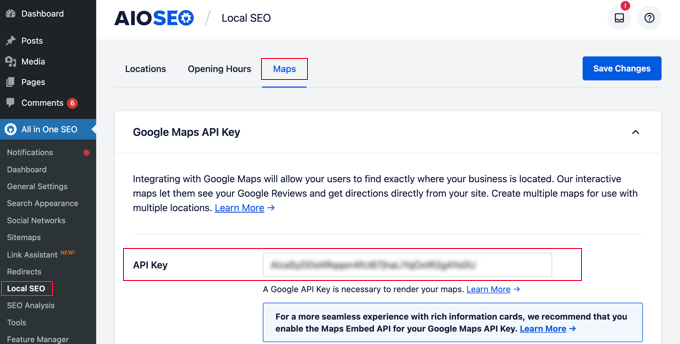
Paste Your Google Maps API Key

You can obtain an API key for Google Maps by going to the Google Maps Platform and logging in with your Google account.

After that, you should click the ‘Get Started’ button.
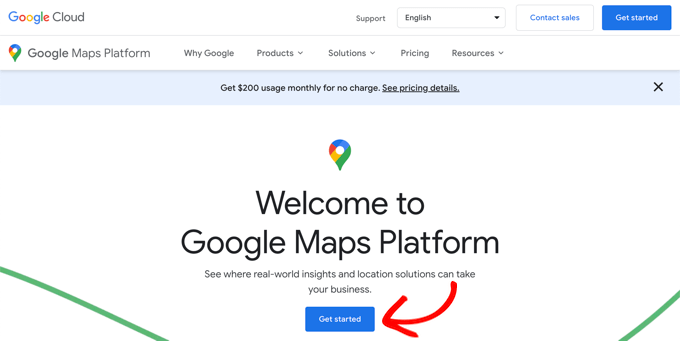
Welcome to Google Maps Platform

Google Cloud resources are organized by project. If you don’t already have a project, then one will be created for you automatically.

Note that you will need to enable billing for the project in order to use the Google Maps API. However, it’s unlikely you will ever pay anything.

Map embed requests are free with unlimited usage as detailed in Google’s documentation, and you’re also given $200 of monthly credit each month.

You need to click the ‘Create Billing Account’ button.
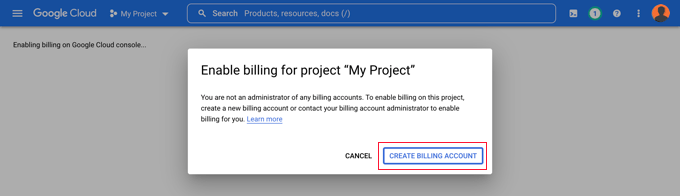
Enable Billing for Your Project

You will now see the Account Information page. You should select your country from the drop-down menu and agree to the terms of service.

When you’re ready, click the ‘Continue’ button.
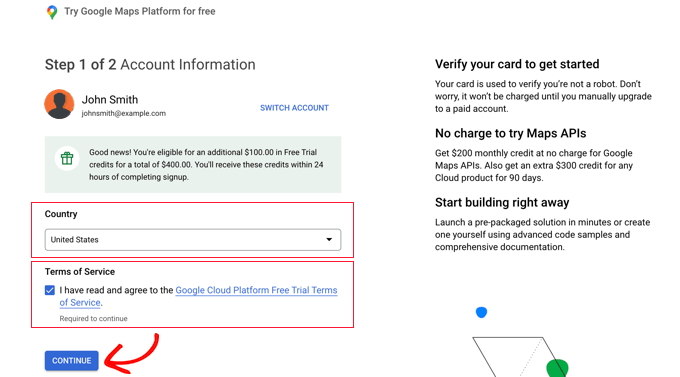
Agree to Google Maps Terms of Service

Now you need to select an existing payments profile or create a new one.

The profile will be either for an individual or a business and will include the name of the individual or business, a payment method, and an address.
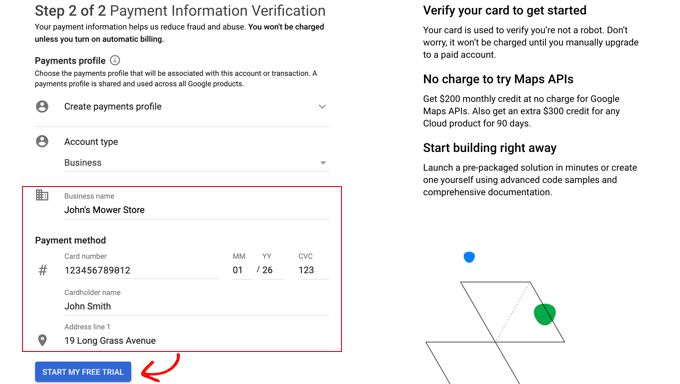
Start Your Free Trial

Once you’ve entered that information, you need to click the ‘Start My Free Trial’ button.

Don’t worry about the ‘Free Trial’ wording. Map embed requests remain free even when the free trial has ended, and your credit card will never be charged until you manually upgrade to a paid account.

You may also be asked to fill in a 30-second survey of your business to make sure you are given the most relevant information.
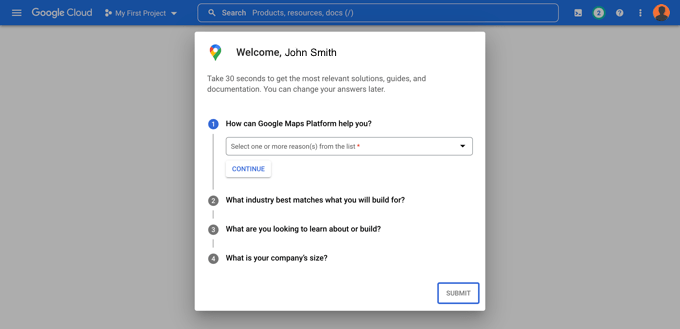
You May Be Asked to Fill In a 30 Second Survey

When you click the ‘Submit’ button, your Google Maps API key will be displayed. You will need to enter this key into the plugin settings for Methods 2 and 3.

Then, you can click the ‘Copy to Clipboard’ icon at the end of the ‘Your API Key’ field. Once you’ve done that, just dismiss the popup by clicking the ‘Go to Google Maps Platform’ button.
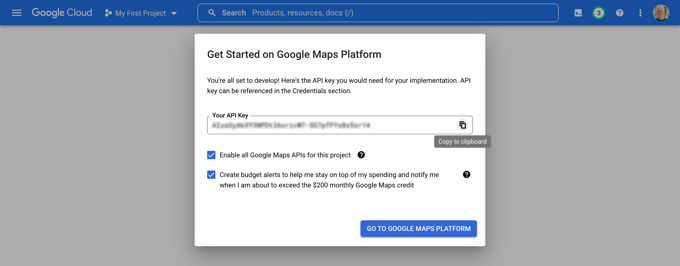
Copy Your API Key

Restricting Your Google Maps API Key

We recommend that you restrict the key so that it can’t be used by others.

After you create your API key, Google will show a ‘Protect your API key’ popup where you can restrict your key so it only works on your own website.

In the ‘Select restriction type’ drop down, you need to select ‘HTTP referrers (web sites).’ Then in the next field, you should type your website domain name into the ‘New item’ field using the pattern *example.com/*.
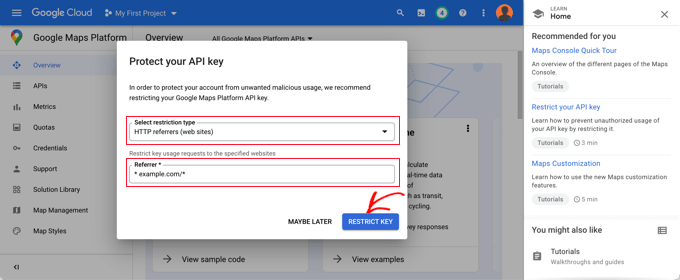
Protect Your API Key

You should see a message saying, ‘Successfully restricted your API key.’ Now the key will only work for Google Maps embedded on your specific website.

Back on your website, you should enter your API key in the field. Next, you can scroll down to edit the map settings.

AIOSEO lets you display Google Maps using a Gutenberg (WordPress editor) block, shortcodewidget, or PHP code. It also lets you choose different map styles and add a custom marker to your map.
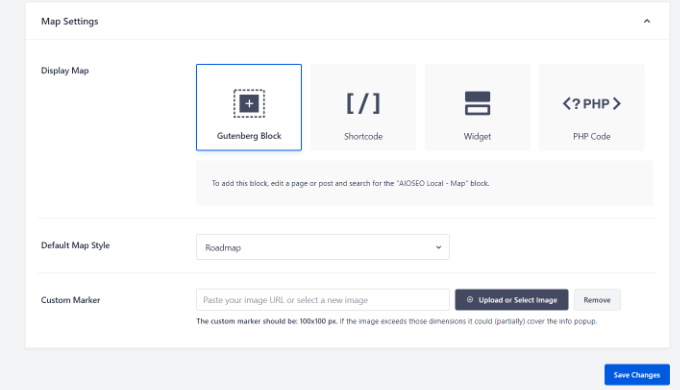
Edit map settings

For this tutorial, make sure the ‘Gutenberg Block’ setting is selected. Don’t forget to click the ‘Save Changes’ button when you’re done.

Now you can create your store locator map. How you do this depends on whether your business has just one store or multiple locations.

Adding a Map for a Single Location

If your business operates out of a single physical location, then the map will use the information you provide on All in One SEO’s ‘Locations Settings’ page.

Go ahead now and switch to the ‘Locations’ tab of the All in One SEO » Local SEO page.

Since you have a single physical location, you should make sure that the ‘Multiple Locations’ option is set to ‘No’.
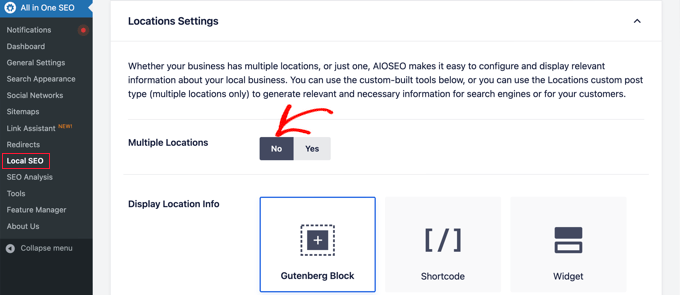
Set Multiple Locations to No

Next, you should scroll down to the ‘Business Info’ section and fill in as much information about your business as possible.

This is important because the information may be displayed when someone searches for your business using Google search or Google Maps.
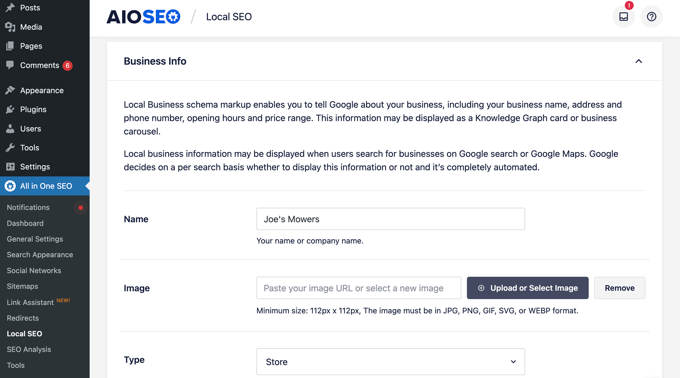
Business Info Will Be Displayed in Google Searches

After that, scroll down to the ‘Maps’ section to pin your exact location.

Simply enter your address in the ‘Enter a query’ field. A pin will be added at that location, and you can move the pin by dragging it to a new location if necessary.
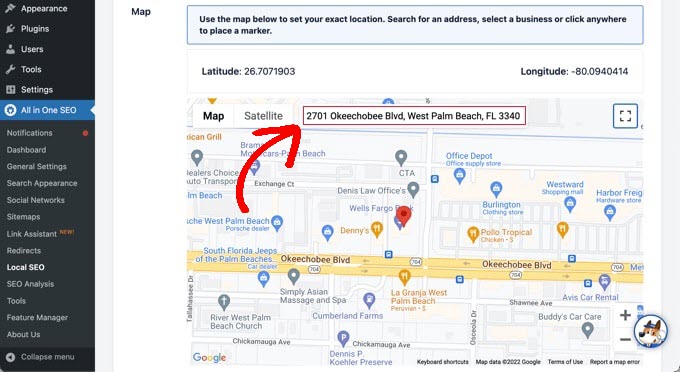
Enter Your Store Location as a Query in the Map Section

When you’re finished, you need to scroll to the top or bottom of the page and click the ‘Save Changes’ button to store your settings.

Now you can add your store locator map to any WordPress post or page. To start, simply edit or add a new post or page on your website.

Once you’re in the block editor, click the ‘+’ button at the top and add the ‘AIOSEO Local – Map’ block anywhere on the page. Make sure you click the ‘Update’ or ‘Publish’ button when you’re finished.
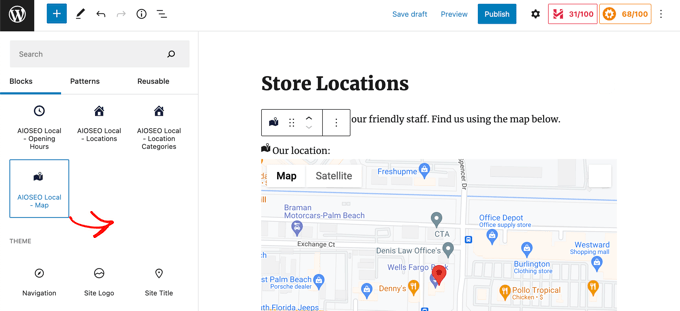
Add an AIOSEO Local Map Block to Your Page

Congratulations, you have successfully added a Google Maps store locator to your site.

Adding Maps for Multiple Locations

To add a map for a different location, you need to navigate to the Locations tab of the All in One SEO » Local SEO page. Once there, you need to click the ‘Yes’ option for Multiple Locations, and then click the ‘Save Changes’ button at the top of the screen.
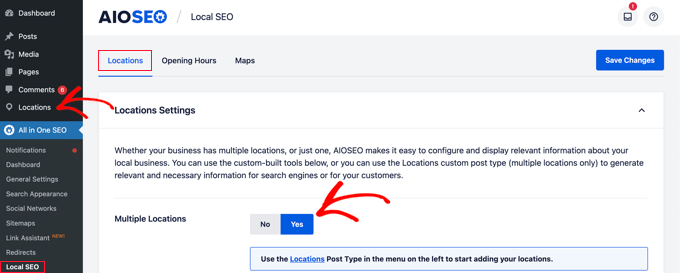
Set Multiple Locations to Yes

Once you save your changes, you will notice that a new Locations custom post type has been added to the admin sidebar. This is where you will enter your business locations.

Go ahead and navigate to Locations » All Locations and then click the ‘Add New’ button.
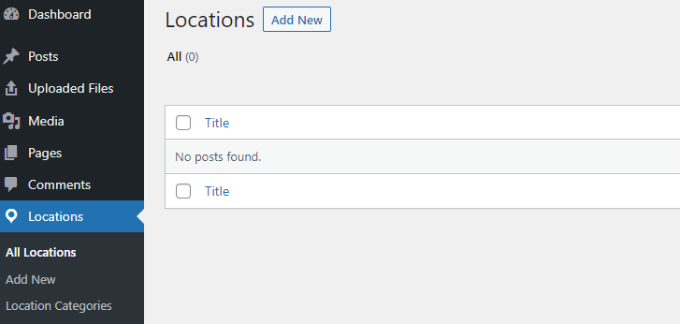
Add a new location

This will take you to the Locations editor. You will need to add a title for the location you are adding, such as the name of the store or the town.

Now you should scroll down to the ‘AIOSEO Local Business’ section of the page, under the post content.

Make sure you enter as much information as possible because it may be displayed when someone searches for your business in Google search or Google Maps.
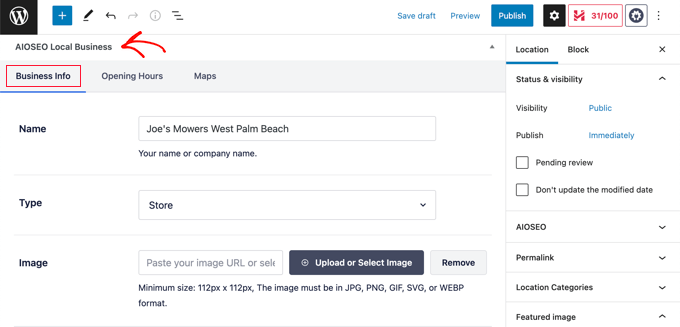
Fill In the Business Info Section

After that, you should find the ‘Maps’ section and enter your address in the ‘Enter a query’ field.

A pin will be displayed at that location.
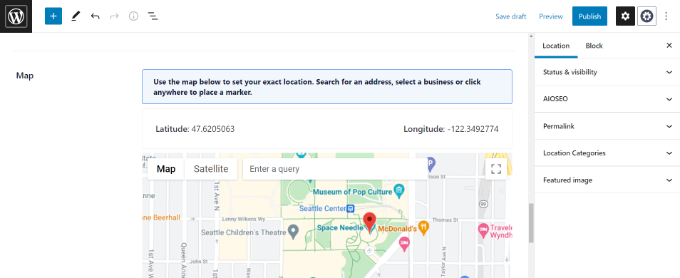
Add multiple map locations

After entering your location on the map and adding location information, go ahead and click the ‘Publish’ button.

You can now repeat this step and add your other business locations.

Once you’ve finished, you can add a store locator map to your website for each location by using the ‘AIOSEO Local – Map’ block in the WordPress editor.
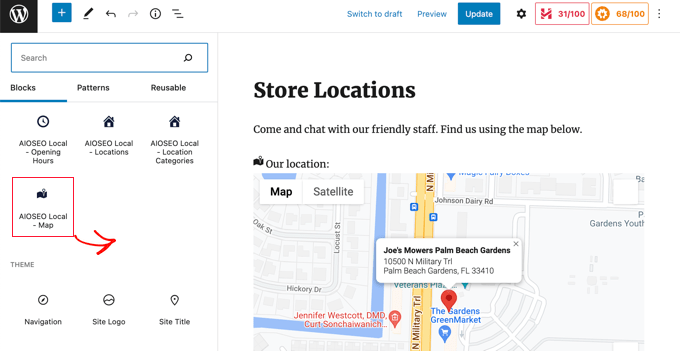
Add an AIOSEO Local Map Block to Your Page

Now you will need to choose which location to display on the map.

To do that, look at the block settings pane on the right of the screen, and choose the store you wish to display from the ‘Location’ drop-down menu.
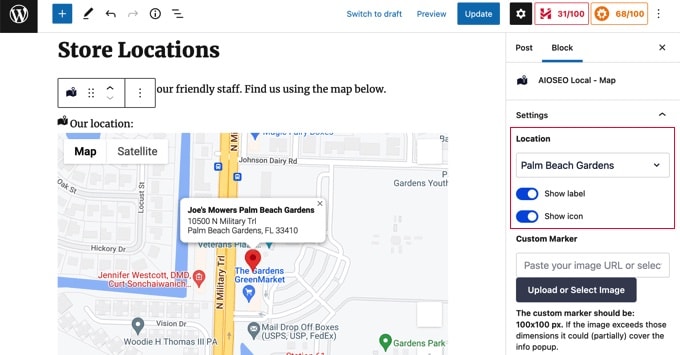
Choose a Store Location From the Drop Down Menu on the Settings Pane

Simply add additional local map blocks for any other locations. Don’t forget to click the ‘Publish’ or ‘Update’ button at the top of the page to display the maps on your website.

Method 3: Displaying Multiple Store Locations on a Single Map

The first two methods let you add store locator maps with a single location. If you have multiple locations, then you need to add a separate map for each one.

Alternatively, you can use our third method to display multiple locations on a single map.

The first thing you need to do is install and activate the Locatoraid Store Locator plugin. For more details, see our step-by-step guide on how to install a WordPress plugin.

On activation, you need to visit Locatoraid » Configuration and set up the plugin.

In the ‘Google Maps’ tab, you’ll need to paste a Google Maps API key. You can follow the method above in Method 2 to create one.

Then you need to click the ‘Save’ icon to store the key. You should notice that Google Maps is able to load correctly in the ‘Map Style Preview’ window.
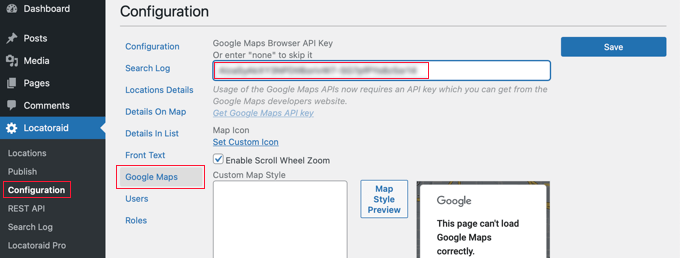
Paste Your Google Maps API Key

Next, you can visit the ‘Configuration’ tab and choose whether to display miles or kilometers on the map.

You can also check the other options, such as the address format, the details you would like to display on the map, and which users can use the plugin.
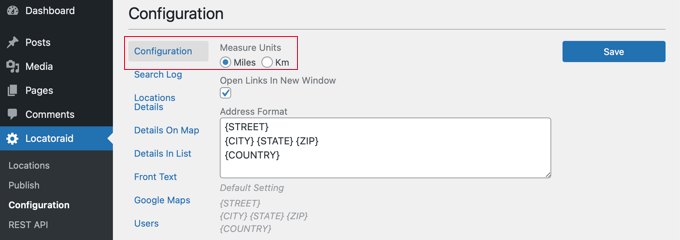
Configure Your Map Including the Units You Wish to Use

Once you are happy with the plugin’s settings, make sure you click the ‘Save’ button to store your settings.

Now you are ready to add your store locations. You should navigate to Locatoraid » Locations. Once there, you need to click the ‘Add New’ button.
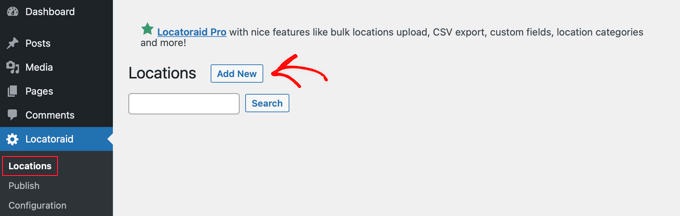
Click the Add New Button on the Locations Page

This will take you to the ‘Add New Location’ page. Here you can type the store name, location, and other details.

When you finish, you should click the ‘Add New Location’ button at the bottom of the page.
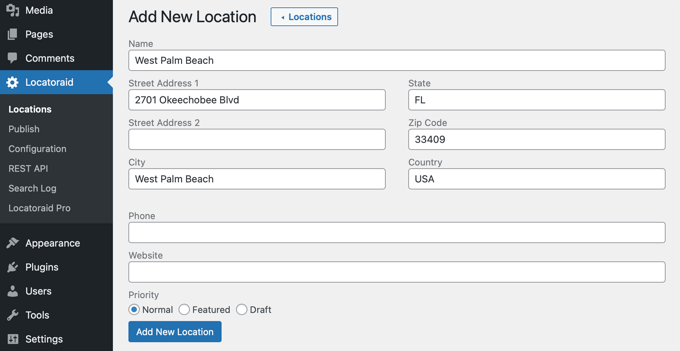
Fill In Your Store's Address and Other Information

You will be taken to the ‘Edit Location’ page where you can see the store location on a map.

If everything looks good, then you should click the ‘< Location’ button at the top of the screen to return to the Locatoraid » Locations page in your dashboard.
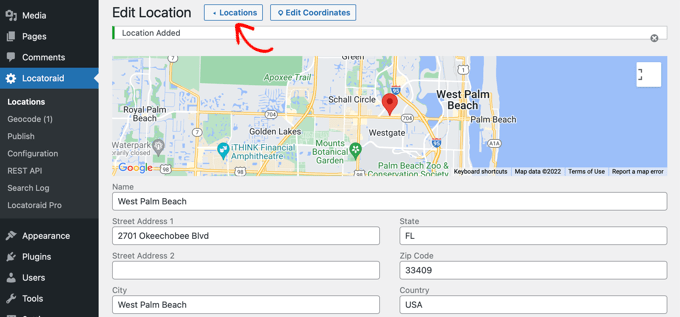
Confirm That the Map Is Correct Then Click the Locations Button

You can add more locations by clicking the ‘Add Location’ button and repeating these steps.

Once all of your store locations have been created, you can add the map to your website.

Simply add or edit a page and click the blue ‘+ Add Block’ icon. You should drag a Shortcode block onto the page and then enter the shortcode [locatoraid] into the field.
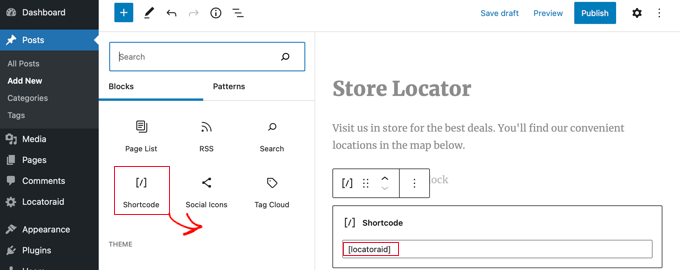
Add a Shortcode Block to Your Page

This default shortcode will work well for most websites. However, you can customize the map by using a different shortcode. Visit the Locatoraid » Publish page to learn more.

Now you can publish or update the page and visit your website to see your store locator map.

All of your store locations will be displayed on the same map. If your users type their address or click the ‘Locate Me’ link, then they can find the closest stores and get directions.
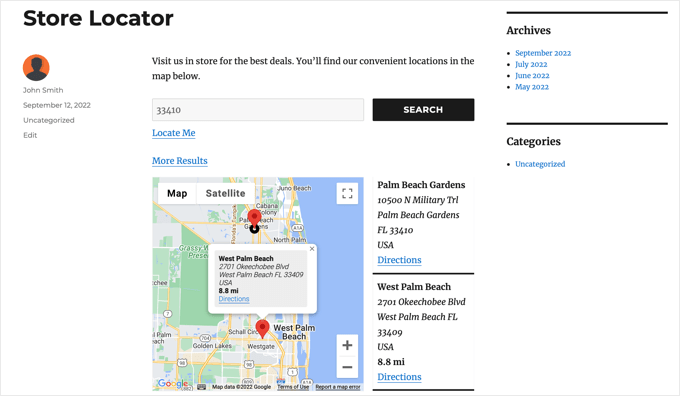
Preview of Locatoraid Map With Multiple Locations

We hope this tutorial helped you learn how to add a Google Maps store locator in WordPress. You may also want to learn how to create a free business email address or check out our list of the best AI chatbots for your website.

If you liked this article, then please subscribe to our YouTube Channel for WordPress video tutorials. You can also find us on Twitter and Facebook.

The post How to Add Google Maps Store Locator in WordPress first appeared on WPBeginner.


September 20, 2022 at 06:00PM
Monday, September 19, 2022

How to Connect WordPress to PayPal Commerce

Do you want to connect WordPress to PayPal Commerce?

PayPal Commerce allows your customers to pay via credit cards without leaving your website. Even better, they also don’t need a PayPal account to make a payment.

In this article, we’ll show you how to easily connect WordPress to PayPal Commerce and start accepting credit cards on your website.

Easily connecting WordPress to PayPal Commerce

Why Use PayPal Commerce in WordPress?

PayPal Commerce offers an easier checkout solution for businesses and online stores to use on their WordPress websites.

Unlike a standard PayPal payment form, your customer can pay using their PayPal account or by entering a credit card number. They don’t need to have a PayPal account to complete the payment.

You can choose which credit card networks you want to accept and show their logo at the checkout. PayPal Commerce supports Visa, Mastercard, American Express, Maestro, and Discover.

PayPal Commerce also lets you accept one-time payments as well as recurring payments for subscriptions and online donations.

It offers a cleaner payment experience, and users can make a payment without leaving your website.

That being said, let’s take a look at how to easily connect WordPress to PayPal Commerce.

We’ll be showing you multiple methods. You can choose one that best suits your business needs.

Method 1. Add PayPal Commerce to Any WordPress Website

This method is easier and recommended for all users who are not using an eCommerce platform on their website.

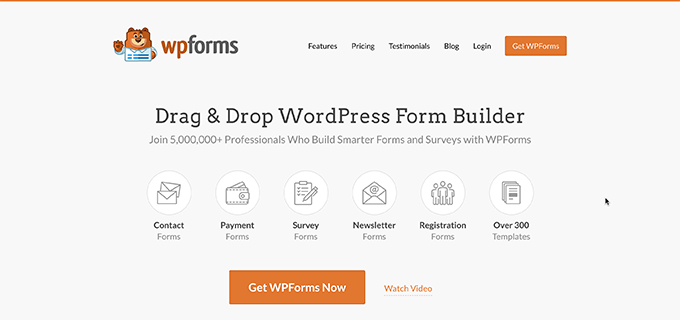
For this method, we’ll be using WPForms. It is the best WordPress form builder on the market and allows you to easily create forms for your website.

WPForms website

With WPForms, you can create an online payment form and start accepting payments without using a full-fledged shopping cart plugin.

First, you need to install and activate the WPForms plugin. For more details, see our step-by-step guide on how to install a WordPress plugin.

Note: You’ll need at least the ‘Pro’ plan to unlock the PayPal Commerce feature.

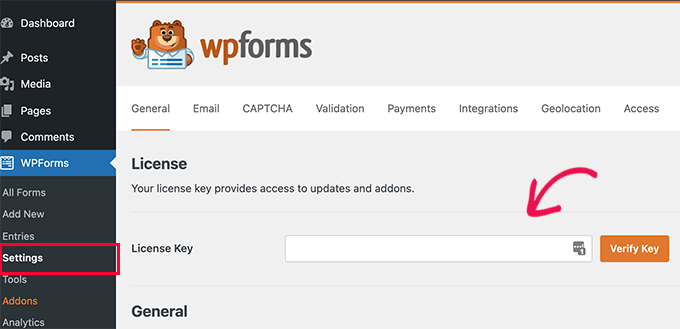
Upon activation, you need to visit the WPForms » Settings page to enter your plugin license key. You can find this information under your account on the WPForms website.

WPForms license key

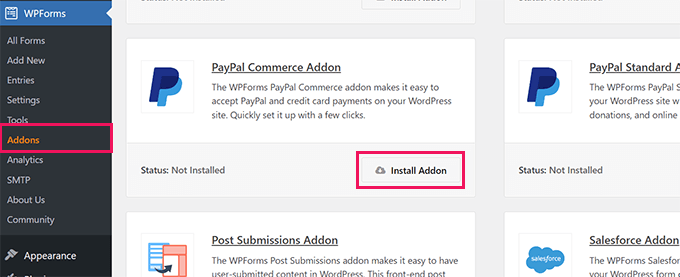
Next, you need to visit the WPForms » Addons page.

From here, locate the box for ‘PayPal Commerce Addon’ and just click the ‘Install Addon’ button.

Install PayPal Commerce addon

WPForms will now install and activate the PayPal Commerce Addon.

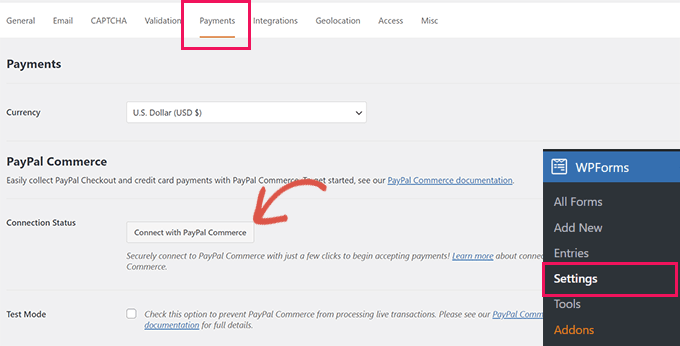
After that, you need to visit the WPForms » Settings page and switch to the Payments tab.

Connect to PayPal commerce

From here, choose the currency and click on the ‘Connect with PayPal Commerce’ button to continue.

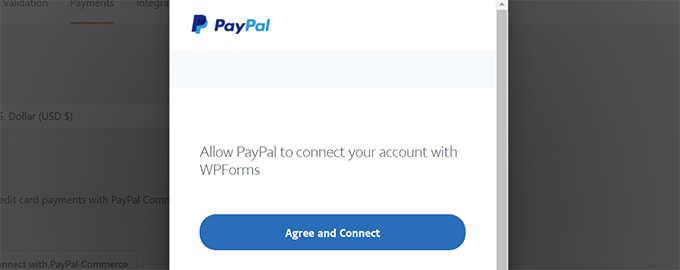
This will bring up a popup where you will be asked to log in to your PayPal account. After that, you will be asked to allow PayPal to connect with your WPForms account.

PayPal connect

Click on the ‘Agree and Connect’ button to continue.

Depending on your account, PayPal Commerce will now walk you through the setup process. Simply follow the onscreen instructions to finish the setup.

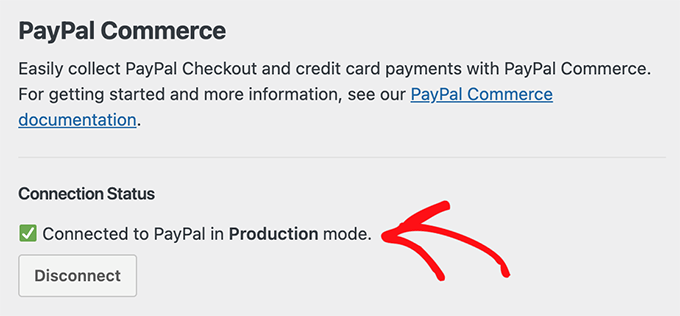
Once finished, you’ll be returned to the Payments tab on your website, and you’ll see a green checkmark under ‘Connection Status’ for PayPal Commerce, indicating that the connection was successful.

PayPal connected message

Now that you’re ready to accept payments with PayPal Commerce, you need to create a payment form to add to your site.

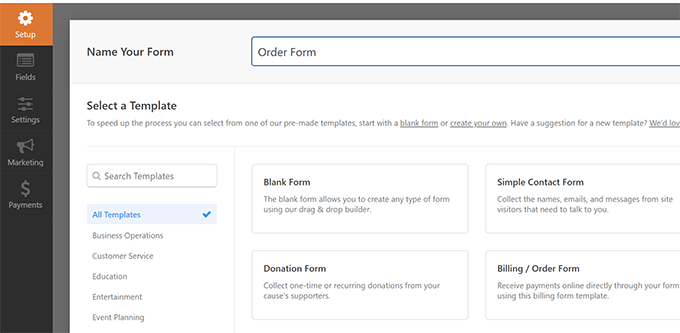
Head over to the WPForms » Add New page and enter a name for your form. Then, you can choose a template or start with a blank form.

Form name and template

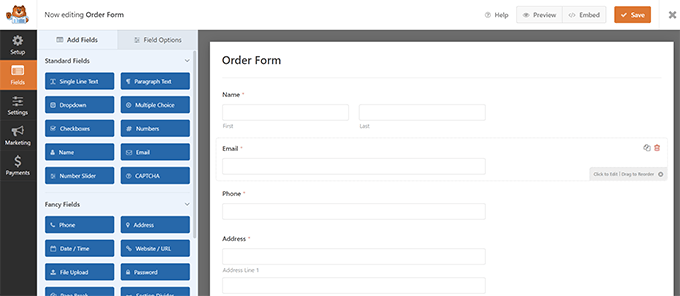
This will launch the WPForms Form Builder interface.

It is a drag-and-drop form builder where you can simply click on the fields to edit them or add new fields from the left column.

WPForms form builder

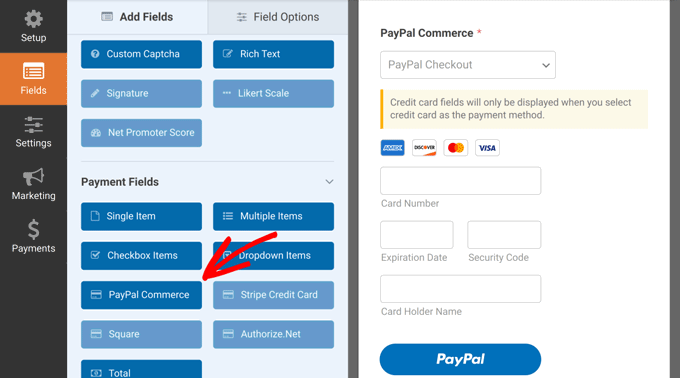
Next, you need to add the PayPal Commerce field from the left column to your form.

You can just drag the element from the left and drop it into the form preview on the right.

Add PayPal Commerce field

This will bring up a popup, reminding you that you need to enable PayPal Commerce payments for this form.

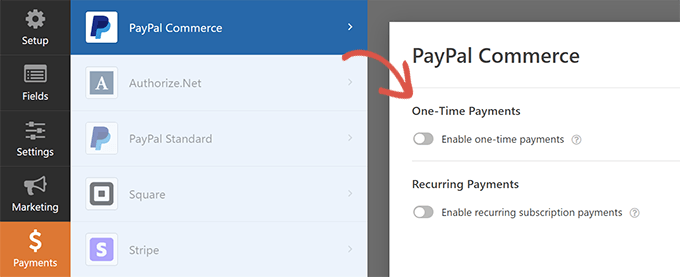
Click on the ‘OK’ button to close the popup, and then switch to the ‘Payments’ section in the left-hand menu of the form builder.

Payment type

Once inside the ‘Payments’ section, click ‘PayPal Commerce’ and then enable the payment type (One-time payments or Recurring Payments).

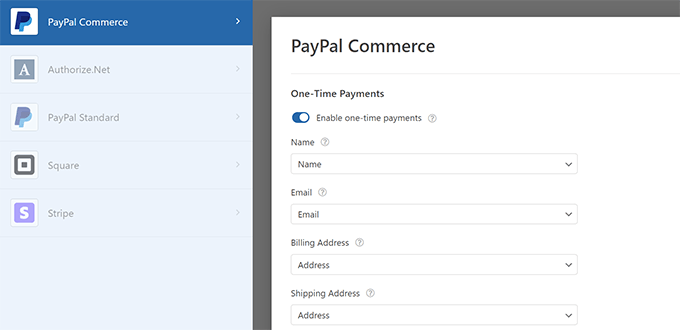
Depending on your choice, you’ll see further options on the screen.

Map form fields

For instance, you’ll be asked to match the form fields to the payment fields. This means that your form’s ‘Name’ field will be mapped as the name field for PayPal Commerce.

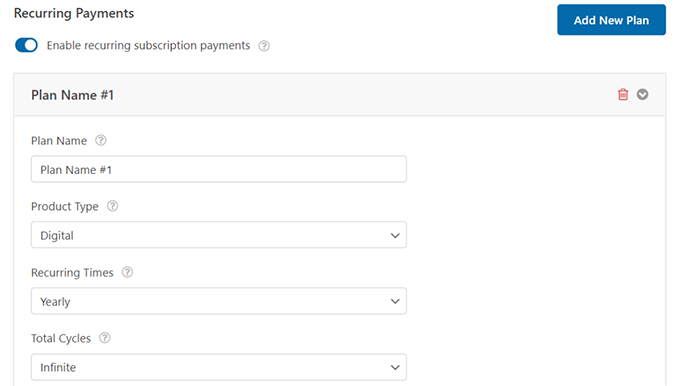
Similarly, if you choose the Recurring Payments option, then you will be asked to create a plan and choose payment frequency and other options.

Create plans for recurring payments

Once you are done setting up your form, don’t forget to click on the ‘Save’ button to store your settings.

You are now ready to add the form to your website.

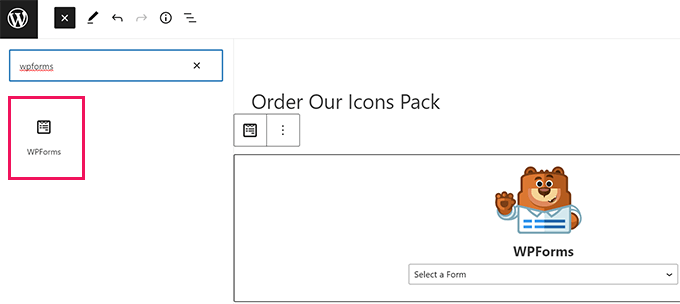
Simply edit the post or page where you want to accept payments. In the block editor, add the ‘WPForms’ block.

WPForms block

Choose the form you created earlier from the block drop-down menu, and WPForms will load a preview of the form for you.

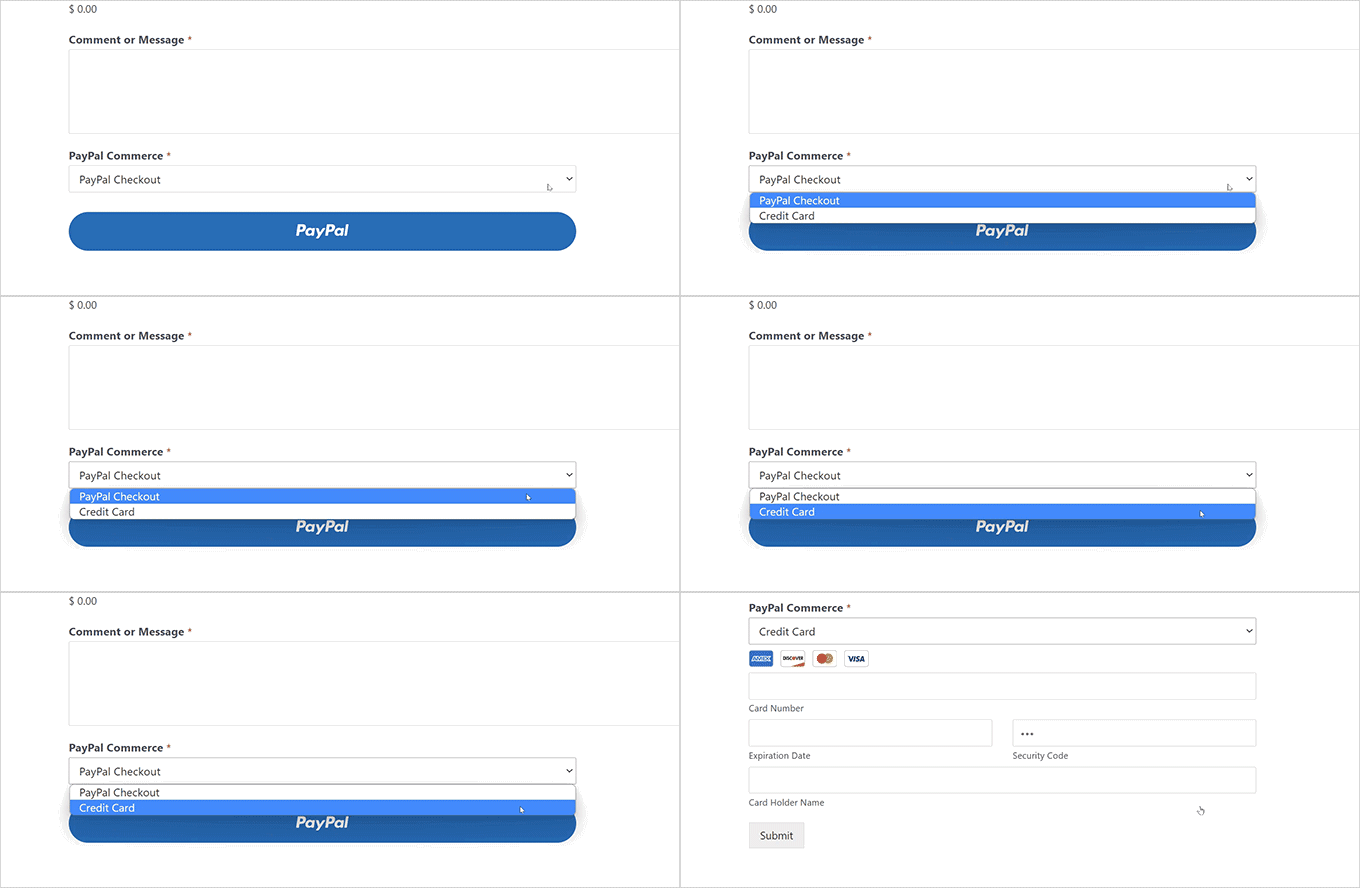
You can now save your post or page and preview it in a new browser window to see your PayPal Commerce payment form in action.

PayPal commerce WPForms

Method 2. Add PayPal Commerce in WordPress Using Easy Digital Downloads

For this method, we’ll be using Easy Digital Downloads. We recommend using this method if you want to sell digital goods like ebooks, software, music, graphics, photographs, and more.

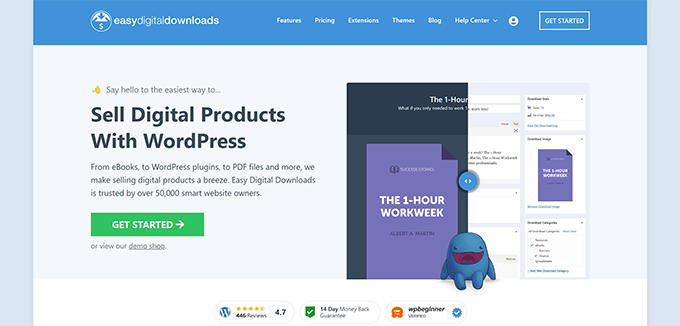
Easy Digital Downloads is the best WordPress eCommerce plugin for selling digital downloads. It is super easy to use and supports many payment providers including PayPal Commerce.

Easy Digital Downloads website

First, you need to install and activate the Easy Digital Downloads plugin. For more details, see our step-by-step guide on how to install a WordPress plugin.

Next, you need to install and activate the PayPal Commerce Pro addon for Easy Digital Downloads. You’ll install it like any other plugin in WordPress.

Note: You’ll need at least the ‘Extended’ plan for Easy Digital Downloads to unlock this addon.

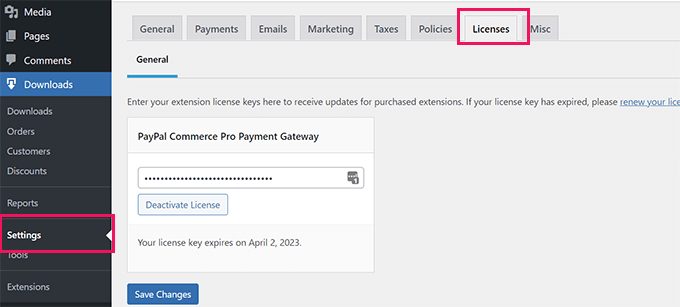
Once you have activated both plugins, login to your WordPress admin area and go to Downloads » Settings page, and switch to the Licenses tab.

Easy Digital Downloads Licenses

You can find your license information under your account on the Easy Digital Downloads website.

Next, you need to set up PayPal Commerce as your payment gateway in Easy Digital Downloads.

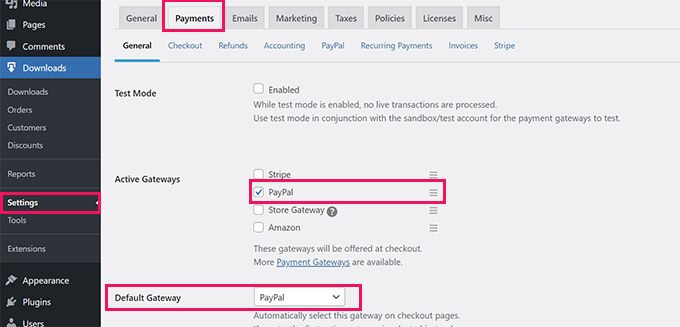
To do this, go to the Downloads » Settings page and switch to the ‘Payments’ tab.

Setting up payments

From here, you need to check ‘PayPal’ under the ‘Active Gateways’ section. Optionally, you can also choose it as your Default Gateway.

Don’t forget to click on the ‘Save Changes’ button to store your settings.

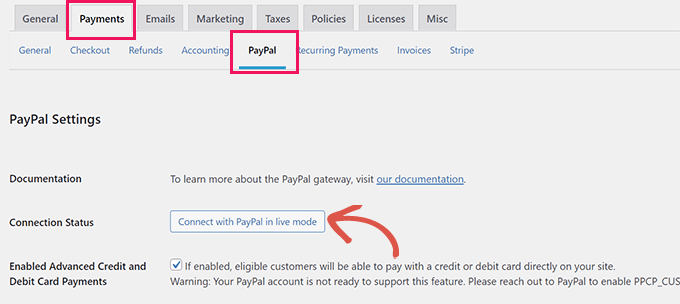
Next, you need to click on the ‘PayPal’ tab under ‘Payments.’

Connect with PayPal button

This will launch a popup where you can sign in with your PayPal account and follow the onscreen instructions to complete the connection.

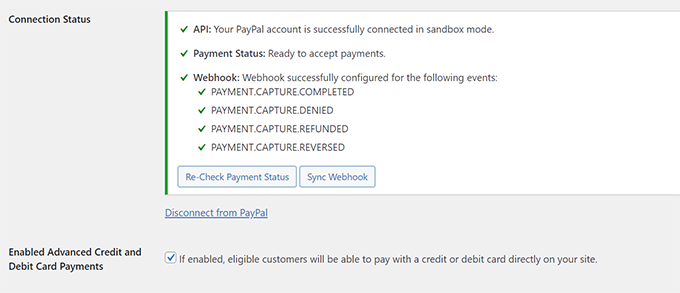
Once finished, you will be redirected back to your website where you will see a success message.

Connection successfull

After that, you need to check the ‘Enabled Advanced Credit and Debit Card Payments’ option.

Don’t forget to click on the ‘Save Changes’ button to store your changes.

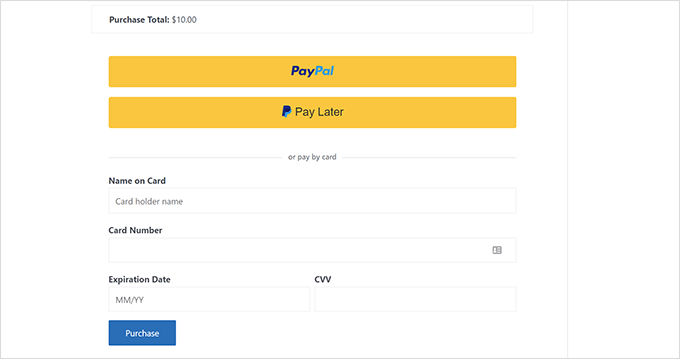
Now, when you sell any product with Easy Digital Downloads, your customers will see the PayPal Commerce payment option during the checkout.

PayPal Commerce checkout in Easy Digital Downloads

To learn more, see our complete guide on selling digital downloads in WordPress.

Method 3. Add PayPal Commerce in WordPress Using MemberPress

This method will use MemberPress, and it is recommended for users who want to sell memberships, pay-per-view content, or online courses on their websites.

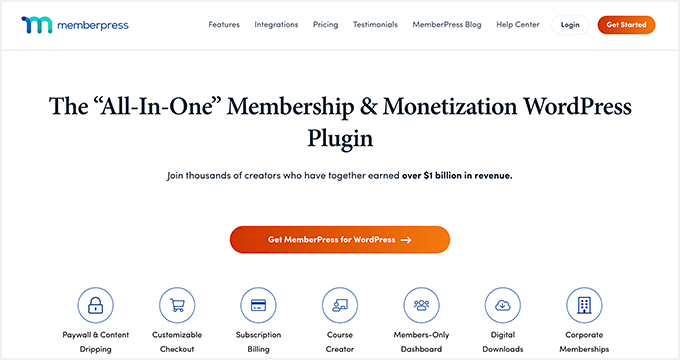
MemberPress is the best WordPress membership plugin on the market and allows you to easily sell subscriptions and online courses.

MemberPress

First, you need to install and activate the MemberPress plugin. For more details, see our step-by-step guide on how to install a WordPress plugin.

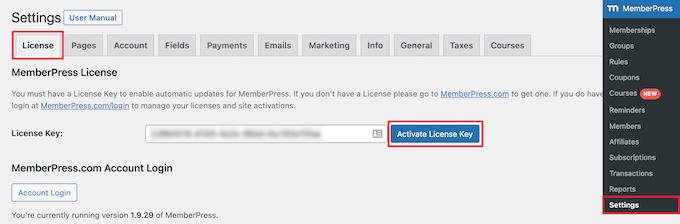
Upon activation, you need to visit the MemberPress » Settings page to enter your license key. You can find this information under your account on the MemberPress website.

MemberPress license key

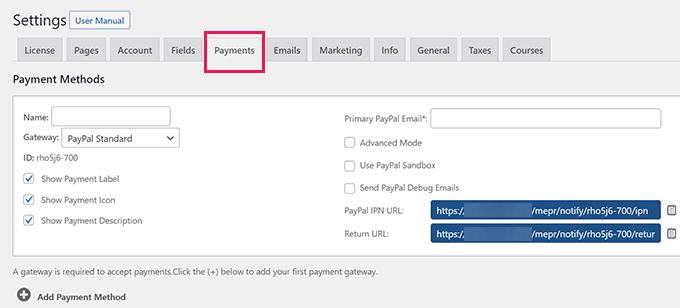
Next, you need to switch to the ‘Payments’ tab and click on the ‘(+) Add Payment Method’ button.

MemberPress supports Stripe and PayPal out of the box. You need to select ‘PayPal’ to continue.

Add PayPal standard

Go ahead and add your PayPal email address and click on the ‘Update Options’ button to save your settings.

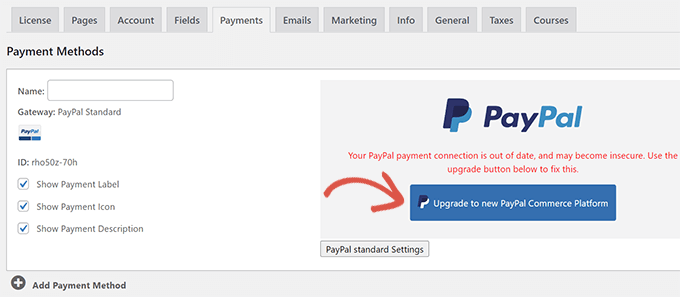
MemberPress will now show you that your PayPal method is outdated. You need to click on the ‘Upgrade to new PayPal Commerce Platform’ button to continue.

Upgrade to PayPal Commerce

Next, you will be asked to connect to your PayPal account to MemberPress.

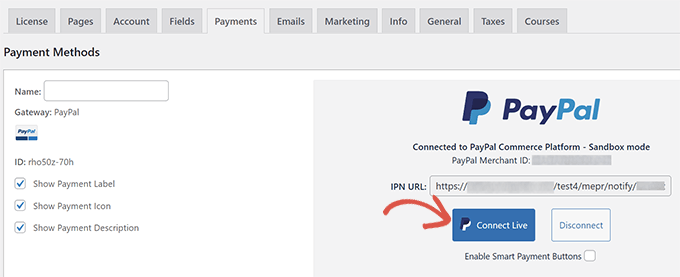
Click on the ‘Connect Live’ button to continue.

Connect MemberPress to PayPal Commerce

This will bring up a popup where you will be asked to log in with your PayPal account and give permission to connect MemberPress with your PayPal account.

Follow the on-screen instructions to finish the setup. Upon completion, you will be redirected back to your website where you continue setting up your membership website.

Note: If this is your first time using MemberPress, you may want to see our guide on how to build a membership site for detailed setup instructions.

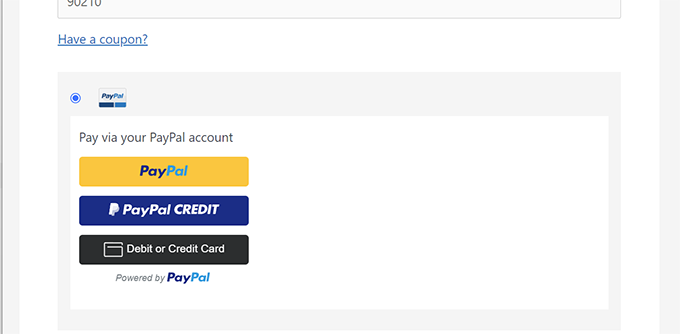
Once you have added subscription plans or online courses, your customers will be able to see PayPal Commerce as a payment option.

PayPal Commerce preview in MemberPress

We hope this article helped you connect PayPal Commerce to your WordPress website. You may also want to see our guide on making money online with your WordPress website or look at these proven online business ideas that you can start with very little investment.

If you liked this article, then please subscribe to our YouTube Channel for WordPress video tutorials. You can also find us on Twitter and Facebook.

The post How to Connect WordPress to PayPal Commerce first appeared on WPBeginner.


September 19, 2022 at 04:18PM
Saturday, September 17, 2022

The Complete Social Media Cheat Sheet for WordPress (Updated)

Are you looking for a social media cheat sheet that you can follow to quickly set up social media profiles the right way?

If you are serious about your website or blog, then you simply can’t ignore social media. The problem is that each of these platforms has different requirements for cover photos, profile images, article covers, etc. This makes it quite overwhelming for new users to get started.

In this article, we will share our ultimate social media cheat sheet for WordPress.

The Complete Social Media Cheat Sheet for WordPress

Why Do You Need a Social Media Cheat Sheet for WordPress?

If you have been running social media profiles for your WordPress blog or website, then you would notice that each platform has different requirements.

For example, Facebook has specific requirements for image sizes while Pinterest needs totally different proportions.

It can be difficult to remember all that information when creating social media images for your articles or profile.

A cheat sheet helps you quickly look up all these options. It will also ensure that you don’t miss anything important when creating a social media profile or publishing a new article on your WordPress website.

That being said, let’s get started with our ultimate social media cheat sheet for WordPress users.

Here is a quick overview of the things we will cover in this article:

Choose Your Social Media Platforms

There are so many social media websites, but not all of them are helpful in growing your business or bringing traffic to your website.

Apart from bigger sites like Facebook and Twitter, you can choose platforms that work best with your website’s target audience and niche.

For example, if you run a fashion blog, then you may want to use Instagram to promote your content.

A food and recipe blog may want to focus on YouTube and Yummly.

Home decor or DIY websites may find Pinterest helpful in finding the right audience.

Choosing the right platforms for your target audience will help you create an effective social media marketing strategy to grow your business.

Social Media Image Sizes Checklist

To promote your blog or business on social media, you will need to setup profiles, upload your website logo and a cover photo, and create images to accompany your articles and links.

You can see our article on how to easily create images for your WordPress blog to learn how to make beautiful images without hiring a graphic designer.

Now the problem is that each social media platform has specific requirements for these images. Not using the right size would make your images look skewed or stretched.

Here is our quick cheat sheet for social media image sizes that you can use when creating images for your social accounts.

Facebook Image Sizes

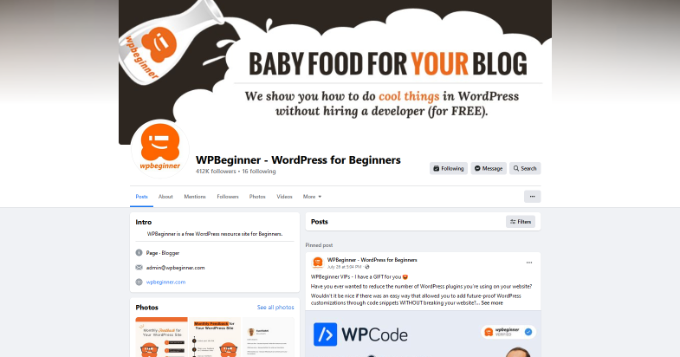
Facebook page preview

Facebook has specific recommendations for images to be used in different areas.

Cover image: 820 x 312 pixels on computers and 640 x 360 pixels for smartphones. Cover images should be less than 100 KB in filesize. It could be in JPEG or PNG file format. You can create a larger image while maintaining the same aspect ratio, and Facebook will automatically create smaller sizes to display on mobile devices.

Profile image: An square image of at least 170 x 170 pixels on computers and 128 x 128 pixels on smartphones. For business pages, this is where you would ideally display your custom logo. This image will be cropped to display as a circle.

Shared Image: 1200 x 630 pixels. This image will be displayed on your page with a maximum width of 470 pixels and in the feed maximum width of 600 pixels.

Group cover image: 1640 x 856 pixels.

Twitter Image Sizes

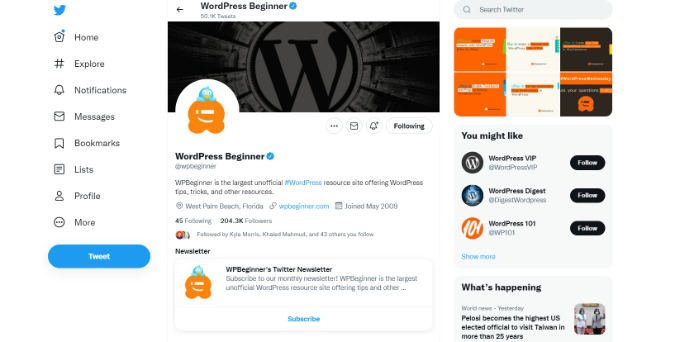
Twitter preview

Twitter is the internet’s conversation hub. Following are the recommended image sizes for Twitter to make your profile more engaging and professional.

Header image: 1500 x 500 pixels. This full-width image appears as the cover image of your Twitter profile page.

Profile image: 400 x 400 pixels. This square image is cropped to be displayed in a circular format. Twitter allows you to upload JPG, PNG, and GIF formats with a maximum file size of 2MB.

In-stream image: 1200 x 675 pixels. This image is displayed when you share an article, retweet, embed a tweet, upload images, and more. If you are already using Twitter Cards then Twitter will be able to pick the correct image to display with your article description and title.

Instagram Image Sizes

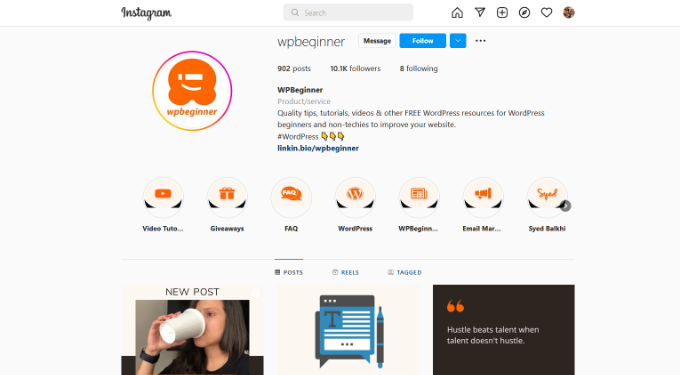
Instagram preview

Instagram’s main content is already in a visual format. If you are uploading photos directly from your phone using the Instagram app, then it will automatically take care of appropriate image sizes for you.

For other uploads, you can follow these Instagram image size recommendations for the best results.

Profile image: 320 x 320 pixels. You can use larger image dimensions as long as it is a square image.

Image thumbnail: 161 x 161 pixels. This image is displayed as your thumbnails for your photos.

Shared photos: 1080 x 1080 pixels. You can use a higher resolution image as long as it is a square image.

Shared videos: 1080 pixels wide.

Instagram Stories: 1080 x 1920 pixels or minimum 600 x 1067 pixels. File size cannot exceed more than 4 GB which is quite a lot for a high-quality video.

YouTube Image Sizes

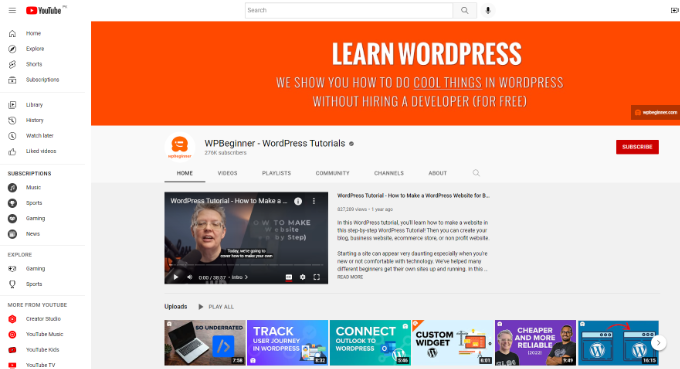
YouTube channel preview

YouTube is not only the second most popular social media platform but also the second most popular search engine. Your YouTube channel image, cover image, and video thumbnails are crucial in getting more views for your videos.

YouTube Channel cover image: 2048 x 1152 pixels. You need to make sure that the image is horizontally centered so that it looks good on mobile devices where YouTube may crop the image to fit the user’s screen size.

Channel icon: 800 x 800 pixels. This image is displayed as your channel icon and may sometimes be cropped as a circular image.

Video thumbnail: 1280 x 720 pixels. Ask any YouTube creator and they will tell you that the video thumbnail is the most important part of video optimization on YouTube. This is what YouTube users will see on their homepage, in search, and in other areas. A highly optimized video thumbnail helps you get more views and grow your channel.

Pinterest Image Sizes

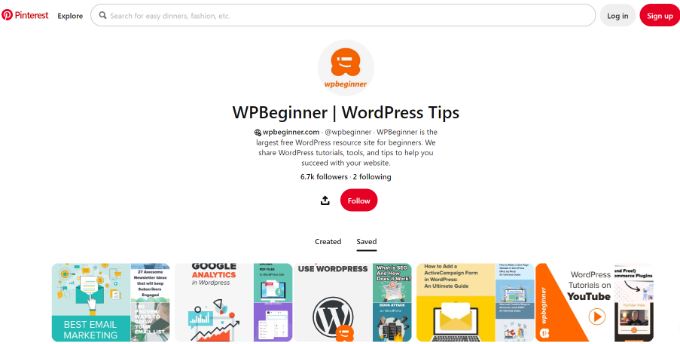
Pinterest preview

Pinterest is a visual social sharing platform, which means images play the most significant role in growing your Pinterest following.

Profile image: 165 x 165 pixels. You can upload a higher resolution image with a maximum file size of 10 MB.

Profile cover: 800 x 450 pixels. Select a board to feature as your profile’s cover. Pinterest will automatically fetch pins from that board to create your profile cover.

Board cover image: 222 x 150 pixels. Pinterest allows you to choose the cover image from the pins you have saved for that board.

Pinned image preview: 236 pixels wide. Pinterest automatically scales your pins to fit their grid. For best results, you need to upload the images with an aspect ratio of 2:3 to 1:3.5.

LinkedIn Image Sizes

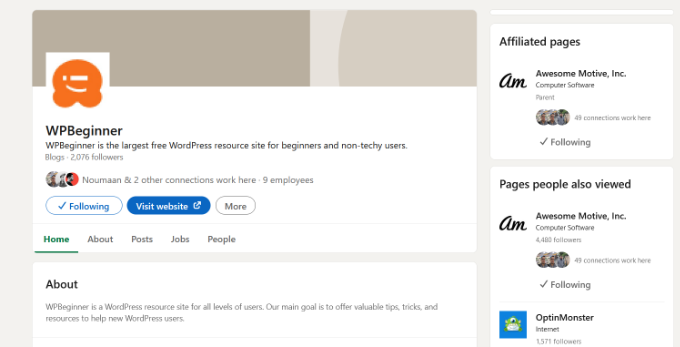
LinkedIn preview

LinkedIn can be a great source of traffic, connections, and building a brand image. It is a social networking platform for professionals and businesses, which makes it a powerful tool to help you grow your business.

Personal profile image: 400 x 400 pixels with a maximum image file size of 10 MB.

Banner image for personal profile: 1584 x 396 pixels with a maximum file size of 4 MB.

Company cover image: 1128 x 191 pixels.

Shared image: 1200 x 627 pixels.

Company profile / logo image: 300 x 300 pixels or higher resolution image with 1:1 aspect ratio.

Setting up Social Media Optimization in WordPress

Now that you have learned about proper social media image sizes, the next step is to make sure that your WordPress site is optimized for social media.

The most important aspect of this optimization is to set up automatic inclusion of Open Graph metadata. Open Graph metadata is a technology that allows you to include additional information to your web pages that social media and search engines need.

First, you need to install and activate the All in One SEO plugin. For more details, see our step-by-step guide on how to install a WordPress plugin.

AIOSEO is the best WordPress SEO plugin that helps you get more traffic from search engines. It is also a complete website optimization tool including support for social media platforms as well.

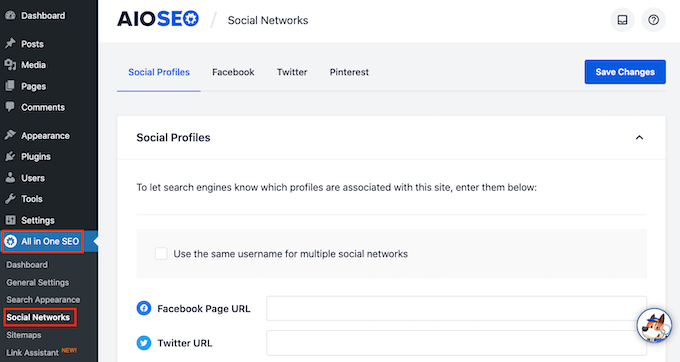
Upon activation, you need to visit All in One SEO » Social Networks page. From here, you need to first add your social media profile URLs under the ‘Social Profiles’ tab.

The AIOSEO SEO plugin for WordPress

You don’t need to add all URLs, you can simply skip the social media websites where you don’t have a profile.

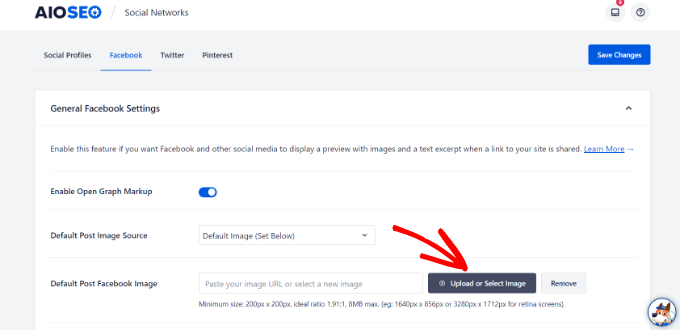
Next, you need to switch to the Facebook tab. From here you can see that AIOSEO enables Open Graph metadata by default.

Upload default Facebook image

Below that you need to provide a default post Facebook image for your website’s front page. The image you provide here will be displayed when someone shares your website’s front page or root URL on Facebook.

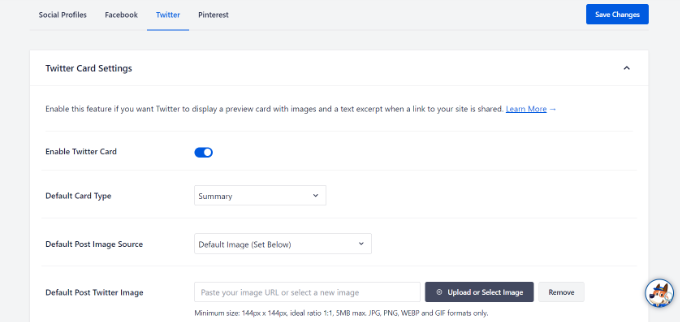
Next, switch to the Twitter tab. Here you can choose the default card display for your website.

Add Twitter card details

A ‘summary with large image’ option will display your Twitter share image with a summary of your article.

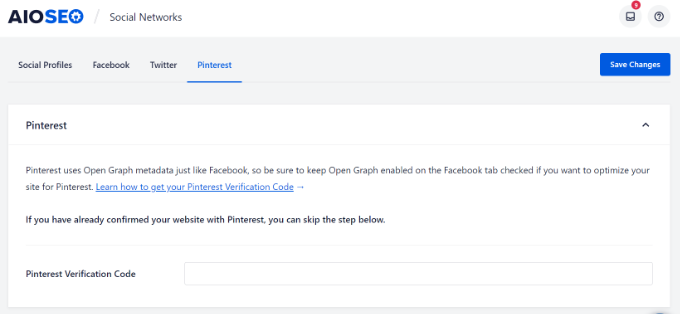
You can now switch to the Pinterest tab. From here you can add the Pinterest confirmation tag to your website.

You can click on the link on the screen to claim your website and get the confirmation code. For more details, you can see our guide on how to verify your WordPress site on Pinterest.

Claim your Pinterest account

Don’t forget to click on the ‘Save Changes’ button to store your settings.

Social Media Settings for WordPress Posts and Pages

Just like the SEO settings for posts and pages, you can also optimize them for social media websites.

AIOSEO plugin allows you to easily set social options for your individual posts and pages.

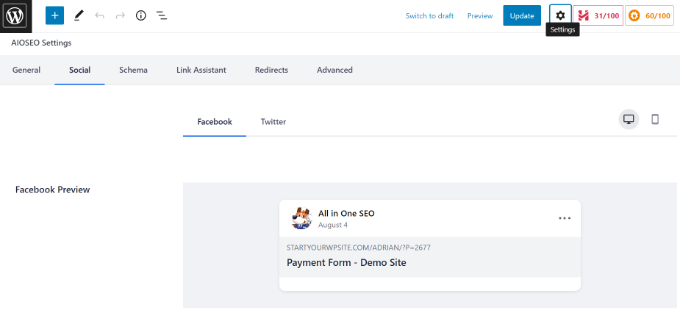
Simply edit the blog post or page you want to optimize, and then scroll down to ‘AIOSEO Settings’ section below the editor.

Add social image in content editor

Switch to the ‘Social’ tab and you can upload a custom title and description as well as an image for Facebook and Twitter shares. You can also see a preview of what your post will look like when shared on social media.

After that, you can click on ‘Publish’ or ‘Update’ to save your post or page.

Adding Social Sharing Buttons to Your Website

The easiest way to promote your website on social media is by encouraging your users to share your content. This can be achieved by adding social sharing buttons to your blog posts and pages.

First, you need to install and activate the Shared Counts plugin. For more details, see our step-by-step guide on how to install a WordPress plugin.

Shared Counts is the best social media plugin for WordPress. It allows you to easily add social sharing buttons to your WordPress blog posts.

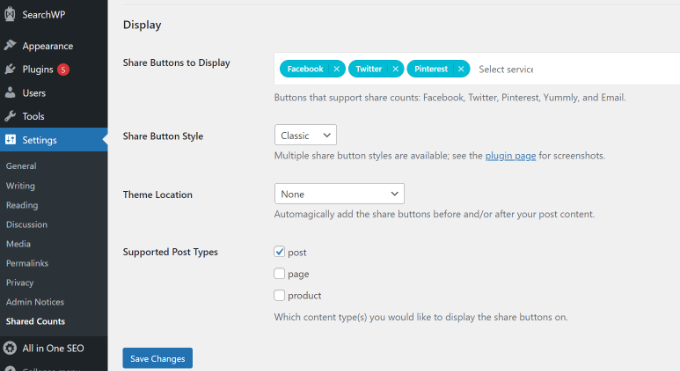
Upon activation, simply head over to Settings » Shared Counts page to configure plugin options.

Share counts settings

From here you need to scroll down to the ‘Display’ section and select the social media websites you want to display in the ‘Share Buttons to Display’ field.

After that, you can choose a button style and location where you want to display the buttons.

Don’t forget to click on the ‘Save Changes’ button to store your settings.

You can now visit any post on your website to see social sharing buttons in action.

For more detailed instructions, see our guide on how to add social share buttons in WordPress.

Setting up Automated Social Sharing in WordPress

Social media platforms are great for building a following and bringing more traffic to your website. However, it can become quite time-consuming to share content across different platforms and engage with your audience.

Luckily, there are several online tools that you can use to automate the process.

We hope this social media cheat sheet for WordPress helped you improve your social media marketing strategy. You may also want to see our list of best email marketing services and how to start your own podcast.

If you liked this article, then please subscribe to our YouTube Channel for WordPress video tutorials. You can also find us on Twitter and Facebook.

The post The Complete Social Media Cheat Sheet for WordPress (Updated) first appeared on WPBeginner.


September 17, 2022 at 03:38PM