Thursday, September 29, 2022

How to Track Website Visitors to Your WordPress Site

Are you looking for an easy way to track your website visitors in WordPress?

Tracking the number of website visitors on your site can help you get insights to grow your business. You can better understand your audience by looking at which posts they like, where they come from, and how they use your website.

In this article, we’ll show you how to easily track website visitors on your WordPress site (step by step).

How to track website visitors to your WordPress

Why You Need to Track Your Website Visitors

Tracking website traffic is one of the most important indicators of your website’s performance. More visitors means more opportunities for converting them into subscribers and customers.

It also unlocks promising insights that you may have missed.

For example, you can find out which country or city your visitors are from. This can help you deliver personalized content or figure out which languages you should translate your website into.

You can see which blog post is getting a lot of traffic and then try to come up with similar topics to help your users. Another benefit of tracking your WordPress website visitors is that you can uncover which source they used to find your website.

For instance, you get to see whether users perform a search on Google and then land on your webpage, or maybe they found your brand-mentioned link on another site or platform.

This way, you can focus your marketing efforts and investment on channels that work. That said, let’s take a look at how to set up website visitor tracking in Google Analytics.

Setting up Google Analytics to Track Website Visitors

Google Analytics is the most powerful website visitor tracking software on the market. It allows you to see how many visitors you are getting and what they do while visiting your website.

However, setting up Google Analytics requires editing code snippets. This can be tricky for beginners, and the slightest mistake can mess up your website tracking.

This is where MonsterInsights comes in handy. It’s the best Google Analytics plugin for WordPress. You can use it to connect Google Analytics with your site without editing code.

First, you need to install and activate the MonsterInsights plugin. For more details, see our step-by-step guide on how to install a WordPress plugin.

Note: the free version of MonsterInsights is a great place to start for beginners.

Upon activation, you will be taken to a welcome screen, and you will also see a new menu item labeled ‘Insights’ in your admin area. On the welcome screen, click the ‘Launch the Wizard’ button.

Launch setup wizard

Next, you can follow the onscreen instructions to connect your site with analytics. For more details, please see our guide on how to install Google Analytics in WordPress.

With MonsterInsights, you can also add a Google Analytics 4 (GA4) property in WordPress. It is the latest analytics version by Google and will soon replace the old Universal Analytics. If you haven’t created a GA4 property yet, then now is the best time to switch to Google Analytics 4.

With MonsterInsights dual tracking, you can start sending data to the new property and use your current Universal Analytics property simultaneously.

MonsterInsights Dual Tracking GA v4

You are now ready to use MonsterInsights and view your website traffic reports inside your WordPress dashboard.

Viewing Website Visitor Reports in WordPress

To view your website visitors, you can use different MonsterInsights reports. They help you save time, as you don’t have to navigate through Google Analytics and try to find data that matters for your business.

Note: Dashboard reports will vary based on the MonsterInsights plan you use. If you upgrade to the MonsterInsights Pro license, then you can view more reports inside your WordPress admin panel.

Let’s look at each report and how you can use it to track website visitors.

Overview Report

To start, go to the Insights » Reports page from your WordPress admin area. Here, the first report you will see will be the ‘Overview’ report.

Overview report in MonsterInsights

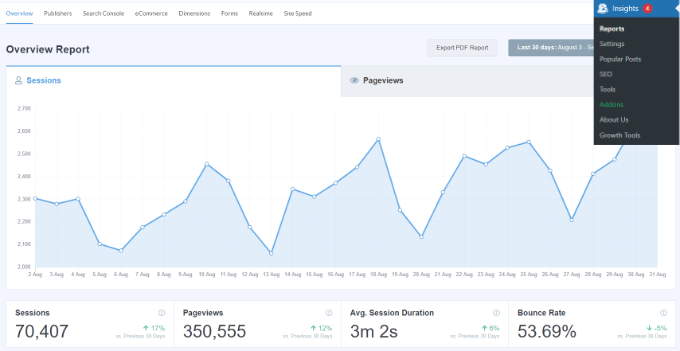
You can select the date range and then see your website’s total number of sessions and pageviews, along with the average session duration and bounce rate.

The report also shows you which device your visitors use to visit your site. This can help you optimize your website for different devices and make sure you have a responsive WordPress theme.

It also gives you a breakdown of new and returning visitors.

Device breakdown and top countries report

If you scroll down, you will see more reports that will help you see where your visitors are coming from.

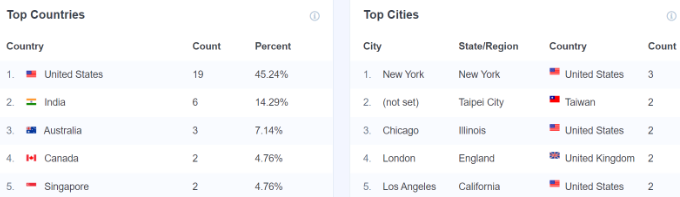
The ‘Top Countries’ report shows the region where most of your traffic is from. You can use this data to come up with different strategies based on geolocation.

Next to it is the ‘Top Referrals’ report, which shows the websites that are sending traffic to your site. Using this information, you can create partnerships, find guest post opportunities, or uncover similar websites to promote your posts and products.

Top countries and referrals report

The last report you can view under Overview is the ‘Top Posts/Pages.’

These are landing pages and blog posts that attract the most website visitors.

Top posts and page report

Publishers Report

Next, you can click on the ‘Publishers’ tab from the top menu and get more insights about your visitors.

The report shows you more stats about your popular landing pages, the number of visits they get, the average duration, and the bounce rate.

Top landing pages report

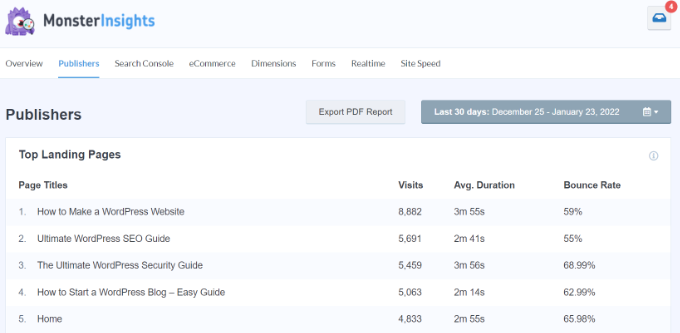
You can use this information to create more content topics and increase your web traffic.

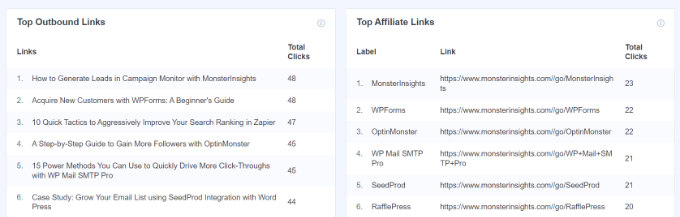
It also tells you which outbound links and affiliate links are getting the most clicks. If you offer downloadable content, then you can also track which file type gets the most downloads.

Outbound and affiliate links report

Another important report you can view for tracking your website visitors is by looking at the demographics. MonsterInsights shows the age and gender of your visitors.

You can do a lot of things with this information. For example, it can help you set the right audience for retargeting ads on Facebook. Another way of using the data is by creating content for specific age groups and gender.

Demographics and interest reports

The plugin also shows an Interests report and automatically tracks scroll depth on your site.

Using scroll depth information, you can add your banner ads and call-to-action buttons in the right place to get more conversions.

Search Console Report

MonstrInsights can help you find out which search terms people enter in Google to find your website through its ‘Search Console’ report.

The report displays data about the Top 50 Google Search Terms, their number of clicks, impressions, CTR (click-through rate), and average position.

Search console report

You can boost your website traffic by optimizing your website for similar keywords and improving the rankings of search terms that are not in the top 10 search results on Google.

To get this set up, be sure to check out our guide on how to add a WordPress site to Google Search Console.

Ecommerce Report

If you have an online store, then MonsterInsights can help you track its performance.

The enhanced ‘eCommerce’ report gives you an overview of the conversion rate, number of transactions, revenue, and average order value of your online store.

Ecommerce report in MonsterInsights

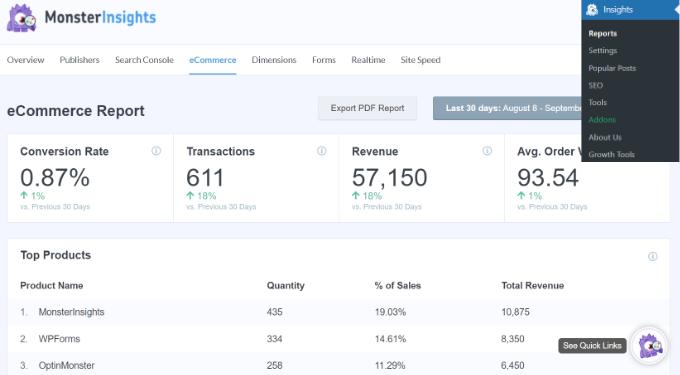
It even shows the most popular products that generate a lot of sales. However, to track your website visitors, you can scroll to the ‘Top Conversion Sources’ report.

These are referral websites that send highly converting traffic to your site. You can invest in promoting your store and products on such websites to boost traffic and sales.

Top conversion sources

For more details, see our guide on how to set up eCommerce tracking in WordPress.

Dimensions Report

MonsterInsights allows you to track additional information about your visitors using custom dimensions. These reports are not available by default in Google Analytics and will enable you to track custom interactions on your website.

For instance, you can set up tracking popular categories, tags, post types, authors, focus keywords, and more. It helps you see what your visitors like on your website and when is the best time to publish blog posts.

Popular authors dimension

Real-Time Report

The last report you can view in WordPress for tracking your website visitors is the ‘Realtime’ report.

It shows how many people are currently active on your site and shows you the real-time count of your traffic. This report is very useful if you’re running a promotional campaign and want to track its performance on runtime.

View real-time report in MonsterInsights

In addition, you can also view the geographic location, top pages, and top referral traffic sources that are driving website visitors at any given time using the Realtime report.

Using these reports, you can easily track your website visitors and create strategies to grow your business.

Realtime top country and city report

We hope this article helped you learn how to track your website visitors to your WordPress site. You may also want to take a look at our ultimate guide to Google Analytics 4 for beginners and tips to get more traffic to your website.

If you liked this article, then please subscribe to our YouTube Channel for WordPress video tutorials. You can also find us on Twitter and Facebook.

The post How to Track Website Visitors to Your WordPress Site first appeared on WPBeginner.


September 29, 2022 at 05:00PM

Wednesday, September 28, 2022

How to Properly Set Up the TikTok Ad Pixel in WordPress

Do you need to set up a TikTok ad pixel on your WordPress site?

When you advertise your website on TikTok, you will need to add code to your site to track the effectiveness of your ad campaign. When your TikTok ads and sponsored posts drive traffic to your website, you can see what content drives the most conversions.

In this article, we’ll show you how to properly set up the TikTok ad pixel in WordPress.

How to Properly Set Up the TikTok Ad Pixel in WordPress

Why Use the TikTok Ad Pixel in WordPress?

According to latest marketing research, TikTok is one of the most popular social networks in the world with over 1 billion monthly active users. This is why many online store owners and small business owners are using TikTok advertising to reach their audience.

TikTok ad pixel helps you maximize the ROI (return on investment) from your TikTok ads because it lets you track the effectiveness of your campaigns.

You can easily add the TikTok ad pixel on your WordPress website or WooCommerce store, so you can easily monitor user activity, ad sales, and optimize your campaigns.

With that being said, let’s take a look at how to properly set up the TikTok ad pixel in WordPress.

Creating the TikTok Pixel Code

To get started, you need to go to the TikTok for Business website and sign into your account. After that, you should navigate to the Assets » Events page.

Navigate to Assets » Events in the TikTok Ads Manager

On the next page, you need to let TikTok know whether you will be sharing events that happen on your app or website.

You will be tracking events that happen on your website, so you need to click the ‘Manage’ button under ‘Web Events’.

Click the Manage Button Under Web Events

Next, you will see a message stating that you need to install a TikTok pixel.

Simply click the ‘Create Pixel’ button.

Click the Create Pixel Button

Now you should give the pixel a name, such as the name of your website.

After that, you need to select ‘TikTok Pixel’ as your connection method and then click the ‘Next’ button.

Name the Pixel Then Select the TikTok Pixel Option

In the next step, you need to let TikTok know that you will install the pixel by copying the code to your website.

You should select the ‘Manually Install Pixel Code’ option and then click the ‘Next’ button.

Select the Manually Install Pixel Code Option

You will now be able to see the pixel code.

You should copy it to the clipboard by clicking the ‘Copy Pixel Code’ button.

Click the Copy Pixel Code Button

Now you can visit your website to set up the TikTok ad pixel in WordPress.

Adding the TikTok Pixel Code in WordPress

The easiest way to add the TikTok ad pixel code to your WordPress site is with WPCode, the most powerful code snippet plugin available for WordPress. It lets you easily add custom code to any area of your site, and best of all, it’s free.

First, you need to install and activate the free WPCode plugin. For more details, see our step-by-step guide on how to install a WordPress plugin.

Once activated, you need to go to Code Snippets » Headers & Footer.

Simply paste the TikTok pixel code you copied earlier into the ‘Header’ field and then click the ‘Save Changes’ button.

Use the WPCode Plugin to Easily Ad the Pixel Code to Your Website

That’s it! The TikTok ad pixel has been added to your site.

Now you will need to switch back to the TikTok website to create the events you wish to track.

Creating and Testing the Events You Wish to Track

When you return to the TikTok Ads Manager website you will use the Event Builder to complete the setup. You should be looking at the ‘Create events to track actions’ page. There are two types of events you can track.

First, there are URL events. These will track each time someone visits a specific page on your site, such as a product page or order confirmation page.

Simply click the ‘+ Enter URL Keywords’ button and enter the event type and some keywords from the URL.

Create URL and Click Events in TikTok

Second, there are click events. These events track when someone clicks a website element like an ‘add to cart’ button or a form submission button.

When you click the ‘+ Add Web Elements’ button you will be prompted to install the ‘Pixel Helper’ Chrome extension. This extension will help you add click events, and it also tests to make sure your TikTok ad pixel is working correctly.

For detailed instructions on how to add both types of events, see the official TikTok Business Help Center documentation on how to create events.

We hope this tutorial helped you learn how to properly set up the TikTok ad pixel in WordPress. You may also check out our guide on how to track website visitors or our list of the best Instagram plugins for WordPress.

If you liked this article, then please subscribe to our YouTube Channel for WordPress video tutorials. You can also find us on Twitter and Facebook.

The post How to Properly Set Up the TikTok Ad Pixel in WordPress first appeared on WPBeginner.


September 28, 2022 at 04:11PM

Tuesday, September 27, 2022

How to Add Klarna Payments to WordPress (2 Easy Ways)

Are you looking for a way to offer Klarna payments on your website or eCommerce store?

Klarna allows you to add financing and installment plans to your website. You can use it to offer a ‘Buy Now, Pay Later’ option and encourage customers to purchase products.

In this article, we’ll show you how to add Klarna payments to WordPress.

How to add Klarna payments to WordPress

What is Klarna & Why Add It to WordPress?

Klarna is a Swedish fintech company offering online payment methods for website and online store owners.

Adding Klarna to your online store can help boost conversions and average order value. It makes it convenient for customers to purchase an expensive product or luxury items they want and pay over time.

Klarna offers 4 ways customers can buy now and pay later for a product:

  • split the purchase amount into 4 interest-free payments
  • use a debit or credit card to pay the total amount
  • purchase a product now and pay in 30 days
  • get financing for your purchase and pay installments over 6 to 24 months.

However, an important thing to remember is that Klarna’s payment options depend on your customer’s location. For example, in the United States, customers can get installment and financing options, but not the ability to pay in 30 days or fully pay using a credit card.

That said, let’s see how you can add Klarna payments in WordPress. We’ll show you 2 methods, including WP Simple Pay and WooCommerce. You can click the links below to jump ahead to your preferred section.

Method 1: Add Klarna Payments Using WP Simple Pay

The easiest way of adding Klarna payments in WordPress is by using WP Simple Pay. It is the best Stripe payment plugin for WordPress and allows you to easily collect online payments using Klarna, with no need to set up a shopping cart.

For this tutorial, we’ll use the WP Simple Pay Pro plan because it includes the Klarna payment forms and ‘Buy Now, Pay Later’ option. There is also a free version of WP Simple Pay you can use.

The first thing you need to do is install and activate the WP Simple Pay plugin. If you need help, then please see our guide on how to install a WordPress plugin.

Upon activation, the plugin will launch the setup wizard. You can simply click the ‘Let’s Get Started’ button to continue.

The WP Simple Pay Setup Wizard Will Start Automatically

On the next screen, you’ll need to enter the license key. You can find the license key in your WP Simple Pay account area.

After that, go ahead and click on the ‘Activate and Continue’ button.

You’ll Be Asked to Enter Your WP Simple Pay License Key

Next, the plugin will ask you to connect your Stripe account. Stripe is a payment gateway that lets you accept online payments with ease.

Simply click the ‘Connect with Stripe’ button.

You Need to Connect WP Simple Pay to Stripe

You can now log in to your Stripe account and follow the onscreen instructions to connect the payment gateway with WP Simple Pay.

If you don’t have a Stripe account, then you can create one. Anyone with a legitimate business can set up a Stripe account. In addition, you’ll need to have SSL encryption on your site. For more details, please see our guide on how to get free SSL certification for a WordPress website.

Once you’ve connected Stripe with WP Simple Pay, you’ll be redirected to the setup wizard.

In the next step, the plugin will ask you to configure emails. For example, you can enable options to send payment receipts to customers, notify them about upcoming invoices, and get payment notifications.

Configure Your WP Simple Pay Emails

Go ahead and enter your email address in the ‘Send to’ field and then click the ‘Save and Continue’ button.

After that, you’ll see the last step in the setup wizard. Go ahead and click the ‘Create a Payment Form’ button.

WP Simple Pay Setup Is Complete

Create a Klarna Payment Form in WP Simple Pay

You can also create new payment forms by going to WP Simple Pay » Add New from your WordPress dashboard.

The plugin offers multiple pre-built form templates. To add Klarna, go ahead and select the ‘Klarna (Buy Now, Pay Later) Form’ template.

Select Klarna form template

Next, you can customize your payment form.

For instance, under the ‘General’ tab, you get options to rename the form, add a description, and select a form type.

Edit the payment form general settings

After that, you can switch to the ‘Payment’ tab.

Here, you’ll find payment mode settings and price options. The plugin lets you add multiple prices, the cost of the product, the currency that will appear in the form, and whether you’d want a one-time payment or a recurring subscription.

Change payment form details

Next, you can scroll down and choose different payment methods.

Ensure that the ‘Klarna’ option is selected. You can also add more options like credit card and ACH Direct Debit.

Select Klarna payment method

From here, switch to the ‘Form Fields’ tab and choose which fields to add.

You can also change the order of existing fields by simply dragging and dropping them. Plus, there are more form fields to add from the dropdown menu at the top.

Add form fields

After editing the form fields, head to the ‘Payment Page’ tab. WP Simple Pay allows you to create a dedicated payment page for your Klarna form.

Just make sure to click the ‘Enable a dedicated payment page’ checkbox.

Add a dedicated page

You can change the permalink for the page, select a color scheme, add the form title and description, add a logo, and change the text in the footer.

When you’ve made the changes, go ahead and publish your Klarna form. Now, visit the dedicated page to see the Klarna form in action.

Klarna payment form dedicated page preview

Alternatively, you can embed the payment anywhere on your website using the WP Simple Pay block.

Simply edit a page or add a new one. Once you’re in the content editor, click the ‘+’ button, and then add the ‘WP Simple Pay’ block. Next, you just select your form from the dropdown menu.

Add a WP simple pay block

After that, go ahead and publish your page.

You can now visit your WordPress website to see the Klarna payment form in action.

Klarna payment form preview

Method 2: Add Klarna Payments in WooCommerce

You can also add Klarna payments in WordPress using the WooCommerce plugin. WooCommerce is the most popular eCommerce platform in the world, and it’s built on top of WordPress.

It has built-in payment options, but you can add a free Klarna Payments extension for your online store.

Before you can use Klarna in WooCommerce, first you need to make sure that you have setup an online store using WooCommerce.

After that, you’ll need to install and activate Klarna Payments for WooCommerce. For more details, please see our guide on how to install a WordPress plugin.

Upon activation, you can go to WooCommerce » Settings from your WordPress dashboard and click on the ‘Payments’ tab.

Set up Klarna payments in WooCommerce

Here, you will have different payment options offered by WooCommerce, including Klarna Payments. Simply click the ‘Set up’ button in front of Klarna Payments.

Next, you can check the ‘Enable Klarna Payments’ to activate the payment service in WooCommerce.

Besides that, there are also options for changing the title, enabling test mode, showing your customers a link to what is Klarna, and more.

Configure Klarna settings

When you’re done, don’t forget to save your changes.

Next, you can go to your WooCommerce store and visit the checkout page to see Klarna as a payment option.

View Klarna payment method at checkout

It’s important to note that Klarna Payments work with merchant accounts and is only available in Australia, Austria, Belgium, Canada, Denmark, Germany, Finland, France, Italy, Netherlands, Norway, New Zealand, Sweden, Spain, Switzerland, United Kingdom, and the United States.

We hope this article helped you learn how to add Klarna payments to WordPress. You may also want to see our ultimate guide to WordPress SEO and our beginner’s guide on how to start an email newsletter.

If you liked this article, then please subscribe to our YouTube Channel for WordPress video tutorials. You can also find us on Twitter and Facebook.

The post How to Add Klarna Payments to WordPress (2 Easy Ways) first appeared on WPBeginner.


September 27, 2022 at 04:04PM