Tuesday, October 18, 2022

How to Create a Simple Event Calendar with Sugar Calendar

Do you want to add an event calendar to your WordPress website?

A calendar is a great way to share in-person and virtual events with your visitors. You can use one to promote your upcoming events, get more people to attend, and help with brand awareness.

In this article, we’ll show you how to easily create a simple event calendar in WordPress with Sugar Calendar.
How to create a simple event calendar with Sugar Calendar

Why Create a Simple Event Calendar For Your WordPress Website?

By adding a calendar in WordPress, you can show upcoming events to your visitors.

This makes it easy for people to learn about your upcoming webinars, virtual retreats, online sermons, coaching calls, and more. In this way, a calendar can promote your events and encourage more people to attend.

If you have a membership website or a forum, then you can even accept user-submitted events. This is a great way to build a community, attract new visitors, and keep your calendar updated with the latest events. You’ll also save time since you don’t need to research upcoming events and add them to the calendar yourself.

With that being said, let’s see how you can add a simple event calendar to your site.

How to Create a Simple Event Calendar in WordPress

The easiest way to add an event calendar to WordPress is by using Sugar Calendar. It is the best WordPress calendar plugin and has everything you need to create multiple calendars, set start and end times for your events, sync with Google Calendar, and more.

The first thing you need to do is install and activate the Sugar Calendar plugin. For more details, see our step-by-step guide on how to install a WordPress plugin.

Upon activation, head over to the Calendar » Settings page. Here, you can enter your license key into the ‘License Key’ field.
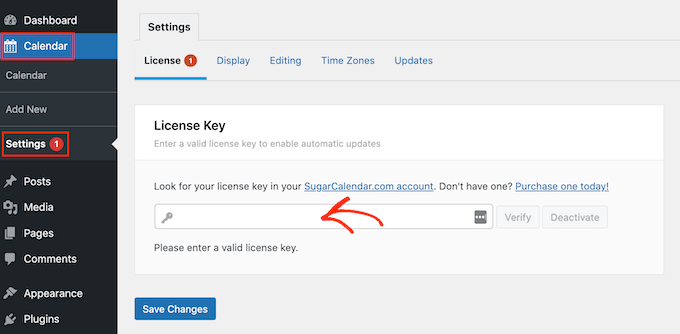
Adding a license to Sugar Calendar

You’ll find this key by logging into your Sugar Calendar account. It’s also in the email you got when you purchased Sugar Calendar.

After that, click on the ‘Verify’ button to check that your license key is valid. Finally, you can click on ‘Save Changes’ to store your settings.
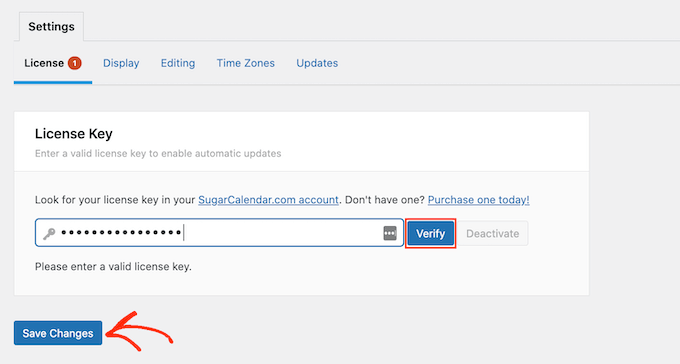
Verifying the Sugar Calendar license in WordPress

Once you’ve done that, you’re ready to create a calendar by going to Calendar » Calender.

Here, click on the ‘Calendars’ tab.
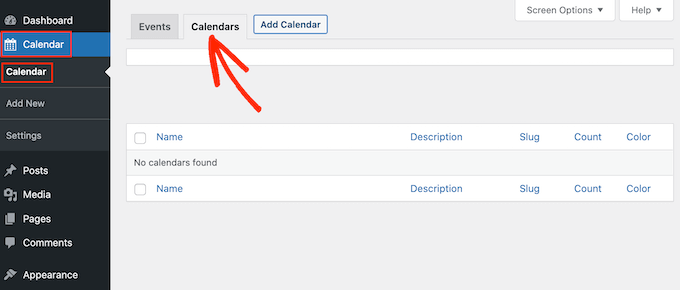
Creating a new calendar in WordPress

You can now click on the ‘Add Calendar’ button.

This opens a popup where you can type a title into the ‘Name’ field. Sugar Calendar lets you create multiple calendars, but it only adds a single calendar view to your site. Visitors can switch between the different calendar views using a dropdown menu.

That being said, the ‘Name’ should help visitors tell the difference between the various calendars.
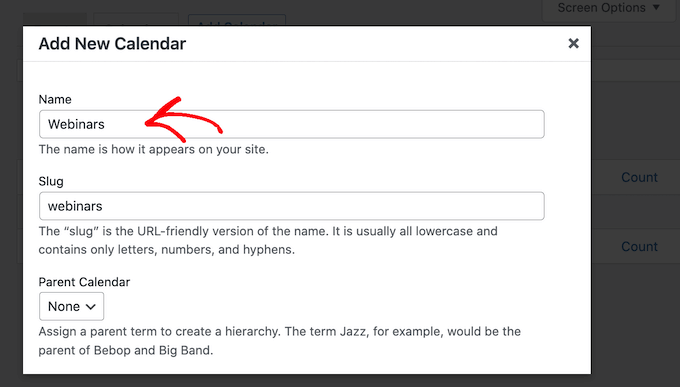
Giving your simple event calendar a name

Similar to child pages, you can arrange calendars in parent-child relationships.

Children appear beneath their parents in the WordPress dashboard, so this can be a useful way to organize your calendars. This is particularly true if you have lots of different calendars.

All calendars are parent calendars by default. To create a child calendar, you’ll need to open the ‘Parent’ dropdown and then choose the calendar that you want to use as the parent.

Next, you can add an optional description. Depending on your WordPress theme, this may appear next to the calendar on your website, but not all themes show the calendar description. If you do add a description, then always check that it shows up on your WordPress website.

Finally, you may want to add a color that will appear next to the calendar in your WordPress dashboard. This color-coding can help you group related calendars together, or easily identify a particular calendar.
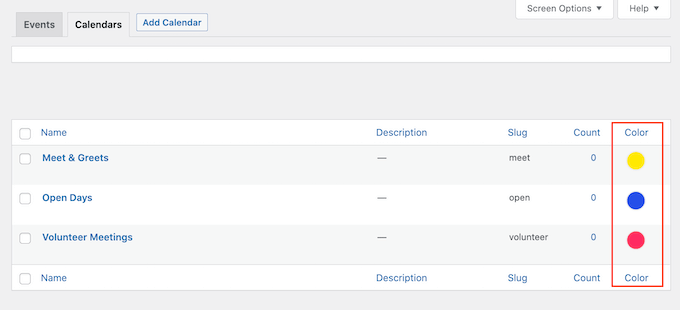
Organizing the calendars on your WordPress blog

To add a color, simply click on the ‘Select Color’ switch and then make your selection using the controls that appear.

When you’re happy with the information you’ve entered, click on ‘Add New Calendar’ to go ahead and create your first Sugar Calendar.
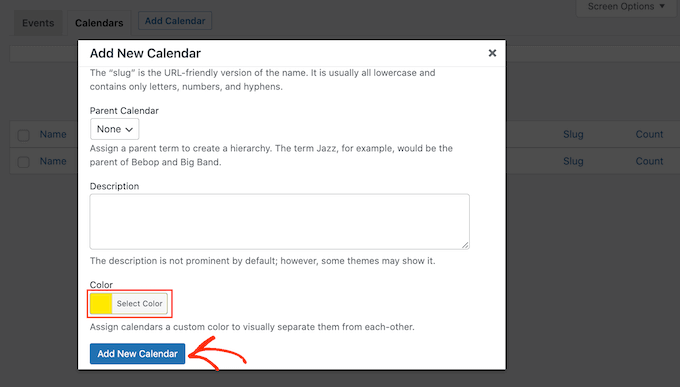
Creating a color-coded WordPress calendar

You can create multiple calendars simply by repeating the same process described above.

Adding Events in Sugar Calendar

Once you’ve created a calendar, you’re ready to add events to that calendar.

To start, select the ‘Events’ tab and then click on the ‘Add Event’ button.
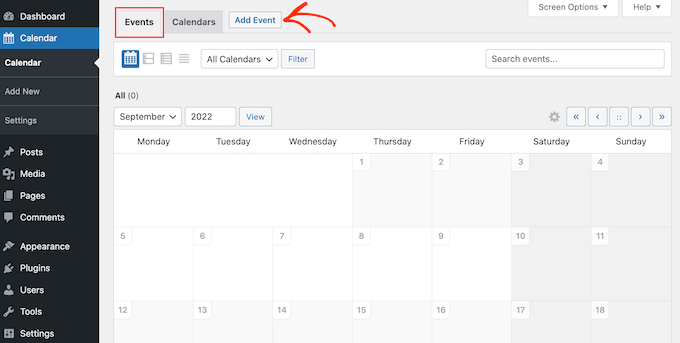
Adding events to your WordPress blog calendar

You can now add all the information about your event, such as date and time, duration, and whether or not it is recurring.

First, you’ll want to go ahead and give the event a name.
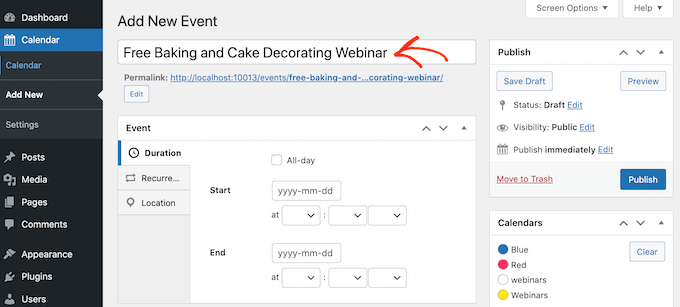
How to add events to an online calendar

Then, add a start time and end date. If the event will last all day, then you can simply check the ‘All-day’ box.

Another option is to set a start and end time, as you can see in the following image.
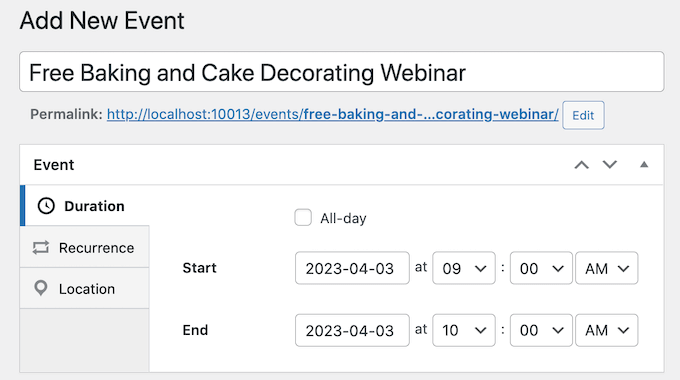
Adding a date and time to an event

By default, Sugar Calendar creates all events as one-time events. However, some events are recurring. For example, you might run a webinar every Monday morning or have a monthly meetup for all the volunteers at your nonprofit organization.

To create a recurring event, simply select the ‘Recurrence’ tab, and then choose an option from the ‘Repeat’ dropdown, such as Daily, Weekly, or Monthly.
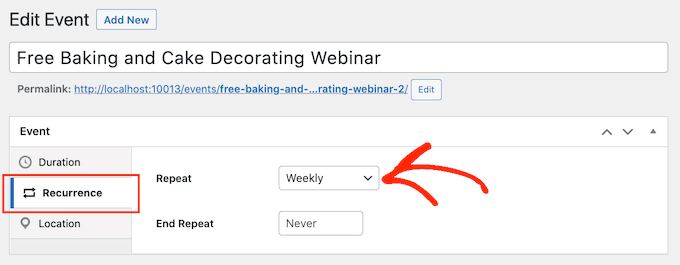
Create a repeating event in WordPress

You can also set an optional ‘End Repeat’ date, which is when the event stops recurring. For example, you might only plan to run webinars until the end of the year.

If you’re organizing an in-person event, then you can also select the ‘Location’ tab and type in where this event will take place.
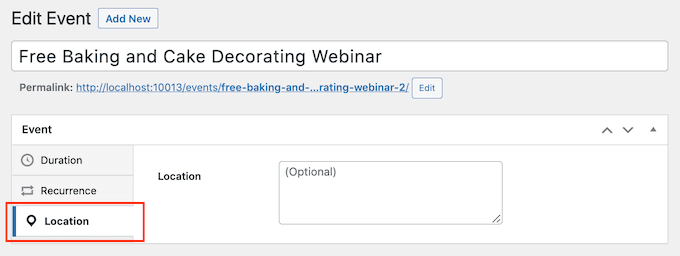
Creating an in-person event with a location

Next, enter some information about the event in the ‘Details’ box.

This works exactly the same as the WordPress classic editor so you can add images, videos, and formatting.
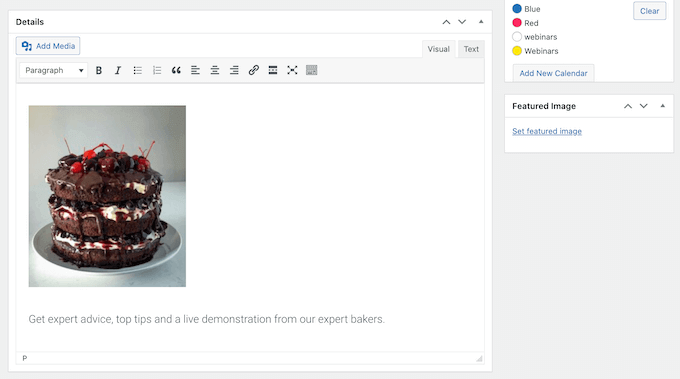
Adding an optional description to an event

You can also add a featured image, which will appear on the event’s page. This can make the page more engaging and may also be used in search results and on social media news feeds.

To add a featured image, simply click on ‘Set featured image’ and then either choose an image from the media library or upload a new file.
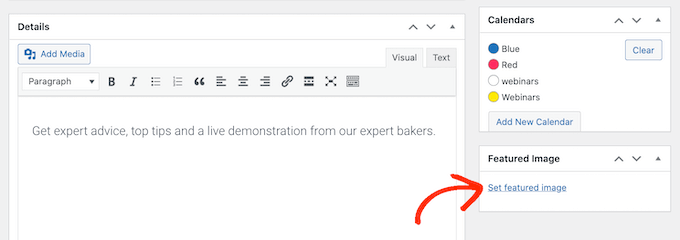
How to create an event with a featured image

In the ‘Calendars’ section, find the calendar where you want to add this event.

You can then click to select its radio button.
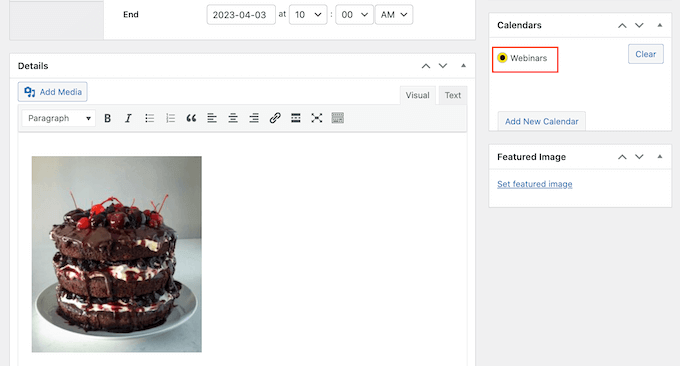
How to add an event to a calendar in WordPress

You can also create a new calendar in this section, simply by clicking on the ‘Add New Calendar’ button.

This adds some settings where you can give the new calendar a name and assign it an optional parent calendar.
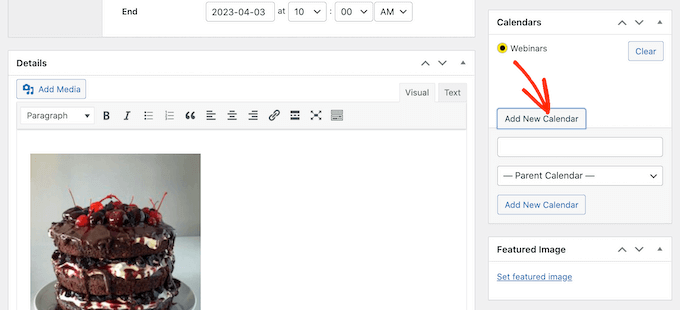
Creating more digital calendars for your website

Once you’ve entered all the information, just click on the ‘Publish’ button.

You can repeat this process to add more events to the calendar.

Putting Your Events Calendar on Your Website

You can add a calendar to any post or page using shortcode. If you’ve created multiple calendars then visitors can switch between these different calendars using a dropdown.
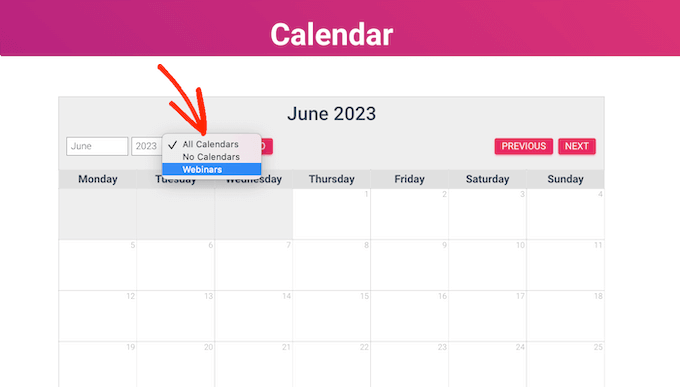
An event calendar on a WordPress website

We’ll add the calendar to a new WordPress page, but the steps will be similar no matter where you’re adding the calendar.

First, go to Pages » Add New in your admin panel. If you want to add it to an existing page, simply click ‘Edit’ under its name on Pages » All Pages.

Then, give your page a title and add any categories and tags that you want to use.

You can then click on the ‘+’ icon to create a new block and type in ‘Shortcode.’ When the right block appears, click on it to add it to the page.
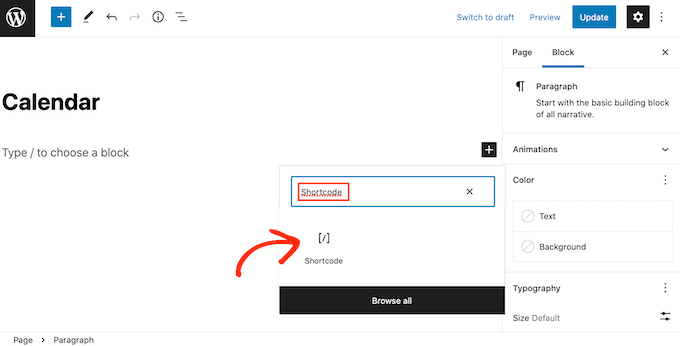
How to add a shortcode block to a page or post

Next, copy the shortcode[sc_events_calendar] into the shortcode block. For more details, please see our guide on how to add a shortcode in WordPress.

You can now publish or update the page to make the calendar live on your website.
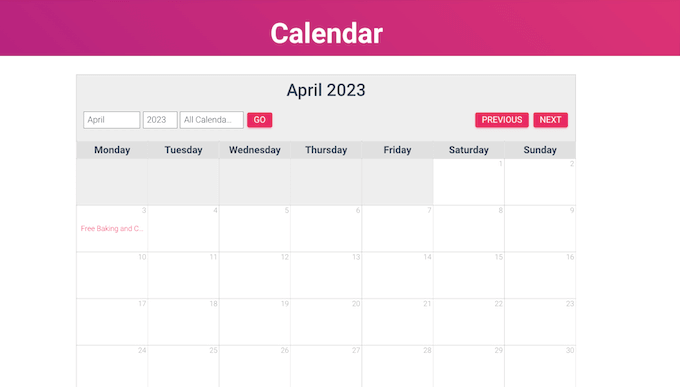
A calendar, created using Sugar Calendar

To see more information about an event in the calendar, simply click on it.

This will open the event’s page showing the time, date, and any other details.
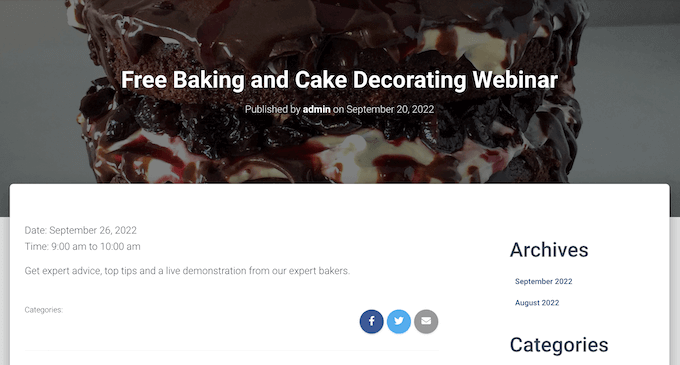
A webinar event page, created using Sugar Calendar

Sugar Calendar also has a widget that you can add to any widget-ready area of your WordPress theme. This is an easy way to add a calendar to every page of your website or WordPress blog.

The widget also lets you set a default calendar, which will be selected in the dropdown menu. This gives you more control over which events visitors see.

To add a widget in WordPress, simply go to Appearance » Widgets. Here, click on the blue ‘+’ button.
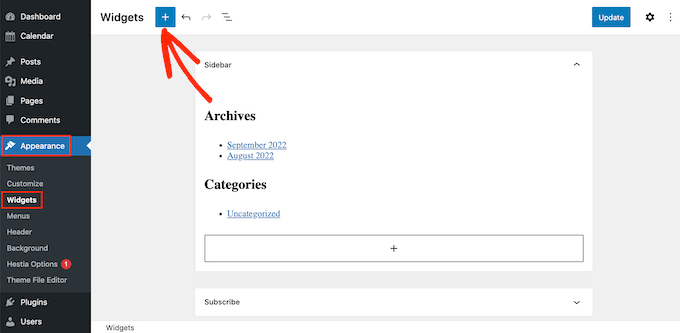
The WordPress widget editor

You can then type in ‘Sugar Calendar.’

There are a few different Sugar Calendar widgets, so make sure you select the ‘Event Calendar’ widget.
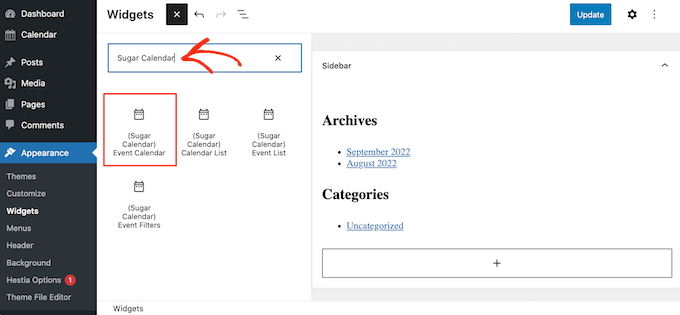
The Sugar Calendar widget

Now simply drag and drop the widget onto the area where you want to show the calendar.

At this point, you can add an optional title and change the size of the calendar.
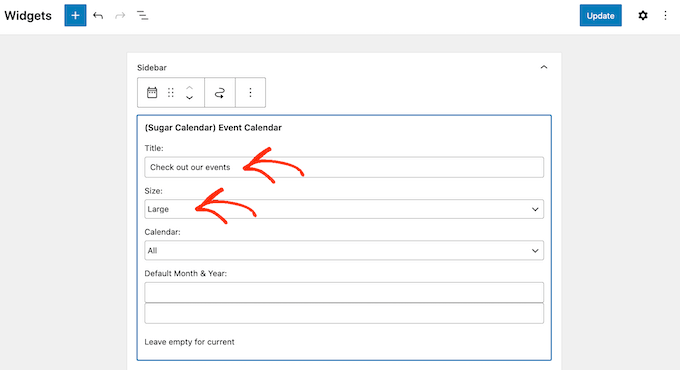
Configuring the Sugar Calendar widget

To change the default calendar, open the ‘Calendar’ dropdown and then choose an option from the list.

By default, Sugar Calendar will show the current month when the page loads, but you may prefer to show a different month instead. To make this change, simply type a new date into the ‘Default Month & Year’ field.
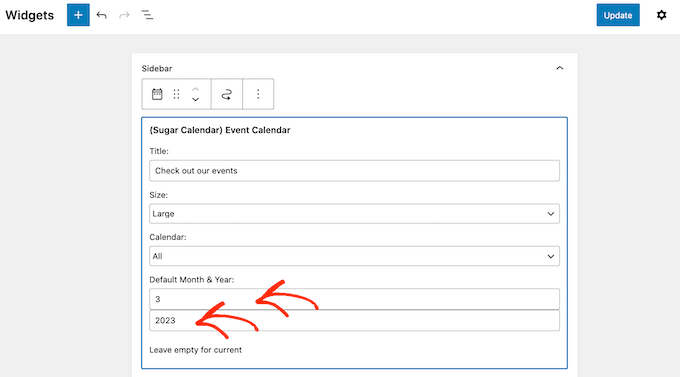
How to set up the Sugar Calendar widget

Once you’re finished, don’t forget to click on the ‘Update’ button. Your Sugar Calendar widget will now show up on your site!

We hope this article helped you learn how to create a simple event calendar with Sugar Calendar. You might also like our article on the best email marketing services and best push notification software, so you can keep your users updated about new events and activities.

If you liked this article, then please subscribe to our YouTube Channel for WordPress video tutorials. You can also find us on Twitter and Facebook.

The post How to Create a Simple Event Calendar with Sugar Calendar first appeared on WPBeginner.


October 18, 2022 at 11:52PM
Full Post vs Summary (Excerpt) in WordPress Archive Pages?

Are you wondering whether you should use an excerpt instead of full posts in your archive pages?

A summary helps provide a quick glimpse to your visitors about your content. Users can read through the short excerpt and decide if they’d like to view the entire blog. However, using the full post may get more eyes on the content because it doesn’t require extra action on the user’s part. But which is better?

In this article, we will compare full post vs summary (excerpt) in your WordPress archive pages.

Full post vs summary in your WordPress

What is an Excerpt and How to Add It in WordPress?

An excerpt is a short summary of an article that you can display on the archive pages in WordPress. The excerpt also has a link that users can click to read the whole article.

If you have limited space on your WordPress site, then excerpts are great for showing descriptions of your content.

By default, WordPress will use the starting 55 words of a blog post and show it as an excerpt. However, you can also manually add an excerpt.

Adding Excerpts in WordPress Posts

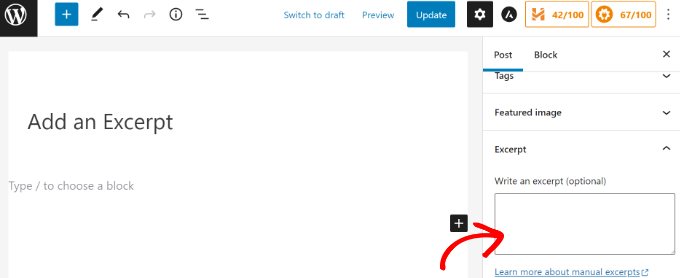
First, you’ll need to add a new post or edit an existing one. Once you’re in the WordPress content editor, you can click the ‘gear’ icon at the top right corner to open the settings panel.

Next, scroll down to the ‘Excerpt’ section and add your text in the ‘Write an excerpt (optional)’ field.

Add an excerpt in WordPress

When you’re done, simply publish or update your blog post.

Adding Excerpts in WordPress Pages

If you need to add a summary to a WordPress page, then you’ll notice that there’s no option to add an excerpt. However, you can simply add the following code to your website:

add_post_type_support( 'page', 'excerpt' );

To add the code, you’ll need to install and activate the WPCode plugin. For more details please see our guide on how to install a WordPress plugin.

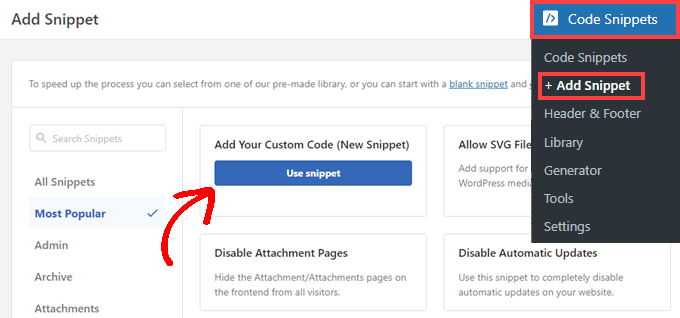
Upon activation, head to Code Snippets » Add Snippet from your WordPress dashboard, and then select the ‘Add Your Custom Code (New Snippet)’ option.

WPCode Add new Snippet

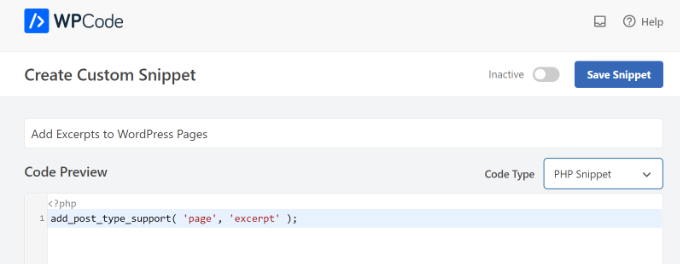
Next, you can enter a name for your code snippet.

After that, simply paste the snippet in the ‘Code Preview’ area and select the ‘PHP Snippet’ from the Code Type dropdown menu.

Add code snippet for excerpt pages

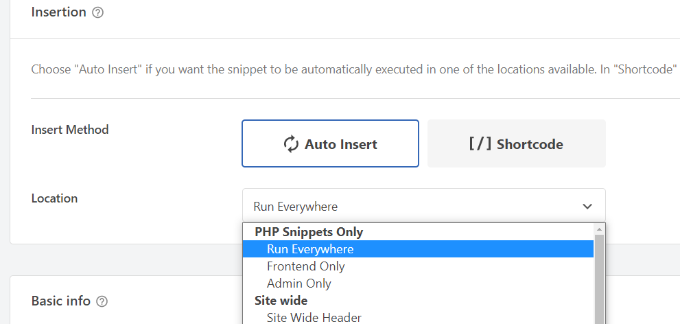
From here, you can scroll down to the ‘Insertion’ section and select where you’d like to add the snippet on your site.

Next, click on the ‘Location’ dropdown menu and choose the ‘Run Everywhere’ option under ‘PHP Snippets Only.’

Run the snippet everywhere

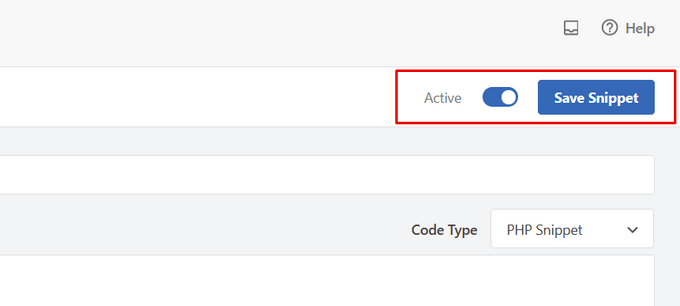
After entering the code, you can click the toggle at the top to activate the snippet and then click the ‘Save Snippet’ button.

This will add an ‘Excerpt’ meta box in the settings panel in your WordPress editor, where you can easily provide a short summary for your page.

Save and activate code snippet WPCode

Please see our tutorial on how to add excerpts to your pages in WordPress for more information.

That said, let’s see the advantages of using a summary vs a full post in archive pages.

Benefits of Using Summary vs Full Post in Archives

When optimizing your site for a better user experience, choosing between excerpts and full posts in archive pages can play a huge role. You want users to easily browse the website, find what they are looking for, and improve search engine ranking.

With summaries, you can provide an improved user experience. It helps users find the content they want to read. Plus, it keeps your page organized and allows you to display multiple posts on a page. This would be very difficult if you show full posts in archives.

That said, here’s a closer look at why we recommend using summary (excerpts) vs full posts on your WordPress site’s archive pages.

1. Improves Page Load Time

Did you know Google now uses your site speed as a ranking factor? The search engine will rank fast-loading websites higher than the ones that take a lot of time to load fully.

By using excerpts on your archive pages, you significantly improve the page load time.

Imagine an archive page that shows 10 posts per page. If each of those 10 pages is 500+ words long with 5 images each, then your user has a lot to scroll through. The page will also load slower than normal.

By using excerpts, you can significantly improve the user experience.

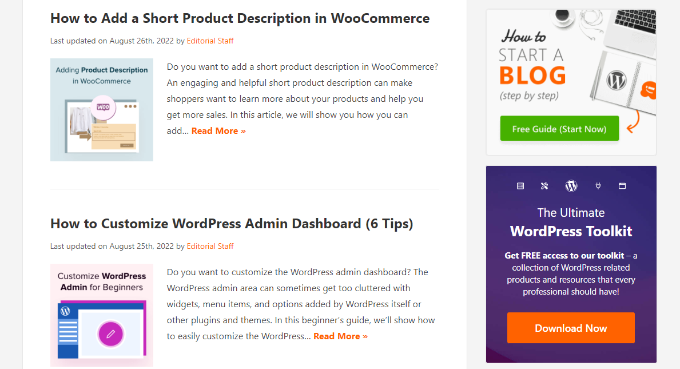
Here’s a preview of how a short summary appears on WPBeginner when you view the archive pages.

Preview summary on WPBeginner

Users can load and browse through our category, tags, date, and other archive pages quickly and easily. As for search engines, you will see a boost in rankings for archive pages and improvement in WordPress SEO with faster page load times.

2. Prevents Duplicate Content

By showing excerpts on your archive pages, you can prevent being flagged for duplicate content in search engines.

For example, WordPress by default has category, tags, date, and author archives. Publishing full posts in archives will make each article appear at full length on several different pages on your site.

Even though search engines are quite smart in finding canonical URLs for each post, they can still flag the site for duplicate content which will affect your search engine rankings.

3. Increases Pageviews and Reduces Bounce rate

Using summaries or excerpts can reduce the bounce rate and increase pageviews. Users can click through to the full post in order to read the entire article.

If you just have full posts displayed in the archive pages, then people will not see any other elements that are on the blog page itself, such as a popular posts widget inside the post or page content.

By displaying the full post, users might just leave your site after looking at a single page instead of clicking around.

A summary makes your archive page more engaging and allows your readers to see find more content easily.

Disadvantages of Using Summary vs Full Post in Archives

1. Short Excerpts Provide Poor User Experience

If you don’t set an excerpt for blog posts, then WordPress will automatically create a summary using the first 55 words in the article. This is too short, and sometimes your sentences will be cut in half, resulting in a poor user experience.

You can always change the excerpt length in a WordPress theme, but that doesn’t fix the problem entirely.

One solution is to write a custom excerpt in the content editor before publication. Another solution is to write short, catchy introductions that will most likely make the user interested and can easily work as excerpts.

2. Hidden Content

Some users prefer to read everything on one page rather than having to go to a different page to read the entire article. This is useful if you have short blog posts that don’t contain many images.

These users are likely to stay on your site longer, even if they don’t click on any other pages, which is also a metric that Google uses to determine search engine rankings.

Should You Use Full Post or Summary in Archive Pages?

If your articles are short and do not contain a lot of images, then you can get away with displaying full posts on your archive pages.

However, in most cases, we always recommend using a summary or excerpts for your archive pages. Most WordPress themes come with a built-in option that allows you to choose between full posts vs excerpts from the settings.

Excerpts provide a better user experience and make your site look clean and organized. You can boost user engagement, increase pageviews, and show multiple articles on your archive pages.

We hope that this article answered the question of whether you should use a full post or summary in your WordPress archive pages. You may also want to see our guide on how to move a WordPress from HTTP to HTTPS and WooCommerce made simple.

If you liked this article, then please subscribe to our YouTube Channel for WordPress video tutorials. You can also find us on Twitter and Facebook.

The post Full Post vs Summary (Excerpt) in WordPress Archive Pages? first appeared on WPBeginner.


October 18, 2022 at 06:02PM

Monday, October 17, 2022

How to Make Google Fonts Privacy Friendly (3 Ways)

Are you concerned about the privacy issues and legal risks of using Google Fonts on your WordPress site?

Google Fonts have been found to breach the EU’s privacy regulations. That means if you have website visitors from Europe, then you may be at risk of paying legal damages.

In this article, we’ll show you how to make Google Fonts privacy friendly in WordPress.

How to Make Google Fonts Privacy Friendly (3 Ways)

Why Are Google Fonts Not Privacy Friendly?

Your WordPress website’s typography plays an important role in your design and brand identity. That’s why many website owners customize their typography by using Google Fonts.

However, when someone visits a website that uses Google Fonts, their IP address is logged by Google when the fonts are loaded. This is done without their permission and the European Union considers it a breach of privacy regulations.

This means that websites using Google Fonts are no longer GDPR compliant. That’s an important legal consideration if you have website visitors from the European Union because it may make you liable for damages (of course you should consider your legal advisors before taking any action).

With that being said, let’s take a look at how to make Google Fonts privacy friendly. We’ll cover three methods, and you can use the list below to jump to the one you wish to use.

Method 1: Host Google Fonts Locally in WordPress

One way to make Google Fonts privacy friendly is to host them locally in WordPress. Luckily, that’s easy to do by using a plugin.

The first thing you need to do is install and activate the OMGF (Optimize My Google Fonts) plugin. For more details, see our step-by-step guide on how to install a WordPress plugin.

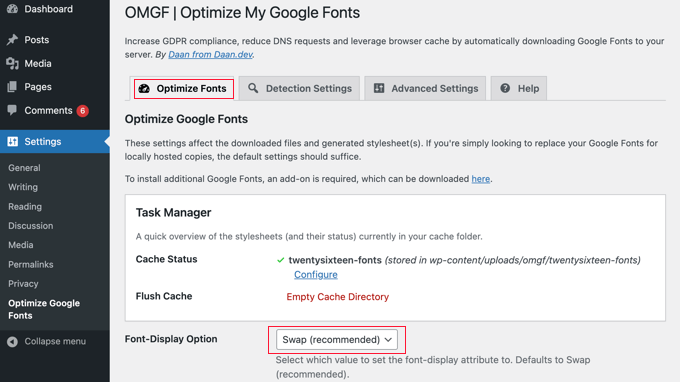
Upon activation, you need to visit Settings » Optimize Google Fonts to configure the plugin. You will see a statement that the default settings will automatically replace your Google Fonts with locally hosted copies.

OMGF Settings

All you need to do is scroll down the page and make sure that the ‘Font-Display Option’ has the default setting of ‘Swap (recommended)’ selected.

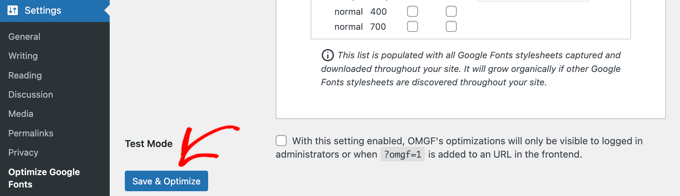
After that, simply click the ‘Save & Optimize’ button at the bottom of the page.

Click the Save & Optimize Button

You’ll see a message at the top of the screen that says ‘Optimization completed successfully.’ Your Google Fonts are now hosted locally.

To learn more, see our guide on how to host local fonts in WordPress, including how to do this manually without a plugin.

Method 2: Replace Google Fonts With Bunny Fonts

Bunny Fonts is an alternative to Google Fonts that puts privacy first. Their zero tracking and no-logging policies help you stay fully GDPR compliant. The Bunny Fonts API is fully compatible with the Google Fonts API, and this makes switching simple.

All you need to do is install and activate the Replace Google Fonts with Bunny Fonts plugin. For more details, see our step-by-step guide on how to install a WordPress plugin.

There will be no configuration needed. Once you’ve activated Bunny Fonts, they will immediately replace Google Fonts on your WordPress blog, shop, and every other part of your site.

Method 3: Disable Google Fonts in WordPress

Another way of avoiding the privacy issues of using Google Fonts is to disable them altogether, and simply use the system fonts installed on your users’ computers. We did this when we redesigned the WPBeginner website, and it improved our page load times.

Simply install and activate the Disable and Remove Google Fonts plugin. For more details, see our step-by-step guide on how to install a WordPress plugin.

Upon activation, the plugin will automatically disable all Google Fonts used by your theme and plugins. It doesn’t need to be configured.

Now WordPress will automatically use a default font in place of any Google Fonts that were being used. If you would like to choose different fonts, then see our guide on how to change fonts in your WordPress theme.

You can learn more in our guide on how to disable Google Fonts on your WordPress website.

We hope this tutorial helped you learn how to make Google Fonts privacy friendly. You may also want to learn how to get a free email domain, or check out our list of ways to make money online blogging with WordPress.

If you liked this article, then please subscribe to our YouTube Channel for WordPress video tutorials. You can also find us on Twitter and Facebook.

The post How to Make Google Fonts Privacy Friendly (3 Ways) first appeared on WPBeginner.


October 17, 2022 at 04:02PM