Wednesday, November 2, 2022

How to Put Your WordPress Site in Maintenance Mode

Do you want to put your WordPress site in maintenance mode?

Maintenance mode allows you to show a user-friendly notice to visitors instead of a broken website. You can also control exactly who has access to your site while you’re working on it.

In this article, we will show you how to easily put your WordPress site in maintenance mode.
How to put your WordPress site in maintenance mode

Why and When You Need to Put WordPress in Maintenance Mode

A lot of the time you can make changes to your WordPress website without having to put it in maintenance mode. For example, you can publish new posts, update WordPress, and install new plugins without any downtime.

However, sometimes you may need to work on your website for a longer period. For example, you might want to completely redesign your WordPress blog.

Some changes are also riskier than others, such as setting up a new plugin that changes your website’s behavior. While you’re making the change, your website may appear broken to your users.

You might even lose data that’s created during this period. For example, if you’re making major changes to an online store, then you might lose any new orders that customers place.

If your website gets lots of visitors, then you don’t want them to see a broken website.

One solution is to set up a staging website so you can work on your site in private.

Many of the top WordPress hosting companies offer 1-click staging websites, including Bluehost, SiteGround, and WP Engine.

If you don’t use a staging site, then it’s crucial you put your website into maintenance mode.
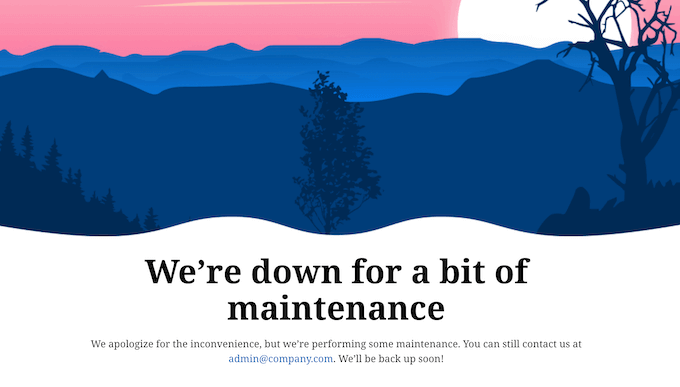
An example maintenance mode, created using SeedProd

Instead of a broken website, visitors will see a helpful maintenance page that lets them know what’s happening.

You might even suggest some alternative actions that visitors can take, such as following you on social media or joining your email list.
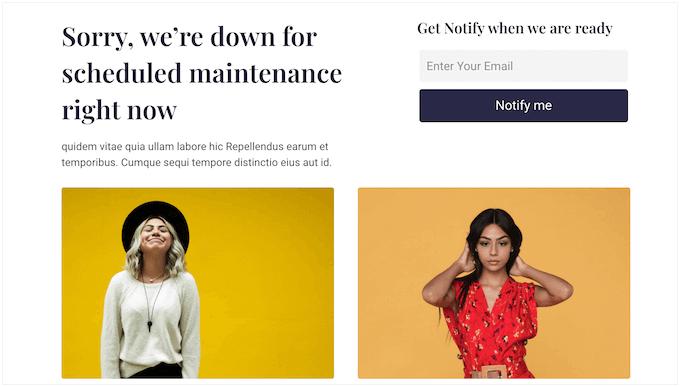
An example 'under construction' page

Having that said, let’s take a look at how to put your WordPress site in maintenance mode.

Video Tutorial

If you’d prefer written instructions, then simply use the quick links below to jump to the method you want to use.

Method 1. Set up WordPress Maintenance Mode using SeedProd Plugin (Recommended)

The easiest way to create a completely custom maintenance page is by using SeedProd.

SeedProd is the best landing page builder for WordPress, used on more than a million websites. It allows you to create beautiful coming soon pages in WordPress, improve your 404 page, and even design unique landing pages using drag and drop.

There’s a premium version of SeedProd that comes with more than 180 professionally-designed templates and blocks. However, you can put your site into maintenance mode using the free SeedProd plugin, so that’s what we’ll be using in this guide.

The first thing you need to do is install and activate the SeedProd plugin. For more details, see our guide on how to install a plugin in WordPress.

Upon activation, go to SeedProd » Pages. In the ‘Maintenance Mode’ section, click on the ‘Set up a Maintenance Mode Page’ or ‘Edit page’ button.
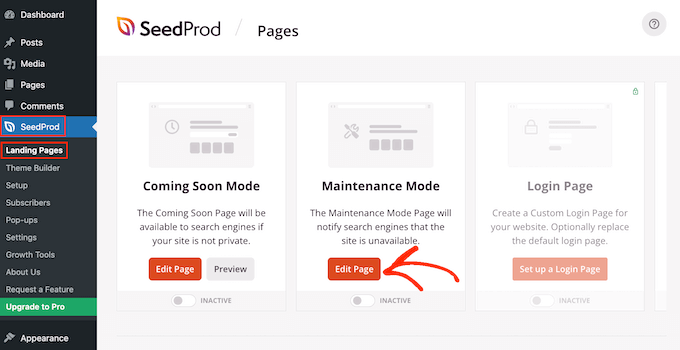
How to set up maintenance mode in WordPress

The next step is building the page that visitors will see when you enable maintenance mode.

You can either choose a ready-made template or start with a blank design. We’re using ‘Down Maintenance Mode’ in all of our images but you can use any template you want.

To select a template, simply hover your mouse over that design’s thumbnail and then click the ‘checkmark’ icon.
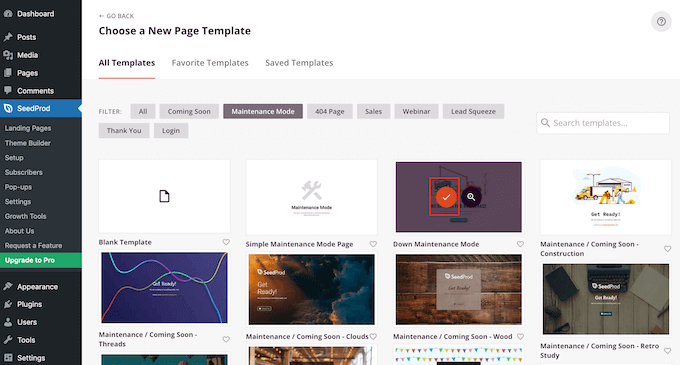
SeedProd's ready-made maintenance templates

After selecting a template, you’ll be taken to the drag-and-drop builder, where you can start customizing the maintenance mode page.

On the left side of the screen, you’ll find blocks and sections that you can add to your design. The right side of the page is the live preview.
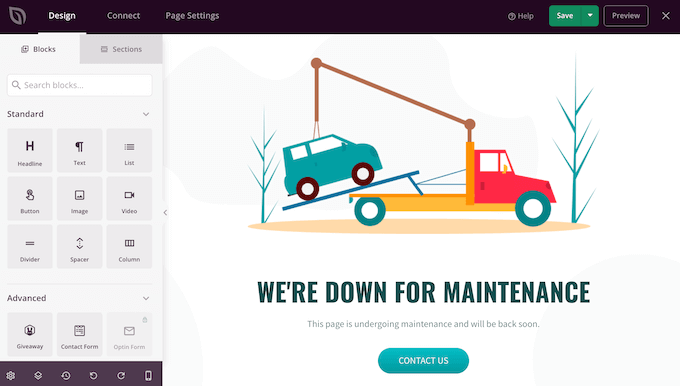
A professionally-designed maintenance page

Most templates already have some blocks, which are a core part of all SeedProd designs. However, you can add more blocks to your maintenance page by dragging them from the left-hand menu and then dropping them onto your design.

For example, you might add your own custom logo, videos, contact form, and more.
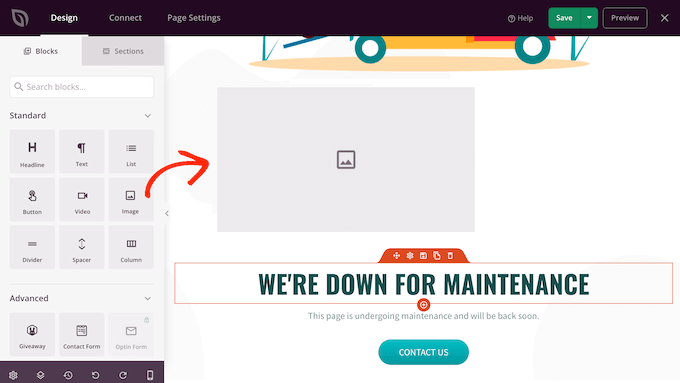
Adding blocks to a custom page design

The options you see may vary depending on the other plugins you’ve installed on your WordPress website. For example, if you have RafflePress then you’ll be able to run a contest on your maintenance page using the Giveaway block.

To customize a block, simply click to select that block in your layout. You can then change the block using the settings in the left-hand menu.

To start, click to select the ‘Contact Us’ button in the live preview. In the left-hand menu, you’ll see a ‘Link’ field, which shows ‘mailto:john@example.com’ by default.
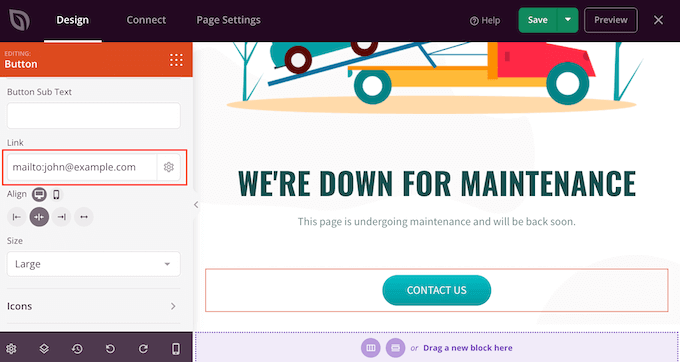
Customizing the CTA button

This means the button will open the visitor’s default email app with the ‘To’ field already filled in as ‘john@example.com.’

To use your own business email address instead, simply type that address into the ‘Link’ field. Make sure not to delete ‘mailto:’ as this opens the visitor’s default email app.
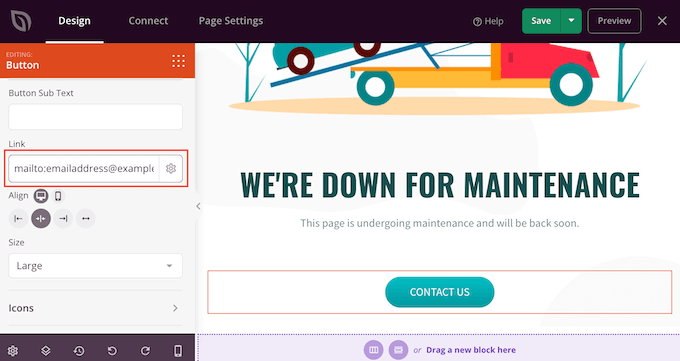
Capturing leads with SeedProd

You can also make other changes to the button, including using a different alignment, button text, and changing the button’s size.

To remove a block from your design, simply go ahead and click on it. You can then select the trash can icon.
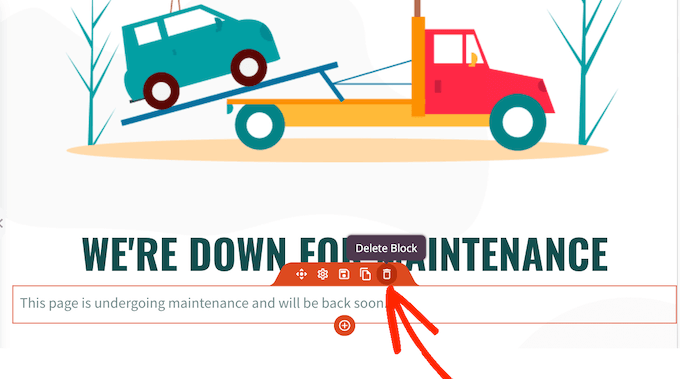
Deleting blocks from a WordPress custom page design

You can now continue customizing the template by adding new blocks, removing any blocks you don’t want, and making changes in the left-hand menu.

When you’re happy with how the maintenance page looks, it’s time to publish it. Go ahead and just click the ‘Save’ button.
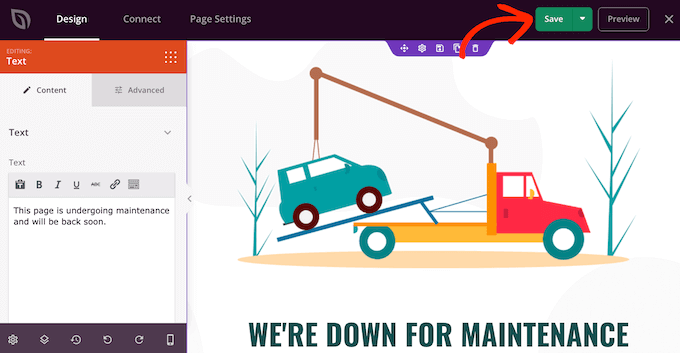
Designing a custom maintenance mode page

After that, you can enable maintenance mode at any point and show visitors your custom maintenance page by going to SeedProd » Landing Pages.

Here, click on the switch in the ‘Maintenance Mode’ section so that it shows ‘Active.’
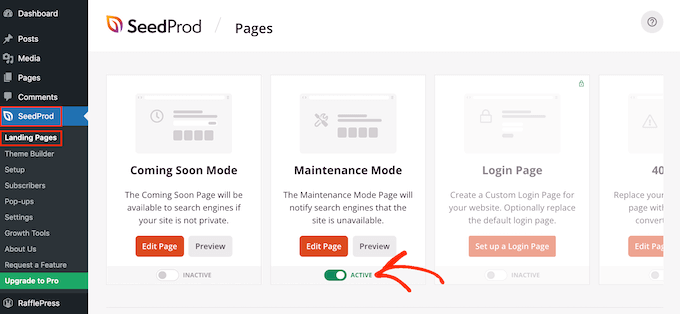
Activating maintenance mode in WordPress

Now, if you visit your website in an incognito browser tab then you’ll see the custom maintenance mode page. The Maintenance Mode won’t show for you because you’re logged into the site.

When you’re ready to relaunch your site, simply go to SeedProd » Landing Pages. Under ‘Maintenance Mode,’ click on the slider to turn it from green (Active) to grey (Inactive).
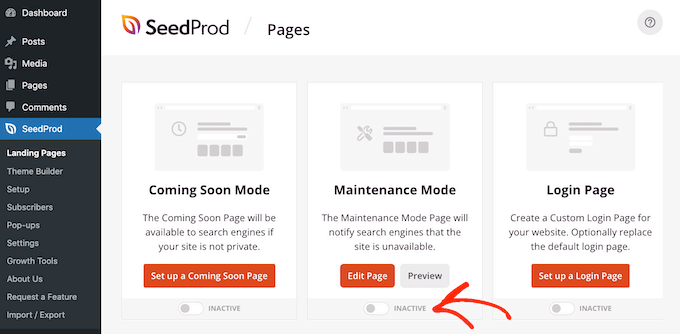
Removing the under construction page

Now, anyone can access your WordPress website.

Controlling Website Access for Logged-in Users

By default, SeedProd will show the maintenance mode page to all non-logged-in users.

Anyone with an account will still be able to log in. For example, subscribers on your membership site and customers on your WooCommerce store can still access their account.

However, you may want to change who has access to your site while it’s under maintenance. For example, if you’re developing a site for a client then they may still need access so they can monitor your work.

You can change the access controls by upgrading to SeedPro Pro. After upgrading, simply go to SeedProd » Landing Pages and then click ‘Edit Page’ under Maintenance Mode.
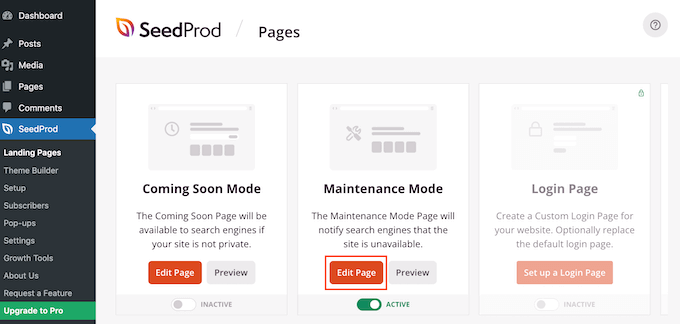
Editing the WordPress maintenance mode settings

This will open the SeedProd page builder.

Here, click on ‘Page Settings,’ followed by ‘Access Control.’
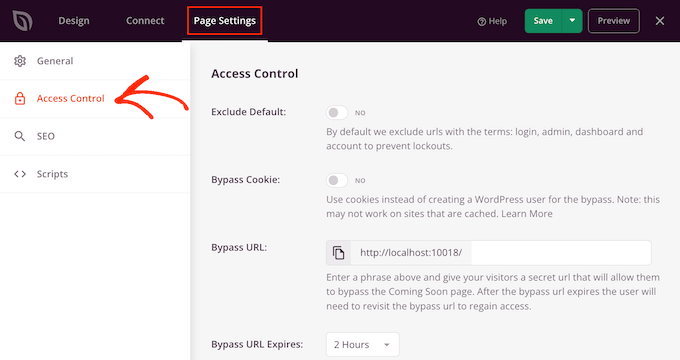
Controlling who can access your site in maintenance mode

To start, activating the ‘Exclude Default’ slider is a good idea. This will give visitors access to URLs that have the terms login, admin, dashboard, and account, which will stop people from getting locked out of their accounts.

You might also allow users with specific browser cookies to get past your maintenance page. Just be aware that if you enable the ‘Bypass Cookie’ toggle then it may not work if you’re using a WordPress caching plugin.

With that being said, we recommend selecting the user roles that can access your site while it’s in maintenance mode. To do this, click on ‘Add Role’ and then select any role from the dropdown menu.
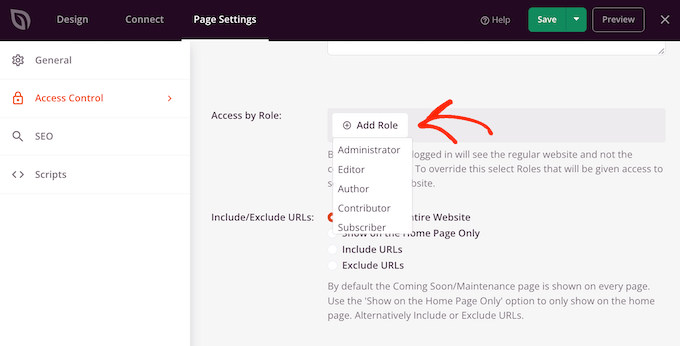
Controlling access to your site using SeedProd's access controls

You can also include or exclude user roles created by your WordPress membership plugin or an eCommerce plugin.

When you’re happy with the access controls, don’t forget to click on the ‘Save’ button to store your settings.

Exclude Specific Pages from Maintenance Mode

SeedProd Pro also lets you include or exclude specific pages from maintenance mode. This comes in handy if you need to allow some users to access certain pages.

For example, if you have a custom login page then you would usually want to exclude it from maintenance mode. If you provide customer support via email, then you may want to exclude your contact form page as well.

You can do this in the ‘Include/Exclude URLs’ settings. Simply choose between ‘Include URLs’ or ‘Exclude URLs’ and then enter your links into the box.
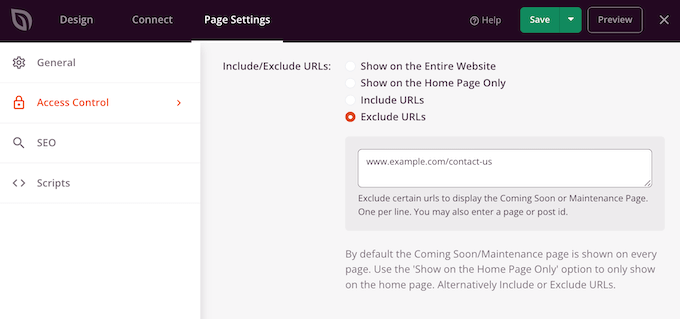
Excluding URLs from maintenance mode

When you’re happy with how the maintenance page is setup, don’t forget to click on the ‘Save’ button to store your settings.

Method 2. Setup Maintenance Mode Using WP Maintenance Mode Plugin

Another option is to use the free WP Maintenance Mode plugin. This is a great choice if you want to create a simple maintenance mode page. However, this plugin uses the standard WordPress Page and post editor, which isn’t as powerful as SeedProd’s drag-and-drop builder.

The first thing you need to do is install and activate the WP Maintenance Mode plugin. For more details, see our step-by-step guide on how to install a WordPress plugin.

Upon activation, you can choose between a ‘maintenance’ and a ‘coming soon’ template. Since we want to create a maintenance mode, click on the ‘Website is under maintenance’ template and then select the ‘Continue’ button.
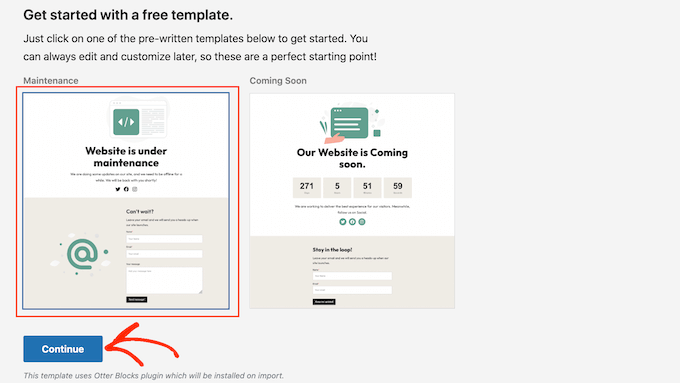
The WP Maintenance Mode WordPress plugin

You will now have the option to join the WP Maintenance Mode email list.

You can simply go ahead and click ‘I’ll skip for now, thanks.’
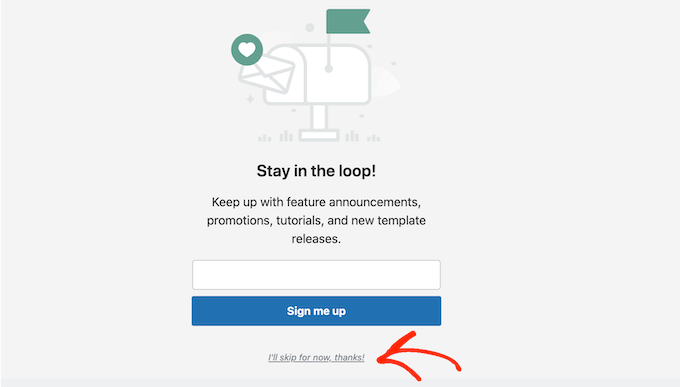
The WP Maintenance plugin email list

WP Maintenance Mode will now go ahead and create a simple page using its built-in template.

To see this page, simply click on ‘View page.’
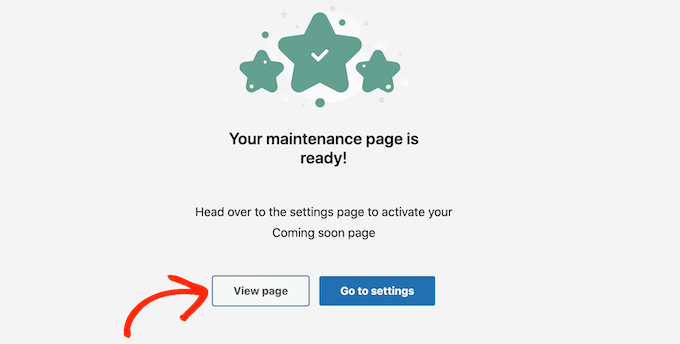
Creating a custom 'under construction' page for WordPress

This opens the template in the standard WordPress post editor.

Note: Unhappy with this default template? You can find other WP Maintenance Mode templates by going to Settings » WP Maintenance Mode in the WordPress dashboard. Then, click on the ‘Design’ tab.

You can now make changes to the design in exactly the same way you edit a page or post.
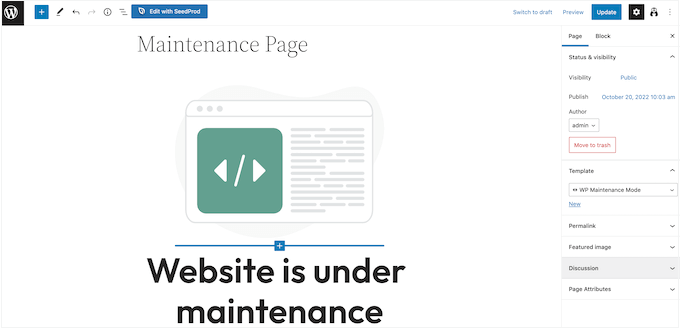
Designing a custom page using the WordPress page and post editor

The template has a few social media placeholders that you’ll want to link to your own pages.

Simply click each of these icons and then type the URL into the little bar that appears.
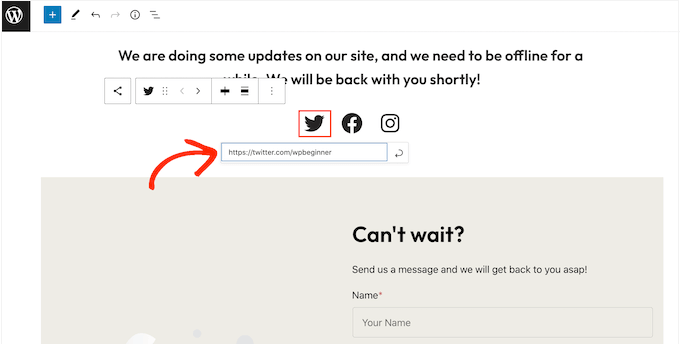
Adding links to your social media page

When you’re happy with how the maintenance page looks, click on the ‘Update’ button in the content editor to save your changes.

Now you’ve designed your page, it’s time to configure your maintenance mode settings by going to Settings » WP Maintenance Mode in your WordPress dashboard.

You can then click on the ‘General’ tab.
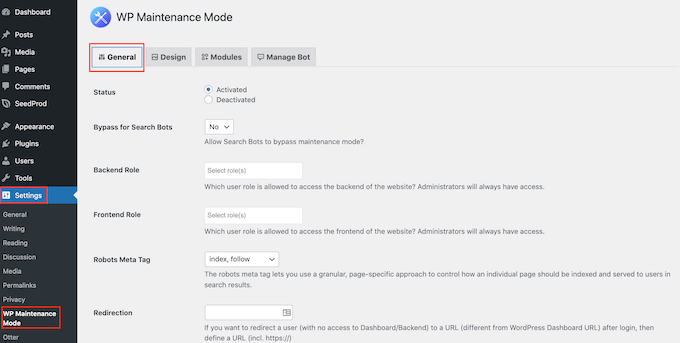
The WP Maintenance Mode plugin's settings

By default, search engine bots can’t see your site while it’s in maintenance mode. This can hurt your WordPress SEO and may affect where your site appears in the search engine rankings, especially if you’re going to be doing maintenance for a while.

That’s why we recommend opening the ‘Bypass for Search Bots’ dropdown and choosing ‘Yes.’ This will allow any search engine crawlers to bypass your maintenance page.
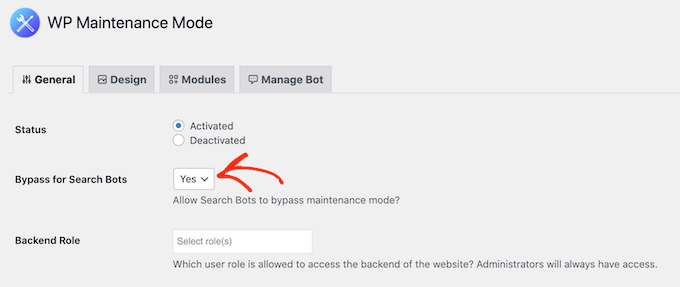
Bypassing the search bots

As the site admin, you can access your WordPress dashboard and website while it’s in maintenance mode. However, you may want to grant access to other user roles.

You can give users access to the WordPress dashboard by opening the ‘Backend’ dropdown and then choosing a user role from the list.
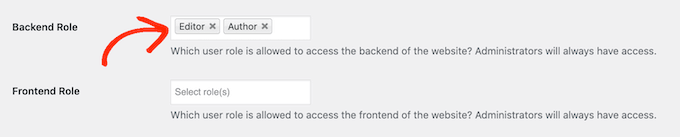
Allowing access to your WordPress dashboard

To give visitors access to your public-facing site, use the ‘Frontend’ dropdown instead.

Similar to SeedProd, you can exclude certain pages from maintenance mode so they’ll always be accessible to visitors. For example, if you have a booking form then you may want to make this page available even when the rest of your site is down for maintenance.

To exclude a page, simply add its slug to the ‘Exclude’ box.
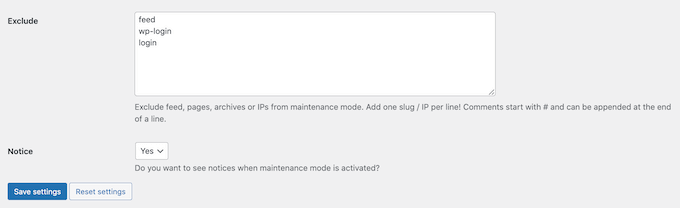
Excluding URLs from 'under construction' mode

If you use Google Analytics to track visitors to your WordPress website, then make sure you click on the ‘Modules’ tab.

You can then open the ‘Use Google Analytics‘ dropdown and select ‘Yes.’
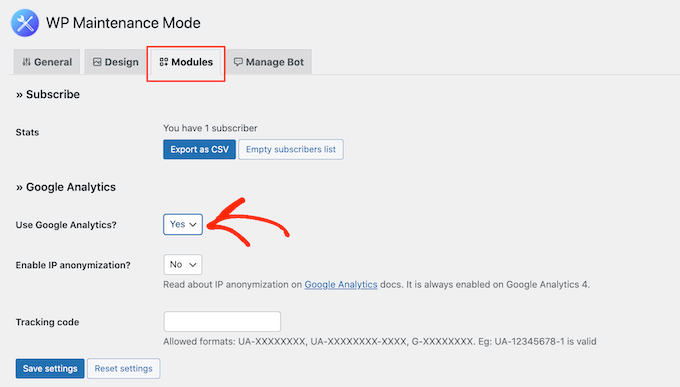
Setting up tracking with Google Analytics

Then, simply add your tracking ID to the ‘Tracking code’ field.

There are lots more settings that are worth looking at, and most are self-explanatory. When you’re happy with how maintenance mode is set up, click on the ‘Save settings’ button to store your changes.

Now, you can activate maintenance mode at any time. Simply select the ‘General’ tab and click on the ‘Activated’ radio button.
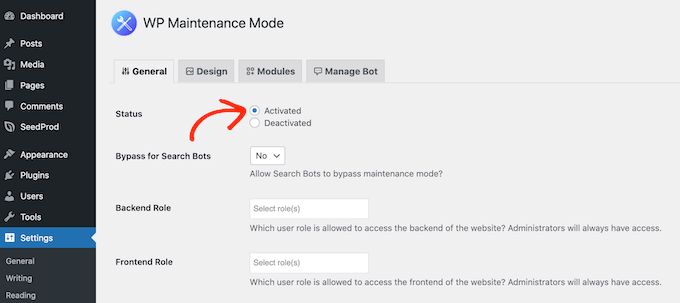
Activating maintenance mode in WordPress

You can then scroll to the bottom of the page and click on ‘Save settings.’ Now, if you visit your site while in an incognito browser tab, you’ll see the maintenance page.

When you’re ready to take your site out of maintenance mode, simply go back to the ‘General’ tab and select ‘Deactivated.’ Then, simply click on the ‘Save changes’ button and your website will once be available to anyone who visits it.

How to Add a Chatbot to Your Maintenance Mode Page

Chatbots allow you to interact with visitors, record information about them, and even do lead generation in WordPress.

The WP Maintenance Mode plugin has a simple pre-programmed live chatbot that you can use to ask visitors if they would like to subscribe to your email list and get notified when your site is out of maintenance mode.
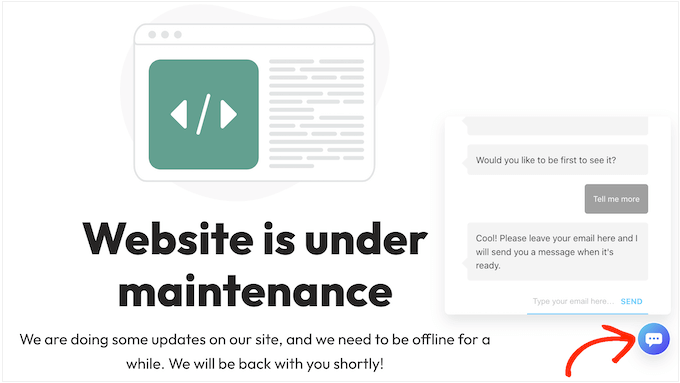
A lead generation chatbot

To see how the chatbot is set up, click on the ‘Manage Bot’ tab.

By default, this bot is named Admin but you can change this by typing a new name into the ‘Bot Name’ field.
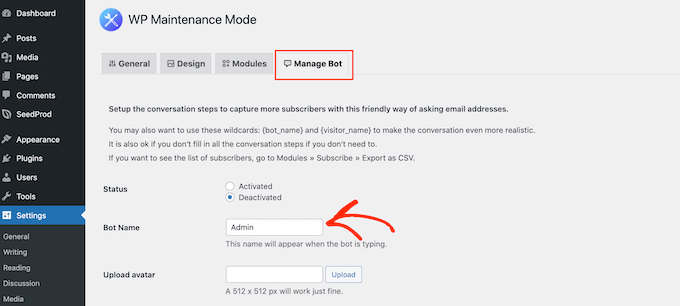
Customizing the maintenance chatbot

You may also want to add an avatar, which will appear in the chatbot popup.

After that, you can see the pre-programmed conversation under ‘Customize Messages.’
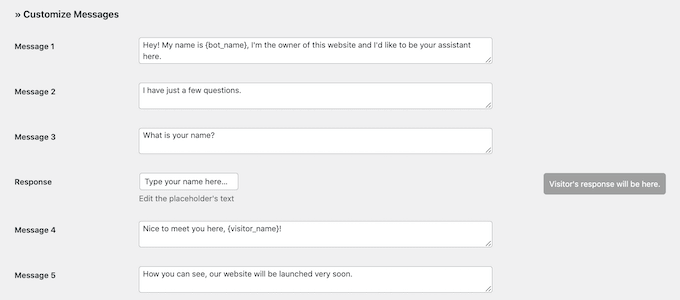
How to create a custom chatbot in WordPress

You can change any of these messages but the default settings should be a good fit for most WordPress websites.

To make the chatbot live, go to the top of the screen and click on the ‘Activated’ button.
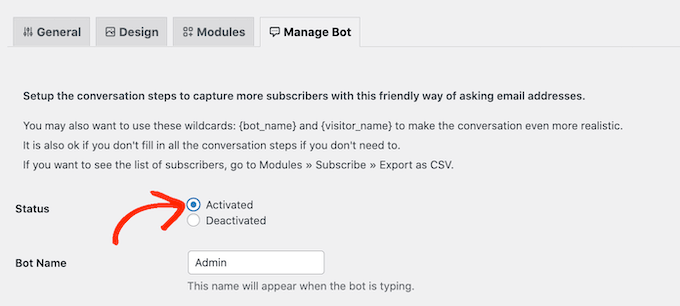
Activating the WordPress chatbot

As always, don’t forget to click on ‘Save settings’ to store your changes.

Now if you visit the maintenance page in an incognito tab, you can talk to the chatbot.
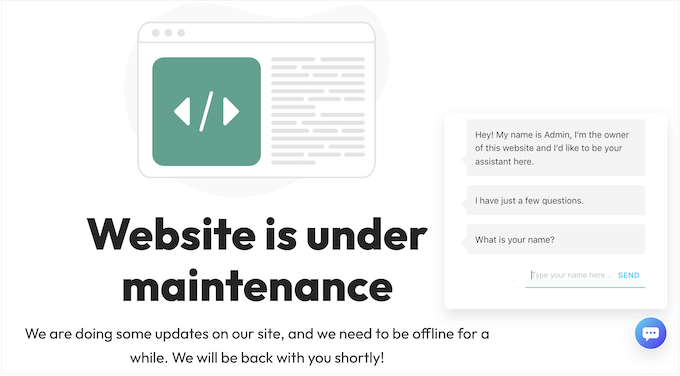
A chatbot pop in WordPress

If you’re collecting user information through a chatbot or maintenance page, then it’s important to make sure your site is GDPR compliant.

We hope this article helped you learn how to put your WordPress site in maintenance mode. You may also want to see our guide on how to create custom pages in WordPress, and our comparison of the best business phone services to allow visitors to contact you while your website is under maintenance.

If you liked this article, then please subscribe to our YouTube Channel for WordPress video tutorials. You can also find us on Twitter and Facebook.

The post How to Put Your WordPress Site in Maintenance Mode first appeared on WPBeginner.


November 02, 2022 at 11:58PM
What’s New in WordPress 6.1 (Features and Screenshots)

WordPress 6.1 was released a few hours back, and it is the last major release of 2022.

This new release contains significant updates to the full site editing and the block editor experience.

In this article, we’ll show you what’s new in WordPress 6.1, and which features you should try after updating your websites.

See what's new in WordPress 6.1 wth screnshot and features

Note: WordPress 6.1 is a major release, and unless you are on a managed WordPress hosting service, you’ll have to manually initiate the update. Here’s how to safely update WordPress.

Important: Don’t forget to create a complete WordPress backup before updating.

That being said, here’s all that’s new in WordPress 6.1.

Twenty Twenty-Three – New Default Theme

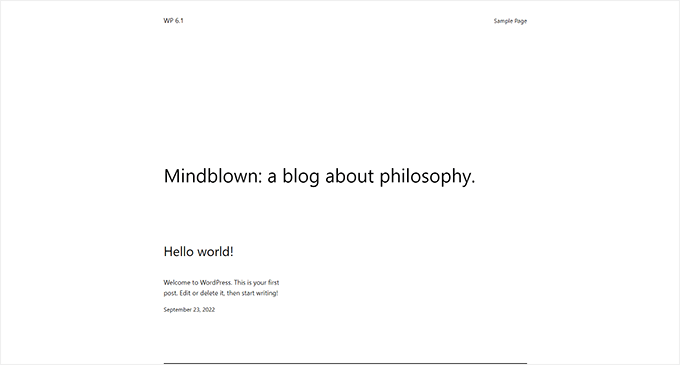
WordPress 6.1 ships with a brand new default theme called Twenty Twenty-Three.

Twenty Twenty-Three new default theme in WordPress 6.1

Out of the box, this theme features a minimalist design that looks like a blank canvas and encourages you to bring your own style to the theme.

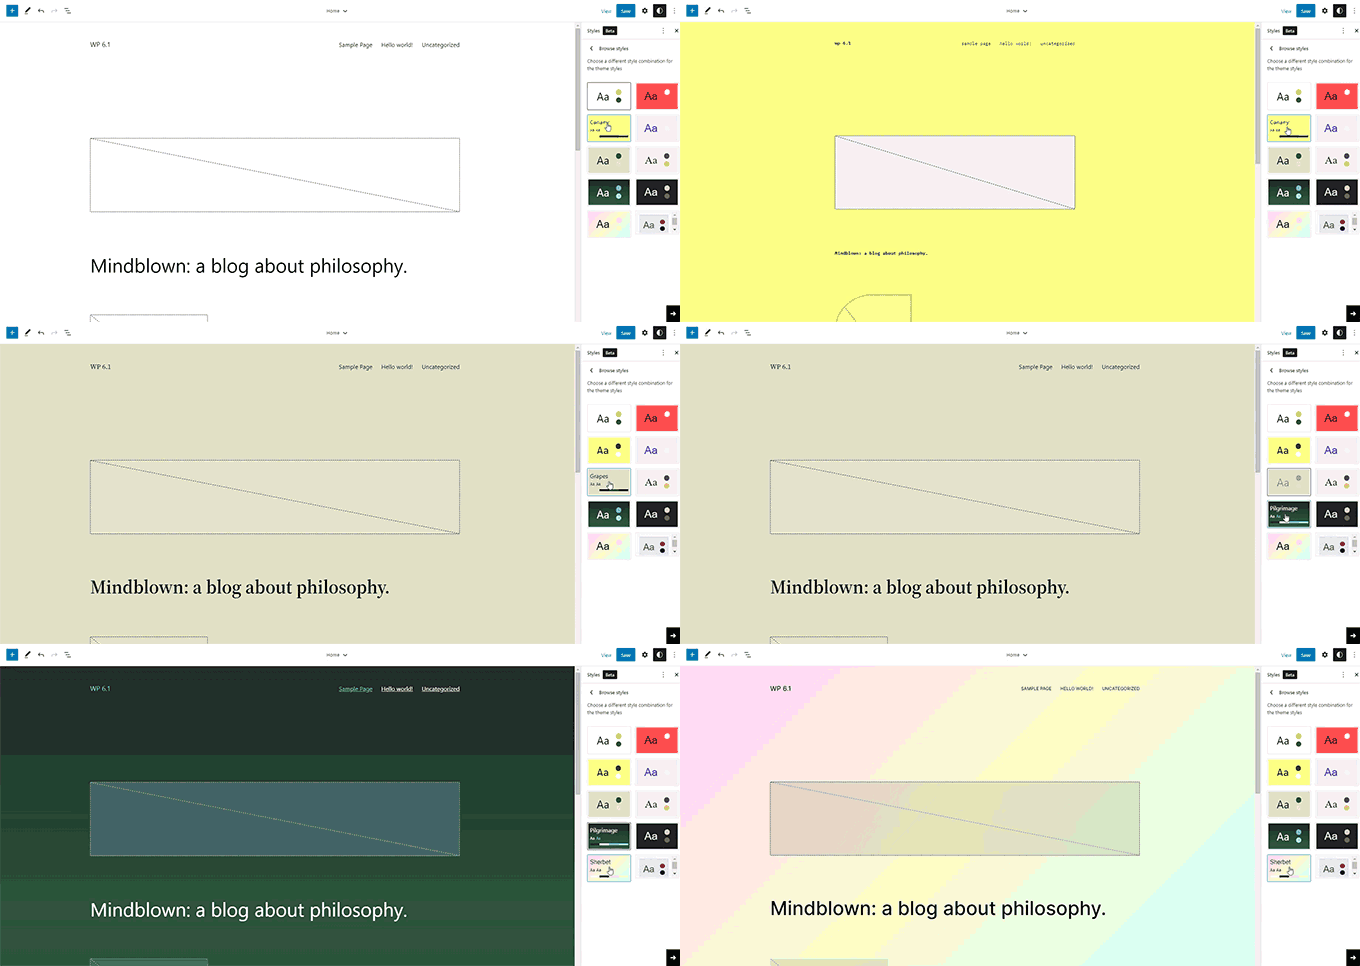
It comes packed with 10 style variations that users can choose from inside the Site Editor. All of these styles are fully customizable using the site editor.

Twenty Twenty-Three styles

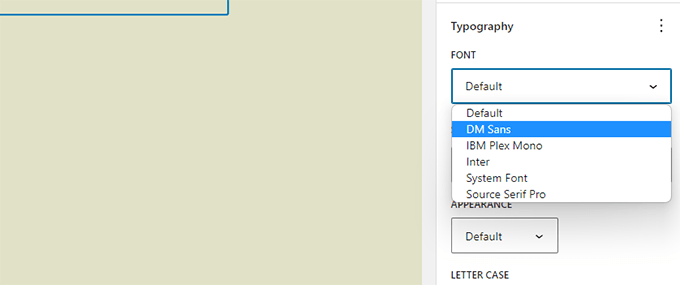
Twenty Twenty-Three also ships with four fonts that are used by different style variations. You can also use these fonts when writing posts or pages.

Twenty Twenty Three Typography

Twenty Twenty-Three can be a perfect starter theme for users who want to make a website using the block editor with their own styles and layouts.

Block Editor Changes in WordPress 6.1

The block editor is where users write content, create pages, and edit their themes.

Each WordPress release comes with major improvements, new features, and enhancements to the block editor.

Following are a few most noticeable changes in the block editor.

List and Quote Blocks Now Have Inner Blocks

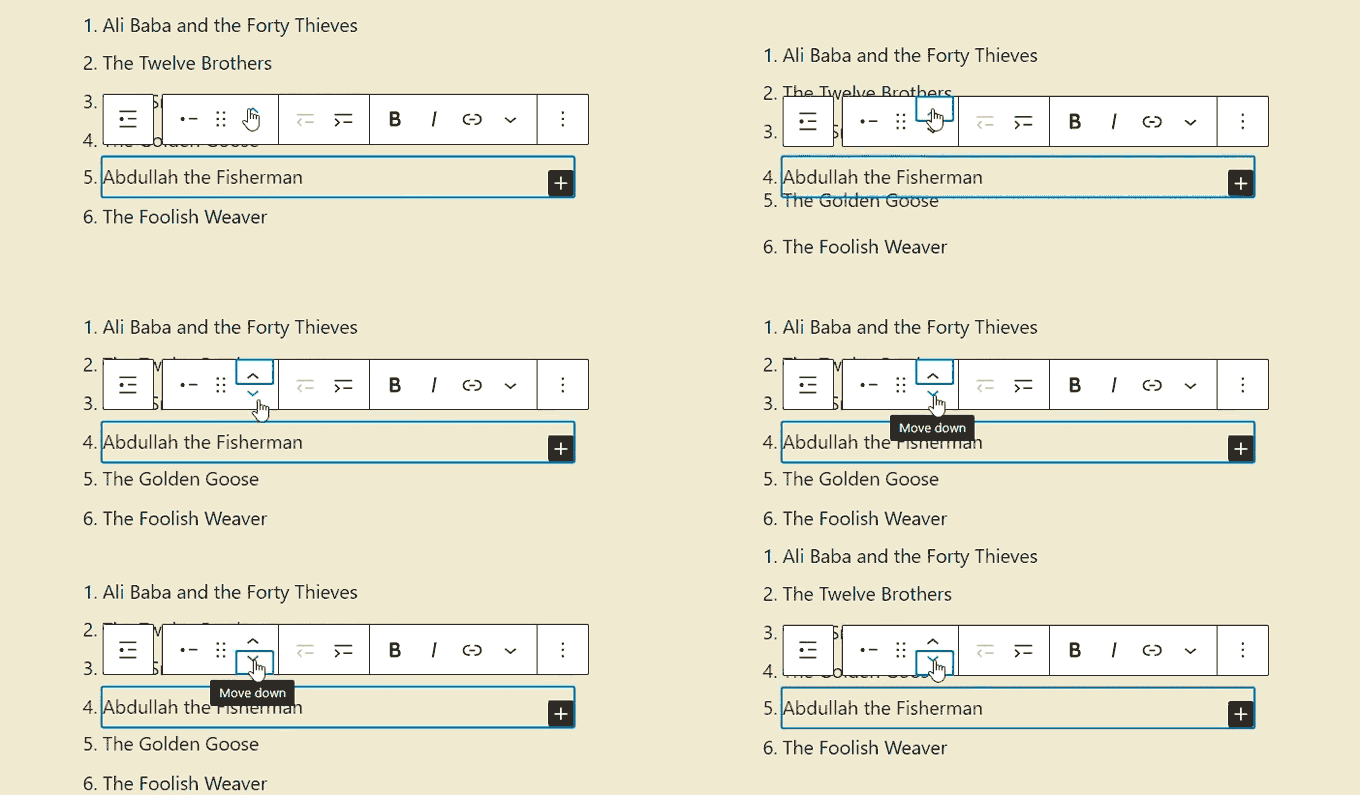
One of the problems with bulleted lists was that if you wanted to move a list item up and down you had to manually delete and edit all the list items.

WordPress 6.1 brings inner blocks for Quote and List blocks. Basically, each list item is its own block and you can move list items up and down.

Move list items up and down

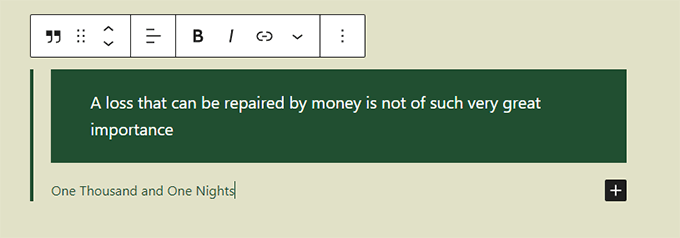
The Quote block is now also divided into inner blocks.

Now you can style quote and cite blocks differently.

Quote block

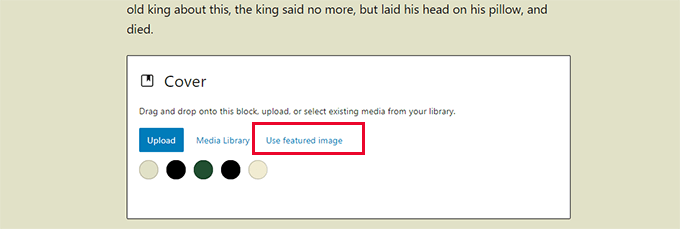
Featured Image in Cover Block

With WordPress 6.1, you can now select the featured image to be used for a cover block. After that, you can just set the featured image and it will start appearing inside the cover.

Featured image in cover block

Many beginners often confuse cover block and featured images. Hopefully, this will now allow them to just use cover block to display featured image for an article.

Note: Depending on your theme, you may see the featuerd image appear twice. First, at the location where your theme displays the featured image and then as the cover block.

New & Improved Borders

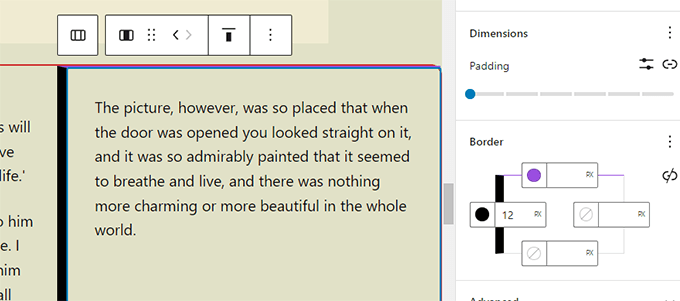
WordPress 6.1 brings a lot of options to the design tools available for blocks. One of them is the more powerful border tool that is now available for several blocks.

You can use set top, right, bottom, left borders separately, and give them different colors and sizes.

Advanced border controls for more blocks

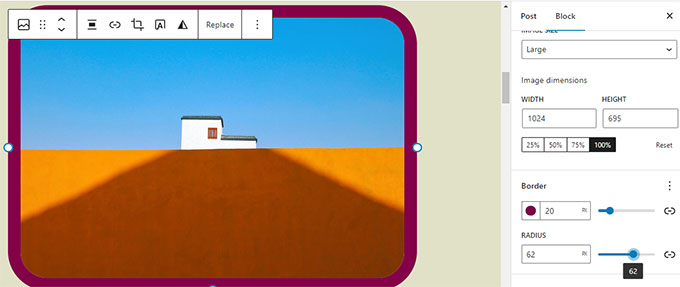
Previously users were able to only select the border radius for the image block.

Now with WordPress 6.1, you can set border color and size as well.

image border

More Padding and Margin Options

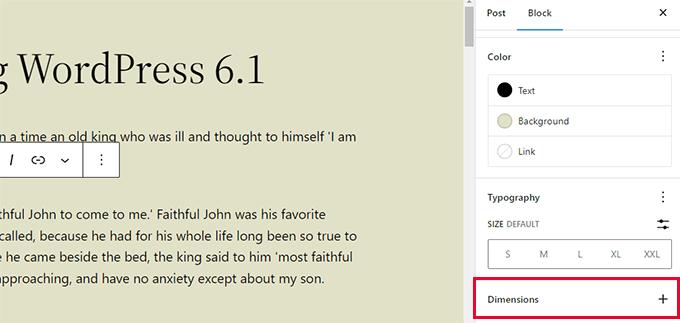
WordPress 6.1 brings ‘Dimensions’ tool to more blocks allowing users to set padding and margins.

Dimensions under block tools

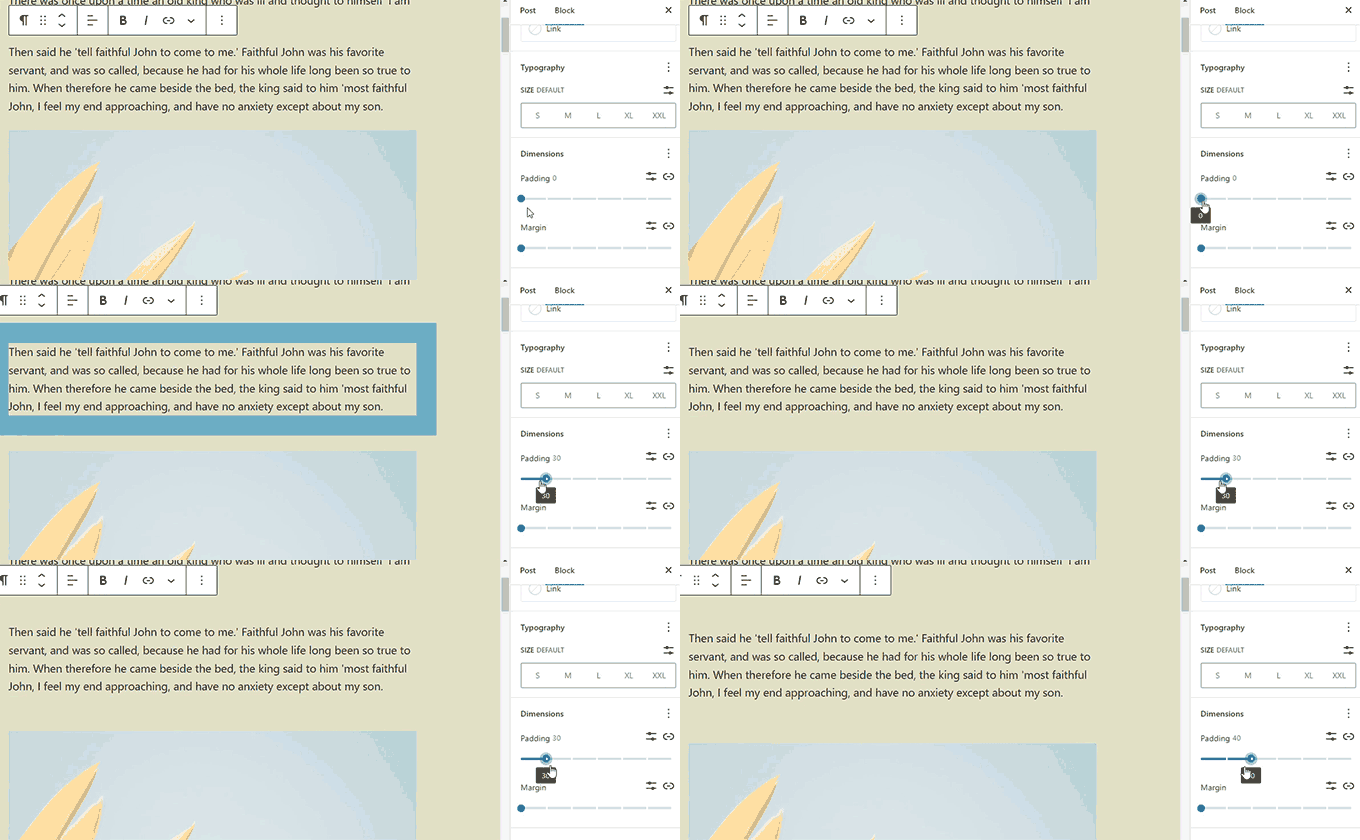
Users will also be able to visualize their changes with neat visual hints.

Visualize padding and margin adjustments

You can also set margins for Spacer and Separator blocks, which allows you to create more spacious content layouts.

New and Improved Navigation Blocks

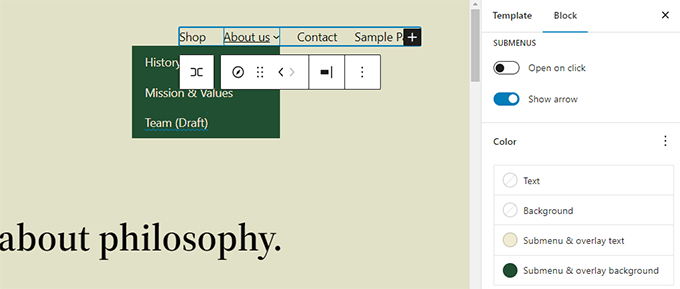
WordPress 6.1 now allows you to easily change background and text color for sub-menus.

Submenu colors

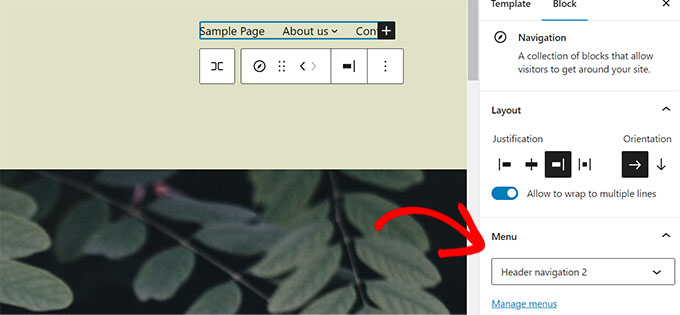
The Navigation now also allows you to easily choose a menu from the block toolbar or the sidebar panel.

Select menu

Editor Design Refinements in WordPress 6.1

WordPress 6.1 ships with some noticable refinements to Editor design. These changes clean up the interface and aim to improve user experience.

Status & Visibility Panel Renamed to Summary

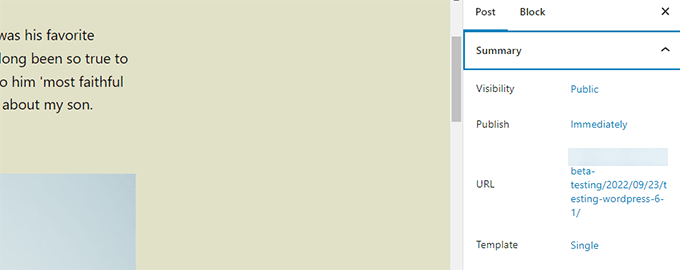
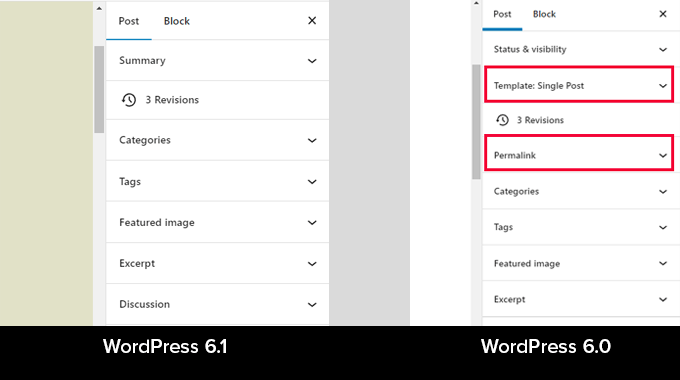
The Status & visibility panel is renamed to Summary. Template and Permalink panels are now removed and merged into the Summary panel.

Moved items

You can click on the URL field to change the Permalink or Template name to change template.

Here is how it looked in WordPress 6.0 vs WordPress 6.1.

Missing panels

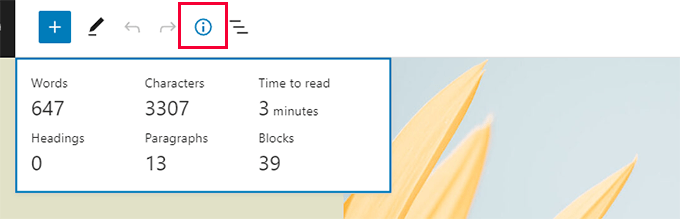
Time to Read in the Information Panel

The information panel now includes ‘Time to read’ information as well.

Improved information panel

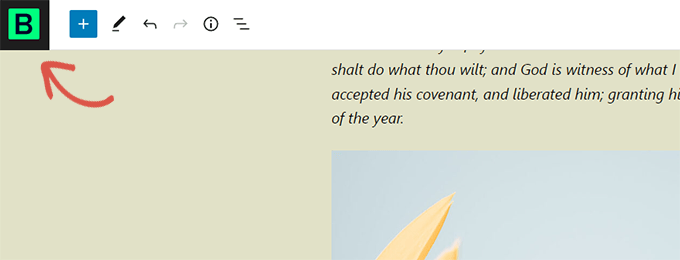
Site Icon Replaces the WordPress Logo

If you have set the site icon for your website, then it will be used as the View Posts button in the top left corner of the screen.

Site icon will be used as logo on editor screen

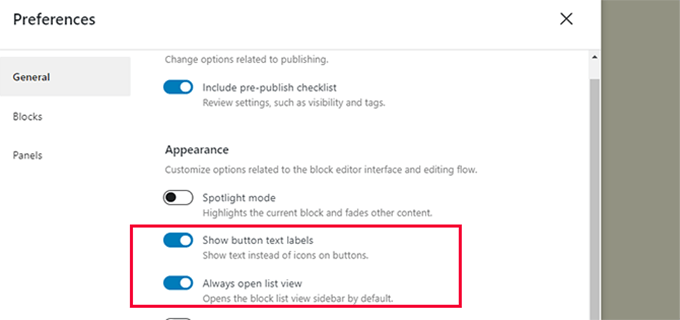
New Preferences Options

The Preferences section for the block editor now includes two new options.

New preferences option

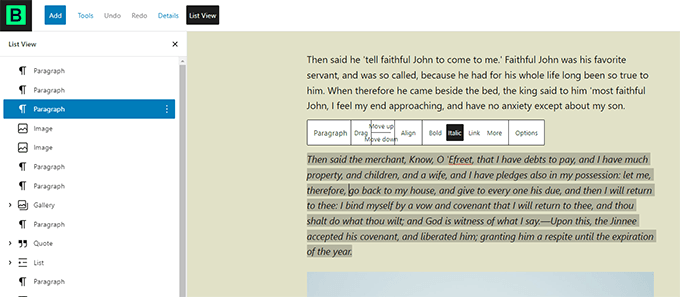
First, there is ‘Always open list view’ which shows the list sidebar by default for all articles.

Then, there is ‘Show button text labels’ which replaces icons in toolbars with text labels.

List view and text labels in toolbars

Create More Templates in Site Editor

If you have used child themes with classic WordPress themes, then you may be familiar with the template heirarchy.

With WordPress 6.1, users are now able to do the same using the block editor and without writing code.

You can use the following templates regardless of which block theme you are using.

  • Single page
  • Single post
  • Indivdual term in a taxonomy
  • Individual category
  • Custom template (can be used for any post or page)

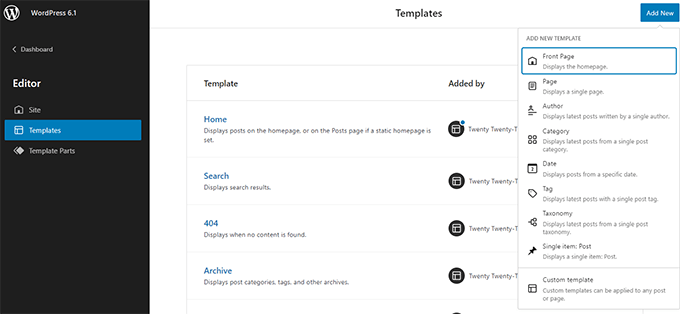
You can go to the Appearance » Editor page and then select templates from the left sidebar. After that, click on the Add New button to see the available options.

Site editor now has more templates

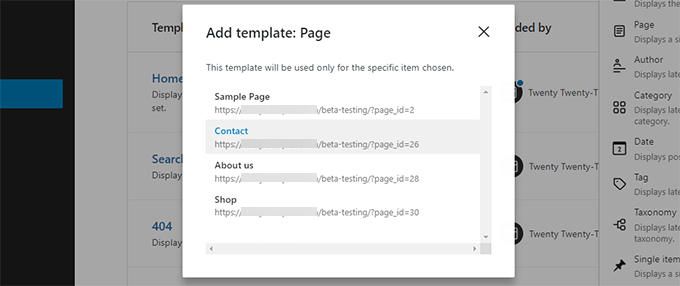
Choosing a template that can be applied to an individual item, will see bring up a popup.

From here, you can choose the item where you want the new template to be used.

Create template for a single item

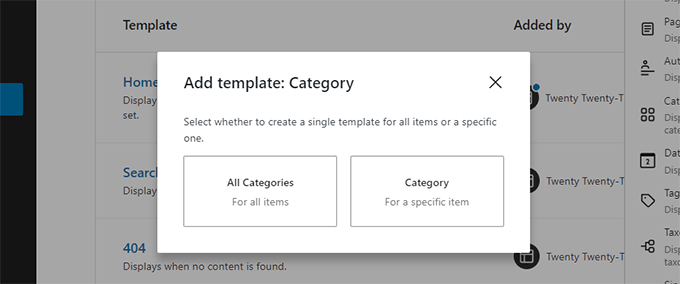
For instance, if you choose the Category template, then you’ll see a popup.

Now you can select if you want to apply your new template for all categories or a specific category.

Create category template

Quickly Search and Use Template Parts

The site editor in WordPress 6.1 now makes it easier to discover and use template parts.

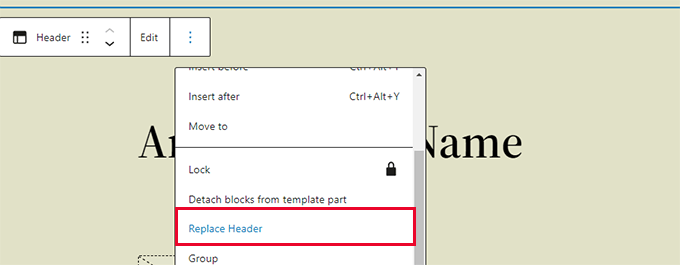
For instance, if your theme had multiple template parts that can be used in the header, then you can simply click on the template part options and select Replace.

Replace template part

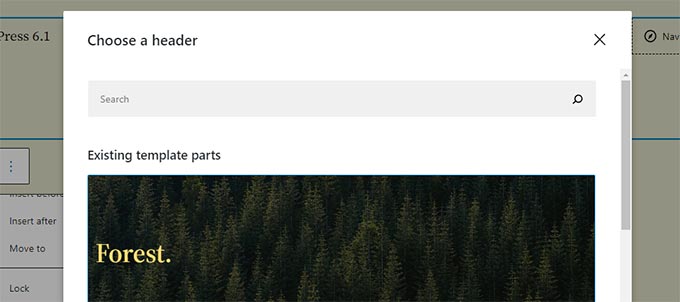
This will bring up a modal popup where you can look for available template parts that you can use.

Select template part

Quickly Clear Customizations in Site Editor

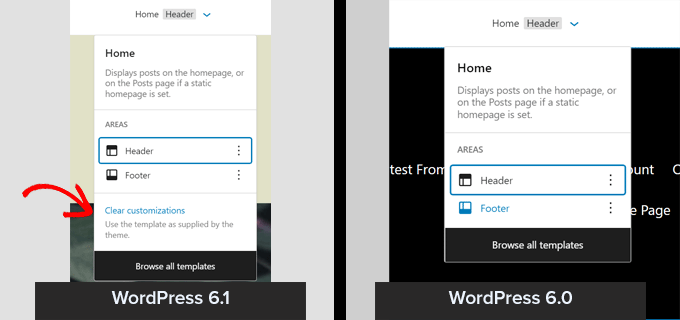
WordPress 6.1 now allows you to quickly clear customizations when working in Site Editor.

Quickly clear customizations

Under the Hood Changes in WordPress 6.1

WordPress 6.1 comes with several important changes for developers. Following are a few of these changes.

  • Classic themes can now use template parts (Details)
  • Fluid typography allows theme developers to dynamically adjust font sizes. (Details)
  • Post types can now have their own starter patterns (Details).
  • Filters to hook into theme.json data (Details)
  • Simplified data access with React hooks in WordPress 6.1 (Details)
  • New is_login() function to for determining if a page is the login screen. (Details)

We hope this article helped you discover what’s new in WordPress 6.0 and which new features to try out. We are particularly excited about all the changes to the block editor.

If you liked this article, then please subscribe to our YouTube Channel for WordPress video tutorials. You can also find us on Twitter and Facebook.

The post What’s New in WordPress 6.1 (Features and Screenshots) first appeared on WPBeginner.


November 02, 2022 at 04:45PM

The WordPress SEO Crawl Budget Problem and How to Fix It

Are you trying to fix the WordPress SEO crawl budget problem?

SEO crawl budget is the number of times search engines will crawl pages on your website. A lower crawl budget can delay your pages from getting indexed in a timely manner. This can hurt your SEO rankings and lower your overall traffic.

In this article, we’ll explain the WordPress SEO crawl budget problem and how to fix it quickly.

Fixing SEO crawl budget issues in WordPress

Because this is a huge topic, we have broken it down into easy-to-understand sections. Here are the different items we’ll cover in this article:

How Does Search Crawling work?

Search engines like Google, use sophisticated bots (computer programs) to visit websites across the internet.

These bots look for changes on a website and compare them to the main search index.

If they discover new content, then they add it to the search index. If they find content that is already in the index but has changed, then they update the index with fresh content.

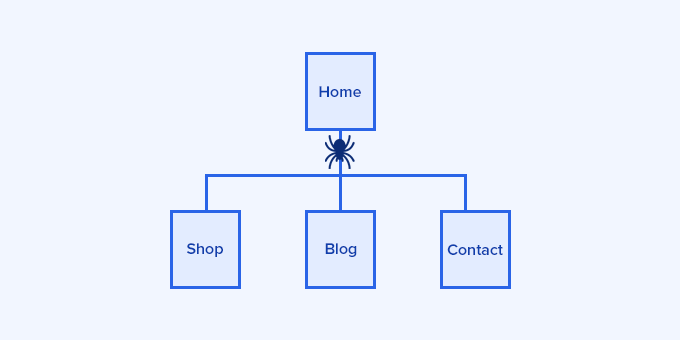
How search crawling works

They follow links on a page and then do the same for those pages as well.

The way bots move from one link to other links on a page is similar to how real spiders crawl along their webs.

That’s why the term crawling is used to describe this activity, and you may sometimes see the bots referred to as search engine spiders.

For better SEO, you need to make sure that search engines can crawl your website easily.

Tip: See our complete WordPress SEO guide for beginners to learn more about SEO.

What is SEO Crawl Budget?

SEO crawl budget is the number of times search engines like Google will crawl pages on your website.

Google bots crawl billions of pages each day. They try to calculate how many pages they will crawl on each website domain to efficiently use resources.

This number is automatically determined by the crawling algorithms based on multiple factors.

It fluctuates daily, which means there is no fixed number for how many pages the Google bot will crawl on your WordPress website.

Generally, larger websites with more content have a higher crawl budget, and smaller websites have a lower budget.

Other factors also influence the crawl budget, like the popularity of a URL, freshness, update frequency, and more.

However, due to several reasons, you may be losing your crawl budget on unwanted pages.

For instance, if your website isn’t properly optimized, then search engines will spend your crawl budget on less significant parts of your website than important content.

What Causes WordPress SEO Crawl Budget Issues

The way WordPress generates URLs and duplicate content can cause crawl budget issues.

For instance, WordPress automatically generates RSS feeds for different areas of your website.

There are RSS feeds for the main blog, categories and tags, comments on each individual post and page, and even custom post types have separate RSS feed URLs.

Links to these RSS feeds are added to the HTML source code of your website which makes them discoverable by search engines.

Now, search engines are smart enough to recognize duplicate content and ignore it. However, they would still crawl them and spend your SEO crawl budget.

Apart from that, search engines would crawl less important items a lot more than needed. This includes your archives, taxonomies, authors, PDF files, and more.

WordPress plugins or other third-party tools can also add query parameters to your WordPress URLs.

Google’s spiders may consider these query parameters to be a different page and crawl them.

For instance, UTM parameters are used for Google Analytics tracking and a page with or without these query parameters would still look the same.

Example: https://yourdomain.com/landingpage/?utm_source=newsletter

This wastes your SEO crawl budget on less important items and becomes an issue.

How to Calculate Your SEO Crawl Budget

The SEO crawl budget is not a set number of pages.

It fluctuates a lot, and there is no reliable way of predicting how many pages Google will crawl on your website on any given day.

However, you can get a pretty decent idea based on recent crawl activity to see how Google crawls your website.

If you haven’t done so, you first need to add your website to Google Search Console. It is a free tool provided by Google to help website owners find out how their website is doing in Google Search.

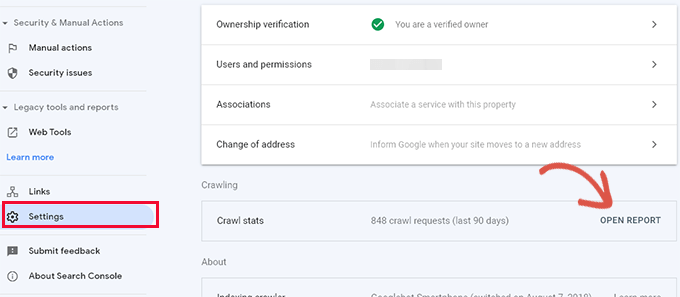
Simply go to your Search Console dashboard. Switch to the ‘Settings’ menu from the left column and then click on ‘Open Report’ next to ‘Crawl stats.’

Open crawl stats report in Google Search Console

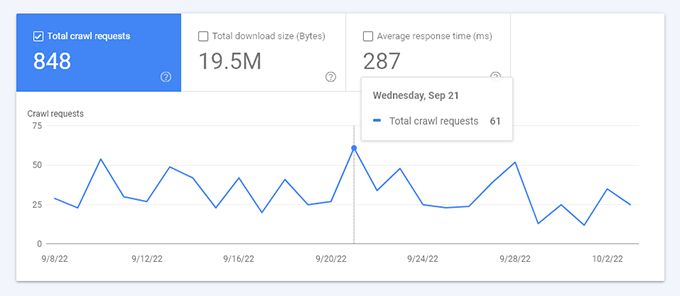
The Crawl stats report will show an overview of crawl requests on your website during the last few weeks.

You can hover your mouse over the chart to see how many pages were requested each day.

Crawl stats overview

This gives you an idea of what the average crawl rate was on your site during this period of time.

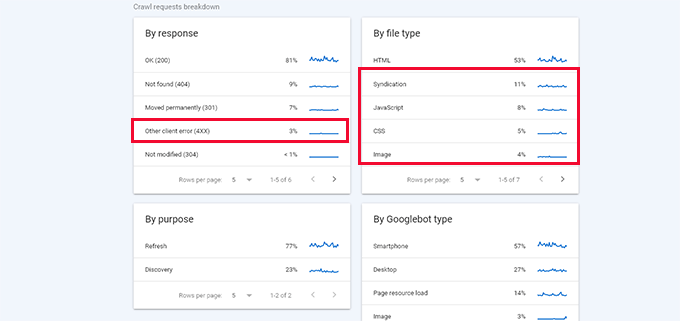
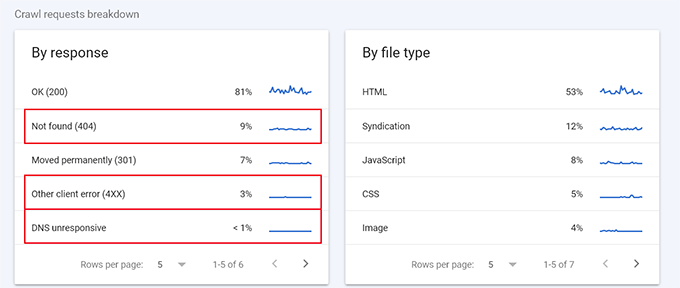
Below that, you can see a breakdown of crawl activity by response code, file types, purpose, and Google bot type.

Crawl break down

From here, you can see how much the crawl budget is spent on errors, syndication (RSS feeds), JavaScript, CSS, Images, and more.

This gives you a snapshot of items that you can optimize to utilize the SEO crawl budget more efficiently.

For example, if you have a lot of 404 errors being crawled, then you can use a redirection plugin to ensure those crawlers land on useful content.

(Later in the article, we show you how to redirect crawl errors step-by-step.)

Why You Should Care About SEO Crawl Budget

Search engines need to crawl your website efficiently, so they can properly index your content on time.

However, if your SEO crawl budget is being wasted, then your important and newer content may not get crawled on time.

It may even take weeks for the search engines to notice updates to your older articles or discover your new content.

You will miss out on getting traffic from search engines, your SEO rankings may not improve, and you will definitely lose money on sales or ad revenue.

How to Easily Optimize SEO Crawl Budget in WordPress

The easiest and safest way to optimize your SEO crawl budget in WordPress is by using All in One SEO for WordPress.

It is the best WordPress SEO plugin that comes with an SEO crawl optimization tool built-in.

First, you need to install and activate the All in One SEO for WordPress plugin. For more details, see our step-by-step guide on how to install a WordPress plugin.

Note: There is also a free version of All in One SEO which also includes a crawl clean-up feature. We recommend using the PRO plan of the paid plugin because it will also give you access to the Redirection manager tool to fix 404 errors on your website.

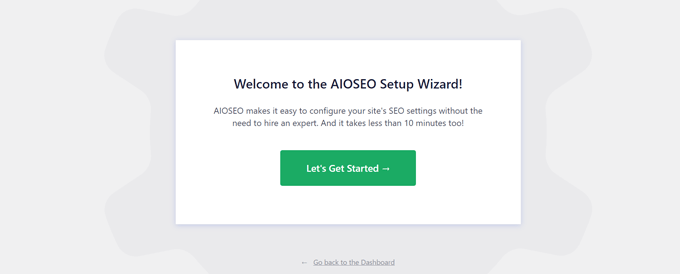
Upon activation, the plugin will show you a setup wizard. Simply follow the on-screen instructions to set up the plugin.

All in One SEO wizard

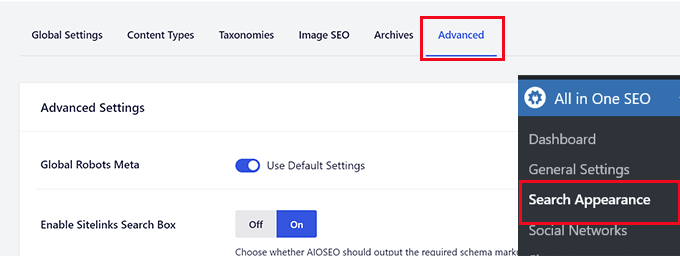
After that, you can go to All in One SEO » Search Appearance page.

Then, just switch to the Advanced tab.

Search Appearance - Advanced

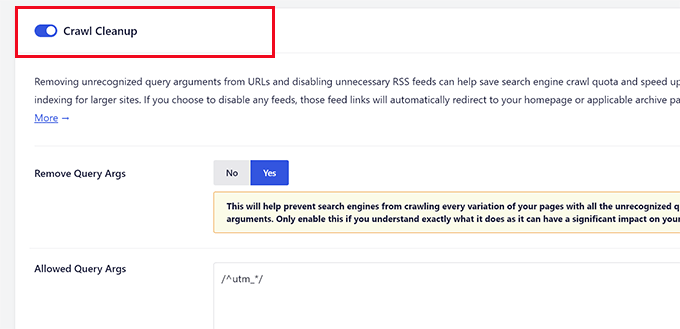
Scroll down to the bottom of the page and there you’ll see the ‘Crawl Cleanup’ option.

Click the toggle to enable the ‘Crawl Cleanup’ feature.

Crawl cleanup

The first option you will see in the crawl cleanup is to remove the query arguments.

Below that, you can provide a list of query arguments that you want to allow. Advanced users can use Regex regular expressions here.

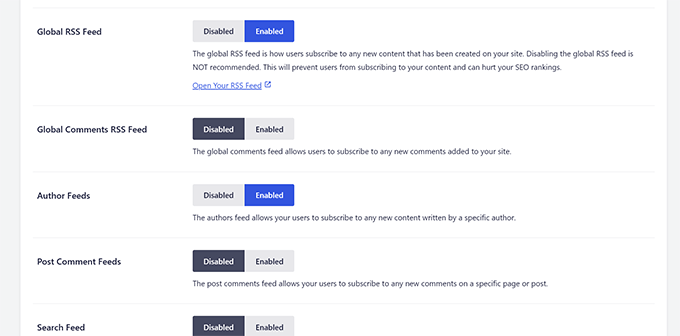
Next, you’ll see options for WordPress RSS feeds. All in One SEO will show you all different kinds of RSS feeds generated by WordPress, and you can disable the less important RSS feeds.

Disable RSS feeds

For instance, if you have a single-author blog, then you can Disable the Author Feeds.

Once you have disabled all the unwanted RSS feeds, don’t forget to click on the ‘Save Changes’ button to store your settings.

How to Set Up Redirects for Error Pages

All in One SEO will automatically set up redirects for feeds you have disabled. For instance, a tag RSS feed will now redirect users to the tag archive page.

Next, you need to switch to your Google Search Console dashboard and open the crawl stats report.

From here, you can see the pages that resulted in errors.

Find error pages

Now depending on the status code, you can set up redirects for those pages.

For instance, you can redirect 404 errors to a similar page. You can check other pages with errors and set up redirects for them as well.

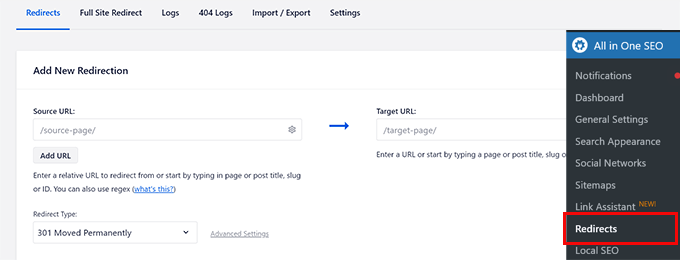
All in One SEO makes it very easy to set up redirects on your WordPress website. Simply go to All in One SEO » Redirects page and add the old URL under the ‘Source URL’ and new URL under the ‘Target URL’ field.

Redirects manager

Click on the ‘Add Redirect’ button to save your settings. Then, you can just repeat the process to set up more redirects as needed. For more details and alternate methods, see our guide on how to set up redirects in WordPress.

We hope this article helped you learn about the WordPress SEO crawl budget problem and how to fix it. You may also want to see these expert tips on using Google Search Console to grow traffic or see practical examples of how to improve organic click-through rate in WordPress.

If you liked this article, then please subscribe to our YouTube Channel for WordPress video tutorials. You can also find us on Twitter and Facebook.

The post The WordPress SEO Crawl Budget Problem and How to Fix It first appeared on WPBeginner.


November 02, 2022 at 02:36PM