Certified WordPress Developer and SEO Specialist with 10+ years of experience on Fiverr. I provide expert solutions for WordPress error fixing, debugging, speed optimization, and security hardening. Services include hacked site recovery, malware removal, on-page SEO optimization, and full customization to ensure your website runs fast, secure, and ranks higher on Google.
Do you want to disable overflow on your WordPress website?
A horizontal scroll bar appears when an element on that page is too wide to display and overflows beyond the screen. Most WordPress themes don’t use horizontal scrolling because it can break your site layout and confuse users.
In this article, we will show you an easy and quick way to disable overflow in WordPress and remove the horizontal scroll bar.
What Causes Horizontal Scroll Bar or Overflow in WordPress
When setting up your WordPress website, it is important to make it user-friendly and accessible for everyone.
WordPress will show a horizontal scrollbar if an element is wider than your website layout. This is called ‘overflow.’ Having a horizontal scroll bar can break your design and make your website less user-friendly.
A web page with both horizontal and vertical scroll bars can be disorienting for the visitor and become hard to navigate. It can result in people leaving your site causing lower conversions and sales.
Disabling overflow can be beneficial for you as it will make your site more user-friendly and intuitive.
Disabling the overflow is an extremely easy process. With that in mind, let’s take a look at how to easily disable the overflow horizontal scroll bar in WordPress.
Method 1: Adding the CSS Snippet using Theme Customizer
You can disable overflow in WordPress by simply adding a CSS code in the ‘Additional CSS’ option of the theme customizer.
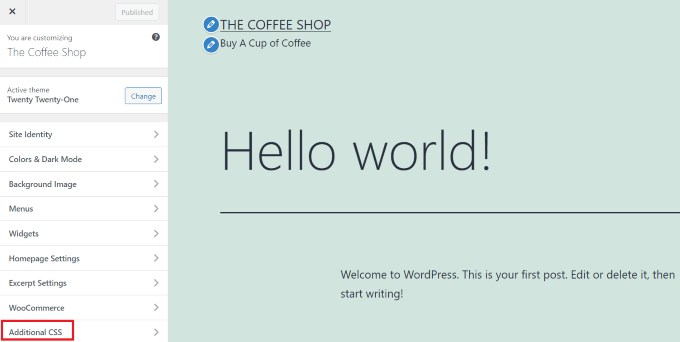
All you have to do is go to the WordPress dashboard and click Appearance » Customize.
Note: You might see Appearance »Editor instead of Customize. This means your theme uses the full-site editor (FSE) instead of the Theme Customizer, and you should check out our guide on how to fix the missing theme customizer or use Method 2 below.
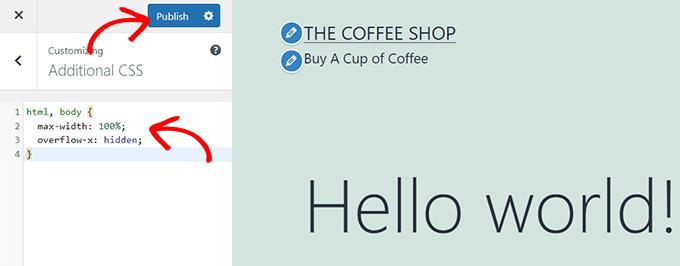
Once you’re on the Customize page, click on the ‘Additional CSS’ option and then simply copy and paste the following code.
html, body {
        max-width: 100%;
        overflow-x: hidden;
}
Once you’ve pasted the code, any overflow will be removed, and you’ll be able to see it applied on your website’s live preview pane.
Don’t forget to click on the ‘Publish’ button at the top of the page when you’re done!
Method 2: Adding The CSS Snippet Using WPCode
You can also add the CSS via code snippet using the WPCode plugin.
WPCode is the most popular code snippet plugin, used by over 1 million websites. We recommend this method as this plugin makes it easy to add custom code to WordPress without having to edit any of your theme files.
So the first thing you need to do is install and activate the WPCode plugin on your website. For more details, you can see our step to step guide on how to install a WordPress plugin.
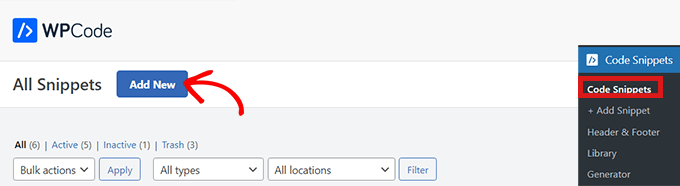
Once you’ve activated the plugin, it will add a new menu item labeled Code Snippets to your WordPress admin bar. Click it, and you will be taken to the ‘All Snippets’ page.
Go ahead and click on the ‘Add New’ button to add your CSS code.
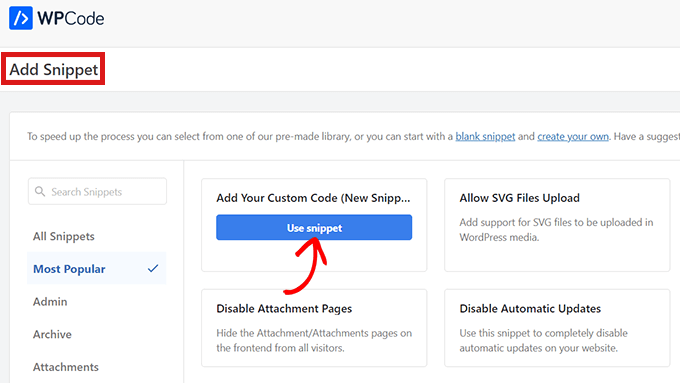
Now that you’re on the ‘Add Snippet’ page, you can either search the WPCode snipept library, or you can start from scratch with your own. That’s what you’ll do here.
Simply hover over ‘Add Your Custom Code (New Snippet)’ and click on ‘Use Snippet.’
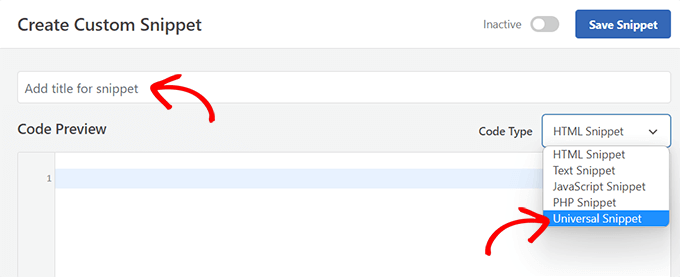
Once you’re on the ‘Create Custom Snippet’ page, start by entering a title for your code snippet. This is for you only, and it can be anything that helps you identify the code.
Next, you’ll have to select the ‘Code Type’ from the drop-down menu on the right. Note that WPCode does not offer an option for CSS, so you’ll need to click on the option ‘Universal Snippet.’
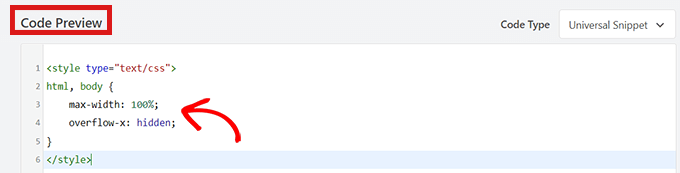
Next, all you have to do is copy and paste the following CSS code snippet into the ‘Code Preview’.
It will look like this once you’ve pasted the code:
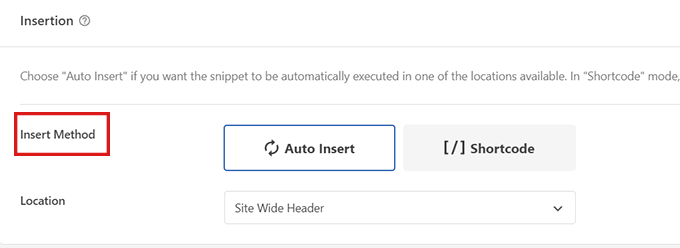
After that, scroll down to the ‘Insertion’ section. Here, you’ll find two options, ‘Auto Insert’ and ‘Shortcode.’
You will choose the ‘Auto Insert’ option so that your code will be automatically inserted and executed on your site.
However, if you just want to disable the horizontal scroll bar on some specific pages, you can use the conditional logic option in WPCode to only show the snippet on specific page.
Alternatively, you can use the WPCode Pro version to load snippets on specific post pages using the Block Editor.
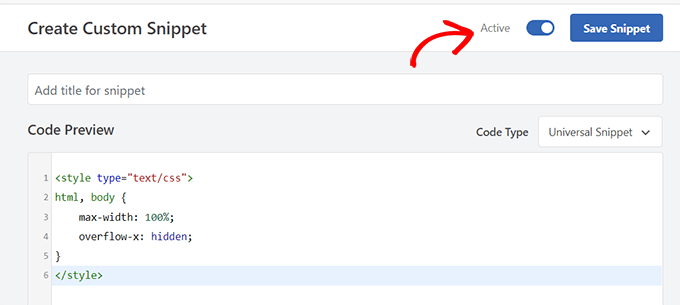
Once you’ve chosen your option, go to the top of the page and toggle the switch from ‘Inactive’ to ‘Active’ in the top right corner.
Then, just click the ‘Save Snippet’ button.
That’s it! You just removed any horizontal overflow scroll bars on your site.
Are you looking for a way to raise funds through crowdfunding using a WordPress website?
Raising funds for a project can be a challenging task. Most people use crowdfunding platforms like Kickstarter or Indiegogo to raise money. However, why work on the terms of third-party platforms when you can do it all on your own with a few simple clicks?
In this article, we will show you how to raise money with crowdfunding in WordPress.
What is Crowdfunding?
Crowdfunding is an organized effort by a person to raise funds for a project, an organization, or their own needs.
Often entrepreneurs use crowdfunding to raise startup money by presenting their ideas to potential customers and allowing them to fund the project rather than giving up equity to investors. Instead of receiving equity, each donor gets a reward of some kind.
Usually, these rewards include getting a shirt, stickers, other goodies, or an actual product. The reward each donor receives is based on the amount they donate.
Besides startups, crowdfunding is a great way for an individual or even nonprofit organizations to raise money for any cause.
Many people use sites like Kickstarter or Indiegogo to crowdfund, but there are a few downsides to those sites. For example, Kickstarter takes 5% of any money you raise, plus processing fees. And if you don’t meet your fundraising goal, all the donations are returned and you won’t receive anything.
That’s why making a WordPress site can be a better alternative. It gives you much more control and flexibility over your crowdfunding campaign.
That said, let’s see how you can raise money through crowdfunding using WordPress.
How to Start Crowdfunding with WordPress
The easiest way to start crowdfunding is by using a WordPress plugin. There are many donations and fundraising plugins that help you collect online payments from investors and crowdfund your project.
We’ll show you 2 plugins that you can use to kickstart your crowdfunding in WordPress. Simply click the link below to jump ahead to any section:
You can use the drag and drop form builder to create any type of form in minutes without editing code. Plus, it easily integrates with payment services like PayPal and Stripe, allowing you to collect online payments from investors.
We’ll use the WPForms Pro version for this tutorial because it includes a nonprofit crowdfunding form template and payment gateway integrations. There is also a WPForms Lite version you can try for free.
First, you’ll need to install and activate the WPForms plugin on your website. If you need help, then please see our guide on how to install a WordPress plugin.
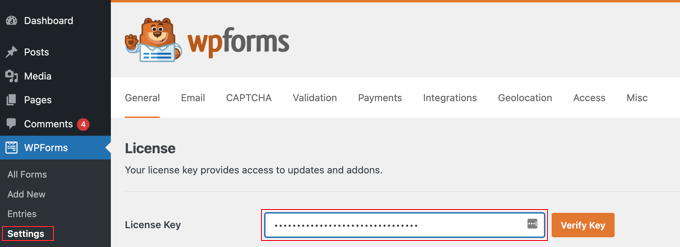
Upon installation, you can head to WPForms » Settings from your WordPress dashboard and enter your license key. You can easily find the license key in your account.
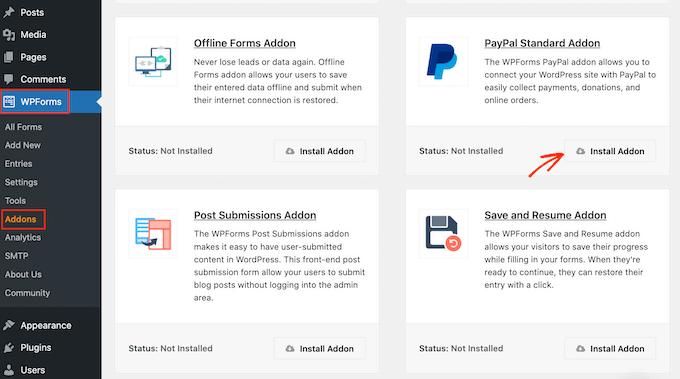
After that, you’ll need to integrate different payment services to raise money through crowdfunding. WPForms supports payment providers like PayPal, Stripe, Square, and Authorize.net.
Simply go to WPForms » Addons from the WordPress admin panel and click the ‘Install Addon’ button for your preferred payment addon.
Once the addon is active, you can now create a crowdfunding form for your WordPress website.
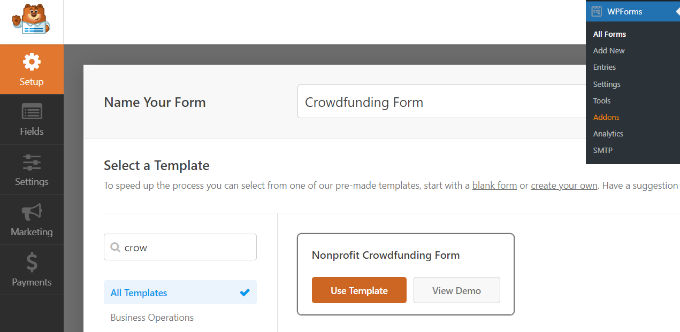
To start, you can go to WPForms » Add New from the WordPress dashboard. This will launch the WPForms drag and drop form builder.
Next, enter a name for your form at the top and then search for the ‘Nonprofit Crowdfunding Form’ template from the menu on your left. Simply hover over the form template and click the ‘Use Template’ button.
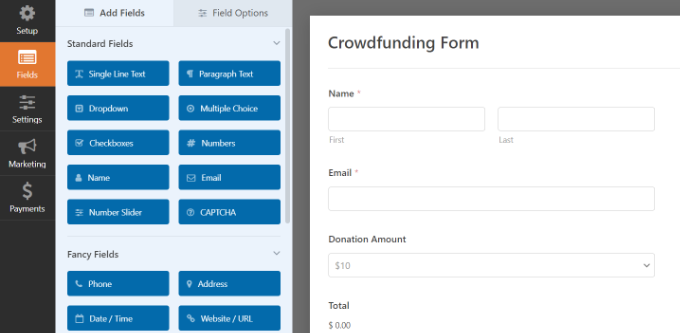
From here, you can use the drag and drop form builder to customize the template.
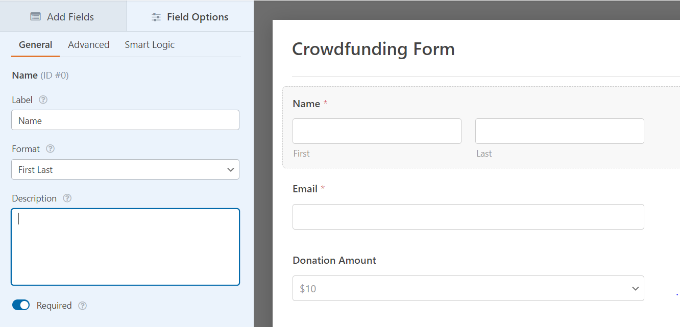
WPForms will already have form fields added to the template. However, you can add more fields by dragging them from the menu on your left or rearranging the existing fields.
You can further customize each individual form field.
Simply select a form field, and you’ll see more options in the menu on your left. For instance, you can change the label and format of the field, make it a required field, and more.
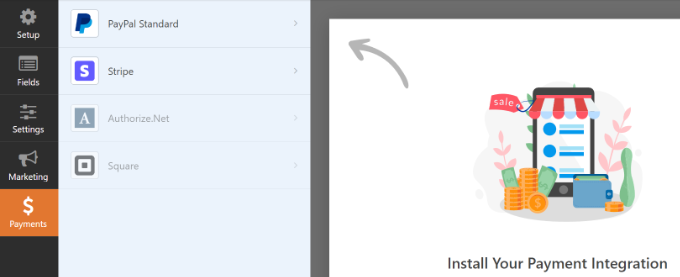
Next, you can go to the ‘Payment’ tab in the WPForms form builder.
Go ahead and select a payment gateway you want to connect to your crowdfunding form.
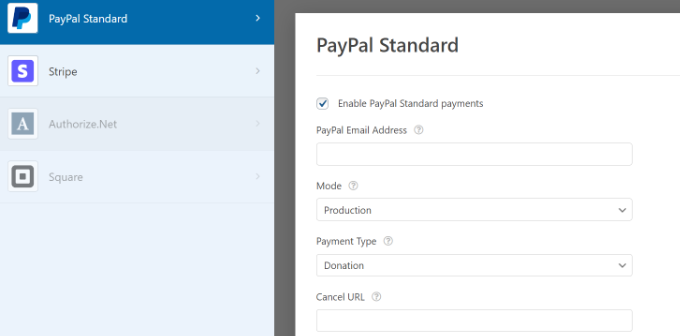
For the sake of this tutorial, we’ll select PayPal.
After that, click the checkbox for ‘Enable PayPal Standard payments’ in the settings.
You can then provide a PayPal email address and select ‘Donation’ from the Payment Type dropdown menu.
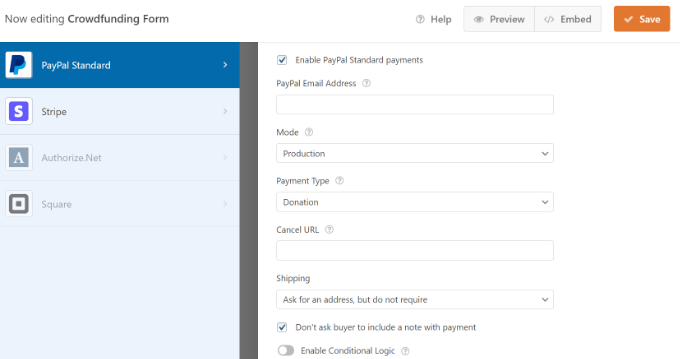
Below that, there are more options where you can enter the Cancel URL. This is a great opportunity to stay connected with your users if they decide the cancel the checkout process.
You can also customize the shipping address options and ask buyers to include a note with payment.
Don’t forget to click the ‘Save’ button at the top.
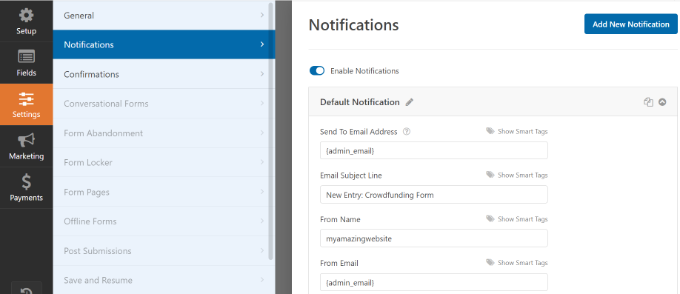
Next, you can head to the ‘Settings’ tab in the form builder and go to Notifications.
Here you can customize the notification settings sent to the site administrator. For example, you can change the email the notifications are sent to, edit the email subject line and message, and more.
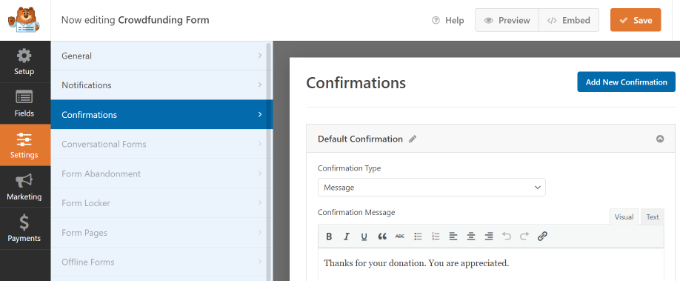
Next, you can go to ‘Confirmations’ in the Settings tab and ensure your donors receive a confirmation email for funding your project.
You can show a message when someone submits the crowdfunding form or take the user to another page or URL on your site.
When you’re done, don’t forget to click the ‘Save’ button at the top.
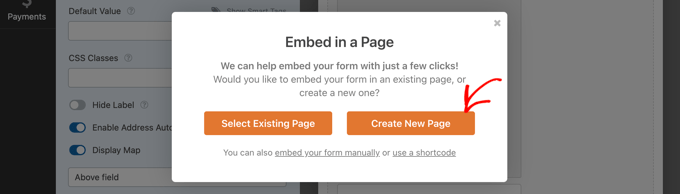
The next step is to add your crowdfunding form to your WordPress blog. You can simply click the ‘Embed’ button in the form builder at the top and choose whether you’d like to select an existing page or create a new page for your form.
Let’s select the ‘Create New Page’ option for this tutorial.
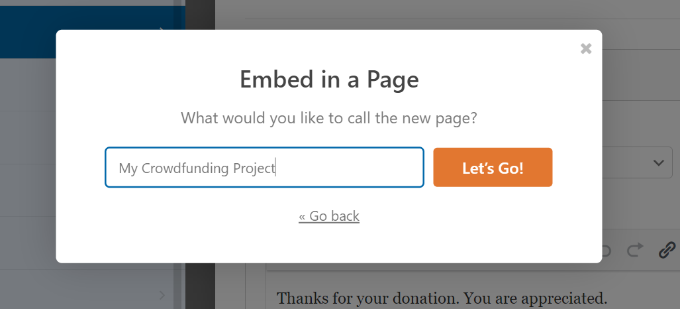
After that, enter a name for your new page and click the ‘Let’s Go!’ button.
WPForms will automatically embed your crowdfunding form to the new page you just created.
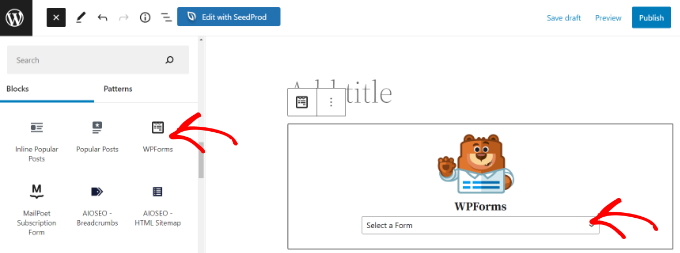
Alternatively, you can add a WPForms block in the WordPress content editor and select your form from the dropdown menu.
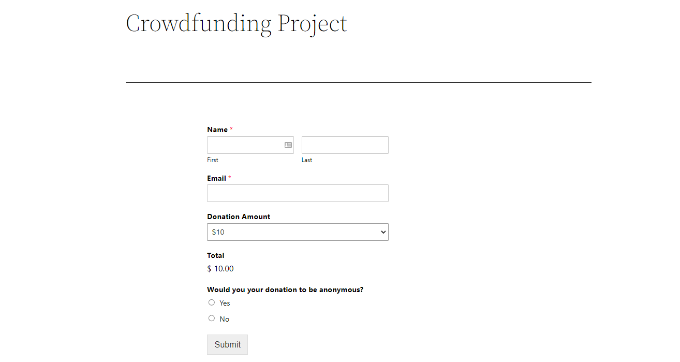
Go ahead and preview your crowdfunding form.
You can then click the ‘Publish’ button and visit your website to see the form in action.
Another way you can start fundraising for your project is by using WP Charitable. It is one of the top-rated WordPress donation and fundraising plugins. Over 10,000 nonprofit organizations use WP Charitable to raise money through crowdfunding and donations.
The plugin offers numerous extensions and features that help you kickstart your crowdfunding campaign. For instance, you can set up peer-to-peer fundraising in WordPress and use word-of-mouth marketing to raise funds.
For this tutorial, we’ll use the WP Charitable Pro license because it includes the Ambassador extension for peer-to-peer fundraising and additional payment gateways.
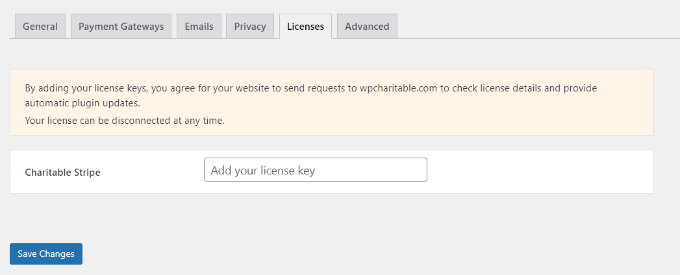
Upon activation, you’ll see the WP Charitable welcome screen in your WordPress dashboard. You can head to Charitable » Settings from the admin panel and go to the ‘Licenses’ tab.
Simply enter your license key and click the ‘Save Changes’ button.
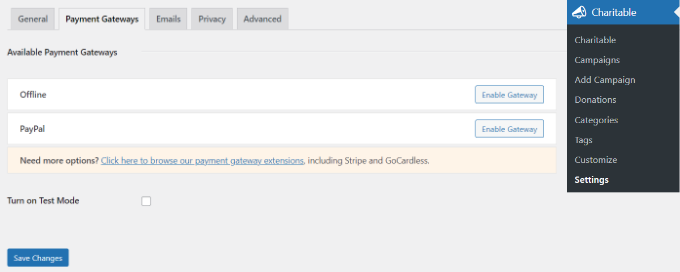
After that, you can head to the ‘Payment Gateways’ tab.
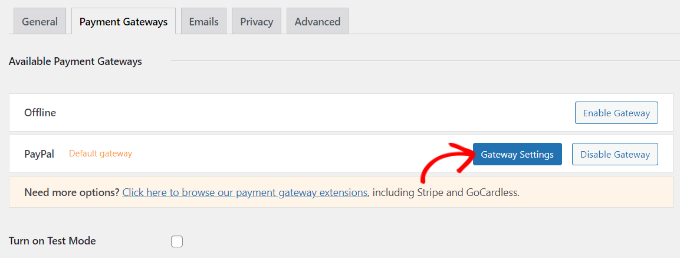
Go ahead and click the ‘Enable Gateway’ button for your preferred payment method.
The default payment gateways offered by WP Charitable will be an offline method or PayPal.
However, you can add more payment methods like Stripe, GoCardless, Payrexx, Mollie, Paystack, Braintree, Authorize.net, and more.
After enabling the payment option, simply click the ‘Gateway Settings’ button.
For the sake of this tutorial, we’ll set up PayPal as the payment gateway.
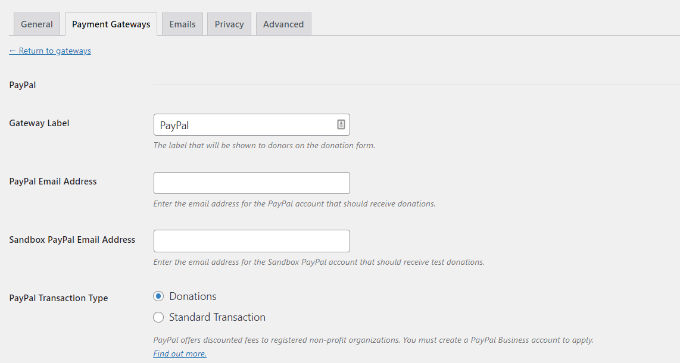
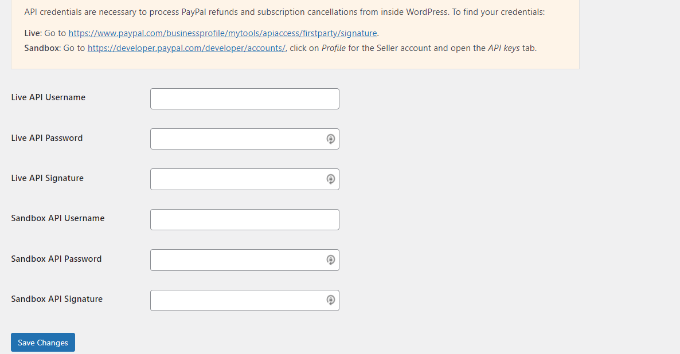
In the PayPal gateway settings, you’ll need to enter your PayPal email address and the API credentials.
You can find the API credentials by going to your PayPal business profile.
When you’re done, click the ‘Save Changes’ button.
The next step is to create a fundraising campaign in WP Charitable.
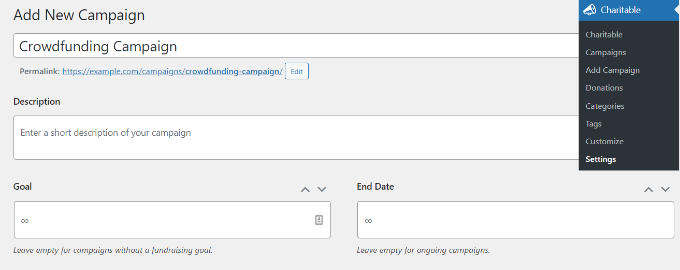
Simply go to Charitable » Add Campaign from your WordPress dashboard and enter a name for your campaign at the top.
There are also options to enter a campaign description, set a goal, and add an end date to the campaign.
You can leave the goal field blank if you don’t have a set target amount you’d like to collect, and also leave the end date fields blank if it’s an ongoing campaign.
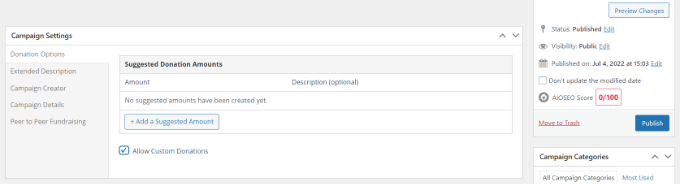
Besides that, you’ll see ‘Campaign Settings’ if you scroll down. Here you can add suggested donation amounts for your campaign. Simply click the ‘+ Add a Suggested Amount’ button and enter the amount.
When you’re done, click the ‘Publish’ button to set your campaign live.
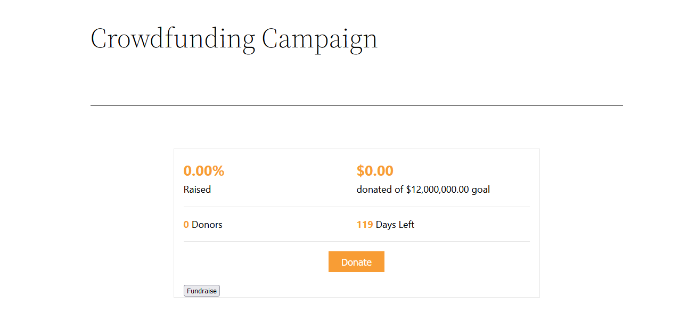
Then you can visit your website to see your crowdfunding campaign in action.
Setting Up Peer-to-Peer Fundraising in WP Charitable
WP Charitable also lets you set up peer to peer fundraising in WordPress. This allows your team members and individuals to create their own campaign and help achieve your overall crowdfunding goal.
First, you can install and activate the Ambassadors extension on your website. It’s just like adding a new plugin. You can follow our guide on how to install a WordPress plugin for more details.
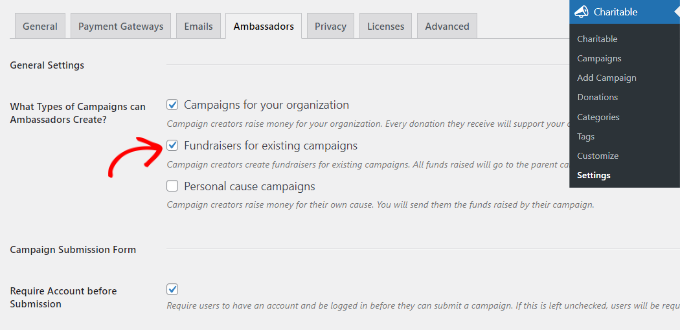
Upon activation, you can go to Charitable » Settings from your WordPress admin area and then click on the ‘Ambassadors’ tab. Next, click the checkbox to enable the ‘Fundraisers for existing campaigns’ option.
There is also an option to disable the requirement for users to register an account before submission.
Don’t forget to save your changes when done.
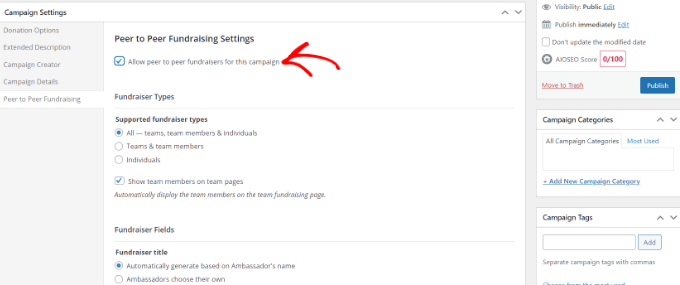
After that, you can edit an existing campaign in WP Charitable or add a new one. Next, you can go to the ‘Peer to Peer Fundraising’ tab in the Campaign Settings section.
Go ahead and click the checkbox for the ‘Allow peer to peer fundraising for this campaign’ option.
You should now see different settings under Peer to Peer Fundraising. You can select who can participate in the fundraiser, customize fundraiser fields, set a goal, add a photo, and more.
Simply publish your new campaign or update an existing one when you’re done.
A fundraiser option should now appear in your campaign. You can also add a fundraiser button anywhere on your website using the [charitable_fundraise_button]shortcode.
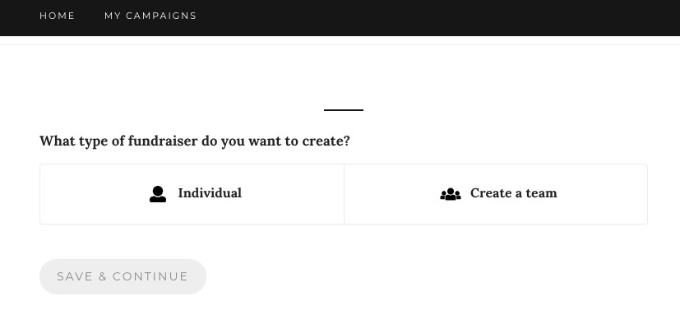
When users click the fundraiser button, they can choose what type of fundraiser they want to create.
After that, users can simply enter details about the fundraiser and confirm their email addresses. Once that’s done, they can help raise money for your crowdfunding project.
Do you want to create a WordPress widget with your contact information?
Adding a contact info widget on your website will allow you to show your email address, phone number, address, and social media profiles. This will make it super easy for visitors to reach out to you.
In this article, we will show you how to create a WordPress widget for contact info.
A contact info widget allows you to display your email address, phone number, and social media profiles in your preferred widget section.
This way, visitors can easily approach you if they want to place an order, need support, or have any questions.
With that being said, let’s see how you can easily create a contact info WordPress in WordPress.
How to Create a Contact Info Widget in WordPress
One of the best ways to add a contact info widget to WordPress is by using Contact Information Widget. It’s a free WordPress plugin that’s very easy to use and works with very little configuration.
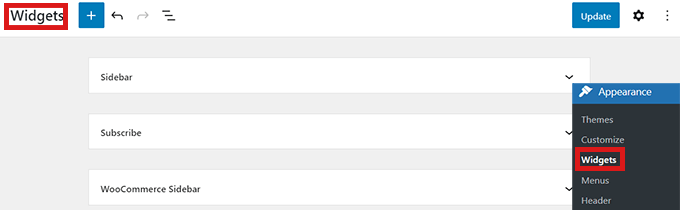
With this plugin, you can add the contact info block in any of the widget-enabled areas. Upon activation, simply head over to the Appearance » Widgets in the WordPress admin dashboard.
Once you’re on the ‘Widgets’ page, simply select where you want to add the widget.
Keep in mind that the areas you can place widgets in are defined by your WordPress theme, so it could look different depending on the theme you’re using.
If you’re not sure about your theme, then you can check out our article on the best block themes for WordPress. We will be using Hestia in this article.
Now we will be adding a contact info widget in the sidebar.
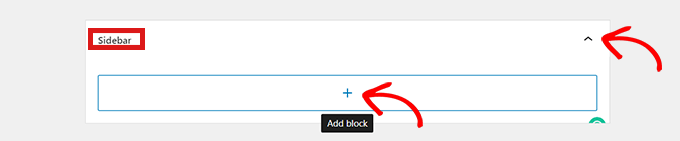
First, simply click the arrow icon in the upper-right corner of the ‘Sidebar’ box to expand it. Then you can click on the ‘+’ plus button to add a contact info widget.
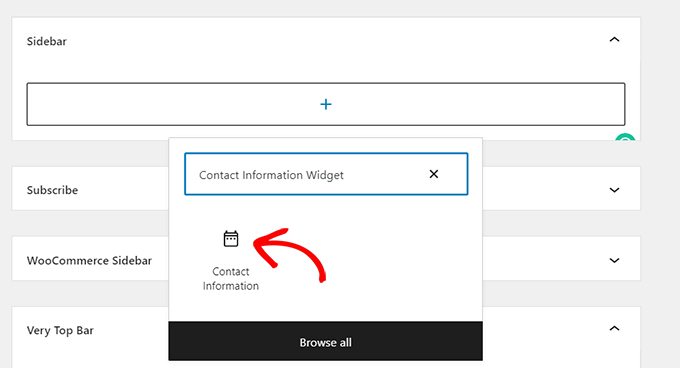
This will open up a ‘Widget Block Menu’ where you can search for the contact info widget by name. Or, click the ‘Browse all’ button to bring up a menu of all the available blocks.
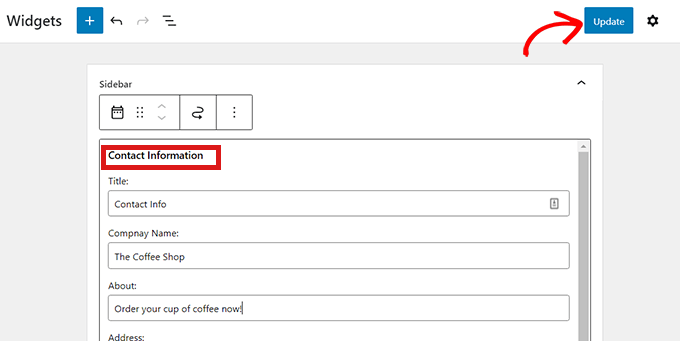
After locating the widget, simply click on the ‘Contact Information’ option.
Now, simply fill in all the contact information that you want to share with your readers such as your business phone number, address, etc.
Then just click on the ‘Update’ button to save your changes.
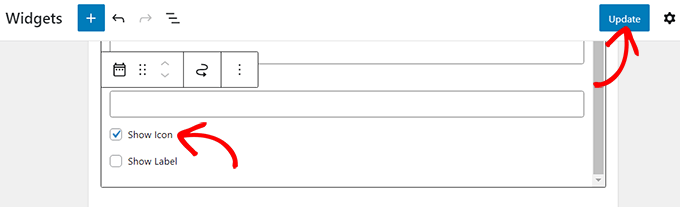
You can also show icons beside your contact details. Simply go back to the ‘Widgets’ page and open up the ‘Contact Information’ widget.
Then, simply scroll down and check the ‘Show Icon’ box. The icon that shows will be automatically selected based on the type of information you’ve entered.
After that, simply click on the ‘Update’ button to save changes.
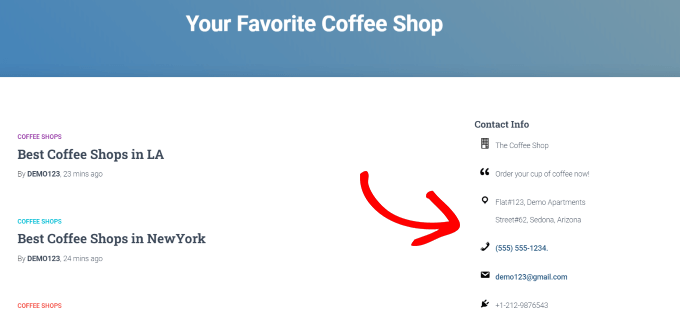
Now, when you visit your site, you will see the icon displayed beside your contact info.
For example, you will see a telephone handset next to a phone number or an envelope next to your business email address.
Final Thoughts and Next Steps
The challenge with a contact information widget is that this will be visible on all pages of your website. Typically this information is best when added in the footer areas of your website.
Often when creating a business website, you may only want to display this information on your contact page. Some website owners don’t want to reveal their business email address at all to reduce spam.
In those cases, you will need to create a contact page and then add a contact form on your site using a plugin like WPForms. You can also embed your location map and other details on that page. This is what most business websites end up doing.