Wednesday, November 30, 2022

How to Add a Buy Now Button in WordPress (3 Methods)

Do you want to add a buy now button in WordPress?

Whether you’re selling a service, subscription, or a physical product, having a quick buy now button helps improve the buying journey and leads to more sales.

In this article, we will show you 3 different ways on how you can add a buy now button in WordPress, step by step.

How to add a buy now button in WordPress

Why Add a Buy Now Button in WordPress?

A buy now button is a great way to reduce your cart abandonment rates. Every step in the purchasing process is another opportunity for the customer to change their mind and abandon their cart.

By taking them straight to the checkout, shoppers have less time to change their minds and give up on their purchases.

Since they speed up the purchasing process, buy now buttons can also improve the customer experience. When the buyer’s journey feels easy, customers are more likely to keep coming back to your store.

You’ll often see buy now buttons on product pages but they’re also sometimes used on landing and sales pages.

In this way, buy now buttons allow customers to kickstart the purchasing process without ever visiting the product page, which may increase the conversion rates for your marketing and advertising campaigns.

With that being said, let’s see how you can add a buy now button in WordPress. Simply use the quick links below to jump to the method you want to use.

Method 1. Adding a Buy Now Button With WP Simple Pay (No eCommerce Plugins Required)

You can add a simple buy now button to any page, post, or widget-ready area using WP Simple Pay.

This is a great option for service based business, non-profits, or anyone who’s looking for a quick buy now button option for WordPress.

WP Simple Pay is the best Stripe payment plugin for WordPress that lets you accept credit card payments, Apple Pay, Google Pay, ACH bank debit, and more without any eCommerce plugins or shopping carts. This makes WP Simple Pay the perfect choice if you want to add a buy now button to a sales page without having to install anything special.

For this guide, we will be using the free version of WP Simple Pay.

If you want to accept payments using ACH direct debit, recurring payments, do automatic tax calculations, or you want to add a buy now pay later plan to WordPress, then you’ll need to upgrade to the pro version.

First, you’ll need to install and activate the WP Simple Pay plugin. If you need help, then please see our guide on how to install a WordPress plugin.

Upon activation, the plugin will automatically launch the setup wizard. Go ahead and click the ‘Let’s Get Started’ button.
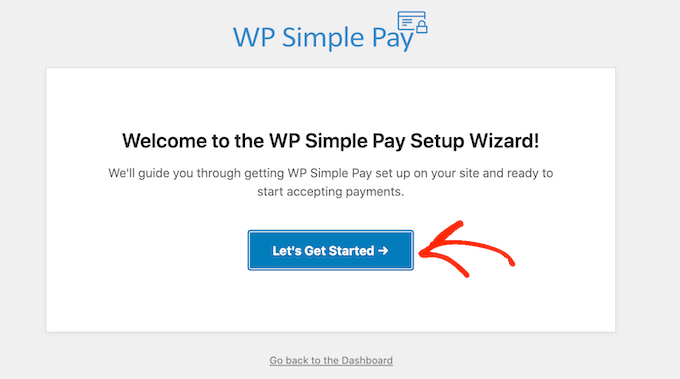
The WP Simple Pay WordPress payment plugin

In the next step, you’ll need to connect a Stripe account to WP Simple Pay. Stripe is a beginner friendly payment processor for website owners.

To get started, click on the ‘Connect with Stripe’ button.
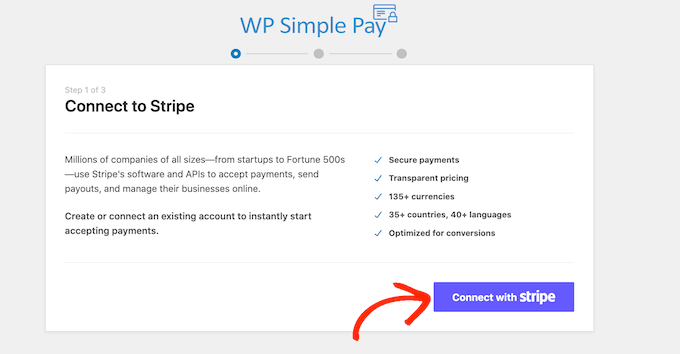
How to connect WP Simple Pay to Stripe

On the next screen, you can either log into an existing Stripe account or create a new one.

If you already have a Stripe account, then simply type in the email address and password for that account.
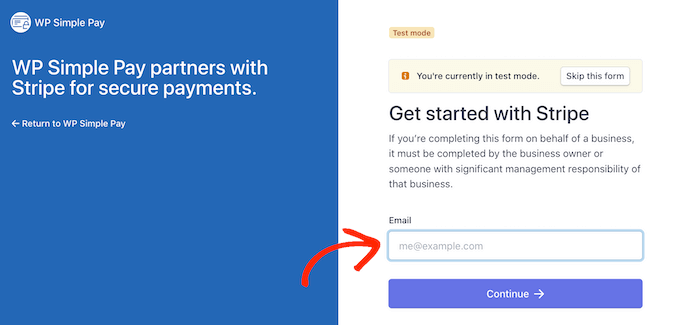
Connecting Stripe to your WordPress website

WP Simple Pay will now show you how to connect your Stripe account to WordPress.

If you’re not already registered with Stripe, then type in your email address and then follow the onscreen instructions to create a Stripe account. Once you’re logged into your Stripe account, click on the ‘Create a Payment Form’ button.

If you’ve clicked away from this screen by accident, then don’t panic. You can reach the same screen by going to WP Simple Pay » Add New.
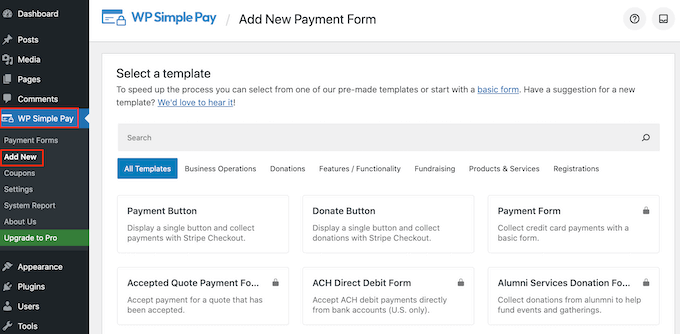
Adding a buy now button using WP Simple Pay

The free WP Simple Pay plugin has a few different templates that can help you create a payment form, fast. You can unlock extra templates by upgrading to WP Simple Pay Pro, including a template that adds a Stripe donate button in WordPress.

Since we want to create a buy now button, hover over the ‘Payment Button’ template and then click on ‘Create Payment Button’ when it appears.
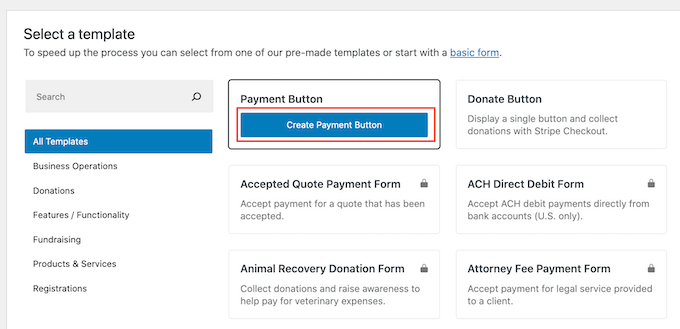
Create a payment button

In the ‘Title’ field, type in a name for your buy now button.

This title is just for your reference so you can use anything you want.
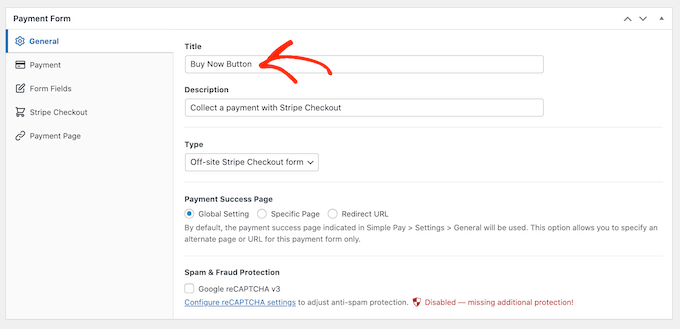
Adding a title to your buy now button in WordPress

You can also use the ‘Description’ field to add some information about your button. Again, WordPress won’t show this to your site’s visitors but it can be useful for your own reference or for anyone else who shares your WordPress dashboard.

After that, click on the ‘Payment’ tab.

By default, WP Simple Pay will create your button in test mode, meaning you can’t accept real payments yet.

We recommend leaving the ‘Global Settings (Test Mode)’ radio button selected so you can test your buy now button before you start accepting payments.
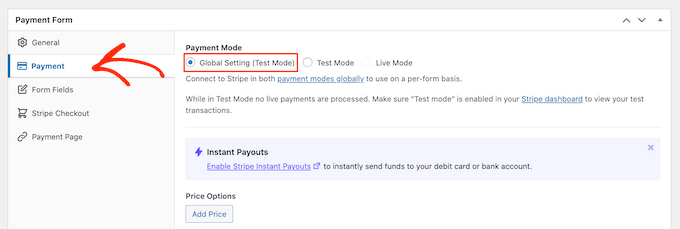
Creating a buy now button in test mode

If you want to start collecting payments straight away then you can select the ‘Live Mode’ button instead.

Next, you can decide how much the button will charge the customer. Go ahead and type this number into the ‘One-Time Amount’ field.
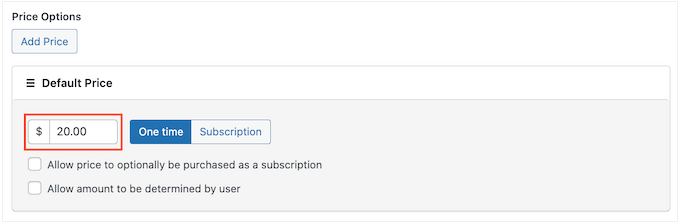
Collecting a one-time payment using WP Simple Pay

Note: WP Simple Pay uses the dollar currency by default. If you want to accept payments in a different currency, then head over to WP Simple Pay » Settings. You can then select the ‘Currency’ tab and choose a new currency.

Once you’ve done that, select the ‘Form Fields’ tab.
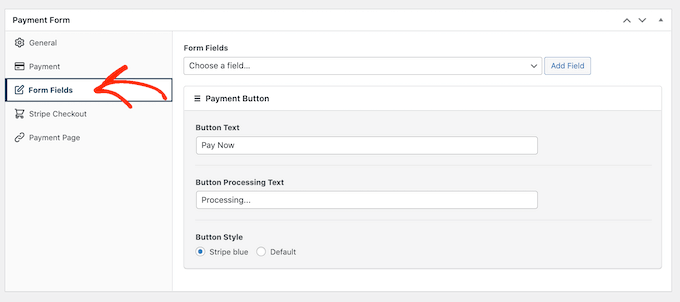
WP Simple Pay's form field settings

By default, your button will have the label ‘Pay Now’, but you can change this to anything you want by typing into the ‘Button Text’ field.

You can also change the ‘Button Processing Text,’ which is the message that WP Simple Pay will show to shoppers while it’s processing their payment.
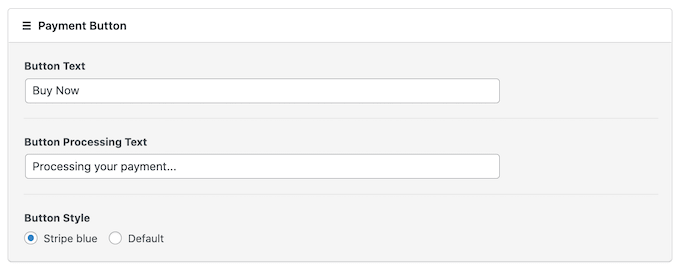
Customizing the buy now button in WordPress

By default, WP Simple Pay will use the same button style as your WordPress theme.

It also has a ‘Stripe blue’ style that you can use, as you can see in the following image. If you want to use this button style, then simply select the ‘Stripe blue’ radio button in the ‘Payment Button’ section.
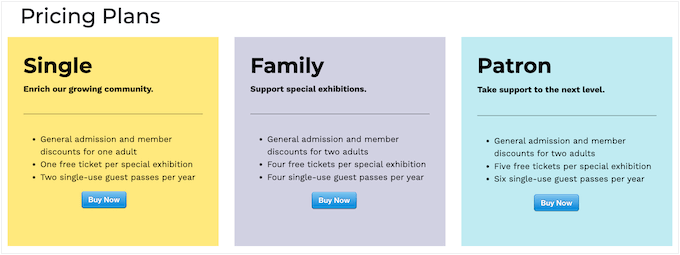
The Stripe blue button style

​Next, select the Stripe Checkout tab and choose the information that WP Simple Pay will collect from visitors at checkout.

For example, if you’re selling a physical product then you can get the customer’s shipping address by checking the ‘Collect Shipping Address’ box.
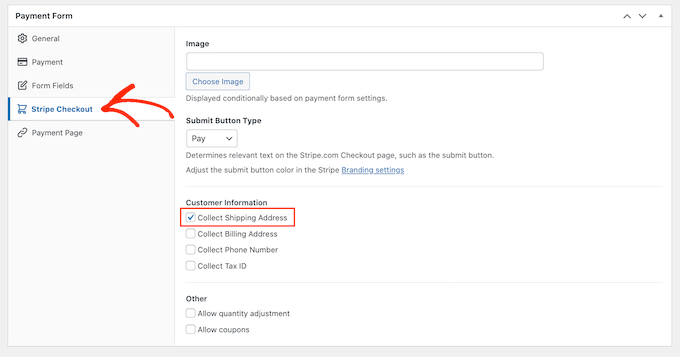
Configuring the Stripe checkout page

If you think that customers may want to buy multiple products, then make sure you check the ‘Allow quantity adjustment’ box.

This adds a dropdown to the Stripe checkout page which allows customers to change how many products they’re buying.
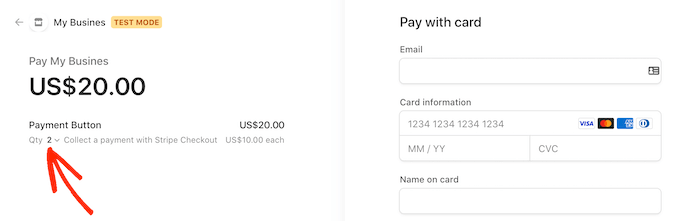
Changing the product quantity at checkout

When you’re happy with how the buy now button is set up, it’s time to make it live by clicking on the ‘Publish’ button.

You can now add this buy now button to any WordPress page, post, or widget-ready area using the ‘Form Shortcode.’
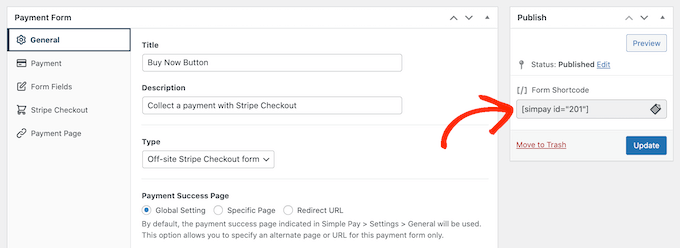
Adding a buy now button using shortcode

For more details on how to place the shortcode, you can see our guide on how to add a shortcode in WordPress.

If you’ve published your button in test mode, then the Stripe dashboard won’t show any payments you get during this time, which makes it difficult to test your buy now button.

To see your transactions, you’ll need to enable test mode in Stripe by logging in to your Stripe dashboard and clicking on the ‘Payments’ tab.
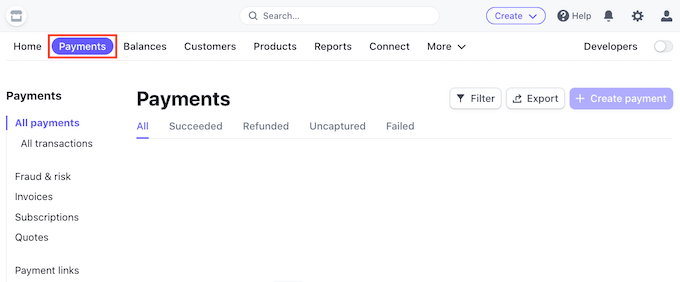
The Stripe payment dashboard

After that, just click on the ‘Developers’ toggle in the upper right corner.

As soon as you’ve done that, you can test your buy now button and the payments will appear in the Stripe dashboard.
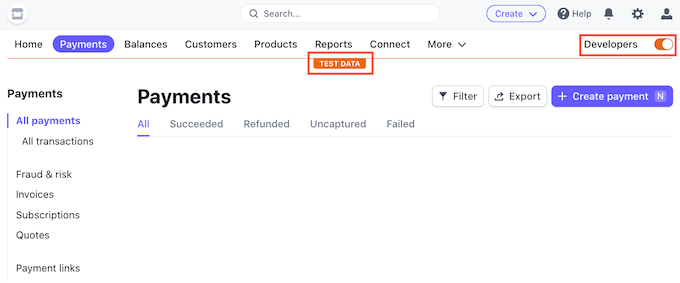
Testing credit card payments with Stripe and WordPress

Once you’ve finished testing your button, you can start accepting payments by going to WP Simple Pay » Payment Forms.

Here, just hover your mouse over the buy now button, and click on the ‘Edit’ link.
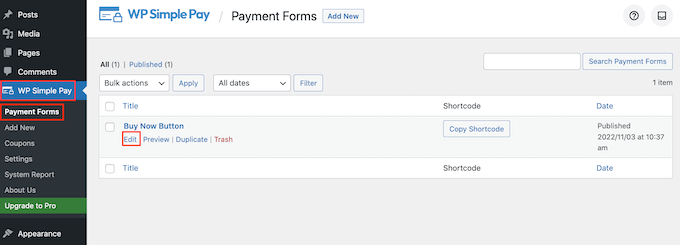
Editing your buy now button

You can now go ahead and select the ‘Payment’ tab, and then click on the radio button next to ‘Live Mode.’

Finally, click on ‘Update.’ Your buy now button is now live, and you’re ready to start accepting payments from your visitors.
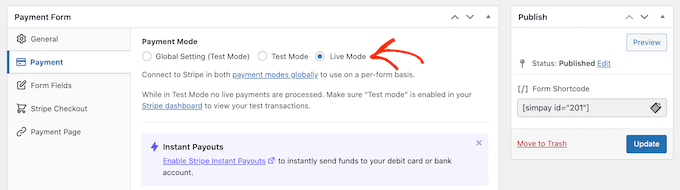
Putting your buy now button into live mode

Method 2: How to Add a Buy Now Button to Your Digital Downloads

WP Simple Pay lets you add a straightforward buy now button to any WordPress blog or website. However, if you want to sell digital downloads on WordPress, then you’ll need an eCommerce plugin that has a buy now feature.

Easy Digital Downloads is the best platform to easily sell digital products. In fact, we use this plugin ourselves to sell many of our premium WordPress plugins.

Easy Digital Downloads gives you a few ways to add a buy now button in WordPress.

By default, Easy Digital Downloads will show an ‘Add to Cart’ button on all its product pages. However, you can replace that with a buy now button instead.
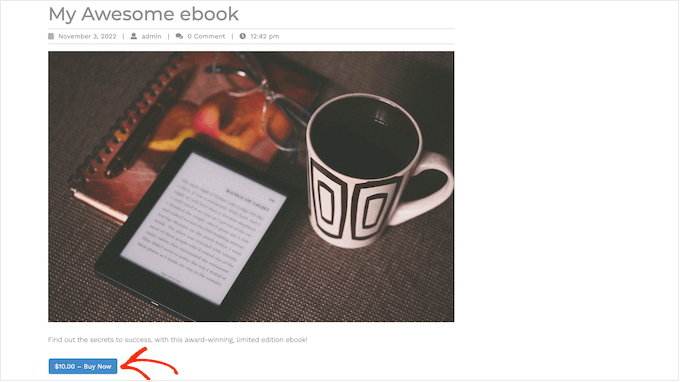
A buy now button, created using Easy Digital Downloads

When the customer clicks on the button that you can see in the image above, they’ll see a popup where they can type in their email address and credit card details.

After that, they just need to click on ‘Purchase’ to go ahead and buy the product.
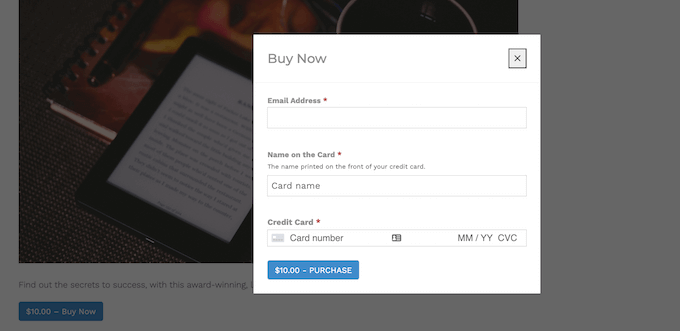
An Easy Digital Downloads popup

Easy Digital Downloads also comes with an ‘EDD Buy Button’ block that you can add to any page, post, or widget-ready area.

You can connect this block to any of your downloadable products. The visitor can then simply click on this button to add the product to their basket and go straight to checkout.

The EDD Buy Block

With that in mind, let’s look at both methods.

How to Add a Buy Now Button to Any Product Page

To start, you may want to add a buy now button to your product pages. This gives the customer less time to change their mind and abandon their purchase.

If you use SiteGround as your hosting provider, then Easy Digital Downloads comes pre-installed so you can start using the plugin straight away.

If not, you can check out SiteGround EDD hosting and get started for as little as $2.99 a month!

If you’re using any other hosting provider, then you’ll need to install and activate the Easy Digital Downloads plugin. For more details, see our step by step guide on how to install a WordPress plugin.

In this guide, we’ll be using the free Easy Digital Downloads plugin as it has everything you need to create a simple buy now button. There’s also a pro version that has more advanced features including wishlists, purchase rewards, fraud monitoring, and more.

Before you can create a buy now button, you need to set up Stripe or PayPal. To configure your payment gateway, go to Downloads » Settings and then click on the ‘Payments’ tab.
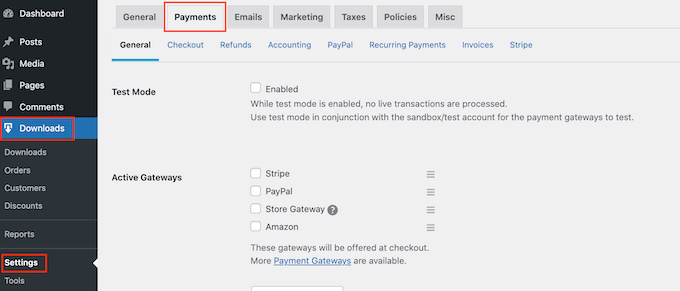
Configuring payment gateways in Easy Digital Downloads

You can now check the box next to ‘PayPal’ or ‘Stripe’ depending on the payment gateway you want to use.

If you add multiple payment gateways, then you won’t be able to create a buy now button, so it’s important to only choose one gateway.

After making your decision, click on ‘Save Changes’ to store your settings.
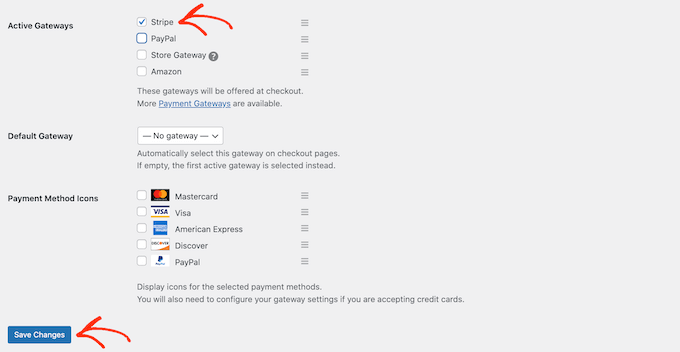
Configuring the Stripe payment gateway for EDD

If you want to use PayPal, then click on the ‘PayPal’ tab.

You can then select the ‘Connect with PayPal in live mode’ button.
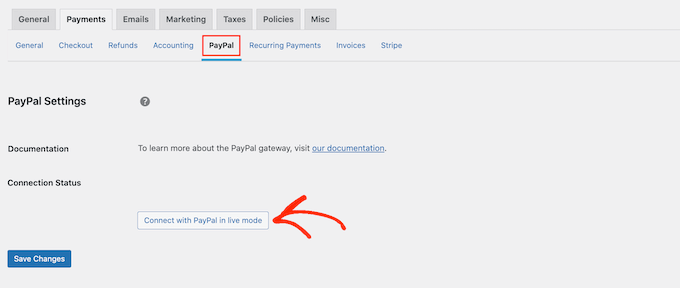
Configuring the PayPal payment gateway

This opens a popup where you can type in the email address and password for the PayPal account where you want to receive payments.

To set up Stripe instead, click on the ‘Stripe’ tab and then select ‘Connect with Stripe.’
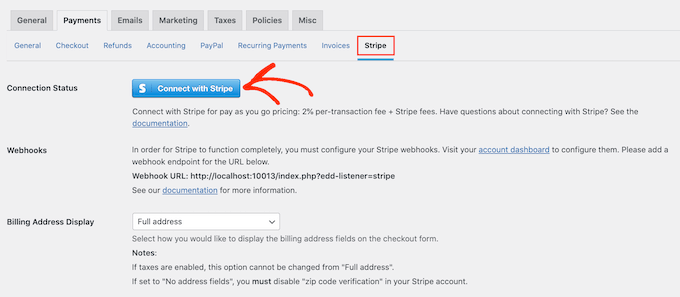
Configuring Stripe for EDD

This opens a setup wizard, which will help you connect your website to Stripe.

After configuring your payment gateway, don’t forget to click on the ‘Save Changes’ button. You can now add a buy now button to any Easy Digital Downloads product page.

To create your first digital product, go to Downloads » Downloads. Then, click on the ‘Add New’ button.
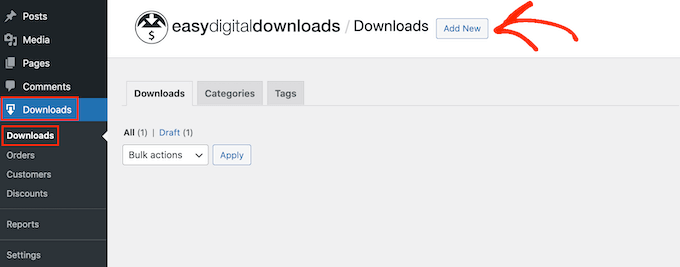
Adding a new digital download product

You can now add a title and a description for the product, upload an image, add categories and tags, and more.

Note: By default, Easy Digital Downloads will set your product as a free download. It’s important to scroll to the ‘Product Options’ section and type in the real price for the product.
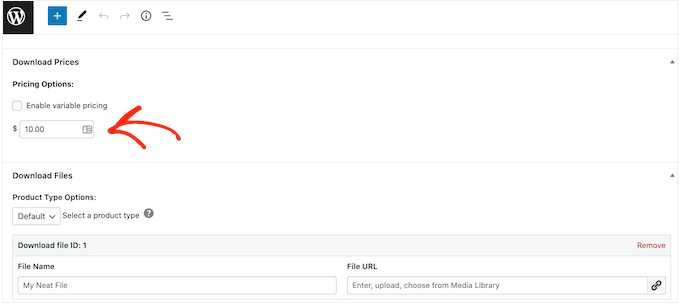
The product options settings

The next step is uploading the product. This might be an ebook download, video training, a PDF guide, digital art and graphics, or any other file that WordPress supports.

Pro Tip: If you want to sell a file type that WordPress doesn’t support, such as SVG images, PSD files, or others, then see our guide on how to allow additional file types in WordPress.

To add your downloadable file, scroll to the ‘Download Files’ section.

In the ‘File Name’ field, type in a name for the downloadable file. Once you’ve done that, click on the ‘Upload a file’ button.
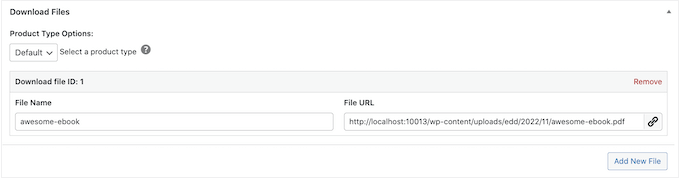
Uploading a downloadable product

This will launch the WordPress media library. Here you can choose the file that you want to sell as a digital download.

When you’re happy with how your product is set up, it’s time to add a buy now button.

In the right-hand menu, find the ‘Button Options’ section. Here, click on the ‘Purchase Button Behavior’ dropdown and choose ‘Buy Now.’
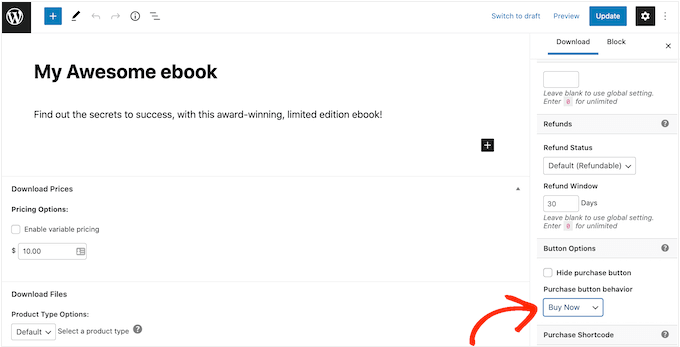
Creating a buy now button using Easy Digital Downloads

You can now make the product live by clicking on ‘Publish.’ Now, if you visit this product page you’ll see the buy now button.

You can add a buy now button to any product page simply by following the same process described above.

How to Add a Buy Now Button to Any Page or Post

Sometimes you may want to use buy now buttons on other parts of your online store.

For example, if you have a landing page that promotes a particular product, then you might allow customers to start the checkout process directly from that landing page.

This can get you more sales by encouraging impulse purchases, while also removing multiple steps from the buyer’s journey.

You can do this easily using the ‘EDD Buy Button’ block. To use this block, you first need to set up a payment gateway and create at least one product following the same process described above.

After that, simply open the page or post where you want to add your buy now button in the content editor. Then, click on the ‘+’ icon and start typing ‘EDD Buy Button.’
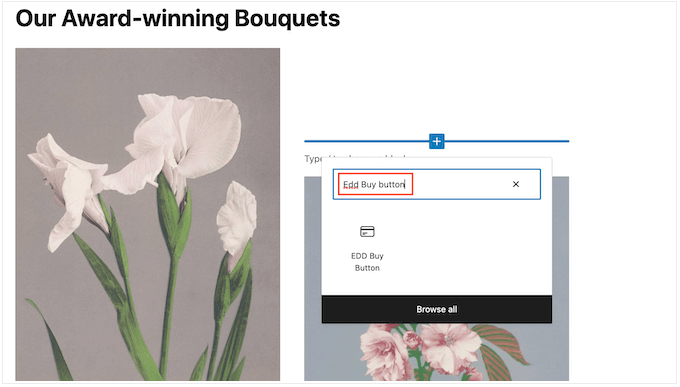
The EDD Buy Button block

When the right block appears, click to add it to your layout.

You can now open the ‘Select a Download’ dropdown and choose the product that will be added to the customer’s cart.
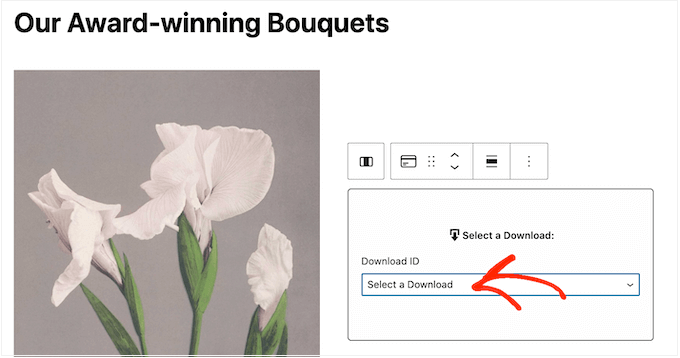
Configuring the EDD Buy Button block

By default, Easy Digital Downloads will show the product’s price on the buy now button.

If you want to hide the price, then click to disable the ‘Show Price’ toggle.
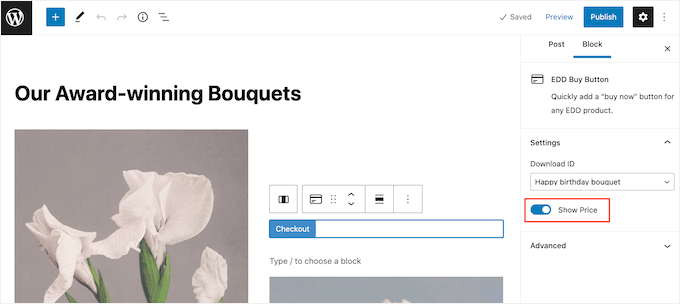
Adding and remove the price from a buy now button

You can now publish or update the page to make it live. Now, if you visit your WordPress website you’ll see the buy now button in action.

Method 3. Add a Buy Now Button to Your WooCommerce Store

If you run a WooCommerce store, then you may want to add a buy now button to your product pages. This allows customers to start the checkout process directly from the product page, which often reduces cart abandonment rates.

The easiest way to add a buy now button to your online store is by using the Buy Now Button for WooCommerce. This is a simple plugin that requires no configuration, and adds a buy now button to every single one of your product pages.
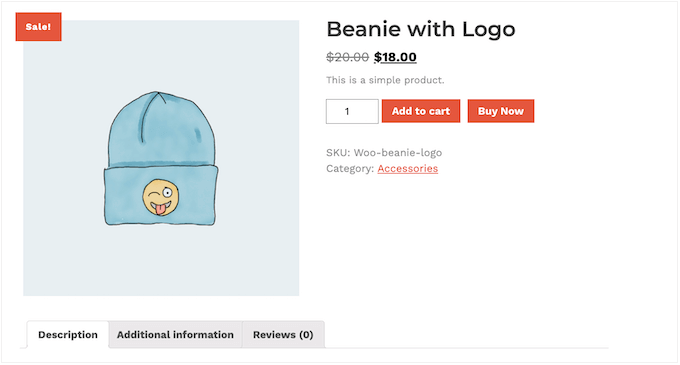
A buy now button, created for a WooCommerce online store

First, you’ll need to install and activate the plugin. If you need help, then please see our guide on how to install a WordPress plugin.

Since the plugin doesn’t have any settings, simply head over to any product page on your online store. You will now see a ‘Buy Now’ button next to the standard ‘Add to Cart’ button.

We hope this article helped you learn how to add a buy now button in WordPress. You can also go through our guide on the best email marketing services and how to get a free SSL certificate for your WordPress website.

If you liked this article, then please subscribe to our YouTube Channel for WordPress video tutorials. You can also find us on Twitter and Facebook.

The post How to Add a Buy Now Button in WordPress (3 Methods) first appeared on WPBeginner.


November 30, 2022 at 03:18PM
Tuesday, November 29, 2022

How to Better Manage Automatic WordPress Updates

Are you looking for a way to automatically manage WordPress updates?

Updates are important for the security and stability of your WordPress site.

In this article, we will show you how to better manage automatic WordPress updates.

How to Better Manage Automatic WordPress Updates

Why Do You Need Better Automatic Updates in WordPress?

Keeping your WordPress website updated is extremely important. The same goes for all plugins and themes installed on your website. You need to install updates for WordPress core, themes, and plugins to get new features and fixes.

Learn more in our guide on why you should always use the latest version of WordPress.

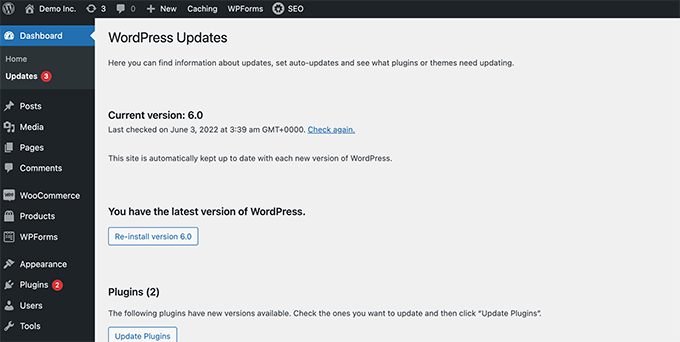
WordPress will automatically update itself when a security or minor release is available. You can also enable automatic updates for major releases, as well as plugins and themes.

WordPress updates

However, you may have noticed that some of them are updated more frequently than others. A lot of popular plugins are updated almost weekly.

Some users find it a bit annoying that whenever they log in there are new updates available for WordPress core, one or more plugins, or their theme. It becomes even more time-consuming when you manage multiple WordPress sites.

That’s why many users want to have WordPress automatically install updates for WordPress core, trusted plugins, and themes. But while WordPress now lets you do this without a plugin, you still don’t have full control over your auto-updates.

Let’s take a look at how you can take total control of WordPress and minimize the time spent on installing updates.

Setting Up Easy Updates Manager

The first thing you need to do is install and activate the Easy Updates Manager plugin. This plugin gives you complete control over customizing your updates and also keeps logs of what is updated and when.

For more details, see our step-by-step guide on how to install a WordPress plugin.

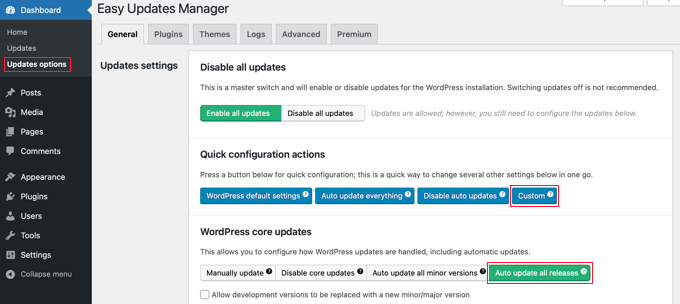
Upon activation, you need to visit Dashboard » Updates Options page to set up the plugin.

Enabling Automatic Updates With a Plugin

This page provides you quick access to turn on or off updates for WordPress core, plugins, themes, and translations. The default settings here will work well for most websites.

We strongly recommend that you never turn off updates for WordPress core, plugins, or themes. It will seriously compromise your site’s security and health.

Setting Up Automatic Updates for WordPress, Plugins, and Themes

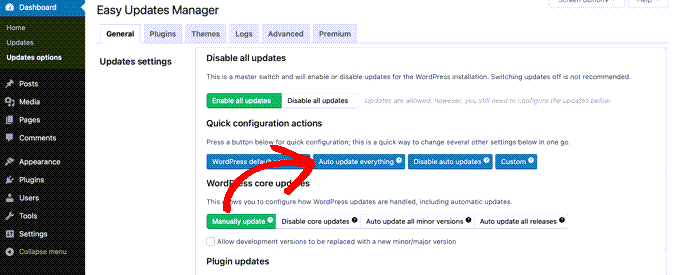
Easy Updates Manager allows you to quickly enable automatic updates for WordPress core, plugins, and themes from the Dashboard » Updates options page. Simply click on the blue ‘Auto update everything’ button in the ‘Quick configuration actions’ section.

Auto Update Everything

This plugin also allows you to selectively turn on automatic updates for certain plugins or themes. If you would like to selectively turn on automatic updates, then click the ‘Choose per plugin’ and ‘Choose per theme’ buttons.

Next, we’ll show you how to select which plugins and themes are updated automatically.

Setting Up Automatic Updates for Select Plugins and Themes

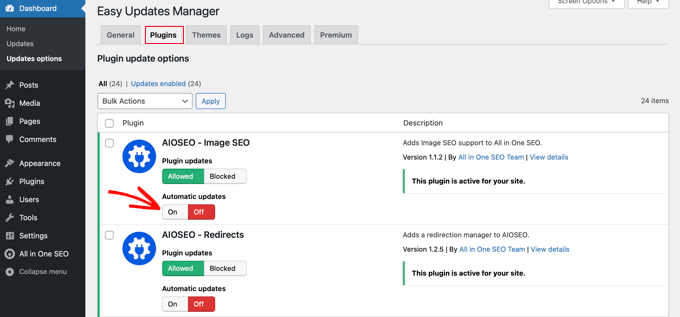
If you selected to individually enable automatic updates for a few plugins, then you need to switch to the ‘Plugins’ tab on the Dashboard » Updates options page.

Enable automatic updates for individual plugins

Here you will see a list of all plugins installed on your WordPress site. To automatically update a certain plugin, simply click the ‘On’ button under ‘Automatic updates’.

When you switch to the ‘Themes’ tab, you will see a list of themes installed on your site.

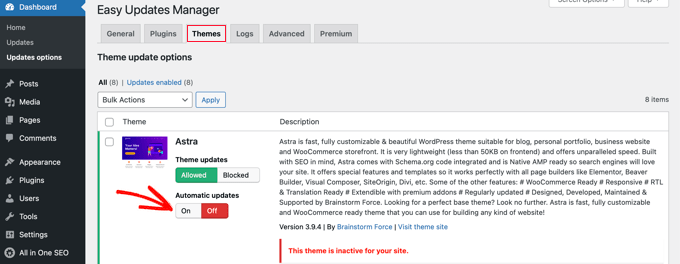
Select which themes to automatically update

You need to click the ‘On’ button under ‘Automatic updates’ for those themes that you want to be updated automatically.

Rolling Back to a Previous Version of a Plugin or Theme

Plugin and theme incompatibilities are the major reason why some users are hesitant when it comes to updating. Even though most good developers thoroughly test their plugins, there can still be bugs that can cause your site to break.

The first step you should take to protect your website is to install a WordPress backup solution. This will let you restore your entire website if something goes wrong.

However, restoring your WordPress site from a backup can be a lot of work. If you know which plugin or theme update caused the problem, then it’s easier just to roll back that one update.

The first thing you need to do is install and activate the WP Rollback plugin. For more details, see our step-by-step guide on how to install a WordPress plugin.

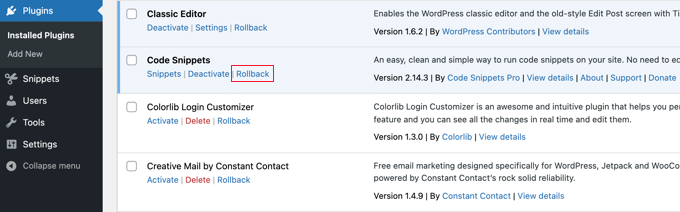
Upon activation, go back to the plugins page on your WordPress site. You will notice a new Rollback option below each plugin installed on your site.

The Plugins Page Now Has a New Rollback Link

Clicking on the ‘Rollback’ link will allow you to roll back your plugin to any previous version you want. It can also roll back theme updates.

For detailed, step-by-step instructions, see our guide on how to rollback WordPress plugins.

We hope this article helped you find a better way to manage automatic WordPress updates on your site. You may also want to learn how to increase your blog traffic, or see our list of 40 useful tools to manage and grow your WordPress blog.

If you liked this article, then please subscribe to our YouTube Channel for WordPress video tutorials. You can also find us on Twitter and Facebook.

The post How to Better Manage Automatic WordPress Updates first appeared on WPBeginner.


November 30, 2022 at 12:47AM

How to Set Up a Media Kit Page in WordPress

Are you looking to set up a media kit or press kit page on your website?

A media kit provides information and media files about your business. It makes it easy for bloggers and journalists to write about your business and provides potential clients and advertisers with the statistics they need to make a decision.

In this article, we’ll show you how to set up a media kit page in WordPress.

How to Setup a Media Kit Page in WordPress

Why Set Up a Media Kit Page in WordPress?

A media kit, or press kit, is a page on your WordPress website that offers everything that busy journalists need to write about your business. It can also offer statistics about your reach and audience for potential clients and advertisers.

A press kit page normally includes company facts and news, press releases, and details about your team. It also offers high-resolution logos and photos, guidelines about your branding, and a way for writers to contact you with further questions.

If you sell advertising or sponsored blog posts, then your media kit should also clearly detail what you offer, as well as your traffic statistics, social media following, audience demographics, and any other data that will make your site more appealing to advertisers.

You can learn more about monetizing your website in our guide on how to make money online blogging with WordPress.

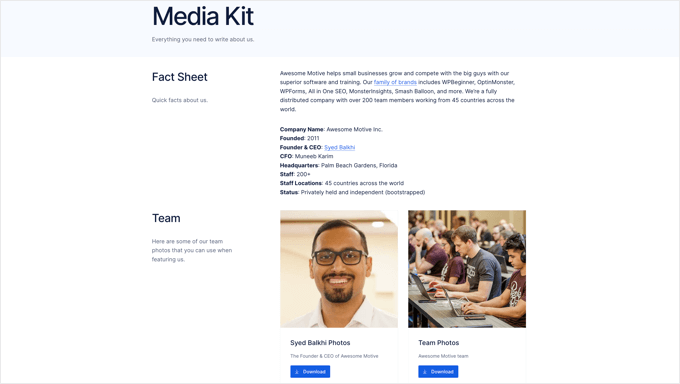
A good example is the Awesome Motive Media Kit page. It provides writers with team photos, logos, brand colors, writing guidelines, and quotes. It also provides a link where the media can get in touch with the PR team when they have further questions about our brands.

Awesome Motive's Media Kit Page

With that being said, let’s take a look at how to easily set up a media kit page in WordPress.

Creating a Media Kit Page in WordPress

The first thing you need to do is install and activate the free Publisher Media Kit plugin. For more details, see our step-by-step guide on how to install a WordPress plugin.

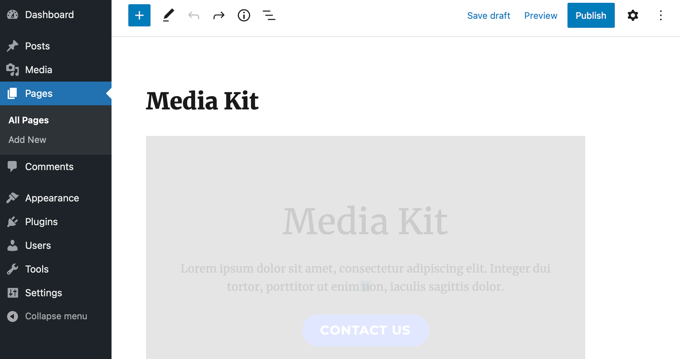
On activation, the plugin creates a new draft page called ‘Media Kit’. This page is made up of beautifully designed block patterns that are easy to customize and look great out of the box.

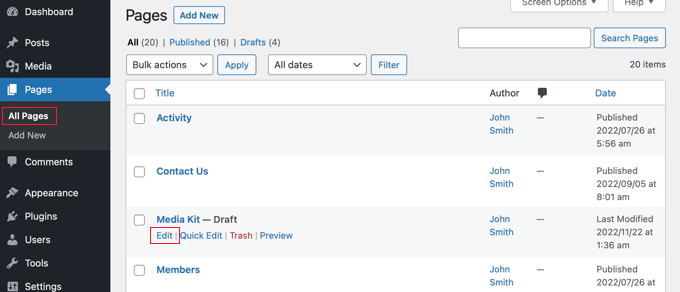
You need to navigate to Pages » All Pages and edit the ‘Media Kit’ page by clicking its title or the ‘Edit’ link below.

Publisher Media Kit Creates a Draft Media Kit

You will now see the draft media kit page. The block patterns contain placeholder text that you can easily customize within the WordPress block editor.

Each block contains information that is typically found in media kits. For most websites, you simply need to click on the block and replace the sample content with your own.

Draft Media Kit

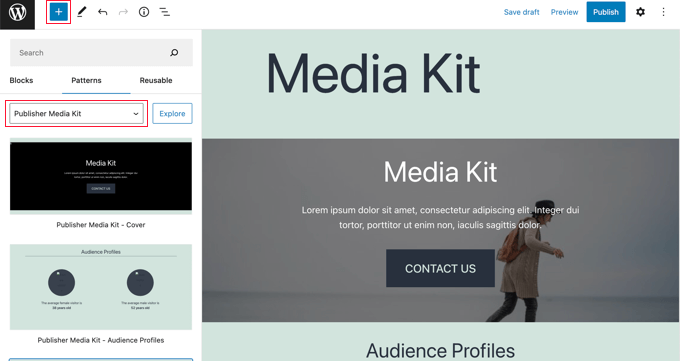
You can find the

Publisher Media Kit block patterns by clicking the ‘+ Block Inserter’ icon at the top of the page.

After that, you need to click the ‘Patterns’ tab and select ‘Publisher Media Kit’ from the drop-down menu. Now you can drag the block patterns onto your post or page.

Publisher Media Kit Block Patterns

This lets you add the block patterns back to the Media Kit if you delete them, or use them in other posts and pages.

If you haven’t used block patterns before, then you might like to check out our beginner’s guide on how to use WordPress block patterns.

Customizing Your Media Kit Page

Now you can go through the draft media kit page and customize it. You should replace the placeholder text with actual information about your business. You can delete any blocks that you don’t need, add additional blocks, and rearrange their order.

Customizing the Media Kit Cover

The media kit starts with a full-width cover block. You will need to replace the placeholder text with a brief overview of your business that journalists can use as a boilerplate.

Media Kit Cover Example

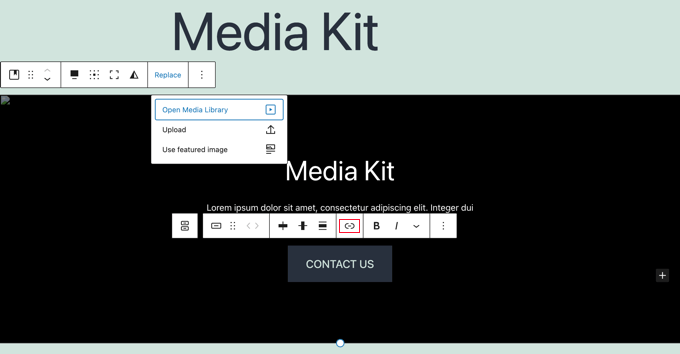
You should also replace the background image with one relevant to your business.

Simply click near the edges of the rectangle and select ‘Replace’ from the toolbar. You can then choose an image from the Media Library, upload a new one, or use the page’s featured image.

Changing the Media Kit Cover's Background Image

You need to add a link to the ‘Contact Us’ button, so it will take visitors to your contact form when it is clicked. You might want to create a custom form that sends media inquiries straight to your public relations person or team. We recommend using a free plugin like WPForms for that.

Finally, you can change the height of the block by dragging the circle at the bottom.

Customizing Audience Profiles

The Audience Profiles block displays the ages of your average female and male visitors, a statistic potential advertisers like to know. You need to edit the ages to match your audience.

Media Kit Audience Profiles
Tip: If you can’t see the images in the circles, then you have probably installed WordPress in a folder. You need to click inside the circle and add your site address like https://example.com/folder at the beginning of the ‘Current media URL’ field.

You can learn how to discover the ages, gender, and much more about your audience in our guide on how to track website visitors to your WordPress site.

Demographics and interest reports

The screenshot above is from our MonsterInsights analytics dashboard. It’s a free plugin that you can use to get similar stats about your site.

Customizing Website Statistics

The next section displays statistics about your reach, including your website traffic and social media following. This section will also help potential advertisers make a decision.

Media Kit Website Statistics

Simply click on the text to update the numbers with your own figures.

You might also want to add links to ‘Facebook Followers’, ‘Twitter Followers’, and ‘Instagram Followers’ if you haven’t already added social media icons to your WordPress menus.

Customizing the Why Choose Section

In the next section, you can outline the unique value your business can provide to potential clients and advertisers. Here you will briefly explain why your visitors should choose your business over your competitors.

Media Kit Why Choose Block

Simply click on the text to edit it. You can swap out the images and add or remove columns as needed. Don’t forget to add a link to the ‘Contact Us’ button as you did earlier.

Customizing Advertising Information

The next three blocks let potential advertisers know what you are offering and how much it costs. Alternatively, you can edit them to show other services you are offering. You can delete any block that you don’t need.

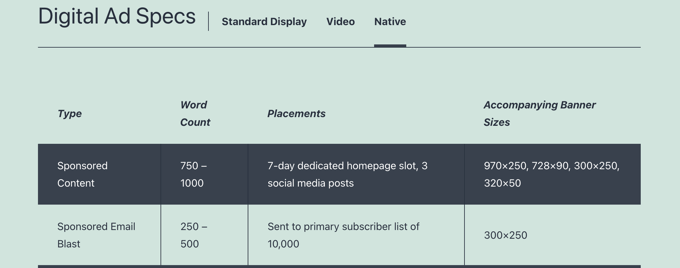
First, you’ll see the Ad Specs block. By default, this block has three tabs at the top to let your visitors easily find the type of ads or services that they are interested in. Simply click on the text to edit it.

Media Kit Ad Specs

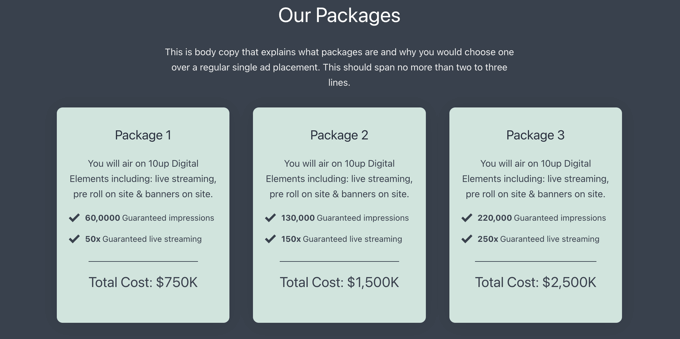
After that, you will find the Our Packages block.

Here you can list the benefits and costs of any package deals you are offering.

Media Kit Our Packages

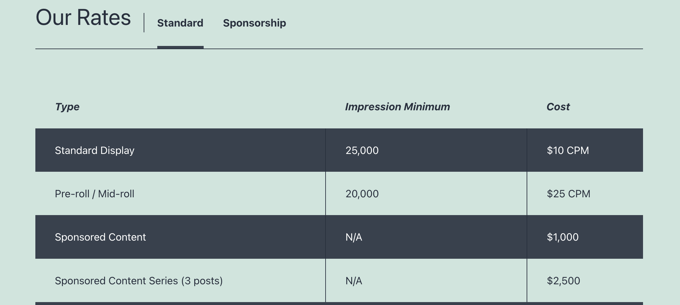
The third block is the Our Rates block. By default, it comes with two tabs where you can display your standard and sponsorship pricing.

You can easily add or remove tabs and customize the content.

Media Kit Our Rates

Customizing the ‘Still Questions’ Block

Finally, if your visitors still have questions after reading your media kit, then they will need a way to contact you. That’s the purpose of the Still Questions block.

Media Kit Still Have Questions Block

Simply add a link to the ‘Contact Us’ button so that visitors will be taken to your contact form when they click it.

Adding Additional Information and Media

Now that you’ve customized each blog provided by the Publisher Media Kit plugin, you may wish to add some additional information or media files. You can do this using standard WordPress blocks such as the heading block, paragraph block, and image block.

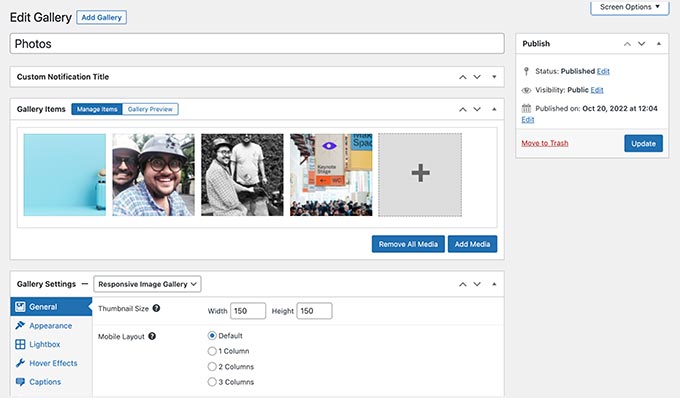
For example, you’ll want to provide high-resolution images for bloggers and journalists to download and use in their articles. You can either create an image gallery or allow the resources to be downloaded in a zip file.

You should start by including your logos and branding. You’ll also want to provide headshots and brief biographies of key staff members and other team photos. The journalists will value any other quality images you can provide to help them show off your business and services.

Image Gallery

Other items you can consider including in a media kit are press releases, news about your company such as acquisitions and new products, a summary of previous media coverage, and case studies that show your effectiveness.

Once your media kit page is finished, don’t forget to click the ‘Publish’ or ‘Update’ button at the top of the page to push it live.

Adding the Media Kit to Your Navigation Menu

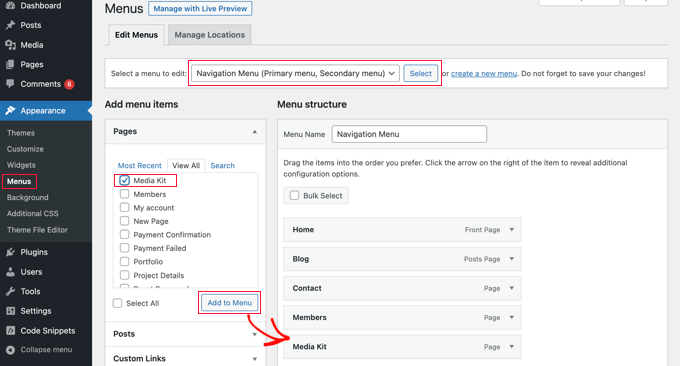
Once you publish your media kit page, you should add the page to your navigation menu so that it’s easy to find.

Head over to Appearance » Menus in the WordPress admin sidebar and make sure the correct menu is selected at the top of the screen. After that, you should click the ‘View All’ tab under Pages and select the ‘Media Kit’ page.

Adding the Media Kit to Your Navigation Menu

Now all you need to do is click the ‘Add to Menu’ button and your media kit will be added to the menu. You can drag the menu item up and down to place it where you want in the list.

If you can’t find Appearance » Menus in the admin sidebar, then you are probably using a block theme. To learn how to add menus using the Full Site Editor, see our beginner’s guide on how to add a navigation menu in WordPress.

We hope this tutorial helped you learn how to set up a media kit page in WordPress. You may also want to learn how to create an email newsletter, or check out our list of the best live chat software for small business.

If you liked this article, then please subscribe to our YouTube Channel for WordPress video tutorials. You can also find us on Twitter and Facebook.

The post How to Set Up a Media Kit Page in WordPress first appeared on WPBeginner.


November 29, 2022 at 04:02PM