Thursday, December 1, 2022

Beginner’s Guide: How to Use Rich Snippets in WordPress

Do you want to add rich snippets on your WordPress site?

Rich snippets allow you to have custom search listings for special content such as reviews, recipes, events, and more. These search listings will stand out and help get more traffic to your site.

In this article, we’ll show you how to add rich snippets to your WordPress site, step by step.
Beginner's guide: how to use rich snippets in WordPress

Why Use Rich Snippets on Your WordPress Site?

Rich snippets use what’s called schema markup to provide extra information about your content to the search engines.

The search engine bots use this data to show additional information about your posts and pages in the search results.

Rich snippets example

This helps to make your posts and pages stand out more in the search results, which can improve your organic click through rate and help you increase your blog traffic.

It also helps you build authority in your niche, as your site becomes more visible in the search.

Rich snippets are not just for review sites or recipes. You can use rich snippets for events, products, people, video, music, apps, articles, blog posts, and more.

Note: It’s important to know that adding schema markup to your website doesn’t guarantee that Google will display it. Google may choose not to for some searches. However, adding the schema markup helps Google to understand your content and makes it much more likely to display rich snippets.

That being said, let’s show you how to add rich snippets to WordPress. Simply use the quick links below to jump straight to the method you want to use.

Method 1. Adding Rich Snippets in WordPress Using a WordPress Plugin

The easiest way to add rich snippets to WordPress is by using the AIOSEO plugin. It’s the best WordPress SEO plugin in the market, used by over 3+ million websites. 

AIOSEO

It helps you easily optimize your site for search engines without the need to hire an SEO expert. Plus, you can set up rich snippets on your site in a couple of clicks.

Note: You’ll need the pro version of AIOSEO since it includes schema markup functionality and other features like XML sitemaps, a redirection manager, and more. There is a free version of the plugin you can use to get started. 

The first thing you need to do is install and activate the AIOSEO plugin. For more details, see our beginner’s guide on how to install a WordPress plugin.

Upon activation, you’ll immediately be taken to the AIOSEO setup wizard. You need to click the ‘Let’s Get Started’ button. 
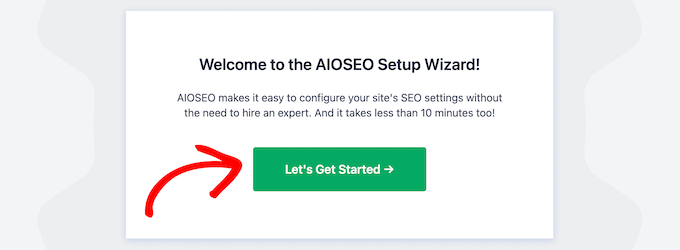
Click let's get started AIOSEO setup wizard

If the setup wizard doesn’t immediately show up, then simply go to All in One SEO » Dashboard.

From here, you can click the ‘Launch the Setup Wizard’ button. This will walk you through the steps of setting up the plugin for your website. 
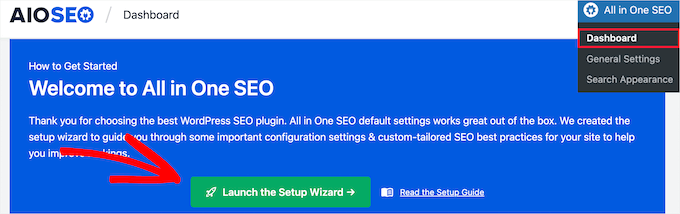
AIOSEO dashboard launch setup wizard

As you go through the setup wizard, you’ll need to activate the ‘Advanced Rich Snippets + Schema Markups’ addon.

Simply check the box so that it turns blue, then click the ‘Save and Continue’ button.
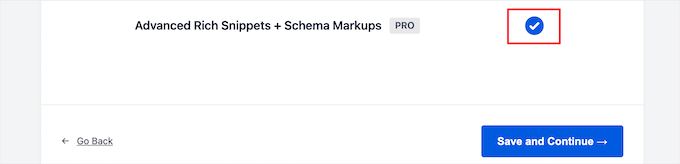
Active rich snippets and schema markup addon

On the final screen, you need to enter your license key and then click the ‘Connect’ button.

You can find this information under your account page on the AIOSEO website. 
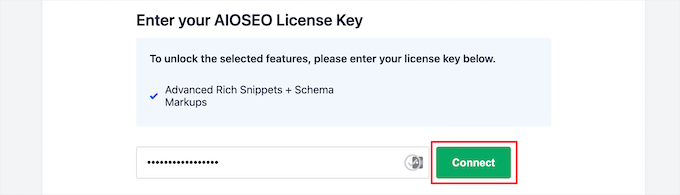
Enter AIOSEO license key

For more details, see our ultimate guide on how to set up AIOSEO for WordPress correctly.

After that, you can go to AIOSEO » Search Appearance in your WordPress admin panel, and then click on the ‘Content Types’ tab.

Go to AIOSEO search appearance and click content types

Then, you can set the schema markup type for your posts and pages.

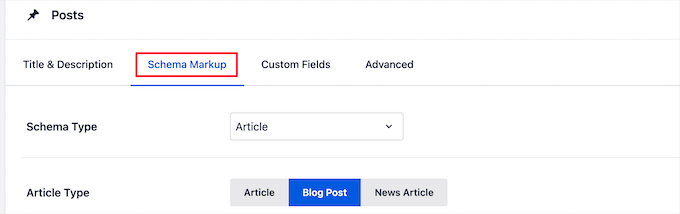
Simply click the ‘Schema Markup’ menu option, then you can choose the schema type from the drop-down.

You will be able to see different content types that you can create with the plugin. The list includes:

  • Course
  • Product
  • Recipe
  • Software/App
  • FAQ
  • Web page
  • Profile
  • Article

Clicking on any content type will show you the fields that will be available.
Default schema markup for posts

These settings will be the default settings when you add a new blog post. However, you can change these on an individual post basis too.

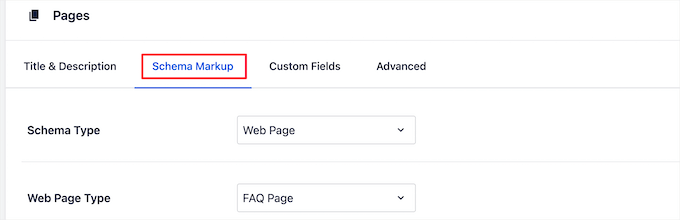
Below the post schema markup, you can also control the default schema for your pages.

Simply select the ‘Schema Type’ from the drop-down. Then, you’ll have additional options for the schema type you select.
Default schema markup for pages

Once you’re finished making changes, click the ‘Save Changes’ button before you leave the page. 

Adding Rich Snippet Information to Your Posts and Pages

Now, you can add schema information to your individual posts and pages, so they’ll display with unique rich snippets in the search results.

To do this, simply open up a blog post and scroll down below the post editor. Here you’ll see a meta box called ‘AIOSEO Settings’.

You need to click the ‘Schema’ tab and then click on the ‘Generate Schema’ button.
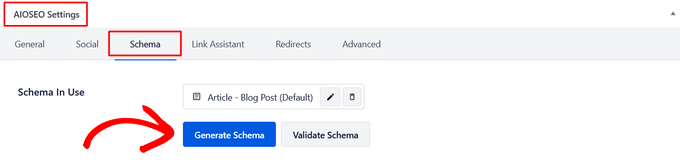
Click the Generate Schema button in AIOSEO

This will open up the Schema Catalog. Simply click the ‘Add Schema’ button next to the type of schema you want to add.
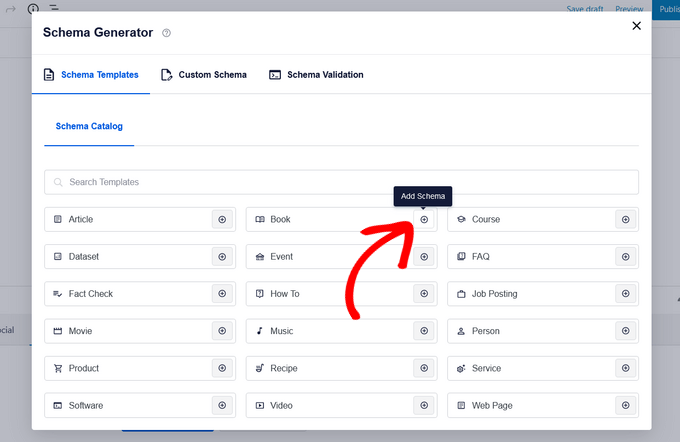
Choose a schema type from the Schema Catalog

Now, there will be different fields available to fill out, based on the option you select. For example, the ‘Software’ schema type includes fields for the name, operating system, price, description, review, and more.
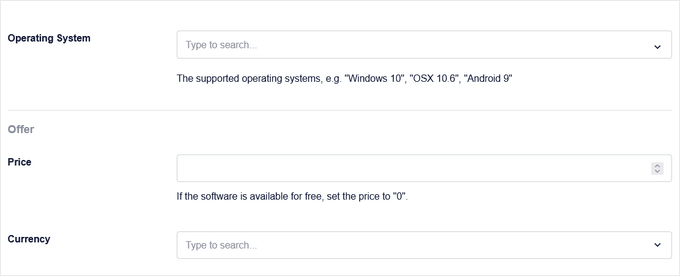
Post schema markup for software application

Once you’re finished, click the ‘Add Schema’ button. Don’t forget to click ‘Update’ or ‘Publish’ on the post to save your changes as well.
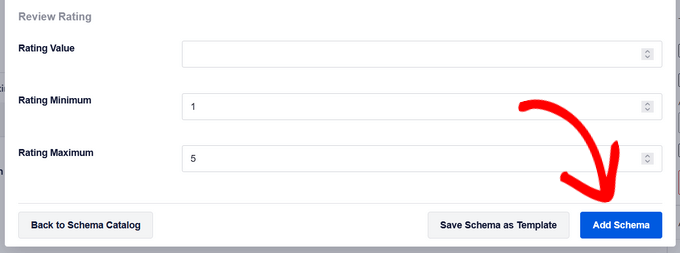
Click Add Schema button

Adding schema markup to individual WordPress pages is similar. You need to open up the page you want to edit and then scroll down to the ‘AIOSEO Settings’ meta box below the page editor.

Then, click the ‘Schema’ menu option, click the ‘Generate Schema’ button, and select your page schema type from the Schema Catalog.
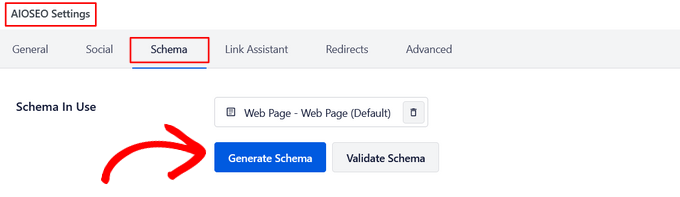
Page schema example for web page

Different options will appear depending on the type of schema you select. 

Just like above, when you’re finished, you need to click the ‘Add Schema’ button and hit ‘Update’ or ‘Publish’ on the page to make your changes live. 

Adding rich snippet information won’t make a difference on the front end of your WordPress blog. However, you’ll be giving the search engine bots extra data to display with your posts and pages in the search results. 

Method 2. Adding Rich Snippets by Adding Code to WordPress

Another way to add rich snippets to WordPress is by adding code to WordPress. If you haven’t done this before, then see our guide on how to copy and paste code in WordPress.

Rich snippets or structured data markup can be written into three different vocabularies. These vocabularies are microdata, RDFa, and JSON-LD. You can use any of them on your site. However, most beginners find RDFa to be more beginner friendly.

Here is an example of a user’s about page in WordPress. Normally the text of the page will look something like this:

John Smith
<img src="johnsmith.jpg" alt="Photo of John Smith"/>
Support Technician
342 Acme Inc.
101 Washington Avenue
Eagleton IN 98052
(425) 123-4567
<a href="mailto:johnsmith@example.com">johnsmith@example.com</a>
Website:
<a href="http://www.example.com">example.com</a>

This can be easily transformed with rich snippets.

If you are familiar with HTML, then you can easily understand the following example:

<div vocab="http://schema.org/" typeof="Person">
  <span property="name">John Smith</span>
  <img src="johnsmith.jpg" property="image" alt="Photo of John Smith"/>
  <span property="jobTitle">Support Technician</span>
  <div property="address"  typeof="PostalAddress">
    <span property="streetAddress">
      342 Acme Inc.
      101 Washington Avenue
    </span>
    <span property="addressLocality">Eagleton</span>,
    <span property="addressRegion">IN</span>
    <span property="postalCode">46818</span>
  </div>
  <span property="telephone">(425) 123-4567</span>
  <a href="mailto:johnsmith@example.com" property="email">johnsmith@example.com</a>
Website
  <a href="http://example.com" property="url">example.com</a>
</div>

For each content type, there are some special properties that need to be defined.

Schema.org is the organization that helps maintain the standard for different content types. You will find extensive documentation with examples for each schema content type on their website.

Here is another example of a recipe with rich snippets.

<div vocab="http://schema.org/" typeof="Recipe">
  <span property="name">Mom's World Famous Banana Bread</span>
  By <span property="author">John Smith</span>,
    <img property="image" src="bananabread.jpg"
    alt="Banana bread on a plate" />
  <span property="description">This classic banana bread recipe comes
  from my mom -- the walnuts add a nice texture and flavor to the banana
  bread.</span>
  Prep Time: <meta property="prepTime" content="PT15M">15 minutes
  Cook time: <meta property="cookTime" content="PT1H">1 hour
  Yield: <span property="recipeYield">1 loaf</span>
  Ingredients:
  - <span property="recipeIngredient">3 or 4 ripe bananas, smashed</span>
  - <span property="recipeIngredient">1 egg</span>
  - <span property="recipeIngredient">3/4 cup of sugar</span>
  ...
  Instructions:
  <span property="recipeInstructions">
  Preheat the oven to 350 degrees. Mix in the ingredients in a bowl. Add
  the flour last. Pour the mixture into a loaf pan and bake for one hour.
  </span>
</div>

If you are manually adding rich snippets into your WordPress posts, then you will need to manually add HTML to WordPress. For more details, see our beginner’s guide on how to edit HTML in WordPress code editor.

You may also need to refer to Google’s Developer resource on structured data to understand which properties are required for each content type.

Testing Your Rich Snippets and Schema Markup

If you’re adding rich snippets manually, then you’ll want to make sure you’ve added the structured data to your WordPress website properly.

To check your rich snippets, simply head over to the Google Structured Data Testing Tool. Then, there are two different tests you can run to test your structured data.

First, click the ‘Go to the Rich Results Test’ button. This will see what rich results can be generated for your page.

Go to rich results test

Then, enter your page or post URL into the box.

Next, click the ‘Test URL’ button.
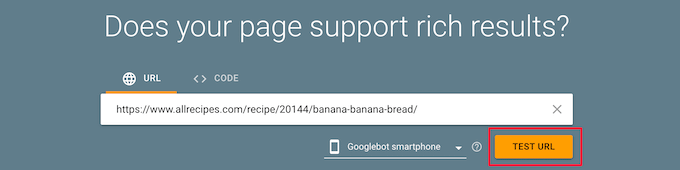
Run rich results test

This will automatically generate a report to see which rich results features can appear when that page or post is listed in the search results.

It will give you any errors or warnings, so you can improve your structured data. You can click the drop-down arrow next to any warning, and you’ll get detailed instructions on how to fix it.
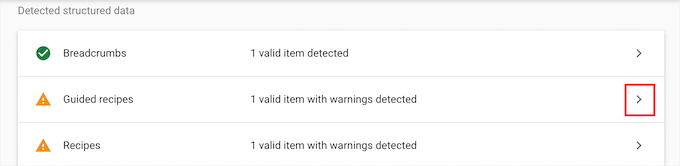
Rich results test results

Next, you can test your schema markup by going back to the Google Structured Data Testing Tools page.

Then, click the ‘Go to the Schema Markup Validator’ button.

Go to schema markup validator test

Next, enter your URL or code snippet into the ‘Test your structured data’ popup.

Then, click the ‘Run Test’ button.
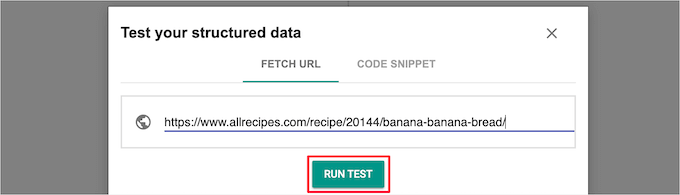
Enter URL or code and test structured data

The tool will automatically analyze your code to see if there are any errors.

You’ll want to see 0 errors on the right-hand side of the page.
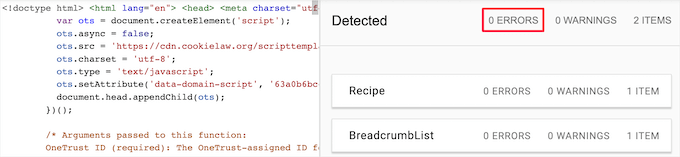
Schema markup test results

We hope this article helped you learn how to use rich snippets on your WordPress site. You may also want to see our guide on how to choose the best domain name registrar and our expert picks of the best AI chatbots software for your website. 

If you liked this article, then please subscribe to our YouTube Channel for WordPress video tutorials. You can also find us on Twitter and Facebook.

The post Beginner’s Guide: How to Use Rich Snippets in WordPress first appeared on WPBeginner.


December 02, 2022 at 12:43AM
How to Add Arrow-key Keyboard Navigation in WordPress

Do you want to add arrow-key keyboard navigation on your website?

Keyboard navigation can make your website more user-friendly. It will allow your visitors to move from post to post using these arrow keys. However, WordPress does not offer these navigation features by default.

In this article, we will show you how to add arrow-key keyboard navigation in WordPress. 

How to add arrow key keyboard navigation in WordPress

Why Add Arrow-key Keyboard Navigation in WordPress

Adding keyboard navigation to your WordPress website allows users to easily browse blog posts on your website. Users are able to view the next and previous blog posts by clicking on the right and left arrow keys on their keyboards.

This feature comes in handy when you want users to easily browse posts in sequential order, For instance, if you’re using blog posts to publish chapters of a book, portfolio items, historical events, or more.

Adding arrow-key keyboard navigation can be a great way to improve user experience on your WordPress blog as it will encourage users to explore your site more.

With that being said, let’s see how to add arrow-key keyboard navigation in WordPress using a plugin.

Method 1. Adding Arrow-Key Keyboard Navigation Using a Code Snippet (Recommended)

You can add arrow-keys navigation on your WordPress blog by adding code to your WordPress theme’s functions.php file. However, adding custom code to WordPress core files can be risky as a tiny mistake can break your site.

That is why we always recommend using WPCode. It is the easiest and safest code snippet plugin available.

By adding this code to your website, your users will be able to switch between different pages and posts on your site using the arrow keys on their keyboards.

First, you need to install and activate the free WPCode plugin. For details, see our guide on how to install a WordPress plugin.

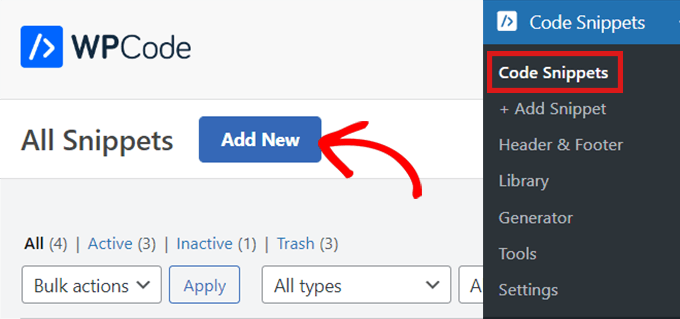
Upon activation, head over to Code Snippets » Add Snippet in your WordPress admin dashboard. Click the ‘Add New’ button to go to the ‘Add Snippet’ page.

Go to Code Snippets and click on Add New

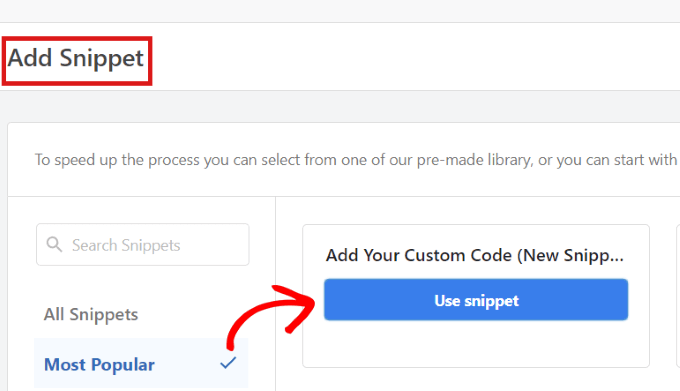
Once there, find the ‘Add Your Custom Code (New Snippet)’ option.

Simply hover your mouse over it and then click the ‘Use snippet’ button.

Click on the Use Snippet button

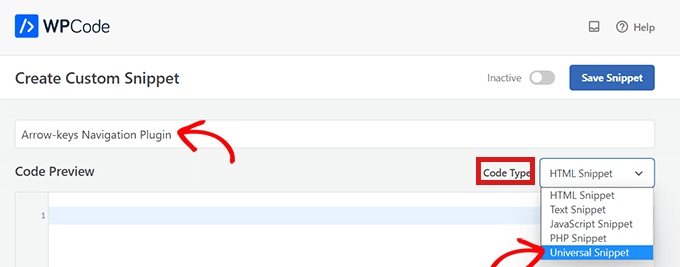
Once you’re on the ‘Create Custom Snippet’ page, start by typing a name for your code snippet.

Then, simply select ‘Universal Snippet’ as the ‘Code Type’ from the dropdown menu in the right-hand corner.

Note: Please do not select ‘JavaScript’ as your code type. Even though it’s JavaScript code, the code only works on your site if you select the ‘Universal Snippet’ option.

Choose Unviersal code type for arrow keys navigation

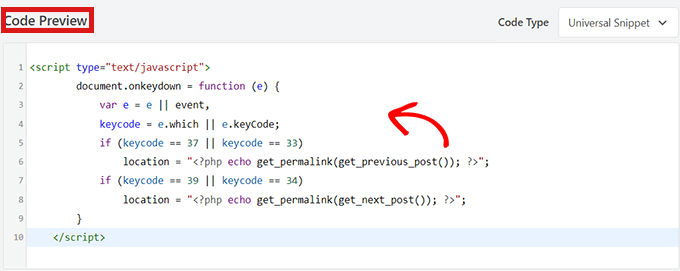
Next, simply copy and paste the following code into the ‘Code Preview.

<script type="text/javascript">
        document.onkeydown = function (e) {
            var e = e || event, 
            keycode = e.which || e.keyCode; 
            if (keycode == 37 || keycode == 33)
                location = "<?php echo get_permalink(get_previous_post()); ?>";
            if (keycode == 39 || keycode == 34)
                location = "<?php echo get_permalink(get_next_post()); ?>";
        }
    </script>

This snippet will enable arrow-key navigation on your website.

Paste the code for arrow keys navigation

After that, scroll down to the ‘Insertion’ box to choose the location of the code snippet.

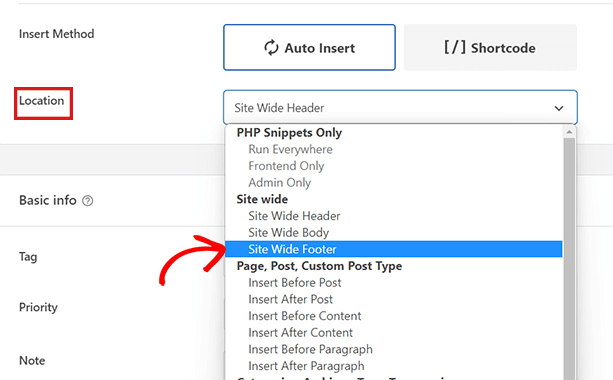
In the dropdown menu beside ‘Location,’ simply choose ‘Site Wide Footer.’

Choose Site Wide Footer from the Location dropdown

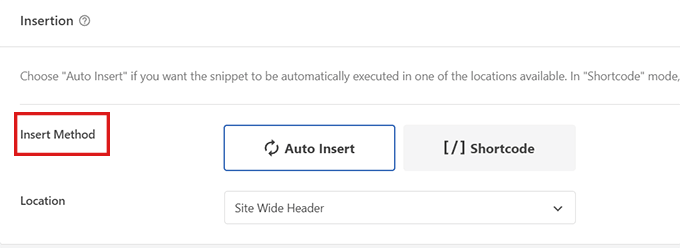
Then, you’ll have to choose an ‘Insert Method.’ To run the snippet everywhere on your website, select the ‘Auto Insert’ option.

If you want arrow-keys navigation only on certain pages, then choose the ‘Shortcode’ option. Once you save the code snippet, a shortcode will appear here for you to copy/paste.

Choose an insert method

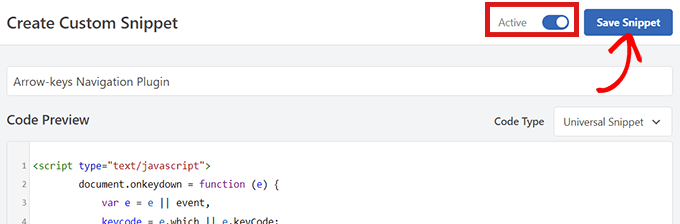
Next, simply go back to the top of the page and toggle the switch from ‘Inactive’ to ‘Active’.

Then all you have to do is click on the ‘Save Snippet’ button.

Save your arrow keys navigation snippet

That’s it! You’ve successfully added the arrow-key navigation on your website.

Method 2. Adding Arrow-Key Keyboard Navigation Using The Arrow Keys Navigation Plugin

If you do not want to add code to your website, then you can use the Arrow Keys Navigation plugin.

This plugin enables you to navigate through the previous and next posts on your site using the right and left arrow keys on your keyboard.

So the first thing you need to do is install and activate the Arrow keys Navigation plugin.

For more details, see our step to step guide on how to install a WordPress plugin.

Note: This plugin hasn’t been updated recently. However, we tested it with the latest version of WordPress, and it is still working.

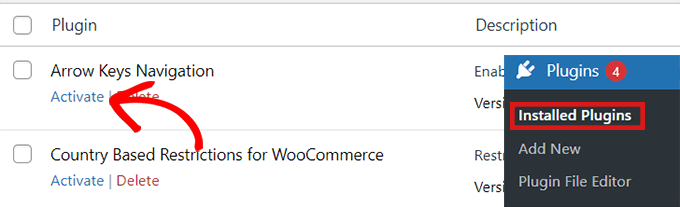
Activate the plugin

Since it is a very simple plugin, it requires no additional configuration. Once you’ve activated the plugin, you can now switch to different posts on your site using the arrow keys.

Keep in mind that this plugin only allows you to switch between different posts on your website, so you won’t be able to use arrow keys to move from one page to another.

For example, you cannot switch from your ‘Home’ page to your ‘Contact Us’ page using arrow keys.

After you’ve activated the plugin, you can add a message or popup on your website that tells the users that they can now navigate through various blog posts by simply using the arrow keys to move from one post to the next.

Arrow-Key Navigation for WordPress Slider and Image Galleries

The above two solutions will allow users to navigate your blog posts with arrow keys, however sometimes you may want to add other functionalities like allowing users to move images with arrow keys, or perhaps move your slider with arrow keys.

In these cases, you will need to use a WordPress gallery plugin, and / or a WordPress slider plugin. Most popular slider and gallery plugins come built-in with arrow key navigation features.

We hope this article helped you learn how to add arrow-key keyboard navigation in WordPress. You may also want to see our top pick of the best WordPress plugins. If you’re interested, you can also go through our guide on how to add special characters in WordPress.

If you liked this article, then please subscribe to our YouTube Channel for WordPress video tutorials. You can also find us on Twitter and Facebook.

The post How to Add Arrow-key Keyboard Navigation in WordPress first appeared on WPBeginner.


December 01, 2022 at 04:15PM

Wednesday, November 30, 2022

How to Remove the Sidebar in WordPress

Do you want to remove the sidebar from your WordPress site?

The sidebar is a widget-ready area in your WordPress theme where you can show information that isn’t part of the main page content. However, sidebars can be distracting and take up valuable space.

In this article, we will show you how to easily remove the sidebar in WordPress.

How to remove the sidebar in WordPress

Why Remove the Sidebar in WordPress?

Most free and paid WordPress themes come with multiple sidebars or widget-ready areas.

You can use sidebars to show a list of your recent posts, adverts, email list signup forms, or any other content that isn’t part of the main page or post.

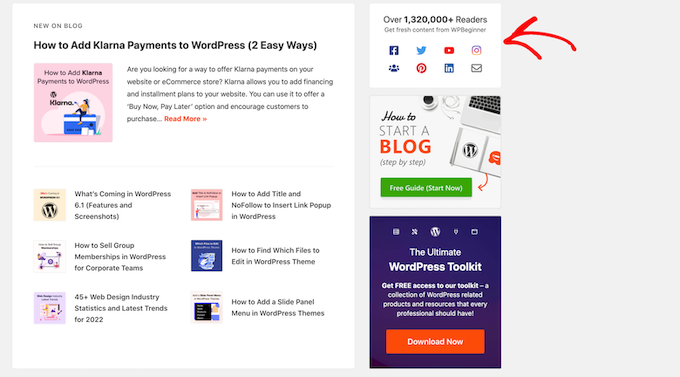
At WPBeginner, we use a sidebar to promote our social media pages and display our most popular posts.

An example of a WordPress sidebar

You can easily add items to a theme’s sidebar using WordPress widgets.

In most WordPress themes, the sidebar looks different depending on whether the visitor is seeing your site on a desktop or mobile device. Since smartphones and tablets have smaller screens, WordPress typically moves the sidebars to the bottom of the screen.

Depending on how your site is set up, this may look strange. Visitors will also need to scroll to the very bottom of the screen to see the sidebar content, which may affect the user experience and your conversion rates.

For more information, please see our guide on how to view the mobile version of WordPress sites from desktop.

Even on a desktop, there’s a chance that the sidebar may clash with your design or distract from the most important content, such as the page’s call to action.

With that being said, let’s see how you can remove the sidebar in WordPress. We’ll show you how to delete the sidebar from your entire site, and how to hide the sidebar on a specific page or post only.

Video Tutorial

If you don’t like the video or need more instructions, then continue reading. If you prefer to jump straight to a particular method, then you can use the links below.

Method 1. Removing Sidebars Using Your WordPress Theme Settings

Many of the best WordPress themes come with built-in settings to remove sidebars. Depending on your theme, you can remove them site-wide, or simply remove them from individual posts or pages.

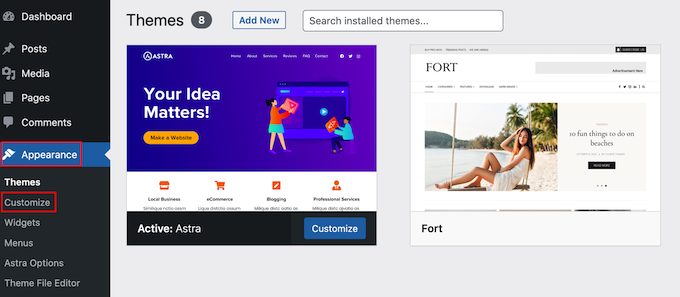
The easiest way to check whether your theme has these settings is to launch the theme customizer. In your WordPress dashboard, go to Appearance » Customize.

Launching the WordPress Customizer

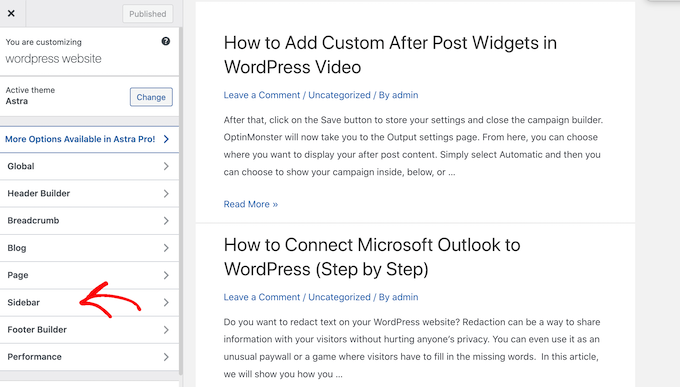
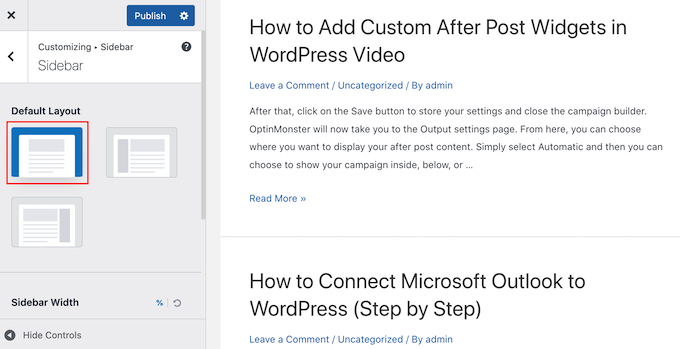
In the left-hand menu, look for a ‘Sidebar’ or similar setting.

In the following image, you can see the options for the popular Astra WordPress theme.

The theme settings for the Astra theme

If you do see a ‘Sidebar’ option, then click on it and then look for any settings that will remove the sidebar.

This might be a dropdown menu, thumbnails showing the different sidebar layouts, or some other setting.

Removing the sidebar using the WordPress Customizer

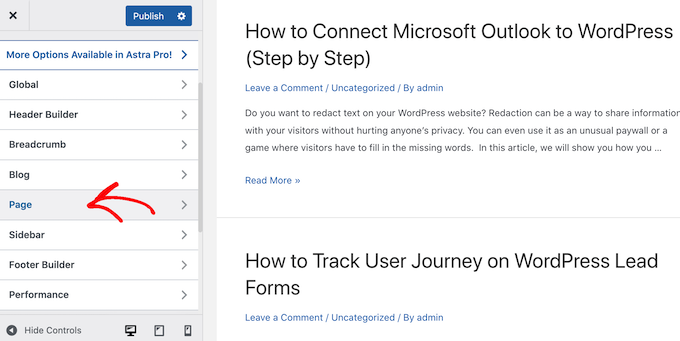
If your theme doesn’t have a ‘Sidebar’ option, then you may be able to remove the sidebar by selecting the ‘Page’ or similar section.

As you can see in the following image, Astra also has a ‘Page’ setting.

Changing the page layout in the WordPress customizer

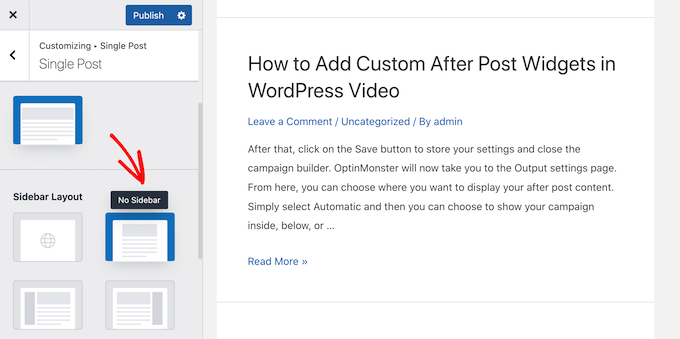
Inside this setting, you’ll see different layouts including several that remove the sidebar such as ‘No sidebar’ and ‘Full Width / Stretched.’

Simply click on the different thumbnails to apply these layouts to your site.

Deleting the sidebar using the WordPress Customizer

No matter how you remove the sidebar, don’t forget to click on ‘Publish.’

Some WordPress themes also have settings that allow you to remove the sidebar from individual posts and pages. This can be useful when designing custom pages, such as a landing page.

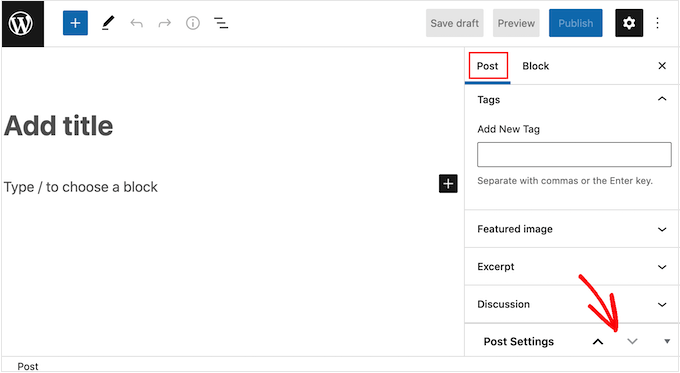
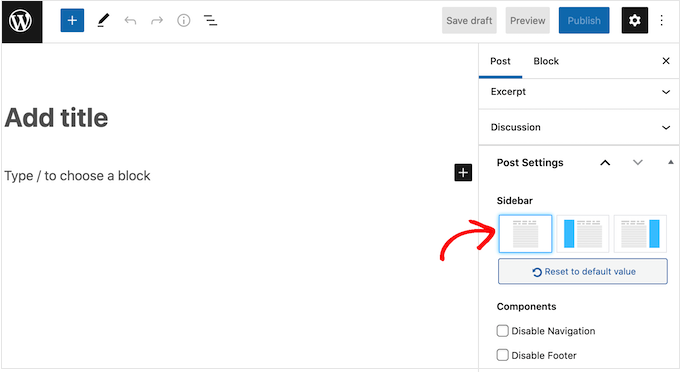
To see whether your theme comes with these settings, simply edit any page or post where you want to hide the sidebar. In the right-hand menu, select either ‘Post’ or ‘Page’ and then look for a ‘Post Settings’ or ‘Page Settings’ option.

The page settings for the Hestia theme

If your theme has this section, then click to expand. You can now look for any settings that allow you to remove the sidebar.

In the following image, you can see the post settings for the popular ThemeIsle Hestia theme.

The Post Settings section

Keep in mind that some WordPress themes may not allow you to easily remove the sidebar using the customizer or page editor. If this is the case, then carry on reading and we’ll show you other ways to remove the sidebar in WordPress.

Method 2. Removing the Sidebar Using the Full Site Editor

If you’re using a block theme, then you can remove the sidebar using Full Site Editing (FSE) and the block editor.

This method is a quick and easy way to remove the sidebar across your entire site, although it won’t work with all themes.

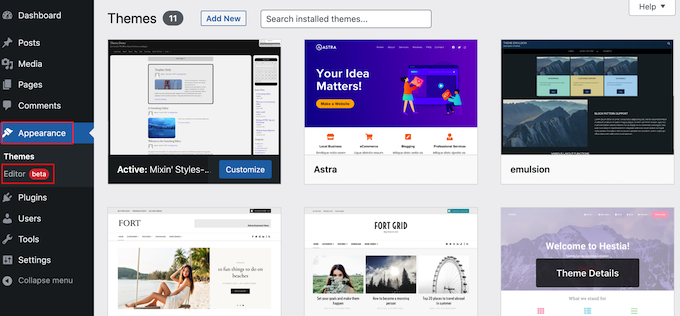
To launch the editor, go to Appearance » Editor.

How to launch the FSE

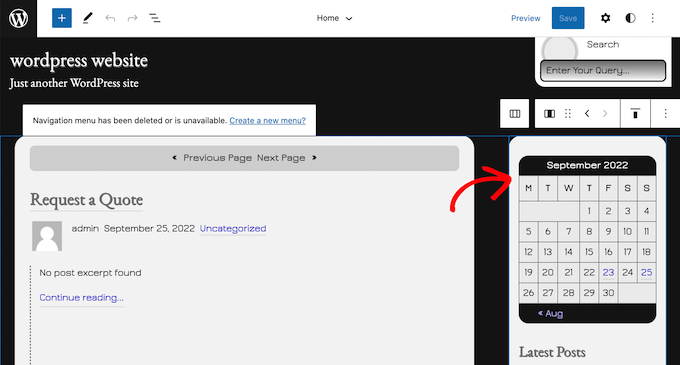
You can now click to select the sidebar.

In the small toolbar that appears, click on the dotted icon.

Customize the sidebar using the full site editor

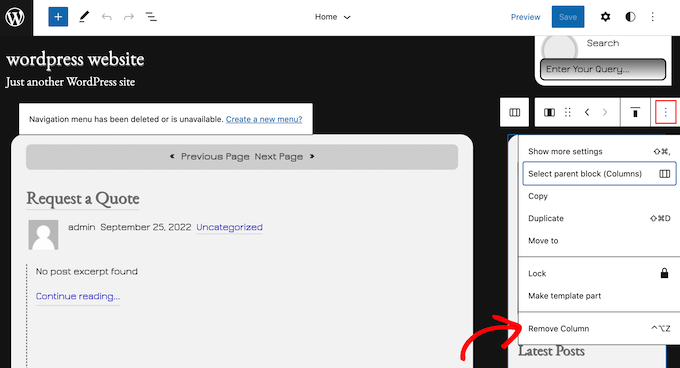
You can now delete the sidebar by clicking on the ‘Remove Column’ or similar setting.

Once you’ve done that, you can go ahead and click on the ‘Save’ button.

Removing the sidebar using the full site editor

Now, if you visit the front end of your WordPress website, you’ll see that the toolbar has disappeared.

Method 3. Removing the WordPress Sidebar Using Code

This method allows you to simply remove sidebars from every page and post on your WordPress site.

You will need to edit your theme files, so it’s not the most beginner-friendly option. However, this method should work for most WordPress themes, including themes that don’t have a built-in way to hide the sidebar.

Keep in mind that if you edit your WordPress theme files directly, then those changes will disappear when you update the theme.

With that being said, we recommend creating a child theme as this allows you to update your WordPress theme without losing customization.

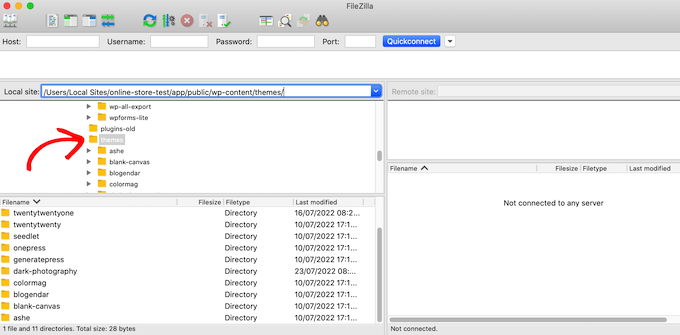
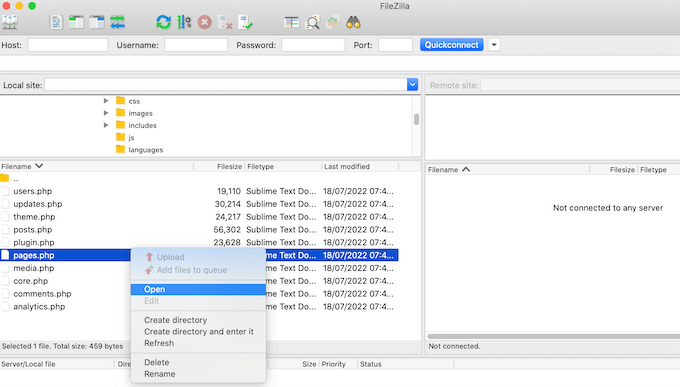
First, you need to connect to your WordPress site using an FTP client such as FileZilla, or you can use the file manager of your WordPress hosting cPanel. Or if you’re a SiteGround user, your Site Tools dashboard.

If this is your first time using FTP, then you can see our complete guide on how to connect to your site using FTP

Once you’re connected, go to /wp-content/themes/ and open the folder for your current WordPress theme.

The FileZilla FTP client

WordPress themes are made up of different templates, so you will need to edit all the templates that include a sidebar. To work out what files you need to edit, see our guide to WordPress template hierarchy.

For example, you may need to edit index.php, page.php, single.php, archive.php, home.php, and so on.

To edit a file, open it in a text editor such as Notepad. Then, find the line that looks like this:

<pre class="wp-block-syntaxhighlighter-code">
<?php get_sidebar(); ?>
</pre>

If your theme has multiple sidebars, then the code will look slightly different and there may be multiple pieces of sidebar code. Typically, this code will have a sidebar name inside the function, for example:

<pre class="wp-block-syntaxhighlighter-code">
<?php get_sidebar('footer-widget-area'); ?>
</pre>

You can simply delete the line for the sidebar that you want to remove.

Now, save and upload the file back to your WordPress hosting account. Simply repeat the process described above for all the template files that include a sidebar.

When you’re finished, you can visit your WordPress blog to see the change in action.

You may notice that although the sidebars are gone, your content area is still the same width, which leaves the sidebar area empty.

An empty space where the sidebar should be

This happens when the theme has a defined width for the content area. After removing the sidebar, you need to adjust the width of the content area by adding custom CSS to your WordPress theme.

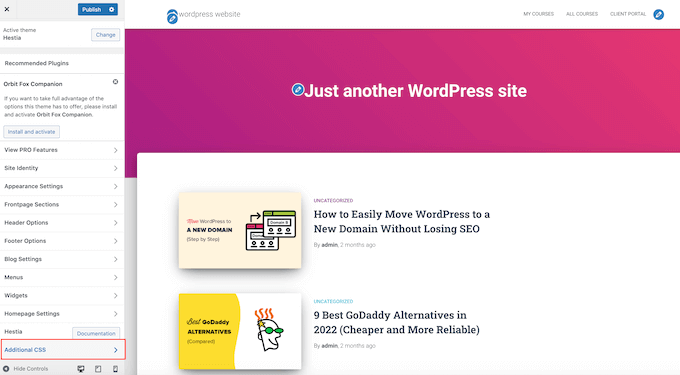
To do this, go to Theme » Customize. In the left-hand menu, click on Additional CSS.

Adding CSS with the WordPress customizer

You can now go ahead and paste the following code into the little code editor:

<pre class="wp-block-syntaxhighlighter-code">
.content-area {
    width: 100%;
    margin: 0px;
    border: 0px;
    padding: 0px;
}

.content-area .site {
margin:0px;
}
</pre>

Don’t forget to click on the ‘Publish’ button. Now, if you visit your site you’ll see that the content area now takes up 100% of the available space.

Method 4. Removing Sidebars From Individual Pages in WordPress

You may only want to remove the sidebar on certain pages while showing the sidebar on other areas of your site. For example, many websites don’t show the sidebar on their sales pages, as this can distract from the page’s call to action.

If you just want to remove the sidebar from a specific page, then we recommend using a page builder plugin like SeedProd.

SeedProd lets you design any kind of page using a simple drag-and-drop editor. This makes it easy to add and remove the sidebar from any page.

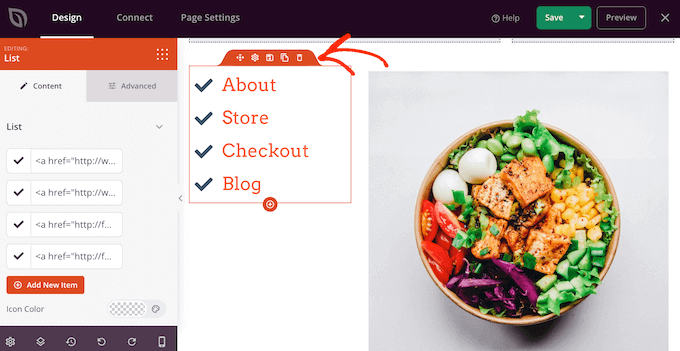
In the SeedProd editor, simply click to select the sidebar you want to remove. Then, go ahead and click on the trash can icon.

Removing a sidebar using SeedProd

If you want to remove the sidebar from your entire site, then you can also use SeedProd to easily create a custom theme that doesn’t have any sidebars.

Method 5. Removing Sidebars from a Static Page in WordPress

Some WordPress themes come with multiple templates, including full-width page templates that don’t show the sidebar on either side of the content. You can use these templates to remove the sidebar from any page.

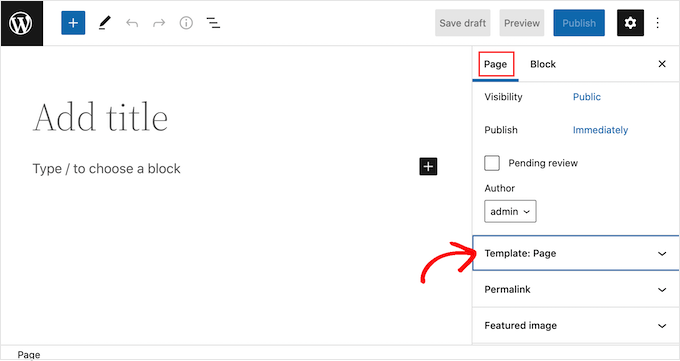
To see whether your theme has a full-width template, simply open any page. In the right-hand menu, select the ‘Page’ tab and look for a ‘Template’ section.

Changing the WordPress page template

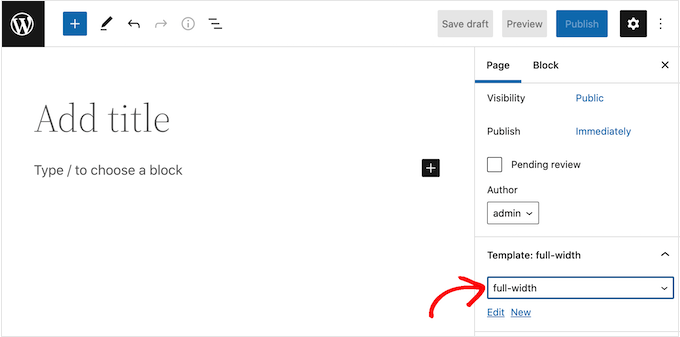
If you find this section, then click on it to see all the options available.

You can now open the dropdown menu and look for a full-width template.

How to remove the sidebar with a full width template

If your theme doesn’t have a full-width template, then you can create one manually.

Open a plain text editor like Notepad and paste the following code in a blank file:

<pre class="wp-block-syntaxhighlighter-code">
<?php
/*
*
Template Name: Full-Width
*/
get_header(); ?>
</pre>

You can now save this file with the name full-width.php.

After that, connect to your site using an FTP client or the file manager supplied by your WordPress hosting provider.

Then, go to /wp-content/themes/ and open the folder for your current theme. Inside this folder, find the page.php file and open it in any text editor.

The FileZilla FTP client

Now, copy everything that appears after the <?php get_header(); ?> line and paste it into your full-width.php file.

Once you’ve done that, find and delete the line that looks like this:

<pre class="wp-block-syntaxhighlighter-code">
<?php get_sidebar(); ?>
</pre>

You can now save your changes and upload the full-width.php file to your theme folder.

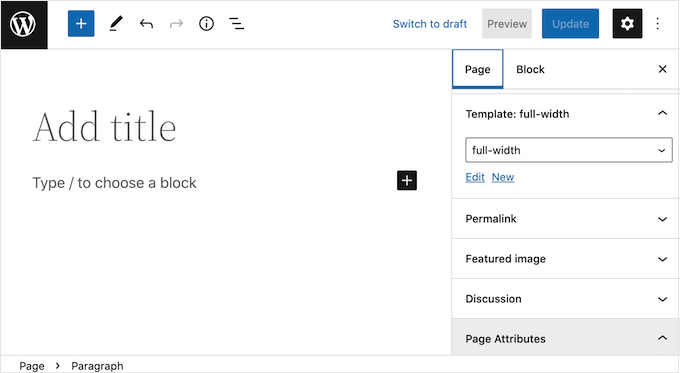
You can now use this template with any page. Simply open the ‘Template’ dropdown in the right-hand menu and select your full-width template.

A full-width template

Note: If you have a page open in the content editor while creating the full-width.php file, you will have to refresh the editor for the new template to appear in the dropdown menu.

For more details, see our guide on how to create a full width page template in WordPress.

Method 6. Remove the Sidebar from a Single Post in WordPress

Just like pages, WordPress also comes with built-in support for post templates.

If you want to remove the sidebar from certain single posts, then you can create a custom single-post template. It is similar to creating a full-width page template.

First, you’ll need to create a new template file using a text editor like Notepad. Once you’ve done that, you can copy and paste the following code in that file:

<pre class="wp-block-syntaxhighlighter-code">
<?php
/*
 * Template Name: Featured Article
 * Template Post Type: post, page, product
 */

 get_header();  ?>
</pre>

This code creates a new template called ‘Featured Article’ and makes it available for any page or post, plus any product post types in your online store.

In your custom single post template, you simply need to remove the sidebar part of the code. For more information, you can follow the steps outlined in our guide on how to create custom single post templates in WordPress.

When you’re done, save this file as full-width.php.

Next, you need to upload the file to your current WordPress theme folder using an FTP client or file manager.

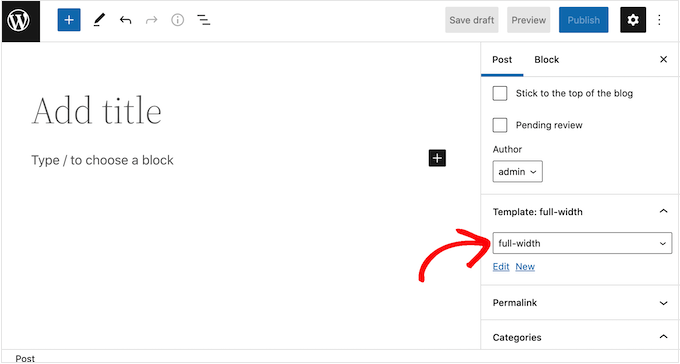
Once you’ve done that, you can apply this template to any post. In the right-hand menu, simply click to expand the ‘Templates’ section and then select the full-width template.

How to create a full-width template in WordPress

We hope this article helped you learn how to easily remove the sidebar in your WordPress theme. You may also want to see our step-by-step guide on how to boost WordPress speed and performance, and our comparison of the best email marketing services to grow your traffic & sales.

If you liked this article, then please subscribe to our YouTube Channel for WordPress video tutorials. You can also find us on Twitter and Facebook.

The post How to Remove the Sidebar in WordPress first appeared on WPBeginner.


December 01, 2022 at 12:21AM