Thursday, December 15, 2022

How to Enable Maintenance Mode for WooCommerce

Do you want to enable maintenance mode for WooCommerce without affecting other parts of your WordPress website?

Maintenance mode allows you to show a user-friendly notice to shoppers instead of a broken eCommerce site. You can even enable maintenance mode for specific product pages or areas of your WooCommerce store.

In this guide, we’ll show you how to enable maintenance mode for WooCommerce.
How to enable maintenance mode for WooCommerce

Why and When You Need to Enable Maintenance Mode for WooCommerce

Sometimes you may need to put your WordPress website in maintenance mode. For example, you may be making major changes such as installing a new theme or completely redesigning your WordPress blog.

At other times you may need to put your WooCommerce store into maintenance mode, while leaving the rest of your site open.

This could be because there’s a problem that’s only affecting your online store, and not the rest of your website. For example, you may be unable to process customer payments. In this case, maintenance mode can stop customers from encountering the error and having a bad shopping experience.

You may also be adding an online store to an existing website and want to keep those pages private while you work on them.

An engaging ‘coming soon’ page can also create a sense of excitement and anticipation while you build your store behind the scenes. You might even encourage shoppers to get ready for the launch by following you on social media, joining your email list, or even entering a WooCommerce contest.

That being said, let’s take a look at how to easily enable WooCommerce maintenance mode without affecting the rest of your website.

Enabling Maintenance Mode for WooCommerce

The easiest way to enable maintenance mode for WooCommerce is by using SeedProd.

SeedProd is the best landing page builder for WordPress, used on more than a million websites. It allows you to create beautiful coming soon pages in WordPress, improve your 404 page, and even design unique landing pages using drag and drop.

There’s a free version of SeedProd that lets you create a maintenance mode page. However, we’ll be using the premium version as it lets you put your WooCommerce store into maintenance mode while keeping the rest of your site available.

The first thing you need to do is install and activate the SeedProd plugin. For more details, see our guide on how to install a plugin in WordPress.

After activating the plugin, SeedProd will ask for your license key.
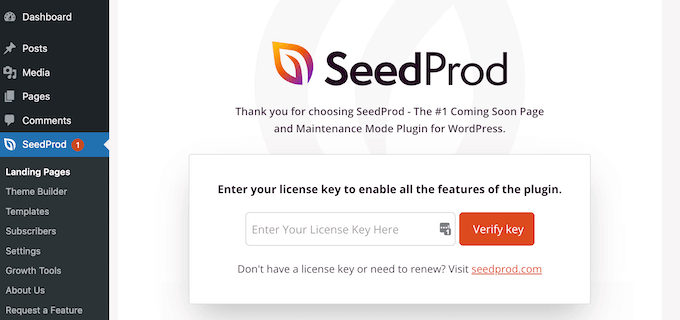
Adding the SeedProd license key

You can find this information under your account on the SeedProd website. After entering the license, click on the ‘Verify Key’ button.

Once you’ve done that, you’re ready to put your WooCommerce store in maintenance mode.

Creating Your Maintenance Mode or Coming Soon Page

After activating SeedProd, go to SeedProd » Pages. Here, you can choose whether to create a maintenance mode page or a coming soon page.

Although some people use these terms interchangeably, there are some important differences you should know.

If you create a ‘Coming Soon’ page, then search engines will still be able to see and crawl your store pages. This gives your WooCommerce site a chance to get indexed by search engines.

If you’re building a new store, then you’ll typically want to create a coming soon page.

If your store is down for maintenance, then you should create a ‘Maintenance Mode’ page instead. This mode tells search engines that your site is temporarily down, using the special header code 503.

After getting this code, the search bots will recheck your WordPress website later to see whether it’s back online. In this way, you can hide your store from shoppers without affecting your search engine rankings.

Note: We’ll create a maintenance mode page in this guide, but the steps will be the same no matter whether you click on ‘Set up a Maintenance Mode Page’ or ‘Set up a Coming Soon Page.’
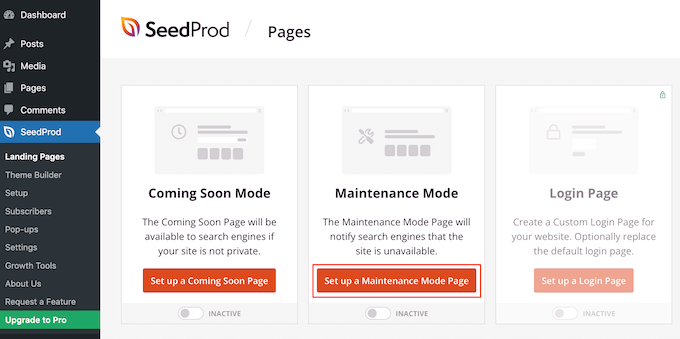
Creating a maintenance page for your online store

The next step is building the page that shoppers will see when you enable maintenance mode for WooCommerce.

You can either choose a ready-made template or start with a blank design. We’re using ‘Celebrate Coming Soon’ in all our images but you can use any template you like.

To select a template, simply hover your mouse over that design’s thumbnail and then click the ‘checkmark’ icon.
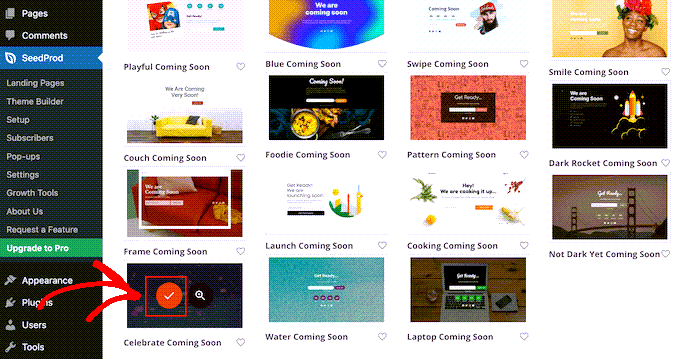
Choosing the WooCommerce coming soon page

After selecting a template, you’ll be taken to the drag-and-drop builder, where you can start customizing the maintenance mode design.

On the left side of the screen, you’ll find blocks and sections that you can add to your design. The right side of the page is the live preview.
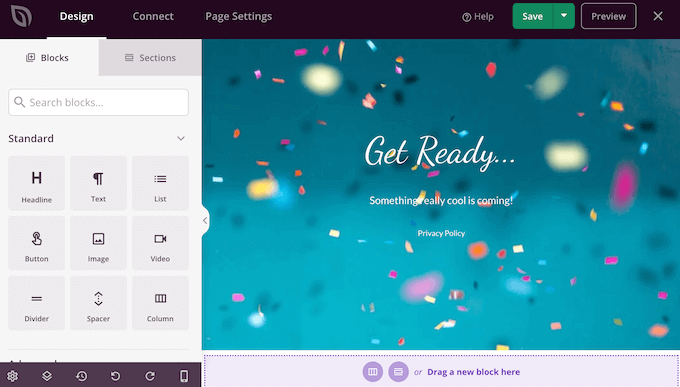
How to create a maintenance mode for WooCommerce

Most templates already have some blocks, which are a core part of all SeedProd designs. To start, you’ll typically want to customize these blocks by adding your own text, images, links, and other content.

To change the text in any Headline or Text block, simply click to select that block in your layout. This brings up all the settings for that particular block.

You can now type your text into the small text editor.
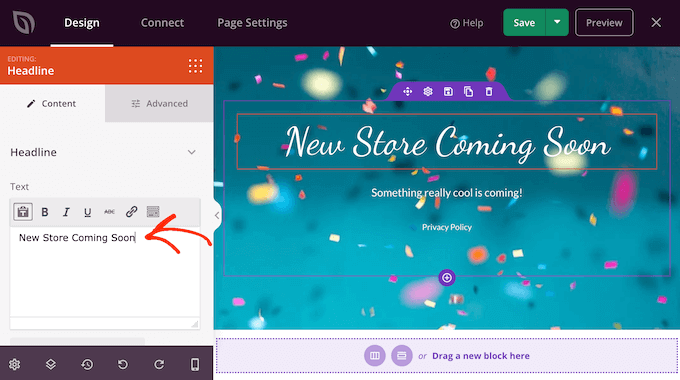
Adding text to a WooCommerce coming soon page

You can also use these settings to style the text, including adding bold and italic formatting, changing the text alignment, changing the font size, and more.

You can add more blocks to your maintenance page by dragging them from the left-hand menu and then dropping them onto your design.

For example, if you wanted to add a custom logo then you could simply drag an ‘Image’ block onto your layout.
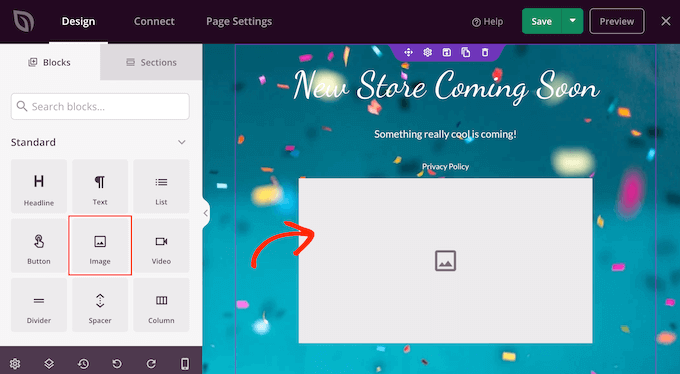
Adding a logo to to your online store's maintenance page

Then, just click to select that block in your layout and the left-hand menu will show all the settings for that block.

To add a logo, go ahead and click on ‘Use Your Own Image.’
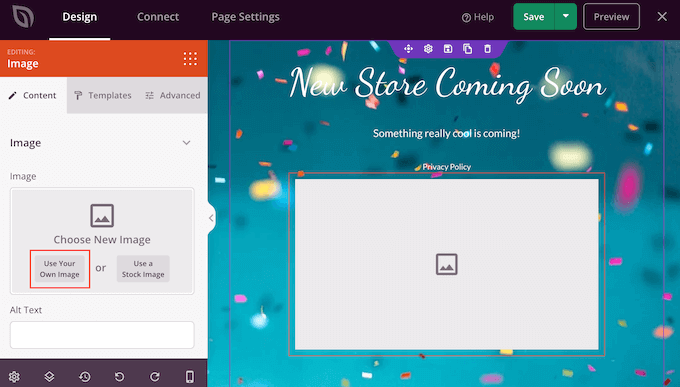
Building a custom coming soon page with WooCommerce

You can then either choose an image from the WordPress media library or upload a new file from your computer.

After adding an image, you can change the size, add image alt text, embed a link, and more using the settings in the left-hand menu.

The SeedProd page builder plugin

If you’re using the WPForms plugin then you can quickly and easily add a contact form to the maintenance page. This gives shoppers a way to talk to you even when your WooCommerce site is down for maintenance.

After creating a contact form in WordPress, you can drag the ‘Contact Form’ block onto your SeedProd layout.
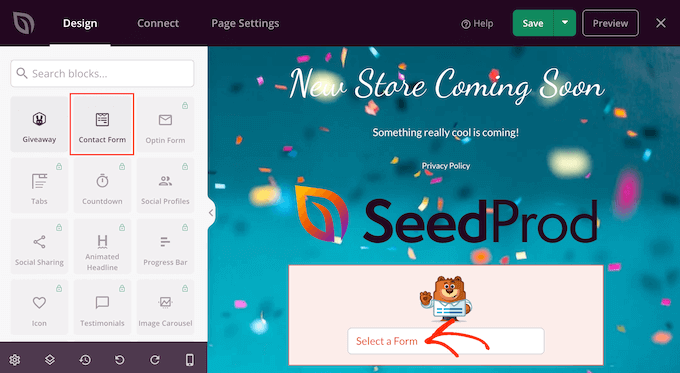
Adding a contact form to your maintenance page

Then, simply click to select the Contact Form block.

In the left-hand menu, open the dropdown menu and choose the form you created earlier.
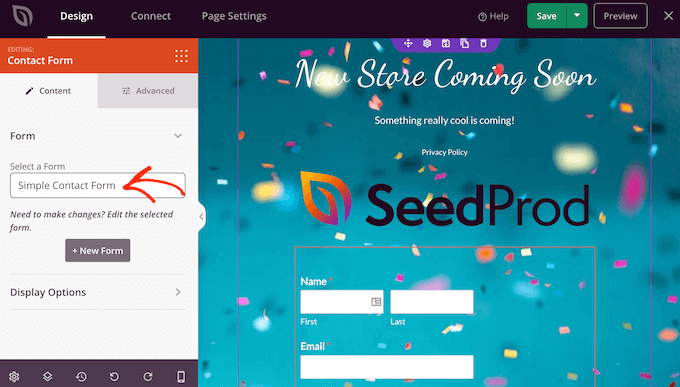
Adding a contact form to the WooCommerce maintenance screen

To remove a block from your design, simply go ahead and click on it.

You can then select the trash can icon.

Deleting blocks in the SeedPage page builder

You can also move blocks around the page using drag and drop.

When you’re happy with how the maintenance page looks, make sure you click ‘Save.’
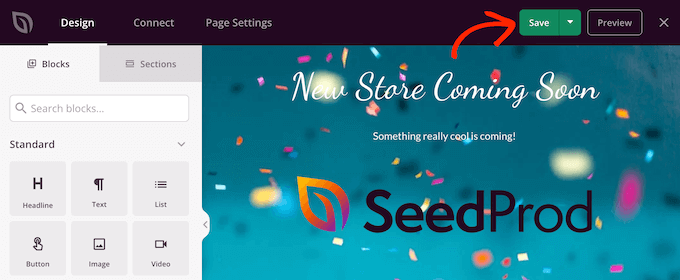
Saving the maintenance mode template

Turn on Maintenance or Coming Soon Mode for Your WooCommerce Store

Now that you’ve created a custom coming soon or maintenance mode page, let’s go ahead and enable it.

Here, we want to put the store into maintenance mode, and not the entire site. To do this, click on the ‘Page Settings’ tab inside the SeedProd editor.

Then, select the ‘Access Control’ tab.
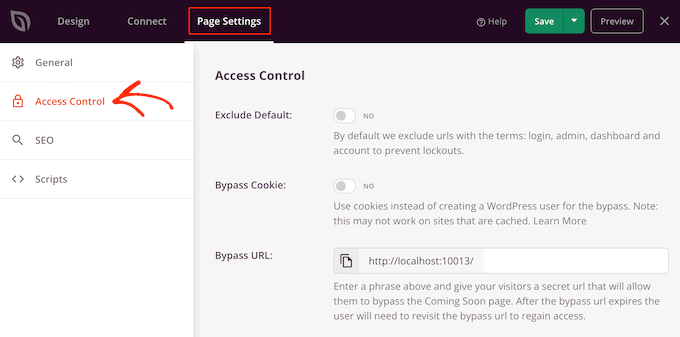
SeedProd's access control settings

You can use these settings to specify where the coming soon or maintenance page appears on your site, and who sees it. For example, you might show this page to people who have a particular user role or IP address.

Since we want to put our WooCommerce site into maintenance mode, scroll to the ‘Include/Exclude URLs’ section.

Then, just click on the ‘Include URLs’ button.
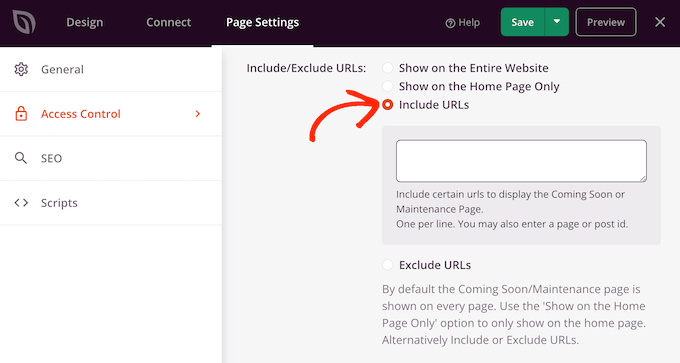
Enabling maintenance mode for a WooCommerce store

Now, you need to enter the URLs for your WooCommerce store. This may vary depending on how your store is set up, and whether you’ve created any custom pages such as a custom WooCommerce cart page or a custom checkout page.

However, it’s smart to start with all the pages that WooCommerce creates automatically:

https://example.com/shop
https://example.com/cart
https://example.com/checkout
https://example.com/my-account

If your store has products, then you’ll also need to add these URLs. Be sure to include the asterisk!

https://example.com/product/*
https://example.com/product-category/*
https://example.com/product-tag/*

The asterisk is a wildcard character, which tells SeedProd to include all URLs that match the pattern before it.

This means that shoppers will see the maintenance page when they try to access any product, product category, or product tag.

After adding all these URLs, click on the ‘Save’ button to store your changes.

Putting Your Store In Maintenance Mode

You’re now ready to put your WooCommerce store in maintenance or coming soon mode at any point. In the WordPress dashboard, simply go to SeedProd » Landing Pages.

Then, click on the ‘Inactive’ slider under ‘Coming Soon Mode’ or ‘Maintenance Mode,’ so that it changes to ‘Active.’
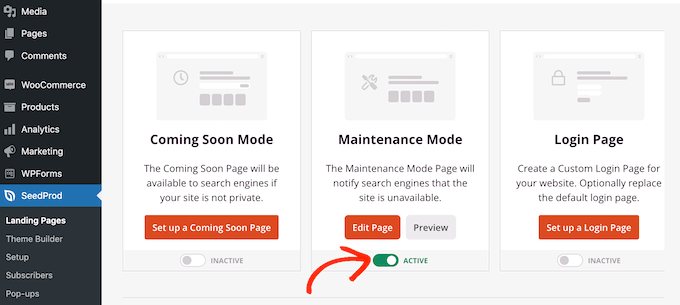
Activating maintenance mode for a WooCommerce store

Now, simply visit your WooCommerce store in an incognito browser tab and you’ll see your custom design, rather than your online store.

When you’re ready to make your store public, simply go back to SeedProd » Landing Pages.

Then click on the ‘Active’ slider so that it shows ‘Inactive.’ Now, anyone who visits your site will see your WooCommerce store, and can buy products and services as normal.

We hope this article helped you learn how to enable maintenance mode for WooCommerce. You may also want to take a look at our expert pick of the best WooCommerce plugins, and our complete step-by-step guide on how to create an email newsletter.

If you liked this article, then please subscribe to our YouTube Channel for WordPress video tutorials. You can also find us on Twitter and Facebook.

The post How to Enable Maintenance Mode for WooCommerce first appeared on WPBeginner.


December 16, 2022 at 01:02AM
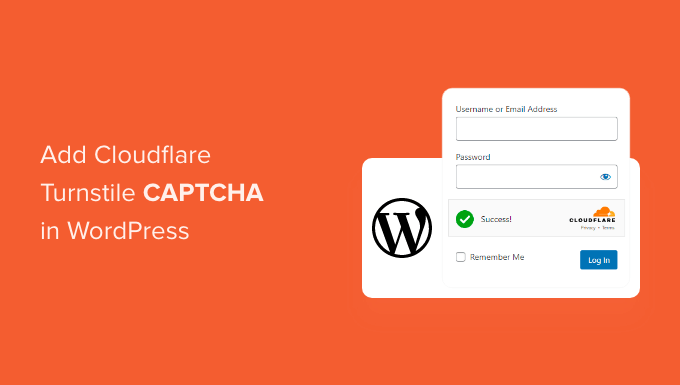
How to Add Cloudflare Turnstile CAPTCHA in WordPress

Do you want to add Cloudflare Turnstile CAPTCHA in WordPress?

CAPTCHA and reCAPTCHA can stop spambots, but they’re also unpopular with visitors. By using a non-intrusive technology like Turnstile, you can protect your website from spambots and automated scripts without annoying your visitors.

In this article, we will show you how to add Cloudflare Turnstile to your WordPress website.

How to add Cloudflare Turnstile CAPTCHA in WordPress

Why Add Cloudflare Turnstile CAPTCHA in WordPress?

Spam is a big problem for all websites including WordPress. Spambots can use non-secure forms to send you spammy links, which will make it more difficult for you to do lead generation.

They can also try to break into your site’s login form by using brute force attacks or flooding your site with spam comments that’ll damage the visitor experience and your WordPress SEO.

If you run an online store, then automated scripts may even place fraudulent orders.

Many website owners use CAPTCHA and reCAPTCHA to block scripts and bots. However, a lot of people complain that these technologies deliver a poor user experience, and some even worry about CAPTCHAs stealing their data.

With that being said, Cloudflare has introduced Turnstile CAPTCHA. This alternative technology uses a selection of non-intrusive challenges that often run invisibly in the browser. This allows you to protect your website without asking visitors to complete complex puzzles.

To help keep visitor information private, Cloudflare uses Apple’s Private Access Tokens to test whether the visitor is a real person without collecting extra data.

If you’re using form builders or WooCommerce, then Turnstile also integrates with these third-party plugins. This allows you to add invisible CAPTCHAs across many different areas of your WordPress website.

With that in mind, let’s see how you can add Cloudflare Turnstile CAPTCHA in WordPress. Simply use the quick links below to jump between the different steps.

Install a WordPress Cloudflare CAPTCHA Plugin

The easiest way to add Cloudflare’s CAPTCHA to WordPress is by using Simple Cloudflare Turnstile. This free plugin allows you to connect your website to the Turnstile service, and then check that it’s responding to your requests correctly.

First, you’ll need to install and activate the plugin. If you need help, then please see our guide on how to install a WordPress plugin.

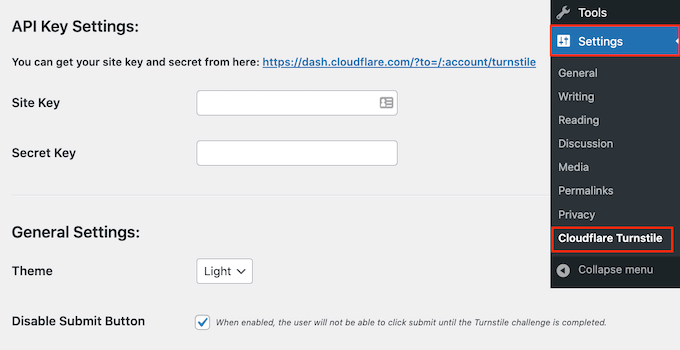
Upon activation, go to Settings » Cloudflare Turnstile.

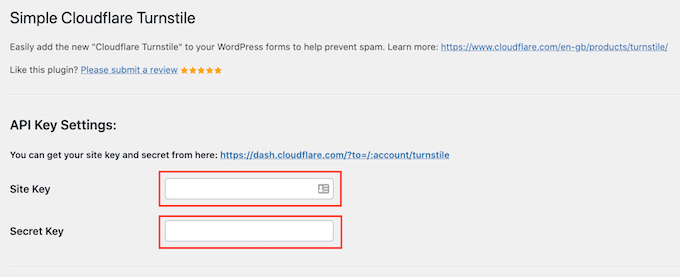
Adding a site key and secret key to a WordPress website

The plugin will now ask you to provide a site key and site secret.

You can get these for free by clicking on the link next to ‘You can get your site key and secret from here.’

Get a Cloudflare Turnstile Site Secret and Site Key

The link will take you to the Cloudflare login page where you can register your domain and create a site key and site secret. This is free, but you will need to create a Cloudflare account using your email address, if you haven’t already.

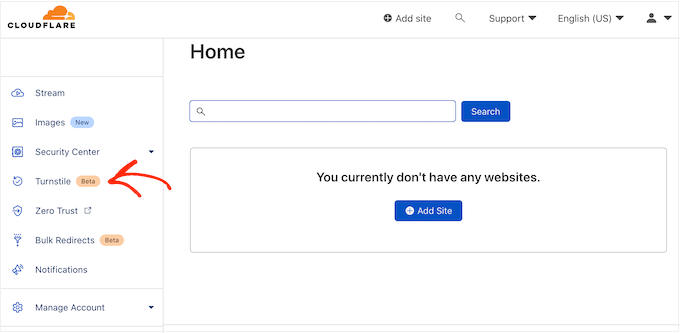
Once you’re logged into the Cloudflare dashboard, find ‘Turnstile’ in the left-hand menu and give it a click.

The Cloudflare dashboard

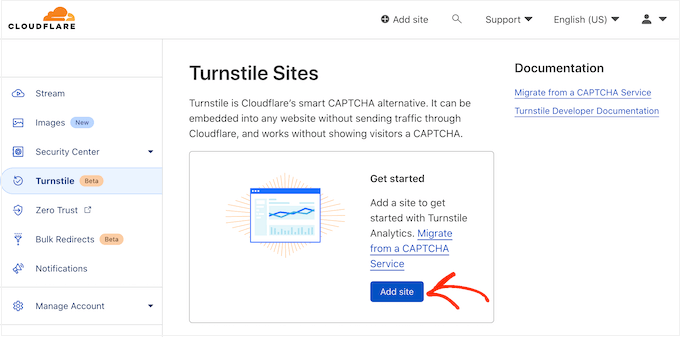
This will take you to a screen with some basic information about Cloudflare Turnstile.

If you’re happy to go ahead, then click on the ‘Add site’ button.

Adding a site to the Cloudflare dashboard

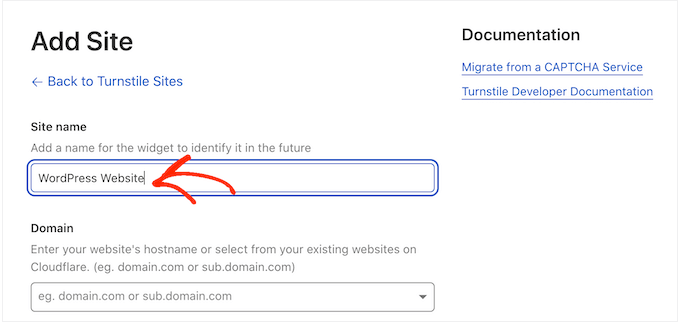
On this screen, start by typing in a ‘Site Name.’

This is just for your reference so you can use anything you want.

Adding a WordPress website to the Cloudflare dashboard

Next, type your website’s domain name into the ‘Domain’ field.

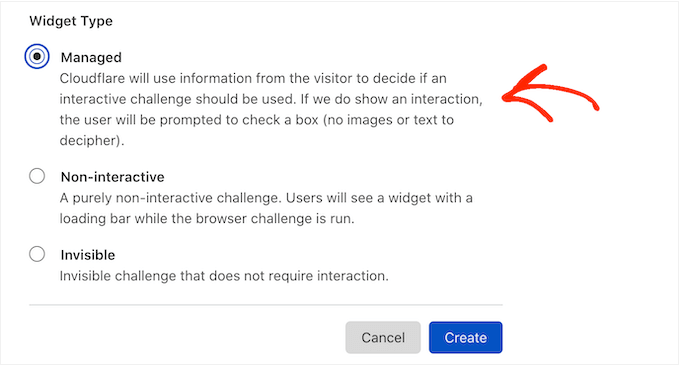
The next step is choosing which CAPTCHA widget you want to create. The first choice is ‘Managed,’ which is the method recommended by Cloudflare. This is where Cloudflare analyzes the browser’s request and then decides what kind of challenge it should run.

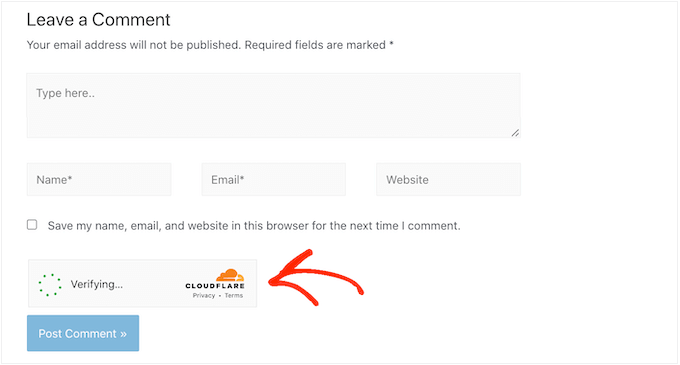
While this is happening, the visitor will see a loading animation.

Adding a Cloudflare Turnstile CAPTCHA to WordPress

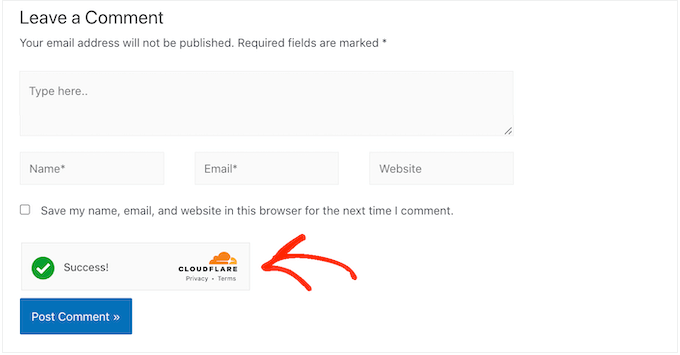
Wherever possible, Cloudflare will try to run a non-interactive challenge in the background, so the visitor doesn’t have to do anything.

In this case, the user will simply see a ‘Success’ message when their browser passes the test.

Creating a managed Cloudflare Turnstile CAPTCHA

Sometimes, Cloudflare may decide that it’s safer to show an interactive challenge instead. However, the visitor will simply need to check a box rather than complete a puzzle, so it’s still easier than the traditional puzzle-based CAPTCHAs.

Unless you have a specific reason not to, it’s smart to use managed CAPTCHAs as this gives you a good level of security with minimum impact on the visitor experience.

How to create a managed CAPTCHA for WordPress

Don’t want to use interactive challenges on your WordPress website? Then you can choose ‘Non-interactive’ or ‘Invisible’ instead.

Non-interactive challenges run in the browser so the visitor doesn’t have to take any action. Just like the managed CAPTCHA, visitors will see the loading animation and a ‘Success’ message when the challenge is complete.

If you choose ‘Invisible’ instead, then the visitor won’t see the animation or success message. This setting allows you to completely hide the CAPTCHA from your visitors, which can avoid confusion and won’t add any clutter to your WordPress theme.

After making your decision, click on the ‘Create’ button.

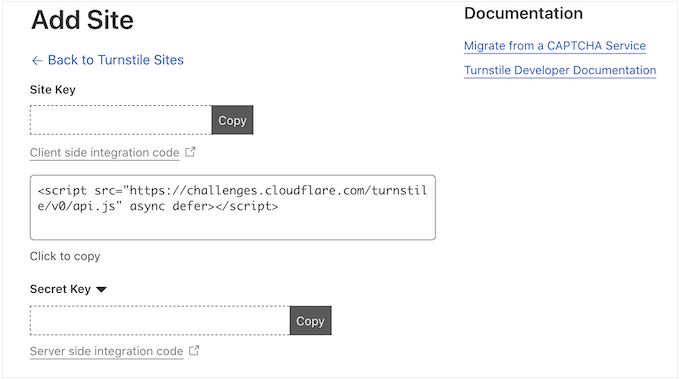
As soon as you’ve done that, Cloudflare will show your site key and secret key.

Creating a site key and secret key for your WordPress website

You can now add this information to the plugin’s settings on your website.

Add Cloudflare Turnstile CAPTCHA to Your WordPress Website

In your WordPress dashboard, head back to Settings » Cloudflare Turnstile. You can now go ahead and add the ‘Site Key’ and ‘Site Secret’ to your WordPress dashboard.

Adding the Cloudflare secret key and site secret to WordPress

After that, you may want to customize how the CAPTCHA looks on your website, and how it acts. To start, you can open the ‘Theme’ dropdown and choose from light, dark, or auto.

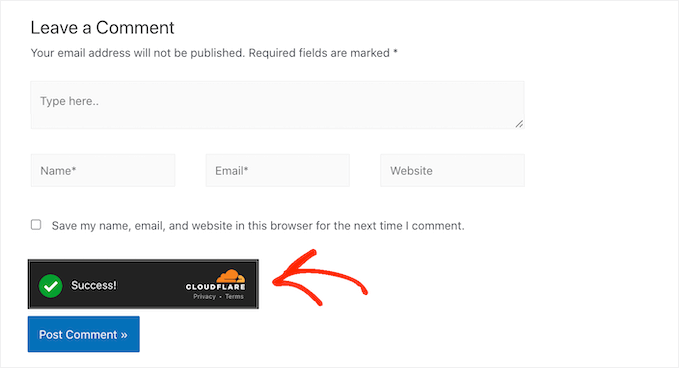
The following image shows an example of how the ‘Dark’ theme looks in the WordPress comment section.

A Cloudflare Turnstile CAPTCHA with a dark theme

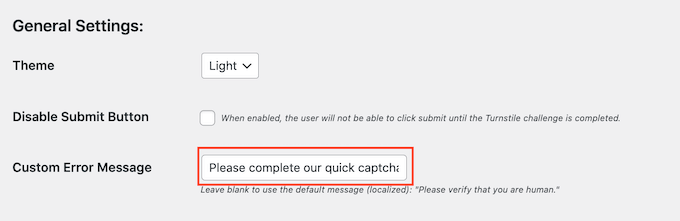
By default, Cloudflare Turnstile shows a ‘Please verify that you are human’ message to visitors. You may want to change this. For example, you might briefly explain why the CAPTCHA is so important, or that it will only take a few seconds to complete.

To add your own wording, simply type into the ‘Custom Error Message’ field.

Creating a custom error message for a WordPress CAPTCHA

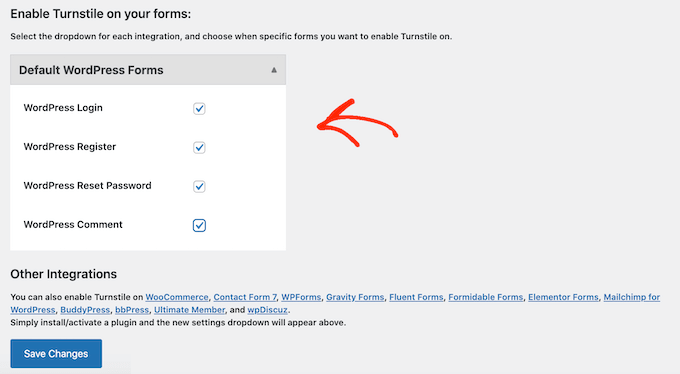
After that, you can select the forms where you’ll use the Cloudflare Turnstile CAPTCHA.

The options you see may vary depending on the plugins you’ve installed, but by default, you can use Turnstile with all the built-in WordPress forms. This includes the login page, user registration form, and password reset page.

Enabling Cloudflare Turnstile CAPTCHA for the WordPress forms

When you’re happy with the information you’ve entered, scroll to the bottom of the screen and click on ‘Save Changes.’

Now, if you visit your website you’ll see the Turnstile CAPTCHA in action.

Bonus: Add Turnstile CAPTCHA to Your WordPress Forms

WordPress comes with different built-in forms, but you’ll often want to create custom forms. For example, you might replace the default forms with professionally-designed alternatives that better suit your website.

You can also add forms that are missing from the core WordPress software, such as contact forms and online order forms.

Simple Cloudflare Turnstile integrates with the best contact form plugins for WordPress including WPForms and Formidable Forms. This allows you to add the same advanced CAPTCHAs to all your forms, no matter how you created them.

How to add a CAPTCHA to a WordPress contact form

To add a CAPTCHA to any WPForms or Formidable Forms page, simply go to Settings » Cloudflare Turnstile in your WordPress dashboard.

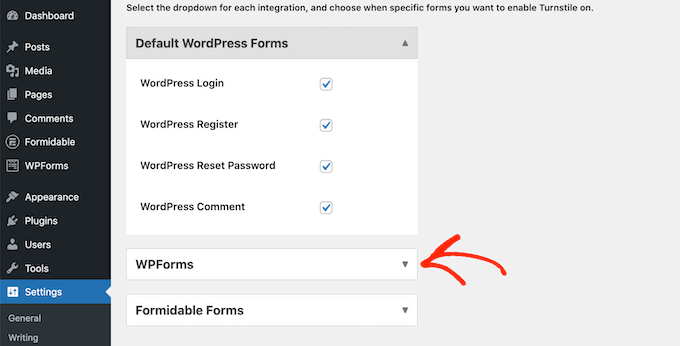
At the bottom of the page, you should see a section for either WPForms or Formidable Forms, depending on which plugin you’re using.

Integrating Cloudflare with WPForms and Formidable Forms

Simply click on either of these sections to expand.

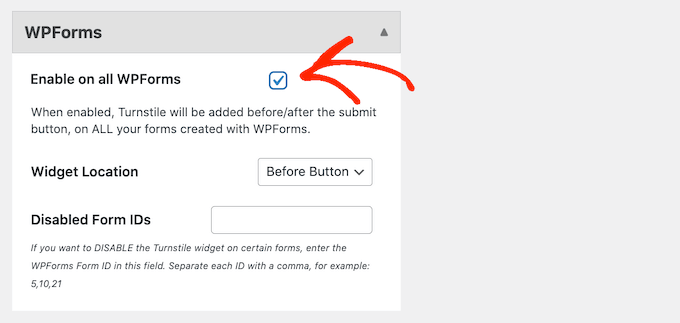
To add the CAPTCHA to all your forms, just check the ‘Enable on all…’ box.

Enabling CAPTCHA for WPForms

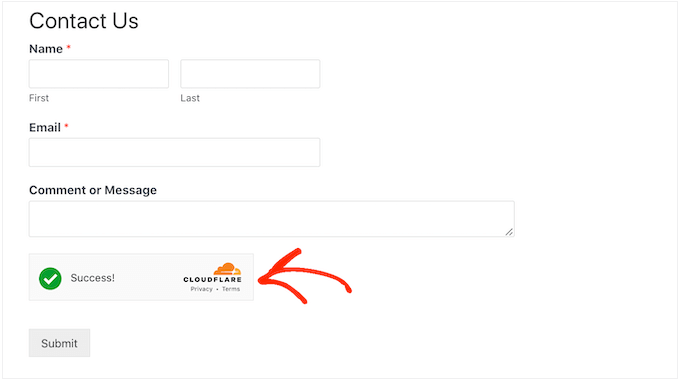
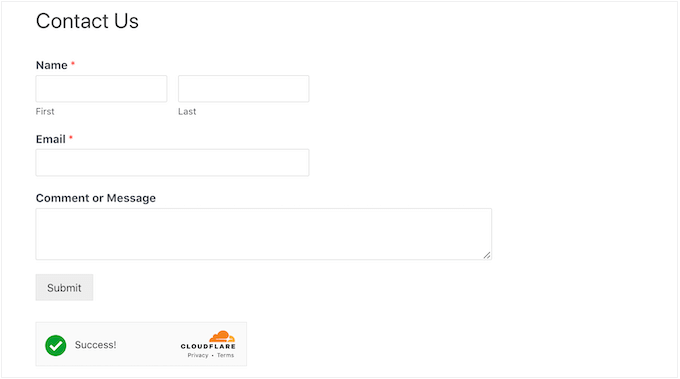
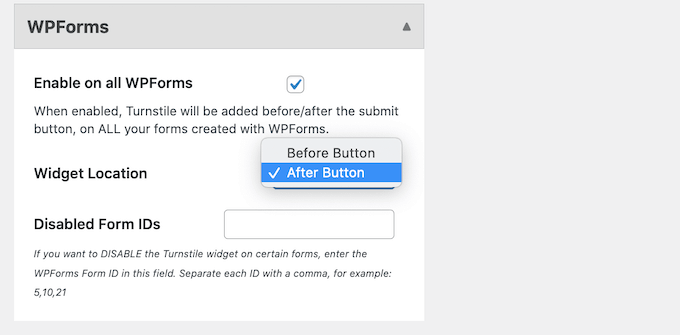
If you’re using a ‘Managed’ or ‘Non-interactive’ CAPTCHA, then you can change whether the loading and success animation appears before or after the form’s ‘Submit’ button.

In the following image, we’re using the ‘After button’ option.

Changing where the CAPTCHA appears in WPForms

To make this change, simply open the ‘Widget Location’ dropdown.

Then, choose either ‘Before Button’ or ‘After Button.’

Changing the location of the CAPTCHA widget

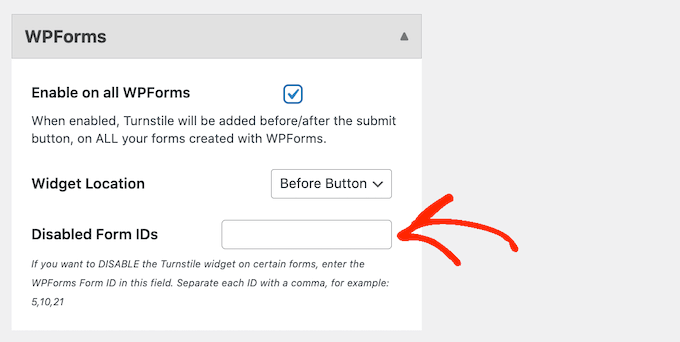
Some forms may not need a CAPTCHA. For example, you might disable the CAPTCHA for forms that aren’t getting many conversions, to see whether this improves your conversion rates. For more information, see our guide on WordPress conversion tracking made simple.

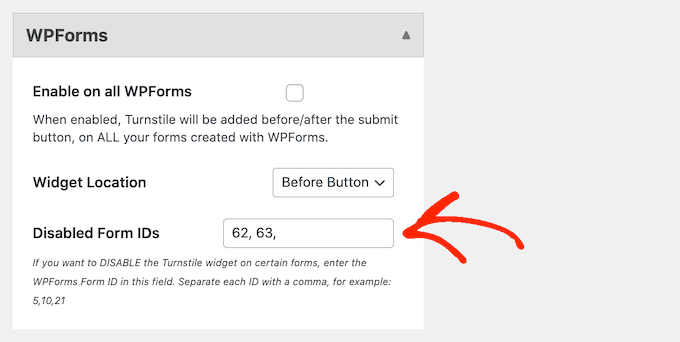
To remove the CAPTCHA, you’ll need to type the form’s ID into the ‘Disable Form IDs’ field.

Removing the CAPTCHA from WPForms

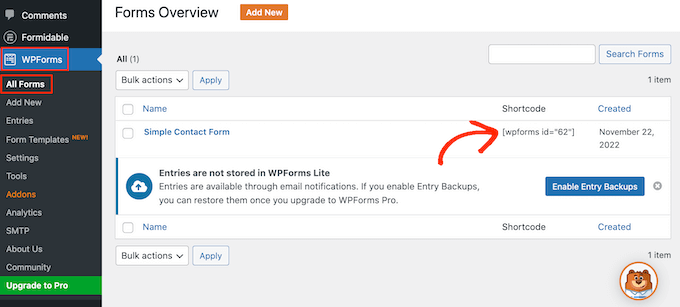
If you’re using WPForms, then you can get this ID by going to WPForms » All Forms.

The ‘Shortcode’ column shows each form’s ID. For example, in the following image the form ID is 62.

How to disable CAPTCHAs on your WordPress website

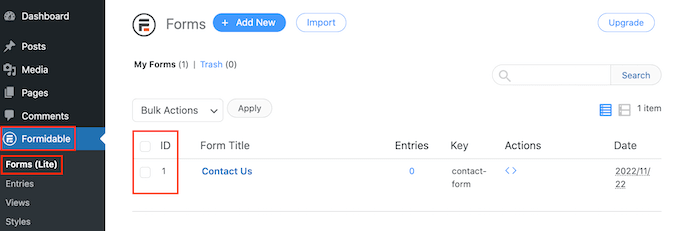
If you’re a Formidable Forms user, then head over to Formidable » Forms instead.

On this screen, find the form that you want to exclude and make a note of the number in the ‘ID’ column.

Forms, created using the Formidable Forms WordPress plugin

You can now add these IDs to the ‘Disable Form IDs’ field.

To remove the CAPTCHA from multiple forms, simply separate each ID with a comma.

Disabling the Cloudflare CAPTCHA for multiple forms

When you’re happy with how you’ve set up the integration, don’t forget to click on ‘Save Changes’ to store your settings.

Now if you visit any form created using Formidable Forms or WPForms, you’ll see the Cloudflare Turnstile CAPTCHA in action.

Bonus: Add Cloudflare Turnstile CAPTCHA to WooCommerce

Scripts and bots aren’t just bad news for WordPress blogs and websites. If you run an online store, then spambots and automated scripts might try to register with your store and place fake orders.

Every transaction comes with processing feeds, so fake orders can cost you a lot of money and make it difficult to grow your business.

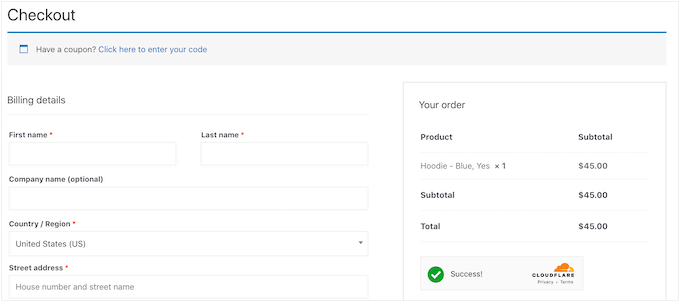
The good news is that Cloudflare Turnstile also integrates with WooCommerce. This allows you to protect all your eCommerce pages including the WooCommerce login, signup, and checkout pages.

The Cloudflare Turnstile CAPTCHA on the WooCommerce checkout page

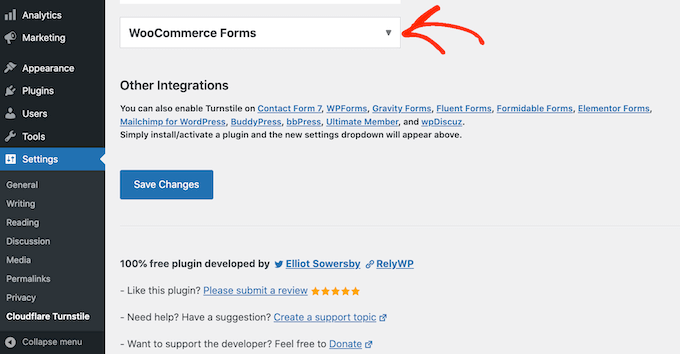
To add Cloudflare Turnstile to your WooCommerce pages, simply go to Settings » Cloudflare Turnstile.

Then, scroll to the ‘WooCommerce Forms’ section.

Adding CAPTCHAs to your WooCommerce forms

If it isn’t already expanded, then click on this section.

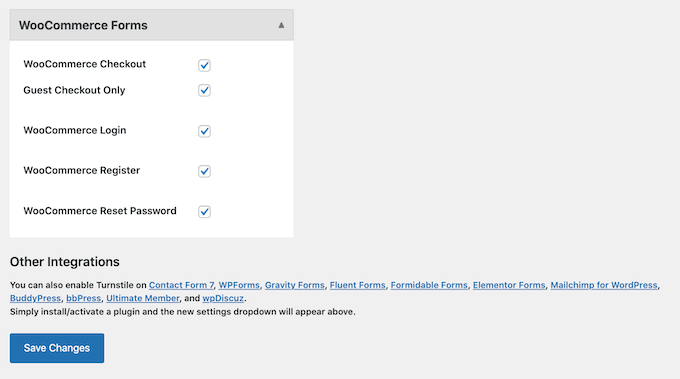
You’ll now see all the WooCommerce pages where you can add a Cloudflare CAPTCHA. Simply check the box next to each page that you want to protect.

Protecting your WooCommerce store with a CAPTCHA

After that, don’t forget to click on ‘Save Changes’ to store your settings. Now, if you visit any of your WooCommerce pages, you’ll see the Cloudflare Turnstile CAPTCHA.

We hope this article helped you learn how to add Cloudflare Turnstile CAPTCHA in WordPress. You can also go through our ultimate WordPress security guide and the best WordPress membership plugins.

If you liked this article, then please subscribe to our YouTube Channel for WordPress video tutorials. You can also find us on Twitter and Facebook.

The post How to Add Cloudflare Turnstile CAPTCHA in WordPress first appeared on WPBeginner.


December 15, 2022 at 05:34PM

Wednesday, December 14, 2022

7 Best Countdown Plugins for WordPress (Easy to Use)

Are you looking to add a countdown timer to their WordPress website?

Countdown timers are a great way to build anticipation, excitement, and create a FOMO effect on your website. There are many different countdown plugins that let you create a countdown timer, so which one should you use?

In this article, we’ll share the best countdown plugins for WordPress and explain the key features of each.

Best countdown plugins for WordPress

What is a Countdown Timer Plugin & When You Need it?

A countdown timer WordPress plugin allows you to display a timer that counts down to a specific time or date.

Savvy marketers use countdown timers to build excitement and create a sense of urgency among their customers. It helps them take advantage of the FOMO effect to boost conversions.

There are many plugins that allow you to add countdown timers to your website. These countdown timers can be divided into two groups:

Normal Countdown Timers

A normal countdown timer, sometimes called a static or fixed countdown timer, is what most people think of when they imagine a timer. This timer counts down to a certain fixed time. That might be the launch of a WordPress website, the end of a sale, or another event.

The countdown clock’s endpoint is the same for everyone and doesn’t change depending on who’s viewing it.

Evergreen Timer

An evergreen countdown timer, sometimes called a dynamic countdown timer, is specific to each user. It begins counting down when the person arrives on your site. For instance, they might have 4 hours to take advantage of a special offer.

This can be a powerful marketing technique as it lets you create a sense of urgency.

Note that most WordPress plugins are designed to run normal countdown timers, and only some let you run evergreen timers.

Having said that, let’s take a look at some of the best countdown timer plugins for WordPress.

1. OptinMonster

OptinMonster

OptinMonster is a powerful popup and lead generation plugin for WordPress. It allows you to convert abandoning website visitors into subscribers and paying customers.

With OptinMonster, you can create both static and evergreen countdown timers. You can make as many timers as you want and use different timers on different pages.

There are lots of ways you can position your countdown timer using OptinMonster. One of the best is to use a floating bar that sticks to the top or bottom of your page. That way, it stays visible at all times.

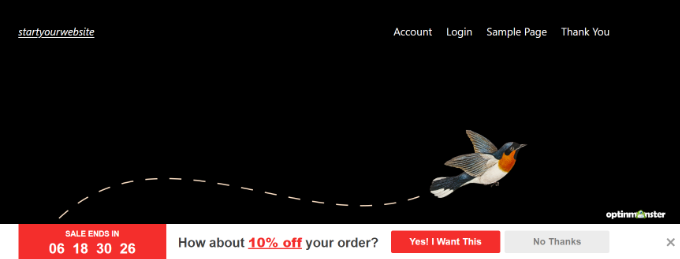
Here’s a countdown timer we created using the OptinMonster plugin:

Countdown timer preview

You’ll need the OptinMonster’s Pro plan or higher to use countdown timers.

They allow you to add countdown timers on popups, floating bars, full-screen welcome mats, scroll boxes, and inline widgets. On top of that, you can personalize the timers based on the user’s location, which page they’re on, where they’re visiting from, and more.

2. SeedProd

SeedProd website builder

SeedProd is the best WordPress website builder and landing page plugin. It is a great option if you want to add countdown timer animation to your landing pages.

SeedProd lets you easily set up a special landing page and put your site into coming soon or maintenance mode. Plus, it has a powerful drag-and-drop website builder. You can easily customize your WordPress theme without touching a single line of code.

With this plugin, you can create a normal and evergreen timer for your website. It offers lots of customization options, including pre-built templates for countdown timers.

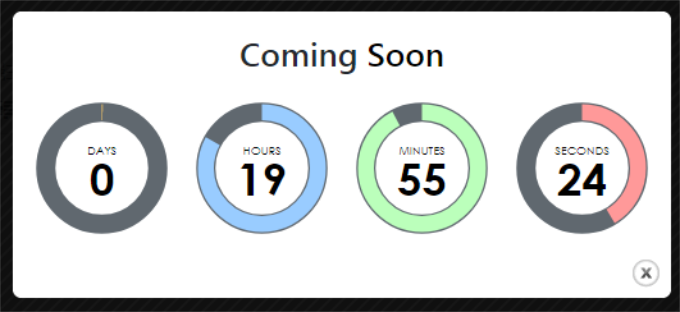
Here’s a countdown timer we created using SeedProd’s Coming Soon Page Pro plugin:

Number counter preview

For more details, you can see our guide on how to show a number count animation in WordPress.

3. Countdown Timer Ultimate

Countdown timer ultimate

Countdown Timer Ultimate is another good option to consider if you want to create a normal countdown timer. It’s a simple plugin that allows you to show timers on the entire website or specific to individual site visitors.

You can use Countdown Timer Ultimate to make as many countdown timers as you want, and you can customize how they look to some degree.

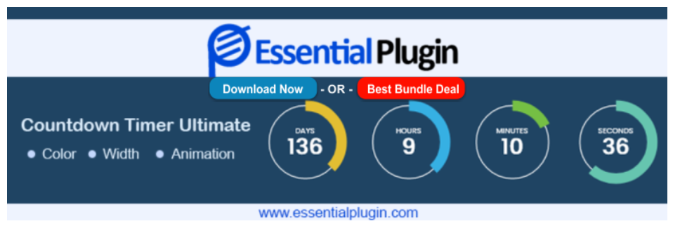
Here’s a preview of the countdown timer that you can create using the free version of the Countdown Timer Ultimate plugin:

Countdown timer ultimate preview

The pro plugin gives you more advanced options. These include being able to show specific text when the countdown expires and extra design features.

4. Countdown Builder

The Countdown Builder plugin page

Countdown Builder is a simple countdown timer with multiple different styles built in. These include circle countdowns, flip clock countdowns, and even a coming soon page.

You can place your timer within a post or page in the WordPress block editor by selecting the ‘Countdown’ block or using a shortcode. You can also choose to display it automatically on specific posts or pages.

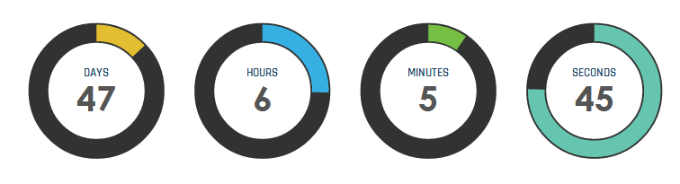
Here’s a preview of a countdown timer you can create using the plugin:

Countdown plugin timer preview

If you want, you can edit how your clock looks in detail, changing things like the font size, the labels, and the animation style. You don’t need to do this with CSS. There’s a built-in editor in the plugin.

5. Evergreen Countdown Timer

Evergreen countdown timer

Evergreen Countdown Timer is the next countdown plugin on our list. It lets you create evergreen countdowns, as you might expect from its name. You can also use it to create normal countdowns as well.

You can choose how the plugin detects visitors by a cookie or their IP address.

To add the timers to your page, you’ll need to enter a shortcode. You can simply copy and paste this from the Manager section of your countdown timer settings.

Once your timer hits zero, you can automatically redirect the visitor to a URL of your choice. For instance, you could send them to a registration page if you’re counting down to the launch of your new course.

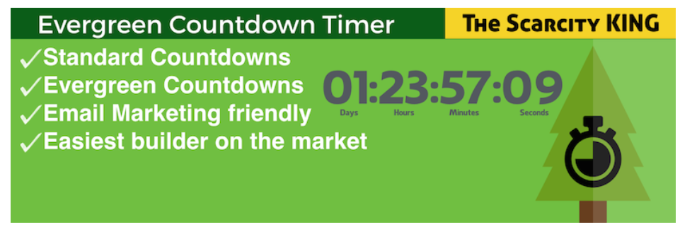
Here’s a timer we created using the Evergreen Countdown Timer plugin:

An example timer created using the Evergreen Countdown Timer

There’s a pro version of the plugin, which gives you lots of extra options. It also lets you choose more colors than just black or white for your timer.

With the Pro version, you can provide a countdown for available spots, such as seats or tickets. This could work well if you’re selling places for a paid webinar or another live event.

6. HurryTimer

Hurrytimer

HurryTimer is a free countdown timer plugin that lets you create both evergreen and regular timers. The evergreen timer uses both cookie and IP detection to display the right timer to each individual user.

You can also set up timers to run a countdown between two fixed dates. This is useful if you want to get ready for an upcoming sale in advance.

The timer works with WooCommerce, though you don’t have to run WooCommerce to use it. You can display your timer several times on the same page if you want to.

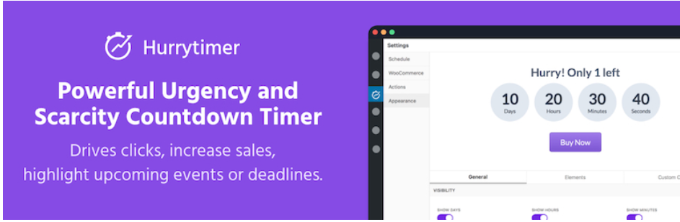
Here’s a timer we created using HurryTimer:

An example timer created using HurryTimer

If you have the Pro version, you can set up a recurring timer. This is a timer that runs according to the rules that you specify. For instance, you could have a timer that shows shipping cut-off times.

With the pro version, you can also create an announcement bar that sticks to the top or bottom of the screen to keep your timer visible.

7. Sales Countdown Timer

Sales countdown timer

Sales Countdown Timer is designed for WooCommerce stores. It helps show timers for sale events, promotional offers, and the latest campaigns.

You can easily integrate the plugin with your WooCommerce products. Plus, it offers different customization options. You can change the style of the timers, edit the message, change the colors in the timer clock, and more.

Besides that, the plugin also lets you choose the location of the timer, whether you’d like to make it sticky, and also select which type of product pages you’d like to show the countdown timer.

Here is a look at the countdown timer we created using the plugin:

Sales countdown timer example

We hope this article helped you learn about the best countdown plugins for WordPress. You may also be interested in our tips to recover WooCommerce abandoned cart sales, and our list of the best email marketing services to grow your sales.

If you liked this article, then please subscribe to our YouTube Channel for WordPress video tutorials. You can also find us on Twitter and Facebook.

The post 7 Best Countdown Plugins for WordPress (Easy to Use) first appeared on WPBeginner.


December 15, 2022 at 01:11AM