Monday, December 26, 2022

How to Highlight a Menu Item in WordPress

Do you want to highlight a menu item on your WordPress site?

Highlighting a menu item can really help you point user’s attention to a specific area on your menu. This can be great if you want to highlight the Pricing or Contact Us page on your website.

In this article, we will show you how to easily highlight a menu item in WordPress using CSS code.
How to Highlight a Menu Item in WordPress

Why Should You Highlight a Menu Item?

A navigation menu is a list of links pointing to important areas of your website. They are usually presented as a horizontal bar at the top of every page on a WordPress website.

This navigation menu is created by adding different menu items. For more details, you can see our article on how to add a navigation menu in WordPress.

A highlighted menu item can be a great way to capture the user’s attention to your most prominent call to action. The eyes of the visitors will be automatically drawn to the menu item when they visit your website.

WPForms highlighted menu icon

By adding this feature, you can create a user-friendly website and highlight important menu items that you want your users to check out.

That being said, let’s see how you can highlight a menu item in WordPress using CSS.

Method 1. Highlighting a Menu Item Using Full Site Editor

If you’re using a block-enabled theme then you’ll have the Full Site Editor instead of the older Theme Customizer. You can easily highlight a menu item in it as well.

First, head over to Appearance » Editor from the WordPress admin dashboard. This will direct you to the full site editor.

Here simply double-click the menu item you want to highlight, and then click the gear icon at the top. This will immediately open up that specific menu item’s ‘Settings’ block.
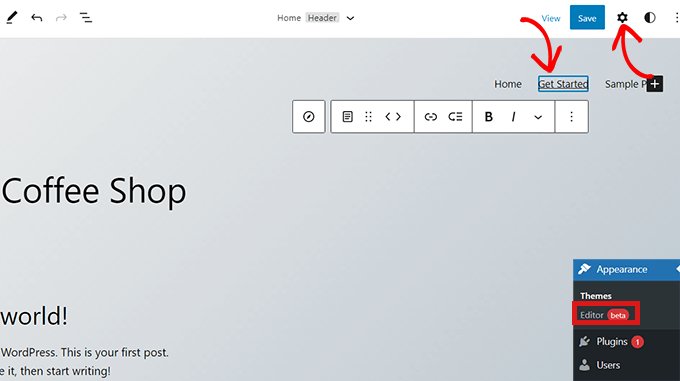
Select the menu item you want to highlight and then click the gear icon at the top

Simply scroll down in the ‘Settings’ block to the ‘Advanced’ tab and click the arrow icon beside it to expand the tab.

This will open up an ‘Additional CSS Class’ field where you simply have to write highlighted-menu in the field.
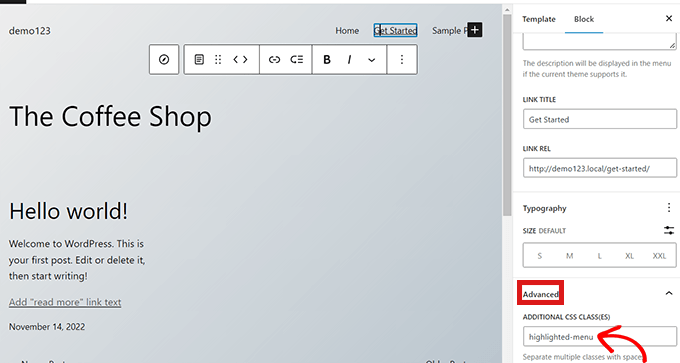
Write highlighted menu in Additional CSS Class field

Next, click the ‘Save’ button at the top of the page to store your changes.

After that, you will need to add a small bit of CSS to your theme for the highlight effect. You can either fix the missing Theme Customizer, or you can use a code snippet plugin to add CSS code.

How to Add CSS Snippets Using WPCode

For adding CSS in WordPress, we recommend using WPCode because it’s the easiest way to add any custom code to WordPress.

First you need to install and activate the free WPCode plugin. For more instructions, check out our guide on how to install a WordPress plugin.

Upon activation, navigate to Code Snippets » Add Snippet from your WordPress admin panel. Now click on the ‘Add New’ button.
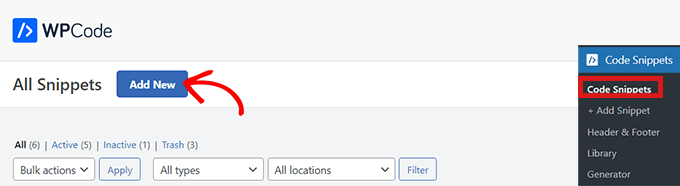
Go to Code Snippets and click Add New

This will take you to the ‘Add Snippet’ page.

Here, hover your mouse over the ‘Add Your Custom Code (New Snippet)’ option and simply click on the ‘Use Snippet’ button below it.
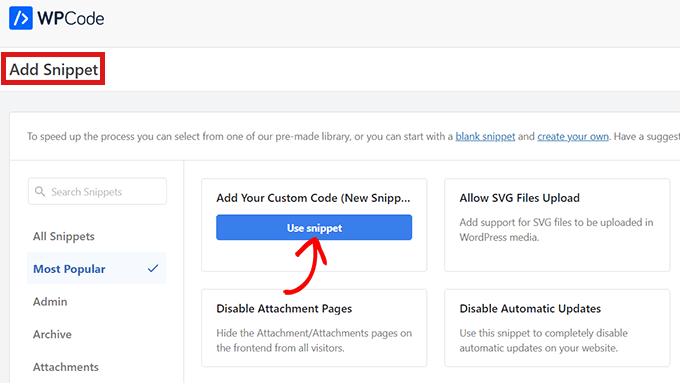
Click Use Snippet button

Now that you’re on the ‘Create Custom Snippet’ page, start by choosing a name and a ‘Code Type’ for your CSS snippet.

You can choose any name you like.
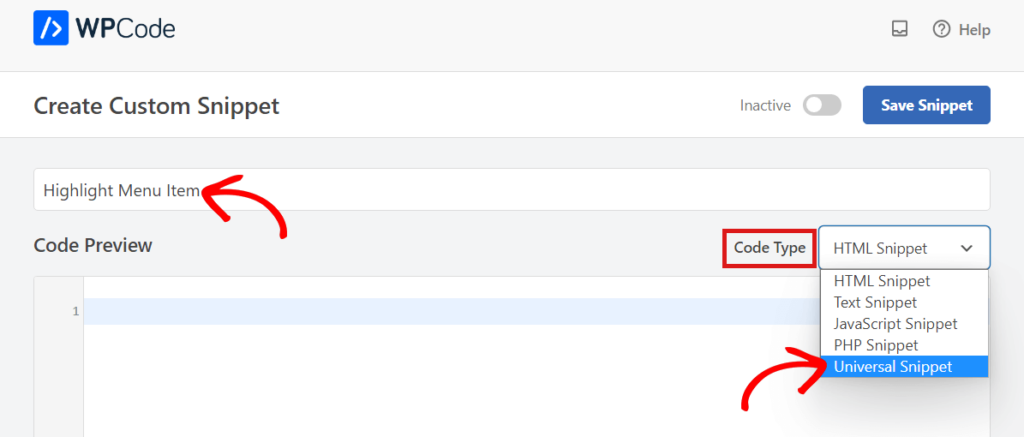
Select Universal Snippet as Code Type

Next, simply click the dropdown menu beside the ‘Code Type’ option on the right and then choose the ‘Universal Snippet’ option.

After that, copy/paste the following CSS code into the ‘Code Preview’.

<style type="text/css">
/* Highlighted menu */
.highlighted-menu
{
background: #d3d3d3;
border-radius: 35px;
padding: 0px 20px;
line-height: 50px;
}
</style>

Be sure to include the style tags, as you see on Lines 1 and 10 below.
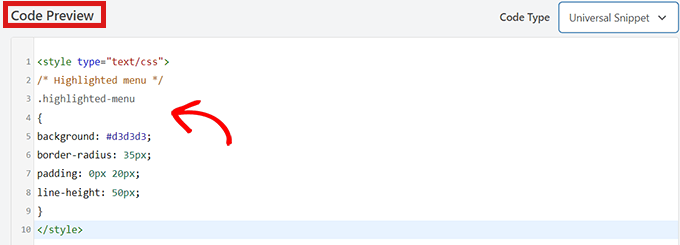
Paste code

After pasting the code, go to the ‘Insertion’ section by scrolling down.

Here simply choose the ‘Auto Insert’ mode so that the code can be automatically executed on your entire website.
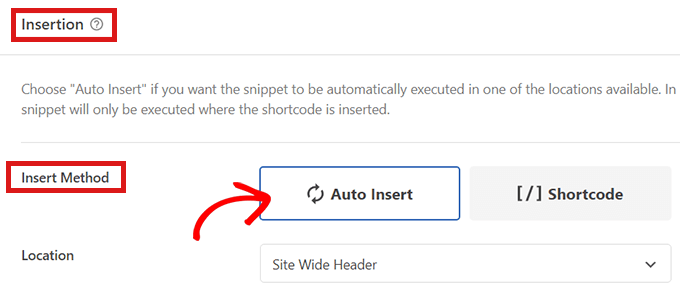
Choose Auto Insert as insert method

Now, go to the top of the page and toggle the switch from ‘Inactive’ to ‘Active’.

Then simply click the ‘Save Snippet’ button.
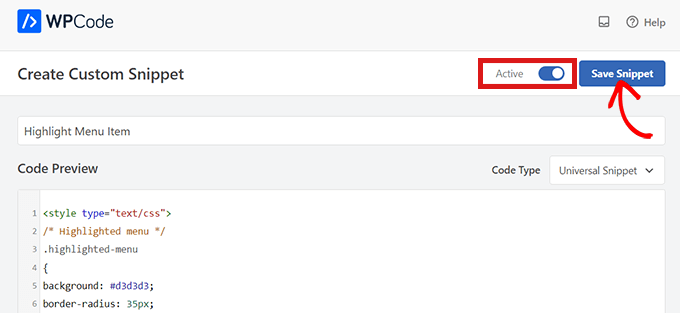
Save your highlight menu item snippet

You have now successfully highlighted a menu item in WordPress using a full site editor.

This is how your menu item will look after you add the CSS code.
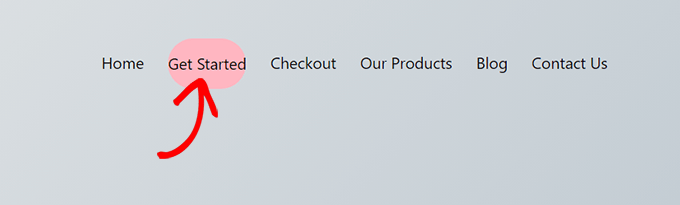
Highlighted menu item

How to Access the Theme Customizer Using a Block Theme

If you want to use the Theme Customizer and use an FSE theme, then simply copy and paste the URL below into your browser. Make sure to replace ‘example.com’ with your own site’s domain name.

https://example.com/wp-admin/customize.php

Here you simply have to click the ‘Additional CSS’ tab.
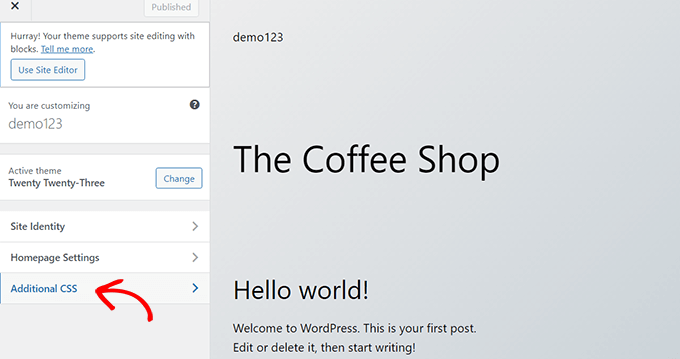
Click Additional CSS tab

Now, expand the ‘Additional CSS’ field, and then just copy/paste the following code snippet.

/* Highlighted menu */
.highlighted-menu
{
background: #FFB6C1;
border-radius: 35px;
padding: 0px 20px;
line-height: 50px;
}

After that, simply click the ‘Publish’ button at the top.
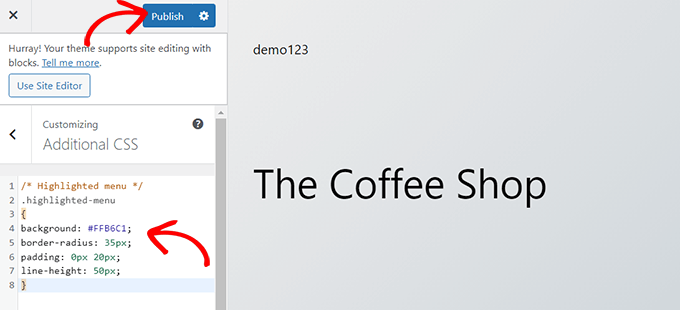
Paste your CSS code

That’s all it takes to highlight a menu item.

It should look something like this on your website when finished:

Highlighted menu item

Method 2. Highlighting a Menu Item Using Theme Customizer

If you’re using a non-block-enabled theme, then you’ll probably have a theme customizer enabled by default. Highlighting a menu item in a theme customizer is a fairly simple process.

First, simply go to Appearance » Customize in your WordPress dashboard to launch the theme customizer. Once the theme customizer opens up, simply click on the ‘ Menus’ tab.
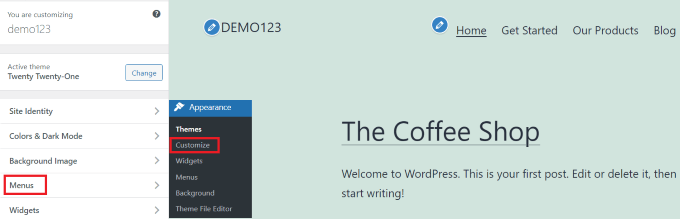
Go to Menu in Theme Customizer

Once you’re in the ‘Menus’ section, simply click on the gear icon at the top right to display advanced properties.

Now, simply check the ‘CSS Classes’ box.
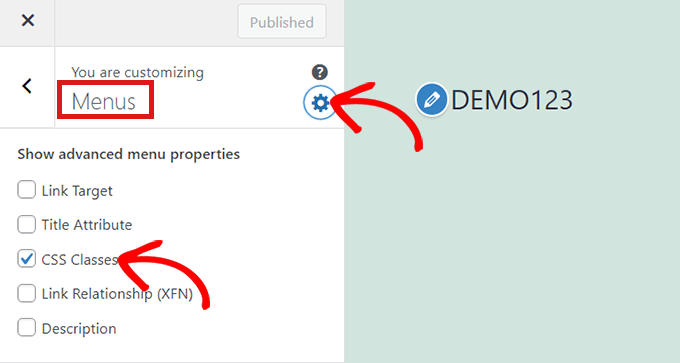
Check CSS Classes box

After that, scroll down to the ‘Menus’ section.

If you have multiple menus on your website, simply click on the menu whose menu items you want to highlight.
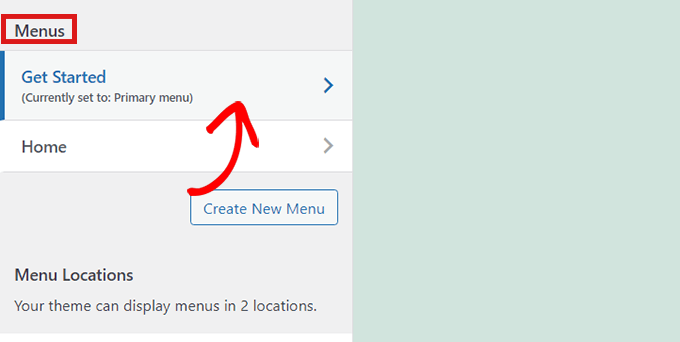
Select a menu

This will open up a new tab where you can select the menu item that you want to highlight. It could be ‘Get Started’ like in our example, or it might be your contact form page or the link to your online store.

Simply click on the menu item of your choice which will expand it to display some options. Click into the ‘CSS Classes’ field.

All you have to do is write 'highlighted-menu' in the field. You can add this CSS Class to multiple menu items, and they will all be highlighted.
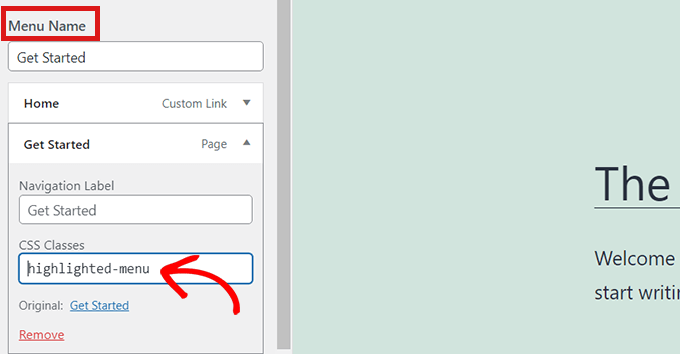
Write highlighted menu as CSS Class

Next, simply go to the ‘Additional CSS’ tab in the theme customizer.

Now, simply copy and paste the following CSS code.

/* Highlighted menu */
.highlighted-menu
{
background: #FFB6C1;
border-radius: 35px;
padding: 0px 20px;
line-height: 50px;
}

Congratulations! You’ve successfully highlighted a menu item.

Note: Your theme might not have an ‘Additional CSS’ field in the theme customizer. If not, check theme settings to find out how to add custom CSS. If you can’t find it, you might want to contact the developer or add it using WPCode.
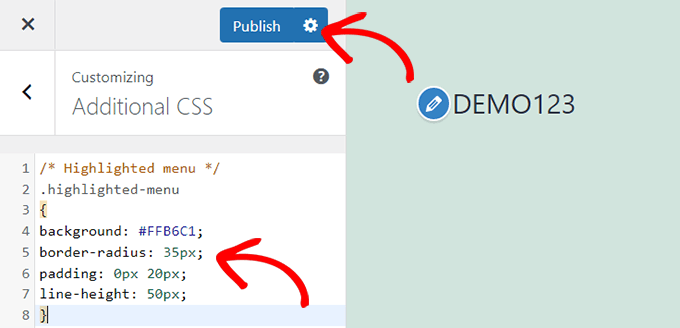
Paste CSS code in Additional CSS tab

Customizing Your Menu Item Highlight

Now that you have highlighted the menu item, you can adjust the CSS code to customize your menu item the way you like it.

For example, you can change the background color of your menu item.
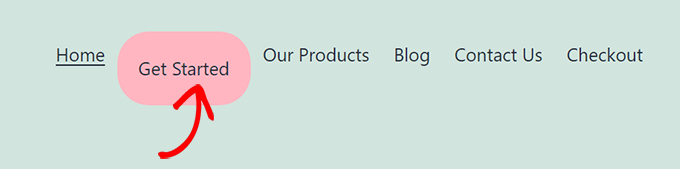
Pink highlighted menu item

Simply look for the following code in the CSS snippet, you just pasted.

background: #FFB6C1

After locating it, you can simply replace the pink color code number with the hex code of any color of your choice:

background: #7FFFD4;

Above is the hex code for aquamarine.
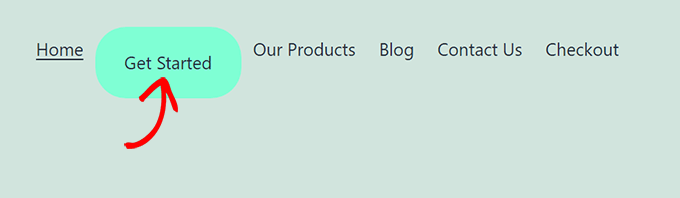
Blue highlighted menu item

You can check out our guide to easily add custom CSS for other ideas on how to customize the highlighted menu item.

After you’re satisfied with your choices, simply click on the ‘Publish’ button in the theme customizer or ‘Save Snippet’ in WPCode to save your changes.

We hope this article helped you learn how to highlight a menu icon in WordPress. You may also want to check out our beginner’s guide on how to style WordPress navigation menus or our expert picks of the must-have WordPress plugins to grow your site.

If you liked this article, then please subscribe to our YouTube Channel for WordPress video tutorials. You can also find us on Twitter and Facebook.

The post How to Highlight a Menu Item in WordPress first appeared on WPBeginner.


December 26, 2022 at 04:15PM

Saturday, December 24, 2022

How to Show Personalized Content to Different Users in WordPress

Do you want to show different content to different users in WordPress?

Sometimes you may want to show custom content to users from specific locations, on specific dates, or under other conditions. Website personalization is not available in WordPress out of the box. However, there are simple and easy tools you can use to handle this.

In this article, we’ll show you how to easily show personalized content to different users in WordPress.

How to show personalized content to different users in WordPress

Why Show Different Content to Users in WordPress?

Normally, when you publish content on your WordPress website, it just becomes available to everyone. What if you wanted to show a different version of the content to specific users?

For instance, you may want to offer free shipping to customers in a specific geographic location or show different content to users coming from a particular landing page.

One way to deal with this is by making a membership site and restricting access to content based on a user’s profile. However, not everyone wants to require user login to offer personalization.

That’s where WordPress website personalization solutions can help.

You can use smart conditions to add content personalization on your blogs, product personalization on your online store, and dynamic text replacement on your landing pages.

These conditions can include specific user interactions, their geographic location, time of day, specific pages they’re visiting, specific traffic referrer source, past behavior, and more.

That being said, let’s take a look at how to show different content to different users in WordPress. You can use the links below to go directly to the method you want to use.

Method 1. Showing Different Content to Users Using OptinMonster (Website Personalization Made Easy)

OptinMonster is the best lead generation and conversion optimization tool on the market. It comes with powerful targeting rules which allow you to show personalized campaigns to users based on a large set of display rules.

This method is recommended for all users because it gives you the ability to design your content and comes with more powerful targeting rules. It also works with email marketing tools and third-party apps.

First, you’ll need to sign up for an OptinMonster account. It is a paid tool, and you’ll need at least a Pro or Growth plan to access all targeting features.

Simply visit the OptinMonster website and click the ‘Get OptinMonster Now’ button to set up an account.

OptinMonster

Next, you need to install the OptinMonster plugin on your WordPress site. For more details, see our step-by-step guide on how to install a WordPress plugin.

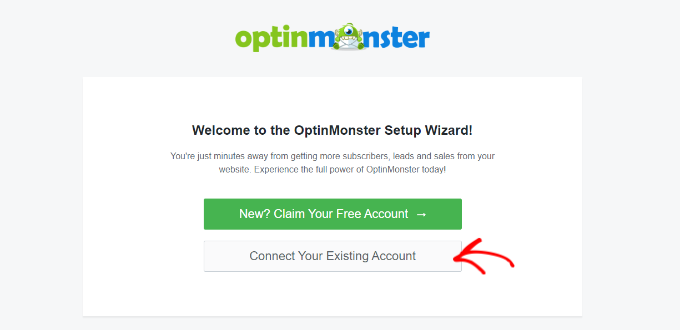
Upon activation, you will see the OptinMonster setup wizard in the WordPress admin panel. Next, you need to click the ‘Connect Your Existing Account’ button to connect your WordPress site to your OptinMonster account.

Connect your existing account

After that, a new window will open.

Simply click the ‘Connect to WordPress’ button to move ahead.

Connect OptinMonster to WordPress

Design The Content You Want to Show to the Users

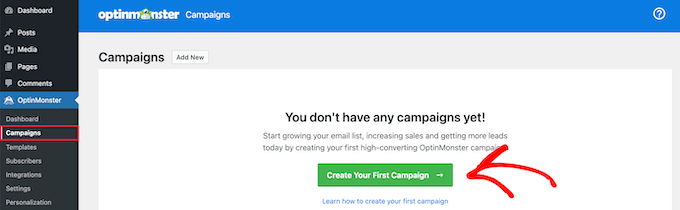
Once connected, you can head to OptinMonster » Campaign from your WordPress dashboard and click the ‘Create Your First Campaign’ button.

Create first OptinMonster campaign

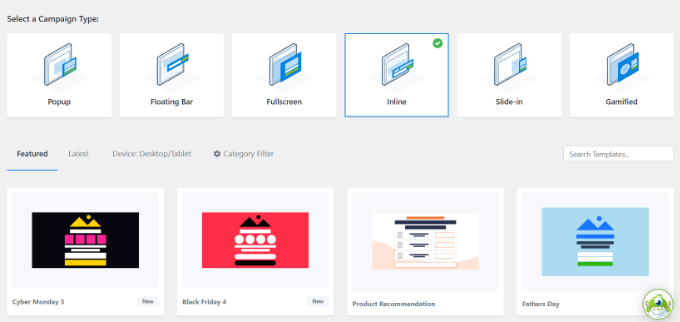
This will take you to the OptinMonster website, where you will be asked to choose a campaign type and template.

OptinMonster offers different campaign types that you can use to show various types of content or targeted messages to your users. This includes lightbox popups, floating bars, fullscreen, inline widgets, slide-in popups, and gamified campaigns.

For instance, if you want to show dynamic content inside a WordPress post or page, then you can choose the Inline campaign type.

Select an inline template

Each campaign type has dozens of templates to choose from. Simply click to select and use a template.

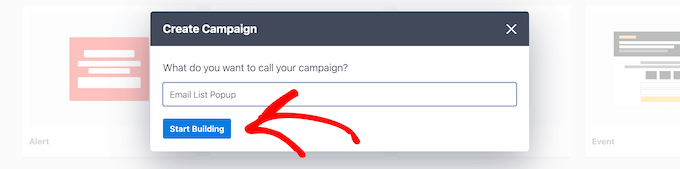
After that, you will be asked to enter a name for this campaign and click the ‘Start Building’ button.

Click start building

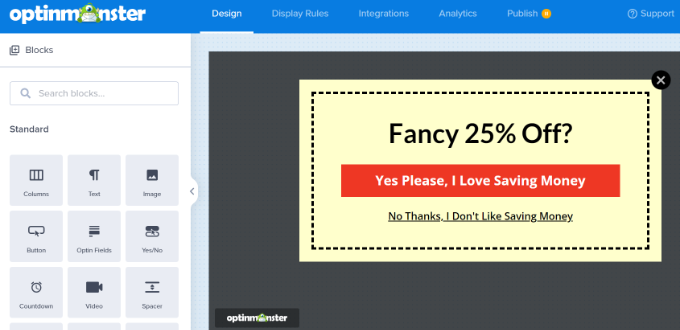
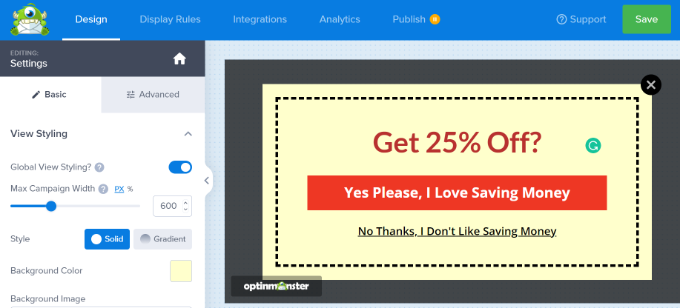
Next, you’ll enter OptinMonster’s campaign builder interface. It is a drag-and-drop tool where you can design your campaign with a live preview.

Simply drag new elements from the menu on your left and drop them onto the template. Plus, you can click on an element in the preview to edit it.

Edit your campaign template

OptinMonster also connects with all top email marketing services so you can show an email sign-up form.

You can use the campaign builder to create campaigns to add any type of content, such as a coupon code, free shipping offer, smart product recommendations, or anything you want.

Once you are done with the design of your campaign, you can click on the ‘Save’ button at the top to store your changes.

Save your popup changes

You can always edit your design to match your display rules. We will show you a few design examples tailored for different display scenarios in the next step.

Setting up Display Rules for Campaign

This is the part where you set up the display rules to decide when to show your campaign.

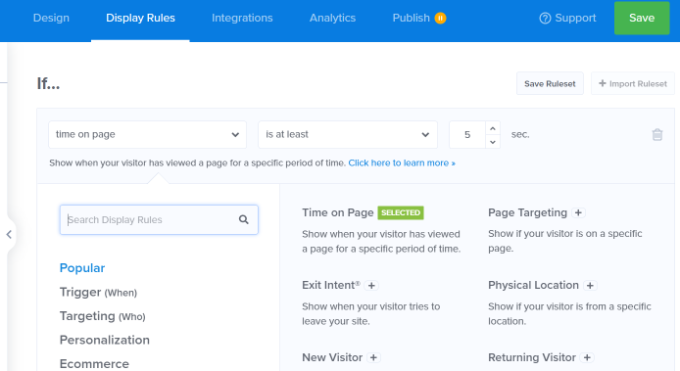
Inside the OptinMonster builder interface, switch to the ‘Display Rules’ tab.

It allows you to create smart rule sets, and choose from a ton of targeting options.

Select display rules

First, you need to choose the conditions to match. There are plenty of options here. Let’s take a brief look a each one of them.

1. Time-based Triggers

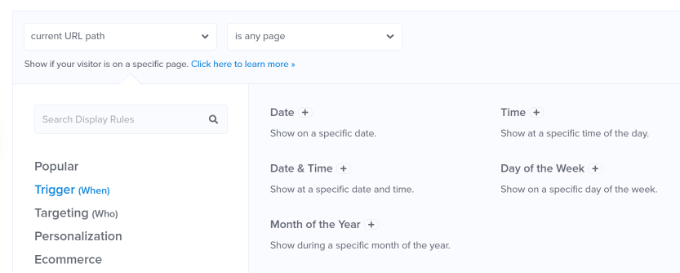
These triggers allow you to set display rules based on time or date. You can show your campaign content at a specific date, time, or day of the week.

Trigger on specific date and time

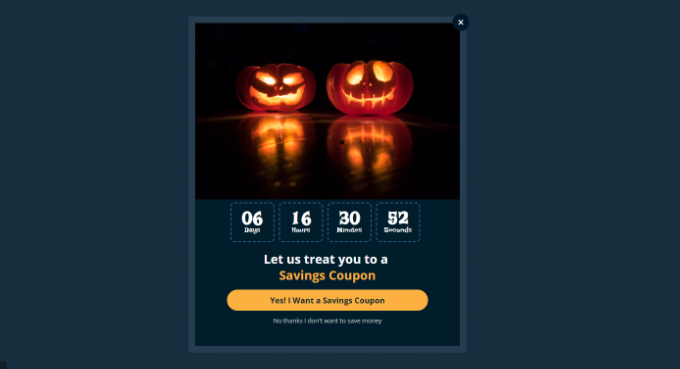
These triggers allow you to show custom messages designed for specific dates and times.

For instance, you can set OptinMonster to show a flash sale coupon on holidays or display a message on special events.

Halloween special popup preview

2. Targetting Users Matching Specific Criteria

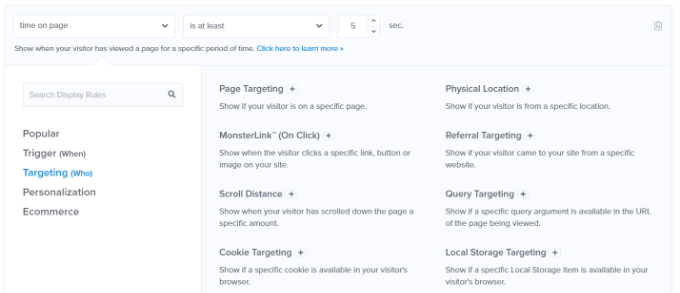
The targeting section lets you set display rules based on smart recognition technology.

For instance, you can show a campaign to users coming from a specific website, referral, landing page, or geographic location. You can also target based on cookies, ad blockers, and JavaScript variables.

Select targeting display rule

As an independent publisher, you may want to ask visitors to support you by disabling the AdBlock software. You can show a message only to the users with AdBlock software installed.

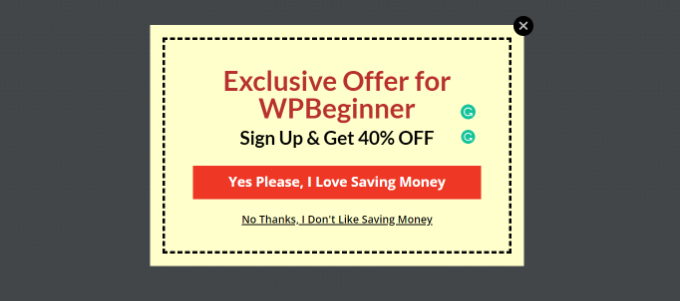
Another great usage is giving special offers to visitors from a specific URL. For instance, you may want to offer an exclusive discount to users coming from an affiliate partner website.

Popup for affiliate users

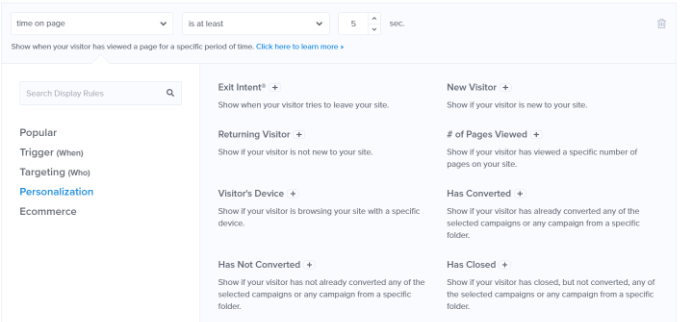
3. Personalization Targeting

OptinMonster allows you to set personalized display rules based on user behavior, too.

You can show custom campaigns to new users, returning visitors, those on specific devices, users who have already converted, not converted, have seen another campaign, visited a page, and more.

Select personalization display rule

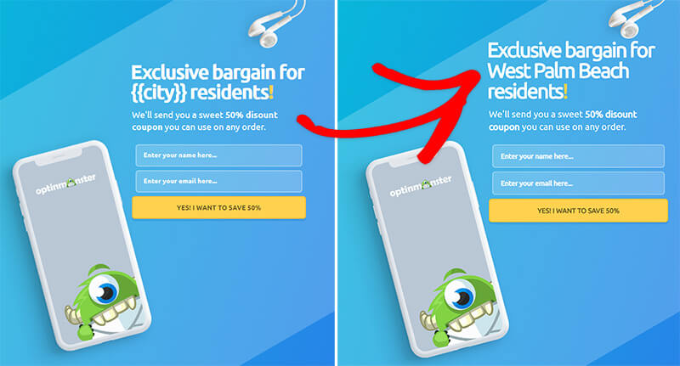
You can also use OptinMonster’s smart tags feature to display a user’s name, location, and more to show them even more personalized content.

This allows you to tailor the content to specific users.

Smart tags smart content example personalization

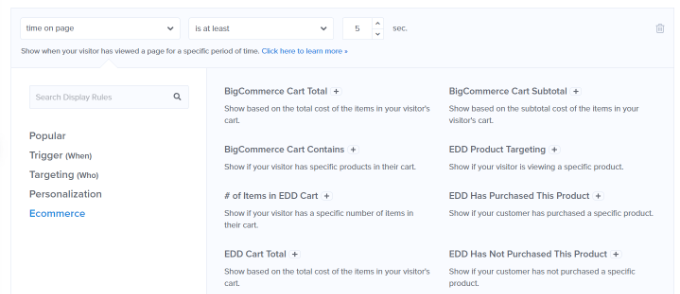
4. Ecommerce Display Rules

These triggers are explicitly made to boost conversions on eCommerce websites.

You can show content to users based on their shopping behavior. OptinMonster supports WooCommerce, BigCommerce, and Shopify eCommerce platforms.

Ecommerce display rules

Ecommerce targeting allows you to show content based on what products users are viewing, the number of products in their cart, the total cart cost, and more.

Bonus: Need more help to reduce cart abandonment on your online store? See our tips on how to recover abandoned cart sales in WooCommerce for some more ideas.

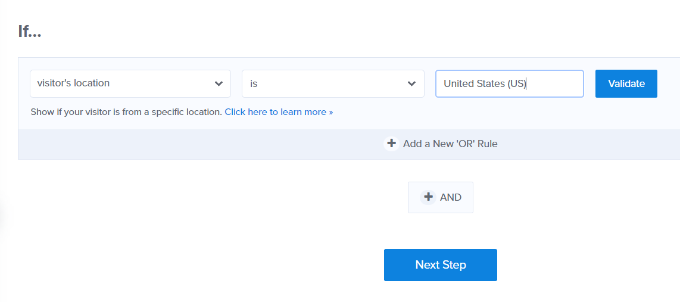
Once you select a condition, you will then be asked to select what to look for. For instance, if you choose a geographic location, then you will be asked to select locations that need to be matched.

Add user location for targeting

After setting up your condition, you can validate it to ensure it is set up correctly and then click on the ‘Next Step’ button.

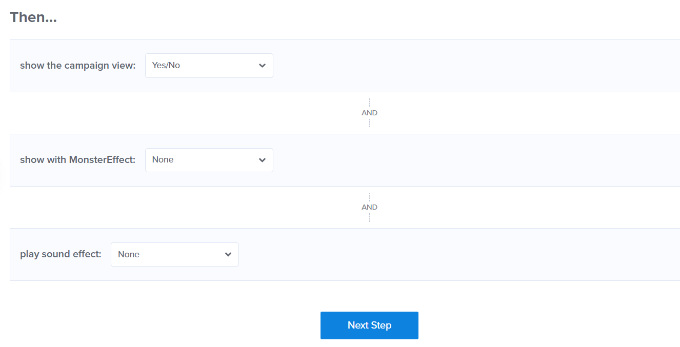
Next, you will be asked to select the campaign view. Depending on your campaign, you can choose from the optin view (the main campaign), success view, or Yes/No view.

Show the campaign view

There are also options to add a MonsterEffect and sound effects for your campaign. Once that’s done, click on the ‘Next Step’ button to continue.

You’ll now see a summary of your display rule set. If you want, you can add more rules or simply click on the ‘Save’ button at the top to store your changes.

Publish Your Content and Add it to Your Website

OptinMonster also makes it super easy to display campaigns on your website.

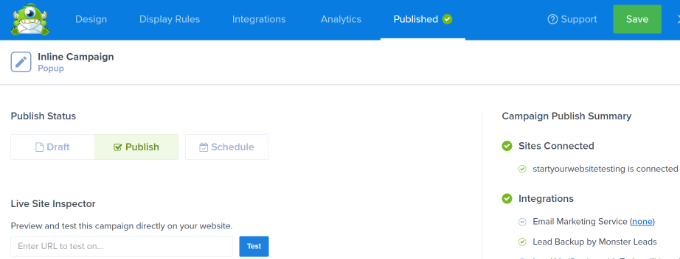
Simply switch to the Publish tab inside the builder and change the ‘Publish Status’ to Publish.

Publish your inline campaign

Don’t forget to click the ‘Save’ button to store your changes.

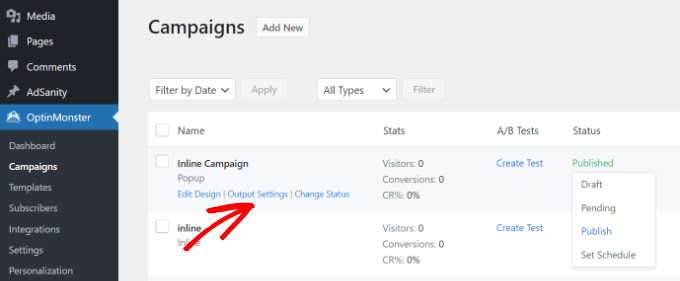
You can now go back to your WordPress site and visit OptinMonster » Campaigns page and you’ll see your new campaign listed there.

Change the status of your campaign

If the ‘Status’ of the campaign is shown as ‘Pending,’ then click the ‘Change Status’ option under the campaign name. From here, simply select the ‘Publish’ status from the dropdown menu.

You can now test it by visiting your website while matching the conditions you set in the display rules.

Note: Clear your WordPress cache and browser cache to make sure you don’t load a cached page. You may also want to use the Incognito mode in your browser to mimic the behavior of a new user.

OptinMonster’s display rules give you many powerful options to show different content to users in WordPress without modifying your templates and code.

Essentially, it lets you leverage additional digital real estate on your site to increase your sales and conversions. With their A/B testing technology, you can easily test and improve your campaigns to drive better results.

Method 2. Showing Different Content to Users using a Plugin

This method is recommended if you want to change the entire content of a post or page in WordPress or show different variations of the same content to your users.

First, you need to install and activate the If-So Dynamic Content plugin. For more details, see our step-by-step guide on how to install a WordPress plugin.

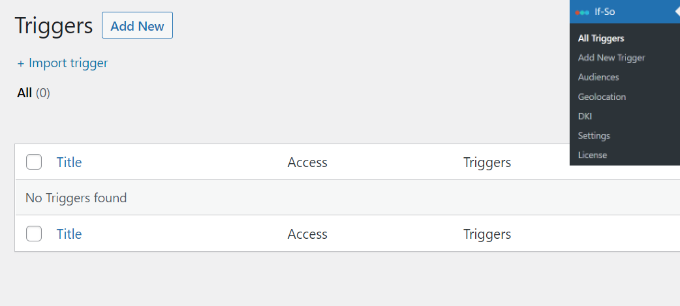
Upon activation, you need to visit If-So » All Triggers page and click on the ‘Add New’ button.

Add a new trigger

This will bring you to the page where you can create a trigger and add the content.

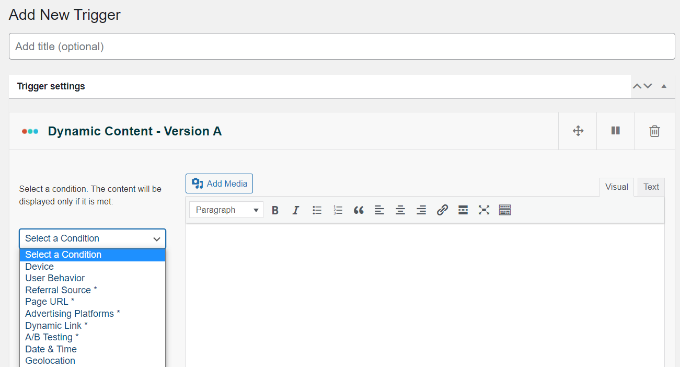
First, you can enter a name for the trigger at the top. Next, you’ll see a ‘Select a Condition’ dropdown menu to the left.

Add a trigger name and select a condition

The plugin offers a number of conditions based on time, date, URL, geographic location, IP address, and more.

After choosing the trigger, you can add the content you want to show users when that condition is matched.

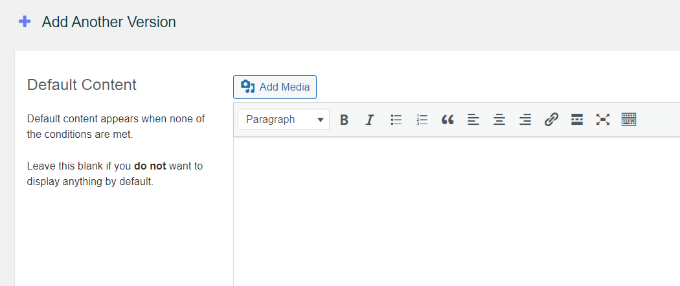
Below that, you can add another version and use another set of rules to display different content.

Add another version of trigger

Lastly, you’ll see the default content area. This is the content you want to show the users who don’t qualify for the conditions you set above.

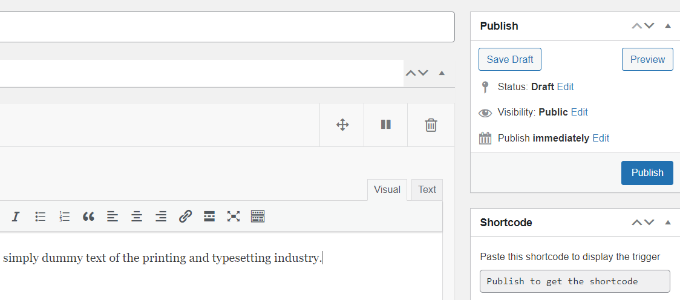
Once you are finished, don’t forget to click the ‘Publish’ button for your trigger.

Publish the trigger

After publishing the trigger, you’ll see the shortcode meta box appear. Simply copy the shortcode shown on the screen.

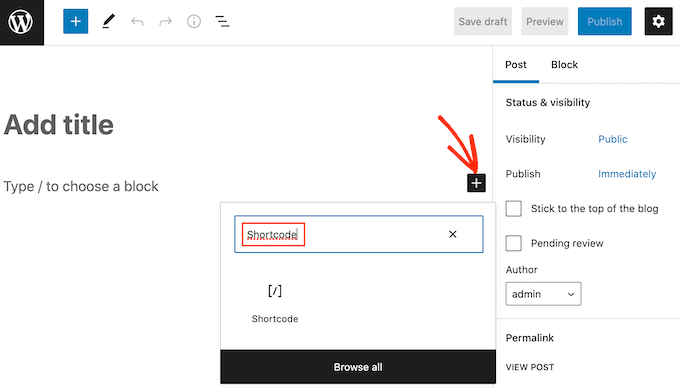
You can now edit any post or page and add the shortcode in your content where you want to display the trigger.

Adding a shortcode block to WordPress

You can now save and publish your post or page.

After that, visit your website to see the trigger in action. If you match the required conditions, then you’ll see the message you set for those conditions.

Otherwise, you’ll see the default message you added for the trigger.

View your trigger preview

Method 3. Showing Personalized Content in WooCommerce using FunnelKit

While the above solutions help you display personalized content to different users, they will not be able to do deep personalization when it comes to adjusting WooCommerce offers.

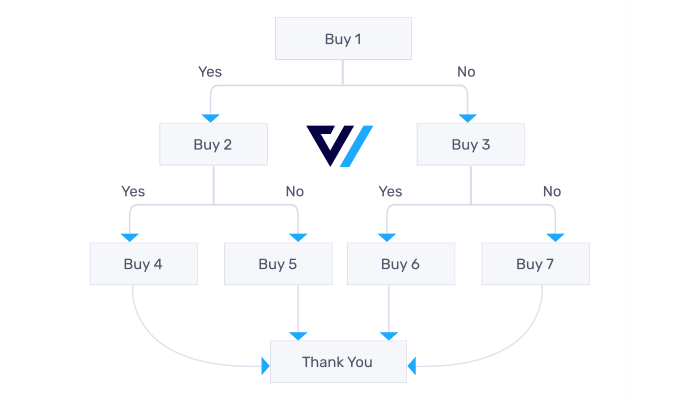
If you run an online store using WooCommerce, then you may want to show dynamic offers such as relevant upsells based on various cart conditions.

This is where you need FunnelKit, it is one of the most powerful WooCommerce plugins to grow your sales.

It lets you add custom one-click upsells or order bumps in your store, so you can increase profits without increasing traffic or ad spend.

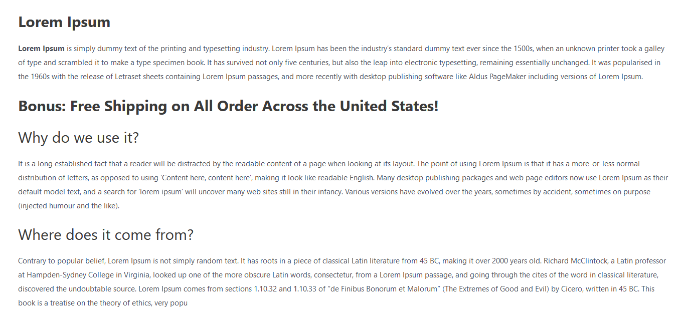
WooFunnels Order Bump for WooCommerce

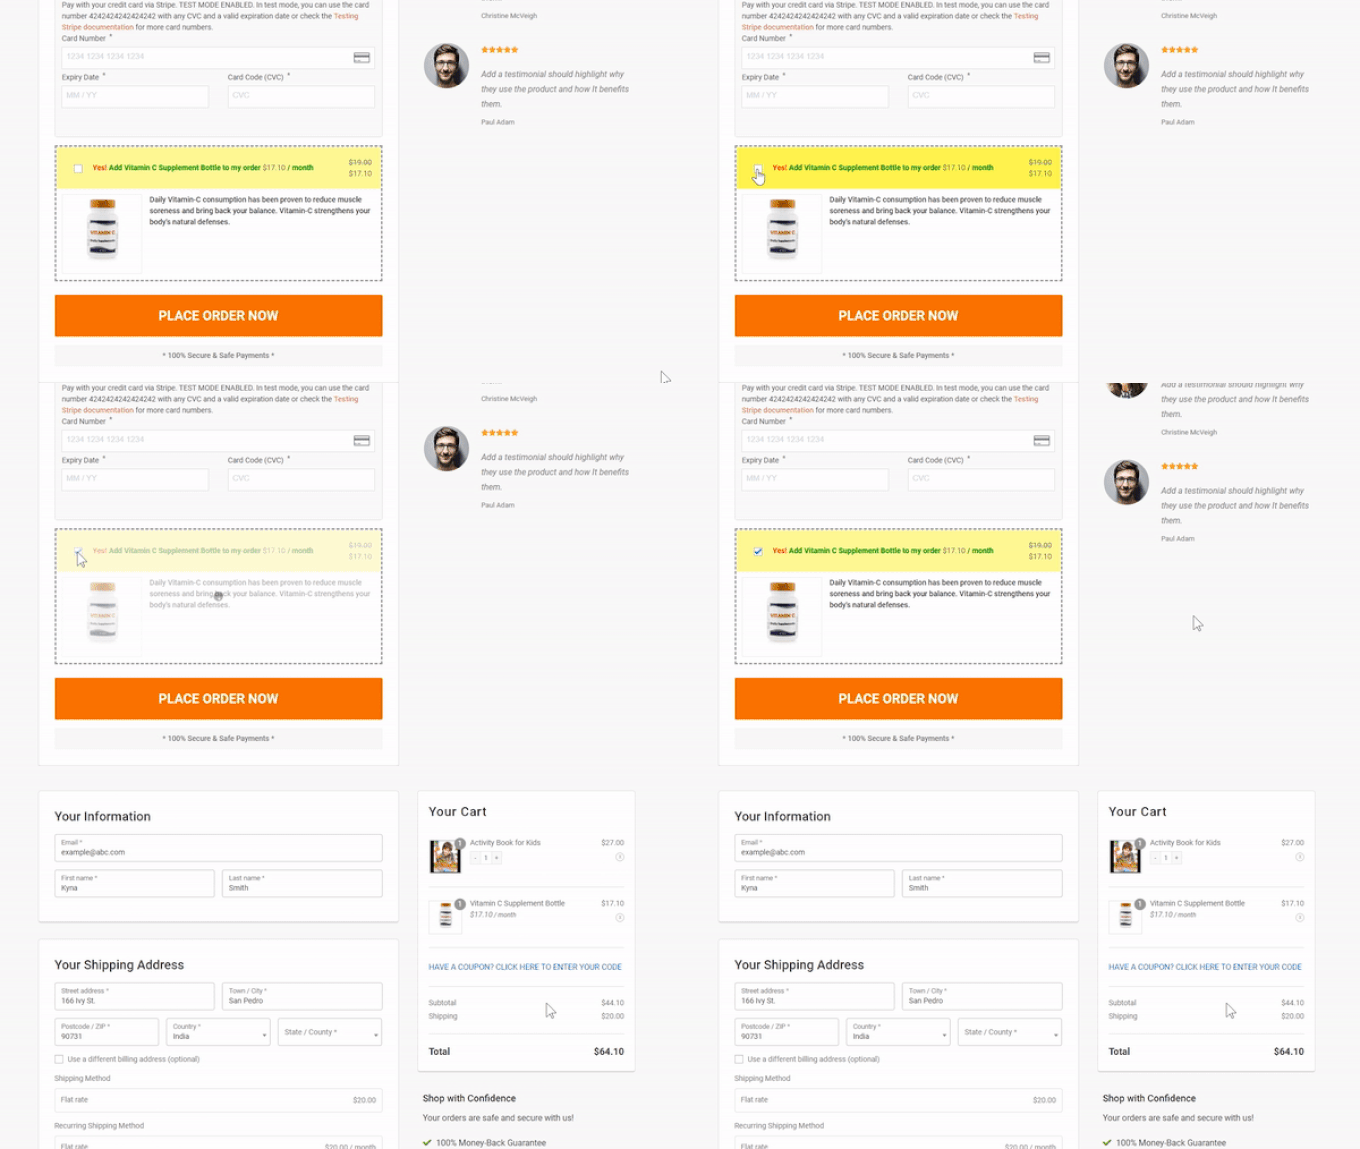
You can use their Dynamic offers to show custom upsells and make any personalization rules that you want.

Dynamic Offers and Upsells for WooCommerce

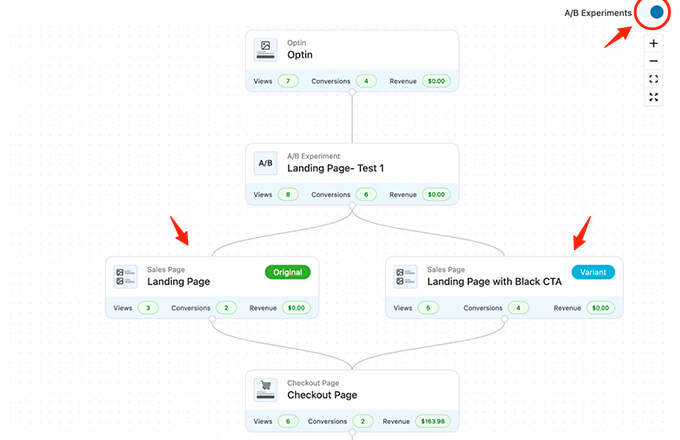
FunnelKit also comes with built-in A/B testing, so you can show different headlines, checkout designs, buttons, and more in less than 5 minutes.

WooFunnels A/B Testing for WooCommerce

Basically if you’re running a WooCommerce store and want to do content personalization than you need FunnelKit. A lot of users use FunnelKit for cart personalization alongside with OptinMonster for overall website personalization.

We hope this article helped you learn how to easily show different content to different users in WordPress. You may also want to see our guide on how to track conversions on your WordPress site like a pro and our list of the best marketing automation tools for small businesses.

If you liked this article, then please subscribe to our YouTube Channel for WordPress video tutorials. You can also find us on Twitter and Facebook.

The post How to Show Personalized Content to Different Users in WordPress first appeared on WPBeginner.


December 24, 2022 at 04:00PM

Friday, December 23, 2022

13 Best Gumroad Alternatives (Cheaper + More Powerful)

Are you looking for a Gumroad alternative to create an online store?

Gumroad is a popular eCommerce platform that lets you sell digital products, online courses, and membership-only content. However, their service isn’t flexible, and they recently increased their fees by quite a lot.

In this article, we’ll share the best Gumroad alternatives and competitors that you can use to sell digital products and make money online without the high costs.

Best Gumroad Alternatives - Cheaper and More Powerful

Why Do You Need an Alternative to Gumroad?

Gumroad is a self-hosted eCommerce platform where you can upload your products and start selling. You don’t need a hosting service, a payment service, or an online store to sell digital goods.

While it is beginner-friendly, there are several drawbacks to using Gumroad.

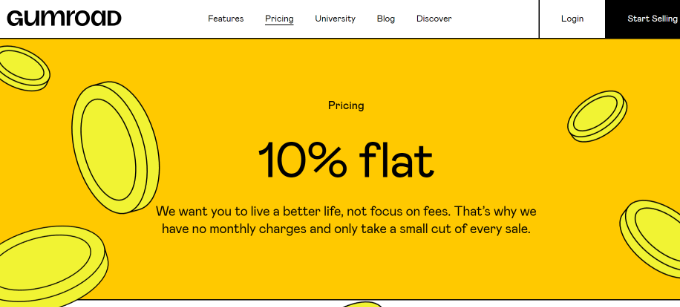
For starters, the platform now charges a flat 10% fee for every sale. These charges are in addition to the transaction fee.

Previously, the percentage would decrease as your revenue grew. However, the new pricing change takes a significant amount of your income.

For creators, this means aside from your local government taxes, now you’re going to be paying a Gumroad tax which simply isn’t acceptable.

Gumroad pricing

Besides that, Gumroad doesn’t offer much flexibility compared to other eCommerce solutions.

For instance, you don’t get features for cross-sell or upsell products to boost sales. If you’re selling online courses, then Gumroad is at a disadvantage as it doesn’t include a learning management system (LMS).

Other alternatives to Gumroad provide more features for personalizing your online store and providing a better customer experience.

That said, let’s look at some of the best Gumroad alternatives.

1. MemberPress

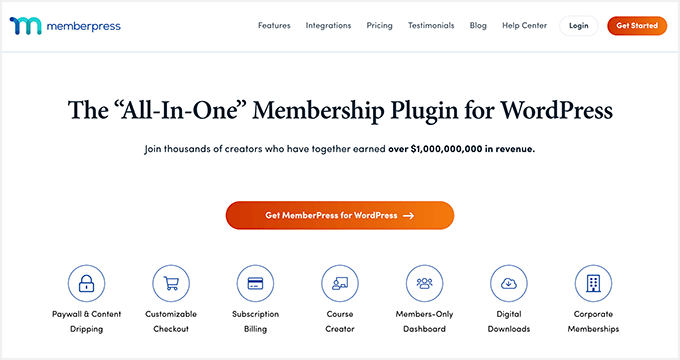
MemberPress

MemberPress is the best WordPress membership plugin that lets you sell subscription-based digital products and online courses.

It’s a great alternative to Gumroad, as the plugin is user-friendly. You can easily create a membership site, set up multiple subscription levels, and control who can access content and products.

MemberPress also offers a built-in drag-and-drop course builder functionality to create and sell online courses. Besides that, it includes a virtual classroom feature, which produces an immersive learning experience.

Another feature offered by MemberPress that you won’t find in Gumroad is automatic drip content. The plugin allows you to release paid content to subscribers over time or once they’ve cleared a particular module.

MemberPress also integrates with other popular WordPress plugins. For instance, you can track your site’s performance by combining it with MonsterInsights or create your affiliate marketing program by connecting it with AffiliateWP.

Pricing: MemberPress pricing starts from $179.50 per year with their Basic plan. If you want more features like quizzes and premium integrations, then you can go for the Pro plan.

2. Easy Digital Downloads

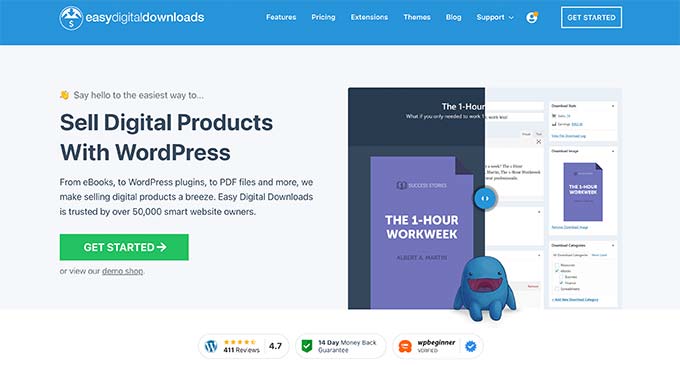
We recommend using EDD and WordPress

Easy Digital Downloads (EDD) is another Gumroad alternative you can use for selling digital products like ebooks, plugins, software, PDF files, and more.

The plugin is best for bloggers, developers, marketers, artists, designers, and other creators to sell products online. It offers powerful features and allows you to create beautiful digital goods stores.

You can start with EDD for free with SiteGround EDD hosting or just try the free version from their website.

We use Easy Digital Downloads ourselves to sell our MonsterInsights and WPForms software, which shows just how powerful the plugin is. Plus, there are managed hosting services that come with EDD pre-installed.

Other than that, Easy Digital Downloads offers multiple extensions. You can easily integrate different payment services, email marketing tools, messaging services, and more.

The best part about using EDD is that it has a software licensing feature. It allows you to sell SaaS products, apps, and other tools with proper digital rights.

Pricing: Easy Digital Downloads premium pricing plans start from $99.50 per year. However, you can also use a free version of EDD to get started and start selling online.

3. WP Simple Pay

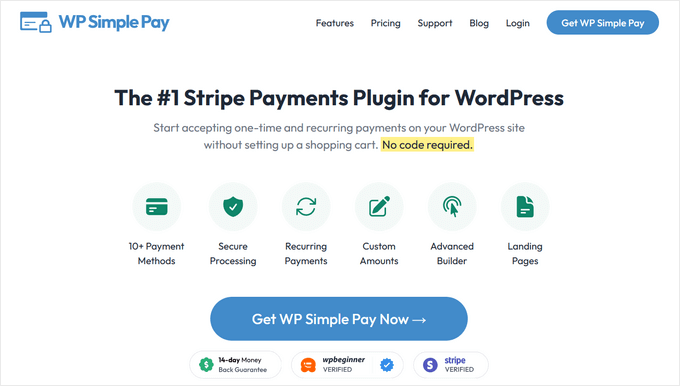
WP Simple Pay

WP Simple Pay is the best Stripe payment plugin for WordPress, and you can use it to accept online payments without setting up a shopping cart.

It’s a great alternative to Gumroad, as you can sell digital products by simply adding a payment form using the plugin. The best part, WP Simple Pay offers a free version. You can accept one-time or recurring payments directly from your WordPress site.

With WP Simple Pay, you get 13 payment methods in 135+ currencies spread across 45+ countries. Some popular methods include credit card payments, ACH debit payments, Google Pay and Apple Pay services, and more.

You can also offer to buy now, pay later payment plans using WP Simple Pay. The plugin supports Klarna and Afterpay/Clearpay, which allow customers to pay in installments. This is great if you’re selling high-value or luxury products.

Pricing: WP Simple Pay premium plan starts from $49.50 per year with the Personal plan. If you want to add recurring payments or buy now, pay later options, then you’ll need the Pro license. To get started, you can also use a WP Simple Pay Lite version for free.

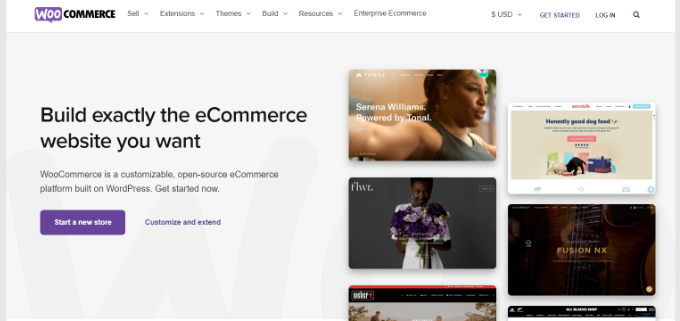
4. WooCommerce

WooCommerce website

WooCommerce is the most popular eCommerce plugin for WordPress. It is an open-source platform that you can use to create any kind of digital store.

For instance, it lets you sell physical products online, set up membership plans, offer digital downloads and affiliate products, create dropshipping stores, and more.

The best part is that there are many themes designed for WooCommerce. This allows you to fully customize and control the design of your eCommerce store.

Another advantage of using WooCommerce over Gumroad is that you can use built-in options or third-party plugins to upsell and cross-sell products, recover cart abandonments, offer discount codes, free shipping, and more by using powerful tools like FunnelKit.

Plus, it easily integrates with different payment services and third-party plugins. WooCommerce also offers premium extensions. You can easily optimize your store for SEO and boost search engine rankings to attract more visitors.

To create a WooCommerce store, you’ll need WordPress hosting and a domain name. However, many hosting companies like Bluehost come with WooCommerce pre-installed.

Pricing: WooCommerce is a free eCommerce platform you can use as a Gumroad alternative. While the plugin is free, you’ll still need to pay for website hosting. Please see our guide on how much does an eCommerce store cost for more details.

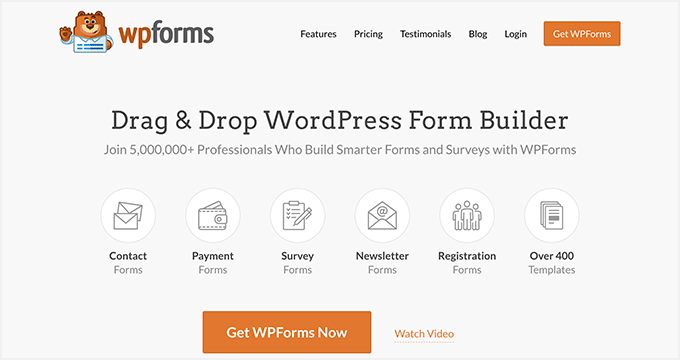
5. WPForms

WPForms

WPForms is the best drag & drop online form builder, and it can be an excellent alternative to Gumroad if you want a simple way to accept credit card payments.

It lets you easily build payment forms, so you can accept credit card payments using Stripe, PayPal, Authorize.net, and Square payment gateway.

Aside from that, WPForms also integrates with hundreds of email marketing services, so you can automatically add your customers to your marketing automation drip campaigns.

You can use WPForms to accept both one-time as well as recurring payments, and the best part is that it doesn’t charge any additional transactional fees.

Pricing: While WPForms has a free version, you will need the WPForms Pro plan which costs $199.50 to accept payments.

6. LearnDash

The LearnDash LMS WordPress plugin

LearnDash is one of the best LMS plugin for WordPress and allows you to run online courses. The plugin offers powerful features to manage your courses, add quizzes, run surveys, and easily accept online payments.

Since Gumroad doesn’t offer a learning management system, LearnDash is an excellent alternative for anyone looking to sell online courses.

With LearnDash, you get a drag-and-drop course builder and multimedia support to run webinars, videos, and tutorials. The plugin also lets you add badges and rewards using different gamification tools. This helps make your lessons engaging.

Pricing: LearnDash premium plans start from $199 per year for 1 website.

7. ConvertKit

ConvertKit Email Marketing Service

ConvertKit is a popular email marketing and eCommerce platform built specifically for creators. They allow you to easily sell digital products, run paid newsletters, sell recurring subscriptions, and even set up tip jars.

The best part is that you get an integrated eCommerce and marketing platform, so when someone becomes a customer, you can send them automated email sequences, targeted marketing, and other subscriber engaging content.

ConvertKit is a hosted platform so it comes with a landing page builder, custom form templates, and it allows you to get unlimited traffic.

Pricing: ConvertKit is free to use for up to 300 subscribers, but your pricing will increase based on the number of subscribers you have. To access the CreatorPro tools, you will need to upgrade to the $25 per month plan.

8. Teachable

Teachable

Teachable is another popular course-building platform that lets you create and sell online courses. You can use it as an alternative to Gumroad to market and promote your online courses.

It is similar to LearnDash and provides a complete solution for creating courses. What makes Teachable different is that it is a hosted platform, so you don’t have to worry about managing any additional software or installing updates.

Teachable is beginner friendly to use and offers a drag-and-drop course builder. It also takes care of online payments and offers multiple payment options. Other features provided by the service include integration with third-party marketing and analytics tools.

Pricing: You can get started on Teachable for free, but it will charge a $1 to 10% transaction fee. There are also premium pricing plans starting from $29 per month.

9. Thinkific

Thinkific

Thinkific is similar to Teachable and also a self-hosted platform to sell online courses. It is easy to use and is a fitting Gumroad alternative to creating courses.

It offers a drag-and-drop course builder that is very easy to use. Plus, you get different themes and templates to get started quickly. Thinkific also allows you to create subscription-based programs, landing pages, and a membership community.

Besides that, it also easily integrates with 40+ different tools and platforms like MailChimp, Shopify, Google Analytics, and Salesforce.

Pricing: Thinkific offers a 6-month premium plan for $196.

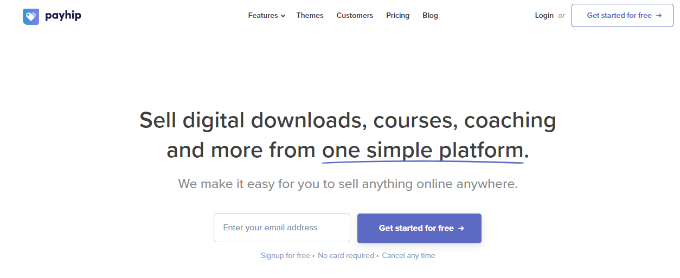
10. Payhip

Payhip

Payhip is another Gumroad alternative that you can use as an eCommerce platform. It lets you sell digital downloads, online courses, memberships, coaching, and physical products.

Besides that, it offers a lot of customization, which isn’t available in Gumroad. For instance, you can use the store builder to create a beautiful and professional online business site within minutes.

If your customers are from Europe or the United Kingdom, then the platform will take full responsibility for complying with the value-added tax (VAT) laws. It will automatically detect their location and apply the correct sales tax or VAT amount to their transaction.

Other features offered by Payhip include different marketing tools to boost conversion rates. For example, it lets you add coupons, cross-sell or upsell products, order bumps, add referrals and affiliates, and show customer reviews to add social proof.

Pricing: Payhip offers a free plan that you can use to get started. However, Stripe and PayPal will charge a 5% transaction fee in the free plan. There are also premium plans starting from $29 per month.

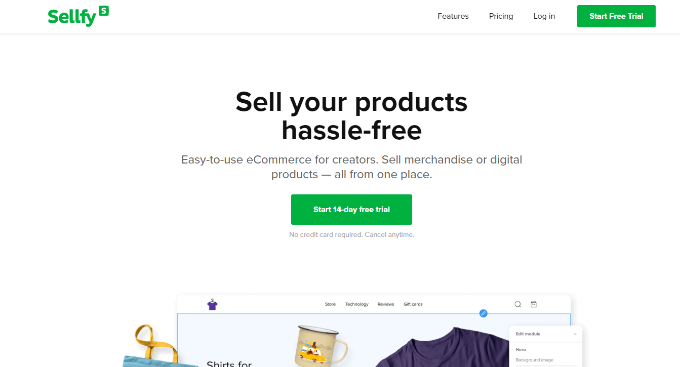
11. Sellfy

Sellfy

Sellfy is the next Gumroad alternative on our list, and it helps you create a storefront for selling digital and physical products. It lets you promote your products anywhere online. Simply embed the Sellfy checkout process on your own website and market your digital goods.

You can also launch a print-on-demand merchandise store using Sellfy. Simply design, create, and sell using different storefront themes. Other than that, you can use it to sell digital downloads and subscriptions.

What makes Sellfy different from Gumroad is that it includes built-in marketing features like upselling, email marketing, and discount codes. Plus, it offers more customization features compared to Gumroad.

Pricing: Sellfy offers premium pricing plans starting from $22 per month (billed annually), and you get a 14-day free trial.

12. BigCommerce

BigCommerce

BigCommerce is a popular eCommerce platform, and you can use it as a Gumroad alternative.

It is a fully hosted eCommerce service that easily integrates with WordPress. You can use it to sell all kinds of digital and physical products.

The service automatically creates different pages for your store, including a shopping cart, sign-in page, account area, sales page, and more.

What makes BigCommerce different is that it lets you sell products across various channels like Amazon and social media platforms like Instagram. Plus, the eCommerce solution doesn’t charge any transaction fees and lets you choose from multiple payment gateways.

Pricing: BigCommerce pricing plans start from $29.99 per month, and you get a 15-day free trial.

13. Shopify

Shopify website

Shopify is the last Gumroad alternative on our list. It is an all-in-one eCommerce solution that you can use to create an online store. It offers more customization options and third-party integrations compared to Gumroad.

With Shopify, you don’t have to worry about web hosting, security, backups, updates, and caching. It does this for you, so you can focus on uploading products to the site and promoting them.

Shopify offers pre-built themes that you can use to set up a store. Plus, it makes it easy to manage inventory and accept online payments from a single platform. You can even use Shopify with WordPress to sell products online.

Pricing: Shopify pricing starts from $1 per month with the Basic plan. However, if you want low transaction costs and advanced features, then there is an Advanced plan costing you $299 per month.

Which Gumroad Alternative Should You Use?

After comparing different eCommerce solutions, we believe MemberPress is the best Gumroad alternative. It is a paid WordPress plugin that helps create subscriptions, sell digital products to premium members, and set up online courses without any extra fees.

If you’re looking for a free alternative to Gumroad, then we highly recommend Easy Digital Downloads. You can use its free version to get started and start selling digital products like ebooks, PDFs, spreadsheets, videos, digital art, apps, plugins, and more.

If you’re looking for a simple solution that lets you accept online payments without the complexity of creating a shopping cart, then WP Simple Pay is your best option.

On the other hand, if you’re looking to create an online store from scratch and have full control over it, then WooCommerce is the best option. You get more customization options, online store management features, and integrations compared to Gumroad.

We hope this article helped you find the best Gumroad alternative. You may also want to read our guide on how much does it cost to build a WordPress website and must have WordPress plugins for business sites.

If you liked this article, then please subscribe to our YouTube Channel for WordPress video tutorials. You can also find us on Twitter and Facebook.

The post 13 Best Gumroad Alternatives (Cheaper + More Powerful) first appeared on WPBeginner.


December 23, 2022 at 04:30PM