Certified WordPress Developer and SEO Specialist with 10+ years of experience on Fiverr. I provide expert solutions for WordPress error fixing, debugging, speed optimization, and security hardening. Services include hacked site recovery, malware removal, on-page SEO optimization, and full customization to ensure your website runs fast, secure, and ranks higher on Google.
Do you want to add third-party fonts to your website without slowing down your website speed?
Custom fonts improve the typography and user experience of your website, but they take longer to load. The good news is that you can host your fonts locally to ensure your website is always fast.
In this article, we’ll show you how to host local fonts in WordPress.
Why Host Fonts Locally in WordPress?
While typography and
custom fonts can improve the overall website aesthetics, they do have a negative impact on your
WordPress performance. For example, if you are using a custom font from Google fonts, then they’re loaded from third-party services which will slow down your website.
Luckily, there is a way to use custom fonts without slowing down your site. A new Webfonts API was introduced in WordPress 6.0. This allows you to host fonts locally so they load faster.
Another reason to host Google Fonts locally is to stay GDPR compliant. That’s an important legal consideration if you have website visitors from the European Union.
When someone visits a website that uses Google Fonts, their IP address is logged by Google when the fonts are loaded. Because this is done without their permission, the EU now considers that a breach of privacy regulations, and you may be liable for damages.
That being said, let’s take a look at how to host local fonts in WordPress for a faster website. We’ll cover two methods, and the first method is recommended for most users.
Method 1: Hosting Local Fonts in WordPress With a Plugin
The first thing you need to do is install and activate the OMGF (Optimize My Google Fonts) plugin. For more details, see our step-by-step guide on how to install a WordPress plugin.
OMGF is one of the best WordPress typography plugins. It offers a beginner-friendly way to improve performance and GDPR compliance by hosting Google Fonts locally.
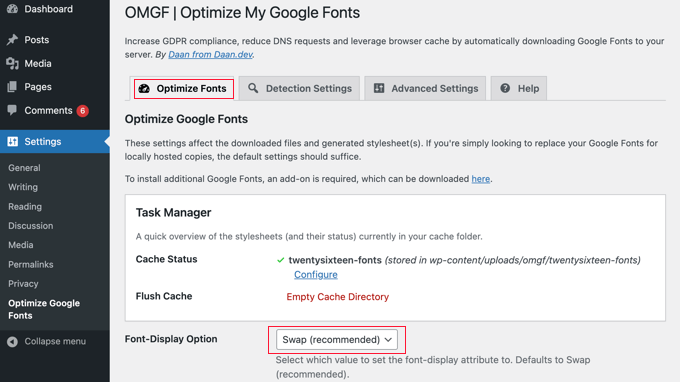
Upon activation, you need to visit Settings » Optimize Google Fonts to configure the plugin. You should be looking at the ‘Optimize Fonts’ tab.
Notice the statement under the ‘Optimize Google Fonts’ heading that you just need to use the default settings to automatically replace your Google Fonts with locally hosted copies.
That means that as you scroll down the settings page, all you need to do is make sure that the ‘Font-Display Option’ has the default setting of ‘Swap (recommended)’ selected.
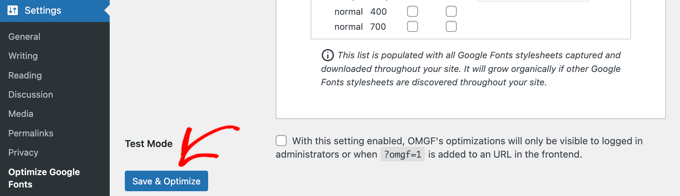
All you need to do now is click the ‘Save & Optimize’ button at the bottom of the page.
You’ll see a message at the top of the screen that says ‘Optimization completed successfully.’
Congratulations! Your Google Fonts are now hosted locally. Your website will load faster and you have reduced the risk of European lawsuits.
Method 2: Hosting Local Fonts in WordPress Manually
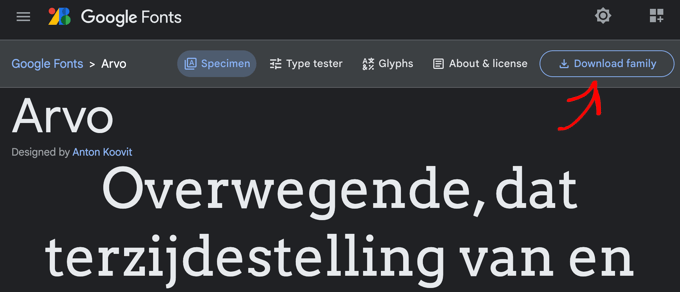
You can also host fonts locally without using a plugin by using the @font-face method from our guide on how to add custom fonts in WordPress. While this method requires more work, it allows you to use any font that you like on your website.
You need to download the fonts you wish to use in a web format. There are many places to find great free web fonts, such as Google Fonts, Typekit, FontSquirrel, and more.
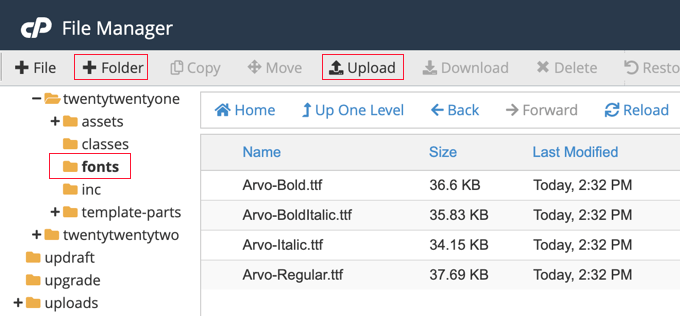
You should create a new folder called ‘fonts’ in the directory of your theme or child theme and upload it there.
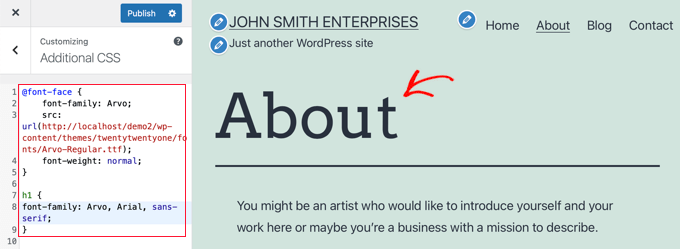
Once you have uploaded the font, you need to load the font in your theme’s stylesheet using custom CSS. You can add the code directly to your theme’s style.css file, or by using the Additional CSS section of the theme customizer.
You can do that using CSS3 @font-face rule like this:
Don’t forget to replace the font family and URL with your own.
After that, you can use that font anywhere in your theme’s stylesheet or the Additional CSS section of the theme customizer. The CSS you use will depend on your theme and where you wish to use the local font. Here’s an example from our demo website:
h1 {
font-family: Arvo, Arial, sans-serif;
}
As you can see, our heading is now using the locally hosted Arvo font.
Do you want to get email notifications for post changes in WordPress?
By default, WordPress doesn’t send notifications when posts are changed by a user. If you run a multi-author WordPress site, then you may want to stay informed about post changes on your website.
In this article, we will show how to get email notifications for post changes in WordPress.
Why Set Up Email Notifications for Post Changes in WordPress?
If you’re the only one working on your own WordPress website, then it is easier to keep an eye on everything that is happening on your website.
For instance, you may want to be alerted when a new post is published or if changes were made to an older article.
This also helps all team members be accountable. If they make a mistake, then it can be easily caught and remedied quickly.
That said, let’s take a look at how to get email notifications for post changes in WordPress. We’ll cover two methods so you can choose one that works best for you. We’ll also show you how to undo post changes and make sure your notification emails are delivered.
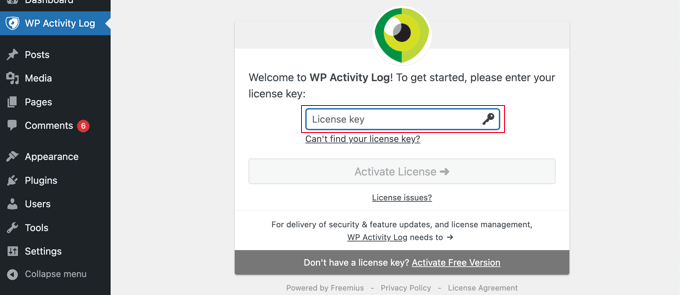
Upon activation, you’ll be asked to enter your license key. You can find this information under your account on the WP Activity Log website.
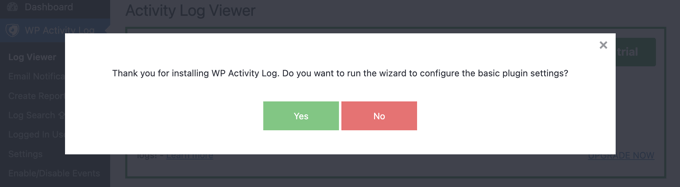
Next, you’ll be given the option to run the setup wizard. You can answer a few quick questions to set up important monitoring and logging features.
All these things can be changed later in plugin settings too.
Setting Up Email Notifications for Post Changes in WordPress
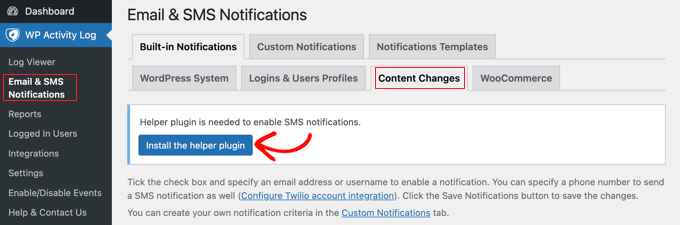
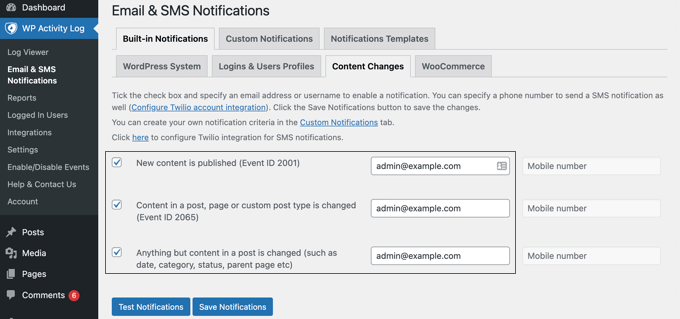
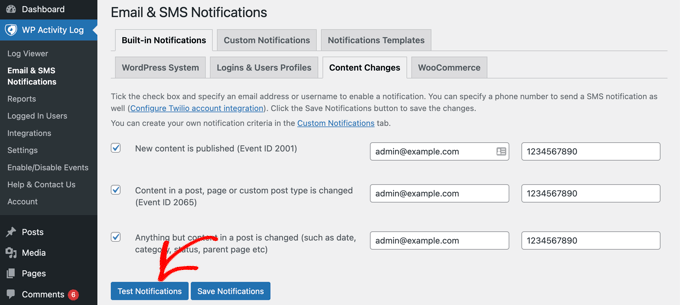
After that, you need to visit the WP Activity Log » Email & SMS Notifications page and switch to the ‘Content Changes’ tab.
You will see a message that a helper plugin is needed to enable SMS notifications.
If you want to receive SMS notifications as well as email notifications, then simply click the button labeled ‘Install the helper plugin’. You will finish setting up SMS notifications in the next step.
Now you need to select the events that will trigger notifications. The plugin comes with three default notifications covering most content changes.
Next to each event, you need to enter the email address the notifications should be sent to. In the next step, you will also add a mobile phone number if you want to get SMS notifications for post changes.
Finally, click on the ‘Save Notifications’ button to store your changes.
Setting Up SMS Notifications for Post Changes in WordPress
WP Activity Log allows you to easily receive SMS notifications for post changes and other WordPress activities. To do that, you’ll need a Twilio account and a phone number.
Twillio is a paid service with a pay-as-you-go pricing model for SMS messages. Pricing starts at $0.0079 per SMS, and you’ll also need to purchase a virtual phone number which will be used to send messages.
Simply go to the Twilio website and signup for a free trial account.
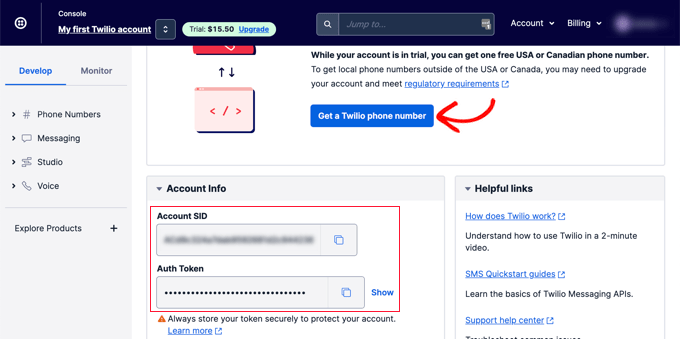
After setting up your account, you’ll reach the Twilio Console.
Here, you can copy your Account SID, Auth Token, and get a trial phone number.
Copy and paste these values to a text editor or leave this browser tab open.
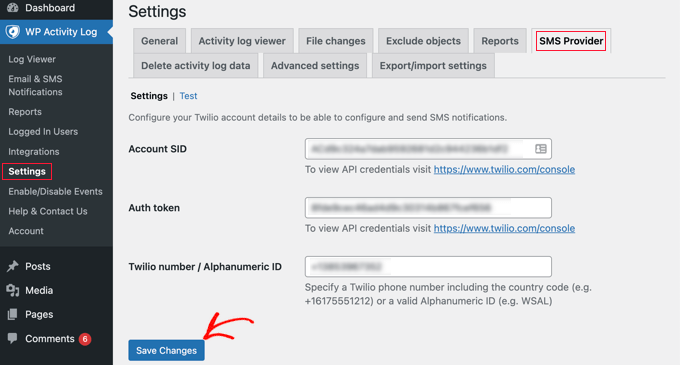
Next, you need to switch back to your WordPress website admin area and visit the WP Activity Log » Settings page. From here, switch to the SMS Provider tab and enter your Twilio Account SID, Auth token, and number.
Don’t forget to click on the ‘Save Changes’ button to store your settings.
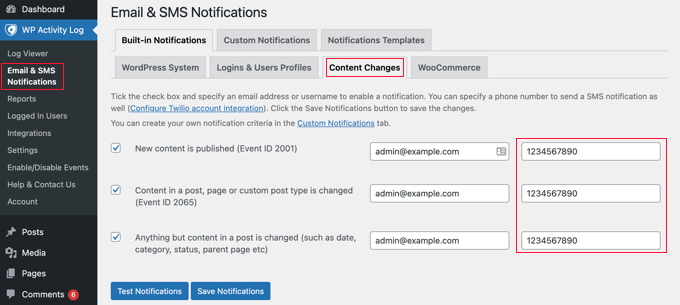
Now you can navigate back to WP Activity Log » Email & SMS Notifications and switch back to the ‘Content Changes’ tab. Here you can add a mobile phone number to get SMS notifications for post changes.
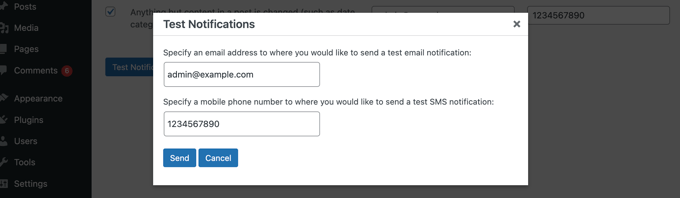
Testing Post Change Notifications with WP Activity Log
WP Activity Log allows you to easily test your post change notifications.
First, make sure you are on the ‘Content Changes’ tab of the WP Activity Log » Notifications page.
Now you can scroll down and click the ‘Test Notifications’ button.
This will bring up a popup window where you can enter an email address and a mobile phone number to send notifications.
WP Activity Log will then send test notifications. If you do not receive an email notification right away, then you can jump to the section below on troubleshooting email notifications.
If you fail to receive SMS notifications, then check your Twilio credentials to make sure they are correct.
Method 2: Getting Notifications for Post Changes With Better Notifications for WP
This method is easy to use, but it doesn’t come with ready-made templates. While this method will send an email notification when a post is changed, you will have to write the email yourself and investigate the activity on your own.
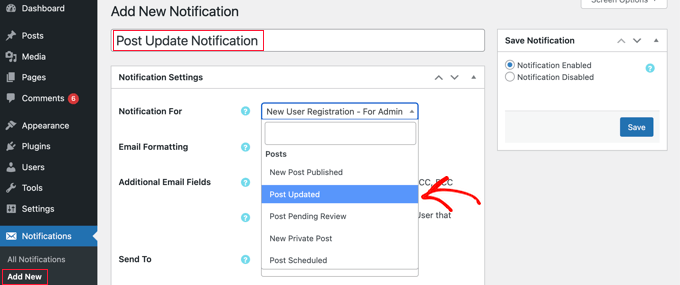
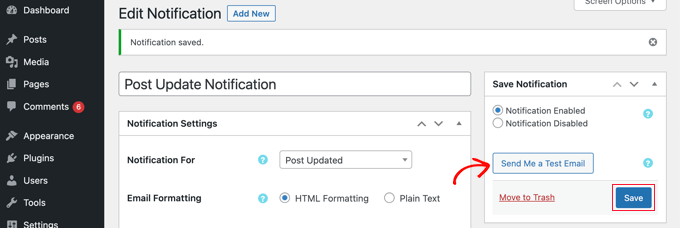
Upon activation, you need to visit the Notifications » Add New page to create your first custom notification.
First, you need to provide a title for the notification. After that, you can choose a ‘Notification For’ option from the drop-down menu. This is the event that will trigger this notification, such as ‘Post Updated’ in the screenshot above.
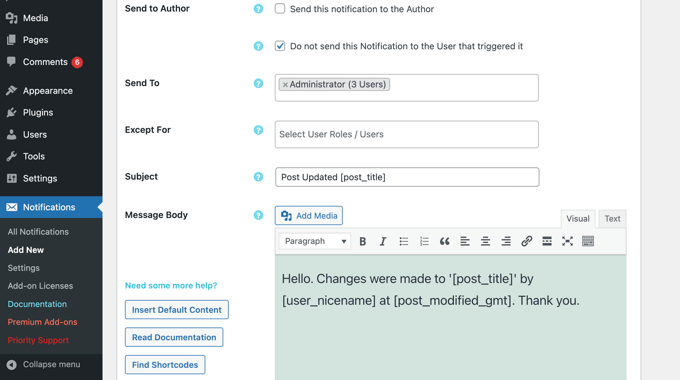
If you like, you can check the ‘Additional Email Fields’ box so you can enter custom email addresses for the sender, cc, and more. If this option is left unchecked, then the plugin will simply use your default WordPress email settings.
Next, you need to select the users or user roles that will receive this notification under the ‘Send To’ option. Below that you can write the email subject and the message itself.
The Better Notifications for WP plugin doesn’t come with a template for post changes. This means you’ll need to write your own email message.
The plugin comes with a bunch of shortcodes that you can use to customize your notifications. You can view all of them by clicking on the ‘Find Shortcodes’ button.
Lastly, you need to click on the ‘Save’ button to store your email notification. Once you’ve done that, you’ll be able to click on the ‘Send Me a Test Email’ button to see if it is working.
Better Notifications for WP is not an activity monitoring plugin. This means you’ll need to set up multiple notifications to cover different types of content changes in WordPress.
For instance, you may want to set up a ‘Post Published’ notification or another one for when a category or tag is changed.
The plugin also allows you to create custom notifications or modify default WordPress notifications as well. For more details, see our article on how to create better custom notifications in WordPress.
Revising and Undoing Post Changes in WordPress
Once you have received an email notification for post changes, you may want to see what changes were made, who made them, and when.
WordPress comes with a built-in revision management system that keeps track of all changes made to an article.
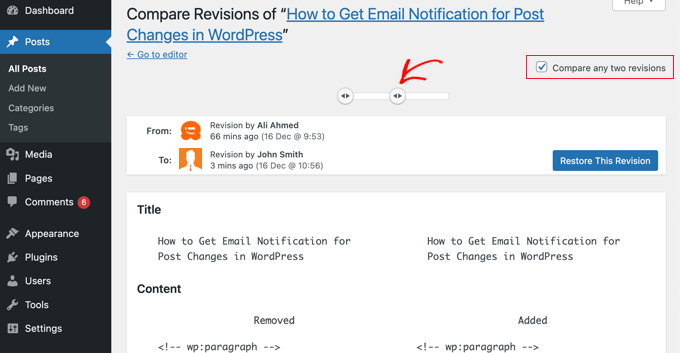
Simply edit the post or page that you want to review and then click on the ‘Revisions’ tab under the ‘Post’ settings from the right column.
This will bring you to the post revisions screen.
You can check the ‘Compare any two revisions’ box and then move the slider below to compare the changes.
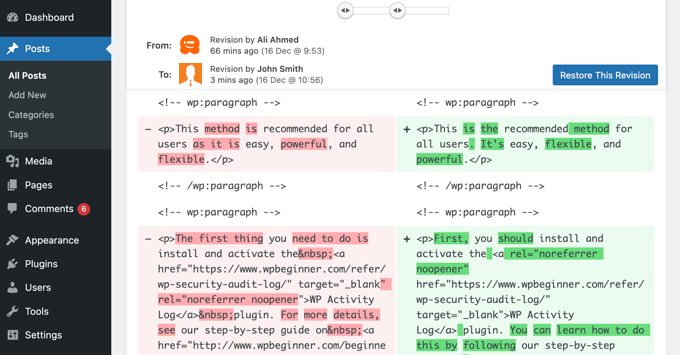
When you scroll down the post, you will see the changes between the two revisions highlighted in red and green colors.
If you don’t like the changes, then you can simply click on the ‘Restore This Revision’ button to undo them and return to the previous version.
By default, WordPress uses the PHPmail() function to send emails. This method does not use proper authentication (login or password) which means it can be easily misused. This is why most spam filters mark such emails as spam or block them altogether.
To fix this, you need to use a proper SMTP service provider to send out WordPress emails. There are even free SMTP servers like SendLayer, Gmail, Sendinblue, Sendgrid, and more that you can use with WordPress.
WP Mail SMTP allows you to connect your WordPress site to your SMTP service provider and send all your WordPress emails with much higher deliverability.
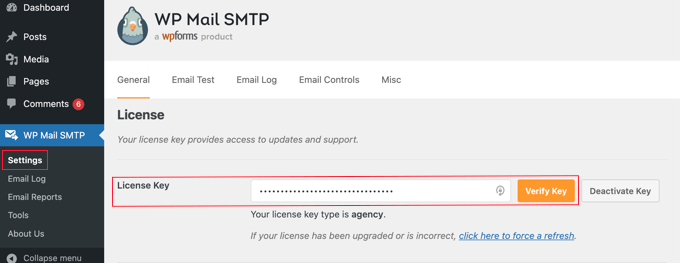
Upon activation, you need to go to the WP Mail SMTP » Settings page in your WordPress admin area to set up the plugin.
First, you need to enter your license key. You can find this information under your account on the WP Mail SMTP website.
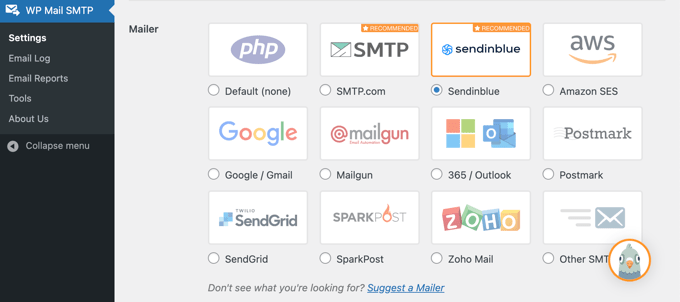
After that, scroll down to the ‘Mailer’ section to select your SMTP service provider. WP Mail SMTP will show all top SMTP service providers. You can click on your provider and then enter the required information below (usually an API key).
If your mailer is not listed, then you can simply choose ‘Other SMTP’ option and enter the required information.
We are often asked by users why they should blog and what are the benefits of blogging.
Blogging has been around since 1993 and has become an essential marketing tool for many businesses. But is it still relevant in the age of social media?
In this article, we’ll talk about why you should blog. And what are the benefits of blogging?
Top Reasons and Benefits of a Blog
Blogs began as a way for individuals to write about their passions, day-to-day life, and things they found interesting. They were like online journals or diaries.
However, blogging quickly became an important part of the marketing strategy for businesses due to its benefits.
Currently, there are 1.9 billion websites in the world, and over 600 million are blogs. That means that the blogging industry makes up a third of the web.
A typical business website consists of a few important pages. You may have a homepage, landing pages for your products/services, a contact page, and a few more.
Search engines may not find your website more important than thousands of other much older websites in the same industry.
For instance, let’s say you sell gardening hoses on your website. There are thousands of companies selling similar products and users may never find your website on their own.
However, with blogging, you can add more content relevant to the topics they’re searching for.
For instance, you can write about ‘Environment-friendly gardening tools’ or ‘water preservation.’ You can also write guides on how to maintain small lawns and gardens and more.
Writing content for a blog opens a doof for more traffic to your website, allowing you to reach more customers, gain a wider audience, and even poach business from big-name brands.
2. Blogging Helps you Generate More Leads and Conversions
Now bringing traffic to your website by creating a blog was the easy part. The more complex part is to convert that traffic into sales and growth for your business.
More than 70% of people visiting your website today, will never find it again. That’s because there is so much content and information on the internet.
A blog helps you convert website traffic into potential leads, convert them into subscribers and social media followers, and allow you to reach out to them later.
Edit YouTube videos to create content for TikTok, Instagram Stories, and more.
These are all the ways that we reuse WPBeginner content across our social media and marketing channels and it works really well.
4. Helps you Build Authority in Your Industry
It is harder to prove your expertise and authority on a subject if all you have is a five-page website selling your products/services.
Adding a blog allows you to regularly publish content on topics related to your industry. This helps you establish authority and win users’ trust.
If you are consistently publishing new content, you’ll become the go-to place for your users and other businesses interested in those topics.
Whether you are a business or an individual, this trust is an invaluable asset. It will unlock tremendous growth opportunities.
5. Helps You Strengthen Brand Recognition
A blog helps you strengthen your brand identity. It gives you more opportunities to use your custom logo across your website, your social profiles, search results, and more.
This brand recognition when combined with customer trust and authority adds enormous value to your digital assets.
As an individual, you get recognized by industry leaders, influencers, and enthusiasts. This opens doors to many opportunities.
Similarly, as a business, your brand becomes more valuable and this weight will be considered by any potential buyer if you want to sell your business in the future.
6. Helps You Build an Engaging Audience
A static website doesn’t leave much room for a conversation. It is uninspiring and often quite boring.
Adding a blog to your website helps you bring the conversation to your website. Now users can engage with your blog posts by leaving a comment, sharing it on social media, writing about it, and more.
We recommend all our users engage with comments and other user activity on their blogs.
It helps you build a community around your business which is extremely useful.
When people leave a few comments on your blog, they develop an affinity with your brand which pays off when they are looking to make a purchase.
These users are also more likely to recommend your products/services to their friends and family.
7. Share Business News, Announcements, Sales, and More
On a typical static website, it is hard to share your business news, announcements, sales events, and more.
A blog on the other hand makes it super easy. In fact, you can get into more details, add context, and write more persuasive content.
For instance, if you are launching a Black Friday sale, you can promote it with a blog post. And then promote that blog post across your website with a floating header or footer banner.
You can make it more rewarding for your regular users and offer a special coupon code to your blog readers.
8. Helps You Improve Long Term SEO
A static website has fewer pages and even if they are ranking high you are still limited to a fixed set of keywords.
Adding a blog allows you to target related keywords and cover more ground by writing on different but related topics.
Over a period of time, you will have multiple posts ranking top on several keywords. Each of these pieces of content is like a soldier in your army.
When asked why they read blog posts, 33% of people said they wanted to learn something new.
Blog posts allow you to educate customers about different ways they can use your products.
You can utilize this opportunity to compare your product with competitors, showcase product features, inform users about benefits, and more.
This makes your blog posts highly valuable even for your existing customers. They can use blog articles to learn about new features that they may not be using.
Basically, it is an opportunity for you to provide real value to your users while promoting your products/services at the same time.
11. Build Additional Revenue Streams for Your Business
Blogs provide many opportunities to generate additional revenue for your business and make money online using your WordPress blog.
For instance, you can display ads in your blog posts using Google AdSense. You can also promote affiliate products and make money with affiliate marketing.
Adding a blog provides you with more opportunities to expand your marketing skills. You’ll have more content to promote which may be suitable for even more marketing channels.
For instance, you will find more opportunities to promote new posts on social media websites. You will also have more useful content to include in your newsletter.
As you explore different opportunities to promote each piece of content, you get to learn more marketing skills to reach new audiences.
13. Unlocks Partnerships and Opportunities for Growth
Blogs are a magnet to attract partnership opportunities to boost your business growth.
With all the activity going on with your blog, you will attract the attention of individuals and businesses looking for mutually beneficial opportunities.
For instance, new vendors may reach out to offer you better pricing or wholesale pricing, smaller shops may want to sell your products, large businesses may want to partner with you regionally, and more.
Similarly, if you sell services or just promoting your personal brand, then your blog may help you get the introduction to the right people. You’ll be able to gradually grow your network and influence.
14. Helps You Find Your Dream Job
Your blog may eventually lead you to find your dream job. Blogging is a popular tool to build a personal brand and promote your services and skills online.
You can show your passion, skills, and knowledge in your specific interests. This may get the attention of businesses looking for talented individuals like you.
Even if businesses don’t reach out to you, you can reach out to them. Your blog will help you see your interest, passion, and expertise in a more interesting way than a plain CV.
How to Get Started with Blogging Right Away
Getting started with a blog is quite easy.
First, you need to choose the right platform. We recommend using WordPress which is the world’s most popular blogging platform.
Now when we say WordPress, we mean WordPress.org and not WordPress.com.
To start a WordPress.org blog, you’ll need a domain name and a hosting account.
Our friends at Bluehost are offering WPBeginner users a free domain name with a generous discount on hosting. Basically, you’ll be able to get started with just $2.75 per month.
Once you have signed up for a domain name and hosting, Bluehost will automatically install WordPress for you.
Need more help? See our complete beginner’s guide on how to start a blog with step-by-step instructions.
We hope this article helped you learn why you should blog and the benefits of blogging. You may also want to see our list of popular online business ideas or take a look at our guide on starting an online store with your blog.
If you liked this article, then please subscribe to our YouTube Channel for WordPress video tutorials. You can also find us on Twitter and Facebook.