Wednesday, January 11, 2023

How to Easily Create a Multilingual Sitemap in WordPress

Are you looking to improve the search engine rankings of your site’s multilingual pages?

Creating a multilingual sitemap helps Google, Bing, and other search engines easily find your content and index it. You can get more international search traffic simply by giving search engines an easy way to find multilingual content on your WordPress site.

In this article, we’ll show you how to create a multilingual sitemap for WordPress.
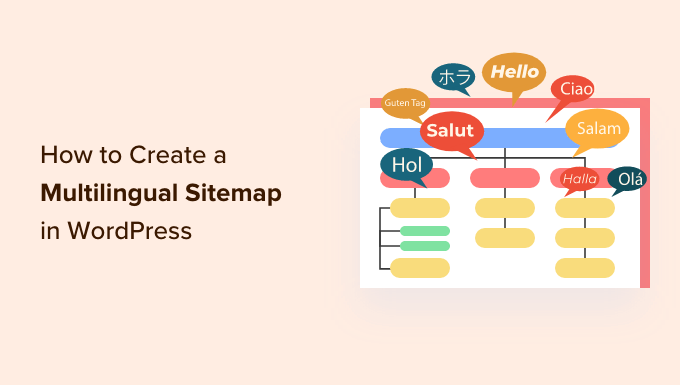
How to create a multilingual sitemap in WordPress

Why Create a Multilingual Sitemap in WordPress?

A sitemap is a file that contains all the important content on your WordPress website. It is in the XML format and is targeted toward search engines instead of people.

Creating an XML sitemap for your multilingual website helps search engines find and index your content faster. For instance, if you have different domains or subdomains translated into multiple languages, then you’ll need to create a sitemap for each website.

Note: If you’re looking for an easy way to set up a website in different languages, then follow our step-by-step guide on how to easily create a multilingual WordPress site.

A sitemap is extremely important for your WordPress SEO. Let’s say you just created a new multilingual website. Your new site won’t have many backlinks, and it can be hard for search engines to discover your new articles and pages.

The sitemap provides a way for search engines to learn about your new content in another language. This way, your multilingual pages will start to get indexed and appear in search results.

That being said, let’s take a look at how you can create a multilingual sitemap in WordPress.

Creating a Multilingual Sitemap in WordPress

By default, WordPress automatically creates an XML sitemap for new websites. You can add wp-sitemap.xml at the end of the domain, and WordPress will display the default XML sitemap.
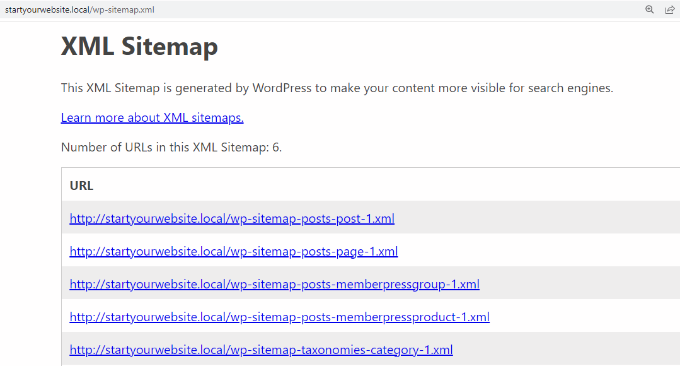
View default sitemap

However, this feature is fairly limited and not very flexible. You can’t control which content to add or remove from the sitemap.

The best way to create an XML sitemap in WordPress is by using the All in One SEO (AIOSEO) plugin. It is the best WordPress SEO plugin and helps you optimize your site for search engines.

It also automatically creates a sitemap for a multilingual site and gives you more control over which pages and website sections you want to show in the sitemap.

The sitemap feature is available in the AIOSEO Lite version for free. However, if you’re looking for more features like video sitemaps, news sitemaps, redirections manager, and link assistant, then we recommend using the AIOSEO Pro version.

First, you’ll need to install and activate the AIOSEO plugin. If you need help, then please see our guide on how to install a WordPress plugin.
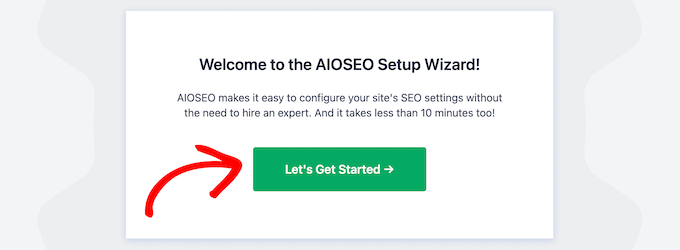
Click let's get started AIOSEO setup wizard

Upon activation, you’ll see the AIOSEO setup wizard. Simply click the ‘Let’s Get Started’ button and follow the onscreen instructions. For more details, you can visit our guide on how to set up All in One SEO plugin for WordPress.

After that, you’ll need to go to All in One SEO » Sitemaps from your WordPress dashboard and ensure that the ‘Enable Sitemap’ option is enabled.
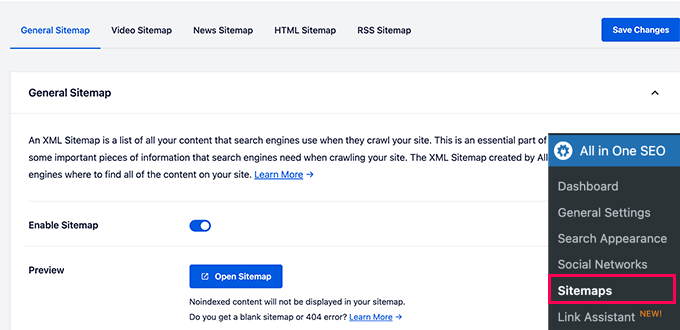
AIOSEO sitemaps

AIOSEO will automatically create a sitemap for your multilingual website.

You can click the ‘Open Sitemap’ button to preview it or simply add ‘sitemap.xml’ to your website URL.
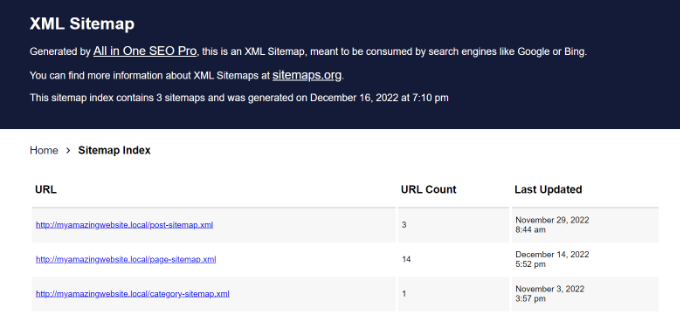
XML sitemap preview

Please note that if you’re using WPML to create multilingual sites, then AIOSEO will automatically serve sitemaps across different languages.

For instance, your sitemap URL will be something like /nl/sitemap.xml, /de/sitemap.xml, or /fr/sitemap.xml.

If you’re using TranslatePress to create your WordPress multilingual site, then you will need to install their SEO pack addon which is fully compatible with AIOSEO.

Configuring Additional Multilingual Sitemap Settings

To further customize your multilingual sitemaps, you can scroll down in AIOSEO Sitemaps settings to view more options.

By default, the plugin lets you include all post types and taxonomies in the sitemap. It also gives the option to include date archives and author sitemaps.
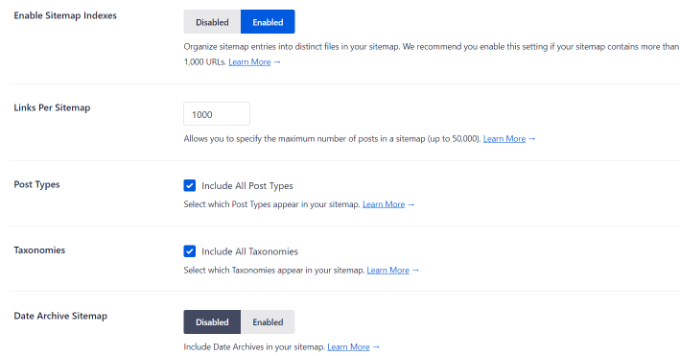
View more sitemap settings

However, you can uncheck the ‘Post Types’ and ‘Taxonomies’ options and view more options.

For example, let’s say you have translated content as a custom post type. You can simply check that option to include in the sitemap and exclude other post types.
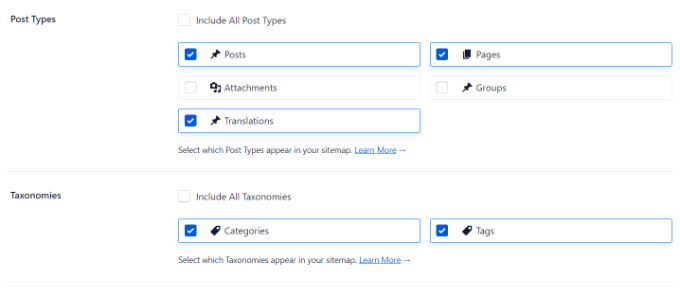
Add translations to sitemap

Besides that, you can also add more pages from your multilingual website to the sitemap.

For example, let’s say you’ve translated a pillar article or an evergreen content into another language. You can add the page URL to the sitemap using AIOSEO and help search engines easily find your content.

Simply scroll down and click the ‘Additional Page’ toggle to enable the option. After that, you can add the page URL, and choose the priority and the frequency.
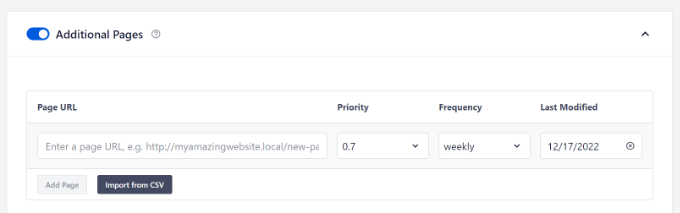
Add additional pages to sitemap

AIOSEO lets you exclude posts, pages, and specific terms from your WordPress sitemaps.

For instance, you can add different multilingual posts and pages that you don’t to include in the sitemap. These can be contact us page, or terms of service pages translated in another language.

First, you’ll need to enable the ‘Advanced Settings’ option. Then enter the URLs in the ‘Exclude Posts / Posts’ field and the terms in the ‘Exclude Terms’ field.
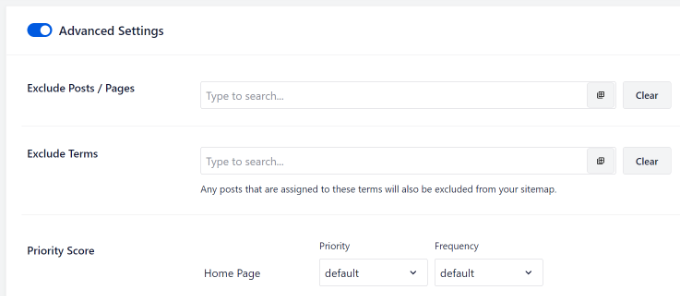
View additional settings in sitemap

Submitting Your Multilingual Sitemap to Search Engines

Now that you’ve created a multilingual sitemap, the next step is to submit it to different search engines. This way, Google, Bing, and other search engines can easily find new content.

Submit Multilingual Sitemap to Google

Google Search Console is a free tool by Google that you can use to monitor your site’s performance on search results. It helps you see which keywords people use to find your website and resolve any errors that might prevent you from appearing on Google.

Submitting your multilingual sitemap to the Search Console helps Google quickly discover new content.

You can simply log in to your account and head to the ‘Sitemaps’ option from the menu on your left. Next, enter your multilingual sitemap URL under the ‘Add a new sitemap’ option and click the ‘Submit’ button.
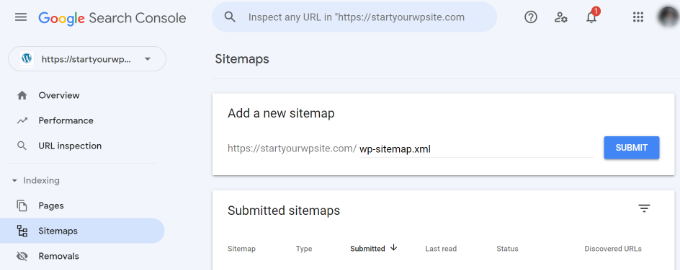
Submit your site to search console

For more details, please see our guide on how to submit your website to search engines.

Submit Multilingual Sitemap to Bing, Yahoo, and DuckDuckGo

Similarly, you can submit the sitemap to Bing using the Webmaster Tools. The best part is that, when you submit your site to Bing, it’s also automatically submitted to the Yahoo and DuckDuckGo search engines.
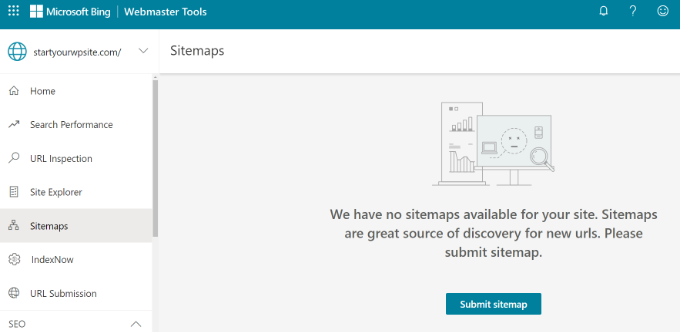
Submit sitemap in Bing

You can see our step-by-step tutorial on how to add your website to Bing Webmaster Tools for more details.

We hope that this article helped you learn how to create a multilingual sitemap in WordPress. You may also want to see our expert SEO tips to optimize your blog posts, and our expert pick of the best keyword research tools to improve your SEO rankings.

If you liked this article, then please subscribe to our YouTube Channel for WordPress video tutorials. You can also find us on Twitter and Facebook.

The post How to Easily Create a Multilingual Sitemap in WordPress first appeared on WPBeginner.


January 11, 2023 at 03:31PM

Tuesday, January 10, 2023

How to Embed Facebook Status Posts in WordPress

Are you looking for a way to embed Facebook status posts in WordPress?

Facebook statuses are an easy way to share important updates and time-sensitive information with your audience. By embedding your Facebook timeline in WordPress, you can get more engagement, let people know what’s happening on your Facebook page or group, and grow your followers.

In this article, we will show you how to embed Facebook status posts in WordPress.

How to embed Facebook status posts in WordPress

Why Embed Facebook Status in WordPress?

Facebook is the most popular social media platform in the world and has billions of active users. For website owners, Facebook is a powerful way to connect with a new audience and engage with the people who already know about your brand.

Facebook is also perfect for sharing time-sensitive information in real time. In this way, you can use FOMO to create a sense of urgency.

For example, you might post a status about how visitors are running out of time to enter your giveaway in WordPress, or take advantage of your flash sale.

However, people won’t see your Facebook status if they just visit your website. This makes it difficult to grow your Facebook following and build a relationship with your audience.

By embedding your Facebook status posts in WordPress, you can promote your social media page and encourage more people to follow you on Facebook.

As you post new statuses, they’ll appear on your site automatically, so it’s also a great way to keep your website fresh, even for regular visitors.

That being said, let’s see how to embed Facebook status posts in WordPress.

Adding a Facebook Status Plugin to WordPress

The easiest way to embed your Facebook status feed in WordPress is by using the free Smash Balloon Social Post Feed.

This plugin lets you display text and links from your Facebook page or group.

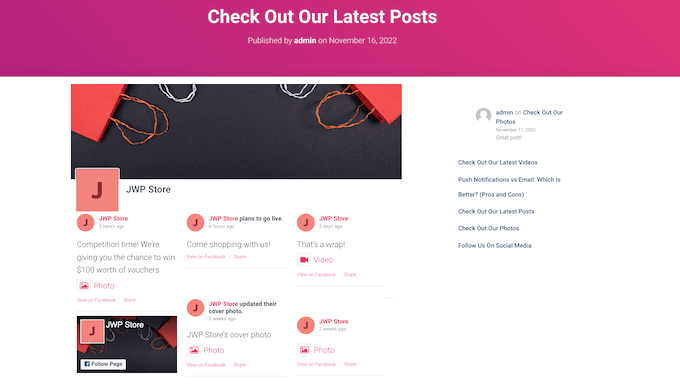
A Facebook post timeline, embedded on a WordPress website.

In this guide, we’ll be using the free version of Smash Balloon as it allows you to embed Facebook statuses no matter what your budget. However, there’s Smash Balloon Facebook Feed that lets you embed different kinds of content. For example, you can embed a Facebook video in WordPress, and show images and videos in a lightbox popup on your site.

The first thing you need to do is install and activate the Smash Balloon Social Post Feed plugin. For more details, see our guide on how to install a WordPress plugin.

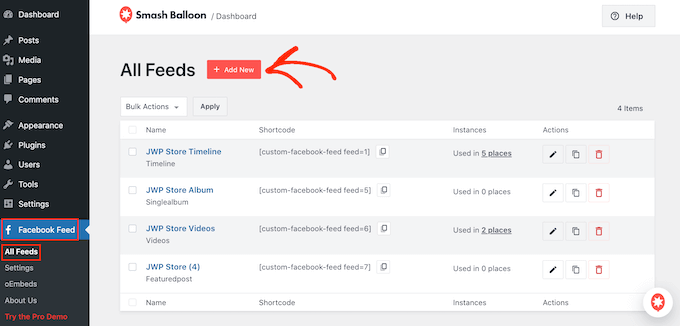
After that, you’ll need to connect Smash Balloon to your Facebook page or group, by going to Facebook Feed » All Feeds. Here, click on ‘Add New.’

How to create a custom Facebook feed

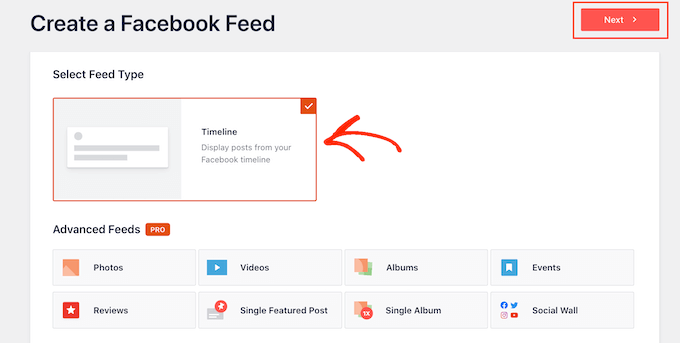
Smash Balloon pro lets you show posts from your photo albums, timeline, events, and more.

However, the free version only allows you to embed your Facebook statuses so click on ‘Timeline’ and then select ‘Next.’

The free Smash Balloon WordPress plugin

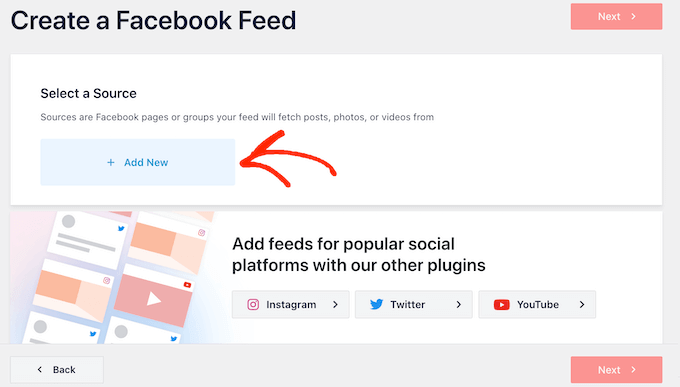
Now, you need to select the page or group which you’ll get the Facebook statuses from.

To get started, click on ‘Add New.’

Adding a Facebook page or group to your WordPress website

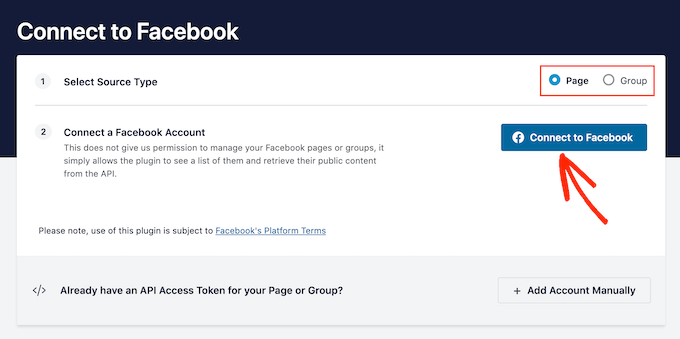
On the next screen, choose whether you want to embed the feed from a Facebook group or Facebook page.

After that, go ahead and click on ‘Connect to Facebook.’

How to connect a Facebook page or group to a WordPress website

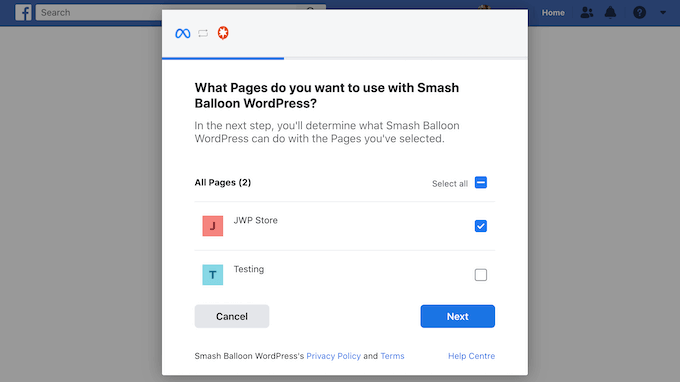
This opens a popup where you can log into your Facebook account and choose the pages or groups which you want to get the status updates from.

As soon as you’ve done that, click on ‘Next.’

Giving Smash Balloon access to your Facebook posts

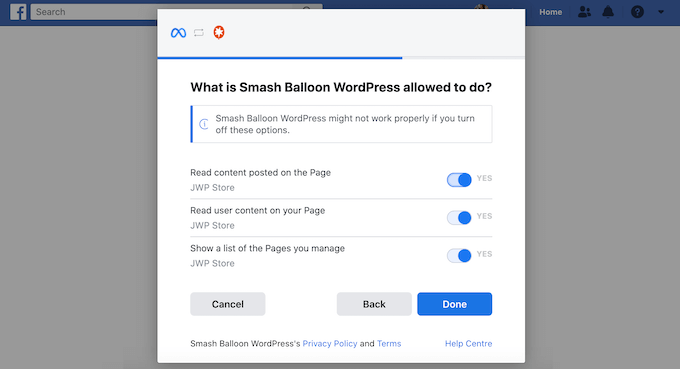
Facebook will then show all the information that Smash Balloon will have access to and the actions it can perform.

To restrict Smash Balloon’s access to your Facebook account, just click any of the switches to turn it from ‘Yes’ to ‘No.’ Just be aware that this may affect the content that you can embed on your WordPress blog or website.

With that in mind, it’s a good idea to leave all the switches enabled.

Connecting Facebook and WordPress using a free plugin

When you’re happy with how your Facebook permissions are set up, click on ‘Done.’

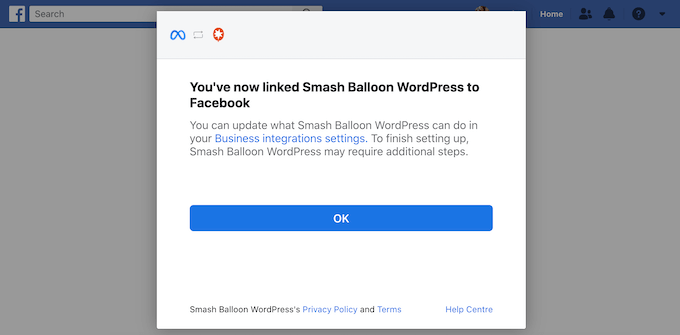
After a few moments, you should see a message confirming that you’ve connected your WordPress website to Facebook. With that done, click on the ‘OK’ button.

Connecting Smash Balloon and Facebook successfully

Smash Balloon will now take you back to the WordPress dashboard automatically.

How to Embed Facebook Status Posts in WordPress

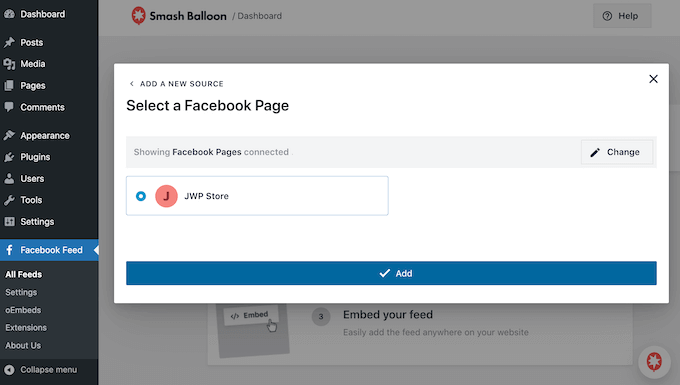
You will now see a popup with the source you just linked to your website. Simply select the radio button next to your Facebook page or group and then click on the ‘Add’ button.

Selecting a page or group as your Facebook source

If you accidentally closed the popup, then don’t worry. You can simply refresh the tab to reopen the popup.

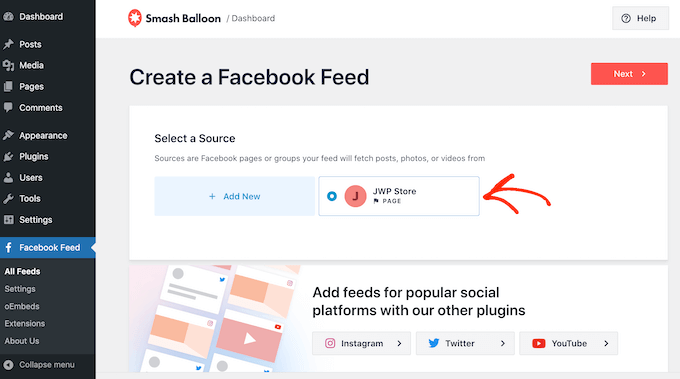
After that, Smash Balloon will take you back to the Facebook Feed » All Feeds page automatically. Just like before, click on the ‘Add New’ button, select ‘Timeline,’ and then click on the ‘Next’ button.

Now, select your Facebook page or group, and click on ‘Next.’

Embedding Facebook status posts in WordPress

Smash Balloon will now go ahead and create a timeline feed from the Facebook page or group you’ve chosen.

This is a good start, but Smash Balloon has lots of settings that you can use to customize your embedded timeline.

How to Customize Your Embedded Facebook Status Posts

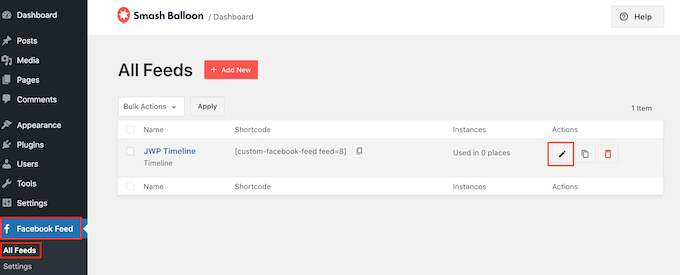
To fine-tune your timeline, go to Facebook Feed » All Feeds in the WordPress dashboard.

Here, find the timeline feed you just created and click on the ‘Edit’ button next to it.

Customizing the Facebook status timeline feed

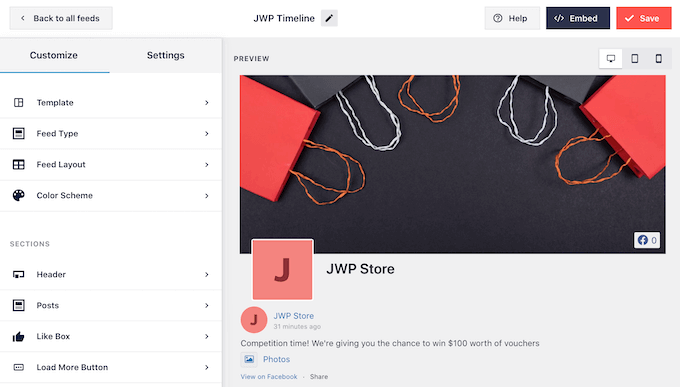
This opens the Smash Balloon feed editor, which shows a preview of your timeline to the right.

On the left-hand side, you’ll see all the different settings you can use to customize how the timeline looks on your site. Most of these settings are self-explanatory, but we’ll quickly cover all the main areas.

Customizing Facebook status posts in WordPress

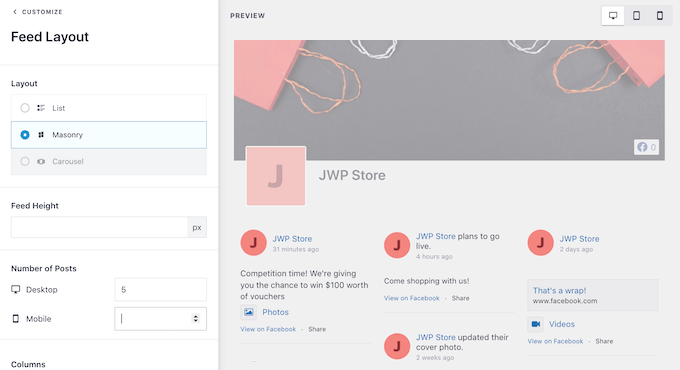
To start, you can change how the statuses are displayed by clicking on ‘Feed Layout.’

On this screen, you can switch between list and masonry layouts, as well as change the feed height. As you make changes, the preview will update automatically so you can try different settings to see what looks the best for your website.

Smash Balloon's Feed Layout settings

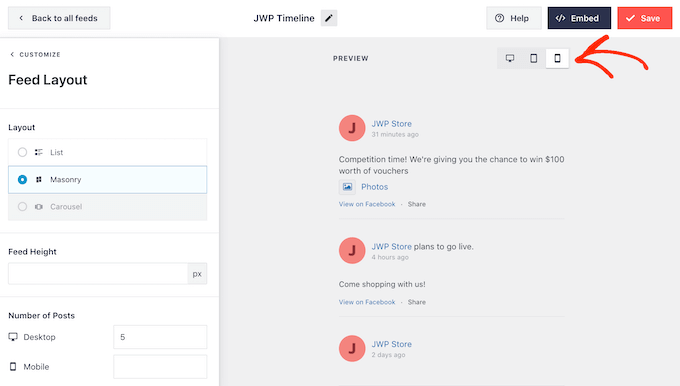
You can preview how your status feed will look on desktop computers, tablets, and smartphones using the row of buttons in the upper-right corner.

Mobile devices usually have smaller screens and less processing power, so if you’re not happy with how the feed looks then it’s smart to show fewer statuses on tablets and smartphones.

Testing your Facebook post status on mobile devices

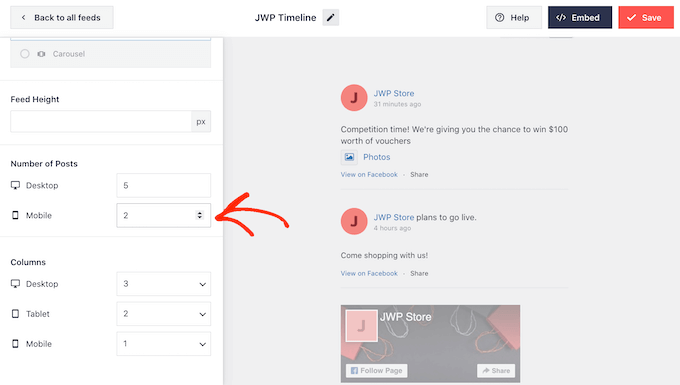
To make this change, just type a different number into the ‘Mobile’ field in the ‘Number of Posts’ section.

By trying out different layouts you can create a Facebook status feed that looks great across all devices.

How to create a responsive social media layout for mobile

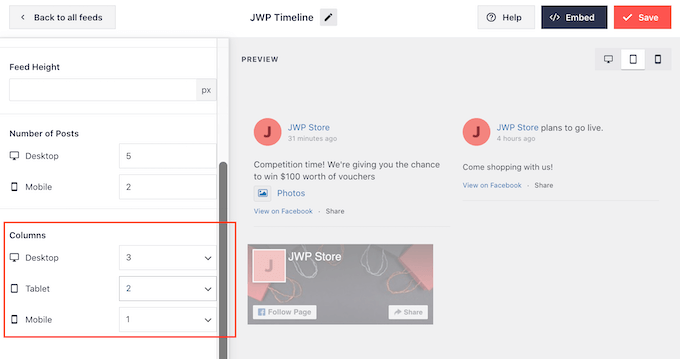
By default, Smash Balloon feed shows fewer columns on smartphones and tablets, compared to desktop computers. This helps your Facebook statuses fit comfortably on smaller screens.

After testing the mobile version of your WordPress website, you may want to show fewer columns on smartphones and tablets.

To do this, simply change the numbers under ‘Columns.’

Adding and removing columns in a Facebook status feed

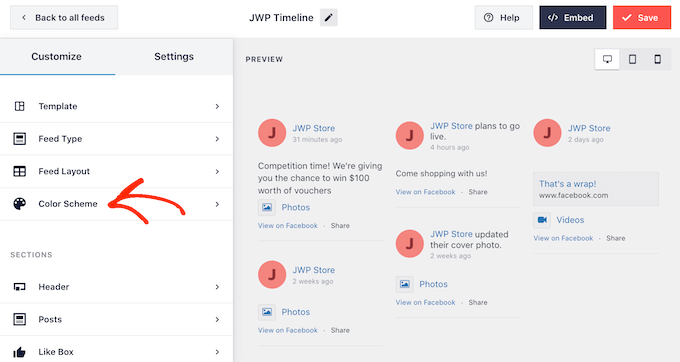
When you’re happy with how the feed looks, click on the ‘Customize’ link.

This will take you back to the main Smash Balloon editor, ready for you to explore the next settings screen, which is ‘Color Scheme.’

Changing the color scheme in your Facebook status feed

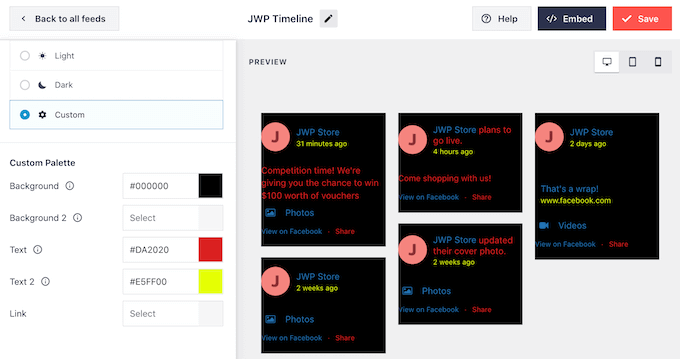
Smash Balloon uses a color scheme inherited from your WordPress theme by default, but on this screen, you can switch to a ‘Light’ or ‘Dark’ look.

You can also create your own color scheme by selecting ‘Custom’ and then using the controls to change the text color in WordPress, change the background color, and more.

Creating a custom color scheme using Smash Balloon

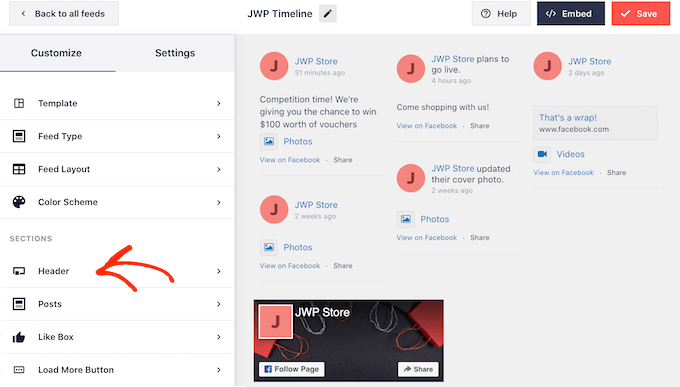
By default, Smash Balloon adds a header to your feed, which is your Facebook profile picture and the name of the group or page.

To customize this section, click on ‘Header’ in the left-hand menu.

Changing the Facebook custom feed header

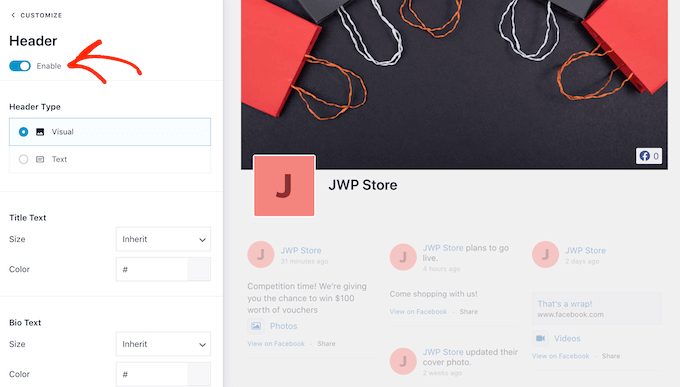
Here, you can change the header size and color, hide your Facebook profile picture, and more.

If you would prefer to remove the header entirely, then click to turn off the ‘Enable’ toggle.

Adding a header to the Facebook status feed

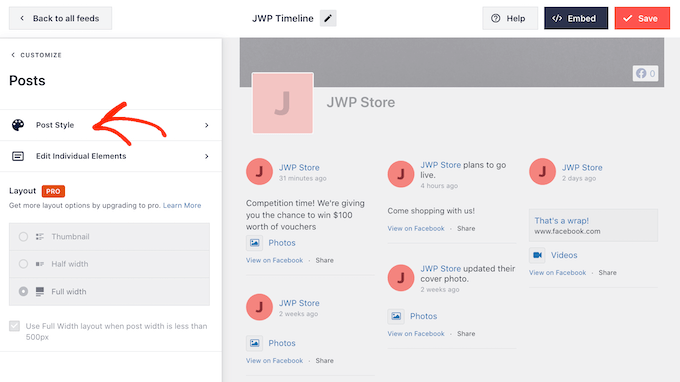
Next, you can change how the individual posts look inside your feed by selecting ‘Post Style’ from the left-hand menu.

After that, click on ‘Post Style’ again.

Customizing a Facebook status feed with Smash Balloon

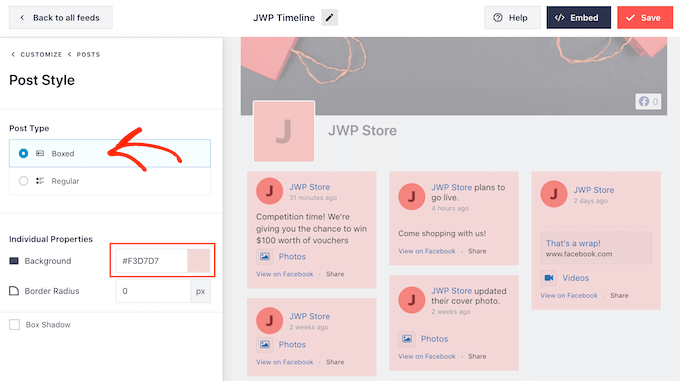
On this screen, you can choose between a regular and boxed layout.

If you select ‘Boxed’ then you can create a colored background for each Facebook post.

Adding colored box backgrounds to your embedded Facebook post statuses

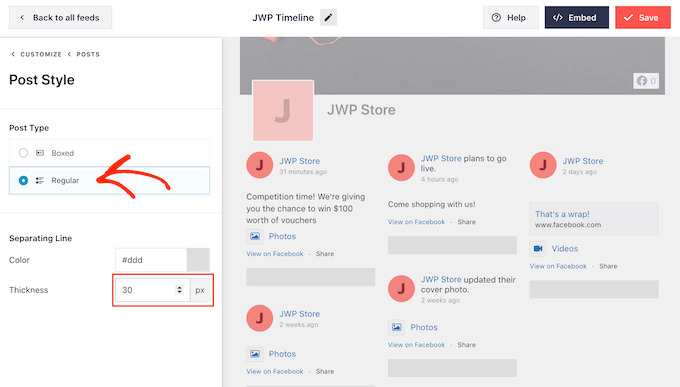
If you choose ‘Regular’ then you can change the thickness and color of the line that separates your different social media posts.

In the following image, we’ve added a thicker line to our Facebook status feed.

Adding borders to a Smash Balloon Facebook feed

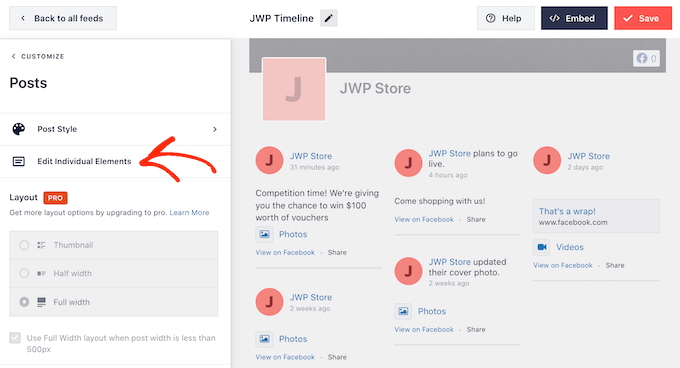
You can also customize the individual parts within each status by going back to the main settings screen.

Once again, select ‘Post Style’ but this time choose ‘Edit Individual Elements’ instead.

Customizing the posts inside a Facebook status feed

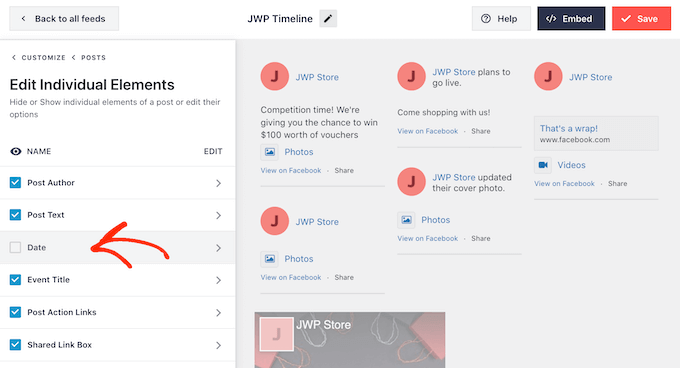
You will now see a list of all the different content that Smash Balloon includes in each post, such as the date, post author, and event title.

To remove a piece of content from your feed, simply click to uncheck its box.

How to remove content from a live Facebook feed

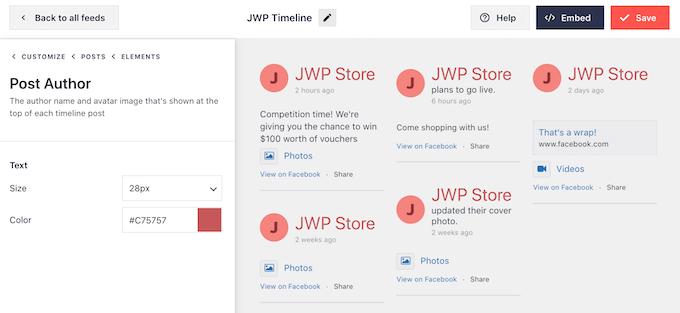
You can also customize how each type of content looks by clicking on it.

For example, in the following image, you can see settings to change the size and color of the author text.

Customizing how the post author is displayed in WordPress

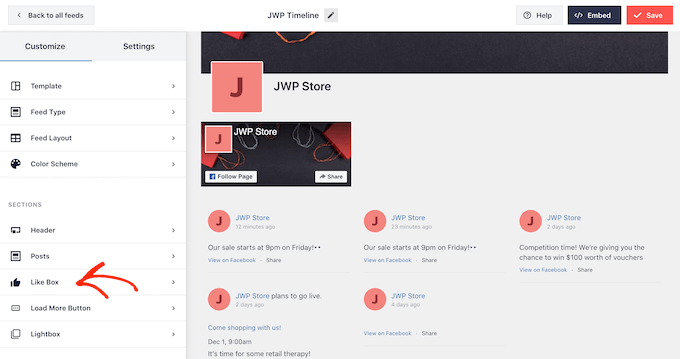
By default, Smash Balloon doesn’t include the Facebook ‘like’ button in your feed.

This button makes it easier for visitors to follow you on Facebook, so you may want to add it to your status feed by selecting the ‘Like Box’ settings.

Adding a like button to the Facebook status feed

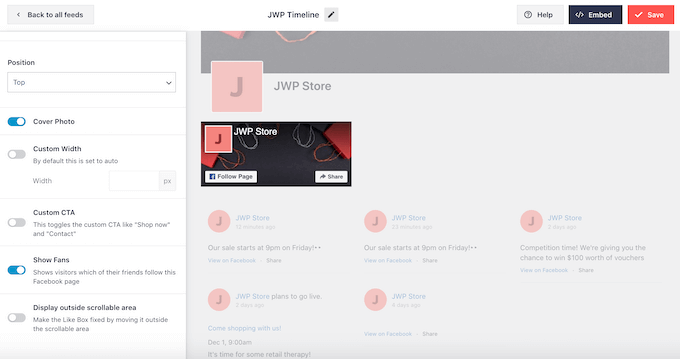
After that, simply click on the ‘Enable’ button so that it turns blue.

You can now use the settings to change where the link box appears and the kind of content included in the box, such as your Facebook cover photo and total number of followers.

Adding a like button to an embedded Facebook status page

If you upgrade to Smash Balloon premium, then there are some more settings to explore. This includes a lightbox feature that allows visitors to explore your content in a popup.

Since you’re using the free version of Smash Balloon for now, you can go ahead and click on ‘Save’ to store your changes.

The next step is adding the Facebook status feed to your WordPress website.

How to Embed Facebook Status Posts in WordPress

You can add your Facebook status feed to WordPress using a block, widget, or shortcode.

If you’ve created more than one feed using Smash Balloon, then you’ll need to know the feed’s code if you’re going to add it using a block or widget.

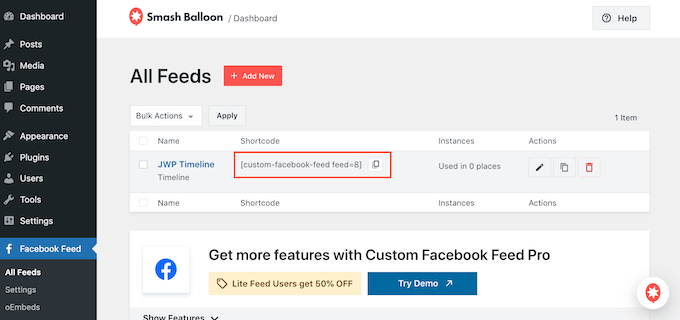
To get this information, simply go to Facebook Feed » All Feeds and then look at the feed="" part of the shortcode. You’ll need to add this code to the block or widget, so make a note of it.

In the following example, we’ll need to use feed="8".

Adding Facebook content to WordPress using a shortcode

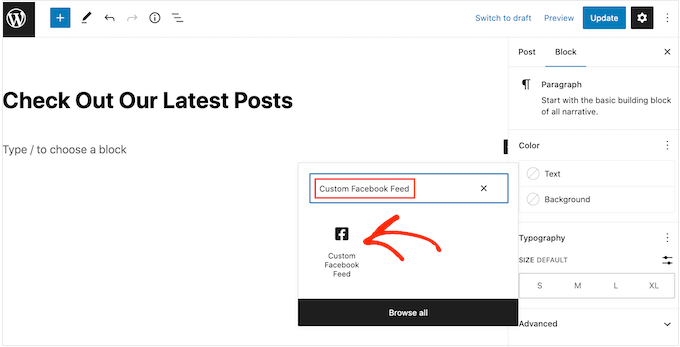
If you want to embed your Facebook statuses in a page or post, then we recommend using the ‘Custom Facebook Feed’ block.

Simply open the page or post where you want to embed the status feed. Then, click on the ‘+’ icon to add a new block and start typing ‘Custom Facebook Feed.’

When the right block appears, click to add it to the post or page.

Adding a Facebook timeline to your website using a WordPress block

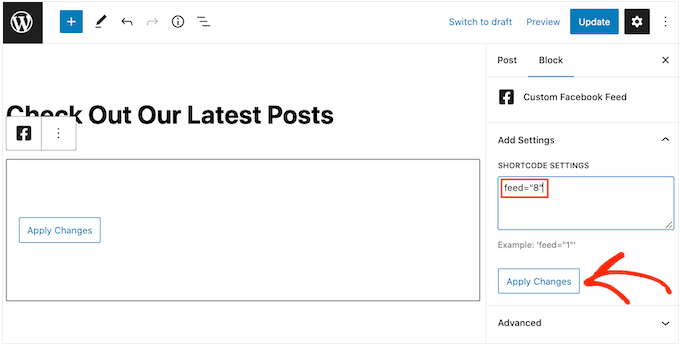
The block will show one of your Smash Balloon feeds by default. If you want to use a different feed instead, then simply find ‘Shortcode Settings’ in the right-hand menu.

You can now add the feed="" code to this box. Once you’ve done that, click on the ‘Apply Changes’ button.

Showing different Facebook feeds using shortcode

The block will now show all the status updates from your Facebook page or group. Just publish or update the page to make the feed live.

Another option is to add the feed to any widget-ready area, such as the sidebar or similar section. This allows visitors to see your latest Facebook updates across your entire website.

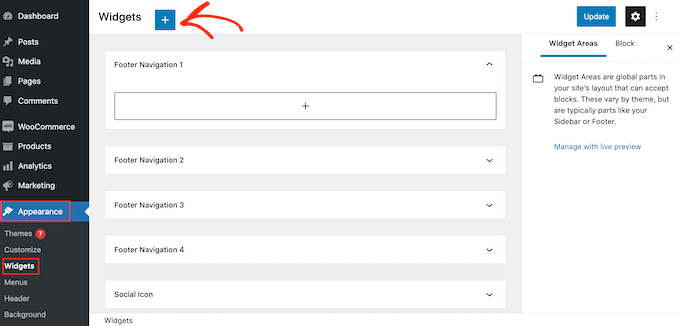
Simply go to Appearance » Widgets in the WordPress dashboard and then click on the blue ‘+’ button.

The Smash Balloon Custom Facebook Feed widget

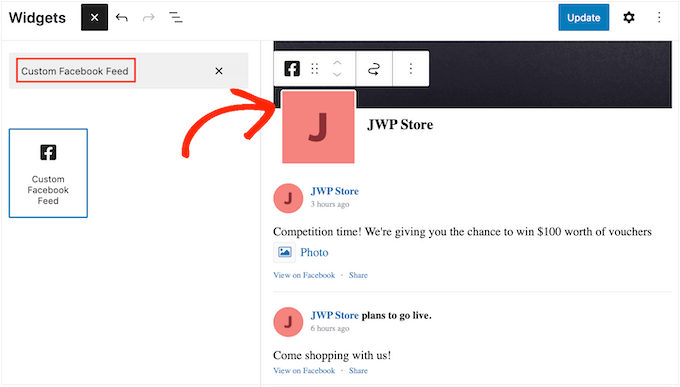
Now, start typing ‘Custom Facebook Feed’ into the search bar to find the right widget.

You can now drag it onto the area where you want to show your Facebook status updates. By default, the widget will show one of the feeds you created using Smash Balloon.

Adding a social media widget to your WordPress website

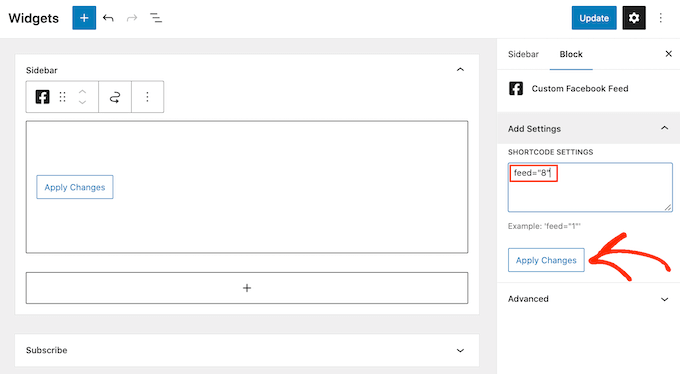
To show a different feed instead, type the feed’s code into the ‘Shortcode Settings’ box and then click on ‘Apply Changes.’

You can now click on the ‘Update’ button to make the widget live.

How to publish a Facebook feed to your website

For more information, please see our step-by-step guide on how to add and use widgets.

Finally, you can embed your status on any page, post, or widget-ready area using a shortcode. To get the shortcode, simply go to Facebook Feed » All Feeds and copy the value in the ‘Shortcode’ column.

You can now add this code to your site. For more information, please see our detailed guide on how to add a shortcode in WordPress.

We hope this article helped you learn how to embed Facebook status posts in WordPress. You may also want to see our guide on how to create an email newsletter and the best WordPress Facebook plugins to grow your blog.

If you liked this article, then please subscribe to our YouTube Channel for WordPress video tutorials. You can also find us on Twitter and Facebook.

The post How to Embed Facebook Status Posts in WordPress first appeared on WPBeginner.


January 11, 2023 at 12:43AM
How to Add Country Restriction for WooCommerce Products

Recently one of our readers asked if it was possible to restrict countries in your WooCommerce store?

By hiding your WooCommerce store from specific countries, you can control your product visibility around the world. That way, your products will only be available in specific countries.

In this article, we will show you how to easily add country based restriction to WooCommerce products or even your entire WooCommerce store.

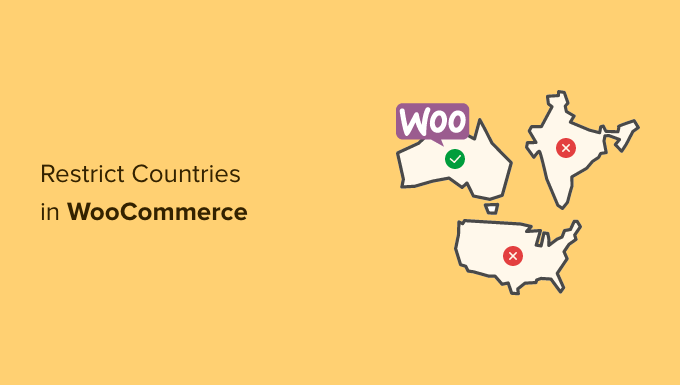
How to Restrict Countries in WooCommerce

Why Restrict Your WooCommerce Store in a Country?

When selling products online, an online store owner can come across a lot of problems. For example, you can get a product order from a country where that product is illegal, or your payment gateways can’t process fees.

When building a WooCommerce store, it is important to provide the best user experience to your customers. You don’t want the customer to place an order only to find out that they can’t complete their purchase.

This can result in customer frustration, and it can keep them from ever coming back to your site or buying something else from you.

To avoid these kinds of situations, it is better to restrict access to your WooCommerce store or products from specific countries.

With that being said, let’s take a look at how you easily can restrict your WooCommerce store and products in specific countries.

You can jump to either method by clicking the links below:

Method 1. Restricting Countries Using WooCommerce Settings

You can easily hide your online store in specific countries using WooCommerce default settings.

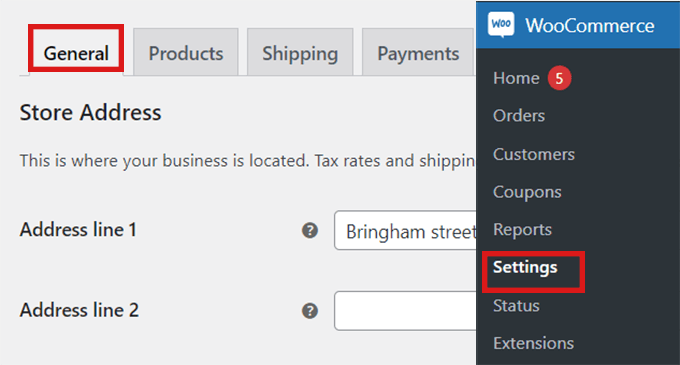
First, go ahead and click on the WooCommerce » Settings option in your WordPress dashboard and then go to the ‘General’ tab.

Go to WooCommerce Settings and select General

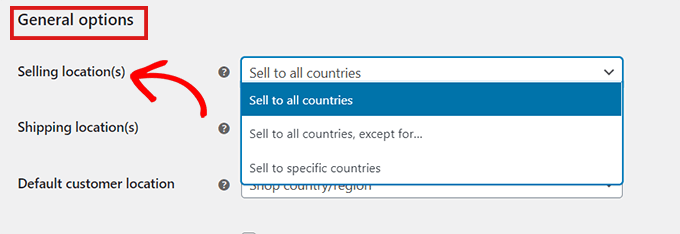
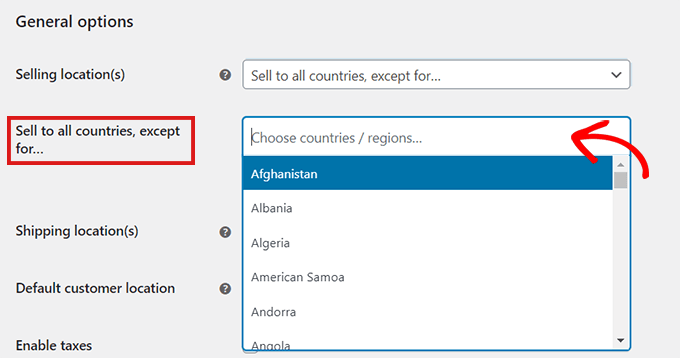
Once there, scroll down to the ‘General Options.’ Here you will find the ‘Selling Location’ section. Simply click on the dropdown menu in the field where you will find three options.

You can either select the ‘Sell to specific countries, except for…’ option, or you can choose the ‘ Sell to specific countries’ option.

Go to General Option and select Selling Location

When you select the ‘Sell to specific countries, except for…’ option, another field will appear.

Now, just select from the dropdown any countries where you don’t want to sell your products.

Select countries where you don't want to sell your product

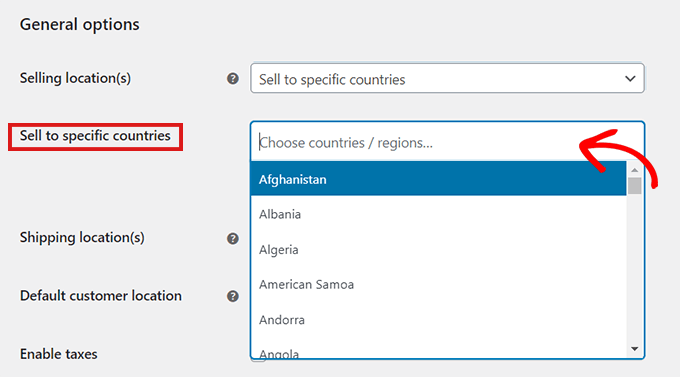
If you’ve chosen the ‘Sell to specific countries’ option, a ‘Sell to specific countries’ field will appear in the settings below.

Now you can select all the countries where your store will be available.

Select countries where you want to sell your product

This method is very easy to use, and you don’t have to download any additional WooCommerce plugins for it.

The main downside of this method is that you cannot hide specific products.

By restricting countries using the default settings method in WooCommerce, the restrictions will be applied to your whole online store, and users in those countries won’t be able to buy any of your products.

If you only want to hide some specific products in different countries, it is better to use a plugin mentioned in Method 2. Let’s take a look at how to restrict specific WooCommerce products in different countries.

Method 2. Add Country Based Restrictions for WooCommerce Products

The best way to hide your store products in some specific countries is by using a WordPress plugin like the Country Based Restrictions For WooCommerce.

It is a free WooCommerce plugin that allows you to hide your products in specific countries.

First, you’ll need to install and activate the ‘Country Based Restrictions For WooCommerce’ plugin. For more details, please take a look at our guide on how to install a WordPress plugin.

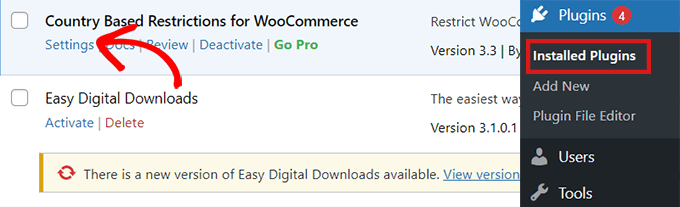
After you’ve activated the plugin, go to Plugins » Installed Plugins.

Go to the country based restrictions for WooCommerce plugin settings

Here, click on the ‘Settings’ link in the ‘Country Based Restrictions for WooCommerce’ entry.

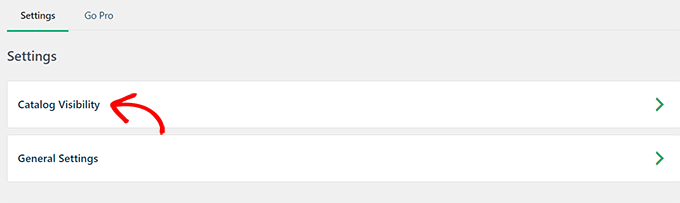
Once you’re on the ‘Settings’ page, just click on the ‘Catalog Visibility’ option.

Choose Catalog Visibility option

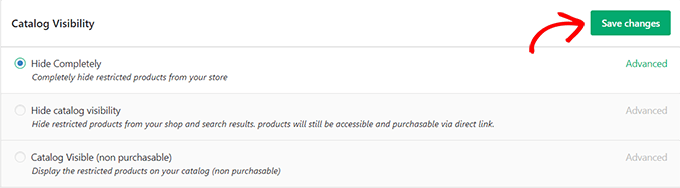
After you’ve clicked on the ‘Catalog Visibility’ option, you will have 3 choices:

  • Hide Completely – Restricted products will not appear in your store.
  • Hide Catalog Visibility – Restricted products will only be available by direct links, but not through browsing or search results.
  • Catalog Visible (non purchasable) – Restricted products will appear as normal, but customers will be unable to purchase them.

Once you’ve chosen an option, simply click on the ‘Save Changes’ button.

Choose your Catalog Visibility option

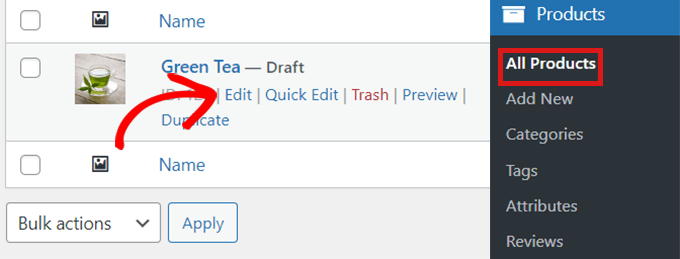
Next, go to WooCommerce » All Products in your WordPress dashboard.

Locate the product that you want to restrict and simply click on the ‘Edit’ link.

Go to WooCommerce Products and select Edit

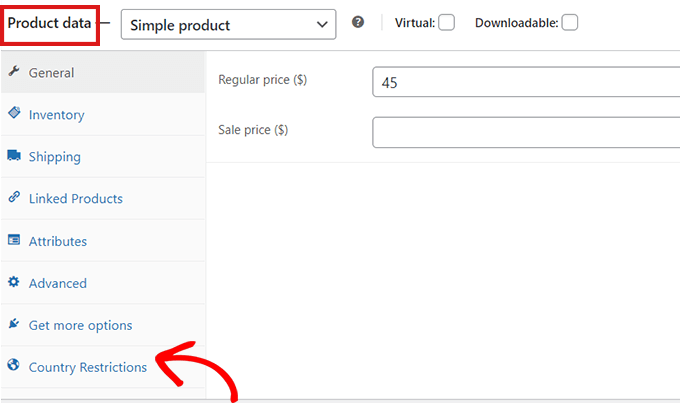
This will open the ‘Edit Product’ page. You can then scroll down to the ‘Product Data’ section.

Next, simply click on the ‘Country Restrictions’ option to the left.

Go to Product Data section and select Country Restrictions

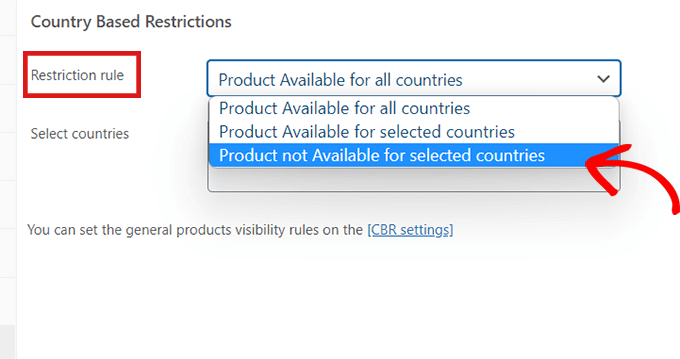
After you’ve clicked on the ‘Country Restrictions’ option, you’ll see a ‘Restriction Rule’ field.

Simply click on the dropdown menu beside the field and select the ‘Product Not Available For Selected Countries’ option.

Select Product not available for selected countries option

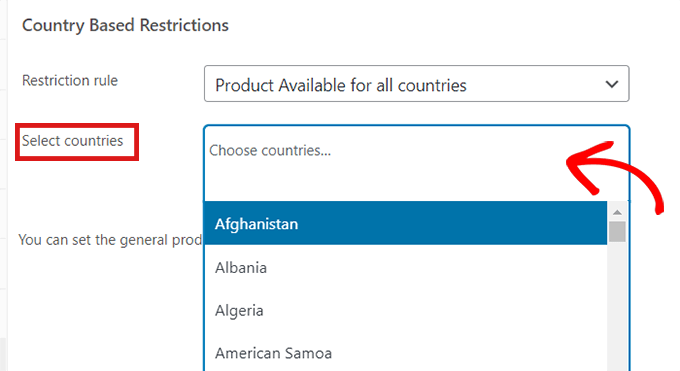
After that, go to the ‘Select Countries’ field and click on the dropdown beside it.

Then, simply choose the countries where your product won’t be available for purchase.

Choose countries you want to restrict

Once you’re happy with your choice, don’t forget to click on the ‘Publish button.’

Now, if a customer from the chosen country visits your store, the product you’ve restricted won’t appear.

Bonus: Geolocation Targeting for WooCommerce to Grow Sales

Did you know that geotargeting in WooCommerce can help you grow sales?

We have created an ultimate guide to geolocation targeting in WordPress that will show you how to create personalized content and offers for users in specific countries using various tools.

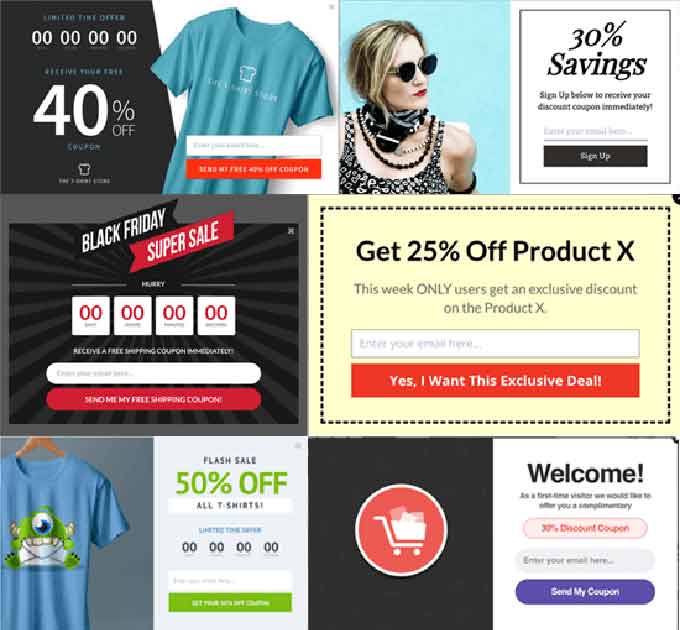
For example, you can use a plugin like OptinMonster to run specific discounts for certain locations, offer different prices based on countries, and so much more.

Optinmonster Coupon Popups

We hope this article helped you learn how to restrict countries in your WooCommerce store. You may also want to see our ultimate WooCommerce SEO guide to improve your SEO rankings, or see our tutorial on how to fix WooCommerce not sending email issue to improve your email deliverability.

If you liked this article, then please subscribe to our YouTube Channel for WordPress video tutorials. You can also find us on Twitter and Facebook.

The post How to Add Country Restriction for WooCommerce Products first appeared on WPBeginner.


January 10, 2023 at 04:02PM