Certified WordPress Developer and SEO Specialist with 10+ years of experience on Fiverr. I provide expert solutions for WordPress error fixing, debugging, speed optimization, and security hardening. Services include hacked site recovery, malware removal, on-page SEO optimization, and full customization to ensure your website runs fast, secure, and ranks higher on Google.
Do you want to translate your website into another language?
By default, WordPress does not offer an easy way to manage multilingual content. However, you can easily translate your WordPress website by using plugins.
In this article, we’ll show you how to easily translate your WordPress website with TranslatePress.
Why Use TranslatePress for Translating a WordPress Website?
The best part about WordPress is that it can be used in any language. Most WordPress themes and plugins can also be used and translated into any language as well.
If your business website has a multilingual audience, then it can be super beneficial to translate your content.
You can rely on machine translations like Google Translate, but these translations are not good and sometimes can be quite misleading.
On the other hand, if you’re using a multilingual WordPress plugin, then you need to create multiple posts which require switching back and forth between different languages.
With the TranslatePress plugin, you can translate your website and content using a live editor and won’t need to create multiple posts for the same content.
You can instantly switch languages from the live editor and can also translate themes and plugins using TranslatePress.
Having said that, let’s see how you can easily translate your WordPress website with TranslatePress.
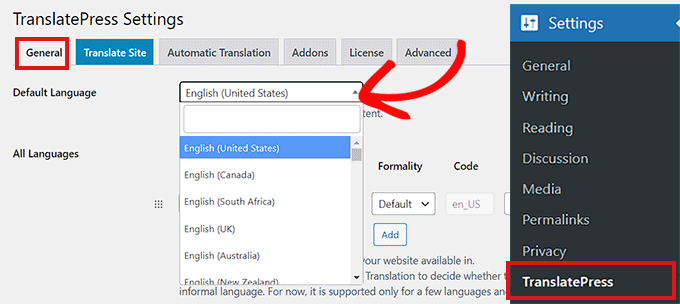
Upon activation, head over to the Settings » TranslatePress page from the WordPress admin dashboard to configure your plugin settings.
From here, you need to switch to the ‘General’ tab.
Now, you first need to choose the default language of your website from the dropdown menu beside the ‘Default Language’ option.
This is the language your WordPress is already downloaded in.
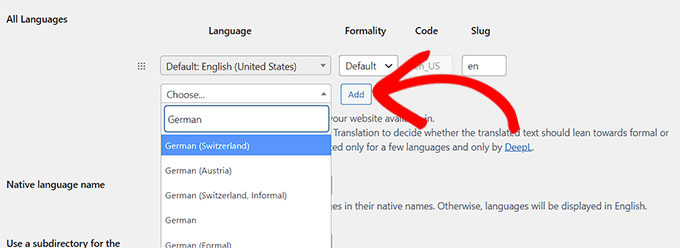
After that, you need to choose the language that you want to translate your site into.
Simply head over to the ‘All Languages’ section, and choose a language you want to translate your website into from the dropdown menu below the ‘Language’ option.
After that, you need to click the ‘Add’ button.
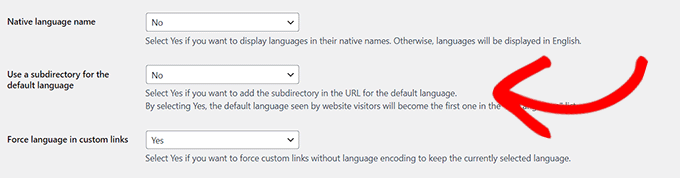
Now scroll down to the ‘Native Language Name’ setting on the page.
Here, you need to select whether you want to display language names in their own language or in English. You can choose ‘Yes’ or ‘No’ accordingly.
The next option is to choose if you want to display the default language name in the URL as a subdirectory. For example, http://example.com/en/.
After that, head over to the ‘Force language in custom links’ setting.
The default option for it is ‘Yes’ which will allow the plugin to change custom links for translated languages, making the URLs more SEO-friendly.
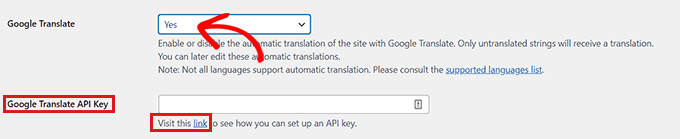
In the next option, you can choose if you want to use Google Translate for automatic translations.
The default choice is ‘No’, but you can change that if you would like to use Google Translate.
All you would need to do is provide a Google Translate API key in the next option. You will find a link under the option which will show you instructions on how to get one.
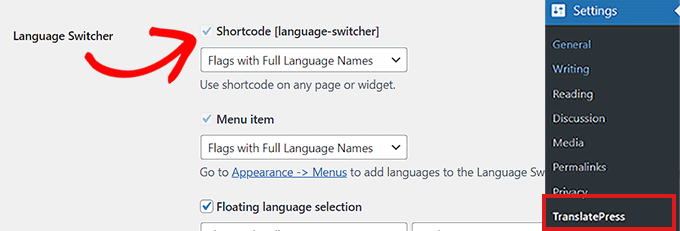
Finally, you will come to the options on how you want to display the language switcher on your website. TranslatePress provides you with three choices.
You can use a shortcode, add a switcher to your navigation menu, or display a floating menu. We will show you how to add the language switcher to your website later in this article.
Now, simply go ahead and click on the ‘Save Changes’ button to store your settings.
Step 2: Translating Your Website Content
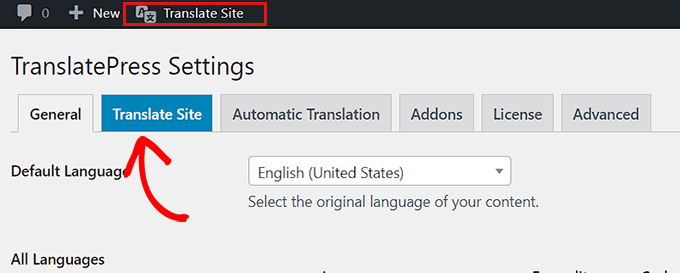
To translate your website, you can either click the ‘Translate Site’ tab on the plugin’s settings page or the ‘Translate Site’ button in your WordPress admin bar.
This will open the live translation editor in a new browser tab.
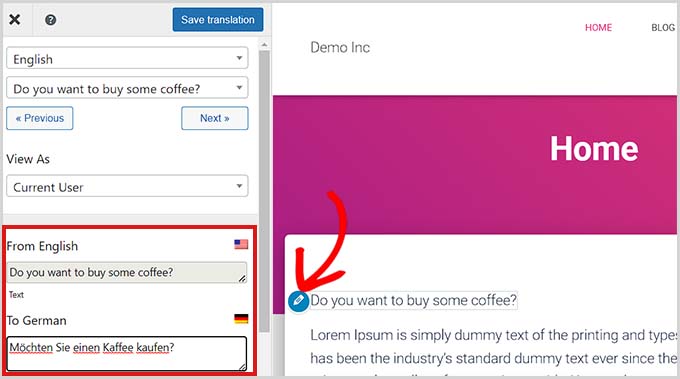
Now, you need to simply click the blue translate icon present next to any text on your website that you want to translate.
After that, TranslatePress will automatically load the chosen text in the left column of the translation editor.
Once the text is loaded in the column, simply add its transition in the box below and then click the ‘Save Translation’ button at the top to store your changes.
This way, you can translate all the content on any page of your site including navigation menus, buttons, sidebar, widgets, meta-text, and more.
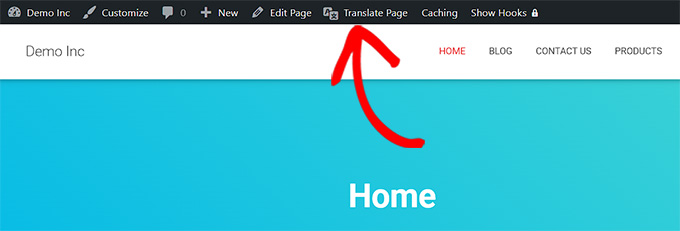
With TranslatePress, you can also instantly start translating any page or post on your site when logged in.
All you would need to do is click on the ‘Translate Page’ button on the top to open up the live editor.
Another benefit of this plugin is that you only need to translate a specific string once.
Once you have translated a string, the plugin will automatically translate it for you in other places.
Step 3: Adding Language Switcher to Your Website
After translating your site, you will need to add a language switcher to your website.
A language switcher allows users to select a language when they visit your website. It usually displays the flag of each country to indicate languages available on your site.
TranslatePress allows you to add a language switcher by using a shortcode, as a navigation menu item, or as a floating banner.
The language switcher can be displayed as flags, language names, or both.
Adding language switcher in WordPress using shortcode
If you want to add a language switcher in WordPress using shortcode, then head over to the Settings » TranslatePress page from the admin dashboard.
Once you’re on the ‘Settings’ page, scroll down on the ‘General’ tab and then copy the [language-switcher] shortcode in the ‘Language Switcher’ section.
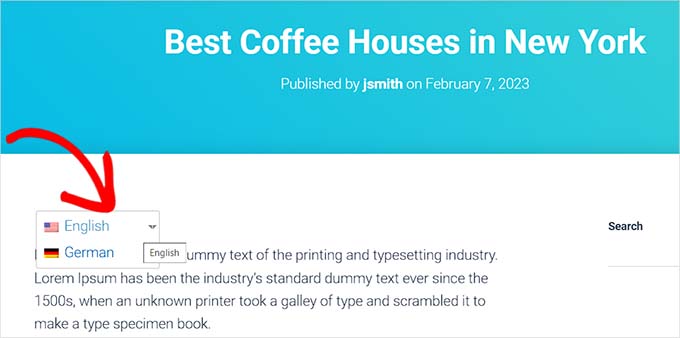
You can now paste this shortcode on any page, post, or sidebar widget where you want to display the language switcher.
This is how the language switcher looked on our demo site.
Adding a language switcher to your WordPress navigation menu
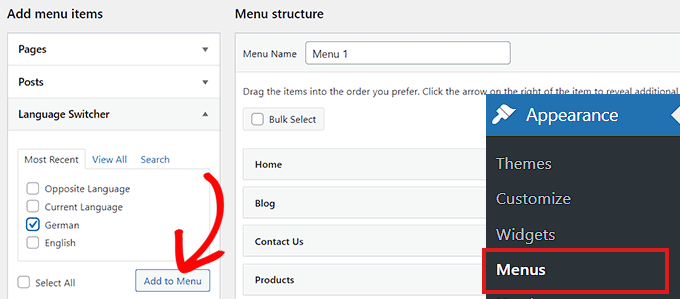
If you want to add a language switcher as a navigation menu item, then go to the Appearance » Menus page from the dashboard.
Note: If you are using a block-based theme with a full site editor, then this method won’t work for you.
From here, you need to click on the ‘Language Switcher’ tab in the ‘Add Menu Items’ section on the left corner of the screen.
Once the tab expands, simply check the languages that you want to display in the language switcher.
After that, click the ‘Add Menu’ button to add the language switcher as a menu item.
Finally, don’t forget to click on the ‘Save Menu’ button to store your changes.
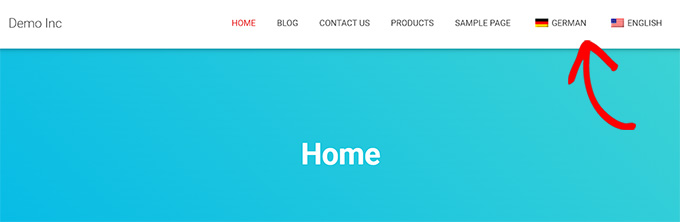
You will now see a language switcher added to your WordPress navigation menu.
This is how it looked on our test site.
Adding a floating language switcher
If you want to add a floating language switcher, then you simply need to head over to the Settings » TranslatePress page from the admin dashboard.
First, you need to scroll down to the ‘Language Switcher’ section in the ‘General’ tab.
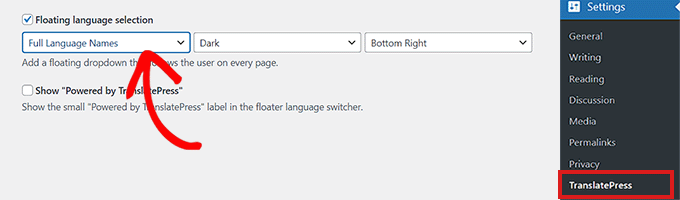
From here, make sure to check the box next to the ‘Floating language selection’ option.
You can also switch the position of the floating language switcher from the dropdown menu on the right corner of the screen.
After that, don’t forget to click on the save changes button to store your settings.
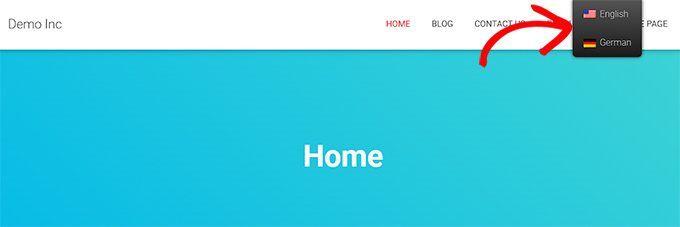
You can now visit your website to see the floating language switcher at the bottom of every page on your website.
Are you looking for ChatGPT prompts ideas to improve blog and marketing strategy?
ChatGPT prompts are the instructions that you type in ChatGPT AI to speed up your workflow. You can use ChatGPT to draft social media posts, come up with blog post ideas, and so much more. The key to getting best results with AI is to make your ChatGPT prompts better and more specific.
In this article, we’ll share the best ChatGPT prompt ideas for bloggers, marketers, and social media, so you can improve your marketing results.
This article will cover a lot of topics, so you can click on any of the links below to jump to a particular section that best suits your needs.
A ChatGPT prompt is the starting point of a conversation in the form of a question or instruction given to an AI language model like ChatGPT.
ChatGPT is an AI-based software that uses machine-learning technology called Natural Language Processing.
To see it in action, you need to sign up for ChatGPT by visiting the OpenAI website.
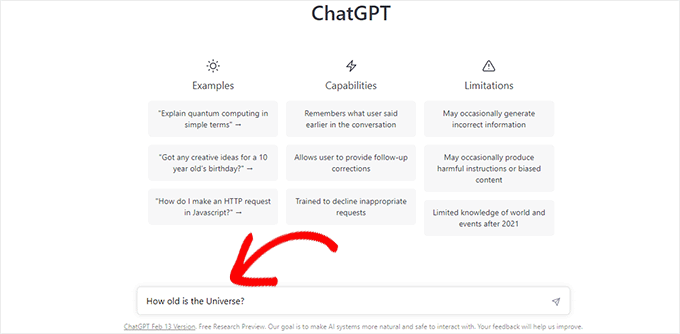
After that, you’ll see a simple chatroom. At the bottom, you can input your prompt in plain language.
For instance, ‘How old is the Universe?’ and hit the send button.
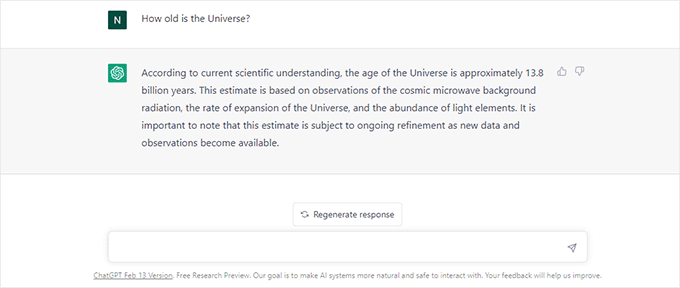
ChatGPT AI will then respond to your question in plain language.
The answer length and style may vary based on the prompt you entered.
Writing better prompts allows AI to narrow down its approach and provide you with more specific details.
If you want to start a blog, then ChatGPT can help you find article ideas, the article outline, rough drafts, SEO optimization, proofreading, research, and more.
Many bloggers and marketers are exploring opportunities to generate content ideas using AI.
By learning some quick prompt ideas, you can speed up the process and unlock maximum benefits from ChatGPT AI to improve your workflow.
Note: ChatGPT and other AI apps are usually not able to create content that can be simply copied and pasted without any human edits. When you use an AI tool, be sure to go through the results thoroughly to be sure that all information is correct and that the messages are appropriate for your audience.
How to Write Better ChatGPT Prompts?
ChatGPT uses natural language processing which means you can write your prompts in a plain conversational style.
For instance, instead of typing a smaller sentence, you can instruct GPT on how to respond, which style to use, length limitations, ask for examples, and more.
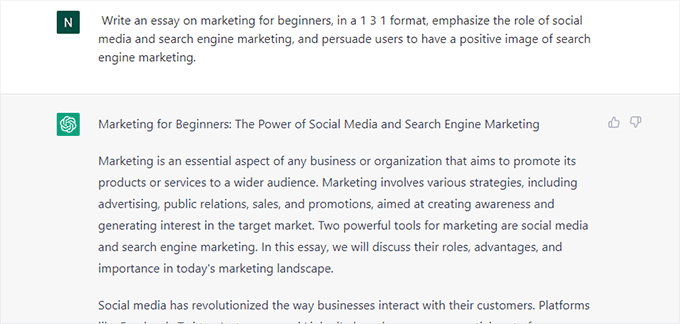
Instead of asking ‘What is Marketing?’ a better prompt would be:
‘Write an essay on marketing for beginners, in a 1 3 1 format, emphasize the role of social media and search engine marketing, and persuade users to have a positive image of search engine marketing.’
While writing your prompts in natural language might seem really simple, many beginners may still be unsure about where to start. It can take a lot of practice to find a style of prompt that works best for your projects.
That being said, let’s take a look at some easy and quick ChatGPT prompt ideas bloggers and marketers and marketers can use to succeed.
Using AIPRM Extension to Generate ChatGPT Prompts
The easiest way to generate ChatGPT prompts is by using AIPRM for ChatGPT.
It is a Google Chrome browser extension with a curated list of ChatGPT prompts for SEO, blogging, content creation, and marketing.
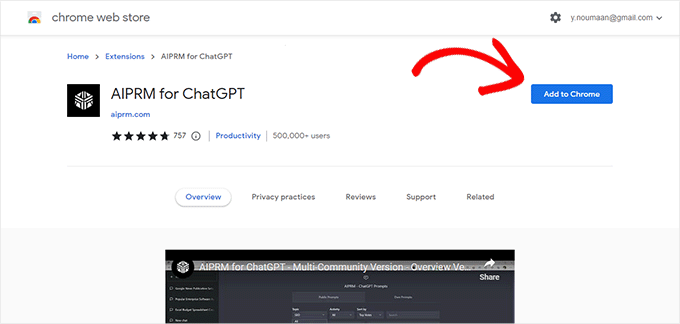
Go to the AIPRM for ChatGPT extension page on the Chrome web store and then click the Add to Chrome button.
Once the extension is added to your browser, it will automatically take you to the ChatGPT website.
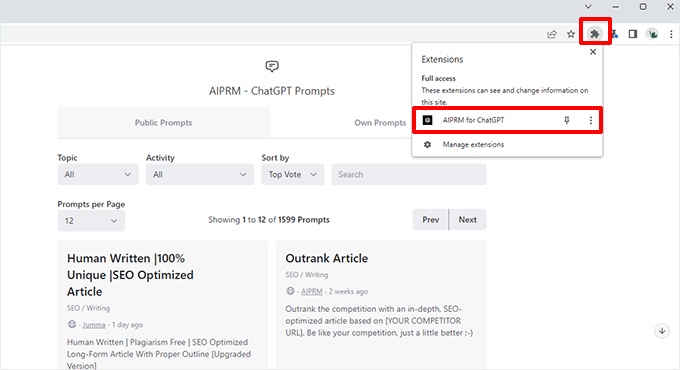
If it doesn’t, you can click on the extensions button in your browser menu and click on the AIPRM for ChatGPT to launch it in a new tab.
You’ll need to sign in to your OpenAI account. After that, you will see a curated list of ChatGPT prompts.
At the time of writing this article, AIPRM had 1600+ ChatGPT prompts.
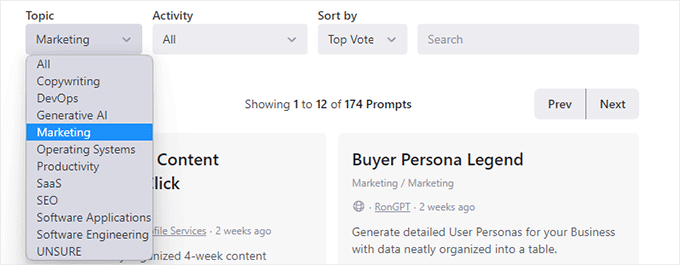
You can browse the prompts by Topic and Activity, sort them, or search for specific prompts from the top toolbar.
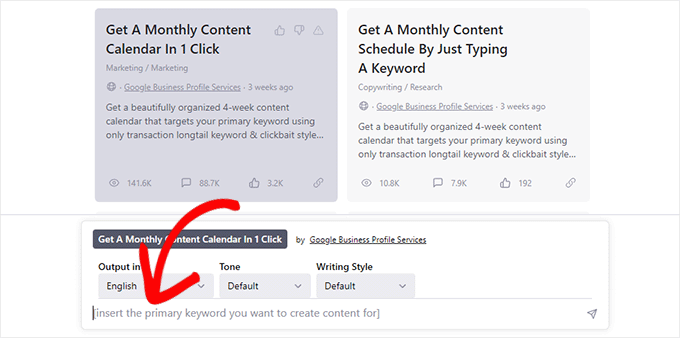
To use a prompt, simply click on it and it will appear in the prompt toolbar below.
If the prompt you are using requires user input, then you can provide it in the chatbox.
For instance, here it wants us to enter a keyword that we would like to target to make a content calendar.
You can also choose language, style, and tone for your response.
Hit the enter button after entering your input and ChatGPT will respond to the prompt.
You can regenerate a response or ask ChatGPT to modify or extend it by adding your instructions into chat.
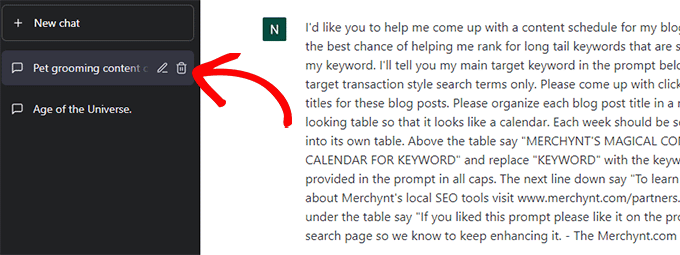
You won’t be able to see the prompt that AIRPM uses at first. However, refreshing the page or switching back and forth between chats will reveal the actual prompt at the beginning of the chat.
AIPRM makes it extremely easy to find detailed, tested, and well-written prompts that you can use on your WordPress website.
Best ChatGPT Prompt Ideas for Bloggers and Marketers
With so many prompt ideas available with AIPRM extension, it could still be a bit overwhelming for users to find or use a prompt.
Here is our top pick of the most useful ChatGPT prompt ideas for blogs, SEO, and marketing.
Blogging ChatGPT Prompts
1. Generate a month-long content calendar targeting specific keywords.
“Make me a month-long calendar for the following keywords [Enter Keywords here]. Add [number of articles] articles each week, and use persuasive SEO-friendly titles for each article.”
2. Generate Blog Post Ideas
“Create a list of at least 10 blog post ideas on the following topics: [Enter topics separated by commas]. Suggest SEO-Friendly title for each post, and use an emotional and persuasive tone in post titles.”
3. Generate SEO title and meta description for a blog post
“Suggest at least 5 SEO-friendly titles and meta descriptions for the following blog post [Enter your blog post text here]. Use a persuasive and intriguing tone.”
4. Suggest tags for a blog post
“Suggest at least 5 tags for the following blog post [Enter your blog post text here].”
5. Generate related long-tail keywords for a blog post
“I want you to generate a list of long-tail keywords that are related to the following blog post [Enter blog post text here].”
6. Create an article outline
“Write an article outline for the following topic [Enter topic or blog post title here].”
7. Write an article on a specific topic
“Write an article on the following topic [Enter topic here]. The article should be at least [number of words] words in length. Use a persuasive tone and pretend to be an expert on the topic.”
8. Outrank a competitor for a specific keyword
“Write an article based on the topics covered in the following article [Enter competitor URL here]. Make the article more comprehensive than the URL provided by adding details that the source URL has missed or didn’t cover. Answer the most commonly asked questions about the topic at the end of the article.”
9. Write a motivational blog post
“I want you to write a motivational blog post about overcoming [fear/failure/challenge goes here].”
10. Generate call-to-action ideas
“I want you to come up with 5 effective call-to-action button ideas based on the contents of the following URL [Your website or landing page URL goes here].”
11. Generate a pros and cons outline for a topic
“Write down an essay on the pros and cons of [Your topic goes here].”
12. Write questions for an interview blog post
“Write interview questions for a blog post with [Guest Name] who is an expert in [Guest profession or area of expertise].”
13. Proofread a text and optimize it for the focus keyword
“I want you to act as SEO editor and copywriter. I need you to proofread and analyze the following text and optimize it for the focus keyword. I also need you to correct any grammar mistakes you find in the article. Ask me to provide you with the article text and focus keyword.”
14. Reuse a blog post for social media content
“I want you to act as a topic authority and social media influencer. I will provide you with the text or URL of an article. You need to summarize it and create content for social media platforms. Ask me to provide you with the text or URL of the article.”
15. Generate a list of tools to mention in a blog post
“Create a list of the most popular tools used by the [Field of Interest] professionals with the pros and cons of each tool.”
16. Write a conclusion for a blog post
“I want you to pretend to be a topic expert, and write a persuasive conclusion for the following blog post. [Your blog post text goes here].”
17. Come up with best practices for using something
“Pretend to be a topic expert and write down an essay on the best practices to follow when using [mention the tool or topic here].”
18. Write a comparison blog post
“I want you to pretend to be a topic expert and compare [Item 1] vs [Item 2] with pros and cons. I need you to show that [item 1] is better than [item 2] and persuade the reader to have a positive feeling about [item 1].”
19. Build reader personas to learn more about a target audience
“Build a reader persona for a blog post titled “[Your blog post title goes here].”
20. Polish your content to look more creative
“Analyze and improve the following content to make it more creative. Use an [Select tone style] tone and write in a casual and conversational style. “[Your content goes here]”
Social Media ChatGPT Prompts
21. Generate captions for Instagram posts, reels, and reels.
“Write an Instagram post description or caption using a few sentences for the post about “[Enter a description of what your Instagram post is about]”. Start the caption with an intriguing sentence and don’t make the first sentence a question. Use emojis in each sentence and add a paragraph after two sentences to make it more readable. Add the most popular hashtags related to the post.”
22. Write an Instagram post about a product / service
“Write an Instagram post promoting [product/services] using a few sentences. Start the post with a captivating sentence and end with a sentence including a call to action to check the link in bio. Use emojis and add the related hashtags at the bottom.”
23. Generate Instagram carousel ideas with slide descriptions
“Write me an Instagram carousel topic idea example. Also, write slide by slide with titles. Explain each slide with the exact content example I should use, not instructions. Also, give me images for every slide that explain all the titles for [Your Instagram Carousel Topic Here]. Do not include content instructions, instead, only write me an actionable text that I can just copy and paste.
After writing the carousel slides. Write me the Instagram post description/caption in just a few sentences. Format every new sentence with new lines so the text is more readable.
Include emojis and the best Instagram hashtags for that post.
The first caption sentence should be intriguing and captivating to the readers.”
24. Write Twitter Bio
“I want you to write an interesting Twitter bio for a [Your brand niche and industry / Profession ].”
25. Suggest Twitter Header Image Ideas
“Give me at least 5 ideas to create a Twitter header image for a [Profession/Industry niche].”
26. Generate Tweets for a specific profession, niche, or business
“I want you to act as a social media manager and come up with at least 20 Tweets for a [Profession/ Business niche or industry] include popular hashtags in each tweet.”
27. Generate a viral Twitter thread
“I am looking for a Twitter thread idea that will go viral and showcase [mention your service, product. or blog] to the ideal customer persona in a creative and engaging way. Include hashtags and emojis in each tweet.”
28. Generate a Twitter content strategy
“I need you to act as my social media manager promoting [Describe your business or brand and what it does]. Generate a Twitter content calendar for the next two weeks. Generate at least three tweets for each day targeting relevant customer persona. Include hashtags and emojis in each tweet.”
29. Generate YouTube Video Description
“Write a unique and intriguing description for a YouTube video titled [Enter your video title here]. Pretend you are an expert on the niche and give your personal best advice in 1st person. Explain why you thought sharing this video would be useful and what users will get out of watching this video.”
30. Generate an entire YouTube video script
“Create an attractive and captivating YouTube video script that is informative. I want you to create a persuasive headline, write a video description repeating keywords used in the headline, cite relevant keywords and tags, create the youtube video script and suggest ideas for a persuasive thumbnail to use for the video, from the following description: [Your video description].”
31. Create thumbnail Ideas for Your YouTube video
“Give me at least 3 ideas for creating an interesting and persuasive thumbnail for a YouTube video using the following description: [Enter your video description].”
32. Generate a YouTube content strategy with video ideas
“I want you to act as my social media manager promoting [mention your brand and what services or products it offers] and come up with a content calendar for our YouTube channel. Give me a monthly calendar of posts with at least one video each week. Suggest video ideas with detailed descriptions of what that particular video will be about. Include keywords and hashtags for each video.”
33. Generate a LinkedIn content calendar with post ideas
“I want you to act as my social media manager for my [Explain your business, brand, profession, and what you typically write about]. I need you to create a month-long content calendar with at least one post each day. Write the post for me including the relevant hashtags and use emojis. Write posts specifically for LinkedIn. My target audience is [companies/professionals interested in my brand product or services].”
34. Write a LinkedIn About section
“I want you to act as my social media manager for my [Explain your business, brand, or profession and what you usually post about]. Give me at least 5 examples of an interesting About section for my LinkedIn profile.”
35. Write a caption for Facebook Photo
“I want you to act as my social media manager and write at least 5 captions for a Facebook photo about [explain what the photo is about]. Use hashtags and emojis in the caption.”
36. Write a Facebook Ad Copy
“I want you to act as a professional copyrighter with experience in writing high-converting Facebook ads. I want you to write a Facebook ad copy for the following products/services [Describe your brand name, products and services you offer]. Produce ad copy that is between 100-150 words, with an attention-grabbing headline and a strong call to action that persuades users to take action. I want you to research the potential target audience and optimize the ad copy so that it appeals to that particular target audience.”
37. Plan a Facebook content strategy
“I want you to act as my social media manager promoting [explain your business brand and what you offer]. I need you to provide me with a two-week content calendar for Facebook posts that are highly engaging and generate emotional responses from the readers. Add one post for each day, using hashtags and emojis.”
E-Commerce ChatGPT Prompts
38. Write an eCommerce product description
“I want you to pretend that you are an eCommerce SEO expert who writes compelling product descriptions. I will provide you with one product title and I want you to come up with three distinct content sections for product description, each section should have its own headline.”
39. Write an eCommerce product short description
“I want you to pretend that you are an eCommerce SEO expert who writes compelling product descriptions. I will provide you with one product title and I want you to come up with a short product description of between 250-300 characters.”
40. Generate product ideas for your eCommerce store
“I want you to pretend as a product specialist for an eCommerce store with a specialty in finding and sourcing products to sell online. My store sells [define your store industry and product types] and I need you to come up with a list of [number of product ideas] product ideas that I can sell on my online store.”
41. Write an SEO Optimized landing page copy for a product
“I want you to pretend as a copywriter specializing in writing landing page copy for better SEO rankings and higher conversions. I need you to write the landing page copy for [Your product name]. I want you to start with an intriguing headline to captivate the target audience followed by a call to action button. Below that I want you to add three content sections with different headings each targeting a specific keyword for the product. I need you to end the landing page copy with a FAQ section answering at least 5 customer questions about the product.”
42. Create and sort products into product categories
“I need you to sort the products into product categories. Ask me to provide you with a list of products. Use hierarchal categories and create child categories as needed. Products can be placed into multiple categories. Show which products are placed under a category. Write a catchy short description for each category. Use this product list [enter your product list].
43. Create an ad strategy for an eCommerce product
“I want you to act as an advertiser. You will create a campaign to promote a product or service. You will choose a target audience, develop key messages and slogans, select the media channels for promotion, and decide on any additional activities needed to reach your goals. The product you will be promoting is: [Enter your product title and description here].”
ChatGPT Prompts for Businesses
44. Polish an email text to be more effective and professional
“Fix this email to write it in a human voice in perfect English, as someone with a charismatic personality, that is extremely professional and concise with their language. Also, give at least three samples to use as the email subject. [Enter your email text here].”
45. Write a job posting ad for hiring
“I want you to act as a recruitment manager specializing in finding talented professionals for a job. I need you to write a job posting for [job title] we are offering the following benefits [mention benefits here] and we are looking for [job requirements such as experience and skills].”
46. Generate a business model canvas
“I need you to help me create a business model canvas for a [explain what your business is about] company. Organize your answers in a table that reproduces the original format used in consulting. I want you to write detailed answers that are focused on adding value and act as an expert consultant in digital marketing.”
47. Generate logo design ideas
“I want you to act as a graphic designer specializing in brand identity development. I want you to come up with detailed ideas for unique and interesting logos for a business. Come up with at least 3 ideas and mention what is unique about each idea and how it is different from the other two ideas. The business name is [Enter your company name] and it offers [mention products/services]. I need you to present your ideas in a format that can be given to a professional graphic designer as initial instructions.”
48. Instantly generate domain name ideas
“I need you to help me find domain name ideas for a business. My company name is [enter business name] and it offers [products/services/industry]. Only give .com domain name ideas. domain name should not be more than 8 characters long.”
49. Write an email to terminate an employee
“Write an email to an employee informing them that they are being fired for the following reason [mention the reason for firing]. Make the email text sound professional and polite. Use a sympathetic and kind tone and thank the employee for their work.”
50. Write a job offer email
“I want you to write a job offer email using the following parameters:
1. Candidate name
2. Job position
3. Company name
4. Salary offered
Ask me to input these parameters one by one before writing the email.”
Miscellaneous ChatGPT Prompts
51. Generate a cover letter for a job application
“I need you to write me a professional cover letter to send with a job application using the following parameters:
1. Job Title
2. Years of Experience
3. Skills to mention
Ask me to input each parameter one by one before writing the cover letter.”
52. Plan your day
“I need you to help me plan my day. Starting at 9 am and ending at 5 pm. Ask me to input the task I will be performing and then ask me for the start time and end time for that particular task. Repeat until the end time of a task is 5 pm. Create a table and add one row for each task with start time, end time, and task detail as columns.”
53. TL:DR Summarize a text or article
“I want you to act as a very proficient researcher. I want you to pretend that you can extract all relevant information from a text or a URL I give you. Your task is to extract all facts and summarize the text in all relevant aspects, presented in bullet points and a 1-liner summary, pick a good matching emoji for each bullet point, and then add it after the 1-liner summary. Ask me to input text or provide you a URL.”
54. Generate a list of popular websites on any topic
“I want you to act as a topic expert. I will provide you with a topic and you will provide me with a list of at least 10 most influential websites on that particular topic. Present the websites in a table with serial number, website name, website URL, 1-liner website summary as columns. Ask me to provide you with a topic.”
Bonus WordPress AI Plugins & Tools Using ChatGPT
AI usage is becoming increasingly popular among marketers and bloggers. As the most popular blogging platform, WordPress has tons of add-ons and plugins that you can use to speed things up.
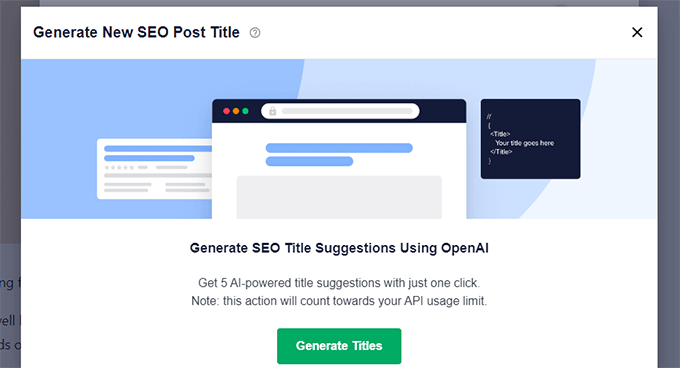
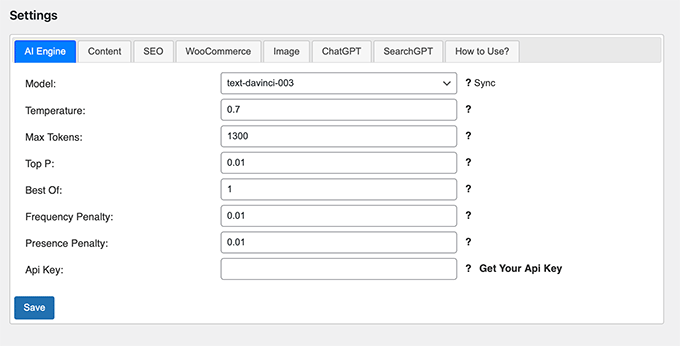
As the best WordPress SEO plugin on the market, All in One SEO comes with built-in ChatGPT integration to generate SEO-friendly headlines and meta descriptions.
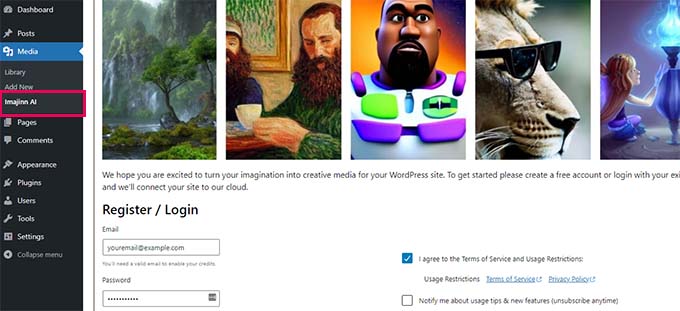
Finding royalty-free images for blog posts is always a challenge for bloggers. Similar to Dall-E, Imajinn AI uses text prompts to generate images using machine learning AI.
All the images generated by the plugin are copyright-free and you can use them in your blog posts.
We hope this article helped you find some useful ChatGPT prompt ideas for your blog and marketing campaigns. You may also want to see our pick of some more useful AI-powered WordPress plugins or take a look at our guide on how to grow your business online.
If you liked this article, then please subscribe to our YouTube Channel for WordPress video tutorials. You can also find us on Twitter and Facebook.
Animations are a great way to grab the visitor’s attention and highlight a page’s most important content. They can also encourage customers to click on your call-to-action buttons and links.
In this article, we will show you how you can easily add CSS animations in WordPress.
Why Add CSS Animations in WordPress?
You can use CSS animations to draw the visitor’s attention to different parts of a page. For example, if you have an online store then animations can highlight a product’s most important features or biggest selling points.
Animations will also make your CTAs stand out, which can help you reach a specific goal such as getting more people to subscribe to your email newsletter.
You can add CSS animations to your theme or child theme‘s stylesheet. However, this takes a lot of time and effort, and it can break your website’s design and even function if you make a mistake.
With that being said, let’s see how you can easily add CSS animations to your WordPress site. If you prefer to jump straight to a particular method, then you can use the links below.
Method 1. How to Easily Animate Any WordPress Block (Quick and Easy)
The easiest way to add a simple CSS animation is by using Blocks Animation.
This free plugin allows you to add an entrance animation to any block without having to write a single line of CSS. It also has a typing animation and a ticker-style effect that you can add to text and numbers.
First, you’ll need to install and activate the plugin. If you need help, then please see our guide on how to install a WordPress plugin.
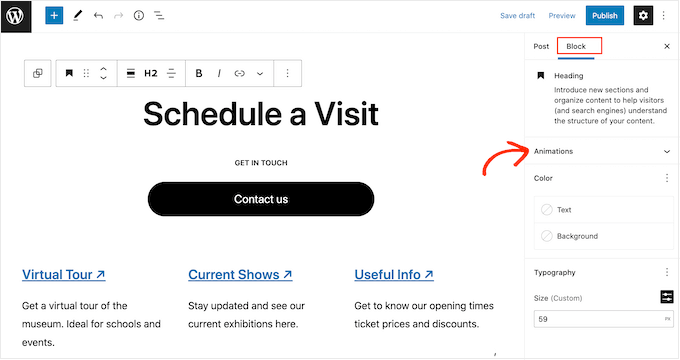
Upon activation, open any page or post in the WordPress editor. Then, simply click on the block that you want to animate and select the ‘Block’ tab in the right-hand menu.
You’ll see this menu has a new ‘Animations’ section.
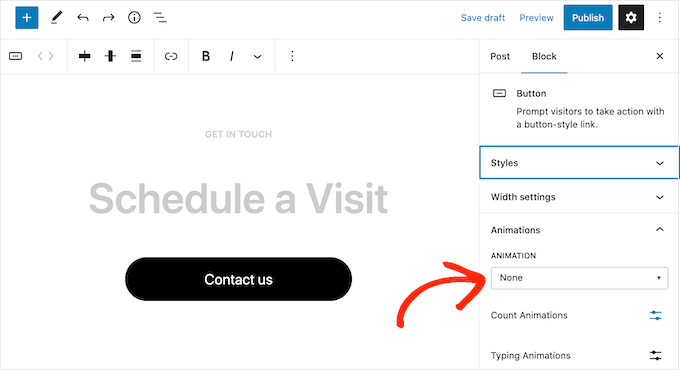
Simply click to expand the ‘Animations’ section, and you’ll see three different options: Animations, Count Animations, and Typing Animations.
‘Animations’ are short effects that play once when the page loads. To add this kind of entrance animation to your WordPress blog, just click on the dropdown next to ‘Animation.’
This opens a menu where you can choose the animation you want to use.
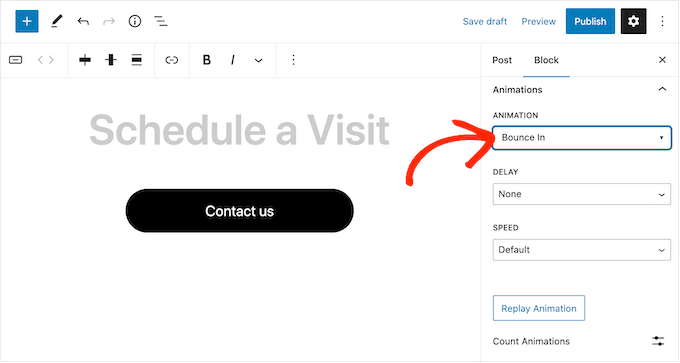
The WordPress editor will show a preview of the animation, so you can try different options to see what looks the best.
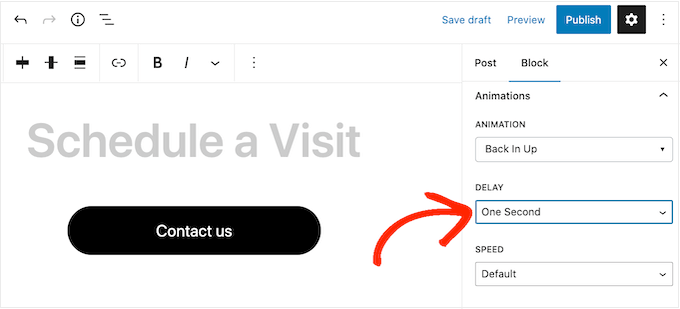
By default, the entrance animation will play as soon as the page loads, but you can add a delay if you prefer. If you use multiple animations on the same page, then you can even use delays to stagger your animations so they’re not overwhelming.
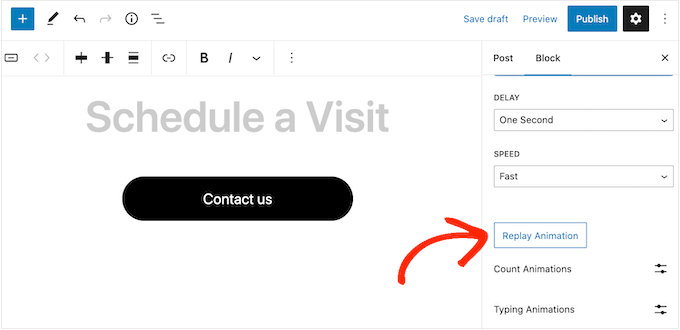
Simply open the ‘Delay’ dropdown and choose a time from the list.
You can also make the animation faster or slower using the ‘Speed’ dropdown.
As you’re trying different settings, you can preview the animation at any point by clicking on ‘Replay Animation.’
The plugin also has ‘Count Animations’ and ‘Typing Animations.’
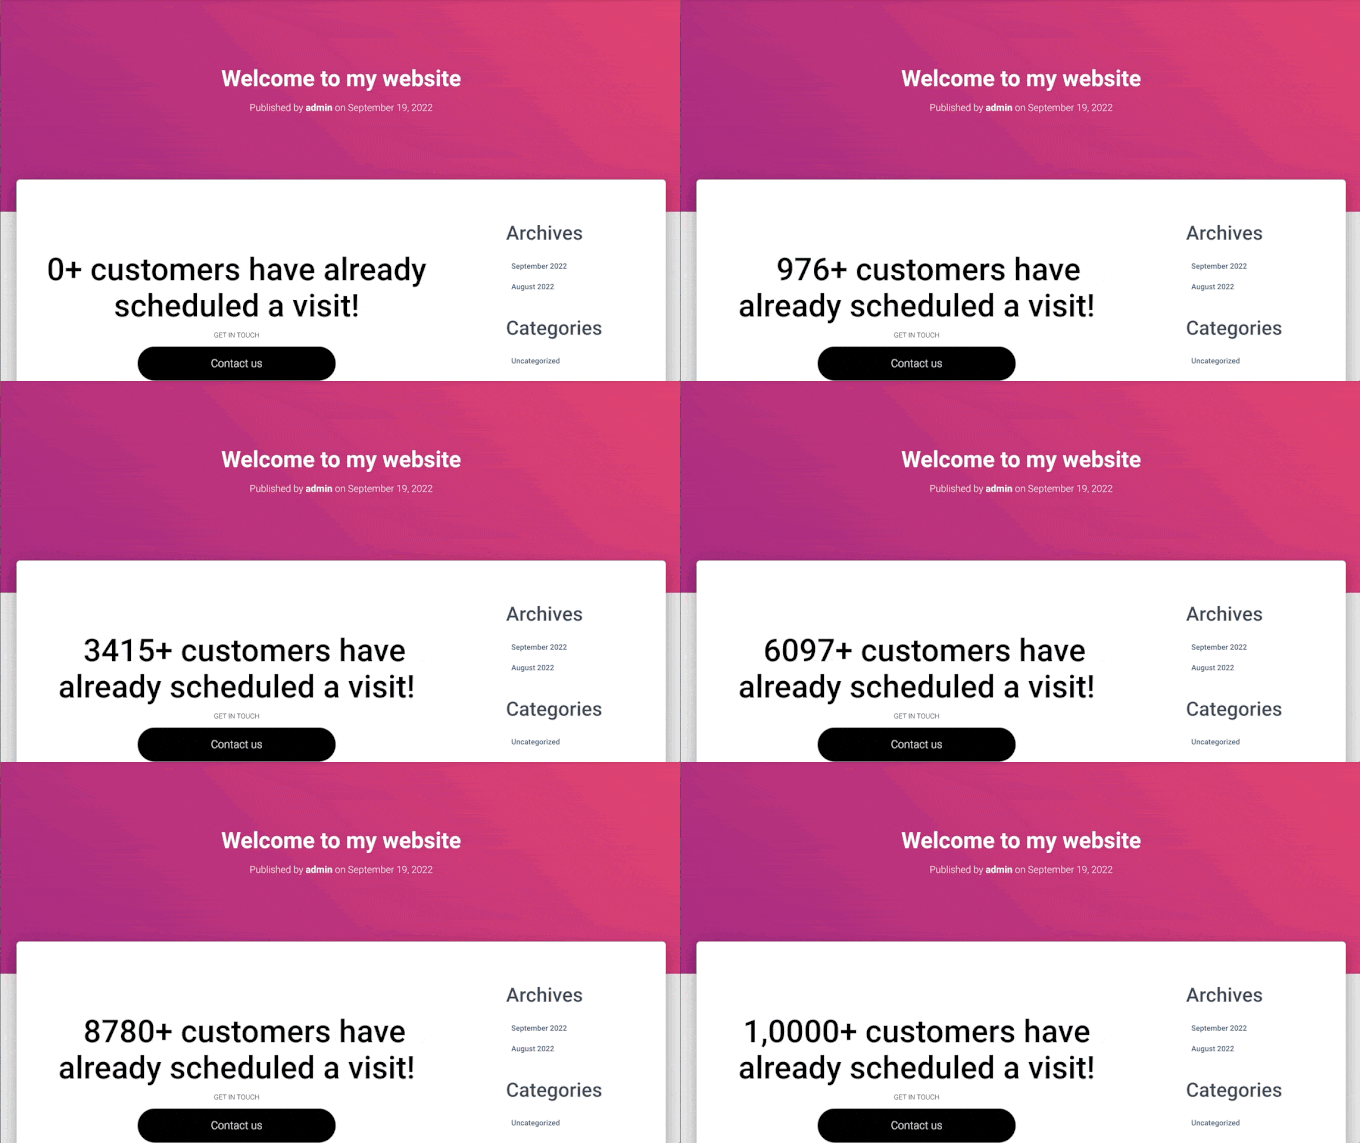
Typing Animations allow you to animate text, while Count Animations add a ticker-style effect to numbers. These animations work with any block that supports text or numbers, so you can use them to animate buttons, image captions, headings, and more.
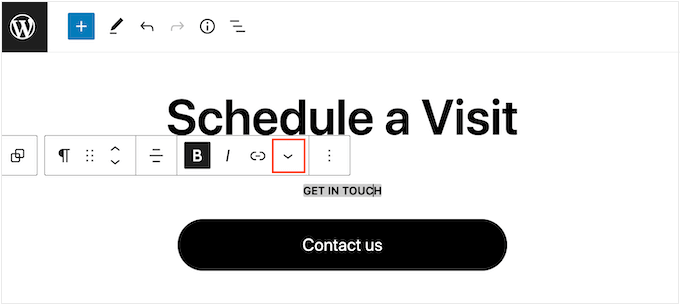
To add either of these effects, start by highlighting the text or numbers that you want to animate. Then, click on the downward arrow in the small toolbar.
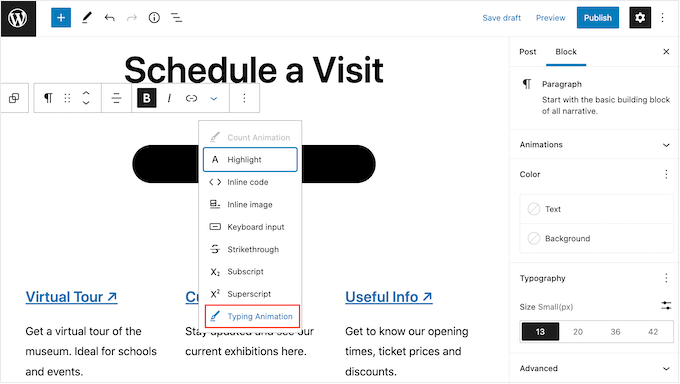
You can now choose ‘Count Animations’ or ‘Typing Animations’ from the dropdown menu.
If these options are grayed out, then make sure you’ve highlighted the right content. For example, you won’t be able to select ‘Count Animation’ if you’ve only highlighted text.
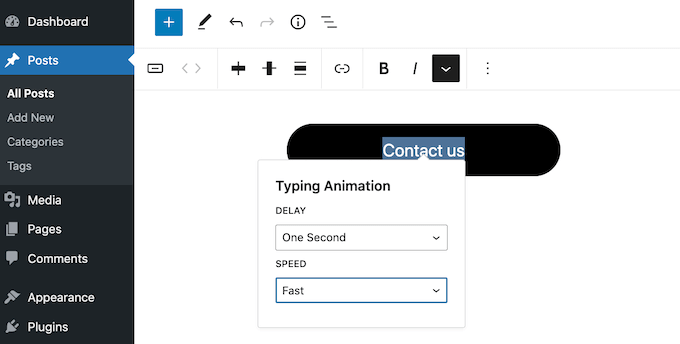
After adding the animation, you can change the speed and add an optional delay using the dropdown menus in the small popup.
For example, in the following image, we’re using a delay of one second.
When you’re ready to make the CSS animation live, either click on the ‘Publish’ or ‘Update’ button. Now, if you visit your WordPress website you’ll see the animation live.
Method 2. How to Add CSS Animations to Custom Pages (Recommended)
If you want to add simple animations to the built-in WordPress blocks, then Blocks Animation is a good choice. However, if you want to really grab the visitor’s attention, keep people on your website, and get more conversions then we recommend using SeedProd.
SeedProd is the best page builder plugin that allows you to create beautiful landing pages, sales pages, and more using a simple drag-and-drop editor.
It also comes with an ‘Animated Headline’ block that you can use to create rotating and highlighted animated headlines.
Despite the name, you can use the Animated Headline block to animate any text including a call to action, subheading, or any other text that you want to emphasize.
SeedProd also comes with over 40 entrance animations that you can add to any block including images, text, buttons, videos, and more.
You can even animate entire sections and columns with just a few clicks. In this way, you can create engaging animated pages within minutes.
If you’re using animations to get more conversions and sales, then SeedProd integrates with WooCommerce and supports many of the top email marketing services you may already be using to promote your website.
How to Setup the SeedProd Page Builder
The first thing you need to do is install and activate SeedProd. For more details, see our step-by-step guide on how to install a WordPress plugin.
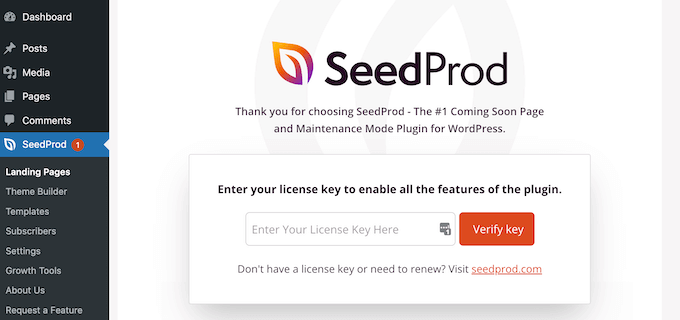
Upon activation, you need to enter your license key.
You can find this information under your account on the SeedProd website. After adding the license key, simply click on ‘Verify Key.’
Create a Custom Page Design
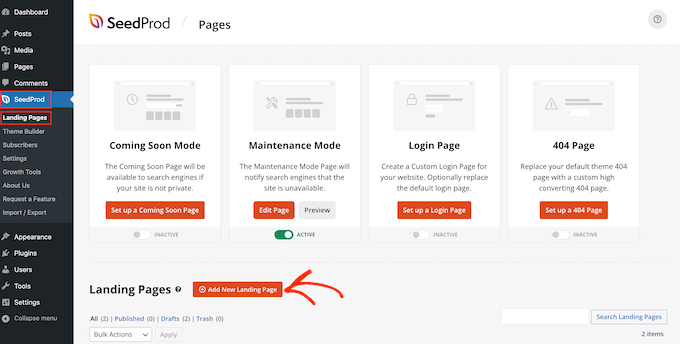
To get started, go to SeedProd » Landing Pages and click on ‘Add New Landing Page.’
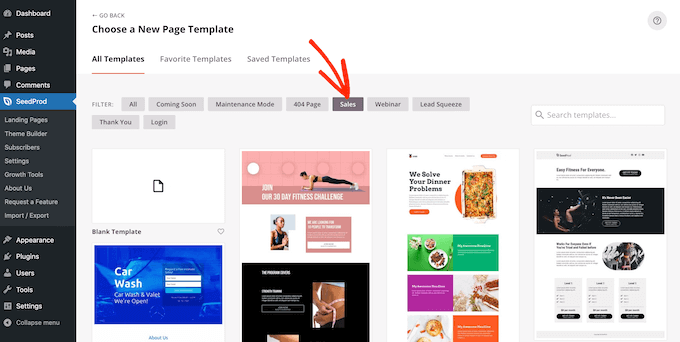
On the next screen, you’ll be asked to choose a template.
For this guide, we’ll show you how to create a sales page with animated text and entrance animations, but the steps will be similar no matter what kind of page you create.
Simply click on any tab to see the different templates within that category.
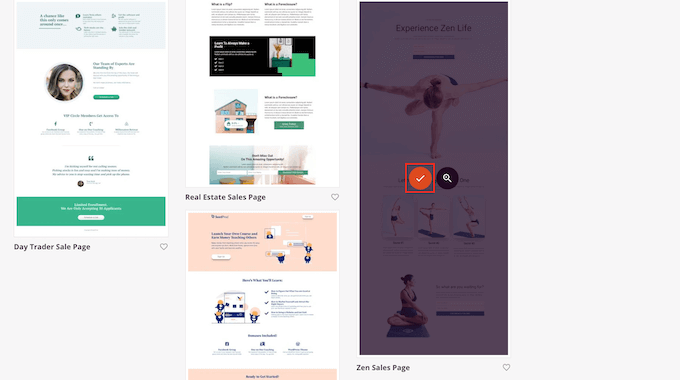
When you find a template you want to use, just hover your mouse over it and then click on the checkmark icon.
We’re using the ‘Zen Sales Page’ template in all our images, but you can use any template.
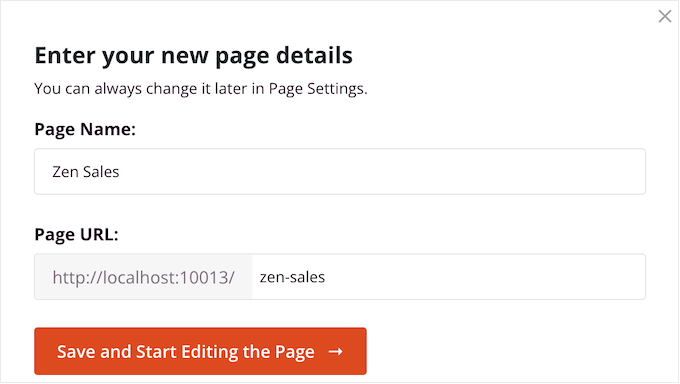
Next, you need to give the page a title.
SeedProd will automatically create a URL based on the page title, but you can change this to anything you want. For example, adding relevant keywords to a URL can often improve your WordPress SEO and help the page appear in relevant search results.
When you’re happy with the title and URL, click on ‘Save and Start Editing the Page.’
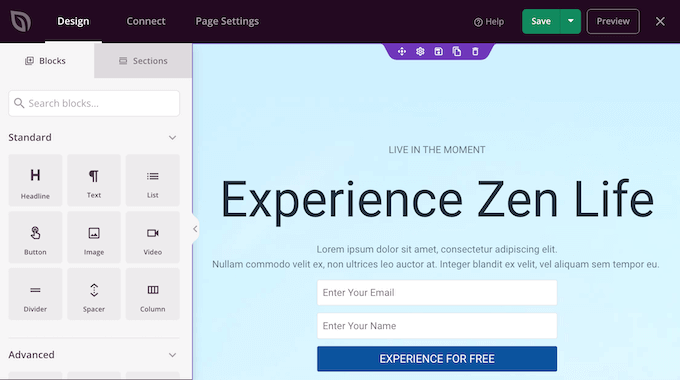
This will load the SeedProd drag-and-drop page editor.
On the right, you’ll see a live preview of the page design, with some settings on the left.
SeedProd comes with lots of blocks that you can add to your design, including blocks that allow you to add social share buttons, videos, contact forms, and more.
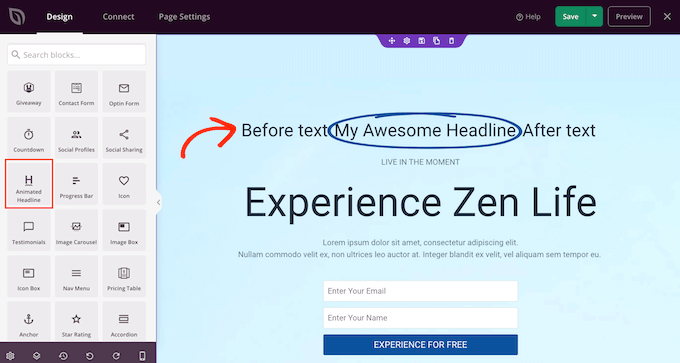
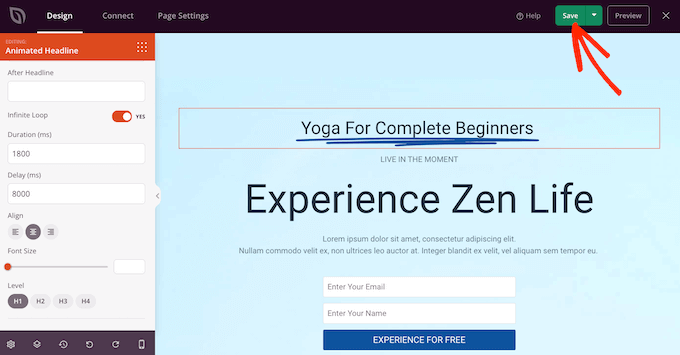
To add some animated text to the page, find the Animated Headline block and drag it onto your page design.
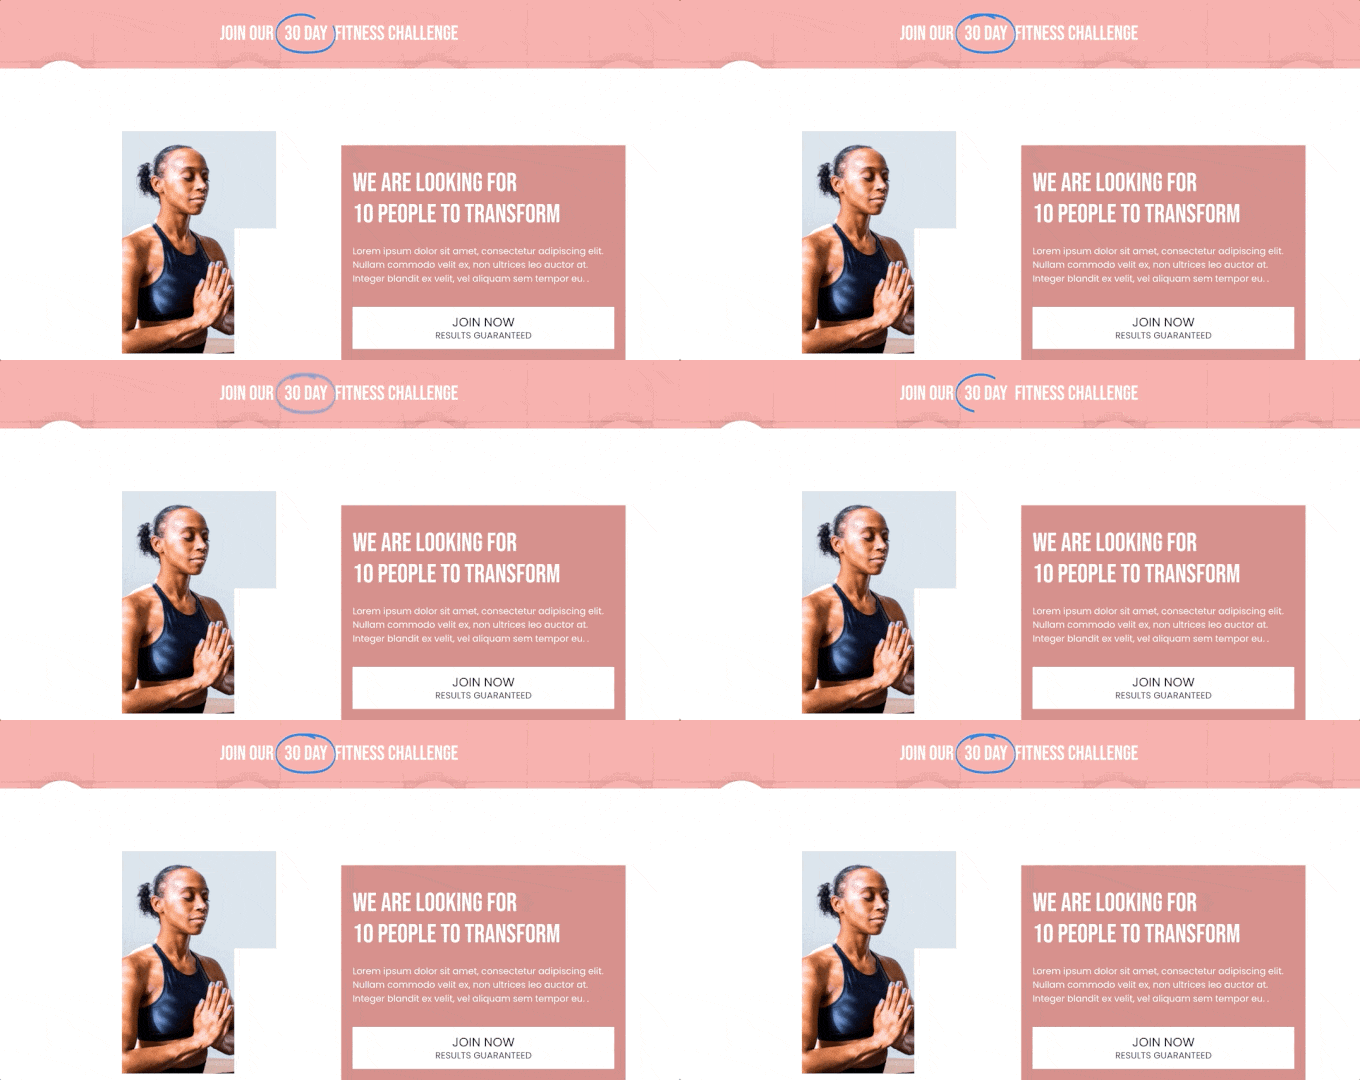
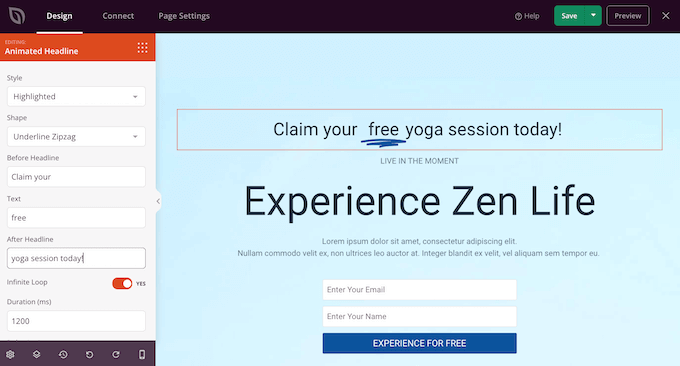
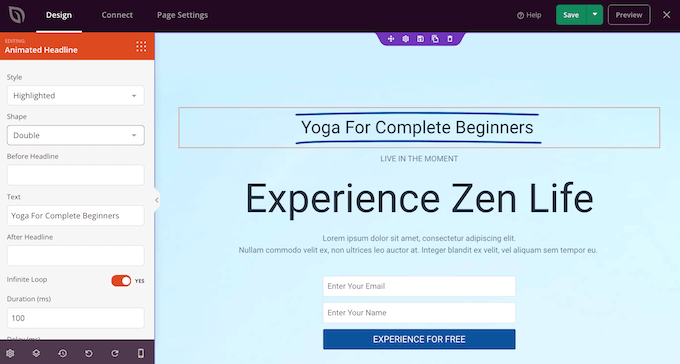
There are two ways to animate your headline. First, the ‘Highlighted’ style adds a shape animation to your text, such as a circle or an underlined zigzag.
You can use this animation to draw attention to a particular word or phrase inside the headline. This can make your headline easier to read and understand by highlighting the most important content. It’s also a great way to draw attention to a call to action.
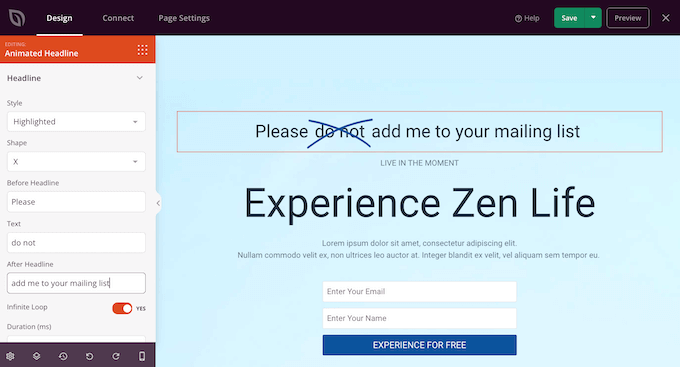
The Highlighted style also has a few strikethrough shapes.
You can use strikethroughs to create interesting and eye-catching effects, or it can simply add some fun to your design.
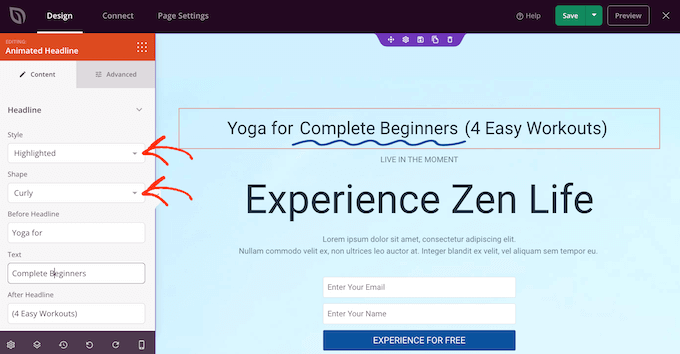
To create a Highlighted animation, just open the ‘Style’ dropdown and select ‘Highlighted.’
Next, open the ‘Shape’ dropdown and choose a shape. When you click on a shape, SeedProd will show a preview of that animation, so you can try different shapes to see which one you like the most.
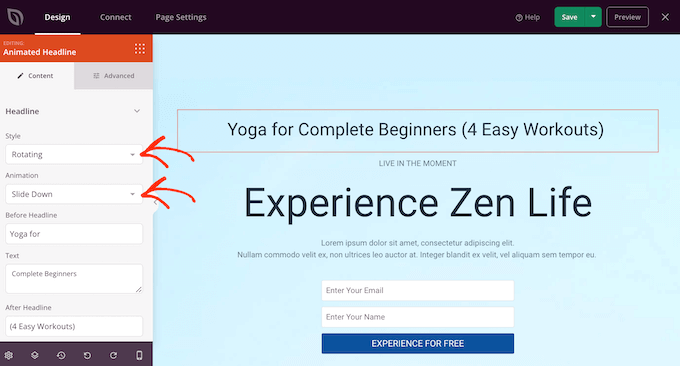
SeedProd also has a ‘Rotating’ animation style, which adds a transition effect to the text.
Often, animated text is the first thing visitors look at when a page loads, so it’s a great way to highlight the most important piece of text.
To create a transition animation, simply open the ‘Style’ dropdown and click on ‘Rotating.’
You can then open the ‘Animation’ dropdown and choose the type of transition you want to use, such as fade, zoom, or roll. Again, SeedProd will play the animation inside the page editor so you can try different effects to see which you prefer.
No matter whether you’re creating a ‘Highlighted’ or ‘Rotating’ animation, you can add text before and after the animated text.
Simply type into the ‘Before Headline’ and ‘After Headline’ fields. In the ‘Text’ field, add the word or phrase that you want to animate.
If you want to animate the whole headline, then simply leave the ‘Before Headline’ and ‘After Headline’ fields empty.
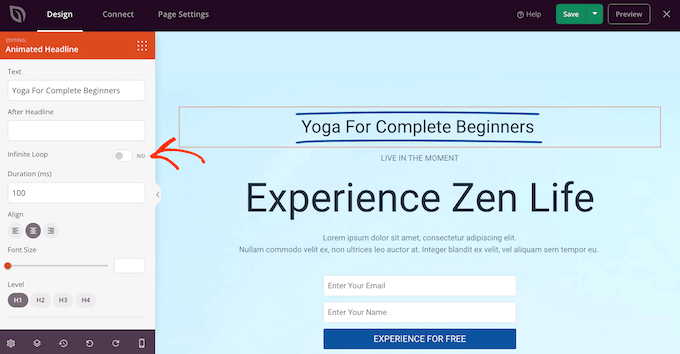
By default, SeedProd will play the animation on a loop, which some visitors may find annoying.
To only play the animation once, click to deactivate the ‘Infinite Loop’ switch.
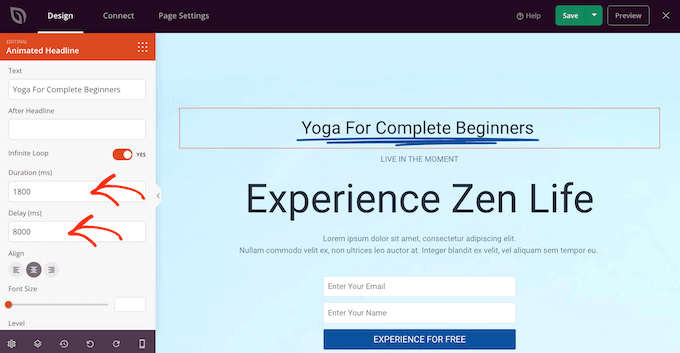
By default, the animation will play for 1200 milliseconds after an 8000 milliseconds delay.
To use different values, type into the ‘Duration’ and ‘Delay’ fields. For example, you can make the animation faster by using a shorter duration.
You may also want to style the text. For example, you can change the font size and alignment.
When you’re happy with how the animated headline looks, go ahead and click on the ‘Save’ button to store your changes.
Add Entrance Animations in WordPress
Entrance animations play when the page first loads, so they’re a great way to catch the visitor’s attention.
You can also use them to highlight the content visitors should look at first. For example, if you have an online marketplace then you might animate the product’s hero image, or the banner advertising your Black Friday sale.
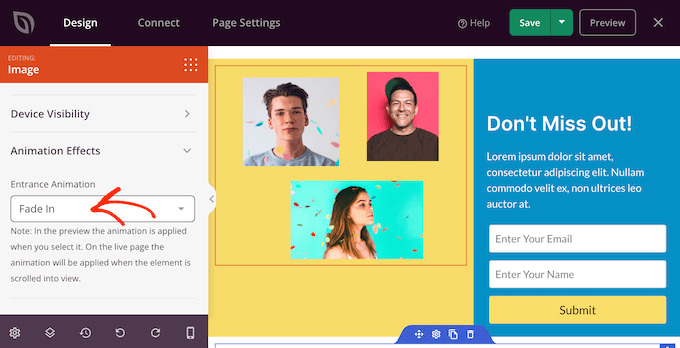
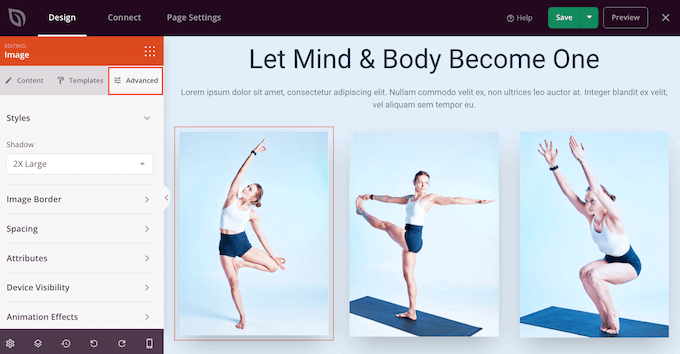
Inside the SeedProd editor, simply click on the content you want to animate, and then select the ‘Advanced’ tab in the left-hand menu.
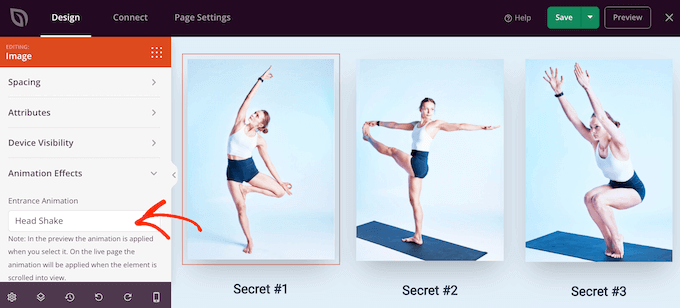
You can then go ahead and click to expand the ‘Animation Effects’ section.
After that, simply choose an animation from the ‘Entrance Animation’ dropdown.
You can now add entrance animations to any block, section, or column simply by following the same process described above.
Publish Your CSS Animations in WordPress
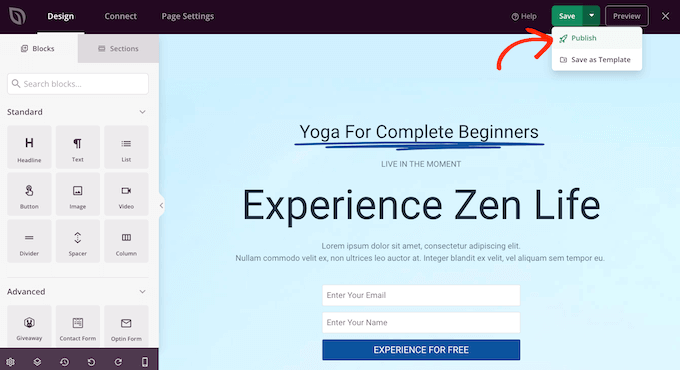
When you’re happy with how the page is set up, click the dropdown menu on the ‘Save’ button and select ‘Publish.’
You can now visit this page to see the CSS animations live.