Tuesday, April 4, 2023

How to Create a Custom Shape Divider in WordPress

Do you want to add custom shape dividers to your WordPress website?

Shape dividers can organize your content in an engaging and eye-catching way. They can also highlight your site’s most important content, so visitors and customers don’t miss out on crucial information.

In this article, we will show you how to create a custom shape divider in WordPress.
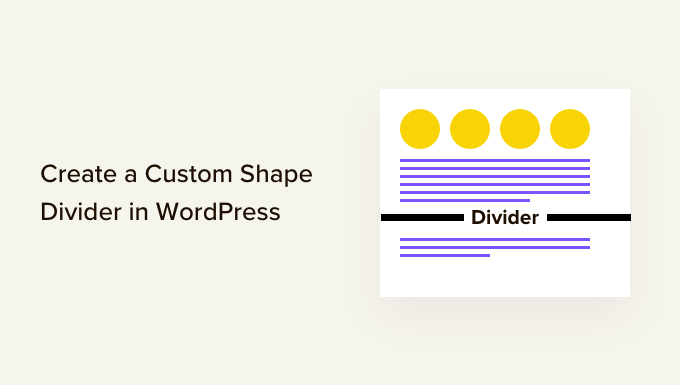
How to create a custom shape divider in WordPress

Why Create a Custom Shape Divider in WordPress?

A shape divider is a type of section divider that you add between blocks of content.

These dividers can be simple, such as a horizontal line created with built-in WordPress blocks.
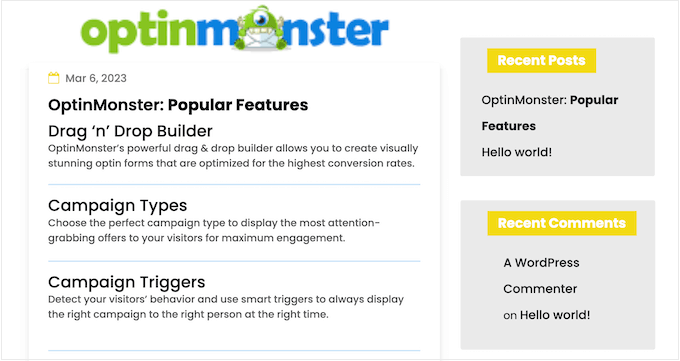
A custom shape divider, created using the built-in WordPress tools

You can use these basic dividers to organize and separate content, which is particularly useful on pages that cover lots of different topics.

You can also create more advanced shape dividers using page builder plugins and other web design software. These can highlight your site’s most important content so it stands out to visitors and customers.

A custom shape divider, created using SeedProd

A professional-looking shape divider can also make a page more interesting and engaging.

For example, you might use them to create a unique background for your email newsletter signup form.
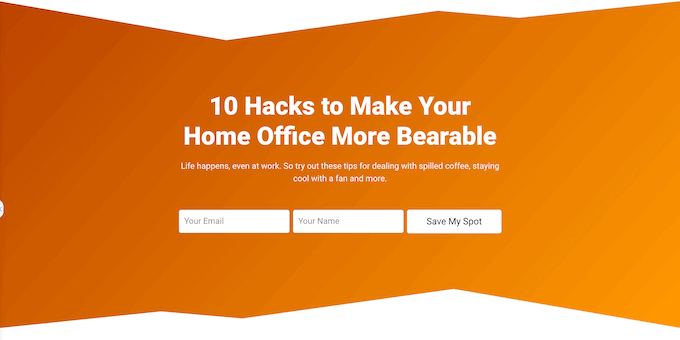
How to create a custom shape divider using SeedProd

With that being said, let’s see how you can create a custom shape divider in WordPress. Simply use the quick links below to jump straight to the method you want to use.

Method 1. Create a Simple Shape Divider (No Plugin Required)

The easiest way to add a custom shape divider to WordPress is by using the built-in Separator block.

This method allows you to add a horizontal line separator in between any WordPress blocks, and then customize the line’s color and style.
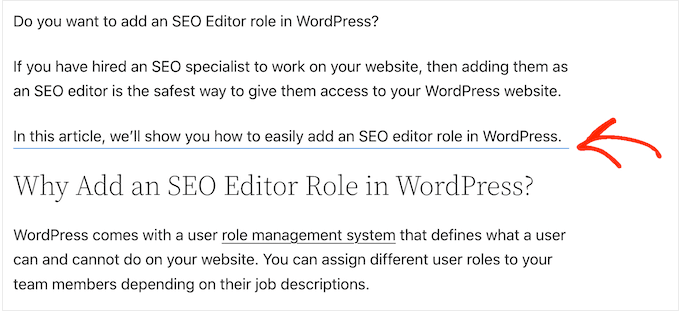
A custom divider created using the WordPress block editor

This method doesn’t let you add different shapes to WordPress and has limited customization settings. However, you won’t need to install an extra WordPress plugin, so this is the easiest way to add a simple shape divider to your website.

To get started, simply open the post or page where you want to add an horizontal divider in the content editor. Then, click on the ‘+’ button where you want to place that divider.
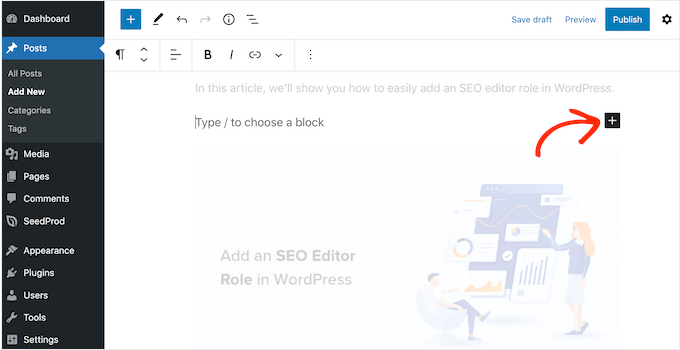
Adding a Separator block to WordPress

In the popup, type in ‘Separator.’

When the right block appears, click to add it to the page or post.
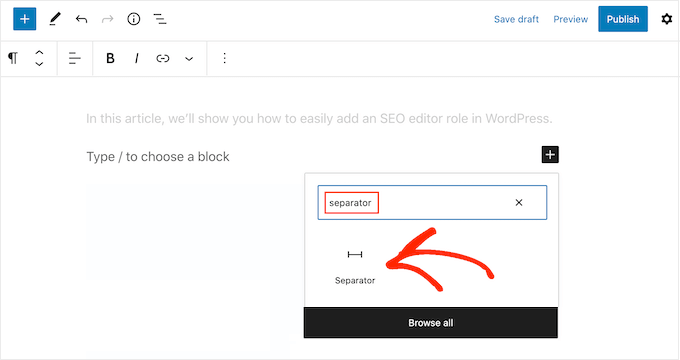
Add a custom shape divider to a WordPress website

To customize the default Separator block, give it a click and then use the settings in the right-hand menu.

You can switch between default, wide line, and dots using the buttons in the ‘Styles’ section.
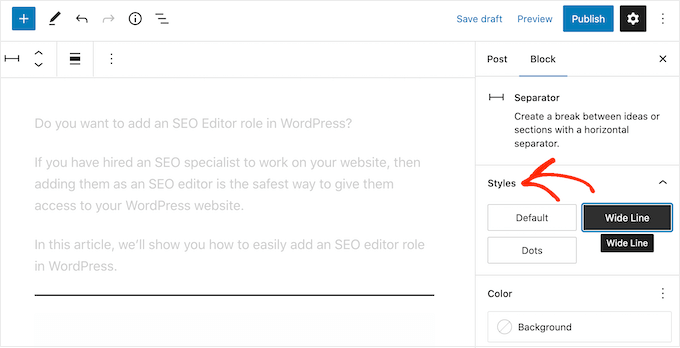
Adding different line styles in WordPress

You can also change the line’s color so that it matches the rest of your theme or branding.

To do this, click on ‘Background’ and then choose a color from the popup that appears.
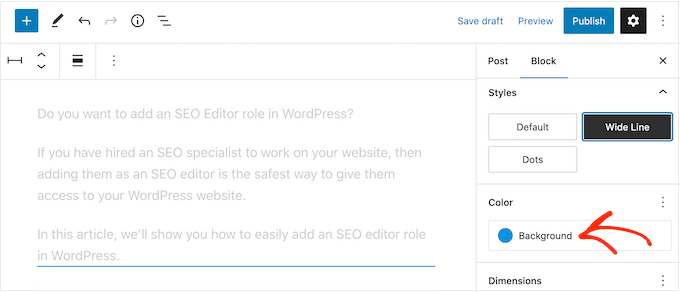
How to style the Separator block in WordPress

When you’re happy with how the divider looks, you can either click on the ‘Publish’ or ‘Update’ button to make the shape divider live.

If you are looking to use different shape and customize every part of your dividers, then we recommend using the SeedProd plugin.

SeedProd is the best WordPress page builder plugin on the market, and it allows you to add a custom shape divider to any section, row, or column using a simple drag-and-drop editor.
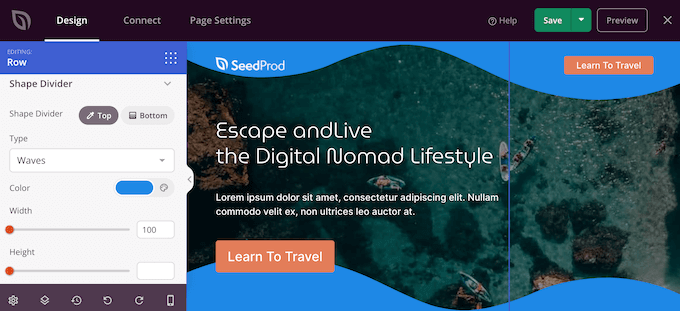
Creating a custom shape divider in WordPress

It also comes with over 180 professionally-designed templates and more than 90 blocks that you can use to create beautiful custom home pages, landing pages, and more.

Note: There is a free version of SeedProd on available on WordPress.org, but we’ll be using the Pro version since it comes with a wide range of shape dividers.

The first thing you need to do is install and activate the SeedProd plugin. For more details, see our step-by-step guide on how to install a WordPress plugin.

Upon activation, you need to enter your license key.
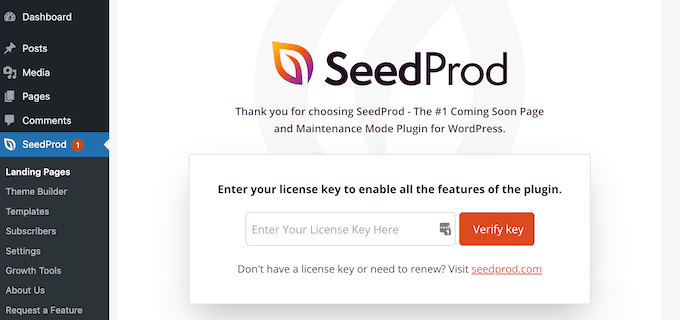
Adding a license key to the SeedProd page builder

You can find this information under your account on the SeedProd website. After entering the license key, click on the ‘Verify Key’ button.

With that done, go to SeedProd » Pages and click on the ‘Add New Landing Page’ button.
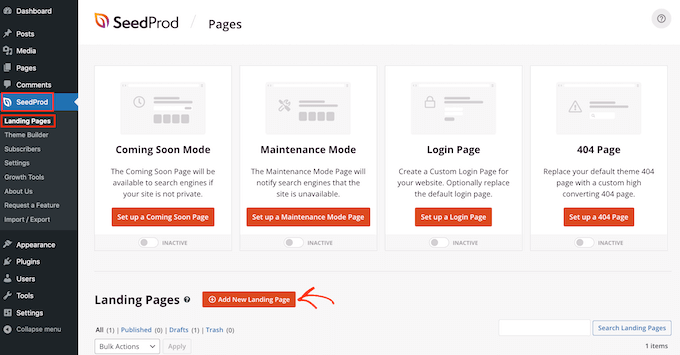
How to create a new landing page design using SeedProd

After that, it’s time to choose a page design template. SeedProd has a ton of professionally-designed templates that you can fine-tune to perfectly suit your WordPress website.

To select a template, simply hover your mouse over it and then click the ‘Checkmark’ icon.
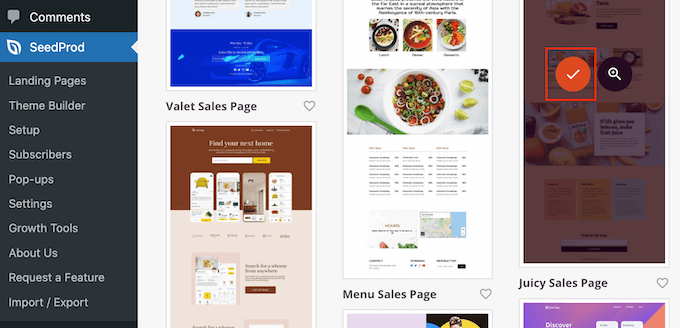
Choosing a page design template for your WordPress website

Next, go ahead and type in a name for the page. SeedProd will automatically create a URL based on the page’s title, but you can change the URL to anything you want.

For example, you may want to add some relevant keywords, which will help search engines understand what the page is about and may improve your WordPress SEO.

When you’re happy with the information you’ve entered, click on the ‘Save and Start Editing the Page’ button.
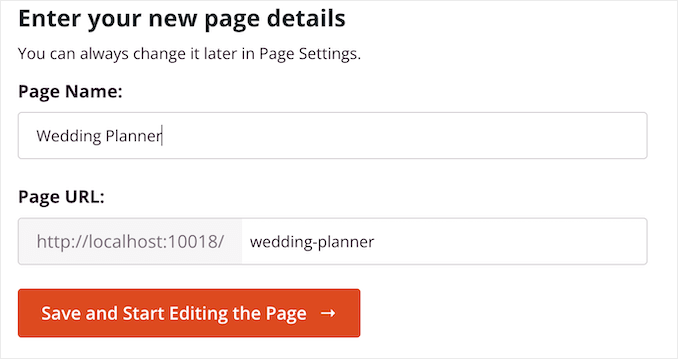
Creating a custom landing page using SeedProd

Next, you’ll be taken to the drag-and-drop page builder, ready to customize the template.

The SeedProd editor shows a live preview of your design to the right and some block settings on the left.

The SeedProd drag and drop page builder

The left-hand menu also has blocks that you can drag onto your layout.

For example, you can drag and drop standard blocks like buttons and images or use advanced blocks such as the countdown timer, contact form, social sharing buttons, and more.
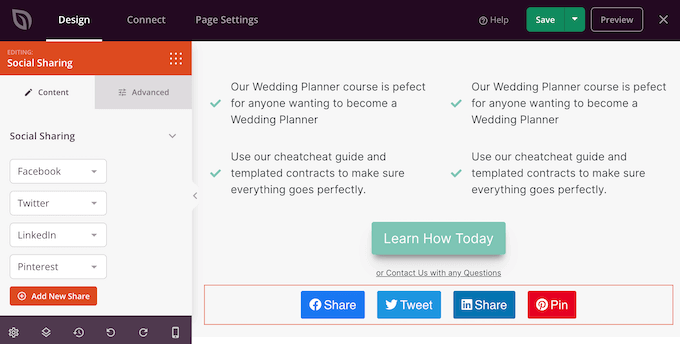
Adding blocks to a WordPress page builder

To customize a block, just click to select it in your layout.

The left-hand menu will then show all the settings you can use to configure that block. You can also change the page’s background colors, add background images, or change the color scheme and fonts to better match your brand.
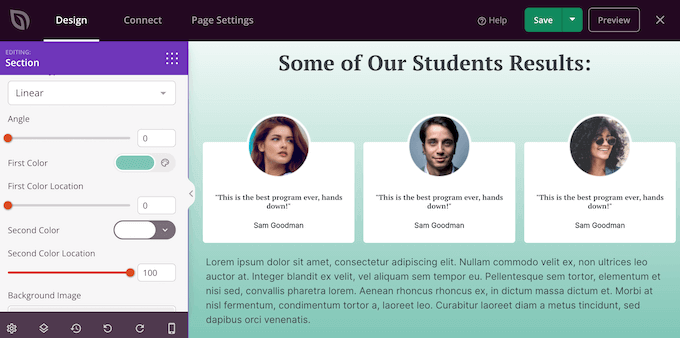
Customizing the background color in WordPress

SeedProd also comes with ‘Sections,’ which are collections of blocks that are often used together. For example, SeedProd has a header section, hero image, call to action, customer testimonialsFAQs, features, footer sections, and more.

To look through the different sections, simply click on the ‘Sections’ tab.
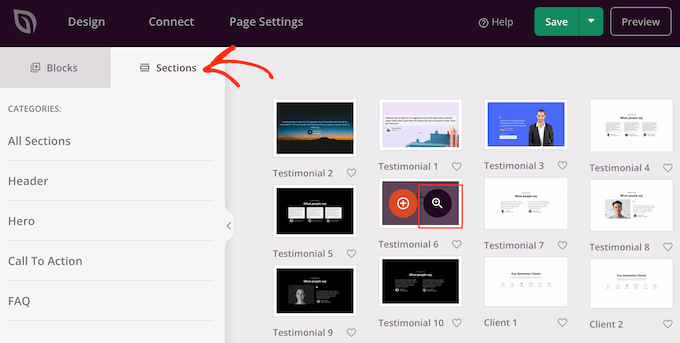
Adding a Section to a custom page template

You can move sections and blocks around your layout using drag and drop.

If you want to delete a block, then simply hover over it and then click on the trash can icon when it appears.
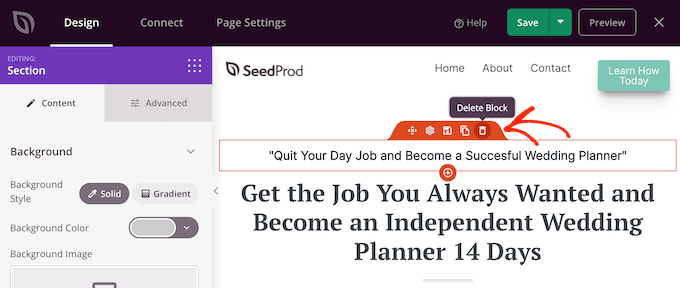
Deleting blocks from a custom page design

Whether or not you choose to use a SeedProd section, you can now create a custom shape divider. Simply click to select the section, row, or column where you want to add the divider.

Then, click on the ‘Advanced’ tab in the left-hand menu.
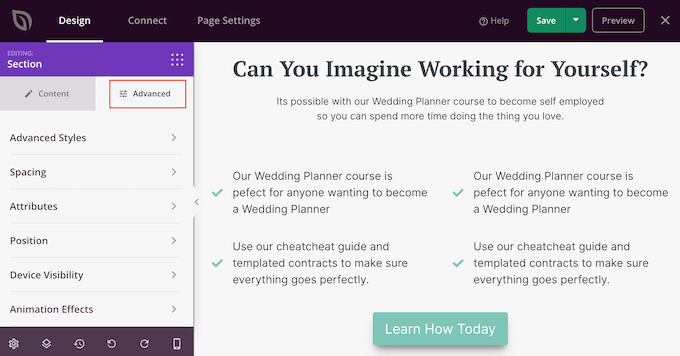
SeedProd's 'Advanced' settings

Now, click to expand the ‘Shape Divider’ section.

To start, you can choose where to show the shape divider by selecting either the ‘Top’ or ‘Bottom’ button.
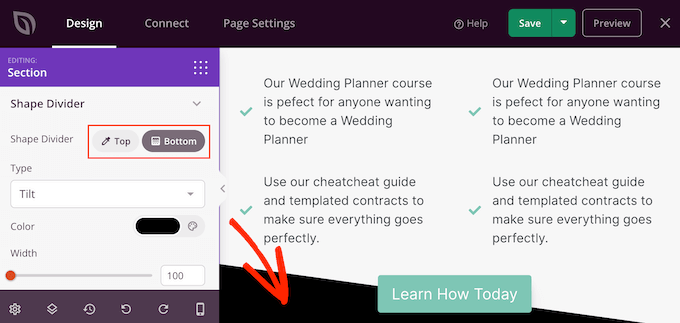
Adding a custom divider to the bottom of a WordPress block

You can now open the ‘Type’ menu and choose the shape divider that you want to use.

As you select different shapes, the live preview will update automatically so you can try different styles to see what looks the best.
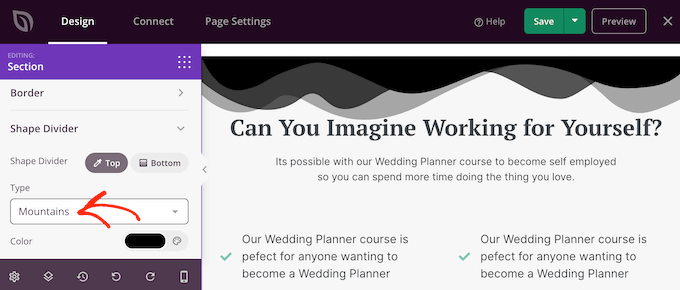
Adding custom shape dividers to a custom landing page

After choosing a shape divider, you can style it using the new settings.

To start, you can click on ‘Color’ and then choose a new color from the popup that appears.
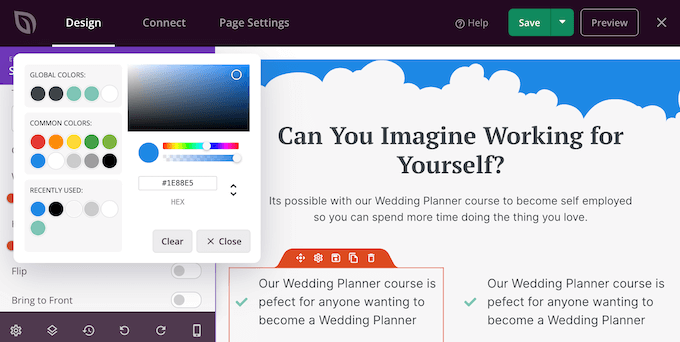
Adding a color to a custom shape divider in WordPress

With that done, you can make the divider bigger or smaller by dragging the ‘Width’ and ‘Height’ sliders.

If you already have a specific size in mind, then you can type those numbers into the boxes.
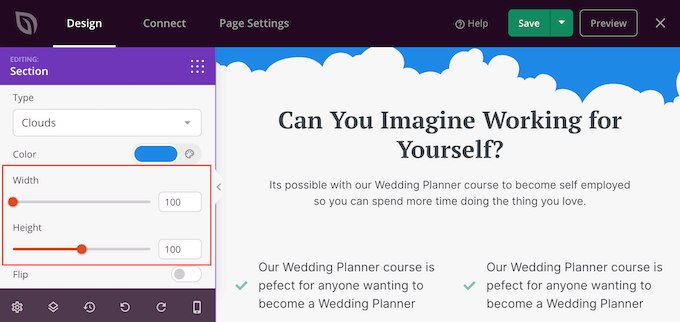
Create a custom shape divider in WordPress

You can also try flipping the divider by clicking to enable or disable the ‘Flip’ switch.

By default, the divider will appear behind the rest of the content, so users can clearly see any text, images, or other content that overlaps the divider.

However, moving the shape to the front can create some interesting effects. If you want to see how this looks, then simply click to enable the ‘Bring to Front’ switch.
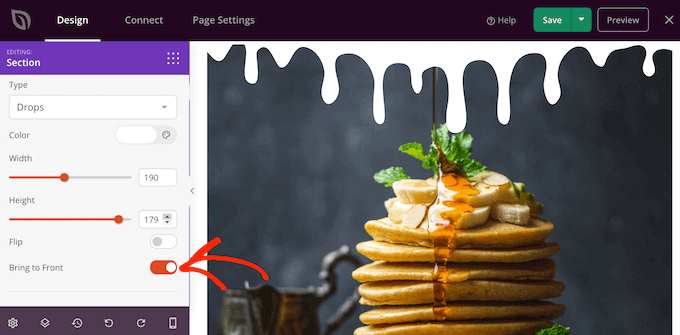
Bringing the custom shape divider to the front

To add more dividers simply follow the same process described above.

You can even add a shape divider to the top and bottom of an area, which often creates some impressive and eye-catching results.
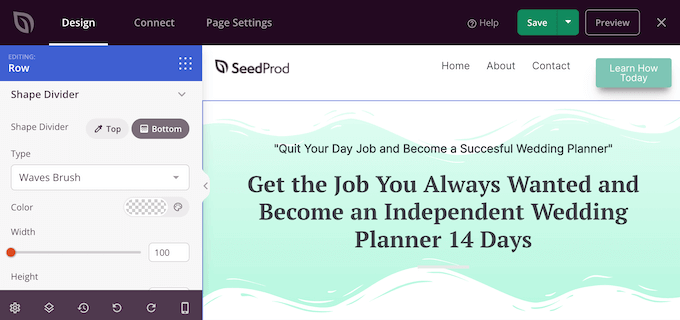
Adding multiple custom shape dividers to a single section

You can continue working on the page by adding more blocks and customizing those blocks in the left-hand menu.

When you’re happy with how the page looks, click the ‘Save’ button. You can then select ‘Publish’ to make that page live.
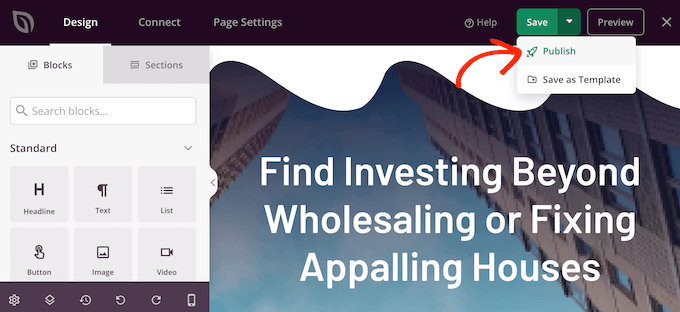
Publishing a custom shape divider

How to Add Shape Dividers to a WordPress Theme

SeedProd’s drag-and-drop editor gives you the freedom to add a unique shape divider to any page. However, sometimes you may want to use the same shape dividers on multiple pages, or even across your entire WordPress blog or website.

This will help you create a consistent design and can also save you a ton of time. In this case, we recommend adding a shape divider to your theme using the SeedProd theme builder.

With SeedProd, you can create a custom WordPress theme without writing any code. It creates all the files that make up your theme, including the sidebar, header, footer, single posts, and more.
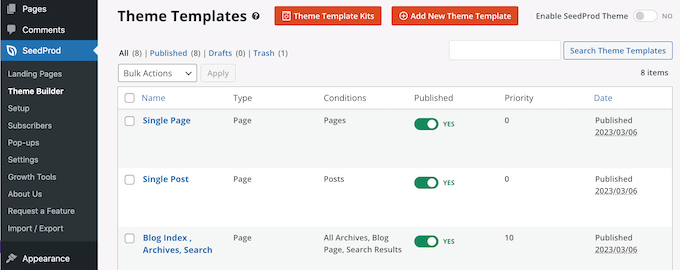
The SeedProd theme builder

You can then customize these files using the familiar drag-and-drop builder. This includes adding shape dividers by following the same process described above.

When you activate the new theme using SeedProd, it will overwrite your existing WordPress theme, so you should only use this method if you want to replace your current theme.

For detailed step-by-step instructions, please see our guide on how to easily create a custom WordPress theme.

We hope this tutorial helped you learn how to create a custom shape divider in WordPress. You may also want to learn how to increase your blog traffic, or see our expert pick of the best social proof plugins for WordPress.

If you liked this article, then please subscribe to our YouTube Channel for WordPress video tutorials. You can also find us on Twitter and Facebook.

The post How to Create a Custom Shape Divider in WordPress first appeared on WPBeginner.


April 04, 2023 at 03:12PM

Monday, April 3, 2023

How Does WordPress Search Work (+ Tips to Make It Better)

Do you want to learn how WordPress search works, and how you can make it better?

By understanding and improving the built-in WordPress search, you can help visitors find what they’re looking for. This can get you more conversions while keeping people on your site for longer.

In this article, we’ll look at how the default WordPress search works, and share tips on how to make it better.

How does WordPress search work + tips to make It better

How Does WordPress Search Work?

WordPress comes with a search system that will look for content within your website.

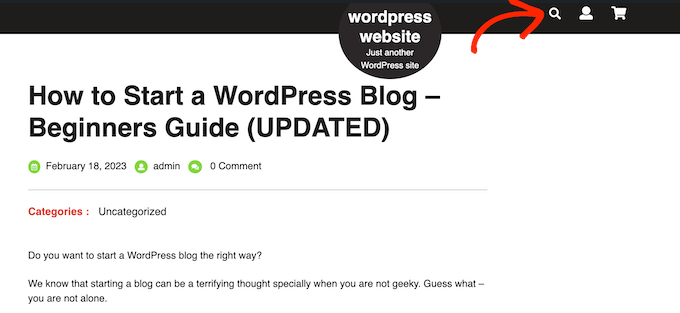
How the search bar looks and where it appears will vary depending on your WordPress theme, but most themes show the search bar in the top right corner.

The built-in WordPress search bar

Note: If your theme doesn’t show the WordPress search bar by default, then skip ahead to our FAQs, where we’ll show you how to add it.

Visitors can type a search query into this field, and WordPress will search:

  • Page titles
  • Page content
  • Single-image titles and captions
  • Image alt text
  • File names

As you can see, it doesn’t search widgets, user comments, categories, tags, WooCommerce products, or PDF documents. It also doesn’t search image gallery titles, captions, or alt text, although you can search this content using a search engine plugin like SearchWP.

WordPress performs this search using the WP_Query class. It will start by displaying any posts that have the search term in the post title, arranged in reverse-chronological order, meaning that the newest entries will be displayed at the top of the results.

After that, it’ll show any posts that have the matching term in the post content.

For example, imagine you’ve just published a post about cats titled ‘My Favorite Pet’, and you also have an older post titled ‘Best Cat Photos.’ In this case, searching for ‘Cat’ will display the older ‘Best Cat Photos’ post first, since it has the search term in the title.

This may not a problem for WordPress blogs or websites that only have small amounts of content. However, this ordering logic will often show inaccurate or confusing results for bigger blogs, online stores, or business websites.

The built-in system is also missing some of the features that people expect from modern search engines. This includes autocomplete, live Ajax search, filtering, and spellcheck.

Why Improve the Default WordPress Search?

An advanced, fast, and accurate on-site search can help visitors find interesting and relevant content, which will keep them on your website for longer. This can increase pageviews and reduce bounce rate in WordPress.

Since visitors are spending more time on your site, this will send positive signals to the search engines. This can improve your WordPress SEO, which means search engines like Google will show your content to more people and drive more visitors to your website.

For more information, please see our guide on how to increase your blog traffic.

People who are using your site’s internal search are already highly engaged. They’re actively looking for specific content, which may mean they’re ready to take actions such as buying a product, signing up to your WordPress membership site, or booking an appointment.

If these people can’t find what they’re looking for, they may give up and go to a different website. This means you’re losing out on visitors who were ready to convert.

A search results page is also an example of personalized content since you’re showing the visitor results that match their unique search query. By providing personalized content that’s accurate and helpful, you can improve the visitor experience. Once again, this can encourage them to convert.

Performance is another reason why it’s a good idea to replace the default WordPress search with a better alternative.

The larger your WordPress website gets, the longer it’ll take WP_Query to scan your database and get the results. This means your site’s search will get slower, as your website gets bigger.

How to Make the WordPress Native Search Better

On-site search helps visitors find what they’re looking for, including products to buy and interesting blogs to read. Since it’s such an important part of your site, it’s a bad idea to rely on the limited built-in WordPress search.

With that being said, let’s see how you can improve the native WordPress search.

Show Instant Results With Live Ajax Search

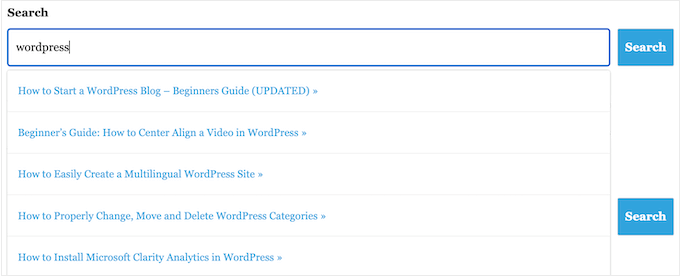
Live Ajax search adds a dropdown and autocomplete feature that’s common in search engines like Google.

As the user types, live search guesses what they want to search for and then shows them results without even reloading the page.

How to improve WordPress search with live ajax results

This can help visitors find the right content, without having to manually press the ‘Search’ button or wait for the page to reload.

The easiest way to add Ajax live search to WordPress is using the free SearchWP Live Ajax Lite Search plugin. It enables instant search automatically and there are no settings for you to configure, so it’s very easy to set up.

The first thing you need to do is install and activate the plugin. For more details, see our step-by-step guide on how to install a WordPress plugin.

Upon activation, the default WordPress search form will automatically use the Ajax live search feature. If you visit your site and start typing into the search bar, then you’ll see the instant search in action.

Change the Default Search URL Slug

By default, WordPress search URLs typically look something like this:

http://example.com/?s=search-term

The extra ?s= characters make this URL more difficult to read and understand, which can confuse visitors who are trying to find their way around your site.

Even worse, these URLs aren’t optimized for search engines which can stop them from correctly indexing your site’s contents.

The easiest way to change these URLs is by adding custom code to WordPress using a plugin such as WPCode.

You can go ahead and use the following custom code to replace the ‘/?s=search-term’ characters with ‘search.’ Your slug will look something like this when finished: https://ift.tt/zZAkiol

To use something other than ‘search’ in your URL, simply customize the code snippet below.

function wpb_change_search_url() {
    if ( is_search() && ! empty( $_GET['s'] ) ) {
        wp_redirect( home_url( "/search/" ) . urlencode( get_query_var( 's' ) ) );
        exit();
    }
}
add_action( 'template_redirect', 'wpb_change_search_url' );

For detailed instructions on how to insert this code to your WordPress website, please see our guide on how to change the default search URL slug in WordPress.

Make PDF Files Searchable in WordPress

By uploading PDFs to your WordPress website, you can share information about your services and products in a format that works on all devices. They’re also perfect for offering your visitors ebooks, user manuals, menus, and more.

However, WordPress only searches the contents of its database by default, so it will only look at the title and description of your PDF files, and not their contents. As a result, your visitors may struggle to find the best PDF for their search query.

The good news is that you can use a custom search plugin to improve the default WordPress search experience. If your PDFs are unencrypted, then the right search plugin will index the contents and metadata of your PDFs and add them to the search results.

For step-by-step instructions, please see our guide on how to add PDF indexing and searching in WordPress.

Add a Search By Category Feature to WordPress

If you have multiple categories of content on your website, then you might want to let users restrict their search to a specific category. This can help visitors find the right content, faster.

An example of search by category on a WordPress website

For example, if you have an online store then it often makes sense to let customers search within a particular product category.

If you run a membership site, then you might use search by category to help visitors find other members, groups, forums, online courses, and other specific kinds of content. For more information, please see our guide on how to add search by category in WordPress.

Make a Smart WooCommerce Product Search

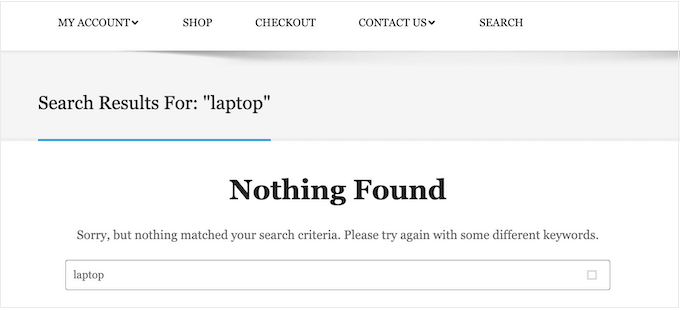
WooCommerce has its own built-in search, but it doesn’t look for matches in product attributes, reviews, or product descriptions. This omission can stop shoppers from finding products they want to buy on your online store, so you get fewer sales.

The built-in WooCommerce search feature

Luckily, there are some excellent WooCommerce plugins that can show more helpful search results, and fetch them faster. To learn more, please see our guide on how to make a smart WooCommerce product search.

To get even more sales, you may want to fine-tune the kind of products WooCommerce includes in its search results. For example, you might only show products that are on sale or come with free shipping.

To learn more, please see our guide on how to customize WooCommerce product search results page.

Create a Search Form for Custom Post Types

Custom post types allow you to go beyond posts and pages and create different content types for your website. Custom post types can have different custom fields and their own custom category structure.

For example, if you run a movie review website, then you would probably want to create a ‘movie reviews’ post type that has fields for the director, release date, and more.

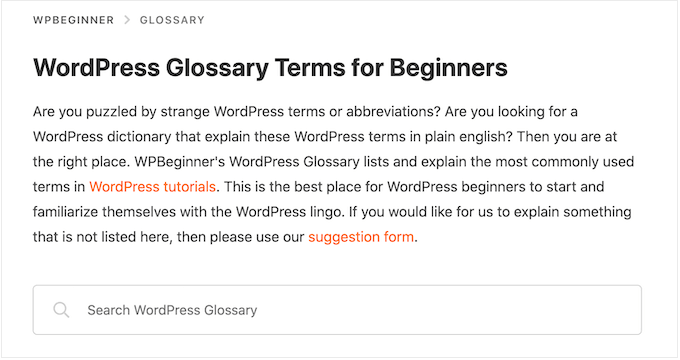
At WPBeginner, we use custom post types for our Glossary section to keep it separate from our blog posts.

How to improve your WordPress search with searchable categories

If you use custom post types, then you may want to create a form that allows visitors to search only that content.

For example, we also have a form that only searches WPBeginner’s coupon codes.

Searching coupons and deals on the WPBeginner website

This can help visitors find the right content faster, even when you have lots of different content types. For step-by-step instructions, check out our guide on how to create advanced search forms in WordPress for custom post types.

You can also make custom fields searchable in WordPress, which is ideal if you’ve added extra metadata to your pages and posts.

Exclude Content From WordPress search

By default, the built-in WordPress search will include all posts and pages in its search results.

However, you may want to exclude certain pages and posts from the search results. For example, if you’re running a WordPress membership website or selling online courses, then you’ll typically want to exclude your premium content from public search results.

If you’re running an online store, then you may want to hide content like your account page, checkout page, and thank you page. To help you out, we’ve created a guide on how to exclude pages from the WordPress search results.

Do you want to exclude posts, authors, custom post types, categories, tags, or even custom taxonomies? Then you can take a look at our guide on how to exclude specific pages, authors, and more from WordPress search.

WordPress Search FAQs

In this guide, we’ve explored how the default WordPress search works and shared lots of tips on how to improve it.

However, you may still have some questions about this important feature. That said, here are some of the most frequently asked questions about WordPress search.

How Do I Improve WordPress Search?

The best way to improve the built-in WordPress search is by using SearchWP.

SearchWP is the best custom search plugin for WordPress and allows visitors to search any content on your site including documents, WooCommerce products, custom fields, tags, comments, and more.

It also lets you customize the WordPress search algorithm, so you can control exactly where the content appears in the search results.

For more information, please see our guide on how to improve WordPress search.

Does WordPress Search Include Tags?

By default, WordPress search doesn’t include tags. The easiest way to make tags searchable is by using a custom search plugin like SearchWP.

SearchWP also has a relevancy slider, so you can control exactly how much tags influence where an item appears in the search results.

How Do I Add Search to My WordPress Theme?

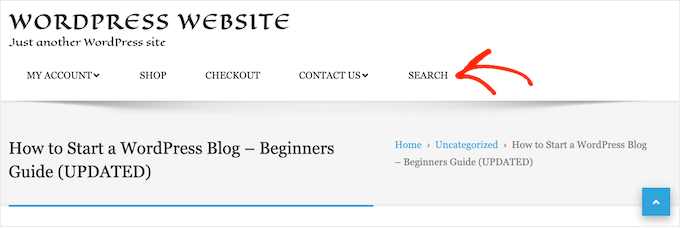
If your theme doesn’t have a built-in search form, then we recommend adding a search bar to the WordPress navigation menu.

Since the main navigation menu typically appears across your entire site, visitors will be able to search for pages, posts, products, and more, from any page of your website.

An example of a search bar, in a navigation menu

If you’re using a block-based theme such as ThemeIsle’s Hestia Pro or Twenty Twenty-Three, then you can add a search bar to your theme using the full-site editor (FSE).

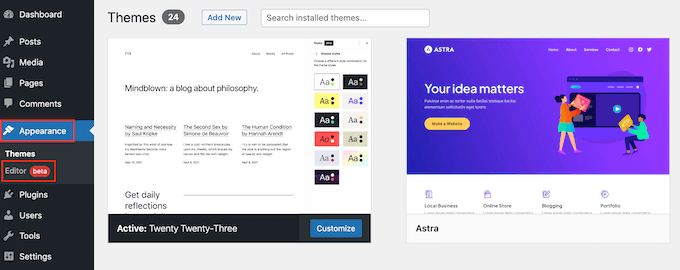
To do this, go to Appearance » Editor in the WordPress dashboard.

Opening the WordPress full site editor (FSE)

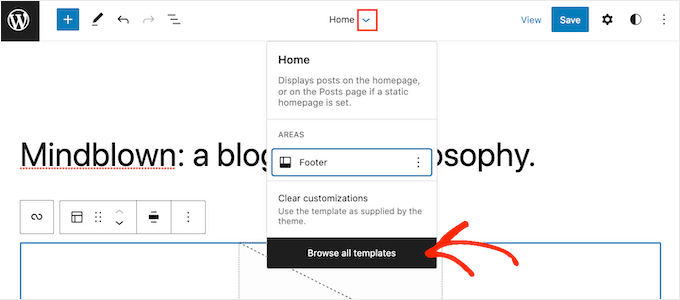
By default, the editor will show your theme’s home template. If you want to add the search bar to a different template, then click on the small arrow icon in the toolbar.

Then, select ‘Browse all templates.’

How to browse all FSE templates in WordPress

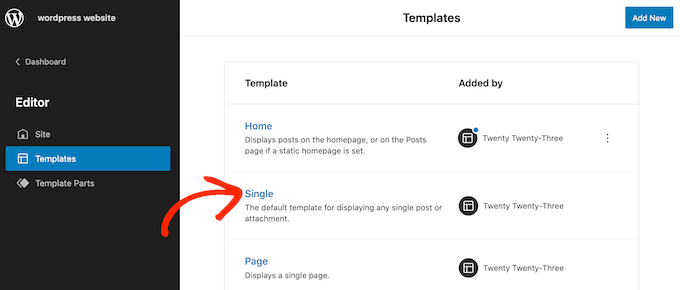
You’ll now see all the templates that make up your WordPress theme. Simply find the template where you want to add the search bar, and then click on its title.

For example, if you wanted to add a search form in your WordPress posts then you’d select the ‘Single’ template.

How to add the search bar to a single template in WordPress

You will now see this template in the full-site editor.

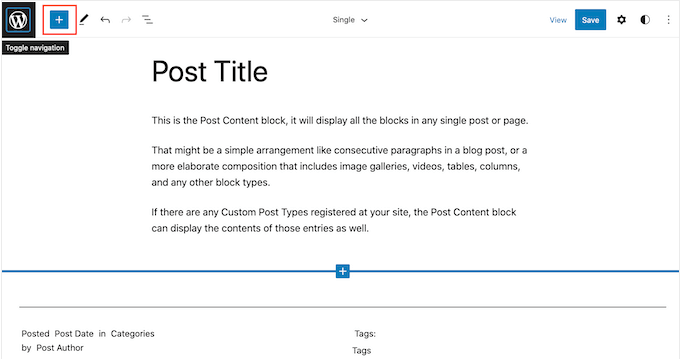
To go ahead and add a search bar, click on the blue ‘+’ icon.

Adding widgets to a single template in WordPress

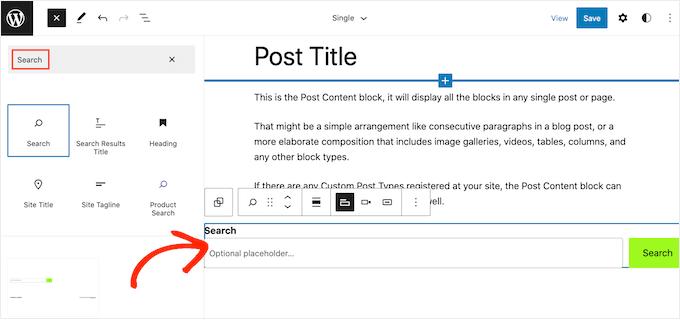
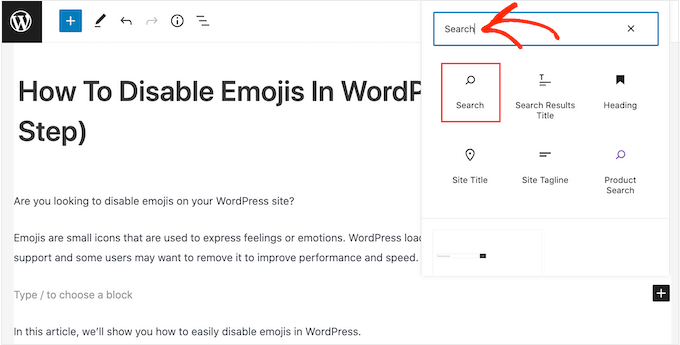
In the popup that appears, type in ‘Search’ to find the right block.

You can then drag the block to the location where you want to show the search bar.

Adding a search block to a block-enabled theme template

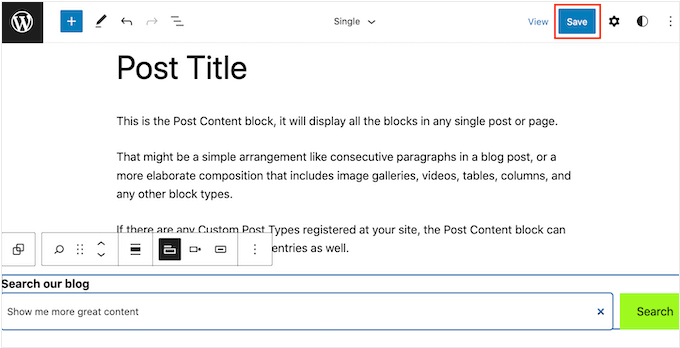
To customize the block title or placeholder text, simply type it into the search block where it says ‘search’ or ‘optional placeholder.’

When you’re happy with how the block looks, click on ‘Save’ to make the search bar live.

Publishing a block-enabled template with a search bar

How Do I Add Search to a WordPress Page or Post?

You can add a search bar to a specific page or post using the built-in Search block.

This is a good choice if you want to control exactly where the search bar appears on every page and post, or you only need to offer search on specific areas of your website.

How to improve the default WordPress search

To get started, simply open the page where you want to add a search form and then click on the + icon.

In the popup that appears, type ‘Search’ to find the right block. Once you click on the Search block, it will add the block to your page.

Adding the Search block to a WordPress page or post

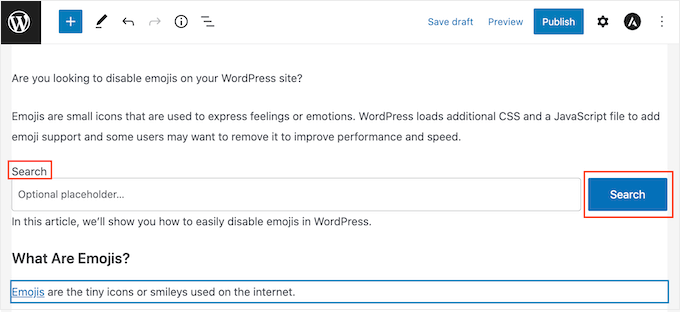
By default, the block uses ‘Search’ for both its label and the button text.

This will be visible to visitors, so you may want to replace it with something more descriptive by typing into the text fields.

Customizing the WordPress search block

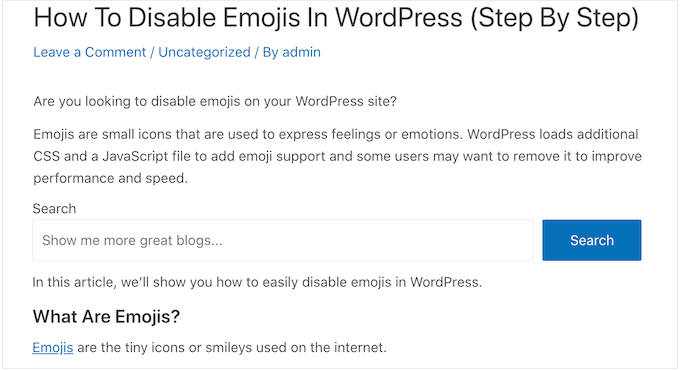
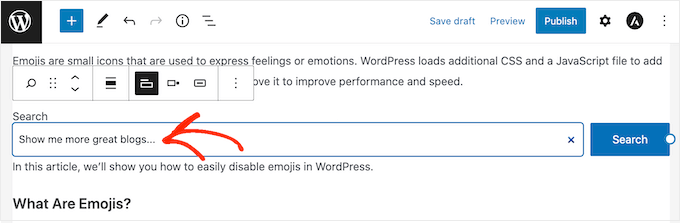
You can also add some placeholder text to the search bar. This text will disappear automatically when the visitor starts typing.

To add a placeholder, simply click on ‘Optional placeholder…’ and then start typing.

How to improve the WordPress search

When you’re happy with how the Search block looks, you can go ahead and either publish or update the post.

We hope this tutorial helped you learn how WordPress search works, and how to make it better. You may also want to learn how to make money online blogging with WordPress, or check out our list of the best email marketing services for small businesses.

If you liked this article, then please subscribe to our YouTube Channel for WordPress video tutorials. You can also find us on Twitter and Facebook.

The post How Does WordPress Search Work (+ Tips to Make It Better) first appeared on WPBeginner.


April 03, 2023 at 03:56PM
Friday, March 31, 2023

How to Add No Right Click on WordPress Images

Do you want to add no right-click to your WordPress images?

If you’re a photographer, artist, or content creator, then you’re probably worried about people stealing your images. While it’s difficult to completely stop image theft, you can make it more difficult for people to steal pictures from your website.

In this article, we’ll show you how to add no right-click on WordPress images and galleries.

How to add no right click on WordPress images

Why Add No Right-Click on WordPress Images?

The Internet has made it easier to share your work with the world, but it’s also made it easier for people to steal your images.

These people might use your content to promote scams or fraudulent products. They might even sell your digital art and graphics online, making money from your hard work while you make none.

If you’re an online influencer or have a big social media following, then people might even steal your photos and impersonate you online. For example, they might pretend you’re an affiliate marketing partner.

Even if you simply write a WordPress blog, people might still use your personal photos as part of online scams like fake ads or reviews.

Scammers could even scrape your WordPress blog content and images, and then republish it on other websites. This duplicate content can damage your WordPress SEO.

While there’s no single solution that can completely prevent image theft, you can make your site a less attractive target.

With that being said, let’s see how you can add no right-click on WordPress images and galleries. Simply use the quick links below to jump straight to the method you want to use.

Method 1. How to Add No Right Click to All Your WordPress Images

The easiest way to protect your images is by using No Right Click Images. This free plugin allows you to disable right-clicking for images only, so users can still right-click on your other content including links.

You can also enable and disable right-click based on whether the visitor is logged into their account. This is perfect if you run a subscribers-only stock photo website or some other form of membership site.

First, you’ll need to install and activate the plugin. If you need help, then please see our guide on how to install a WordPress plugin.

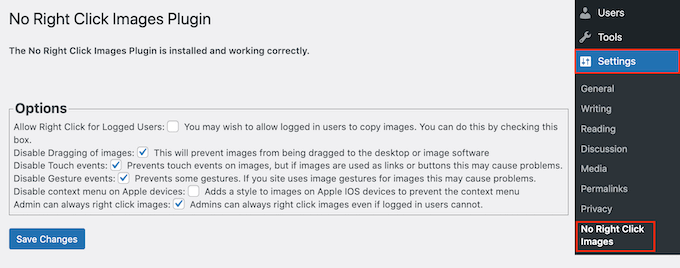
Upon activation, go to Settings » No Right Click Images to configure the plugin settings.

How to add no right-click on WordPress images

The default options should work for most users, but it’s still worth checking whether you need to make any changes. In particular, these settings can help you close any loopholes that people might use to get around the no right-click protection.

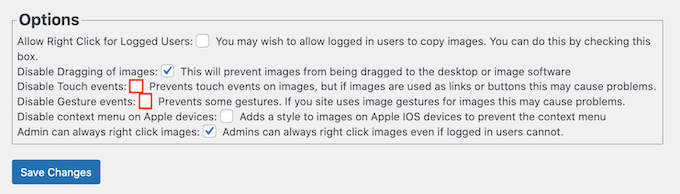
Out of the box, the plugin disables dragging images so users can’t copy an image by dragging it onto their desktop or another tab. With that in mind, we always recommend leaving ‘Disable Dragging of images’ checked.

No Right Click Images also disables touch and gesture events, which can stop people from stealing images on devices that make use of those sorts of actions. However, this can cause problems if you use images as links or buttons, or if your visitors interact with your pictures using gestures, such as before-and-after images.

If you do encounter problems, then you can re-enable support for touch events and gestures by unchecking the following boxes: ‘Disable Touch events’ and ‘Disable Gesture events.’

How to disable touch events and gestures on your WordPress website

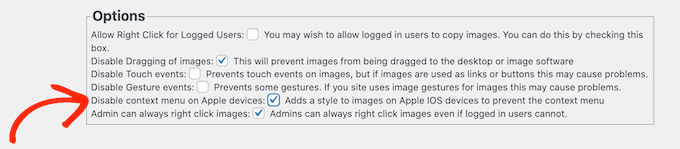
By default, visitors can still open a context menu and save your images on Apple devices.

That said, you may want to check the box next to ‘Disable context menu on Apple devices.’ This adds a style to images on iPhones and iPads, which stops users from opening the Apple context menu and stealing your images.

How to disable the Apple context menu on your WordPress blog or website

When you’re happy with how the plugin is set up, don’t forget to click on ‘Save Changes’ to store your settings.

You can now log out of your WordPress admin account and visit your website. Then, simply right-click on any image to check the plugin is working.

Method 2. How to Add No Right Click to Image Galleries

If you want to protect individual images across your website, then the first method is a good choice. However, sometimes you may want to create an image gallery in WordPress, and then disable right-clicking for the entire gallery. For example, you might build a photography portfolio or display your most popular products in a nice gallery layout.

This is where Envira Gallery comes in.

It is one of the best WordPress gallery plugins on the market and comes with a protection addon that disables the ability to right-click on any galleries you create using the plugin.

How to disable right-click for a WordPress gallery

The first thing you need to do is install and activate the Envira Gallery plugin. For more details, see our step-by-step guide on how to install a WordPress plugin.

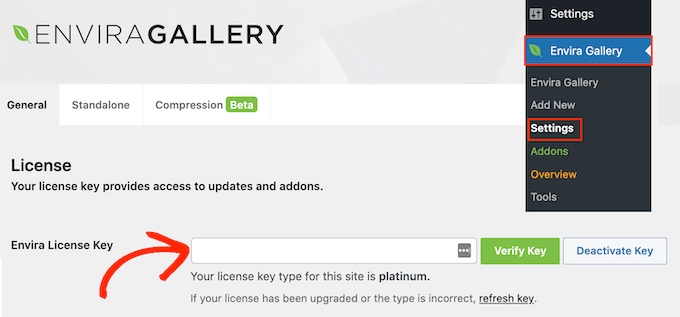
Upon activation, go to Envira Gallery » Settings and enter your license key.

Activating the Envira Gallery WordPress plugin

You can find this information under your account on the Envira Gallery website.

With that done, click on ‘Verify Key.’

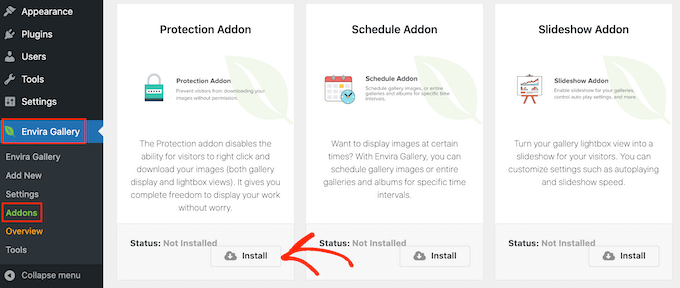
Next, head over to the Envira Gallery » Addons page. Here, find the Protection addon and click on its ‘Install’ button.

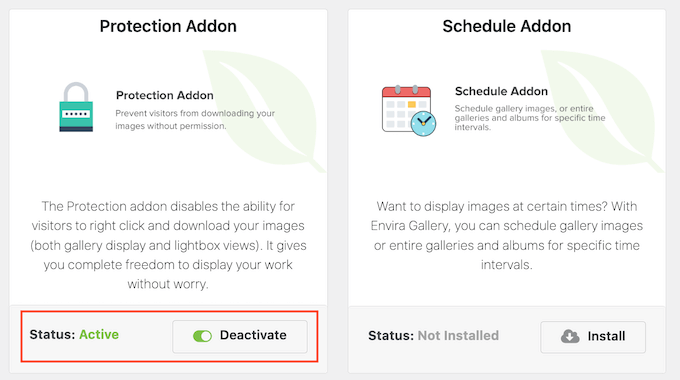
Activating the Protection addon for Envira Gallery

When you see the ‘Inactive’ slider, give it a click so it shows ‘Active’ instead.

After that, you’re ready to start creating protected image galleries.

How to protect your galleries using the Protection addon

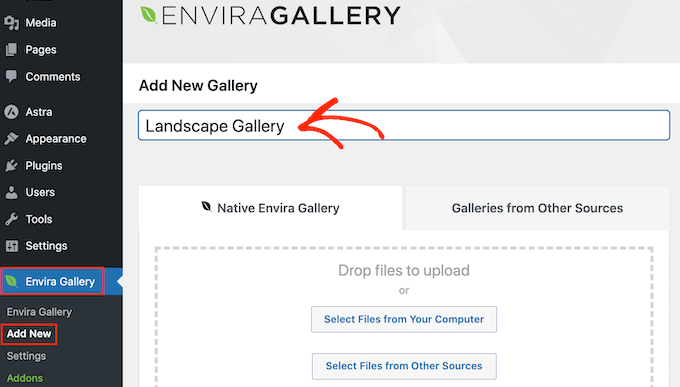
To get started, go to the Envira Gallery » Add New page and type in a name for your gallery.

This is just for your reference so you can use anything that helps you identify the gallery in your WordPress dashboard.

Creating a new gallery using a WordPress plugin

You’re now ready to add images to the gallery. You can click on ‘Select Files from Your Computer,’ or ‘Select Files from Other Sources’ and then choose images from the WordPress media library.

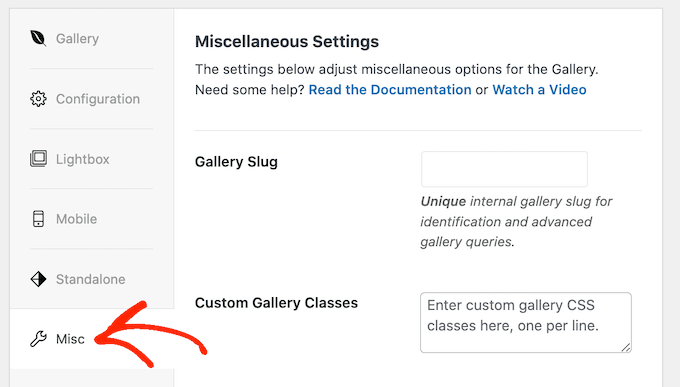
After that, scroll to the ‘Currently in your Gallery’ section and click on the ‘Misc’ tab.

How to disable no right-click for your image gallery

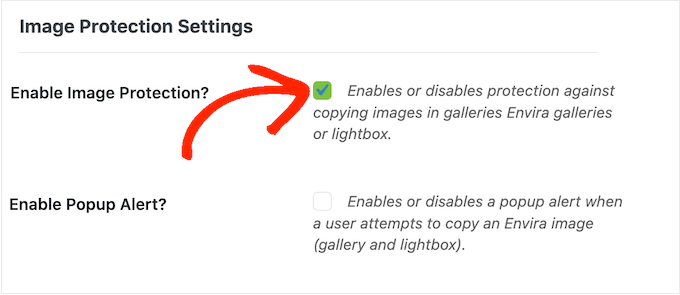
Under ‘Image Protection Settings,’ check the box next to ‘Enable Image Protection.’

This disables the right-click action for all your Envira galleries.

Enabling image protection for your image galleries

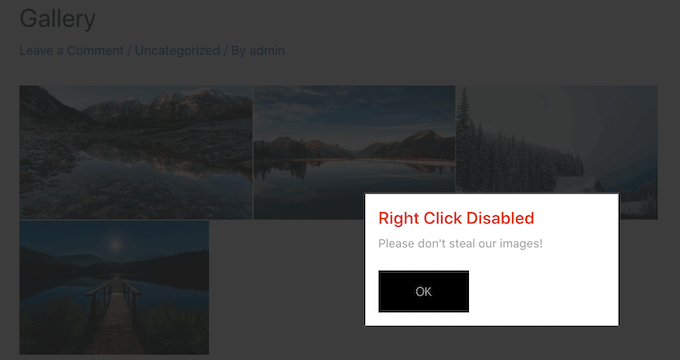
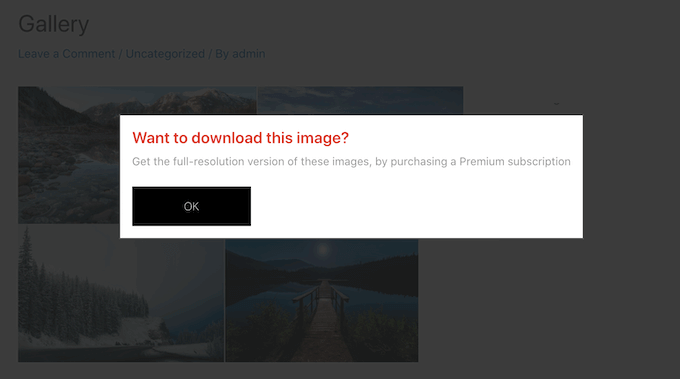
If a visitor tries to right-click a gallery, you may want to show a popup on your WordPress website. For example, you might let this person know your images are copyrighted, and can’t be downloaded without your permission.

If you’re selling your digital artwork or photos, then you can even use the popup to get more sales on your online store.

Showing a popup on right-click

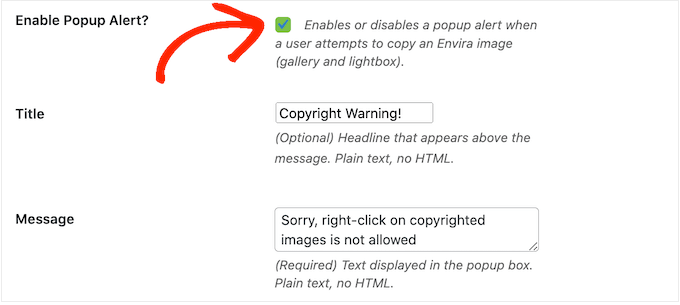
To create a popup, check the box next to ‘Enable Popup Alert.’

You can then type in a title and message.

Show a popup when a visitor right-clicks an image

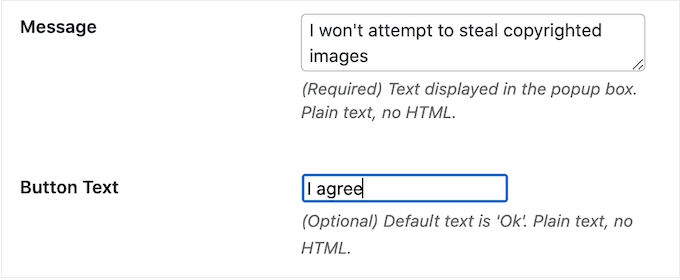
By default, visitors will click an ‘OK’ button to close the popup.

You can replace ‘OK’ with your own custom messaging by typing into the ‘Button Text’ field.

Adding a custom message to an image protection popup

When you’re happy with how the gallery is set up, click on ‘Publish’ to save your settings.

To add the gallery to your website, simply edit the post or page where you want to show the images and then click on the ‘+’ icon.

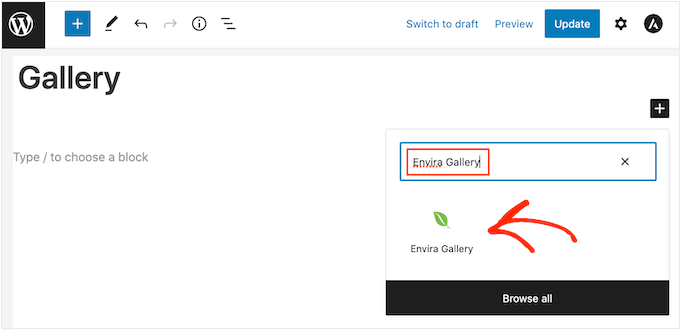
In the popup, type in ‘Envira Gallery’ and then click on the right block when it appears.

Add the Envira Gallery block to WordPress

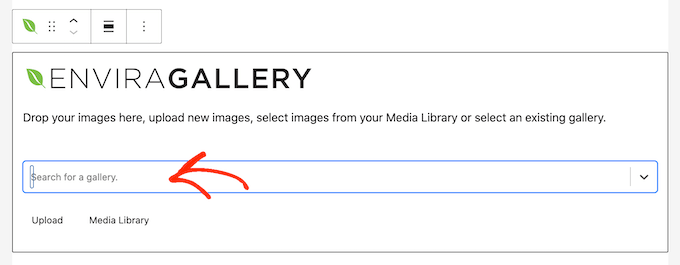
This adds the Envira Gallery block to the page.

You can now open the dropdown menu and select the gallery you just created.

Publishing an image gallery to your website or blog

When you’re happy with how the page looks, either click on ‘Publish’ or ‘Update’ to make the protected gallery live.

Pros and Cons of Disabling Right-Click on WordPress Images

Disabling the right-click action makes it more difficult for people to steal your images. It also reminds users that they can’t simply download files without the owner’s permission.

Sometimes, this will be enough to stop people from stealing your photos. This is particularly true for scammers, who tend to look for easy ways to download as many images as possible. It can also discourage genuine visitors, who may assume they can download and use any online content.

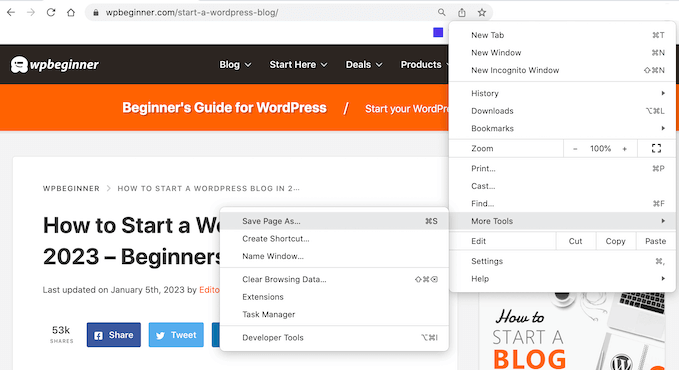
However, there are still ways to get around a website’s no right-click protection. For example, users can still download an entire page.

How to download images using the browser tools

This will copy the page’s content into a file, including all the images.

People can even use their browser’s view source or inspect tool to directly access an image file without right-clicking.

Inspecting an image using the built-in browser tool

With that in mind, you shouldn’t assume that disabling right-click is enough to keep your images safe.

On the other hand, some visitors may have a genuine reason why they need to download your images. For example, they may want to share your work with a potential future customer or post it on social media.

You might even allow people to reuse your images in specific ways, such as using your digital artwork on a non-profit website. In this case, disabling right-click can stop genuine users from accessing your images, which is a poor visitor experience.

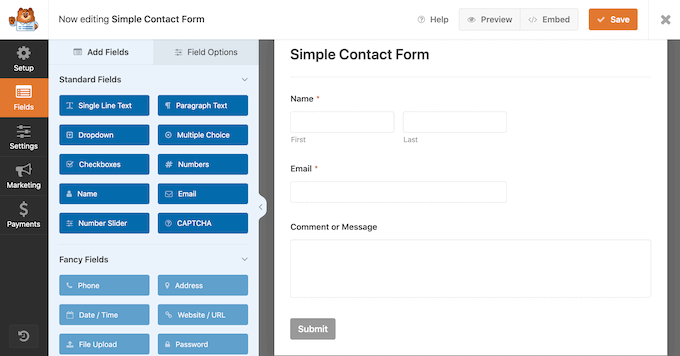
If you do add no right-click to your website, then we recommend giving people an easy way to request access to your images. You can do this by adding a contact form to WordPress using a plugin such as WPForms.

How to create a contact form using WPForms

If there’s a chance your visitors may need immediate access, then you can also add live chat to your site. This allows people to send their requests and get a response in real time, which is a great user experience.

Alternative Ways to Discourage Image Theft on Your Website

When it comes to protecting your images, disabling right-click is a good first step. However, if you really want to stop thieves then we recommend taking some extra measures.

With that in mind, here are some additional ways to stop people from downloading, reusing, and selling images without your consent.

1. Add a Copyright Notice Below Your Images

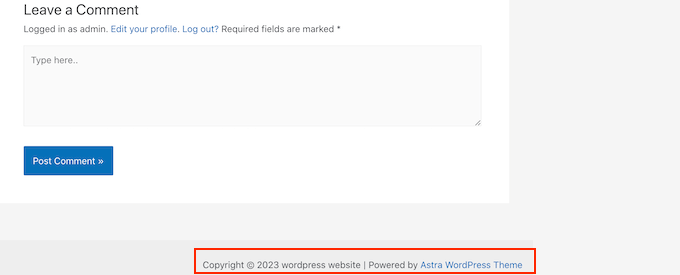
If you haven’t already, then you should add a copyright notice to your website. We recommend adding a dynamic copyright date to the WordPress footer so it appears on every page and always shows the current date.

An example of a copyright notice, in a website footer

This is a great start, but it’s also a good idea to add a copyright notice below each image in plain text. This discourages people from stealing your photos, without affecting how that image looks on your website.

Some visitors simply assume they can download and re-use any images they see online. By adding a copyright notice, you can clear up any confusion and stop people from making this innocent mistake.

How to protect your photos with a copyright disclaimer

2. Add Watermarks to Your Images

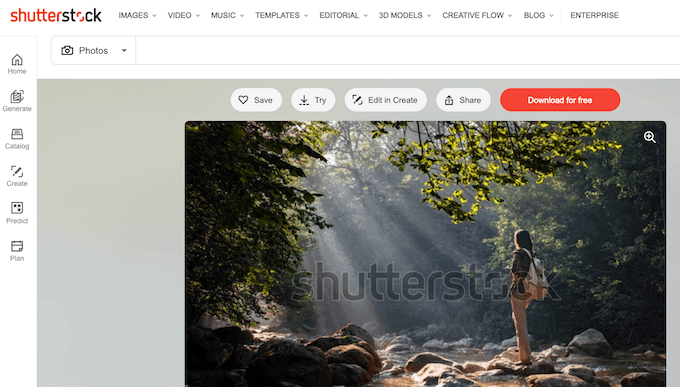
Another option is adding a watermark to your images. This works great for stock photography websites where visitors expect to see a watermark, but your images might not look their best.

An example of a stock photography website with watermarks

This can be a problem for some websites, particularly if you’re a photographer or digital artist who’s promoting their work.

For that reason, we recommend positioning your watermarks carefully so they discourage people from stealing the image, without ruining how that image looks on your website.

To learn more, please see our guide on how to automatically add watermarks to images.

3. Set Up Automatic Content Theft Notifications

Sometimes, websites will mention your business or brand name next to the stolen images, particularly if they’ve scraped an entire page from your site.

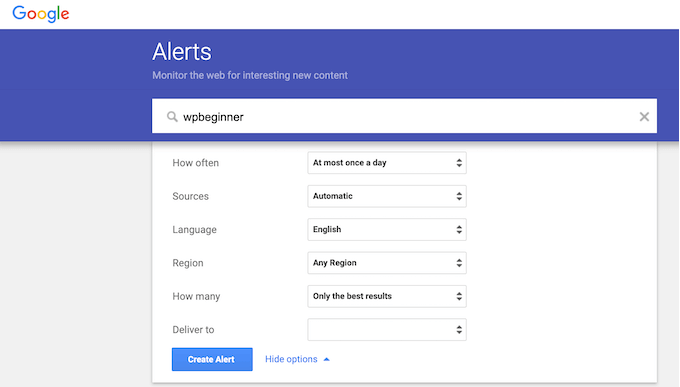
With that in mind, it’s a good idea to set up brand name notifications using a service such as Google Alerts. Simply head over to the Google Alerts page and type in the name of your site, brand, products, or any other important text.

If there’s a specific phrase or call to action that you add to every post, then you may also want to type this into Google Alerts.

Set up content theft notifications using Google Alerts

After that, use the dropdown menus to configure the alert and type in the email address where you want to get the notifications.

When you’re happy with how the alert is set up, go ahead and click on ‘Create Alert.’

Now, when someone publishes scraped content of yours, you will get an email letting you know about it.

4. Reverse Image Search with Google

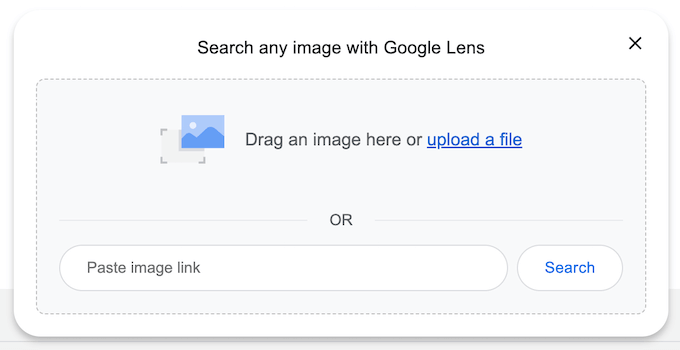
You can use Google image search to find all the places where a particular image is used online. Simply head over to the Google Images page and click on the small camera icon.

Protect your site against content theft

This will add a section where you can paste a direct link to the image or upload a copy from your computer.

After that, click on ‘Search.’

How to do a Google Reverse Image Search

Google will now show all the images that are similar to your picture. If you find the exact image on another website, then you can click through to see how that picture is being used.

If you have lots of photos, then checking each one manually can take a lot of time and effort. However, Google reverse image is a great way to uncover sites that re-using your images, so it’s smart to do a search from time to time.

Alternatively, you can use an advanced reverse image service such as Pixsy.

5. Contact the Website’s Host or Registrar

If someone has stolen and re-published your images, then we recommend contacting that person. There’s a chance they may be unaware they’re using copyrighted images illegally.

However, if it’s a spam website then you may struggle to find contact information. Instead, you can use the IsItWP lookup tool to find out where the domain and website are hosted.

The IsItWP lookup tool

The tool will pull up any available information, including the web hosting company.

Stealing content is an illegal activity and most web hosting companies don’t want to host sites that are breaking the law. With that in mind, you can contact the host and registrar directly to try and get the site taken down.

Most reputable web hosting companies take DMCA (Digital Millennium Copyright Act) complaints seriously, so this method usually gets good results.

We hope this article helped you add no right-click on WordPress images. You may also want to see our ultimate WordPress security guide or check out our expert pick of the best Instagram WordPress plugins.

If you liked this article, then please subscribe to our YouTube Channel for WordPress video tutorials. You can also find us on Twitter and Facebook.

The post How to Add No Right Click on WordPress Images first appeared on WPBeginner.


April 01, 2023 at 12:30AM