Tuesday, May 9, 2023

How to Add Custom Post Types to Your Main WordPress RSS Feed

Do you want to add custom post types to your main WordPress RSS feed?

By default, the WordPress RSS feed only shows your recent blog posts. However, if you are using custom post types for other content, then you may want to include them in your main RSS feed as well.

In this article, we will show you how to easily add custom post types to your main WordPress RSS feed.

Add custom post types to your main WordPress RSS feed

Why Add Custom Post Types to Main RSS Feed in WordPress?

By default, WordPress comes with two commonly used content types called posts and pages. However, you can also create custom post types to add more content types if needed.

For instance, a movie review website may want to create a custom post type using custom taxonomies suitable for that particular content type.
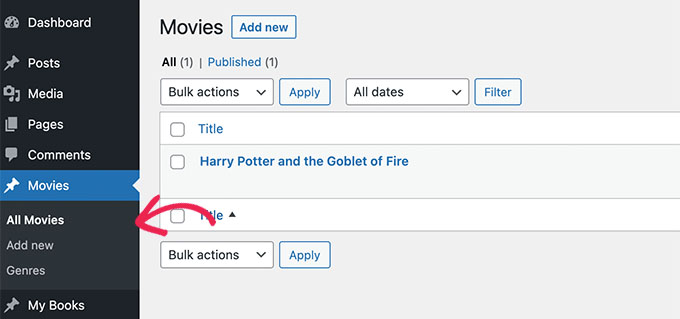
Custom post type preview

Now, your custom post types can have their own RSS feed, which users can access by adding /feed/ at the end of the custom post type archive URL.

https://ift.tt/TDCX4nO
https://ift.tt/QjMYS6a

However, these custom post-type feeds are not easily discoverable.

For example, when a user enters your website’s URL into their feed reader, they will only be shown the subscription option for your main WordPress RSS feed, and custom post types won’t be included.

Feed reader showing main RSS feed at the top

That being said, let’s see how to easily fix that by adding a custom post type to your main WordPress RSS feed. We will cover two methods, so you can use the links below to jump to the method you want to use.

Method 1: Add All Custom Post Types to Your WordPress RSS Feed

This method is for you if you want to add all the custom post types to your WordPress RSS feed.

If you are using an eCommerce plugin like WooCommerce, then using this method will also enable you to include the Products custom post type in the main RSS feed.

You can easily do this by adding custom code to your theme’s functions.php file.

However, keep in mind that making the smallest error when entering code can make your website inaccessible.

That’s why we recommend using the WPCode plugin to add code to your website. It is the best custom code snippet plugin on the market and is the easiest way to add custom code without breaking your site.

First, you need to install and activate the free WPCode plugin. For more instructions, see our beginner’s guide on how to install a WordPress plugin.

Note: The free WPCode plugin is all you need for this tutorial. However, upgrading to the premium WPCode plugin will give you access to a cloud-based snippet library, smart conditional logic, code revisions, and more.

Upon activation, head to the Code Snippets » + Add Snippet page from the WordPress admin sidebar.

From here, click on the ‘Use Snippet’ button under the ‘Add Your Custom Code (New Snippet)’ option.
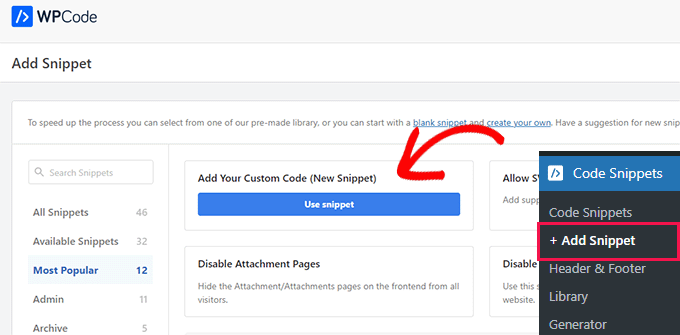
Add new snippet

This will take you to the ‘Create Custom Snippet’ page, where you can start by typing a name for the code snippet.

After that, simply select ‘PHP Snippet’ as the ‘Code Type’ from the dropdown menu on the right.
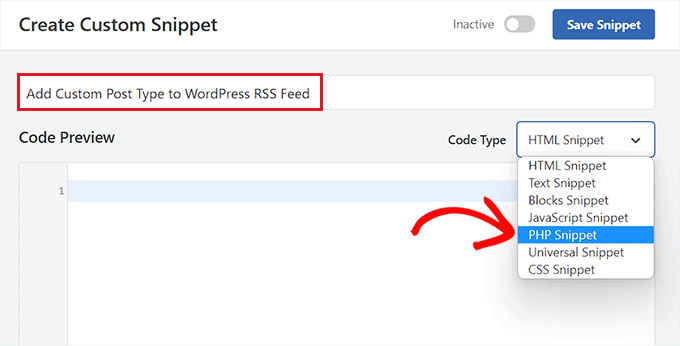
Choose PHP as the code type for the Custom Post type code

Next, you need to copy and paste the following code into the ‘Code Preview’ box.

This code will allow you to add all publicly available post types to your main WordPress RSS feed.

function myfeed_request($qv) {
if (isset($qv['feed']))
$qv['post_type'] = get_post_types();
return $qv;
}
add_filter('request', 'myfeed_request');
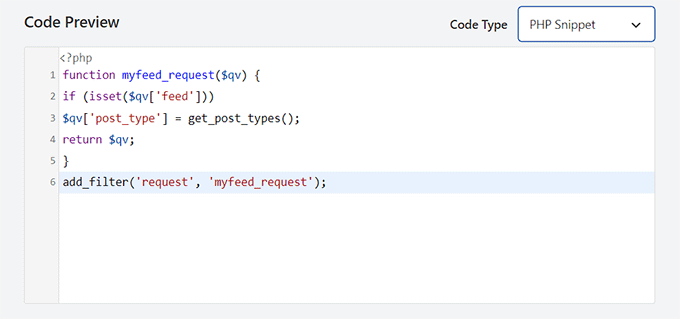
Paste the code for adding custom post type to the WordPress RSS feed

Once you have done that, just scroll down to the ‘Insertion’ section and choose ‘Auto Insert’ as the insert method.

Now, the code will automatically be executed on your WordPress website once you have activated and saved the snippet.
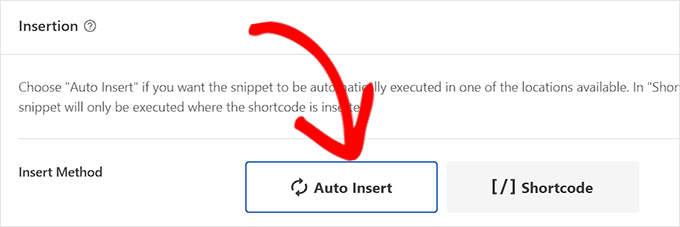
Choose an insertion method

After that, scroll back to the top of the page and toggle the ‘Inactive’ switch to ‘Active’.

Finally, simply click the ‘Save Snippet’ button to save and execute the custom code on your website.
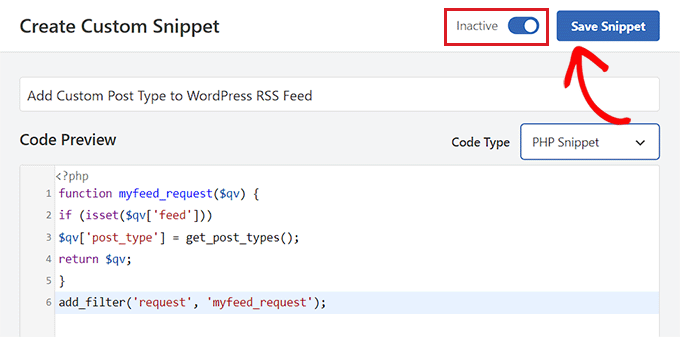
Save Snippet for adding custom post type to WordPress RSS feed

All the custom post types will now be added to your main WordPress RSS feed.

To make sure that your code is working, you can check your RSS feed by visiting a feed reader.

For this tutorial, we’ll be using Feedly, which is an online tool that allows users to add RSS feeds and websites to their Feedly account, easily organize their content, and receive updates in real time.

Once you are there, simply type your website URL under the ‘Follow your favorite websites’ option.

The custom post type content will now be displayed in your WordPress RSS feed.
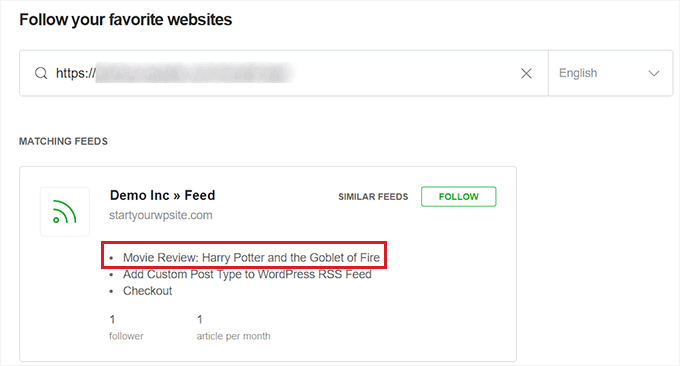
Check WordPress RSS feed

Method 2: Add a Specific Custom Post Type in the WordPress RSS Feed

If you want to add a specific custom post type to the main WordPress RSS feed, then this method is for you.

To do this, you will have to add custom code to your theme’s functions.php file. But keep in mind that the smallest error while entering the code can break your website.

That’s why we recommend using WPCode instead. It is the #1 WordPress code snippet plugin on the market. Using WPCode is the easiest and safest way to add custom code to your WordPress website.

First, you need to install and activate the free WPCode plugin. For more instructions, see our beginner’s guide on how to install a WordPress plugin.

Note: The free WPCode plugin is all you need for this tutorial. However, upgrading to the premium WPCode plugin will give you access to a cloud-based snippet library, smart conditional logic, code revisions, and more.

Once the plugin is activated, visit the Code Snippets » + Add Snippet page from the WordPress admin sidebar.

From here, you need to click the ‘Use Snippet’ button under the ‘Add Your Custom Code (New Snippet)’ option.

Add new snippet

You will now be directed to the ‘Create Custom Snippet’ page, where you can start by typing a name for your code snippet.

This name won’t be displayed anywhere and is just used for identification purposes.

Next, choose the ‘PHP Snippet’ option from the ‘Code Type’ dropdown menu on the right.
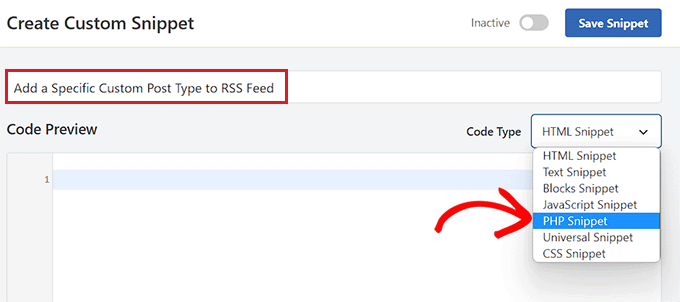
PHP as code type for the specific custom post type code

Once you have done that, you need to copy and paste the following code into the ‘Code Preview’ box.

function myfeed_request($qv) {
    if (isset($qv['feed']) && !isset($qv['post_type']))
        $qv['post_type'] = array('post', 'movies', 'books');
    return $qv;
}
add_filter('request', 'myfeed_request');

After adding the code, type the name of the custom post type next to where ‘[‘post_type’]’ is written in the code. In our example, we have ‘post’, ‘movies’, and ‘books’.

This custom post type will be added to your main WordPress RSS feed.
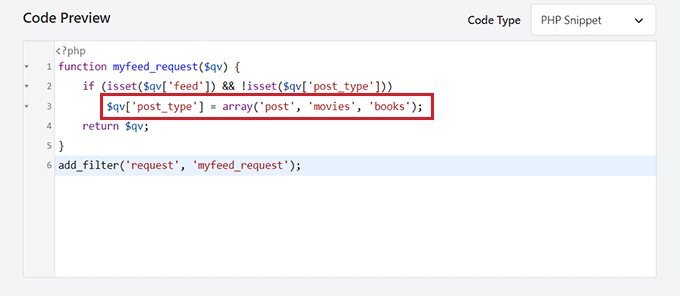
Paste code to add a custom post type to RSS feed

Now, scroll down to the ‘Insertion’ section and select the ‘Auto Insert’ setting.

The custom code will now be automatically executed on your WordPress website upon activation.
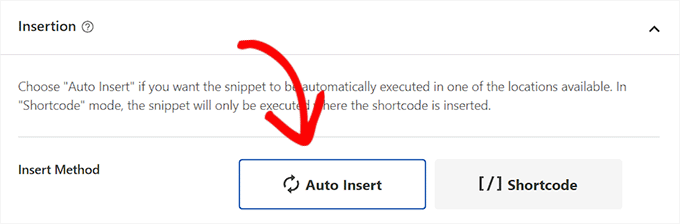
Choose an insertion method

Next, you need to scroll back to the top of the page and toggle the ‘Inactive’ switch to ‘Active’.

Finally, don’t forget to click the ‘Save Snippet’ button to save and execute the code on your WordPress website.
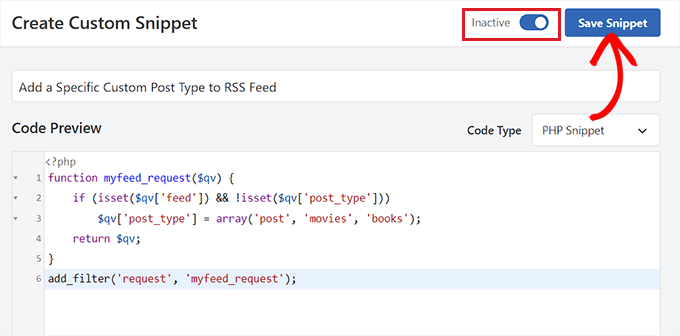
Save your snippet

To make sure that the custom post type has been headed, you will need to visit a feed reader like Feedly.

Once you are there, simply type in your website’s URL to search for its RSS feed.

The custom post type content will now be displayed in your WordPress RSS feed.

Check WordPress RSS feed

We hope this article helped you learn how to add custom post types to your main WordPress RSS feed. You may also want to see our tips to optimize WordPress RSS feeds and our top picks for the best WordPress RSS feed plugins to boost website traffic.

If you liked this article, then please subscribe to our YouTube Channel for WordPress video tutorials. You can also find us on Twitter and Facebook.

The post How to Add Custom Post Types to Your Main WordPress RSS Feed first appeared on WPBeginner.


May 09, 2023 at 10:52PM

Introducing Headline Analyzer – Writing Captivating Headlines Made Easy

Do you want to write captivating headlines that boost traffic?

Have you ever wished there was an EASY tool that helps everyone write great headlines regardless of their skill set or having to hire an elite copywriter?

If you’re like me and most other smart website owners, then you have at least wished for this solution a couple of times in your WordPress journey.

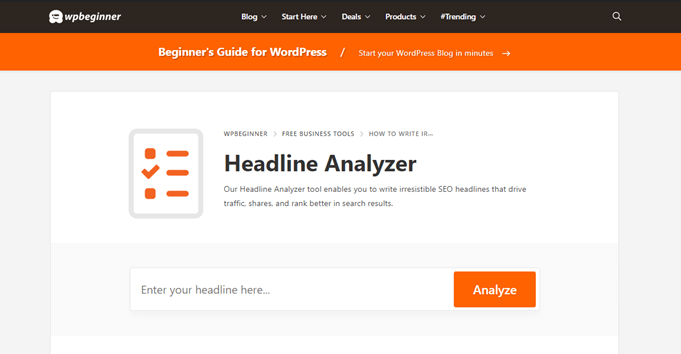
Today, I’m excited to release a free WPBeginner tool, Headline Analyzer, which enables you to write irresistible headlines that your users can’t help but click.

We built this tool because we believe headlines are the single most important factor that can make or break your content.

Introducing Headline Analyzer – Writing Captivating Headlines Made Easy

With our tool, we want to empower all bloggers and website owners to write great headlines so they can compete with the big guys and drive more traffic.

What is Headline Analyzer Tool?

WPBeginner’s Headline Analyzer tool is a powerful FREE online tool that makes it easy to write compelling headlines that drive website traffic and shares and rank better in search results.

And it is a FREE tool… no signup or registration is required!

wpbeginner headline analyzer tool

One of the reasons most people fail to make their headlines compelling is that there is no clear-cut way to write one. This is why I decided to build a headline analyzer at WPBeginner.

Backed by data, our free tool reviews your headlines and provides suggestions to help you earn the highest number of click-throughs.

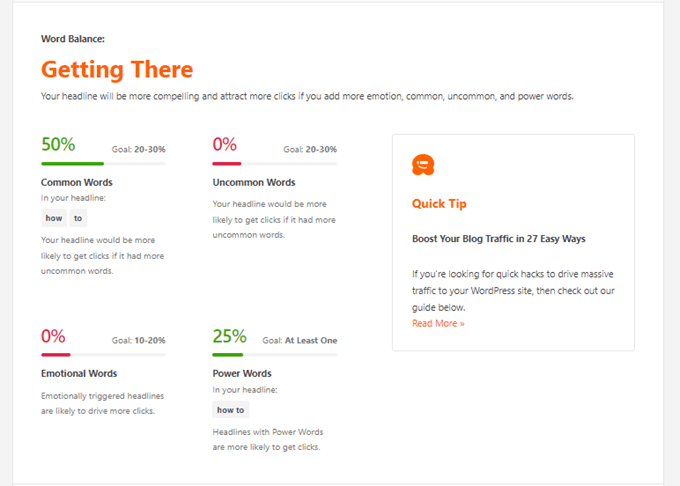
To analyze your title, the headline checker considers a few different factors, including word balance, power words, headline sentiment, headline type, word count, and more.

Some of the benefits of our title analyzer include…

Why Writing Great Headlines is Important?

Did you know 4 out 5 people will NEVER click through to read your articles?

That means even if your site gets on the first page of Google for relevant keywords, only a minority of your target audience will visit your website.

Fortunately, there is an easy way to improve your chances of driving more visitors to your site… and that is by writing a click-worthy headline.

A click-worthy headline can mean the difference between the search results your users will notice and click on Google – and the search results they’ll skip right over.

With WPBeginner’s Headline Analyzer, it takes less than 2 minutes to write a perfect title for your content… and you don’t have to be an SEO or copywriting guru to do so.

How to Use WPBeginner’s Headline Analyzer Tool

The first thing you’ll need to do is head over to the WPBeginner’s Headline Analyzer tool.

Next, type in your headline in the search bar and click Analyze.

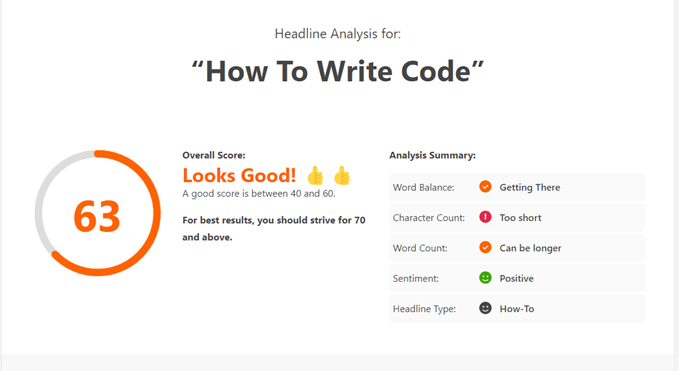
Backed by data, our tool analyzes your headline, grades it on a scale of 1-100, and offers suggestions to improve it.

You can then follow those recommendations and re-analyze your title to see if it improves your score. Then you can repeat the process until you get a great score. The general rule of thumb is to aim for a score of 70+.

headline analysis report

To get the best results from the analyzer, follow the below recommended practices.

Always Come Up with Multiple Headline Ideas

It is recommended to come up with around 3 to 5 headlines for your content. When you brainstorm multiple headline ideas, you’re more likely to think out of the box, which in turn helps you create great headlines.

After the analysis, you can pick the one that has a better score and then refine it until it gets a better score.  

Choose the Optimal Length for Your Titles

Choosing the optimal length for your titles is important. If it is too lengthy, it might get cut off from Google Search results, email inbox, social media feeds, and so on.

word balance headline analyzer

Generally speaking, too short headlines fail to incite curiosity, leading to a drop in click-throughs.

Most WordPress SEO plugins and tools recommend keeping the number of characters under 60 to ensure the title fits in the search snippet and other marketing channels.

Improve Your Workflow with Headline Analyzer

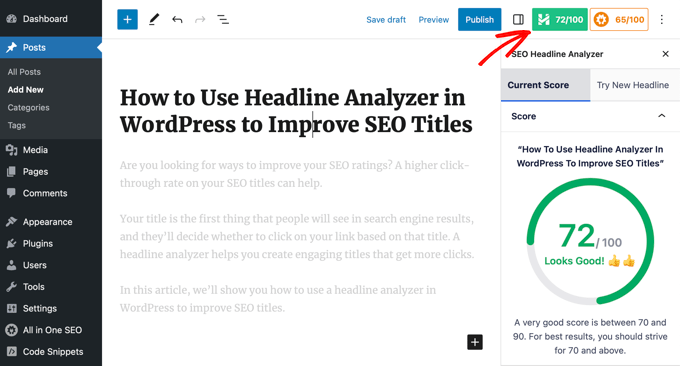
Want to get the headline analyzer inside the WordPress post editor?

You can do so free by installing and activating either the free All in One SEO plugin or the free MonsterInsights plugin.

Both of these plugins give you access to the same headline analyzer except right inside the WordPress post editor.

Click the SEO headline analyzer button

What’s Coming Next?

At WPBeginner, we always strive to build powerful tools for small businesses, so they can grow and compete with the big guys.

Headline Analyzer is just one of the new tools that we’ve launched.

We have an exciting roadmap ahead of us, and in the coming weeks, hopefully, we’ll deliver more free tools at your disposal.

Here are a few more business tools that you can use RIGHT NOW.

Our goal is to continue to build best-in-class tools to help you level the playing field.

If you have ideas on how we can make WPBeginner’s Headline Analyzer or other tools more helpful for you, then share your thoughts in the comments.

As always, I want to thank you for your continued support of WPBeginner, and we look forward to continue serving you for years to come.

Yours Truly,

Syed Balkhi
Founder of WPBeginner

The post Introducing Headline Analyzer – Writing Captivating Headlines Made Easy first appeared on WPBeginner.


May 09, 2023 at 05:57PM

Monday, May 8, 2023

How to Add a Currency Converter in WordPress

Do you want to add a currency converter to your blog?

A currency converter allows your website visitors to quickly calculate the exchange rate of different currencies without leaving your website.

In this article, we will show you how to easily add a currency converter in WordPress.

How to add a currency convertor in WordPress

What Type of Websites Need a Currency Converter?

Whether you have an online store, a small business website, or a WordPress blog, as long as you have an international audience and you’re selling something, then you can use a currency converter.

Here are a few examples of websites that may need a currency calculator for WordPress:

  • Ecommerce stores: If you are running an ecommerce store with WordPress and selling products internationally, then a currency converter can help your users quickly calculate costs in their local currency.
  • Travel blogs: If you own a travel blog, then a currency calculator can help your users calculate travel costs in different currencies.
  • Business websites: A business website may also want its users to see the exchange rates of different currencies. Particularly, businesses with a presence in different countries.
  • Finance and banking websites: Websites in the finance and banking industries can add currency calculators for their visitors to calculate conversion rates without leaving their website.
  • Coin and forex exchange sites: There are many websites that blog or deal with crypto-currencies, forex trading, and similar niches. These websites need a currency converter so that their users can quickly calculate conversion rates.

There can be many other WordPress websites that may need a currency converter. That being said, let’s take a look at how to easily add a currency converter in WordPress.

We will show you 2 methods, including a way for WordPress site and WooCommerce store. You can click the links below to jump ahead to your preferred section:

Adding a Currency Converter in WordPress

You easily add a currency converter in WordPress using CBX Currency Converter. It is a free WordPress plugin that calculates and displays up to 117 currencies.

The first thing you need to do is to install and activate the CBX Currency Converter plugin. For more details, see our step-by-step guide on how to install a WordPress plugin.

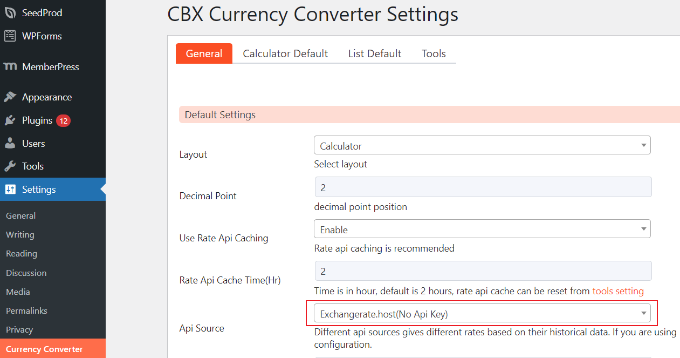
Upon activation, you need to go to Settings » Currency Converter page in your WordPress admin area. From here, you can manage general settings, like choosing a layout for your currency converter and selecting your API source to fetch the exchange rates.

CBX currency converter settings

By default, the plugin will use Exchangerate.host, which doesn’t requires an API key. However, you can click the dropdown menu and choose other sources, like Alphavantage, Openexchangerates, and Currencylayer.

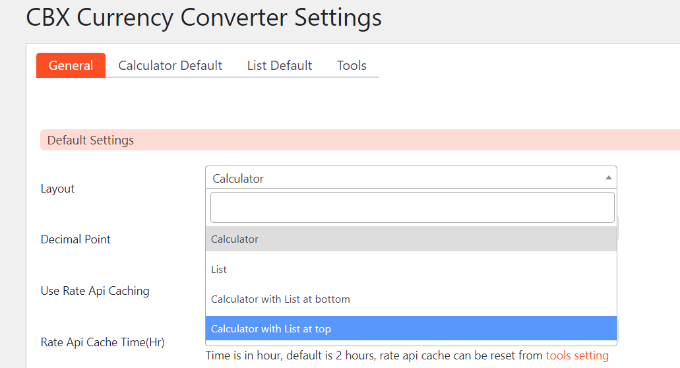
After adding the API key, you can select a layout for the currency converter.

There are 4 layouts to choose from. Using these layouts, you can display a currency calculator, exchange rate list, or both. You can also define the decimal point position.

Layout of currency converter

Besides that, you can further edit the settings for each currency converter layout.

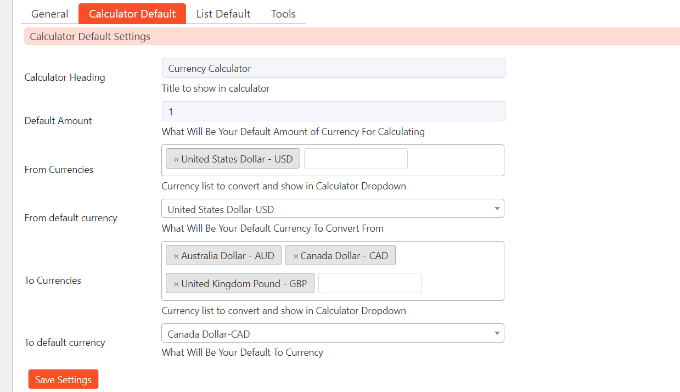
For instance, in the ‘Calculator Default’ tab, you can set the default values for the currency calculator. It allows you to enable currencies, set default options for from and to currencies, and more.

Edit calculator layout settings

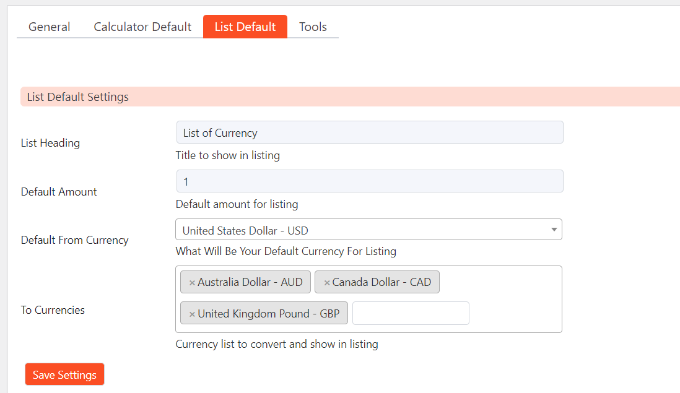
After the calculator layout, you can go to the ‘List Default’ tab for currency rate list default settings.

You can select the primary currency and then add a list of other currencies to display in the rate list.

Edit list layout settings

Once you are done with the settings, click the ‘Save Changes’ button. Make sure to perform this step whenever you change any settings in the above tabs.

Displaying the Currency Converter on Your Site

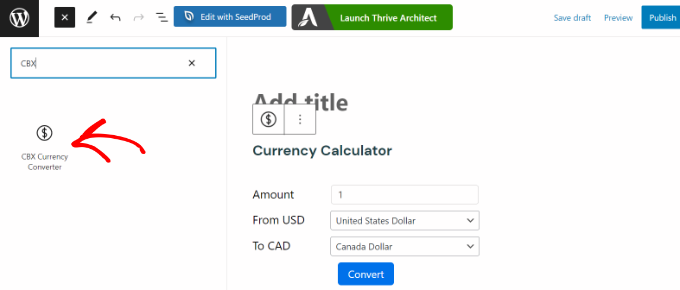
You can easily display the currency converter anywhere on your website using the CBX Currency Converter block.

First, you can create a new page or edit an existing one. Once you’re in the content editor, simply click the ‘+’ button and add the CBX Currency Converter block.

Add the CBX converter to page

Alternatively, you can also display the currency converter in the sidebar of your website.

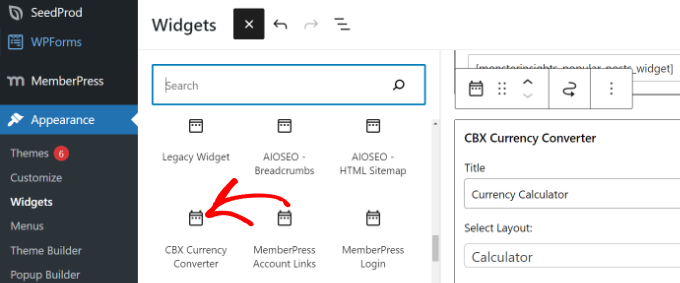
You can go to Appearance » Widgets from your WordPress dashboard. After that, you can simply add the ‘CBX Currency Converter’ widget block to the sidebar area.

Add CBX converter to sidebar

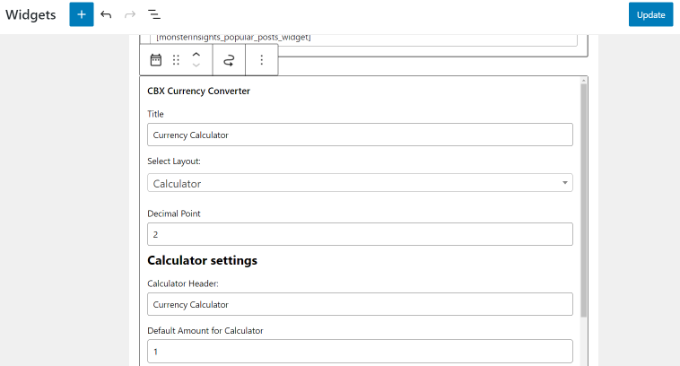
After adding the widget block, you can edit the title, select a layout, change the decimal points, choose the default currency, and more.

Once you’re done, simply click the ‘Update’ button.

Change the currency converter settings

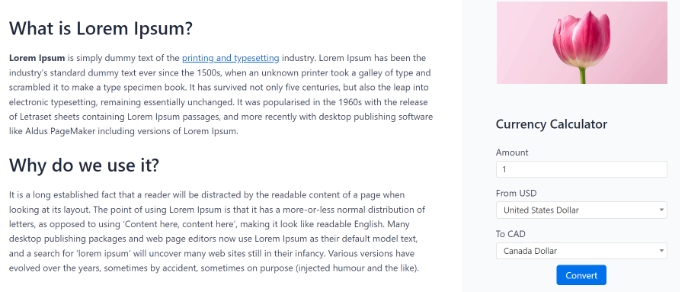
Simply visit your website to see the currency converter in the sidebar widget or WordPress page.

Your users will be able to enter an amount, select the currency they want to check, and then click the ‘Convert’ button to have the results displayed right there.

Currency convertor widget preview

You can also integrate a currency converter in your WooCommerce or any other WordPress ecommerce site. For this, you will need the Currency Converter Pro plugin.

However, other multi-currency plugins will also get the job done, most of which are free. Let’s look at how you can add a currency converter in WooCommerce.

Adding a Currency Converter in WooCommerce

If you have a WooCommerce store that attracts customers from different parts of the world, then a currency converter can show prices in local currencies and boost conversions.

The easiest way of adding a currency converter in WooCommerce is by using the CURCY plugin. It is a free WooCommerce plugin that is easy to use and offers multi-currency support.

First, you will need to install and activate the CURCY plugin. For more details, please see our guide on how to install a WordPress plugin.

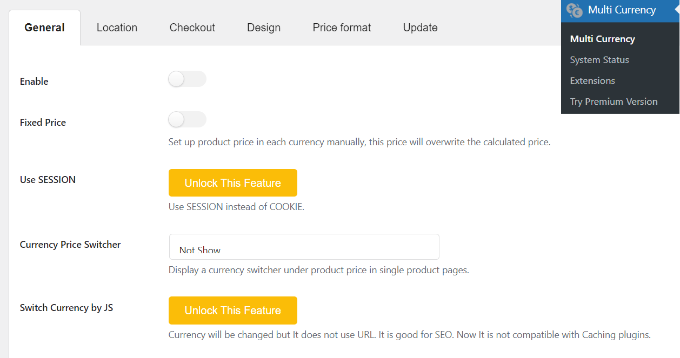
Upon activation, you can head to the Multi Currency page from the WordPress dashboard and view the General settings tab.

CURCY general settings

Here, you can click the ‘Enable’ toggle to activate currency converter options for WooCommerce. Besides that, the plugin also lets you fix the prices.

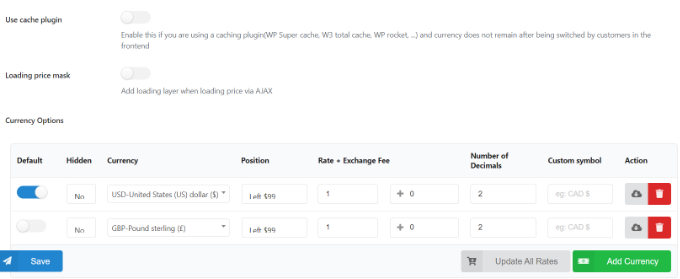
Next, you can scroll down and add different currencies. Simply click the ‘Add Currency’ button. Do remember that in the free plugin, you can only add 2 currencies at a time.

Add currencies

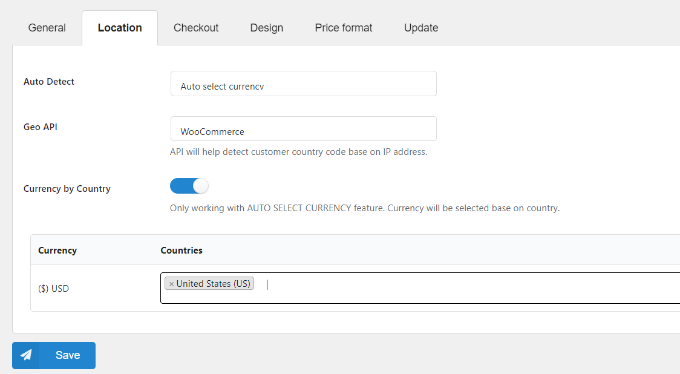
After that, you can switch to the ‘Location’ tab.

Here, you’ll find options to auto-detect currencies and show a particular currency for visitors from different locations.

Auto detect currencies

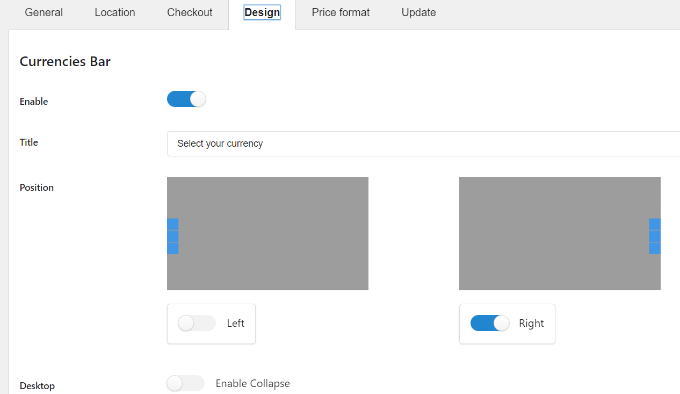
Next, you can head to the ‘Design’ tab and edit your currency converter’s appearance.

The plugin lets you choose its position, add a title, change the text color, style, main and background color, and much more.

Change the design of currency converter

Once that’s done, you can save your changes.

You can now visit your WooCommerce store to see the currency converter in action.

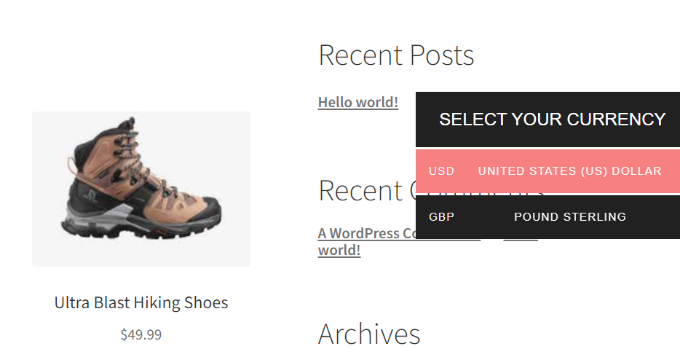
WooCommerce currency converter preview

We hope this article helped you learn how to add a currency converter in WordPress. You may also want to see our expert pick of the best calculator plugins for your WordPress site, and how to customize your WooCommerce cart page.

If you liked this article, then please subscribe to our YouTube Channel for WordPress video tutorials. You can also find us on Twitter and Facebook.

The post How to Add a Currency Converter in WordPress first appeared on WPBeginner.


May 08, 2023 at 10:30PM