Monday, May 15, 2023

How to Customize the WordPress Reset Password Page

Do you want to create a custom password reset page in WordPress?

The default WordPress reset password form has the standard WordPress branding and doesn’t change to match your theme. This isn’t the best experience, especially if you run a membership site or client portal.

In this article, we’ll show you how to customize the WordPress reset password page.
How To Customize WordPress Reset Password Page

Why Customize the Reset Password Page in WordPress?

Your WordPress website comes with a powerful user management system that allows people to create a user account, log in, and reset their password.

By default, these pages show the WordPress branding and logo. Sometimes, this isn’t a major problem especially if you or your team are the only people logging into the admin area.
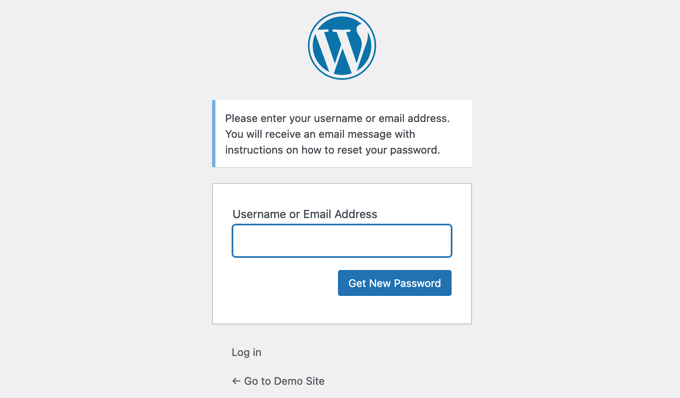
Default Reset Password Page

However, if you’re running an online store or membership site, then your customers may also need to log in.

You can provide a much better user experience by customizing these pages to match your website’s design and branding. You might also add extra content such as your logo, or a list of recent posts.

You may have already followed our other guides on how to add a custom user registration form and login page. Now let’s take a look at how to customize the reset password page. Simply use the quick links below to jump straight to the method you want to use.

Method 1: Customizing the Reset Password Page Using Formidable Forms (Easy)

The easiest way to replace the WordPress password reset page is by using Formidable Forms. This plugin lets you replace the default password reset page using a shortcode.

This method doesn’t allow you to edit the password reset form, but you can add your own content around it. For example, you can add text, images, and other content using the standard WordPress post editor.
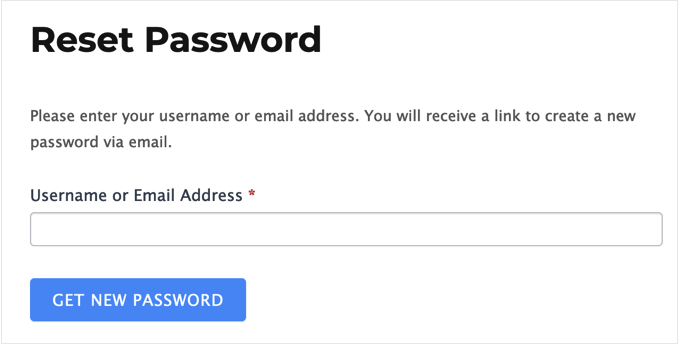
An example of a custom password reset page

First, you need to install the Formidable Forms plugin. To learn more, see our step-by-step guide on how to install a WordPress plugin.

Upon activation, you’ll also need to install Formidable Forms Lite. This free plugin provides the core foundation for the premium plugin’s more advanced features.

Once you’ve done that, go to the Formidable Forms » Global Settings page in your dashboard and select ‘Click to enter a license key manually.’
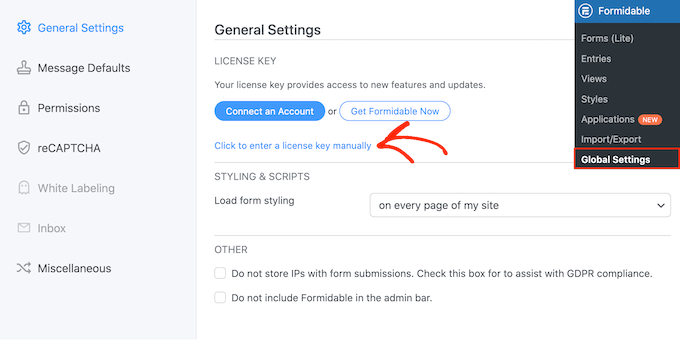
The Formidable Forms license page

You can find the license key under your account on the Formidable Forms website. After entering this information, go ahead and click the ‘Save License’ button.

Next, you will need to install the User Registration addon by going to Formidable » Add-Ons. On this screen, find the User Registration addon and click on its Install button.
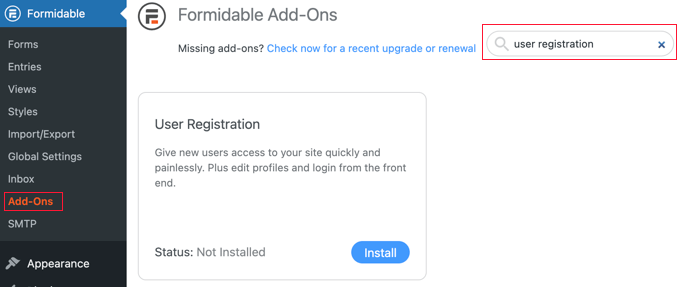
Formidable Forms Add-Ons Page

Now you’re ready to create a custom reset password page by going to Pages » Add New.

To start, give the page a title and then click on the + button. In the popup that appears, start typing ‘Shortcode.’
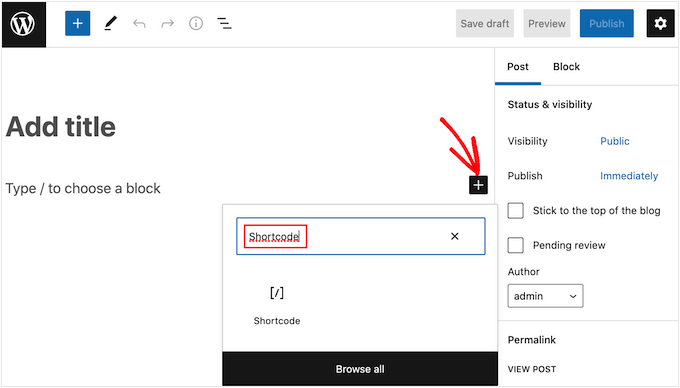
Adding a shortcode block to WordPress

Simply click on the right block to add it to the page.

You can now add the following shortcode: [frm-reset-password].
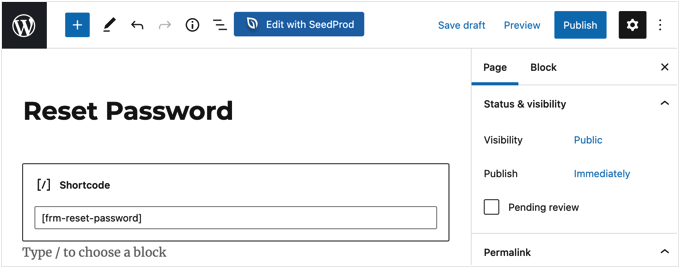
Adding a custom password reset form using shortcode

At this point, you can add any other content you want to show on the password reset page.

When you’re happy with how the page is set up, click on the ‘Publish’ button to make it live.

Finally, you need to tell WordPress to use this page, rather than the default password reset page. To do that, head over to Formidable » Global Settings and then click the ‘Registration’ tab in the menu.

From here you just need to open the ‘Reset Password Page’ dropdown and choose the page you just created.
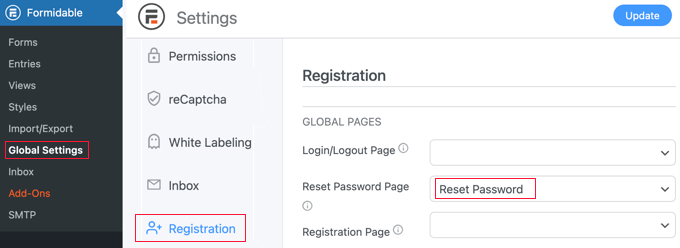
Formidable Forms Global Settings Registration Page

Don’t forget to click the ‘Update’ button at the top of the screen to store your settings.

You can now visit your WordPress website to see the custom reset password page in action.

Method 2: Customize All Membership Pages Using ‘Theme My Login’

To provide a consistent user experience, it’s a good idea to use the same styling on all your membership pages. Theme My Login is a free plugin that allows you to replace the built-in WordPress dashboard, login, logout, registration, forgot password, and reset password pages.

It’s not the most customizable solution, but all its pages will use your WordPress theme.
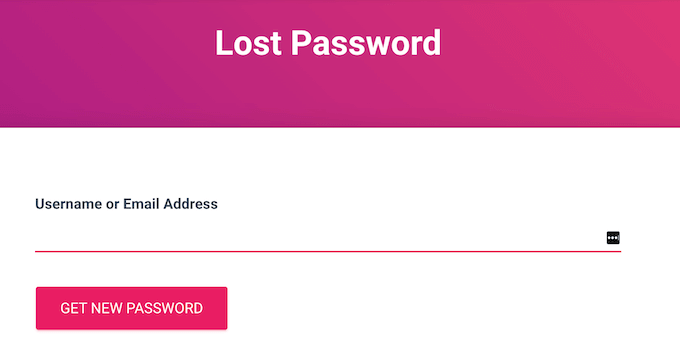
A custom lost password page in WordPress

The first thing you need to do is install and activate the Theme My Login plugin. For more details, see our step-by-step guide on how to install a WordPress plugin.

Upon activation, Theme My Login automatically creates URLs for your custom login, logout, registration, forgot password, and reset password screens. You can see these URLs by going to the Theme My Login » General page.
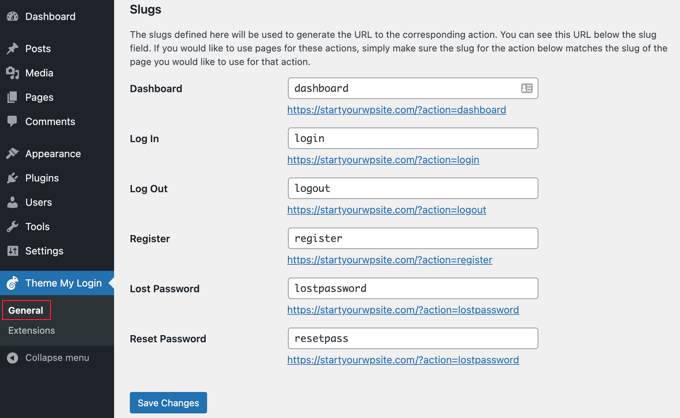
Theme My Login Slugs

To replace any of these pages, you simply need to create a new page with this exact URL.

To create a custom password reset page, go to Page » Add New. Here, click on the ‘+’ icon and start typing ‘Shortcode.’

When the right block appears, give it a click to add it to the page.
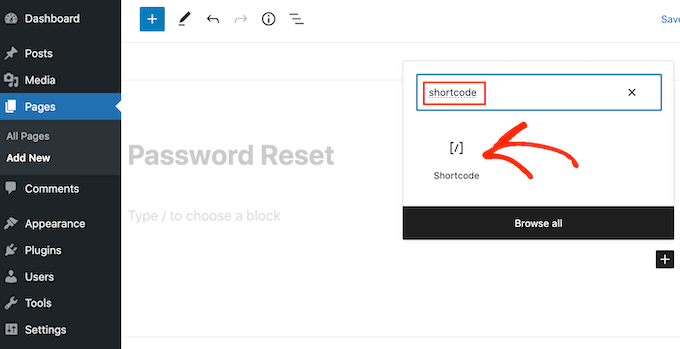
Adding a custom password reset page using a shortcode

Inside the block, add the following shortcode:

[theme-my-login action="lostpassword"]

You can now add any extra content you want to show on the password reset page, such as your logo. When you’re happy with how the page is set up, click on ‘Save draft.’
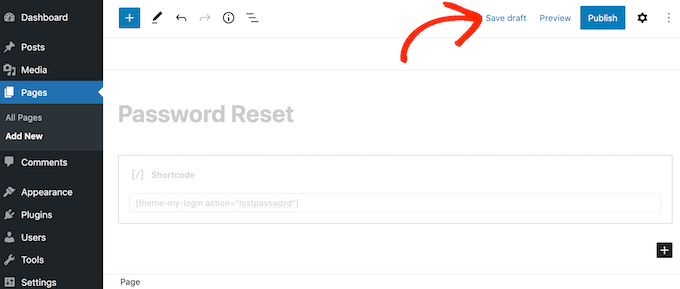
Publishing a custom password reset page

After that, go to Pages » All Pages and find the password reset page you just created.

Simply hover your mouse over the page and click on the ‘Quick Edit’ button when it appears.
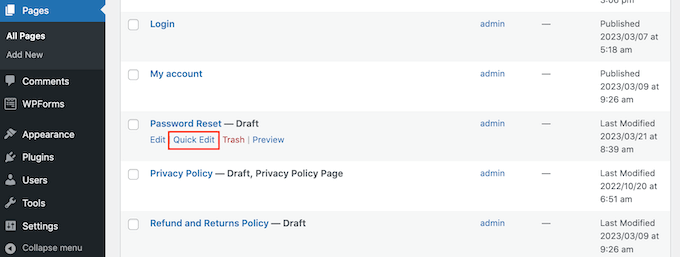
Adding password reset with quick edit

In the ‘Slug’ field, type in ‘lostpassword.’

After that, open the ‘Status’ dropdown and select ‘Published.’
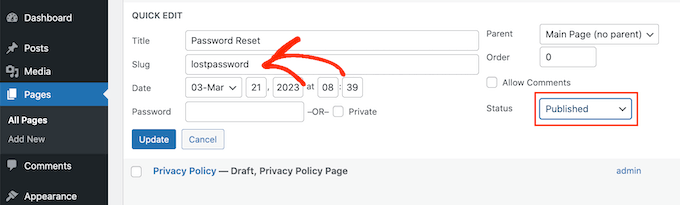
Customizing the password reset slug in WordPress

With that done, go ahead and click on ‘Update.’ Now, if you visit your WordPress blog you’ll see the lost password page live.

To replace the other built-in WordPress membership pages, simply follow the steps described above, but make sure you use the right URL slug and shortcode.

For example, if you wanted to create a custom password reset page, then you’d need to use the [theme-my-login action="resetpass"] shortcode. You’ll also need to change the ‘URL slug’ to resetpassword.

Method 3: Create a Password Reset Page Using WPForms (Completely Customizable)

If you want to replace the default password reset page with a completely custom form, then we recommend using WPForms.

This plugin has a ‘User Password Reset Form’ template that you can customize with your own text, images, and branding. You can even add and remove fields, to collect exactly the information you want from members.
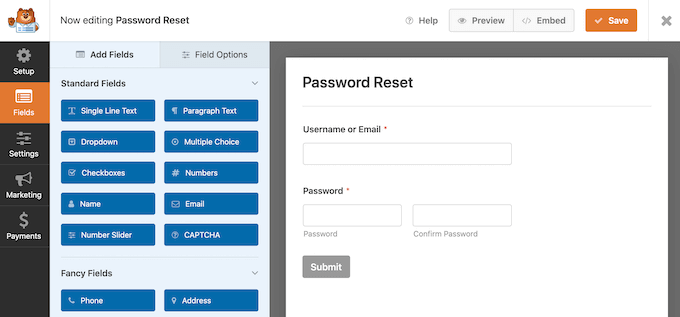
The WPForms drag and drop form editor

The first thing you need to do is install and activate the WPForms plugin. For more details, see our step-by-step guide on how to install a WordPress plugin.

Upon activation, head over to WPForms » Settings and enter your license key. You can find this information under your account on the WPForms website.
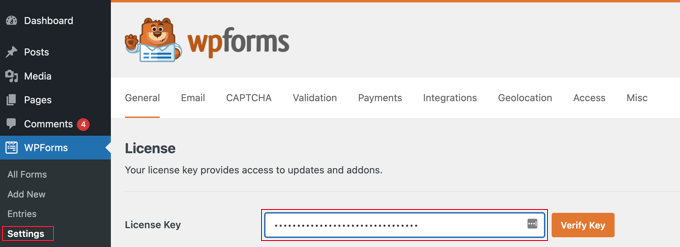
Entering the WPForms license key

After entering the license key, you’ll need to install the User Registration addon, which allows you to create custom user registration, password reset, and login forms for your site.

In the dashboard, go to WPForms » Addons and find the User Registration Addon.
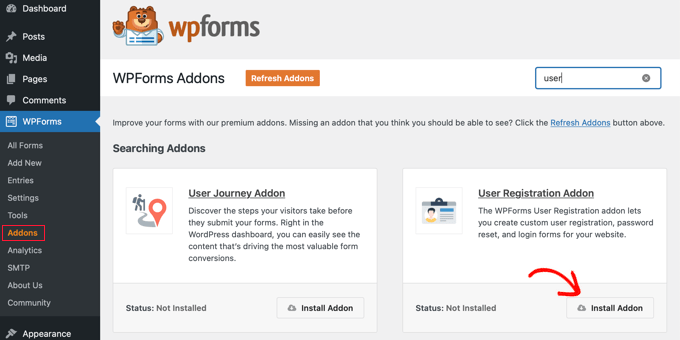
The WPForms user registration addon

Simply click on ‘Install Addon’ to download it, and then click on ‘Activate’ to make it live.

You are now ready to create your own custom password reset form by going to the WPForms » Add New page. Here, type in a title for the new form.

With that done, scroll to the ‘User Password Reset Form’ template and click on its ‘Use Template’ button.
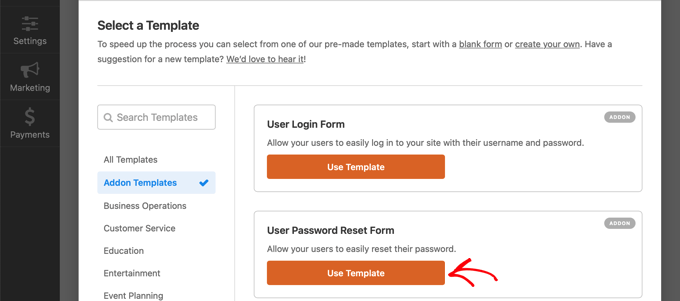
The WPForms password reset template

WPForms will now load the User Password Reset Form template.

To customize any field with your own text, label, or description, simply click to select it and then use the settings to make your changes.

For example, the template has a ‘Submit’ button. To show a different button label, simply click to select the field and then type a new message into ‘Submit Button Text.’
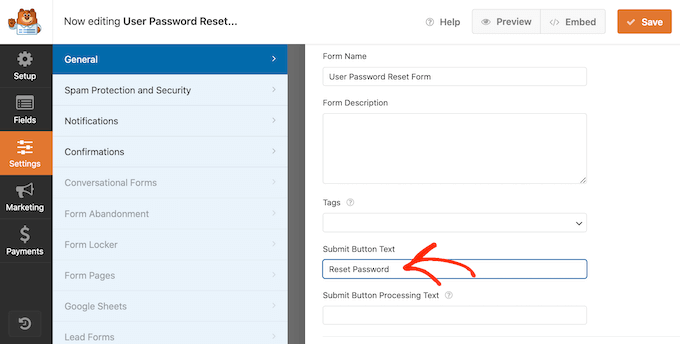
Customizing the text in a password reset form

You can also change what happens when a user submits their password reset request by going to Settings » Confirmations.

Here, open the ‘Confirmation Type’ dropdown and choose whether to redirect the user to a different page or URL, or simply show a message asking them to check their inbox for a password reset email.
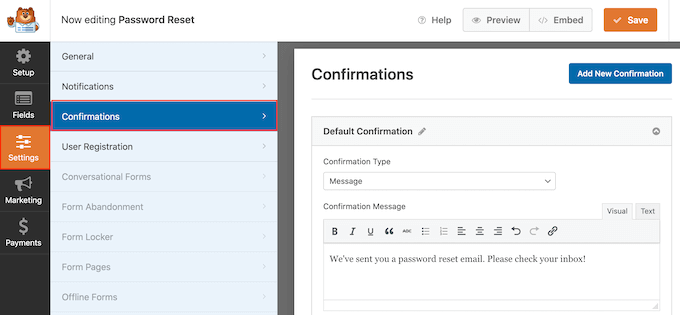
Creating a custom message for the WPForms password reset page

You can also customize the message by typing it into the small text editor. For example, you might remind users to check their spam folders.

Pro Tip: If your emails are regularly getting sent to spam, then we recommend using an SMTP service provider to improve your email deliverability rates.

When you’re happy with how the form is set up, click on the ‘Save’ button at the top right corner of the screen.

To replace the default WordPress password reset page, we’ll need to place the form on a page with the slug ‘onepassword.’ The easiest way to do this is by clicking on the ‘Embed’ button. Then, select ‘Create New Page.’
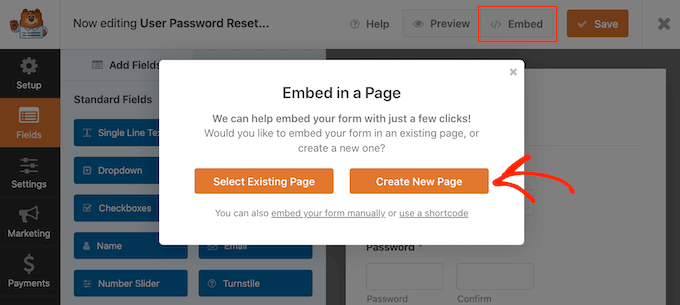
Adding WPForms to a new WordPress page

You can now type in a title for the new page. We’ll be changing the slug in a later step so you can use anything you want.

With that done, click on ‘Let’s Go.’
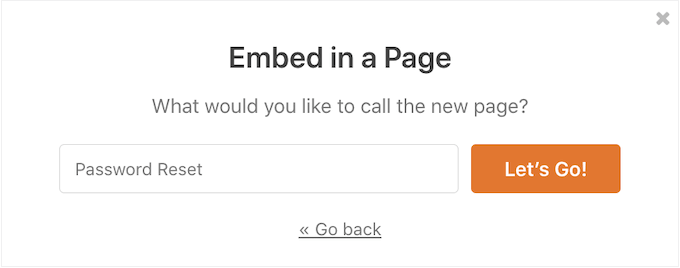
Adding a custom password reset form to a WordPress page

This takes you to the WordPress page editor, with the form already added to the new page. You can now make any changes to this page, such as adding more text, a custom logo, or categories and tags.

When you’re happy with how the page looks, click on the ‘Save draft’ button.
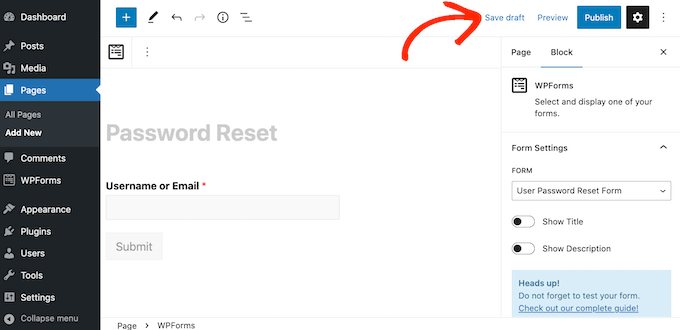
Creating a custom password reset form using WPForms

After that, go to Pages » All Pages and find the password reset page you just created.

Simply hover your mouse over the page and click on the ‘Quick Edit’ button when it appears.
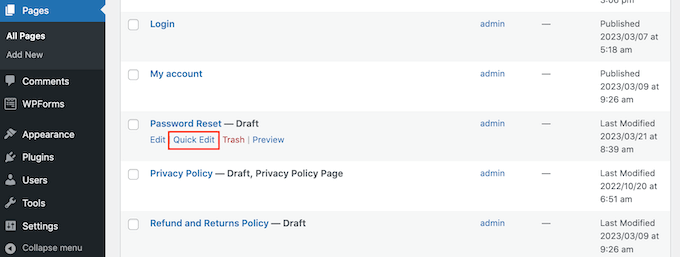
Customizing the password reset slug

In the ‘Slug’ field, type in ‘lostpassword.’

After that, open the ‘Status’ dropdown and select ‘Published.’

Customizing the password reset slug in WordPress

Now, we need to set up a redirect that will send visitors to our custom password reset page, rather than the built-in WordPress page. The easiest way to do this is by using the free WPCode plugin.

WPCode is the best code snippets plugin used by over 1 million WordPress websites. It makes it easy to add custom code in WordPress without having to edit the functions.php file.

With WPCode, even beginners can edit their website’s code without risking mistakes and typos that can cause many common WordPress errors.

The first thing you need to do is install and activate the free WPCode plugin. For more details, see our step-by-step guide on how to install a WordPress plugin.

Upon activation, head over to Code Snippets » Add Snippet.
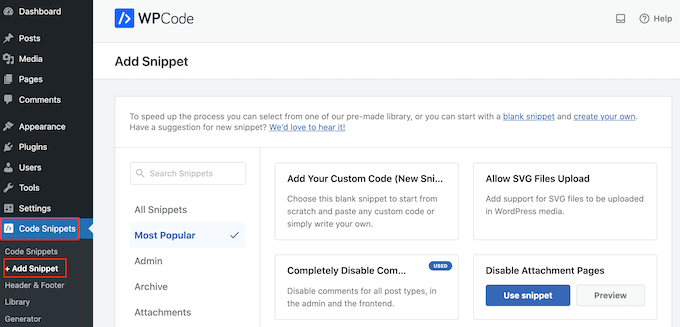
Adding a custom snippet to WordPress

Here, simply hover your mouse over ‘Add Your Custom Code.’

When it appears, click on ‘Use snippet.’
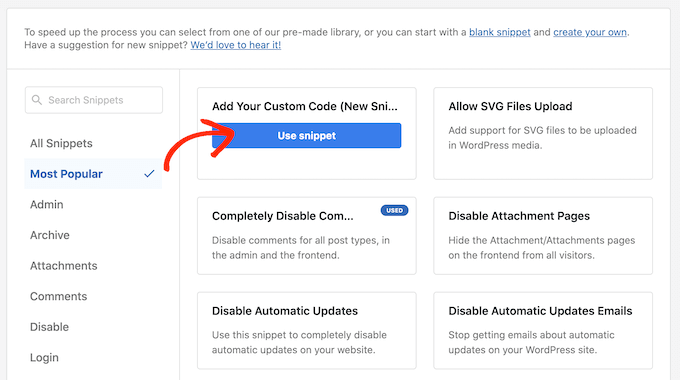
Redirect to a custom password reset page with WPCode

To start, type in a title for the custom code snippet. This can be anything that helps you identify the snippet in the WordPress dashboard.

After that, open the ‘Code Type’ dropdown and select ‘PHP Snippet.’
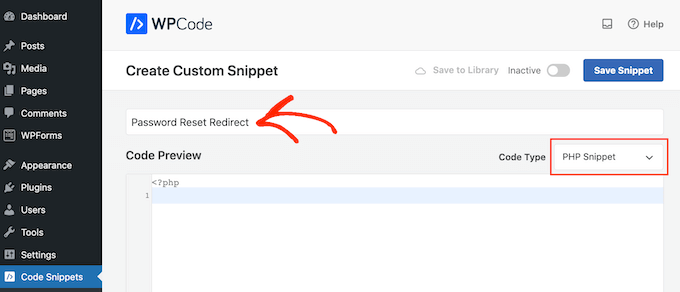
Adding a password reset redirect

In the code editor, add the following code snippet:

add_filter( 'lostpassword_url', 'my_lostpassword_url' );
function my_lostpassword_url() {
return site_url('/lostpassword/');
}

Next, scroll to the ‘Insertion’ section. WPCode can add code to different locations, such as after every post, frontend only, or admin only.

We want to use the custom PHP code across our entire site, so click on ‘Auto Insert’ if it isn’t already selected. Then, open the ‘Location’ dropdown menu and choose ‘Run Everywhere.’
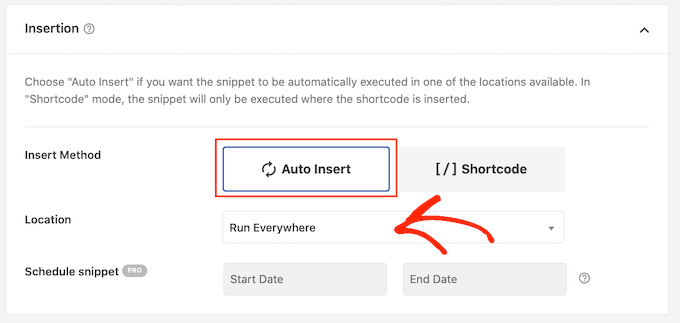
Adding a redirect to WordPress using a code snippet plugin

After that, you’re ready to scroll to the top of the screen and click on the ‘Inactive’ toggle, so it changes to ‘Active.’

Finally, click on ‘Save Snippet’ to make the PHP snippet live.
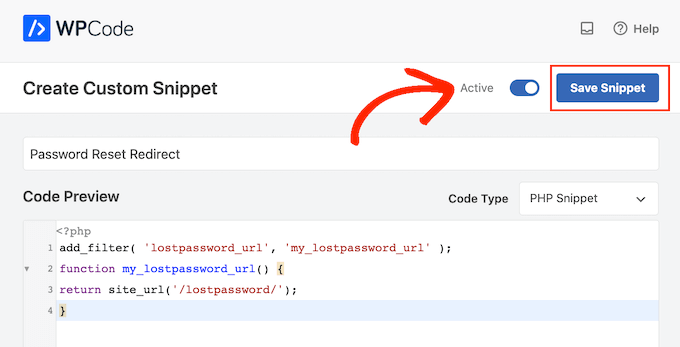
Publishing a custom PHP snippet in WordPress

Now, try visiting the built-in WordPress login screen.

If you click on the ‘Lost your password?’ link, then you’ll be redirected to the custom password reset page you just created.
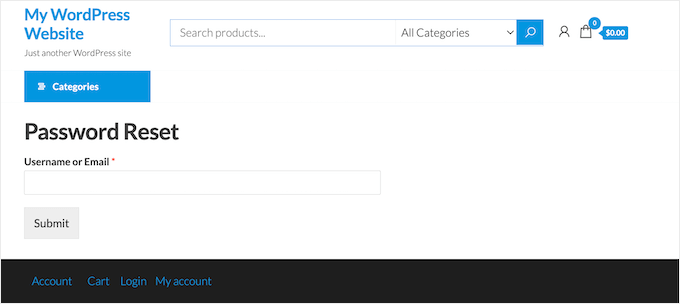
A custom password reset form

Depending on how your site is set up, you may need to update the password reset links on other pages.

If you’ve created a custom login page for WordPress using a plugin such as WPForms, then we also recommend adding the new password reset link to this form.
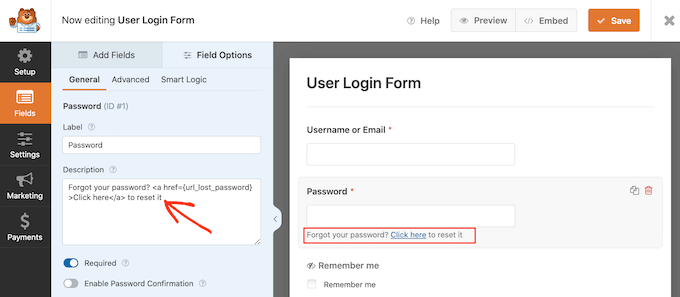
Customizing the login page and form

We hope this tutorial helped you learn how to customize the WordPress reset password page. You may also want to learn how to create a free business email address or check out our list of must-have plugins to grow your site.

If you liked this article, then please subscribe to our YouTube Channel for WordPress video tutorials. You can also find us on Twitter and Facebook.

The post How to Customize the WordPress Reset Password Page first appeared on WPBeginner.


May 15, 2023 at 10:00PM
How to Create a Digital Product Marketplace in WordPress

Do you want to create a digital product marketplace in WordPress?

A digital marketplace is a website where other people can sell their photos, artwork, music, ebooks, spreadsheets, online courses, or other digital downloads. Luckily, WordPress makes it easy to create a secure online marketplace for multiple vendors.

In this article, we will show you how to easily create a digital product marketplace using WordPress without hiring a developer.

How to Create a Digital Product Marketplace in WordPress

What Platform Should You Use for Your Digital Product Marketplace?

A digital product marketplace is a website where users can sign up to sell ebooks, images, videos, and other downloadable content.

If you want to create a digital marketplace, you will first need to choose your eCommerce platform. Some platforms are better suited for selling physical goods than digital ones.

Plus, some don’t have the features you need for a multi-vendor marketplace. Moving to a different platform in the future can be hard and time-consuming.

That means you want to be sure you are choosing a solution with features that protect your digital downloads, including proper licensing and subscriptions.

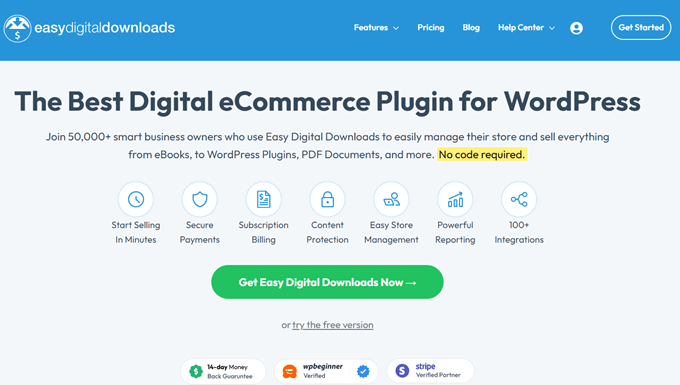
We recommend using WordPress + Easy Digital Downloads.

easy digital downloads

WordPress is the best website builder on the market, used by over 43% of all websites on the internet.

Now, it’s important to know that there are two types of WordPress software, and you don’t want to choose the wrong one.

First, there is WordPress.com, which is a blog hosting platform. Then, there is WordPress.org, which is also known as self-hosted WordPress. For a detailed comparison, you can see our guide on the difference between WordPress.com and WordPress.org.

You need to use the self-hosted WordPress.org platform because it gives you full control over your website. It provides complete freedom to sell any type of digital product by using a plugin like Easy Digital Downloads.

Easy Digital Downloads (EDD) is the best WordPress eCommerce plugin for selling digital products, and it has all the features you need to set up a multi-vendor marketplace.

In fact, we use this plugin ourselves to sell many of our premium WordPress plugins, which are downloadable files restricted to members only. Easy Digital Downloads also comes with license keys built-in.

If you just want an online store where you can sell digital products yourself, then please see our guide on how to sell digital downloads on WordPress.

However, in this article, we will show you how to set up a multi-vendor marketplace where other people can sell digital goods on your WordPress website.

That being said, let’s look at how to easily set up your WordPress digital marketplace site with Easy Digital Downloads.

Step 1: Setting Up Your WordPress Website

To start selling digital downloads with WordPress, you will need a domain name, web hosting, and an SSL certificate. 

  • A domain name is your website’s address on the internet. This is what visitors will type into their browsers to reach your website, such as ‘wpbeginner.com’.
  • Web hosting is a service that will store your website files and digital downloads. To help you out, we have hand-picked some of the best WordPress hosting that you can buy.
  • An SSL certificate is needed to create a secure connection between your website and users so that you can accept online payments.

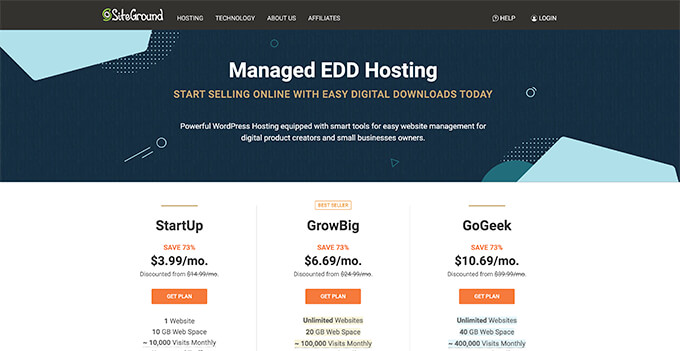
One of our top recommended hosting providers, SiteGround, offers managed WordPress hosting for Easy Digital Downloads. It comes with a free SSL certificate, EDD preinstalled, and optimization features. Plus, you get a huge 73% off!

Basically, you can create and run your website for less than $5 per month.

Let’s walk through how to purchase your domain, web hosting, and SSL certificate.  

Go ahead and open the SiteGround website in a new tab so that you can follow along. The first thing you need to do is click on the ‘Get Plan’ button.

SiteGround Managed EDD Hosting

After that, SiteGround will ask you to enter a domain name for your website. If you don’t already have a name in mind, then you can see our guide on how to choose the best domain name.

Lastly, you will need to add your account information.

You will also be able to purchase some optional extras. You can always add these at a later date if you need them. If you are unsure, then we recommend skipping this step. 

After entering your payment details, SiteGround will send you an email with instructions on how to log in to your hosting account. This is a web hosting control panel where you can manage your new website. 

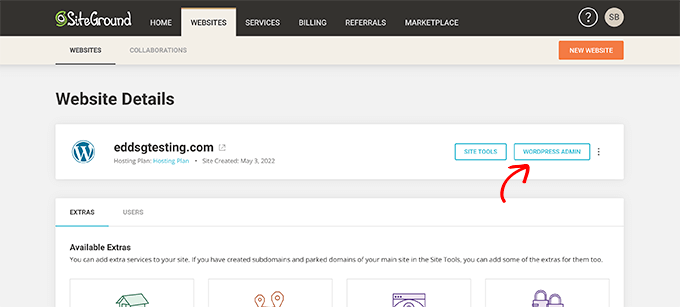
Simply log in to your SiteGround account, and you will see that SiteGround has already installed WordPress for you. It has also preinstalled Easy Digital Downloads.

SiteGroud Login to WordPress

You can then click on the ‘WordPress Admin’ button. This will take you to your WordPress site’s dashboard.

If, for some reason, you don’t want to use SiteGround, then you can also install WordPress on other hosting companies like BluehostHostinger, and WP Engine by following a similar process.

Step 2: Creating an Online Store With Easy Digital Downloads

By default, WordPress doesn’t include eCommerce functionality out of the box, so you will need a plugin to sell digital downloads.

Plugins for WordPress sites are like apps for your phone. They add all kinds of different features and functionality to your website.

We will be using the Easy Digital Downloads plugin to add the multi-vendor eCommerce features we need.

If you claimed our SiteGround EDD Hosting deal in the previous step, then Easy Digital Downloads is already installed on your website. You can move on to the ‘Entering Your Business and Location Information’ section below.

But if you are using another hosting provider, then you first need to install and activate the Easy Digital Downloads plugin. For more details, see our step-by-step guide on how to install a WordPress plugin.

Note: Although you can use the free Easy Digital Downloads plugin for selling digital products online, you will also need a Professional Pass or higher to turn your website into a digital product marketplace. Later in this tutorial, we will show you how to set this up.

Entering Your Business and Location Information

Upon activation, you need to visit the Downloads » Settings page in your WordPress admin area. This will start the Easy Digital Downloads setup wizard.

On the setup wizard’s first page, you will be asked to enter your business name and location.

You might wonder why your location is needed if you are not selling physical products. This is because when a customer makes a purchase, Easy Digital Downloads will use the country and state information to auto-fill some fields.

Also, your location may be used to calculate sales tax.

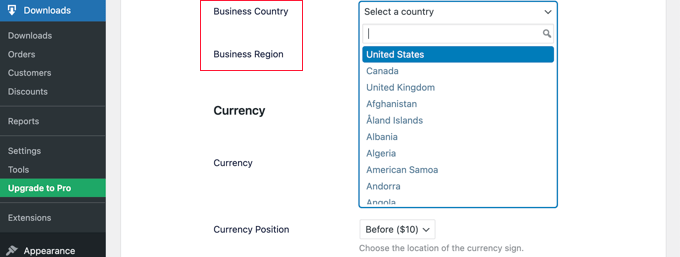
To add your location, open the ‘Business Country’ dropdown menu. You can now choose the country where your business is based.

Easy Digital Downloads Setup Select a Country

Next, find the ‘Business Region’ field. Here you can type the state or province where your store operates from.

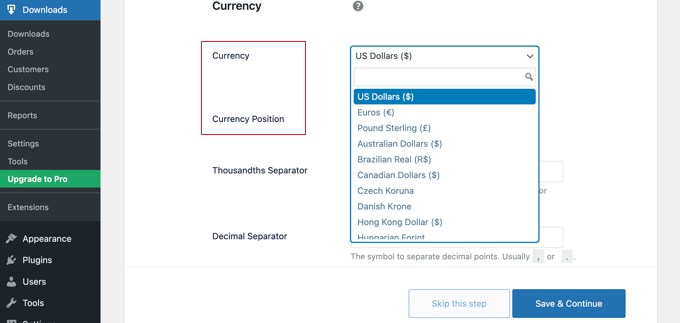
Depending on your location, you may also want to customize the currency used on your website. By default, Easy Digital Downloads shows all of your prices in US dollars. It also places the dollar sign before the price, so five dollars is shown as ‘$5.’

To change the default currency settings, scroll down to the Currency section and open the ‘Currency’ dropdown. You can now choose a new currency. 

Easy Digital Downloads Setup Select Currency

Just be aware that some payment gateways may not accept every currency. If you are not sure, then it’s a good idea to check the website for your chosen payment gateway. Most payment gateways have a list of the currencies that they support. 

Once you are finished, you will need to click on the ‘Save & Continue’ button. This will bring you to the next page, where you can set up your payment methods.

Setting Up Your Payment Methods

If you want to sell digital products, then you will need a way to collect online payments.

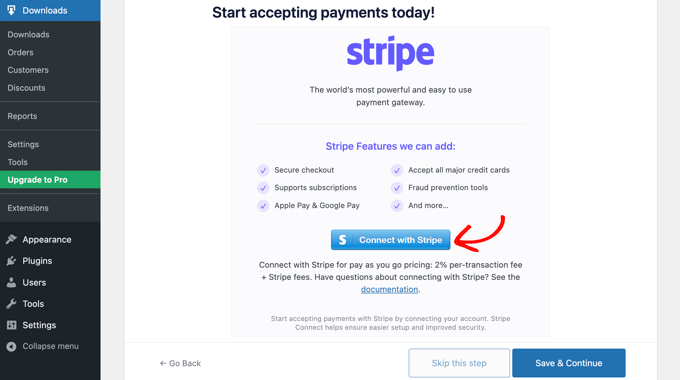
Stripe is one of the top payment companies that does not require going through a long process to sign up for a merchant account. They allow anyone with a legitimate business to accept credit card payments online.

To quickly get started with Stripe, simply click on the ‘Connect with Stripe’ button.

Easy Digital Downloads Setup Connect With Stripe

This opens a setup wizard, which will help you connect your website to Stripe.

If you need, you can add more payment gateways later. Just take a look at the options on the Easy Digital Download extensions page, such as PayPal, Braintree, Authorize.net, and more.

When you are done, just click the ‘Save & Continue’ button at the bottom of the screen.

Configuring Your Receipts

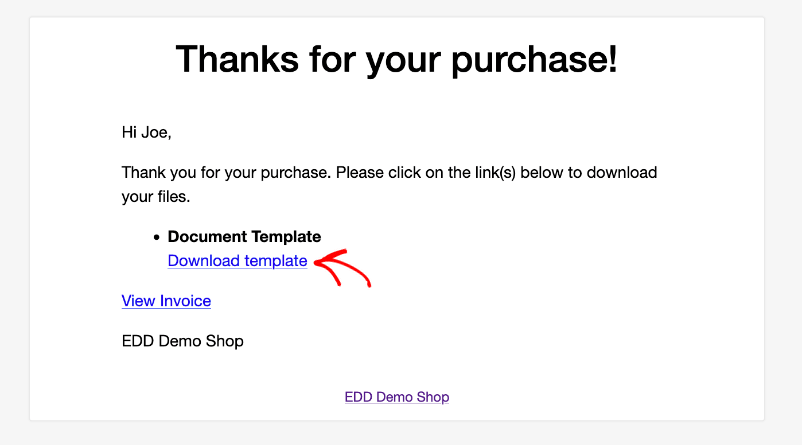
Every time someone buys a digital download, Easy Digital Downloads will send them an email.

This email has a link that the customer can use to download the file they just purchased.

The Easy Digital Downloads purchase receipt email

You can configure that email by adding your own text and branding. Strong branding can make your business look more professional and inspire loyalty.

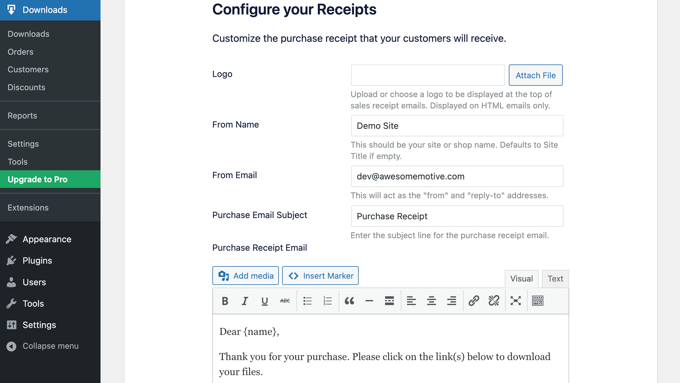
To add a logo to your emails, click on the ‘Attach File’ button and upload or choose an existing image from your WordPress media library.

Easy Digital Downloads Setup Configure Your Receipts

You can also add a ‘From Name.’ This name will be shown in the customer’s inbox. You will want to use something that immediately lets customers know who you are, such as your website’s name.

You will also need to add a ‘From Email.’ This email will act as the ‘from’ and ‘reply-to’ address. Since customers may reply to your messages, you will want to use a professional email address that you check frequently.

Once you are happy with your email branding, you might like to edit the content of the email receipt. Keep in mind that the default message will work well for most marketplaces. 

Once you are happy with your changes, make sure to click the ‘Save & Continue’ button.

Selecting Conversion and Optimization Tools

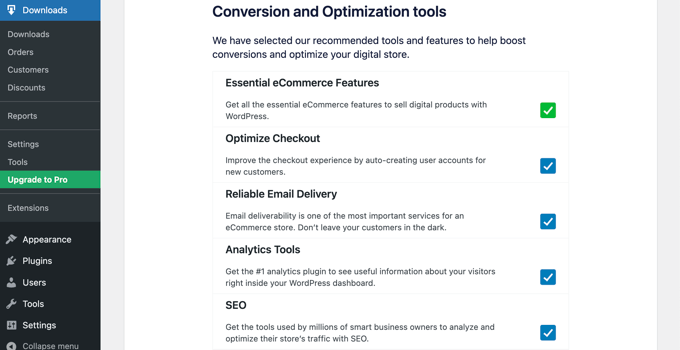
The setup wizard will now offer to install some free tools to help boost conversions and optimize your digital store.

Easy Digital Downloads Setup Conversion and Optimization Tools

These tools include:

We recommend keeping all of the boxes checked. However, you can uncheck the boxes of any tools you don’t want to install.

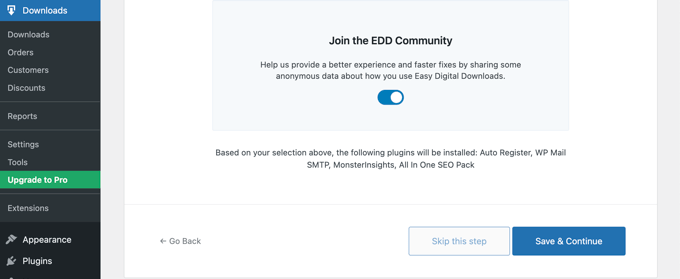
You will also find a toggle button where you can help improve Easy Digital Downloads by sharing anonymous usage data with the developers. You can learn more in our guide on giving permission for WordPress plugins to collect data.

Easy Digital Downloads Setup Join the EDD Community

Once you have made your selections, just click the ‘Save & Continue’ button at the bottom of the page.

Adding Your First Product

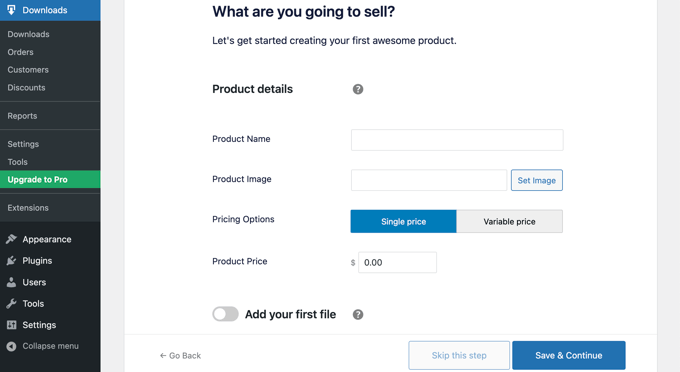
You are now on the last page of the Easy Digital Downloads setup wizard. Here you can add your first product to your website.

Easy Digital Downloads Setup What Are You Going to Sell?

If you are ready to add a new product now, then you can enter its details into the form and then click the ‘Save & Continue button.

Otherwise, feel free to click the ‘Skip this step’ button to finish the Easy Digital Downloads setup wizard.

Congratulations, you have now completed the initial setup of your online store. The next step will be to turn it into a multi-vendor marketplace.

Step 3: Turning Your Online Store Into a Multi-Vendor Marketplace

Now that you have created an online store using Easy Digital Downloads, you will need to add extra features to turn it into a multi-vendor marketplace.

This includes allowing others to add digital products to your site, plus the ability to split the payments between your store and the vendor. If software will be sold on your site, then you will also need to manage license keys.

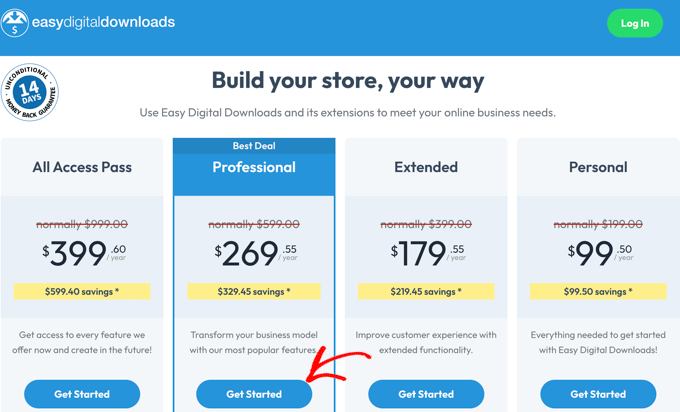
Purchasing a Professional Pass

To do all of these things, you will need to purchase a Professional Pass or higher and install the extensions you need. You can buy the pass from the Easy Digital Downloads website.

Purchase an EDD Professional Pass

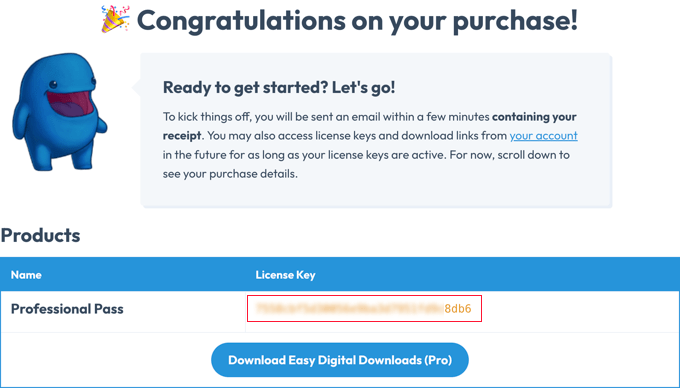
Once your purchase has been completed, you will be taken to a confirmation page that displays your license key.

You must copy this key so you can paste it into the Easy Digital Downloads plugin on your WordPress website.

EDD License Key

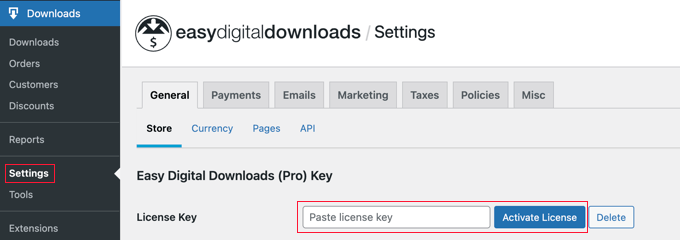
Now, simply return to your website and navigate to the Downloads » Settings page in the WordPress admin area.

Paste EDD License Key

You must paste the key into the ‘Paste license key’ field. After that, you will need to click the ‘Verify License Key’ button.

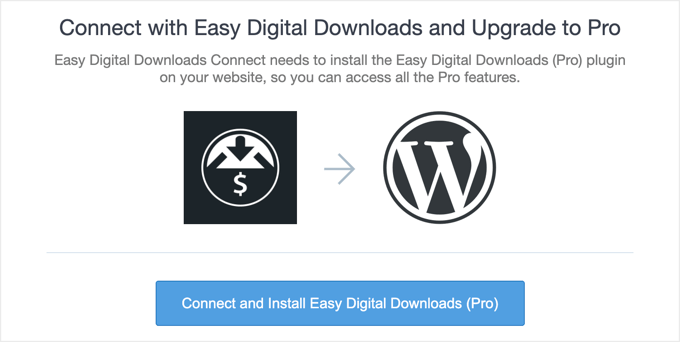
On the next page, simply click the ‘Connect and Install Easy Digital Downloads (Pro)’ button to continue.

Connect EDD and Upgrade to Pro

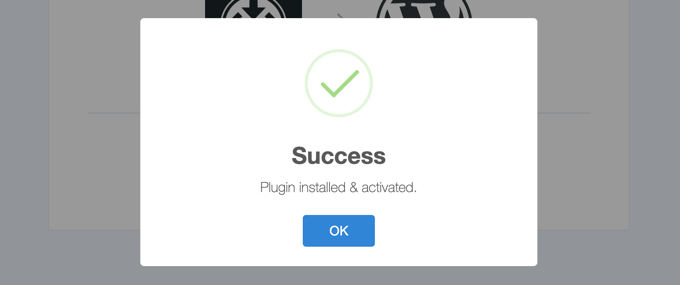
The plugin’s Pro features will be unlocked, and a’ Success’ message will be displayed.

Once you click the ‘OK’ button, you will be redirected back to the Easy Digital Downloads Settings page.

EDD Upgrade Success Notification

Now you are ready to configure the Pro extensions to allow multiple vendors to sell digital products on your website.

Configuring the Frontend Submissions Extension

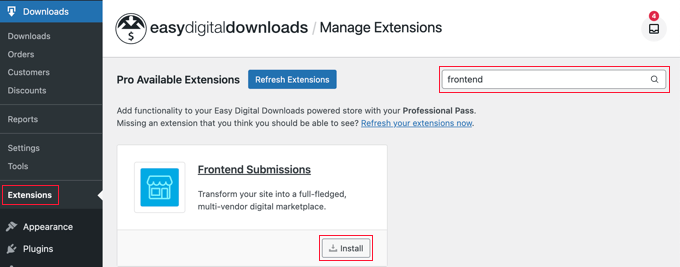
The first Easy Digital Downloads extension you need to install is Frontend Submissions. This will allow multiple vendors to add their digital products to your site. It also lets you approve their products before they become available for sale.

Just navigate to Downloads » Extensions and search for Frontend Submissions.

EDD Frontend Submissions Extension

Once you find it, simply click the ‘Install’ button. Once the extension is installed, it will be automatically activated.

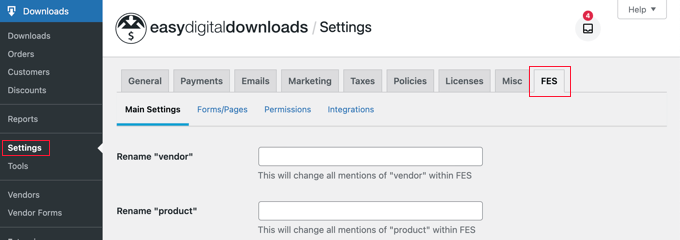
Now you need to navigate back to the Downloads » Settings page and then click on the ‘FES’ tab that has been added. Here, you can configure the Frontend Submissions extension.

The terms’ vendor’ and ‘product’ will work for most digital product marketplaces. However, if you wish to use different terms, then you can type them into the first two fields on this page.

EDD Frontend Submissions Extension Settings

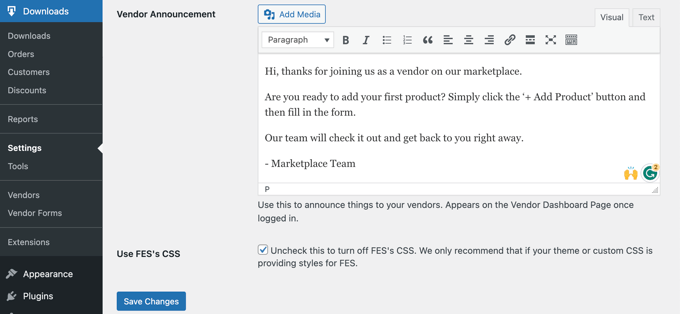
Next, you can scroll down to the Vendor Announcement field. This will be the message your vendors see when they log in to your site and land on the Vendor Dashboard page.

Simply type the message you wish them to see into the text box.

EDD Frontend Submissions Extension Vendor Announcement

Make sure you click the ‘Save Changes’ button at the bottom when you are finished.

Configuring the Commissions Extension

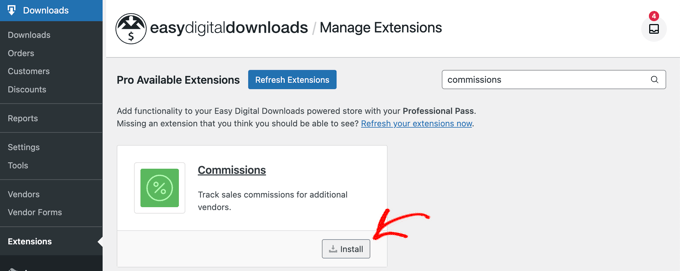
Next, you need to install a second Easy Digital Downloads extension. The Commissions extension will allow you to configure what percentage of each sale goes to the vendor and what percentage goes to your store.

You need to navigate to Downloads » Extensions and install the Commissions extension. Once the extension is installed, it will be automatically activated.

EDD Commissions Extension

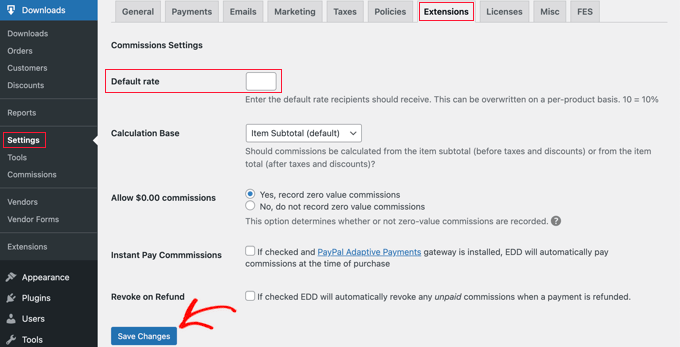
Now, you need to head back to the Downloads » Settings page and click on the Extensions tab. In the ‘Commissions Settings’ section, you will find options for the default percentage your vendors will be paid and more.

The first option is the ‘Default rate’ that your vendors will make from a sale. The default is 60%, but you can change this to any number you like.

EDD Commissions Extension Settings

The default settings for the other options will work for most digital marketplaces, so you only need to change them if you have a specific need.

Once you have finished setting up the extension, don’t forget to click the ‘Save Changes’ button at the bottom of the screen.

Tip: Make sure to add all the information potential vendors need to know to your website. Don’t forget to include the commission rate the vendors will be earning.

Optional: Configuring the Software Licensing Extension

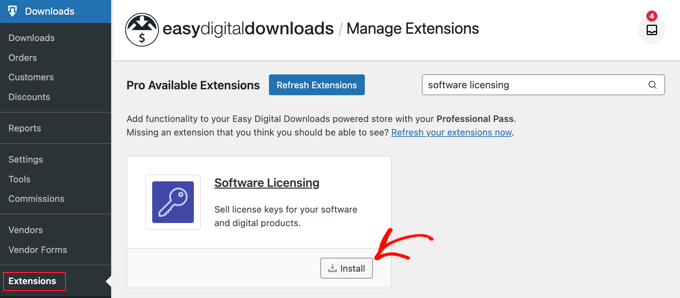
If you are planning to allow users to sell license keys for software and other digital products in your marketplace, then you will also need the Software Licensing extension.

This can be installed from the Downloads » Extensions page.

Installing the Easy Digital Downloads Software Licensing Extension

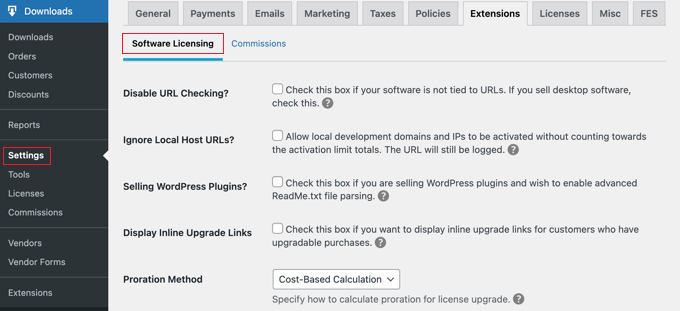
You can set up this extension by going to Downloads » Settings » Extensions.

Then, open the the Software Licensing tab.

Configuring the Easy Digital Downloads Software Licensing Extension

The options you choose will depend on the needs of your marketplace and the types of downloads being sold.

You can learn more on the Software Licensing page of the Easy Digital Downloads website.

Step 4: Customizing Your Digital Product Marketplace Emails

Easy Digital Downloads includes default emails for when your users sign up to become a vendor, make a sale, and more.

While the default messages will work well for most marketplaces, you might like to customize them to match your style and branding.

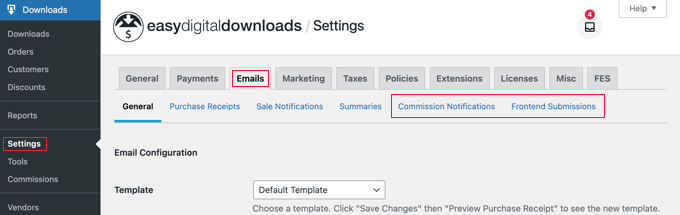
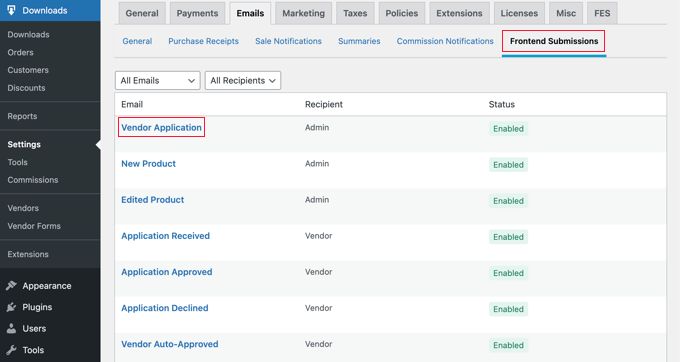
To do this, you will need to navigate to the Download » Settings page and click on the ‘Emails’ tab. You will find links along the top for different types of emails, including emails for ‘Commission Notifications’ and ‘Frontend Submissions’.

EDD Email Settings

When you click on the ‘Frontend Submissions’ link, you will see a list of emails.

These include ‘Vendor Application’, ‘New Product’, ‘Edited Product’, ‘Application Received’, and more.

EDD Frontend Submissions Emails

You can customize each email by clicking on its title.

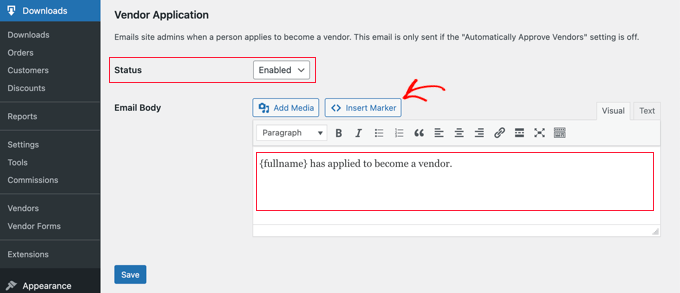
For example, if you click on ‘Vendor Application’, then you can customize the notification email you will receive whenever someone applies to become a vendor.

Customizing EDD Frontend Submissions Email

If you would rather check for new vendor applications manually, then you can select ‘Disabled’ from the Status dropdown.

Note: By default, all vendor applications are automatically approved, and the Vendor Application email will not be sent. You can change this setting by navigating to Downloads » Settings » FES » Permissions and unchecking the ‘Automatically Approve Vendors?’ box.

Alternatively, you might like the email to tell you more information about the person who is applying to become a vendor. You can do this by editing the ‘Email Body’ field.

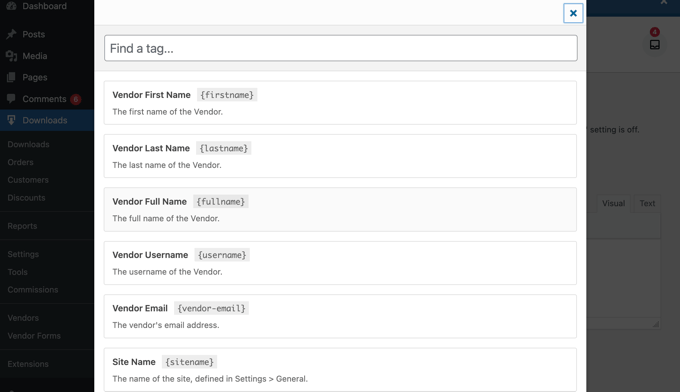
To add personal information about the applicant, you must insert markers for their name, email address, site name, and more. Simply click the ‘Insert Marker’ button, and choose the tags from the popup.

Inserting Markers Into an EDD Email Template

Once you have finished customizing the email, don’t forget to click the ‘Save’ button to store your settings.

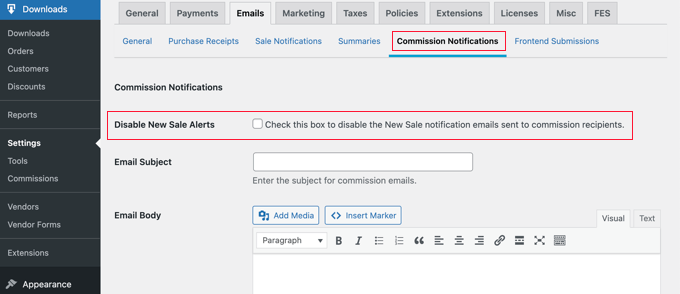
You can also customize the email your vendors will receive when they have made a sale by clicking on the ‘Commission Notifications’ link at the top of the page.

Disable New Sale Alerts

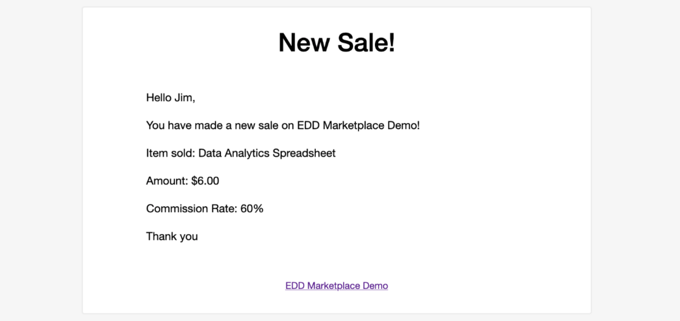
The email body is blank by default, meaning the vendor will receive the default notification email.

The default commission notification email looks like this.

Default EDD Sale Alert

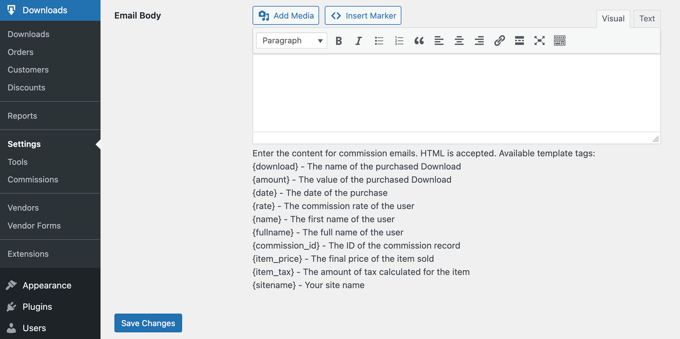
If you wish to change the wording of the email, then simply type your content into the ‘Email Body’ field.

You can customize the email using the template tags listed at the bottom.

Customizing Sale Alert Email

Make sure you click the ‘Save Changes’ button at the bottom of the screen to store any changes you have made.

Step 5: Selecting and Customizing Your WordPress Theme

A WordPress theme controls the appearance of your online marketplace site, including its layout, typography, color, and other design elements.

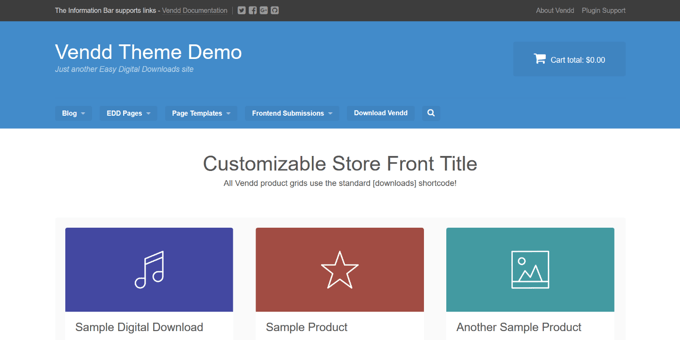
You might like to use the Vendd theme for your digital goods marketplace because it is designed for digital downloads. This free theme works together with Easy Digital Downloads to give you a lot of options and features for your online marketplace.

Vendd Theme

If you purchased SiteGround EDD hosting as we recommended earlier, then Vendd was installed and activated automatically when you installed WordPress.

Otherwise, you will need to install and customize the theme yourself. For more information, see our beginner’s guide on how to install a WordPress theme.

However, there are thousands of other WordPress themes available. For example, both the Astra theme and the Coaching Pro theme are fully compatible with EDD.

Another option is to create your own custom theme from scratch.

To create a custom theme, you will need SeedProd.

It is the best website builder plugin in the market and is used by over 1 million websites. You can use SeedProd to create beautiful layouts that are professionally designed and optimized for conversions and sales.

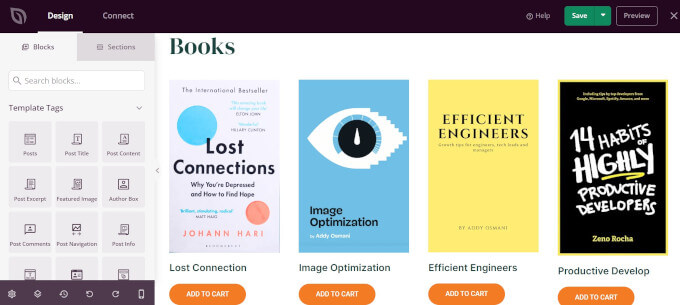
SeedProd also comes with lots of ready-made templates. These include designs that are perfect for promoting your digital downloads. 

SeedProd ebook digital marketplace theme

For more details, check out our guide on how to create a custom WordPress theme (no coding needed).

Step 6: Adding the Vendor Dashboard Page to the Navigation Menu

When you installed the Frontend Submissions extension, a new page was created on your website called the Vendor Dashboard. This is an important page that you want vendors and potential vendors to find easily.

When the user has not signed in to your website, this page will display a registration page where they can apply to become a vendor on your website. It will also show a login form where your vendors can sign in.

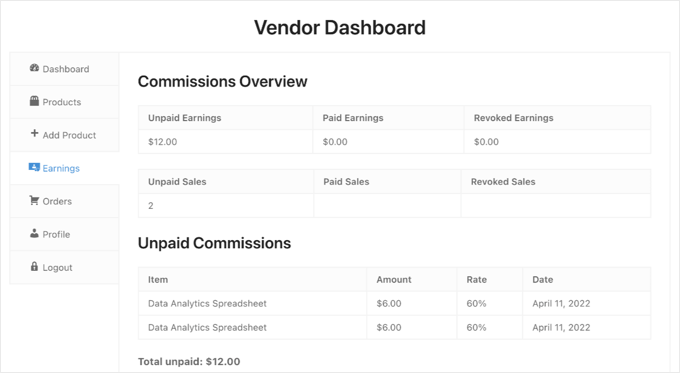
Once a vendor has signed in, this page will be the dashboard where they can add new products, view their earnings and orders, and more.

Vendor Dashboard Preview

You can make sure that the Vendor Dashboard is easy to find by adding the page to your navigation menu.

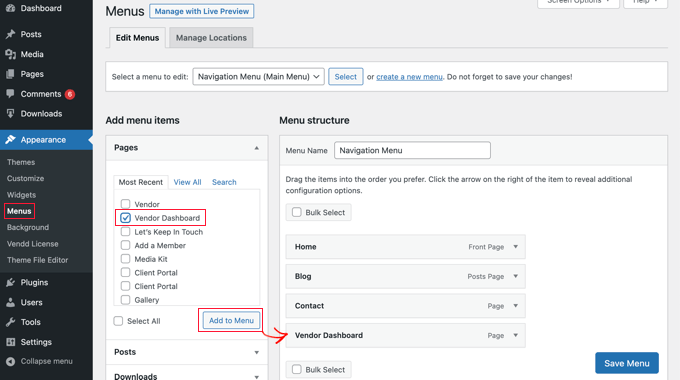
Head over to Appearance » Menus and make sure the right menu is selected at the top of the screen. After that, you should look for the ‘Vendor Dashboard’ page under Pages.

Adding the Vendor Dashboard to the Navigation Menu

Now all you need to do is click the ‘Add to Menu’ button, and the Vendor Dashboard will be added to the menu. You can drag the menu item up and down to place it where you want in the list.

If you can’t find Appearance » Menus in the admin sidebar, then you are probably using a block theme.

To learn how to add the Vendor Dashboard page to a block theme’s menu, see the ‘Adding Navigation Menus in Full Site Editor’ section of our beginner’s guide on how to add a navigation menu in WordPress.

We hope this tutorial helped you learn how to create a digital product marketplace in WordPress. You may also want to see our guide on how to track website visitors on your WordPress site and our expert picks for the best WordPress popup plugins.

If you liked this article, then please subscribe to our YouTube Channel for WordPress video tutorials. You can also find us on Twitter and Facebook.

The post How to Create a Digital Product Marketplace in WordPress first appeared on WPBeginner.


May 15, 2023 at 04:00PM