Friday, May 19, 2023

How to Create Your Company Org Chart in WordPress

Do you want to create your company org chart in WordPress?

Organizational charts can help visitors, clients, and potential customers learn more about your business, and find the right person to contact. If you have lots of employees, then an org chart can also help different teams communicate and work together more easily.

In this article, we will show you how to create a company org chart in WordPress.
How to create your company org chart in WordPress

Why Create Your Company Org Chart in WordPress?

An organizational chart shows how a company is structured, from the CEO right through to the different teams and individual employees within each team.

A helpful organizational chart can help employees understand how other teams are structured, and who they need to contact in any situation.

A chart may also be useful to third parties. For example, if you’re creating a client portal then an org chart can help clients find the best person to contact.

You might even add a company org chart to your public WordPress website, to show the human side of your business and improve your brand’s reputation.

That being said, let’s take a look at how to easily create and manage a company organizational chart in WordPress.

How to Create Your Company Org Chart in WordPress

The easiest way to build an employee chart is by using Organization Chart.

With this free plugin, you can create charts using a simple visual editor, and add images, links, text, and popups to your company org chart.
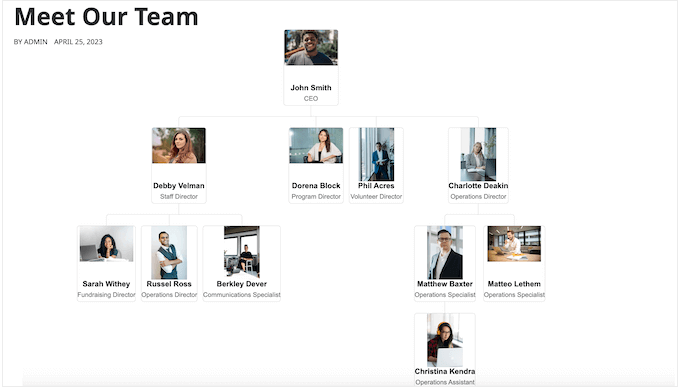
An org chart, created using WordPress

The first thing you need to do is install and activate the Organization Chart plugin. For more details, see our step-by-step guide on how to install a WordPress plugin.

Upon activation, go to Wpdevart Chart » Charts. Then, click on the Add New button.
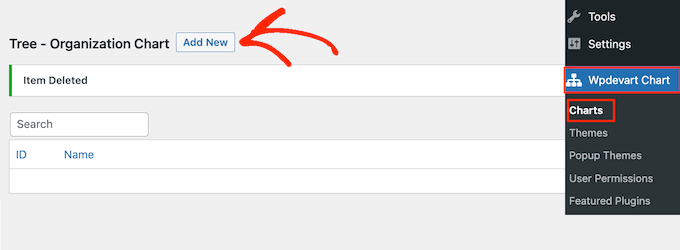
How to create a company org chart in WordPress

This launches the user-friendly visual editor.

To start, type in a title for the company org chart. This is just for your reference so you can use anything you want.
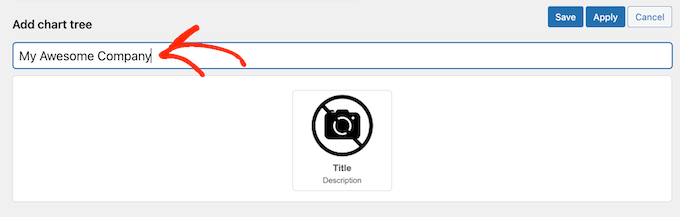
Adding a title to a company organizational chart

By default, Organization Chart adds one element to the chart. Typically, you’ll turn this into the head of your organization, such as the team leader or CEO.

To add more people to the chart, simply hover over the default element. You’ll now see two small icons: a pencil and an arrow.

Go ahead and click on the arrow, which adds one element directly below the first one.

Building an organizational chart in WordPress using a plugin

Now, simply hover your mouse over this new element and you’ll see three arrows.

This allows you to add another element to the right or left of this person. Typically, people on the same level in an org chart have the same job title or similar responsibilities.
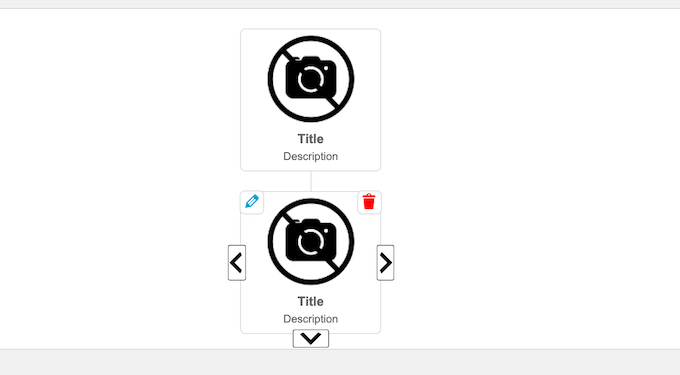
Adding multiple levels to a company org chart

You can also click on the downwards-pointing arrow to create a new level below this person. Usually, people will report to the person above them in an org chart.

By hovering over each element and clicking on the different arrows, you can easily create your company’s structure. This includes multiple different branches or teams.
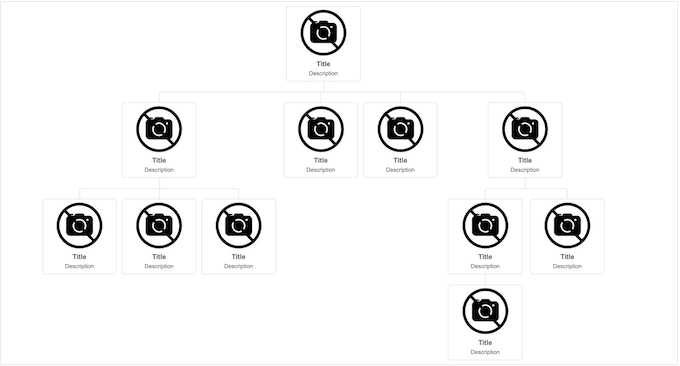
Customizing a company employee chart

The next step is adding content to each element, such as the person’s name, author photo, or email address.

To get started, hover over any element and then click on the small pencil icon.
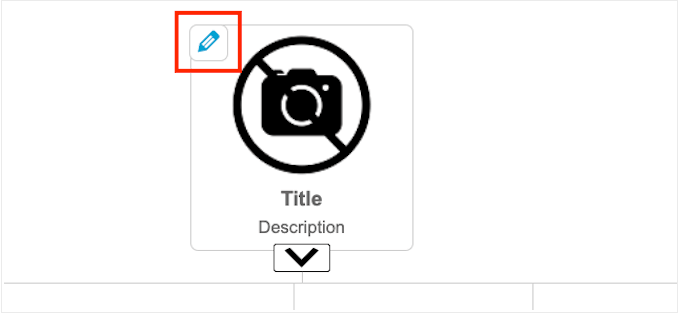
Adding content to a company staff chart

In the popup that appears, you’ll need to add a photo of the person.

Go ahead and click on the ‘Upload’ button and then either choose an image from the WordPress media library or upload a new file from your computer.
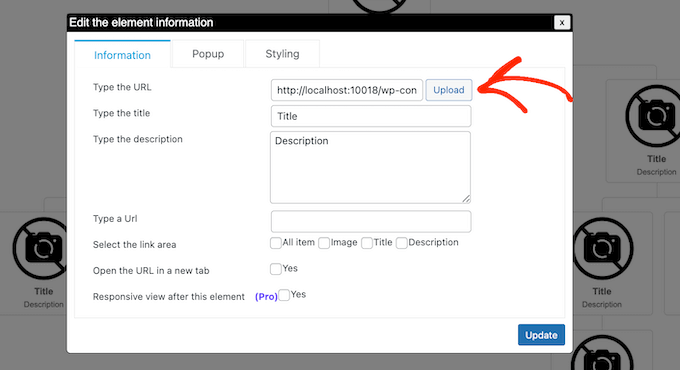
Adding employee images to a hierarchical chart

After that, type in a ‘Title,’ which will appear directly below the person’s picture. Typically, you’ll want to use the person’s name.

You can then add a ‘Description,’ which will appear beneath the title. Usually, you’ll want to type in the person’s job title, but you can also add a short sentence about their role.
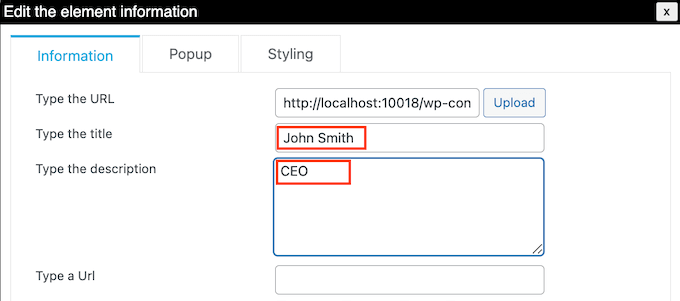
Adding a title to an employee chart

Next, you may want to add a link to the image, title, or description. For example, you might link to a contact form for the person or maybe a page where potential clients can see the employee’s design or photography portfolio.

To do this, simply type in the URL you want to use. Then, choose the area where you want to add the link using the settings in the ‘Select the link area’ section. For example, you might add a link to the person’s image or description.
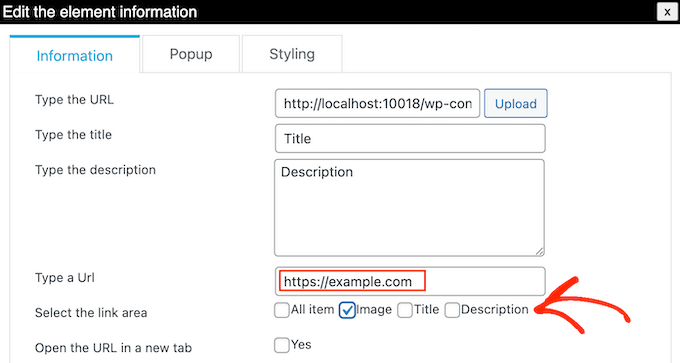
Adding links to a staff chart

By default, the link opens in the same tab. You may prefer to open the link in a new tab, particularly if you’re using an external URL. To do this, simply check the box next to ‘Open the URL in a new tab.’

You may want to show more information about each person in the company org chart. For example, you could add their business email address and phone number, bio, a more detailed job description, or any other information you want.

This plugin lets you create a popup for each person. In this way, you can show detailed information without making the chart look complicated or text-heavy.

To add a popup, simply click on the ‘Popup’ tab.
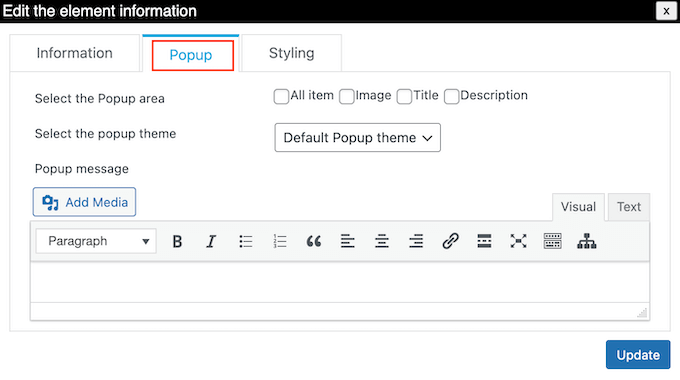
Adding popups to a staff chart in WordPress

You can now type your messaging into the small text editor. This editor has all the standard WordPress formatting, so you can add links, create a bullet point list, use bold and italic text formatting, and more.

When you’re happy with the information you’ve entered, you can specify how visitors will open the popup using the settings next to ‘Select the Popup area.’
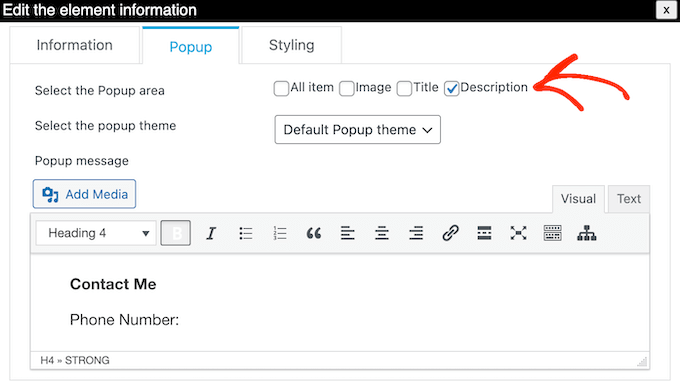
How to add popups to a business website

With that done, click on ‘Update.’

Now, simply repeat this process for every person in the company org chart.
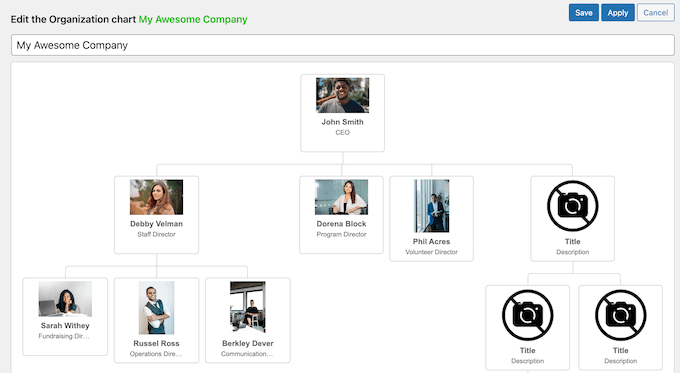
Building an employee page using WordPress

When you’re happy with how the chart looks, click on the ‘Save’ button.

After that, it’s time to add the chart to your WordPress blog or website. Simply open the page or post where you want to show the company org chart, and then click on the ‘+’ icon.

In the popup that appears, type in ‘WpDevArt organization chart.’ When the right block shows up, give it a click to add it to the page.
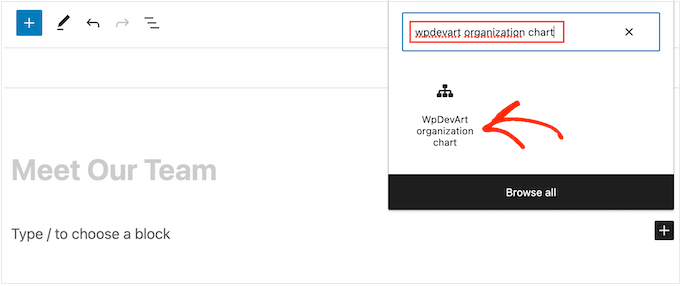
Adding a block to a WordPress website

That done, open the ‘Select a Tree’ dropdown and choose the org chart you created earlier.

When you’re ready to make the org chart live, click on either the ‘Update’ or ‘Publish’ button.
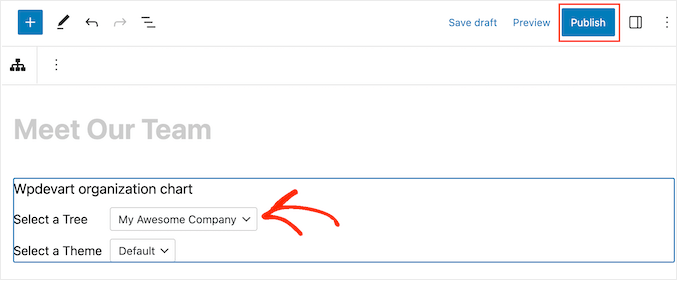
Publishing an organizational chart in WordPress

Now, you can visit your business website to see the company org chart in action.

We hope this article helped you learn how to create your company org chart in WordPress. You may also want to see our guide on how to create automated workflows in WordPress, and our expert pick of the best live chat software for small businesses.

If you liked this article, then please subscribe to our YouTube Channel for WordPress video tutorials. You can also find us on Twitter and Facebook.

The post How to Create Your Company Org Chart in WordPress first appeared on WPBeginner.


May 20, 2023 at 06:12AM
How to Create a Roundup Post in WordPress (The Easy Way)

Are you looking for an easy way to create roundups and showcases on your WordPress blog?

A roundup post lets you quickly create a new blog article by repurposing your existing content. This list post allows your readers to easily find related content on your blog while improving your website’s internal linking and SEO.

In this article, we will show you how to create a roundup post in WordPress the easy way.

How to Create a Roundup Post in WordPress (The Easy Way)

Why Create Roundup Posts in WordPress?

A roundup or list post features your best articles on a certain subject to give a detailed overview of that topic. Sometimes called ‘listicles,’ these posts offer a collection of helpful content on a particular topic or industry.

For example, you can create a showcase post of your most popular recipes of the year, your best advice for small businesses, or the best reviews on your WordPress website.

Roundup posts are a great way to promote your older articles. They can also showcase the best products in a certain category or solutions to a specific problem.

Plus, these roundups and listicles have another benefit for your WordPress blog. They will improve your internal linking, which in turn will improve your site’s SEO.

With that being said, let’s take a look at how to create a roundup post in WordPress.

How to Create a Roundup Post in WordPress the Easy Way

The first thing you need to do is install and activate the WP Tasty Roundups plugin. For more information, see our step-by-step guide on how to install a WordPress plugin.

WP Tasty Roundups is the easiest way to repurpose your existing content into beautiful roundup posts that rank in search results. Even though the plugin is designed with food blogs in mind, it can be used for any blogging niche or industry.

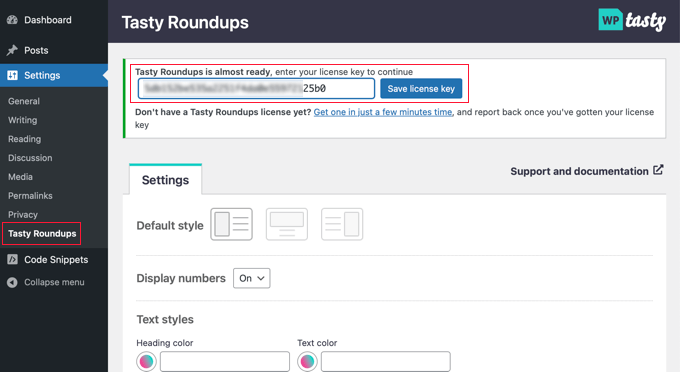
Upon activation, you will need to navigate to Settings » Tasty Roundups in your WordPress admin dashboard to enter your license key and configure the plugin’s default settings.

Simply paste your license key into the field at the top of the screen. You can find it in the email that was sent to you after buying the plugin. After that, just click the ‘Save license key’ button.

Paste the WP Tasty Roundups License Key

While you are on this page, you can also configure the default style for your listicles. For example, you can display images at the left, top, or right of each post and choose whether to number each post in the list.

By default, the roundup will follow the formatting of the WordPress theme you are using. However, you can customize its text, number, button, and block styles.

Once you have configured the plugin, simply click the ‘Save Changes’ button at the bottom of the page to store your settings.

To make a roundup post, you will need to either create a new post or open an existing post where you want to add the listicle.

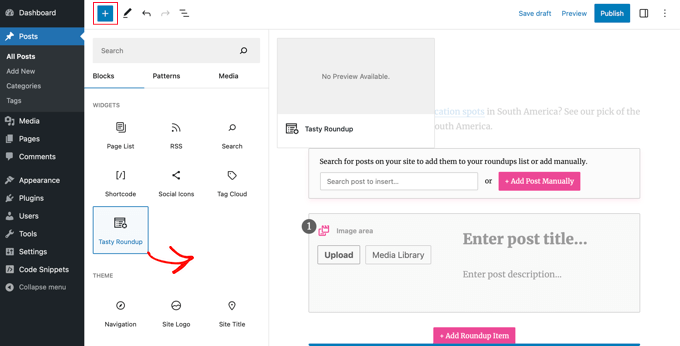
After that, you should click the ‘+’ button at the top of the screen and locate ‘Tasty Roundup’ in the Widgets section. Then, you can drag the block where you want it to appear in your post.

Add a Tasty Roundup Block to Your Post

Next, you can use the block to add posts to the roundup from your own blog or other sites.

Each post will have a simple design, consistent formatting, and clear links to your source posts. This creates a good user experience and allows readers to scan your content easily.

Adding a Post From Your Blog

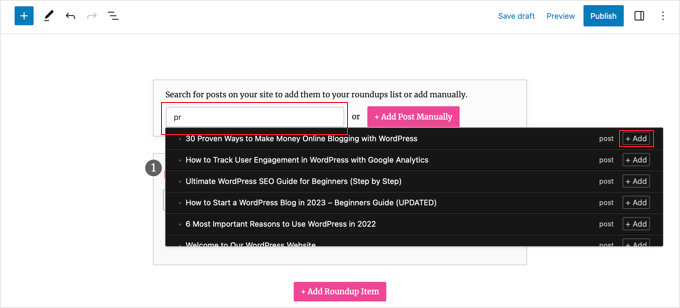
Your list posts will usually include posts from your own WordPress blog, and WP Tasty Roundups makes this easy. Simply type one or two keywords into the built-in search feature, and a list of matching posts will display on your screen.

Searching for a Post to Add to the Roundup

All you need to do is click on the name of the post or the ‘+ Add’ button next to it.

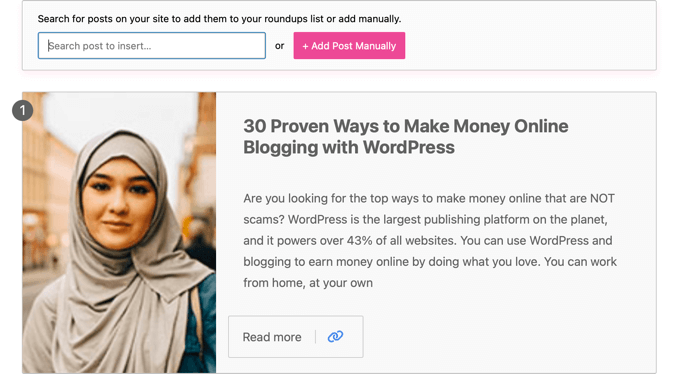
That post will be immediately added to your roundup. The plugin will automatically pull images, titles, descriptions, and links from the post into your roundup list. Later in this article, we will show you how to customize this information.

The Selected Post Will Be Automatically Added to the Roundup

You can add more blog posts to the list post by repeating these steps.

Adding a Post From Another Blog or Website

You can also add posts from other blogs or websites, though this takes a little more work.

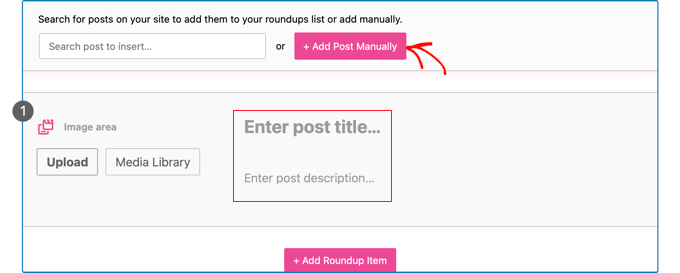
When you click the ‘+ Add Post Manually’ button, a blank roundup item is added to the bottom of the Tasty Roundups block.

You Can Add Posts From Other Blogs Manually

Now, you need to manually type the post title and description. You can also use the buttons in the image area to upload a new image or add one from the media library.

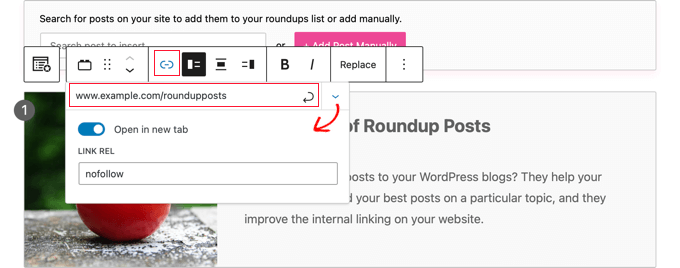
Once you have done that, you need to add the article’s URL by clicking the ‘Add link’ icon in the toolbar. Simply paste the article’s URL into the box and press the Enter key or click the ‘Apply’ icon to the right of the URL box.

Adding a Link to a Manual Post

You can see more options by clicking the ‘Link Settings’ down arrow icon on the right. For links to other websites, we recommend enabling the ‘Open in new tab’ toggle. You can also type ‘nofollow’ into the ‘Link Rel’ box so that you don’t pass on your link authority to other sites.

For more information, see our beginner’s guide on how to add nofollow links in WordPress.

After adding the link, a ‘Read More’ button will appear in the article. Clicking this link will take your readers straight to the article.

Once You Add a Link, a Read More Button Will Be Shown With the Post

Customizing Your Roundup

Once you have finished adding all of the articles to your list post, there are a few ways you can customize the roundup.

For example, you can change the order of the posts by selecting a post and then clicking the ‘Move Up’ or ‘Move Down’ buttons on the toolbar. You can also use drag and drop.

Reorder Your Roundup Using Toolbar Buttons or Drag and Drop

You are also able to individually customize each post in the roundup.

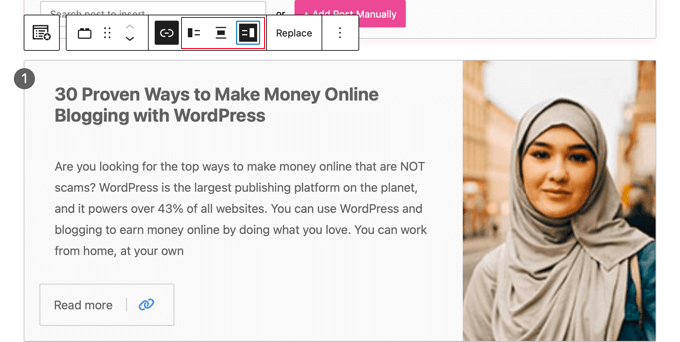
For example, using the toolbar buttons, you can change whether the image is displayed on the left, top, or right. You might like to have some posts with the image on the right and others with the image on the left.

Change the Position of Images Using Toolbar Buttons

It’s also possible to edit the title and excerpt. You can format this text using the ‘Bold’ and ‘Italics’ icons in the toolbar. You can even edit the button text.

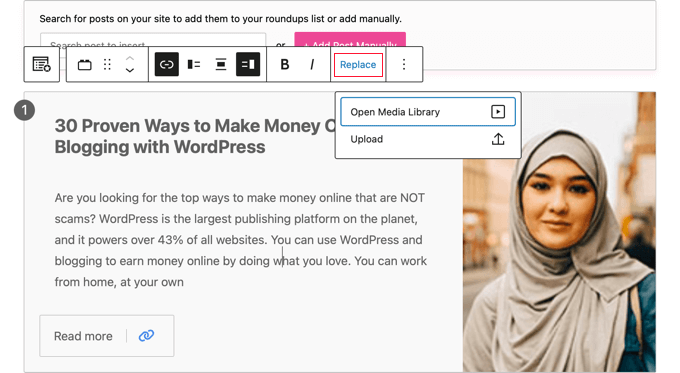
Additionally, you can change the image displayed in the roundup by clicking the ‘Replace’ button in the toolbar. This will let you upload a new image or choose one from the media library.

You Can Change the Image for a Certain Post Using the Replace Button

Once you have finished creating and customizing your roundup post, you can publish it using the ‘Publish’ or ‘Update’ button at the top of the page.

After that, you can visit your website to see how your roundup post or showcase looks. Here is a preview of our sample roundup.

Preview of the Final Roundup

We hope this tutorial helped you learn how to easily create a roundup post in WordPress. You may also want to see our guide on how to increase your blog traffic or our expert picks for the must-have WordPress plugins to grow your site.

If you liked this article, then please subscribe to our YouTube Channel for WordPress video tutorials. You can also find us on Twitter and Facebook.

The post How to Create a Roundup Post in WordPress (The Easy Way) first appeared on WPBeginner.


May 19, 2023 at 04:04PM

Thursday, May 18, 2023

How to View the Mobile Version of WordPress Sites From Desktop

Do you want to preview the mobile version of your WordPress site?

Previewing the mobile layout helps you see how your website looks on mobile devices. When your site is under development or even when it’s live, it’s often easier to view the mobile version on a desktop computer. Then, you can quickly make changes and see their effect.

In this article, we will show you how to view a mobile version of the WordPress site from a desktop.

How to view the mobile version of WordPress sites from desktop

Why You Should Preview Your Mobile Layout

More than 50% of your website visitors will be using their mobile phones to access your site. Around 3% will be using a tablet.

This means that having a site that looks great on mobile is very important.

In fact, mobile is so important that Google is now using a mobile-first index for its website ranking algorithm. This means that Google will use your site’s mobile version for indexing. You can learn more by reading our ultimate guide to WordPress SEO.

Even if you are using a responsive WordPress theme, you still need to check how your site looks on mobile. You might want to create different versions of key landing pages that are optimized for mobile users’ needs.

It’s important to keep in mind that most mobile previews will not be completely perfect because there are so many different mobile screen sizes and browsers. Your final test should always be to look at your site on an actual mobile device.

That said, let’s look at how you can view the mobile version of your WordPress website on a desktop.

We are going to cover two different methods for testing how your site looks on mobile using desktop browsers. You can click the links below to jump to any section:

Video Tutorial

If you’d prefer written instructions, then continue reading.

Method 1: Using WordPress’s Theme Customizer

You can use the WordPress theme customizer to preview the mobile version of your WordPress site.

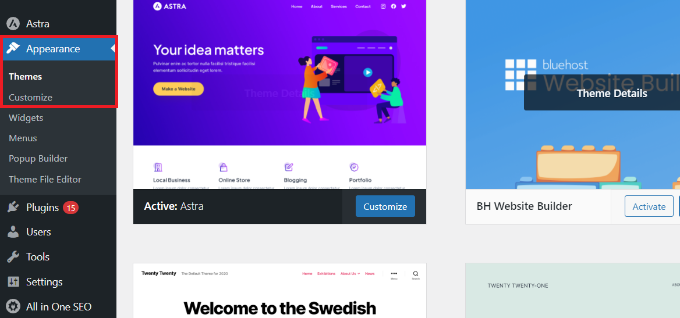
Simply log in to your WordPress dashboard and go to the Appearance » Customize screen.

Go to theme customizer from WordPress dashboard

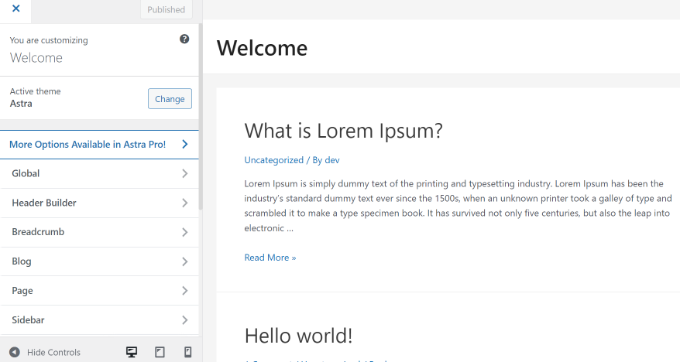
This will open up the WordPress theme customizer. For this tutorial, we will be using the Astra theme.

Depending on what theme you are using, you may see slightly different options in the left-hand menu.

View options in theme customizer

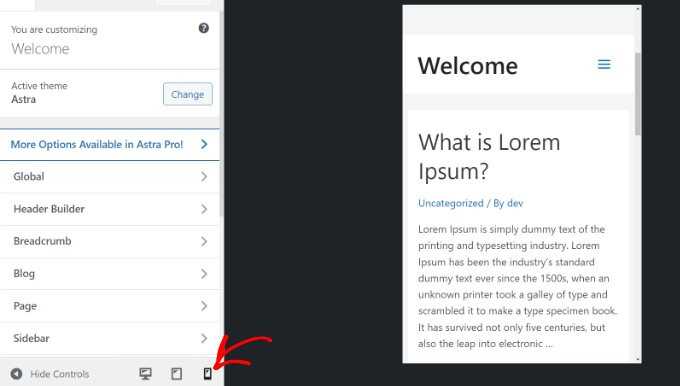
At the bottom of the screen, simply click the mobile icon.

You will then see a preview of how your site looks on mobile devices.

View mobile screen preview

This method for previewing the mobile version is particularly useful when you haven’t yet finished creating your blog or when it’s in maintenance mode.

You can now make changes to your website and check how they look before you push them live.

Method 2: Using Google Chrome’s DevTools Device Mode

The Google Chrome browser has a set of developer tools that let you run various checks on any website, including seeing a preview of how it looks on mobile devices.

Simply open the Google Chrome browser on your desktop and visit the page you want to check. This could be the preview of a page on your site, or it could even be your competitor’s website.

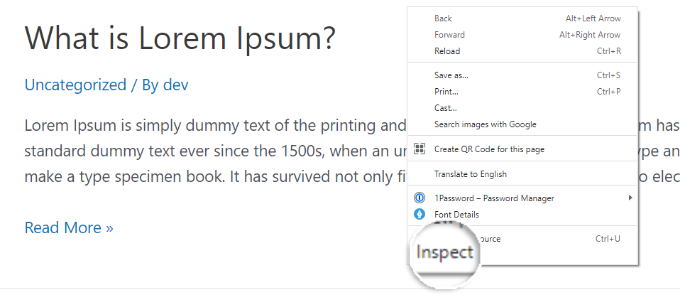
Next, you need to right-click on the page and select the ‘Inspect’ option.

Right click to open the inspect option

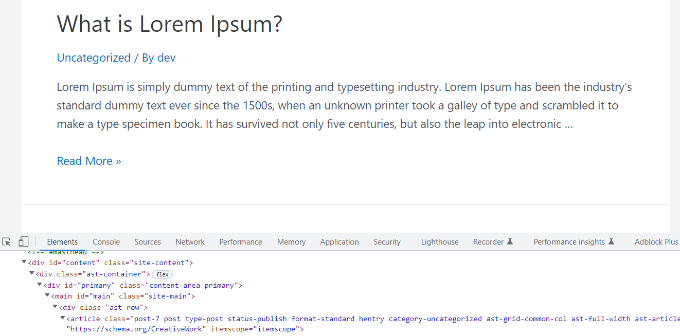
A new panel will open up on the right-hand side or at the bottom of the screen.

It will look something like this:

View the inspect tool

In the developer view, you will be able to see your site’s HTML source code, CSS, and other details.

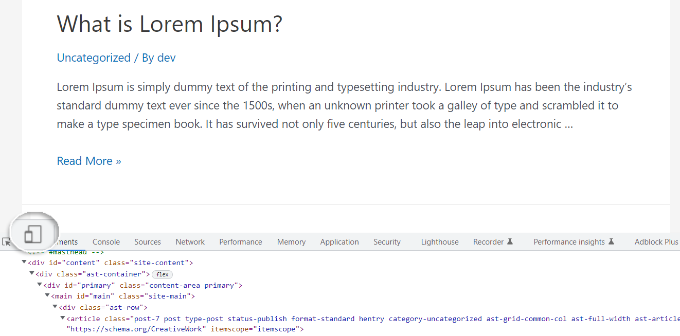
Next, you need to click the ‘Toggle Device Toolbar’ button to change to the mobile view.

Click the toggle device toolbar

You will see the preview of your website shrink to the mobile screen size.

Your website’s general appearance will also change in the mobile view. For instance, the menus will collapse, and additional icons will move to the left instead of the right of the menu.

View the mobile version in inspect tool window

When you hover your mouse cursor over the mobile view of your site, it will become a circle. This circle can be moved with your mouse to mimic the touchscreen on a mobile device.

You can also hold down the ‘Shift’ key, then click and move your mouse to simulate pinching the mobile screen to zoom in or out.

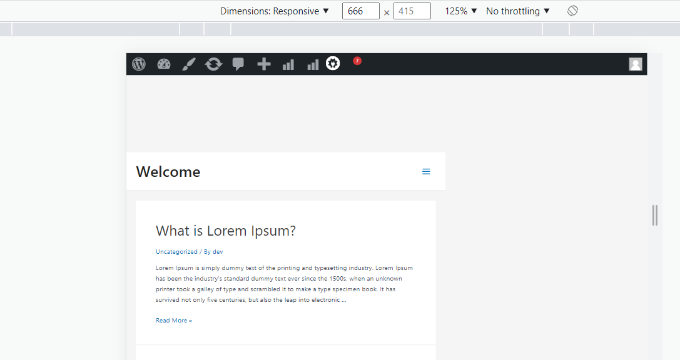
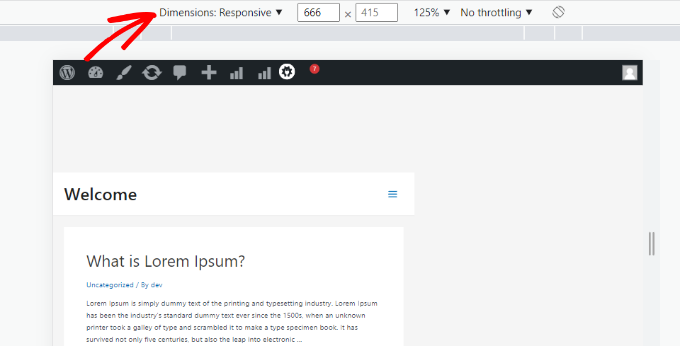
Above the mobile view of your site, you will see some additional options.

Change the dimensions for responsiveness

These settings let you do several extra things. You can check how your site would look on different types of smartphones.

For example, you can select a mobile device like an iPhone and see how your site will appear on the device.

You can also simulate your site’s performance on fast or slow 3G connections. You can even rotate the mobile screen using the rotate icon.

Bonus: How to Create Mobile-Specific Content in WordPress

It’s important that your website has a responsive design so that mobile visitors can easily navigate your website.

However, simply having a responsive site may not go far enough. Users on mobile devices are often looking for different things than desktop users.

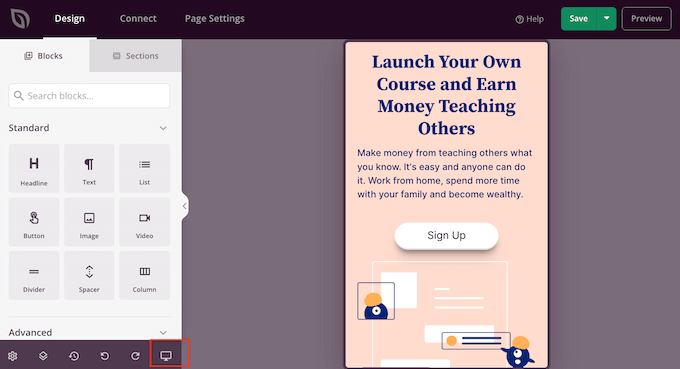
Many premium themes and plugins let you create elements that display differently on desktop versus mobile. You can also use a page builder plugin like SeedProd to edit your landing pages in mobile view.

Previewing a custom page on mobile

You should consider creating mobile-specific content for your lead generation forms. On mobile devices, these forms should ask for minimal information, ideally just an email address. They should also look good and be easy to close.

For more details, you can see our guide on how to create a landing page in WordPress.

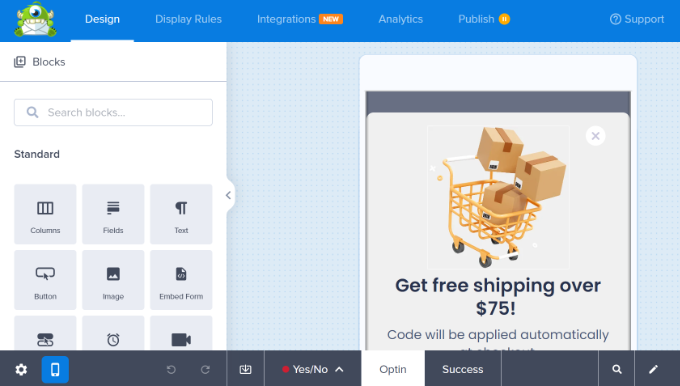
Another great way to create mobile-specific popups and lead-generation forms is with OptinMonster. It is the most powerful WordPress popup plugin and lead-generation tool on the market.

Edit campaign design on mobile

OptinMonster has specific device-targeting display rules that let you show different campaigns to mobile users vs desktop users. You can even combine this with OptinMonster’s geo-targeting feature and other advanced personalization features to get the best conversions.

You can see our guide on how to create mobile popups that convert for more information.

We hope this article helped you learn how to preview the mobile layout of your site. You may also want to see our expert picks for the best plugins to convert a WordPress site into a mobile app and learn how to increase blog traffic.

If you liked this article, then please subscribe to our YouTube Channel for WordPress video tutorials. You can also find us on Twitter and Facebook.

The post How to View the Mobile Version of WordPress Sites From Desktop first appeared on WPBeginner.


May 19, 2023 at 12:08AM