Wednesday, July 28, 2021

How to Add Expires Headers in WordPress (2 Methods)

Do you want to learn how to add expires headers in WordPress?

Expires headers are rules that let web browsers know whether to load a web page resource like images from the visitor’s browser cache or from your server. These can help improve the performance of your site.

In this article, we’ll show you two ways to add expires headers in WordPress.

How to Add Expires Headers in WordPress

How Are Expires Headers Used in WordPress?

The first time someone visits a web page on your WordPress site, all of the files are loaded one by one. All of these requests between the browser and your WordPress hosting server increase the web page loading time.

Browser caching stores some or all of those files on the visitor’s computer. That means that the next time they visit the page, the files can be loaded from their own computer, boosting your WordPress performance.

Now you might be wondering, how do the browsers know which files to save, and how long to keep them?

That’s where expires headers come in.

The rules about which files to save and how long to save them are set using either expires headers or cache-control headers. In this article, we’ll focus on expires headers because they’re simpler to set up for most users.

Expires headers set an expiration date for each type of file stored in the browser cache. After that date, the files will be reloaded from your server to give visitors the most recent version of the page.

We’ll show you how to add expires headers using two different methods. The first method is easier and recommended for most users. You can click the links below to jump ahead to your preferred section:

Method 1: Add Expires Headers with WP Rocket WordPress Plugin

WP Rocket is the most beginner-friendly WordPress caching plugin in the market. Once enabled, it works immediately to speed up your site without having to mess with complicated configuration settings like many other caching plugins.

WP Rocket is a premium plugin, but the best part is that all features are included in their lowest plan.

HP Rocket

The first thing you need to do is install and activate the WP Rocket plugin. For more details, see our step by step guide on how to install a WordPress plugin.

Once installed and activated, WP Rocket will automatically turn on browser caching. By default, it add expires headers and cache-control headers with the best settings to speed up your WordPress site.

That’s all you need to do. If you want to learn more about the plugin, then see our guide on how to properly install and setup WP Rocket in WordPress.

If you’d prefer to use a free caching plugin to add expires headers to your website, then we recommend you take a look at W3 Total Cache.

W3 Total Cache offers some of the same features as WP Rocket, but it’s not as beginner-friendly. You’d have to manually enable expires headers, since it doesn’t enable them automatically.

Method 2: Add Expires Headers in WordPress Using Code

The second method to add expires headers in WordPress involves adding code to your WordPress files. We don’t recommend it for beginners, since a mistake in the code could cause serious errors and break your site.

Before making these changes, we recommend that you first back up your WordPress site. For more details, see our guide on how to backup and restore your WordPress site.

With that said, let’s take a look at how to add expires headers by adding code to WordPress.

Determine if Your Website is Running Apache or Nginx

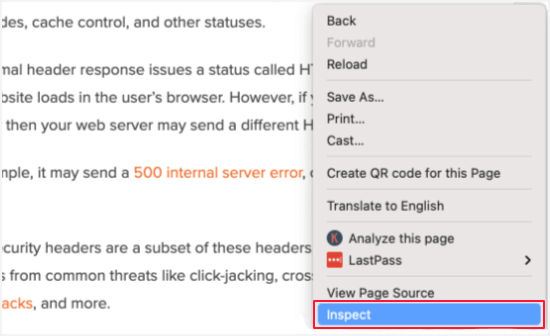
First, you need to figure out whether your website is using Apache or Nginx servers. To do this, browse to your website and right click the page, then select the ‘Inspect’ option.

Right Click the Inspect Option

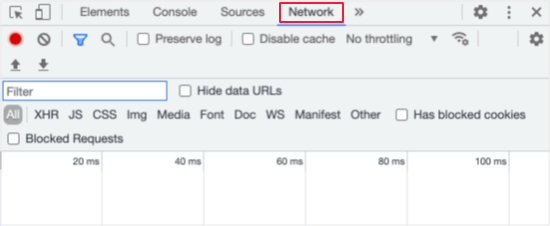
Next, you need to click the ‘Network’ tab at the top of the page. You may need to refresh the page for the results to load.

Click the Network Tab

After that, you can click your domain name at the top of the ‘Name’ column. Then you should scroll down to the ‘Response Headers’ section and check for an item called ‘server’.

Check the Response Headers Section

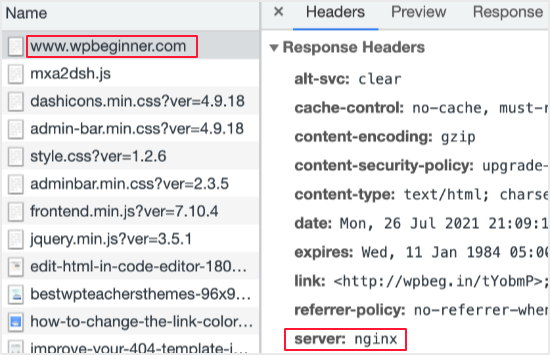
This will show you which web server is being used. In this case, the site is running on an Nginx server.

Now that you know which web server your site is using, use then links below to jump ahead:

How to Add Expires Headers in Apache

To add expires headers to an Apache server, you need to add code to your .htaccess file.

To edit this file, you need to connect to your WordPress hosting account with an FTP client or your host’s file manager tool. You’ll find your .htaccess file in your website’s root folder.

Find .htaccess in the Root Folder

Sometimes the .htaccess file can be hidden. If you need help finding it, then see our guide on why you can’t find .htaccess file on your WordPress site.

Next, you need to add expires headers to turn on browser caching. This tells the web browser how long it should store your website resources before they are deleted.

You can add the following code near the top of your .htaccess file to add expire headers:

## EXPIRES HEADER CACHING ##
<IfModule mod_expires.c>
ExpiresActive On
ExpiresByType image/jpg "access 1 year"
ExpiresByType image/jpeg "access 1 year"
ExpiresByType image/gif "access 1 year"
ExpiresByType image/png "access 1 year"
ExpiresByType image/svg "access 1 year"
ExpiresByType text/css "access 1 month"
ExpiresByType application/pdf "access 1 month"
ExpiresByType application/javascript "access 1 month"
ExpiresByType application/x-javascript "access 1 month"
ExpiresByType application/x-shockwave-flash "access 1 month"
ExpiresByType image/x-icon "access 1 year"
ExpiresDefault "access 3 days"
</IfModule>
## EXPIRES HEADER CACHING ##

These values should work fine for most sites, but you can adjust the time periods if your needs are different.

Notice that the code sets different cache expiration dates based on the type of file. Images are cached longer than HTML, CSS, Javascript, and other file types because they usually stay the same.

How to Add Expires Headers in Nginx

If you’re using an Nginx server to host your WordPress blog, then you need to edit the server configuration file to add expires headers.

How you edit and access this file depends on your host, so you can reach out to your hosting provider if you need help accessing the file.

Then, you need to add the following code to add expires headers:

location ~* \.(jpg|jpeg|gif|png|svg)$ {
  expires 365d;
}
 
location ~* \.(pdf|css|html|js|swf)$ {
  expires 3d;
}

This code will set the expiration times for the different file types. Notice again that images are cached longer than HTML, CSS, JS, and other file types since images usually stay the same.

We hope this tutorial helped you learn how to add expires headers in WordPress. You may also want to see our ultimate WordPress security guide to improve your website security, and see our comparison of the best email marketing services to grow your traffic.

If you liked this article, then please subscribe to our YouTube Channel for WordPress video tutorials. You can also find us on Twitter and Facebook.

The post How to Add Expires Headers in WordPress (2 Methods) appeared first on WPBeginner.


July 28, 2021 at 05:08PM

Tuesday, July 27, 2021

How to Add Front-End Login Page and Widgets in WordPress

Do you want to add a front-end login page and widgets in WordPress?

The default WordPress login page doesn’t provide the best user experience and can confuse your users. Adding a front-end login page lets your users log in directly from the front-end of your website.

In this article, we will show you how to add a front-end login page and widgets in WordPress.

How to add a front-end login page and widgets in WordPress (3 ways)

Why and When Do You Need Front-End Login in WordPress?

By default, the WordPress login page will show the WordPress branding and usually won’t match the design of your current WordPress website.

Default WordPress login page

This works for smaller WordPress blogs and websites.

However, if you have a membership site, online store, or another site where users can register and log in, then adding a front-end login page and widget offers a better experience for your users.

You can even customize this page with your own branding, or add a simple login form to your WordPress sidebar.

There are multiple ways you can add a front-end login page and login widget in WordPress. In this tutorial, we’ll show you the 3 easiest ways to do this.

Method 1. Add a Front-End Login Page and Widgets in WordPress with WPForms

WPForms is the best WordPress contact form plugin in the market used by over 4 million websites. It lets you easily create a custom front-end login page and login widget on your website.

To get started, you will need their User Registration addon which lets you create WordPress user registration and login forms.

Next, simply use the drag and drop form builder to create your login form, then add it to your site using the WordPress block editor or a form shortcode.

WPForms login form

For more details, see our guide on how to create a custom login page for WordPress.

Once you’ve created your user login form, you can also add this form to your WordPress sidebar or other widget areas.

WPForms login widget

All you have to do is drag the WPForms widget to any widget area of your site and select the login form.

For more details, see our guide on how to add a login form in your WordPress sidebar.

WPForms login widget display

Method 2. Add a Front-End Login Page in WordPress with SeedProd

SeedProd is the best WordPress drag and drop page builder in the market used by over 1 million websites.

It lets you create a completely custom login page that can match the design of your current website or be something unique.

SeedProd login page example

It’s very beginner-friendly and comes with a ton of professionally designed login page templates that you can use to build your login page.

All you have to do is choose a template and use the drag and drop builder to customize the page.

You can even design a completely custom front-end login page from scratch using a blank template.

SeedProd login page templates

For more details, see our guide on how to create a custom WordPress login page.

Method 3. Add a Front-End Login Page and Widgets in WordPress with Theme My Login

If you want to add a very simple front-end login page to your site, then you can use the free Theme My Login plugin.

First thing you need to do is install and activate the plugin. For more details, see our beginner’s guide on how to install a WordPress plugin.

Upon activation, the plugin will automatically create pages for login, logout, forget password, and registration.

You can navigate to Theme My Login » General and view the plugin settings.

First, you can set the login type. The ‘Default’ setting is the most secure since it asks for an email and password to log in.

Theme My Login settings

Next, you can choose your Registration settings.

We kept the default settings here since it requires both email and password to login.

You can also check the ‘Passwords’ box to let users create their own passwords and the ‘Auto-Login’ box which automatically logs in users after they register.

Theme My Login registration settings

After that, you can change your login and registration URLs in the ’Slugs’ settings.

These automatically create redirects. So, the standard “yoursite.com/wp-admin” login URL will redirect to “yoursite.com/login”.

Theme My Login URL slug settings

You can keep these URLs the same or change them.

Once you’re done making changes, make sure to click the ‘Save Changes’ button.

Save Theme My Login settings

You can’t add much more advanced functionality unless you upgrade to use their premium extensions.

Still, it is a good solution for users on a budget who want to create a simple front-end login page.

You can also add a login form to your WordPress widget areas using the included shortcode.

Simply navigate to Appearance » Widgets and drag the ‘Text’ widget to your sidebar.

Then, copy and paste the shortcode below. You can customize the widget by changing the title or adding more text. Don’t forget to click the ‘Save’ button when you’re done.

[theme-my-login]

Add Theme My Login widget

Now your users will see the login form on the WordPress sidebar or any other area of your site where you added the shortcode.

Theme My Login sidebar widget display

We hope this article helped you add a front-end login page and widgets in WordPress. You may also want to see our expert picks of the best membership plugins for WordPress and our ultimate WordPress security guide to improve the security of your login pages and widgets.

If you liked this article, then please subscribe to our YouTube Channel for WordPress video tutorials. You can also find us on Twitter and Facebook.

The post How to Add Front-End Login Page and Widgets in WordPress appeared first on WPBeginner.


July 27, 2021 at 04:00PM

Monday, July 26, 2021

How to Edit HTML in WordPress Code Editor (Beginner’s Guide)

Are you looking for an easy way to edit HTML on your WordPress website?

HyperText Markup Language or HTML is a code that tells a web browser how to display the content on your web pages. Editing HTML comes in handy for advanced customization and troubleshooting issues.

In this article, we’ll show you how to edit HTML in the WordPress code editor using different methods.

How to Edit HTML in WordPress code editor

Why Should You Edit HTML in WordPress?

WordPress offers thousands of themes and plugins to change the appearance of your website and customize different elements without touching a single line of code.

However, plugins and themes have their limitations and might not offer the exact features you’re looking for. As a result, you might be unable to style your website the way you want it to look.

This is where editing HTML is really useful. You can easily perform advanced customization using HTML code. It provides a lot of flexibility and control over how your site will look and function.

In addition, learning how to edit HTML can also help you identify and fix errors on your WordPress website when you don’t have access to the dashboard.

Note: If you don’t want to edit HTML, but still want full customization options, then we recommend using a drag and drop WordPress page builder like SeedProd.

That being said, let’s look at different ways to edit HTML in a WordPress website.

We’ll cover how to edit HTML using the block editor and classic editor, and we’ll also show you an easy way to add code to your site. You can click the links below to jump ahead to your preferred section.

How to Edit HTML in WordPress Block Editor

In the WordPress block editor, there are multiple ways to edit the HTML of your post or page.

First, you can use a Custom HTML block in your content to add HTML code.

To start, head over to your WordPress dashboard and then add a new post/page or edit an existing article. After that, click the plus (+) sign at the top left corner and add a ‘Custom HTML’ block.

Adding custom HTML block in WordPress

Next, go ahead and enter your custom HTML code in the block. You can also click on the ‘Preview’ option to check if the HTML code is working properly and how your content will look on your live website.

Custom HTML code in WordPress Editor

Another way to add or change HTML code in the WordPress block editor is by editing the HTML of a particular block.

To do that, simply select an existing block in your content and then click the three-dot menu. Next, go ahead and click the ‘Edit as HTML’ option.

Click the three dots and select edit as HTML

You’ll now see the HTML of an individual block. Go ahead and edit the HTML of your content. For example, you can add a nofollow link, change the style of your text, or add other code.

Edit the HTML of an individual block

If you want to edit the HTML of your entire post, then you can use the ‘Code Editor’ in the WordPress block editor.

You can access the code editor by clicking the three-dots option in the top right corner. Then select ‘Code Editor’ from the drop-down options.

Access the Code Editor

How to Edit HTML in WordPress Classic Editor

If you’re using the WordPress classic editor, then you can easily edit the HTML in the Text view.

To access the Text view, simply edit a blog post or add a new one. When you’re in the classic editor, click the ‘Text’ tab to see the HTML of your article.

Click on Text in the Classic Editor to edit HTML

After that, you can edit the HTML of your content. For example, you can bold different words to make them prominent, use the italic style in the text, create lists, add a table of contents, and more.

How to Edit HTML in WordPress Widgets

Did you know that you can add and edit HTML code in your site’s widget area?

In WordPress, using a Custom HTML widget can help you customize your sidebar, footer, and other widget areas. For instance, you can embed contact forms, Google Maps, call to action (CTA) buttons, and other content.

You can start by heading over to your WordPress admin panel and then go to Appearance » Widgets. After that, go ahead and add a Custom HTML widget by clicking the ‘Add’ button.

Add a Custom HTML Widget

Next, you’ll need to select where you’d like to add the Custom HTML widget and choose a position. The widget area will depend on the WordPress theme you’re using. For example, you may be able to add it to your footer, header, or other areas.

Select the area and position for your Custom HTML widget

Once you’ve selected the widget area and position, go ahead and click the ‘Save Widget’ button.

After that, you can click on your Custom HTML widget, enter the HTML code, and then click the ‘Save’ button.

Enter Custom HTML

You can now visit your website to see the Custom HTML widget in action.

Custom HTML Preview

How to Edit HTML in WordPress Theme Editor

Another way to edit the HTML of your website is through the WordPress Theme Editor (Code Editor).

However, we don’t recommend that you directly edit the code in the Theme Editor. The slightest mistake when entering code can break your website and block you from accessing the WordPress dashboard.

Also, if you update your theme, then all your changes would be lost.

That said, if you are considering editing HTML using the Theme editor, then it’s a good idea to backup your website before making any changes.

Next, head over to Appearance » Theme Editor from your WordPress dashboard. You’ll now see a warning message about directly editing theme files.

Theme editor warning in WordPress

Once you click the ‘I Understand’ button, you’ll see your theme files and code. From here, you can choose which file you’d like to edit and make your changes.

WordPress Theme Editor

How to Edit HTML in WordPress Using FTP

Another alternative method to editing HTML in the WordPress theme files is by using FTP also known as file transfer protocol service.

This is a standard feature that comes with all WordPress hosting accounts.

The benefit of using FTP instead of the code editor is that you can easily fix issues using the FTP client. This way, you won’t be locked out of your WordPress dashboard if something breaks when editing HTML.

To start, you’ll first need to select an FTP software. We’ll be using FileZilla in this tutorial, as it’s a free and user-friendly FTP client for Windows, Mac, and Linux.

After selecting your FTP client, you’ll now need to log in to your site’s FTP server. You can find the login details in your hosting provider’s control panel dashboard.

Once you’re logged in, you will see different folders and files of your website under the ‘Remote site’ column. Go ahead and navigate to your theme files by going to wp-content » theme.

You’ll now see different themes on your website. Go ahead and select the theme that you want to edit.

Navigate to your theme files in FTP client

Next, you can right-click on a theme file to edit the HTML. For example, if you want to make changes in the footer, then right-click the footer.php file.

Many FTP clients allow you to view and edit the file and automatically upload them once you’ve made the changes. In FileZilla, you can do this by clicking the ‘View/Edit’ option.

Download and edit your theme file

However, we suggest that you download the file that you want to edit to your desktop before making any changes.

After editing the HTML, you can replace the original file. For more details, we recommend following our guide on how to use FTP to upload files in WordPress.

Easy Way to Add Code in WordPress

The easiest way to add code to your WordPress is by using the Insert Headers and Footers WordPress plugin.

The team at WPBeginner designed this plugin, so you can easily add code to your site in minutes, and we’ve made it 100% free to use.

It also helps organize your code, as it’s stored in one place. Plus, it prevents errors that can be caused when manually editing code.

Another benefit is that you don’t have to worry about your code being erased if you decide to update or change your theme.

The first thing you’ll need to do is install and activate the Insert Headers and Footers plugin on your website. For more details, you can follow our detailed tutorial on how to install a WordPress plugin.

Once the plugin is active, you can head over to Setting » Insert Headers and Footers from your admin panel.

Next, you can add the HTML code to your website in the header, body, and footer boxes.

For example, let’s say you want to display an alert bar on your website. You can simply enter the HTML code in the ‘Scripts in Body’ box and click the Save button.

Adding the HTML code using the Insert Headers and Footers plugin

Besides that, you can add a Google Analytics tracking code and Facebook pixel in the header or add a Pinterest button in the footer of your website using the plugin.

For more details, you can see our guide on how to add header and footer code in WordPress.

We hope that this article helped you learn how to edit HTML in the WordPress code editor. You may also want to look at our guide on how much it really costs to build a WordPress website, or see the most important reasons you should use WordPress for your website.

If you liked this article, then please subscribe to our YouTube Channel for WordPress video tutorials. You can also find us on Twitter and Facebook.

The post How to Edit HTML in WordPress Code Editor (Beginner’s Guide) appeared first on WPBeginner.


July 26, 2021 at 03:26PM