Thursday, February 27, 2020

How to Easily Create a Multilingual WordPress Site

Do you want to translate your WordPress site in multiple languages?

WordPress powers more than 35% of all websites on the internet. Many of them serve non-English or multilingual audiences.

In this article, we will show you how to easily create a multilingual WordPress site. We will cover three different solutions, so you can choose the one that works best for you.

With each solution, you’ll be able to easily translate your WordPress posts, pages, tags, categories, and themes into as many languages as you like.
Creating a multilingual WordPress site

What is a Multilingual WordPress Website?

A multilingual WordPress website serves the same content in multiple languages. It can automatically redirect users to a language based on their region, or users can select their preferred language using a dropdown link.

There are few different approaches used to create a multilingual website.

The first approach allows you to manually translate all the content into languages of your choice with the help of human translators.

The second method does not actually create a multilingual site but uses machine translations of your existing content by using auto-translate services.

However, Google Translate has stopped supporting new accounts for website translation. The other options are either not-free or not very good in quality.

It goes without saying that manually translating your content is a much better approach. This allows you to maintain quality throughout your website. You can translate the content yourself or hire professionals to do that.

Choosing a WordPress Multilingual Plugin

There are several WordPress plugins that you can use to translate your website into multiple languages. You need to choose a plugin that helps you easily manage translations without making things unnecessarily difficult for your users.

In this guide, we will show you three of the top WordPress multilingual plugins with step by step instructions on how to set them up.

If you know which plugin you are going with, then you can directly jump to the instructions.

  1. TranslatePress
  2. WPML
  3. Polylang

All three of them comes with the necessary features you’ll need to make a robust multilingual website.

  • They allow you to translate posts, pages, products, and other post types
  • You can easily translate your categories, tags, plugins, and themes
  • They allow you to set up SEO friendly URLs for each language

With that said, let’s get started.

1. Create Multilingual WordPress Website Using TranslatePress

TranslatePress is one of the best WordPress translation plugins on the market. It is a bit different than other solutions mentioned in this guide.

Normally, multilingual plugins ask you to create multiple versions of the same article in order to translate it. TranslatePress allows you to create translations at the same time.

It also allows you to use a live editor to translate all the visual aspects of your website.

Most importantly, you can combine machine and human translations. This means you can use Google Translate or similar AI-powered tools to generate machine translations and only improve the parts that artificial intelligence missed.

The first thing you need to do is install and activate the TranslatePress plugin. For more details, see our step by step guide on how to install a WordPress plugin.

If you want to translate your website to more than one language, then you will also need to install ‘Extra Languages’ add-on. You can do this from the download addons button under your account on the TranslatePress website.
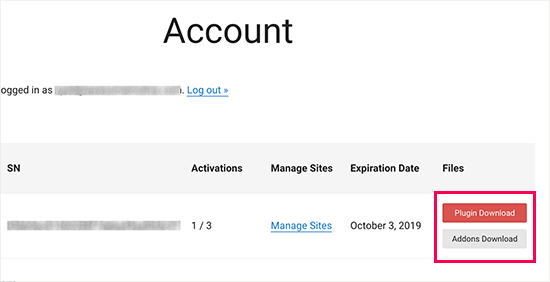
Download addons

After downloading the add-on, you can install and activate it like any other WordPress plugin.

Upon activation, you need to visit Settings » TranslatePress page to configure plugin settings.
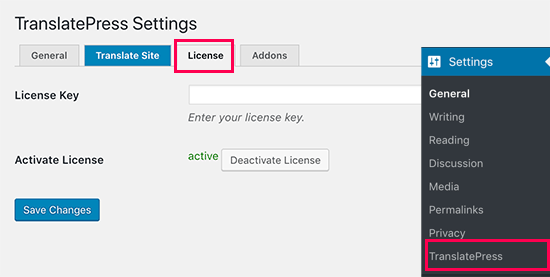
Add license

First, you need to switch to the license tab and enter your license key. You can find this information under your account on the TranslatePress website.

After that, you need to switch to the General settings tab to set up other settings.
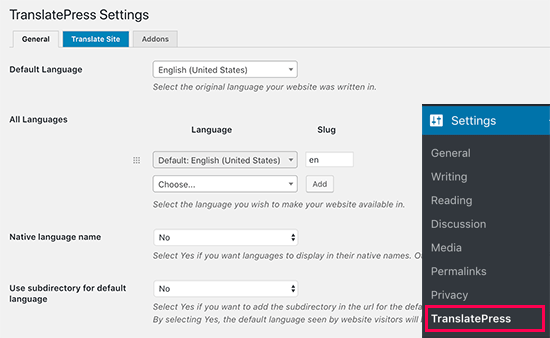
TranslatePress settings

The first option on the page is to choose the default language of your website, and the languages you want to translate your website into.

Next, you need to choose whether you want to display language names in the native language. The default option is ‘No’ which means language names will be shown in the default language.

After that you need to choose whether you want to display the default language name in the URL as a subdirectory. For example, http://example.com/en/.

The default choice is no which means only the other languages will have the language name in URL as a subdirectory. We recommend leaving this setting as-is for best SEO.
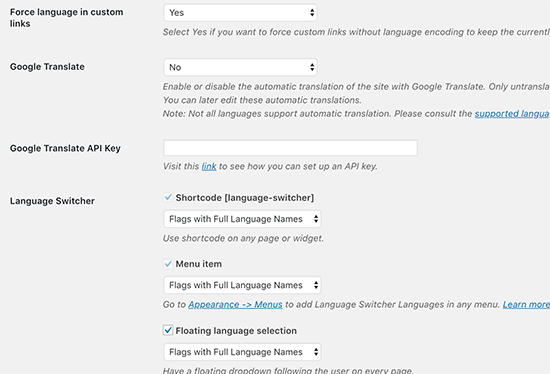
TranslatePress settings

This brings you to the next setting, ‘Force language in custom links’. The default option is ‘Yes’, because that will change custom links for translated languages making the URLs more SEO friendly.

Next, you need to choose whether you want to use Google Translate for automatic translations. The default choice is ‘No’, but you can change that if you would like to use Google Translate.

You will need to provide a Google Translate API key in the next option. You will find a link under the option which will show you instructions on how to get one.

Finally, you will come to the options on how you want to display the language switcher on your website. TranslatePress provides you with three choices.

You can use a shortcode, add switcher to your navigation menu, or display a floating menu. We will show you how to add the language switcher to your website later in this article.

Go ahead and click on the ‘Save Changes’ button to store your settings.

Translating Your Website Content

To translate your website, you can simply click on the ‘Translate Site’ tab on plugin’s settings page or the button in your WordPress admin bar.
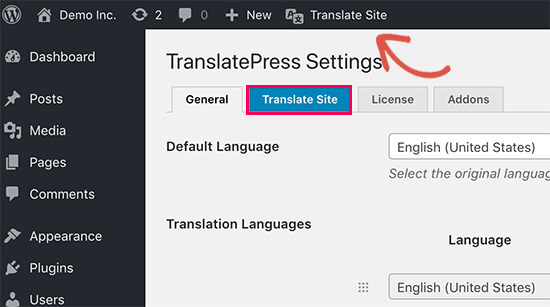
Translate site button

This will open the live translation editor in a new browser tab.

In this live editor, you can click on any text on your website in the right pane and TranslatePress will load it in the left column to translate.
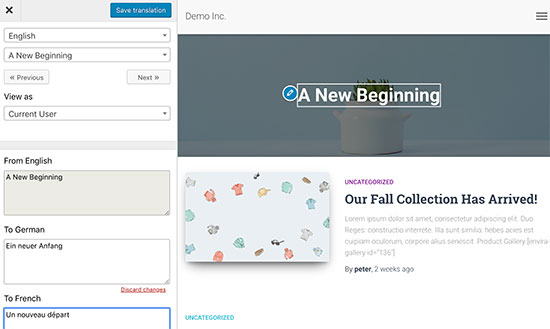
Translating site in TranslatePress

Now click on the language you want to translate the string into and then provide your translation.

After entering the translation, click on the ‘Save Translation’ button on the top and then click on the next button. TranslatePress will automatically load the next string on the page for you to translate.

You can also just click on the drop-down menu below your default language, and it will show you the list of translatable text strings on the page. You can select a string and then provide its translation.
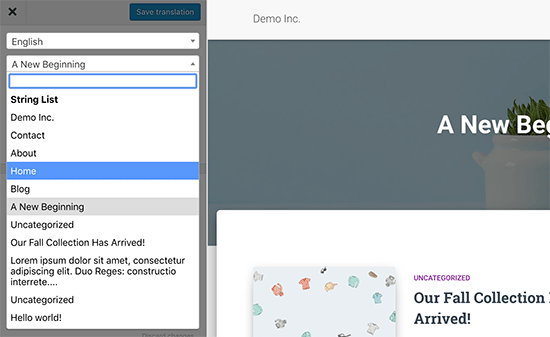
Select and translate strings on a page

You can translate all content on any page. This includes navigation menus, buttons, sidebar widgets, meta text, and more.

You can also visit any page by clicking on the links on the screen and start translating that page.

TranslatePress allows you to instantly start translating any page or post on your site when logged in. Simply click on the ‘Translate Page’ button on the top to enter the live editor.
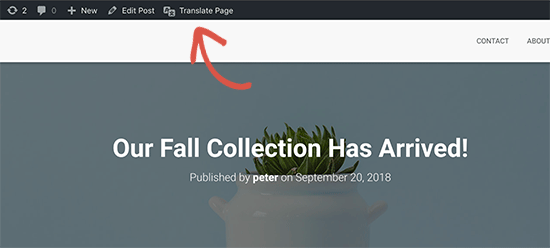
Start translating any page

Once you have translated a string, the plugin will automatically translate it for you on other places. For example, if you translated a post title, then the post title in your sidebar widgets will be automatically translated.

Adding Language Switcher to Your Website

Language switcher allows your website visitors to select a language when they visit your website. It usually displays the flag of each country to indicate languages available on your site.

TranslatePress allows you to add language switcher by using a shortcode, as a navigation menu item, or as a floating banner. The language switcher can be displayed as flags, language names, or both.

Adding language switcher in WordPress using shortcode

You just need to add [language-switcher] shortcode to posts, pages, or a sidebar widget where you want to display the language switcher.
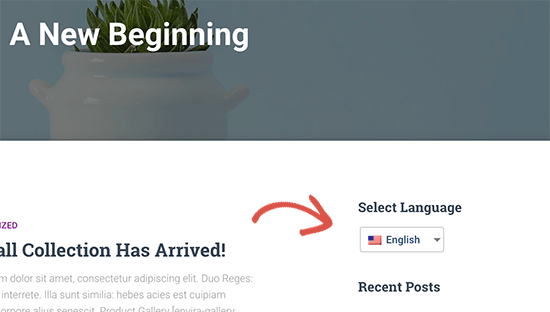
Shortcode switcher

Adding language switcher to your WordPress navigation menu

Simply go to Appearance » Menus page and click on the ‘Language Switcher’ tab in the left column. Now select the languages you want to display and then click on add to menu button.
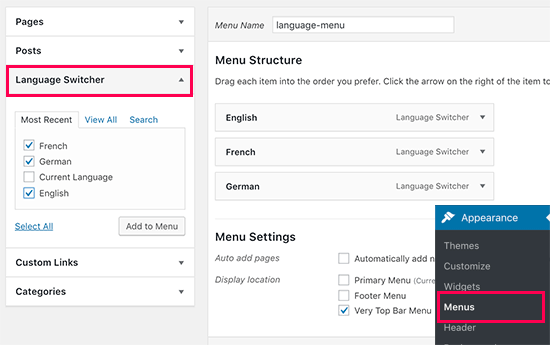
Adding language switcher to WordPress navigation menus

You will now see languages added to your WordPress navigation menu. Don’t forget to click on the ‘Save Menu’ button to store your changes.

This is how it looked on our test site:
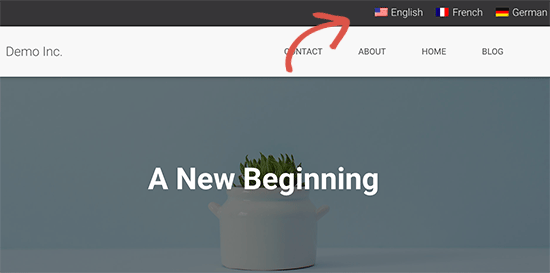
Language switcher in navigation menu

Adding a floating language switcher

Go to plugin’s settings page and scroll down to language switcher section. From here make sure the box next to the ‘Floating language selection’ option is checked.
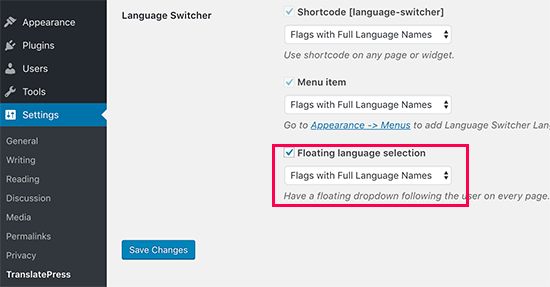
Floating language switcher

Don’t forget to click on the save changes button to store your settings.

You can now visit your website to see the floating language switcher at the bottom of every page on your website.
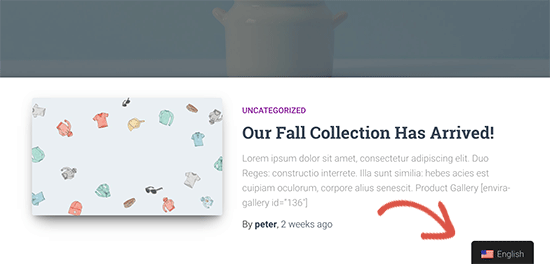
Floating language switcher

2. Create Multilingual WordPress Website Using WPML

WPML (short for WordPress Multi-lingual) is one of the oldest and most popular WordPress multilingual plugin.

First thing you need to do is install and activate the WPML (WordPress Multi-language) plugin. For more details, see our step by step guide on how to install a WordPress plugin.

Upon activation, the plugin will add a new menu item labeled ‘WPML’ in your WordPress menu. Clicking on it for the first time will take you to plugin’s settings wizard.
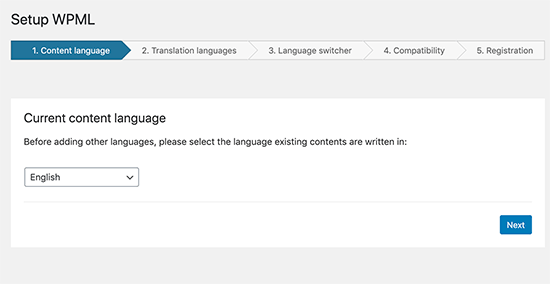
WPML Setup - Choose primary language

WPML will automatically detect your WordPress site’s language. You can change it here now if you want.

After that click on the next button to continue.

On the next screen, you will be asked to select the languages you want to enable on your site. Simply select the languages from the list that you want to add to your site.
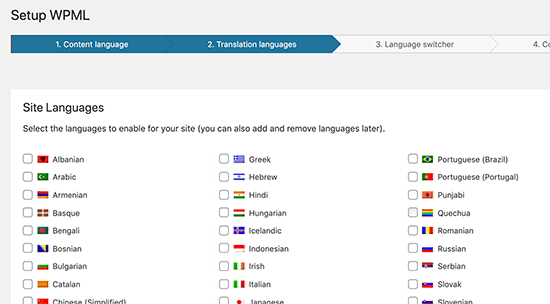
WPML select languages

You can always add or remove languages later if you need them. Once you have selected the languages, click on the Next button.

Now you will be asked to add a language switcher to your site. This language switcher will allow your users to choose a language to view content in their preferred language.
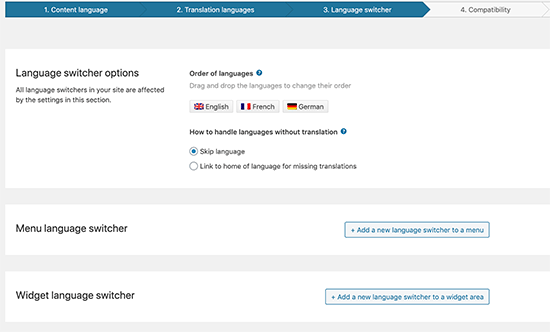
WPML language switcher

WPML allows you to automatically add content switcher as a sidebar widget, in your navigation menu, a plain list, or in the footer area.

Next, you will be asked if you like to send a compatibility report to WPML regarding the plugin and themes you are using.
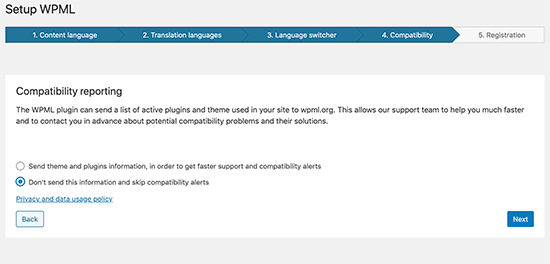
WPML compatibility report

It is up to you to decide whether or not you want to send this data to WPML.

As the final step, you will be asked to enter your site key. If you have not generated one yet, then you can click on ‘Generate a key for this site’ button.
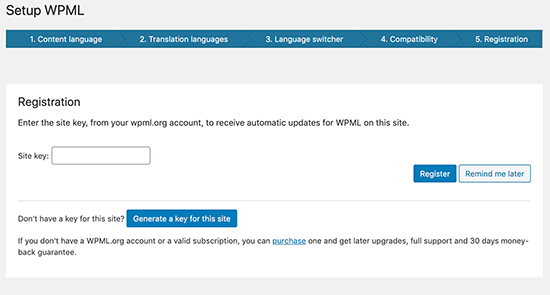
WPML site key

This will take you to the WPML website, where you will be asked to add the site you are coming from to your WPML account.

Once your site is added, you can click on it to get to your site key. Copy and paste this key into your WordPress site.

That’s all you have successfully finished the WPML setup wizard. You can now click on the Finish button to exit the setup.

Adding Multilingual Content into WordPress with WPML

WPML makes it really easy to translate every area of your WordPress site into multiple languages.

You will be able to easily translate your WordPress posts, pages, tags, categories, and themes into as many languages as you like.

Adding Multilingual Posts and Pages

Simply click on the posts menu to view your existing posts. You will notice the language column next to your post titles.
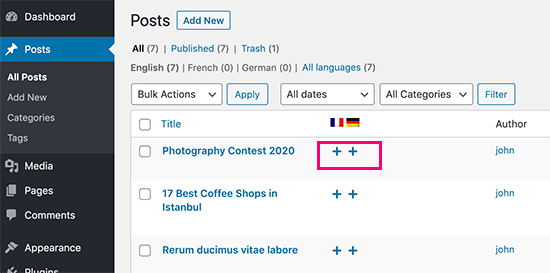
WPML translate posts and pages

WPML assumes that your existing content is in your site’s primary language. It will show Add buttons for each language next to your posts. Click on the add button under a language to translate a post.

You can also manage translations by editing a post.

On the post edit screen, you will notice the new ‘Language’ meta box to manage translations.
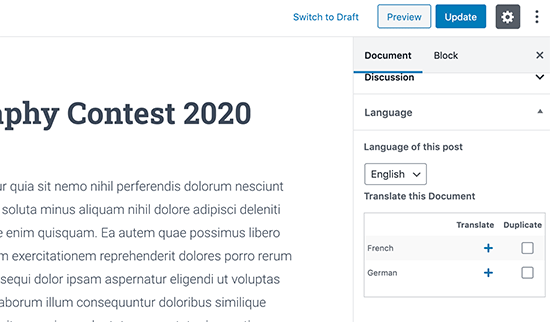
Managing translations while editing a post

WPML also offers a better way to manage users who work as translators on your website. If you purchase their Multilingual CMS Plan, then you can use their translation management module.

The translation management module allows you to add users as translators regardless of what role they have on your WordPress site. You can even add subscribers as translators.
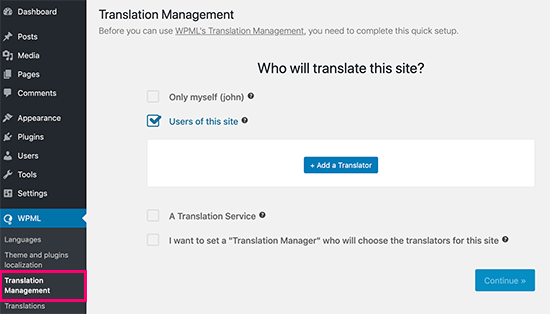
Adding translators
Instead of editing posts, these translators will be able to add translations directly in WPML.

Adding Translations for Categories and Tags

WPML allows you to easily translate categories and tags, or any other custom taxonomies that you may be using.

Visit WPML » Taxonomy Translation and load the custom taxonomies you want to translate.

For example: in this screenshot we selected categories, and it displayed all categories from our example site.
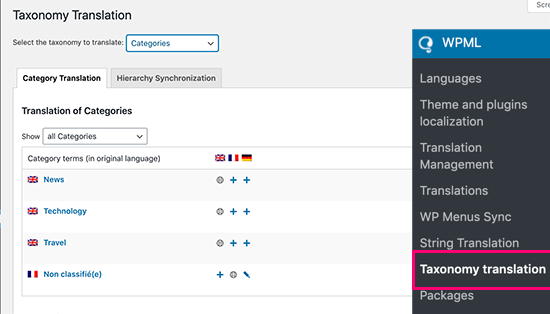
Translate categories and tags

Click on the add button next to the taxonomy term to add the translation.

Translating Navigation Menus

WordPress comes with a robust navigation menu system. WPML allows you to translate it just like you would translate posts or taxonomies.

Visit Appearance » Menus page on your site. If you have more than one menus, then select the menu you want to translate.

In the right-hand column, you will see your menu with links to translate into other languages enabled on your site.
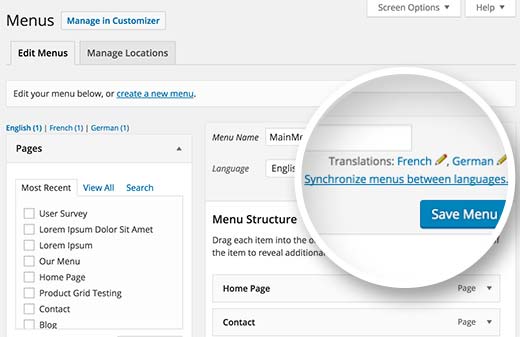
Translate Menus in multilingual WordPress

Clicking on a language will create a new menu for that language. You will need to add the same menu items as in your primary language menu.

If you have your posts and pages in navigation menus, then you will first need to translate them. After that, you can add them from the tabs on the left in edit menu screens.

Don’t forget to click on the Save button to save your menu.

Translating Themes, Plugins, & Other Text with WPML

WPML multilingual CMS allows you to choose between official translations of themes and plugins or use its own string translator.

Go to WPML » Themes and plugins localization page.
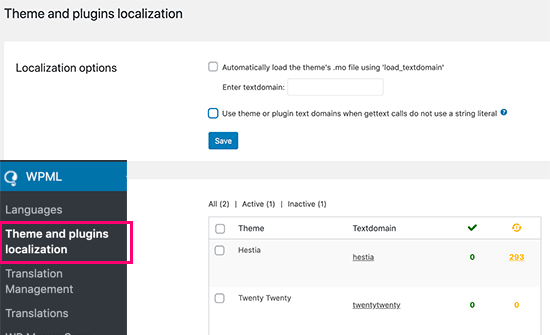
WPML themes & plugin translations

By default, WPML will look for your plugin’s translation files if they are available, and use them.

However, if your WordPress theme or WordPress plugins are not translated into the languages you are using, then you can translate them using the WPML string translation feature.
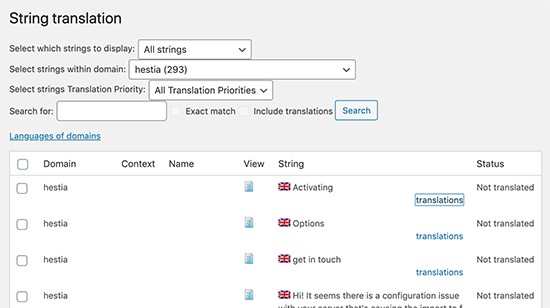
WPML string translations

Simply scan your theme or plugin to load the strings and then start translating those strings.

This module will also allow you to translate custom fields, widgets, and other translatable strings generated by WordPress.

3. Create Multilingual WordPress Website Using Polylang

Polylang is a free WordPress multilingual plugin with more than 500,000 active installs. It allows you to easily create a multilingual website without purchasing the premium version.

Note: If you are running WooCommerce or need support, then you may want to upgrade to the Polylang Pro or purchase their WooCommerce addon.

For this tutorial, we’ll be using the free version of the plugin.

The first thing you need to do is install and activate the Polylang plugin. For more details, see our step by step guide on how to install a WordPress plugin.

Upon activation, you need to visit Languages » Languages page to configure the plugin.
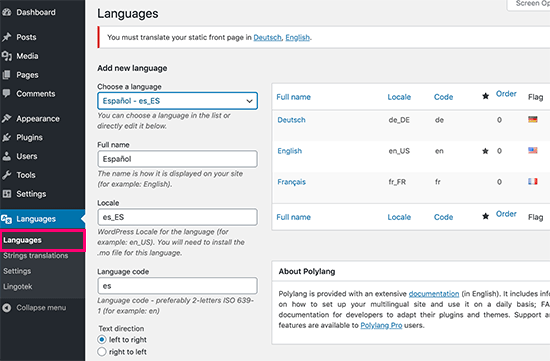
Adding languages

The language settings page is divided into three tabs. The first tab is labeled ‘Languages’. This is where you add the languages you want to use on your site.

You will need to add the default language, as well as select all other languages that users can choose on your site.

After adding the languages, switch to the ‘Strings Translations’ tab. Here you need to translate site title, description, and then choose the date and time format.
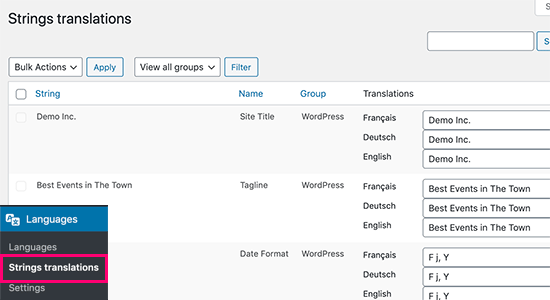
Translate website title, description, and date format

Next, you need to visit Languages » Settings page. From here you can set the URL settings for languages and set up SEO friendly URLs.
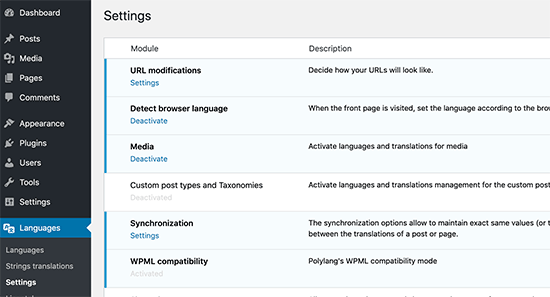
Polylang settings

Once you are done, click on the save changes button to store your settings.

Translating Content in WordPress with Polylang

Polylang makes it super easy to add content in different languages. Simply create a new post/page or edit an existing one. On the post edit screen, you will notice the language meta box.
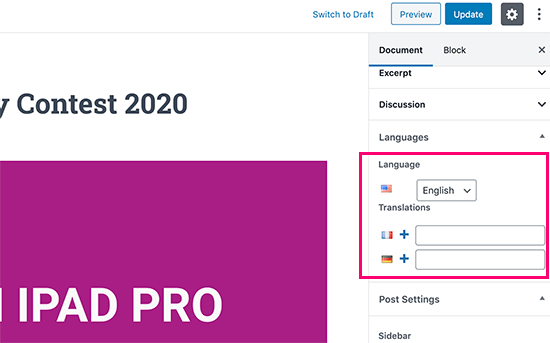
Adding multilingual content in Polylang

Your default language will automatically be selected, so you can first add content in your default language, and then translate it into others.

To translate, you need to click on the + button next to a language and then add content for that language.
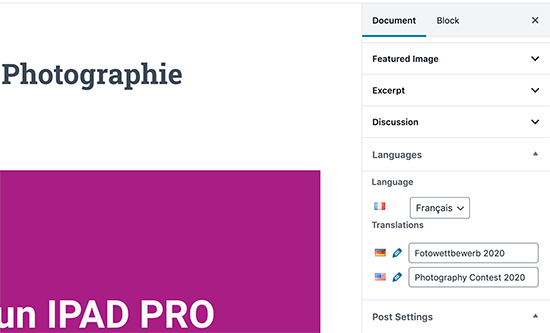
Polylang translations

Repeat the process for all languages. Once you are done, you can publish your posts and pages.

Translating Categories, Tags, and Custom Taxonomies

You can also translate categories and tags, or any custom taxonomies you may be using.

If you want to translate categories, then go to Posts » Categories.
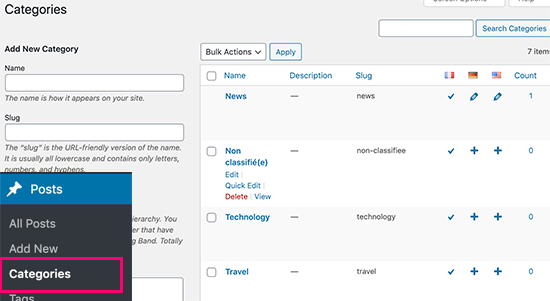
Translating categories

Add a category in your default language and then click on the plus icon for each language to start adding translations.

Displaying Language Switcher on Your WordPress Site

Adding a language switcher allows users to select a language when viewing your site. Polylang makes it super simple. Just go to Appearance » Widgets and add the language switcher widget to your sidebar or another widget-ready area.
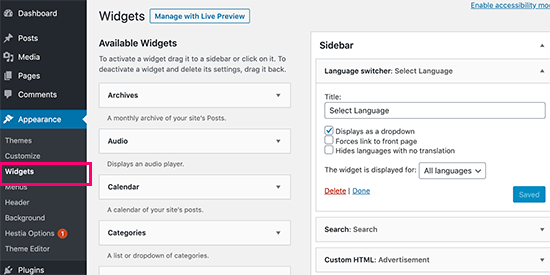
Polylang language switcher widget

You can choose a drop-down, or use language names with flags. Once you are done, click the save button to store your widget settings.

You can now preview your site to see the language switcher in action.
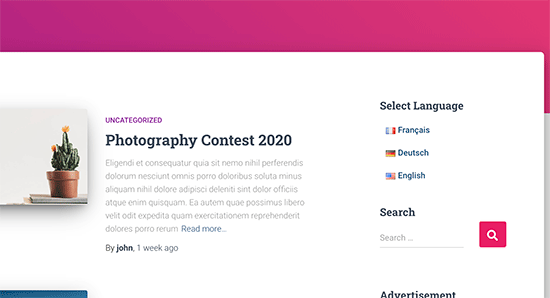
Language switcher preview

FAQs About Creating a Multilingual WordPress Site

Having helped thousands of beginners start their websites, we know a thing or two about making a multilingual website. Following are some of the top questions we have been asked about multilingual WordPress websites.

1. Which WordPress multilingual plugin is the best?

All three plugins mentioned in this guide are the best. However, they are slightly different in some aspects.

If you are a beginner looking for an easier solution then we recommend using TranslatePress. Its live editor makes translations easier.

Advanced users and eCommerce websites may find WPML more comprehensive for their needs. Lastly, if you are looking for a free solution, then Polylang is the best option for you.

2. How to translate my WordPress admin area for users?

WordPress allows each user on your website to select the admin interface language. They simply need to edit their user profile and there they will find the option to select language.
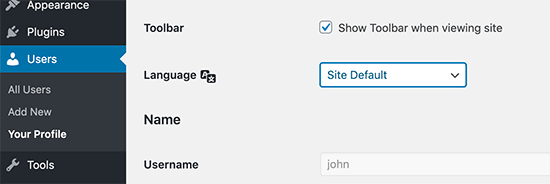
User language

3. How do I translate my WordPress theme?

All three plugins will allow you to automatically fetch theme translations. You can also find and translate a WordPress theme by yourself and then upload translation files to your website.

4. How do I translate a WordPress plugin

Many of the top WordPress plugins are translation ready. However, they may not be translated into all languages. TranslatePress and WPML allow you to easily translate strings within the plugin interface.

You can also translate WordPress plugins on your own and upload the translations to your website manually.

We hope this article helped you learn how to make a multilingual WordPress site like a pro. You may also want to see our guide on how to easily get more traffic to your website.

If you liked this article, then please subscribe to our YouTube Channel for WordPress video tutorials. You can also find us on Twitter and Facebook.

The post How to Easily Create a Multilingual WordPress Site appeared first on WPBeginner.


February 27, 2020 at 07:00PM
Wednesday, February 26, 2020

How to Enable Maintenance Mode for WooCommerce

Recently some of our readers asked us if it’s possible to put a WooCommerce store in maintenance mode without affecting other parts of a website?

The good news is that it’s not only possible, but it’s also very easy to do.

In this article, we’ll show you how to enable maintenance mode for WooCommerce. You will have the option to restrict maintenance mode only to your store pages, or you can enable it for the entire website.

How to enable maintenance mode for WooCommerce

Why and When You Need to Enable Maintenance Mode for WooCommerce

There are couple of key reasons why you might want to put your WooCommerce store (but not your whole site) into maintenance mode or coming soon mode:

  • Your store is still under construction and you haven’t launched it yet. This is a great time to use a “coming soon” page to build excitement while you work on your store behind the scenes.
  • Something’s gone wrong with your store. If there’s a problem, being able to quickly put the store into maintenance mode will give you the time you need to fix things (without any Google penalties).
  • You are adding an online store section to an existing website, but want to test it properly before opening it for the general public.

Putting your WooCommerce store under maintenance mode helps you improve overall user experience and avoid any misplaced orders as you work on your site.

That being said, let’s take a look at how to easily enable WooCommerce maintenance mode without affecting rest of your website.

Tip: If you do want to hide your entire WordPress site from visitors, check out our article that explains how to put your WordPress site in maintenance mode.

Enabling Maintenance Mode for WooCommerce

The first thing you need to do is install and activate the SeedProd plugin. For more details, see our step by step guide on how to install a WordPress plugin.

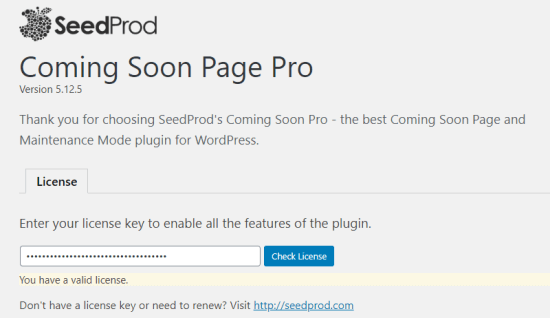
Upon activation, you’ll need to enter your license key by going to Settings » Coming Soon Pro and clicking on the ‘License’ tab:

Entering your license key on the SeedProd Coming Soon Pro settings page

Now you’re ready to put your WooCommerce store under maintenance mode.

Creating Your Maintenance Mode or Coming Soon Page

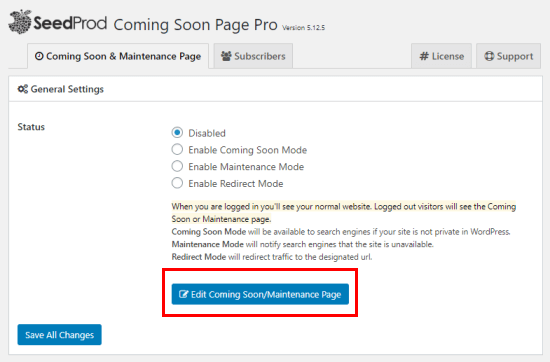
To start designing your page, you need to visit Settings » Coming Soon Pro page and click on the ‘Edit Coming Soon/Maintenance Page’ button.

Click the button Edit Coming Soon/Maintenance Page

On the next page, you’ll see many different templates to choose from. Each of them can be easily customized to match your needs.

Furthermore, you can switch to a different theme at any time without losing the changes you’ve made to the text and other fields on your maintenance page.

Viewing the available maintenance page themes

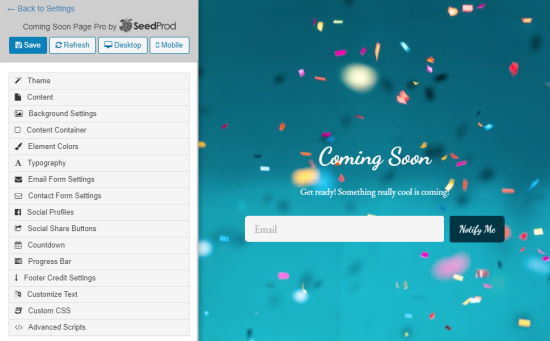
Once you’ve chosen a theme, your page will be automatically created for you, with the header ‘Coming Soon’. We’re using the ‘Party Confetti Celebration’ theme here.

The Party Confetti theme, with colorful confetti in the background

To change the text on the page, click the ‘Content’ tab on the left, and you will see the option to edit the text.

You can also change the order of the different areas of the page by simply moving them up and down under the ‘Sections Order’.

If you want to add extra sections to your maintenance page, you can do that too. Simply close the ‘Content’ tab by clicking on it, and then open the tab for the new section that you want.

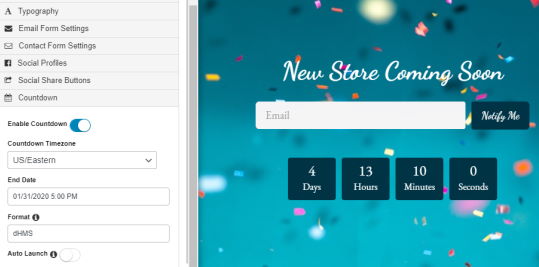
Here, we’re adding a countdown timer to the page. This can be a great way to build excitement when your store is about to launch.

Adding a countdown to your maintenance page

Tip: If you want to launch your store automatically when the countdown finishes, then just turn on ‘Auto Launch’ in the countdown timer settings.

The page you create can act as a type of landing page, allowing you to start building an email list straight away.

When you’re happy with how your maintenance page looks, make sure you click ‘Save’ at the top of the page.

Turn on Maintenance or Coming Soon Mode for Your WooCommerce Store

Now that you have created your custom coming soon or maintenance mode page, let’s go ahead and enable it.

In your WordPress dashboard, go to Settings » Coming Soon Pro.

Under ‘Status’ you can choose either ‘Enable Coming Soon Mode’ or ‘Enable Maintenance Mode’.

Although these terms often get used interchangeably, they each have a different meaning and purpose here.

Coming Soon Mode

If you haven’t yet launched your online shop, you should normally pick ‘Enable Coming Soon Mode’. This mode lets your page start getting indexed by Google, without potential customers being able to view any of the pages.

Coming Soon Mode is for sites that are under construction.

Maintenance Mode

If your store is genuinely down for maintenance, you should normally pick ‘Maintenance Mode’. For instance, if you installed a new plugin that’s caused problems, you might need to take your site down while you fix things.

Maintenance Mode tells search engines that your site is temporarily down, using the special header code 503.

Once you’ve chosen the appropriate option, you need to ensure that just your store is being put into coming soon or maintenance mode, not your entire site.

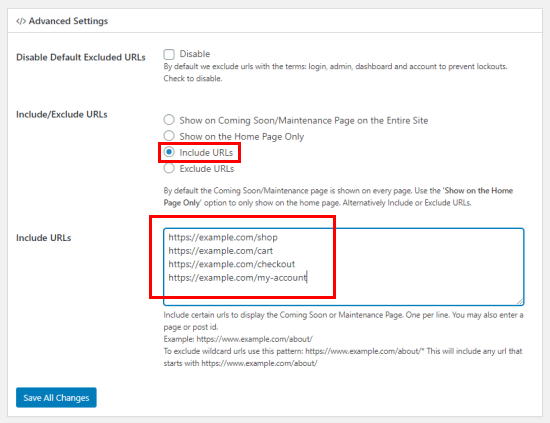
To do this, scroll down to ‘Advanced Settings’ and click ‘Include URLs’.

Enter the URLs you want to include in coming soon / maintenance mode

In the text box, you need to enter the URLs for your WooCommerce store. You’ll want to include all the default WooCommerce pages. (Don’t forget to replace example.com with your own domain name.)

https://ift.tt/1W0hfQd
https://ift.tt/2vkpf9T
https://ift.tt/2TanfZG
https://ift.tt/381t9Sg

If your store has products, then you’ll need to also add these URLs:

https://ift.tt/2TjlGc2
https://ift.tt/2HUvmVa
https://ift.tt/2Th6fRJ

The asterisk at the end of each of those URLs is a wildcard character. That means that the SeedProd will include all URLs that match the pattern before the asterisk.

Once you’ve done this, click the ‘Save All Changes’ button.

Checking Your Store is In Maintenance Mode

Once you’re done, we recommend opening up a guest or incognito browser window where you’re not logged in, and head to your WooCommerce store. You should see the coming soon or maintenance mode page, and not your online store.

Don’t forget to check a page that’s not part of your store, too, to make sure you didn’t accidentally put your whole site into maintenance mode.

Now you can login and work on your WordPress store without worrying about others potentially seeing a broken area on your site while it’s under construction or maintenance.

We hope this article helped you learn how to enable maintenance mode for WooCommerce. You may also want to take a look at our list of the the best WooCommerce plugins, and our complete step-by-step WooCommerce SEO guide for beginners.

If you liked this article, then please subscribe to our YouTube Channel for WordPress video tutorials. You can also find us on Twitter and Facebook.

The post How to Enable Maintenance Mode for WooCommerce appeared first on WPBeginner.


February 26, 2020 at 06:45PM

Tuesday, February 25, 2020

WordPress vs Joomla vs Drupal – Which One is Better?

While WordPress powers more than 35% of all websites on the internet, it’s not the only open-source content management system (CMS) in the market. There are other poplar software like Joomla and Drupal.

All three of them have a lot in common and many significant differences. Each one of them is a unique website builder with pros and cons.

In this article, we will compare WordPress vs Joomla vs Drupal to find out which one is the best choice for you.

WordPress vs Joomla vs Drupal

Note: We are comparing WordPress.org, and not the WordPress.com hosting service. Please see our guide on the difference between WordPress.org and WordPress.com.

What’s Common in WordPress, Joomla and Drupal

All three of the web’s most popular CMS have a lot in common in terms of technology, philosophy, and community.

WordPress, Joomla, and Drupal are released under GNU GPL license

  • WordPress, Joomla, and Drupal are all free and open source software licensed under GPL. See our article on why is WordPress free to learn more about free software.
  • All three of them are written primarily in PHP.
  • They all support MySQL as their database management system. WordPress exclusively supports only MySQL, while Joomla and Drupal support other database management systems.
  • All three of them use themes and templates for visual appearance of sites, and plugins, modules, or extensions for extending features.
  • As open source software, they are all community-driven projects.

While there are a lot of similarities, they are different in many aspects.

For instance, they have different policies about what to include in the core software, how to handle modules and templates, how to deal with security, etc.

These differences make a big impact on users, and how they build their websites.

Having that said, let’s take a look at how WordPress, Joomla and Drupal compare to each other, so you can choose the best website builder platform for your business.

Ease of Use and Beginner Friendliness

Most people creating their websites are not web developers, designers, or programmers. They are average users who just want to build a website. Ease of use is the most important factor for majority of users.

WordPress

WordPress comes with a famous five minute install. Most WordPress hosting providers also offer one click install of WordPress. This makes it fairly easy for a new user start a WordPress blog or website in minutes, not hours.

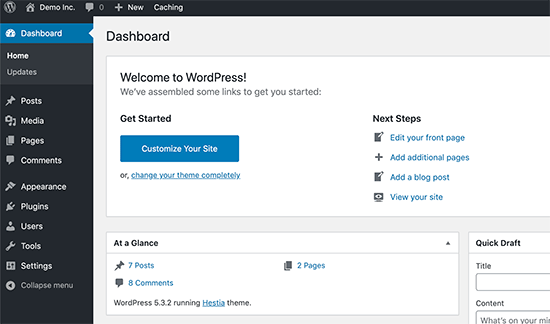
WordPress dashboard

The post-install user experience of WordPress is way better than Joomla or Drupal. The user sees a simple clean-cut user interface with the menus to create posts, pages, or start customizing appearance and themes.

Joomla

Joomla installation may not look as quick as WordPress, but it has very similar steps. Apart from that many shared hosting providers offer one-click install packages for Joomla as well.

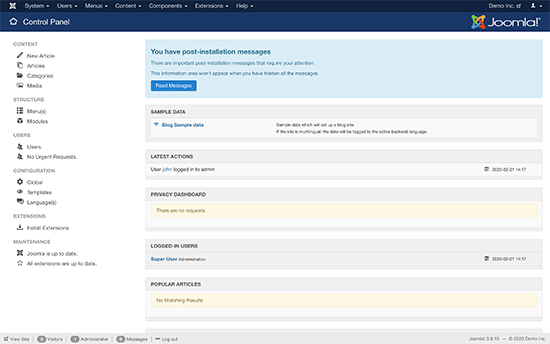
Joomla dashboard after a fresh install

After the installation, the user lands on a control panel that is not as straight forward as WordPress. There are just too many menus to click on and customize your site.

Joomla fans would say that’s because Joomla is a lot more powerful than WordPress, but we don’t believe that to be true.

Drupal

Drupal’s installation is similar to both Joomla and WordPress. Simply download and upload the package and run the installation script.

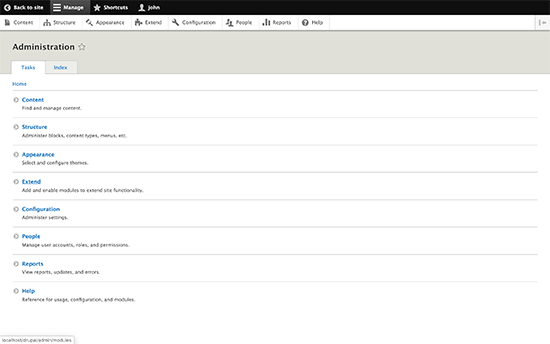
Drupal admin

Drupal also offers distributions. These are pre-packaged Drupal bundles with modules and configurations to create specific types of websites.

The post-installation experience for absolute beginners is a bit complicated. Users will find it difficult to figure out how to change things on their site. Drupal makes it very obvious how to add the content, but changing appearance and adding non-content elements is not very obvious.

Winner: WordPress

Themes and Addons

All three of these popular CMS come with themes and plugins / modules as a way to extend the features and appearance of the software.

Themes control the appearance of your website and how it looks to your users. Plugins or Modules are like apps for your CMS.

Let’s see how these three major CMS software perform in this category.

WordPress

WordPress allows users to change their site’s appearance using themes. WordPress comes with a few default themes pre-installed.

At any time, you can click on the add new button from your Appearance page and install free WordPress themes from the official WordPress.org theme directory.

Wordpress themes

Apart from free themes, you will find many more premium WordPress themes developed by third-party theme shops like StudioPress, Astra Theme, Elegant Themes, and more. These are paid themes and come with premium support options.

The real power of WordPress lies in plugins. There are more than 55,000 WordPress plugins available for free in the official WordPress plugin directory. You can also buy premium plugins that come with paid support provided by plugin developers. Check out our list of must-have WordPress plugins to see how plugins make WordPress awesome.

Joomla

Just like WordPress, Joomla also comes with templates and extensions. There are great extensions to do just about anything from creating an eCommerce store to managing email.

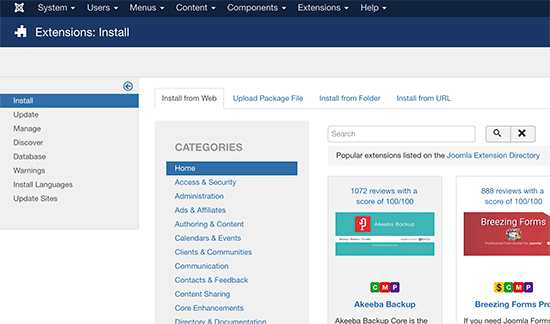
Joomla extensions

However, the quantity of these templates and extensions is not as high as WordPress. This could make finding the perfect template and the perfect extensions a bit difficult.

By default, Joomla does not have a feature that would allow users to search and install extensions or templates from the administration area. There is an extension that allows you to add “install from web” feature for extensions. But for templates, users will still have to manually search templates and then install them by adding their URL.

Drupal

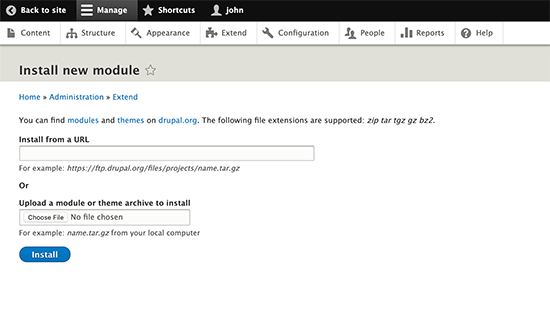
Drupal has the same issue with the availability of themes and modules. Users will have to leave their site, search for the module and theme they want to add, then locate the project’s zip file URL. Finally, they can enter the URL in the Modules or Themes page to install them.

Drupal Modules

There are modules to do just about anything and new ones are added regularly. Still, the overall quantity of modules is lacking when compared to WordPress.

Winner: WordPress.

Support Options

The availability of help and support options is very important for beginner users. There will surely be some hurdles when you are trying new software. That’s ok as long as you can get help.

WordPress

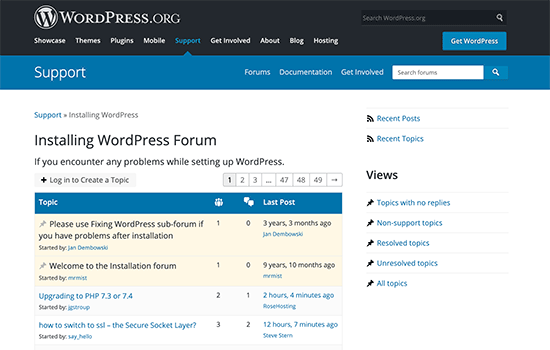
WordPress has a strong community of users. You can find WordPress help on official support forums, docs, handbooks, codex, Slack channels, Stack Exchange, WPBeginner Engage facebook group, and almost every forum on the internet about web design and development.

WordPress support forums

There are sites like WPBeginner, containing hundreds of tutorials, video tutorials, and articles catering to beginner level WordPress users. There are many ways to ask for free WordPress support and get it.

Apart from the free support options, there are ways to get paid support for WordPress as well.

Online platforms like Codeable, UpWork, Fiverr, etc. are just some of the places where you can hire WordPress professionals to help you. Due to the immense popularity of WordPress, finding WordPress developers is easy and affordable for small businesses and individuals.

Joomla

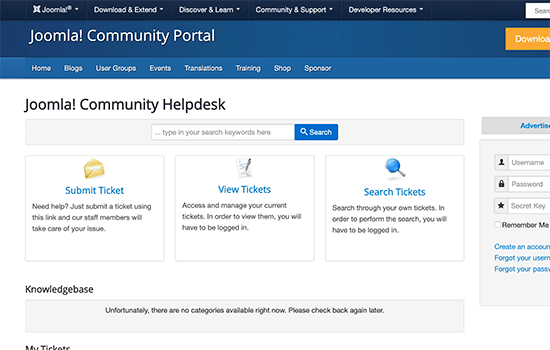
Joomla, just like WordPress has a large and very helpful community. There is extensive documentation on the Joomla website which is a valuable resource for beginners. For more interactive support, users can join forums, mailing lists, user groups, etc.

Joomla support forum

Apart from community support, there are third party resources, paid training, and development agencies that can be helpful.

Unlike WordPress, finding affordable expert help is quite difficult for Joomla. Hiring a developer or expert for Joomla development, troubleshooting or assistance can cost way more than WordPress.

Drupal

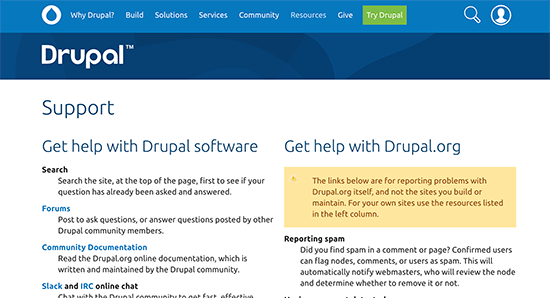
Drupal has a very proactive community of fans and users. You will find all the community support options for Drupal just like WordPress and Joomla. There is extensive documentation, support forum, mailing lists, user groups, irc chatrooms. All good places to get advice and free help.

Drupal community support

Drupal tries to connect users to developers and companies offering professional Drupal services. You may find them in Drupal Marketplace.

However Drupal developer similar to Joomla are very expensive when compared to WordPress.

Winner: WordPress

Localization & Multilingual Support

A large percentage of websites created each day, are non-English or multilingual sites. It is much more likely that many beginners would probably be looking for a CMS that can handle multiple languages or has support for different locales and languages.

WordPress

WordPress does an excellent job of offering a good platform to build a multilingual site. It does not support multiple languages out of the box, but there are some excellent plugins that allow you to easily create a WordPress multilingual site.

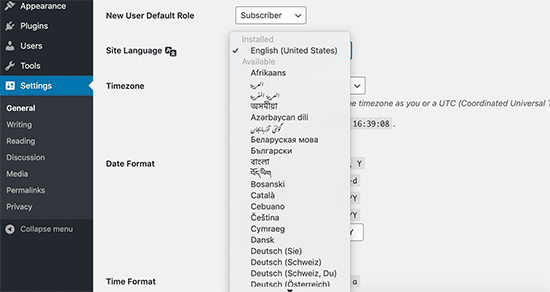
WordPress is available in more than 57 languages. New languages can be installed with just a click from the WordPress admin area.

Select language in WordPress

Most popular themes and plugins are also available in multiple languages. Theme and plugin developers are actively seeking help to translate their packages into other languages.

All these efforts make WordPress a great platform to build a non-English or multilingual website.

Joomla

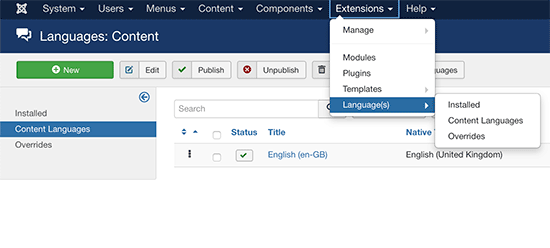
Joomla comes with out of the box capability to handle a multilingual website without installing any extension. Simply go to language manager, add a content language and start creating multilingual content on your website.

Adding language support in Joomla

Translations are also available for the admin interface in many languages and can be easily installed from the admin area.

Drupal

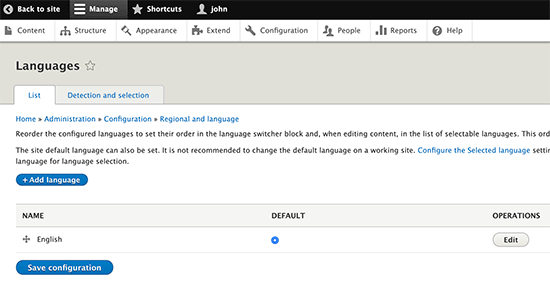
Drupal comes with built-in support to handle non-English or multilingual sites. You will need to enable locale and content translation modules. After that, you can add site and admin interface languages from Drupal’s configuration section.

Drupal multilingual support

Winner: Tie – All three of them support multilingual sites and are available in multiple languages.

Security

Security is a very important factor when choosing a CMS for your website. Almost every website on the internet is vulnerable to security threats.

WordPress

Being the most popular CMS in the world, WordPress based websites are often targeted by hackers. However, WordPress is built on a very secure code, and it responds to security vulnerability very quickly.

WordPress also has an auto-update mechanism which allows WordPress websites to automatically update when there is a new security patch.

WordPress sites can be further secured with automated backups, two-factor authentication, and other WordPress security best practices.

There is also a built-in mechanism to show updates for WordPress themes and plugins. This allows themes and plugin developers to rapidly respond to any security vulnerability.

Joomla

Joomla is very similar to WordPress when it comes to security. They actively respond to any security vulnerability and are very quick to patch it up. However, maintaining a website and installing updates is still up to the user.

There are extensions available to backup your Joomla site. You can also strengthen your Joomla site’s security by following the same best practices as WordPress.

Drupal

Drupal takes a very serious approach to security. They publish security vulnerabilities on their own site as they are discovered and patched. There is a perception that Drupal is more secure because you don’t hear about Drupal sites being hacked as often, but that could because it’s not as popular Joomla or WordPress.

Winner: Tie – All three follow proper security standards.

Conclusion:

Drupal, Joomla, and WordPress are all fantastic content management systems. Drupal and Joomla come with many more built-in features than WordPress.

However, WordPress beats them with its ease of use, huge global community, plugins, and themes. We feel that most non-developer users would find it much easier to build with WordPress than Joomla or Drupal.

With over 55,000 WordPress plugins, you can add just about any feature or build any type of website that you like (without writing code).

Overall Winner: WordPress

How to Get Started With Your Favorite CMS

Whether you choose WordPress, Joomla, or Drupal, you will need a domain name and website hosting to make a website.

Luckily, all three of these top CMS software have quite similar requirements which means all top web hosting companies support them.

We recommend using either Bluehost or SiteGround. They are both among the largest hosting companies in the world and specialize in hosting WordPress, Joomla, and Drupal websites.

For more recommendations, see our complete web hosting guide for beginners.

If you are starting with WordPress, then see our beginner’s guide on how to make a website with step by step instructions.

We hope this article helped you compare WordPress vs Joomla vs Drupal, to find out the best CMS for your site. You may also want to see our comparison of the best email marketing services and best live chat software for small business.

If you liked this article, then please subscribe to our YouTube Channel for WordPress video tutorials. You can also find us on Twitter and Facebook.

The post WordPress vs Joomla vs Drupal – Which One is Better? appeared first on WPBeginner.


February 25, 2020 at 07:00PM