Saturday, June 26, 2021

How to Redirect your 404 page to the Home Page in WordPress

Do you want to redirect your 404 page to your home page in WordPress?

Redirecting your 404 not found pages to your website’s home page can help reduce bounce rate and give your users a chance to discover other useful content on your website.

In this article, we’ll show you how to redirect your 404 page to your home page in WordPress, step by step.

How to redirect your 404 page to the home page in WordPress

Why Redirect Your 404 Page to Your WordPress Home Page?

If you haven’t had the time to create a custom 404 page, then redirecting visitors to your home page can be a great solution.

When a user requests a page that doesn’t exist on your WordPress website, then WordPress will show them a 404 error page instead.

Default WordPress 404 page

Most users who land on the default 404 page will leave your site quickly. This can increase your overall bounce rate and negatively impact your search engine rankings.

One way to keep your users engaged is by redirecting them to another more relevant page. Some website owners choose to take the shortcut and redirect users to homepage.

In the perfect world, you’ll redirect specific 404 error requests to a more relevant page.

That being said, we’ll show you two ways you can redirect your 404 pages to your home page as well as custom pages in WordPress.

Method 1: Redirect All 404 Pages to Home Page in WordPress

This method uses a simple code snippet to redirect all 404 pages to homepage. If you want to see how to redirect individual 404 pages to more relevant pages, see method 2 in this article.

In this method, you need to add code to your WordPress files. If you haven’t done this before, then see our beginner’s guide on pasting snippets from the web into WordPress.

First, you’ll need to create a new file in your WordPress theme folder and name it 404.php. If your theme already has a 404.php file, then you’ll need to edit that file instead.

To edit this file, you need to connect to your WordPress hosting account with an FTP client or their file manager tool.
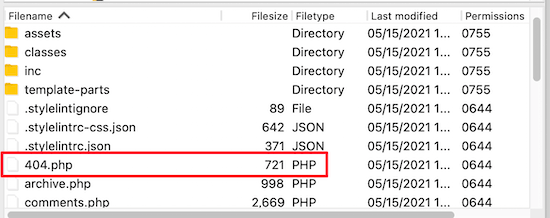
FTP 404 php file

Once you’re connected to your website, you will be able to see your 404.php file in your WordPress themes folder.

You need to add the following code as the first line in your 404.php file:

<?php
header("HTTP/1.1 301 Moved Permanently");
header("Location: ".get_bloginfo('url'));
exit();
?>

Next, you need to save the 404.php file and reupload it to your theme directory using FTP or your hosting control panel.

Now, when a page is not found, instead of showing a 404 page, they will be redirected to your WordPress home page.

Method 2: Use AIOSEO to Set up Custom 404 Page Redirects in WordPress

The best and most SEO friendly way of handling 404 errors is to redirect them to the most relevant page, not just your homepage.

This is where All in One SEO plugin comes in. It’s the best SEO plugin for WordPress used by over 2 million websites.

Their Redirects feature track all 404 page errors and lets you set up smart 404 page redirects in WordPress.

First thing you need to do is install and activate AIOSEO. For more details, see our step by step guide on how to install a WordPress plugin.

Note: there is a free version of All in One SEO, but we’ll be using the pro version since Redirect is a Pro addon.

Once the plugin is activated, you need to go to All in One SEO » Redirects. If you haven’t set up redirects yet, then you need to click the ‘Activate Redirects’ button.
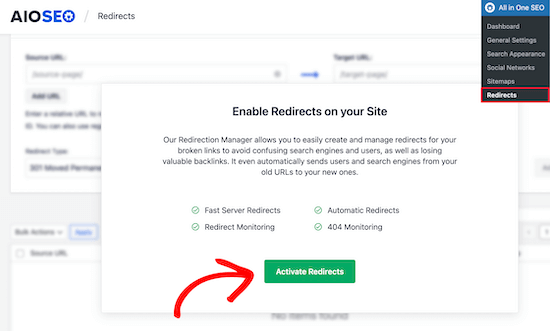
Activate AIOSEO redirects

Once you’ve done that, you need to click on the ‘Settings’ menu item and enable 404 logs.

Next, scroll down until you see the ‘Logs’ section and then click the ‘404 Logs’ toggle, so it turns blue.
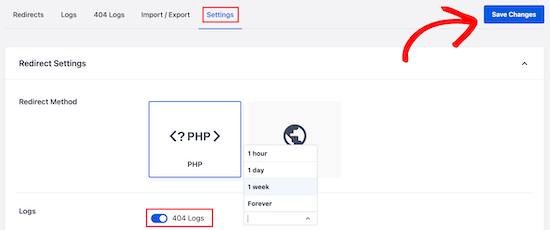
Enable 404 logs

Your 404 logs are a record of URLs that your visitors have tried to use to visit pages that no longer exist on your site.

You can choose how long you want the plugin to record your logs by selecting the time period from the drop down menu.

Make sure you click ‘Save Changes’ before moving on.

After that, click on the ‘404 Logs’ menu option to see the last accessed 404 page. Remember, since you just enabled logging, it may not display anything right away. Give it up to 24 hours to see more useful insights there.

Click 404 logs menu option

The ‘URL’ column will show you the 404 page the user tried to visit. You need to click the ‘Add Redirect’ link in the ‘Redirect’ column.

This will create a drop down where you can enter your redirect information.

For best results, you need to enter the most relevant page to the original query in the ‘Target URL’ box and then click ‘Add Redirect’.

Add home page redirect

For example, if you had a tutorial on how to start a WordPress blog that you deleted and updated with a new one, then it’d be best to redirect that old URL to the new blog post rather than your homepage.

To add multiple 404 page redirects, simply follow the same steps as above.

Remember, generally you don’t want to redirect your 404 page to your home page forever. It’s a great temporary solution, until you create a custom 404 page that will convert better or simply redirect users to a more relevant page.

We hope this article helped you learn how to redirect your 404 page in WordPress. You may also want to see our guide on the best drag and drop WordPress page builders to create custom 404 pages and our expert picks of the must have WordPress plugins for businesses.

If you liked this article, then please subscribe to our YouTube Channel for WordPress video tutorials. You can also find us on Twitter and Facebook.

The post How to Redirect your 404 page to the Home Page in WordPress appeared first on WPBeginner.


June 26, 2021 at 02:00PM

Friday, June 25, 2021

12 Top Domain Name Extension List 2021 (TLDs, gTLDS, ccTLDS)

Are you wondering which are the most popular domain name extensions?

Choosing a new domain name is a very important decision for every business. Your domain name extension is a big part of this decision and can influence your brand identity.

In this article, we will share the top domain name extensions, so you can choose the perfect extension for your new domain name.

Top domain name extensions list (tlds, gtlds, cctlds)

What are Domain Name Extensions?

Domain name extensions, also called top level domains (TLDs), are a part of the domain name that’s to the right of the dot. So, with “wpbeginner.com”, the domain name extension is “.com”.

The right domain name extension can make it easier for people to find your WordPress website.

There are hundreds of different domain name extensions to choose from.

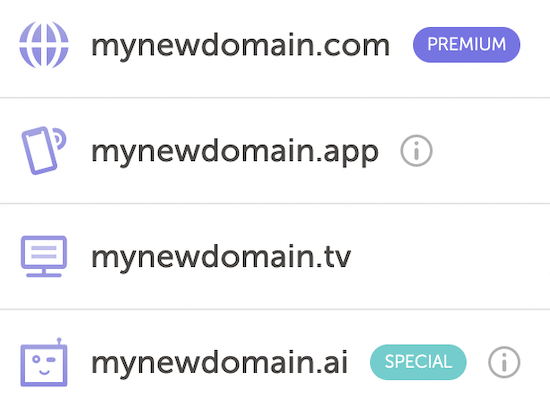
Domain name extension list sample

The two main types of top level domains are generic top level domains (gTLDs), and country code top level domains (ccTLDs).

  • Generic top level domains (gTLDs) are the most common type of domain extensions including .com, .net, etc.
  • Country code top level domains (ccTLDs) are commonly reserved for certain countries, but these can be used in certain cases, as you’ll see below.

Beyond the top domain name extensions, there are hundreds of additional new domain name extensions, like .app, .technology, .guru, and more.

Choosing a new domain extension like these won’t negatively impact your SEO, but it can impact your overall discoverability since these extensions are not as popular as the well known ones like .com or .net.

For most people who’re just getting started with a new WordPress blog, we recommend choosing a top domain name extension, so your website visitors will recognize it more easily.

That being said, let’s take a look at the top domain name extensions you can choose for your new domain name.

Top Domain Name Extension List

There are hundreds of different domain name extensions out there today, with more being added all the time.

It’s important to choose a domain name extension that is both popular and matches your brand.

Note: if you want to register a new domain, then we recommend using Domain.com, it’s one of the best domain name registrars and lets you register every popular domain name extension. You can also follow our guide here to learn how to get a free domain name.

1. .Com Domain Name Extension

The .com domain extension is the most popular TLD available.

It was initially used by for profit businesses, but it has become the most popular domain name extension in the world. Over half of websites on the internet use the .com domain name extension.

We use the .com domain name extension here at WPBeginner, and our other companies.

The .com is the most natural extension for visitors to type in when it comes to domain names. If they’re guessing your domain, then they will probably try the .com first.

If a .com version of your domain is available, then this should be your first choice.

2. .Net Domain Name Extension

The .net domain was originally used by ISP (Internet Service Providers) and network services. However, it has grown to become the most popular alternative to the .com domain name extension.

It’s a great choice for technology / online companies since it refers to networks, tech, and other web-based businesses.

Popular websites like Behance.net and Sourceforge.net use this domain name extension.

You can always purchase multiple domain name extensions and forward them to your primary domain name. For example, if you type “wpbeginner.net” into your browser bar, then it automatically forwards to “wpbeginner.com”

3. .Org Domain Name Extension

The .org domain name extension was created for nonprofit organizations. However, it’s now available to most business owners today.

This is a standard domain name extension for nonprofits, political parties, and website owners who want to establish themselves as a source for trustworthy information.

The .org domain extension is associated with brands like Wikipedia, WordPress.org, and more.

It’s also less popular than .com, so there’s a better chance the perfect domain name will be available.

4. .Co Domain Name Extension

The .co domain extension is the country code domain name extension (ccTLD) for Colombia. However, it has become a popular domain name extension for startups and other web based businesses.

The .co TLD is a common acronym for companies and corporations, so it’s easy to see why it’s becoming popular for online startups.

The .co domain name extension is similar to the .com extension, but it’s shorter and can be seen as being more trendy.

5. .Edu Domain Name Extension

The .edu domain name extension is for educational institutions and universities.

To use this domain name extension, you need to operate or be part of an accredited educational institution.

.Edu domain name registrations are managed by a third party organization called EduCause to verify the accreditation.

Note: you can create your own virtual classroom using WordPress. For more details, see our guide on how to run a virtual online classroom using WordPress tools.

6 .Us Domain Name Extension

The .us domain name extension is pretty popular as well. This domain name extension can only be registered by citizens and business entities based in the United States of America.

It’s a common choice for US-based non-profits, corporations, and full time US residents.

It used to only be available to government organizations, but this requirement has been lifted.

If your new website or business is very American-focused or patriotic, then this could be a good domain worth using.

7. .Me Domain Name Extension

.Me is a country code domain name extension (ccTLD) for the country of Montenegro.

But, it’s often used for personal or portfolio websites.

If you want to build a simple portfolio or site using your name, then the .me domain extension can be good for branding.

8. .Cn Domain Name Extension

The .cn domain name extension is for the country of China. Since China has the world’s largest population, it makes sense that this domain name extension is prevalent.

A country code top-level domain name can be helpful if you have a business tied to a certain area of the world.

9. .Uk Domain Name Extension

The .uk domain name extension is the ccTLD for the United Kingdom. This is a very widely used extension for UK-based businesses. It’s used by the major news outlet BBC.co.uk.

The other variation is ‘.co.uk’, which is the first version of the extension.

If you register this top level domain, then you can register both ‘.uk’ and ‘co.uk’ together.

10. .De Domain Name Extension

The .de domain name extension is a ccTLD for the country of Germany. By registering the ‘.de’ domain name extension, you can build trust with potential German visitors.

This domain name extension has been widespread across the internet for a very long time.

It’s currently available for anyone to register, no matter what country you live in.

11. .Ly Domain Name Extension

The .ly domain name extension is the ccTLD for the country of Libya. However, it’s grown in popularity over the years thanks to URL shorteners like Bit.ly and other new startups.

It can be a great domain name extension to build a strong and unique brand, especially if you’re launching a new app or technology website.

12. .In Domain Name Extension

The .in domain name extension is the ccTLD for the country of India.

This domain name extension is becoming more popular and is an excellent fit for businesses serving the Indian market.

Anyone can register this domain name, no matter where in the world you live. It’s a shorter domain name so that it can be used for creative branding too.

Registering a New Domain Name

There are two different ways you can get a domain name.

Choose the method that works best for you.

1. Get a FREE Domain Name with Bluehost

If you want to create a website, then you need website hosting plus a domain name.

For more details, see our guide on the difference between a domain name and website hosting.

Typically, a domain name will cost around $14.99 per year and $7.99 per month for hosting. When you’re just starting, this can be expensive.

Luckily, we’ve worked out a deal with Bluehost to offer our readers a free domain name and a 65% discount on web hosting.

→ Click Here to Claim Your Free Domain Name ←

2. Register a Domain with Domain.com

If you don’t want to create a website right away, then you can still register a domain name and build a website later.

We recommend using Domain.com. They’re one of the best domain name registrars offer features like private registration, easy transfers, WHOIS privacy protection, and much more.

Domain.com register domain

To get a 25% discount on your domain name, make sure to use our Domain.com coupon code.

If this is your first time registering a domain name, then see our step by step guide on how to register a domain name.

We hoped this article helped you choose the right domain name extension for your next domain name. You may also want to see our business name generator tool to come up with business ideas, and our expert picks of the best WordPress hosting companies to start your website.

If you liked this article, then please subscribe to our YouTube Channel for WordPress video tutorials. You can also find us on Twitter and Facebook.

The post 12 Top Domain Name Extension List 2021 (TLDs, gTLDS, ccTLDS) appeared first on WPBeginner.


June 25, 2021 at 04:00PM
Thursday, June 24, 2021

How to Set Up a Site Like Teachers Pay Teachers with WordPress

Do you want to set up a website like Teachers Pay Teachers using WordPress?

Teachers Pay Teachers is an online marketplace for educators where they can sell educational resources to other teachers. The platform makes money by selling memberships and taking a small fee on transactions.

In this article, we’ll show you how to easily create a website like Teachers Pay Teachers in WordPress.

Setting up a website similar to Teachers Pay Teachers (TPT) using WordPress

Getting Started with Your Teachers Pay Teachers Like Website

To make a Teachers Pay Teachers like website in WordPress, you’ll need a few things to get started.

First, you’ll need a domain name (example: wpbeginner.com) and a web hosting account to store your website files.

Normally, a domain name will cost you 16.99 per year and web hosting starts at $7.99 per month (paid annually). Now if you are just testing the waters, then this may sound a little expensive.

Luckily, Bluehost has agreed to offer WPBeginner users a generous discount with a free domain name and an SSL certificate. Basically, you’ll be able to get started for $2.75 per month.

→ Click Here to Claim This Exclusive Bluehost Offer ←

After sign up, Bluehost will automatically install WordPress for you. You’ll be able to login to your WordPress website from your hosting account dashboard.

Next, you need to set up a WooCommerce store on your website. This will allow you to convert your website into an eCommerce platform and accept online payments from your customers.

For complete step by step instructions, see our tutorial on how to create an online store.

Step 2. Converting your Website into a Marketplace for Educators

Now that you have set up an online store, you’ll need to open it up for other educators to create an account and list their resources for sell.

By default, WooCommerce is a single vendor eCommerce store. In order for other teachers to sell their resources, you’ll need to convert it to a multi-vendor marketplace.

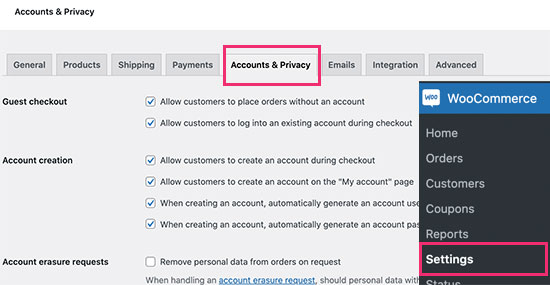
First, you need to visit WoooCommerce » Settings page and switch to the ‘Accounts & Privacy’ tab.

Opening user registration in WooCommerce

From here you need to check the boxes to allow users to register and allowing users to register on the ‘My Account’ page.

Don’t forget to click on the Save changes button to store your settings.

Next, you need to install and activate the WC Vendors plugin. For more details, see our step by step guide on how to install a WordPress plugin.

WC Vendors allows you to convert your WooCommerce store into a multi-vendor platform.

Upon activation, the plugin will ask you to install WC Vendors marketplace plugin. This is the limited free version of the plugin that acts as the base for the pro version. The free version lacks all the features you’ll need to create a professional marketplace platform that’s why you need to have both items installed.

Next, the plugin will show you a set up wizard which you can skip as we will show you how to manually set up the plugin.

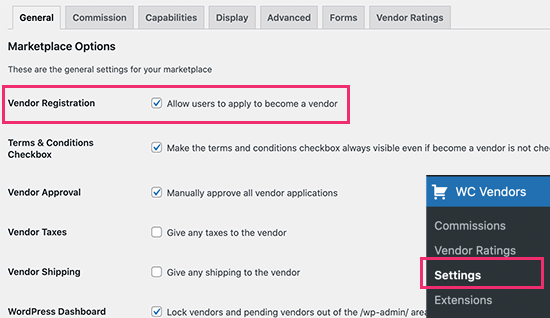
After that, you need to visit the WC Vendors » Settings page to configure plugin.

Allow vendor registration

From here, you need to check the box next to the ‘Allow users to apply to become a vendor’ option. This will allow teachers to register as a vendor on your platform.

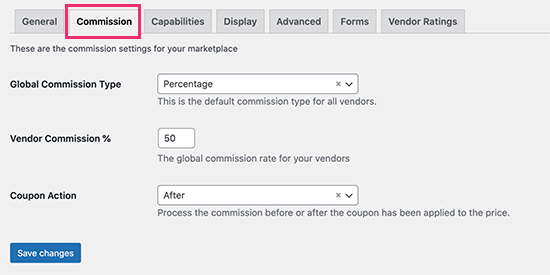
After that, you need to switch to the Commission tab and set up the default commission you want to pay to the sellers.

Set commission default

There are a number of ways you can set up commission including percentage, fixed amount, percentage + fee, based on total sales, and more.

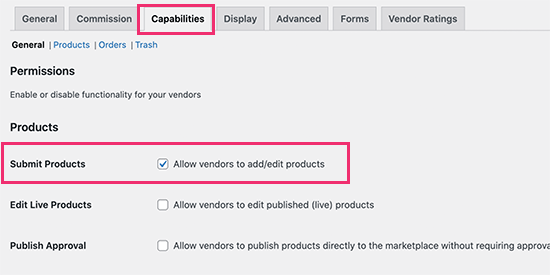
Next, you need to switch to the Capabilities tab. From here, you can choose how other educators will add their products on your website.

Allow vendors to add and edit products

From here you need to check the box next to the ‘Allow vendors to add/edit products’ option. By default, all products on the website will need to be approved first.

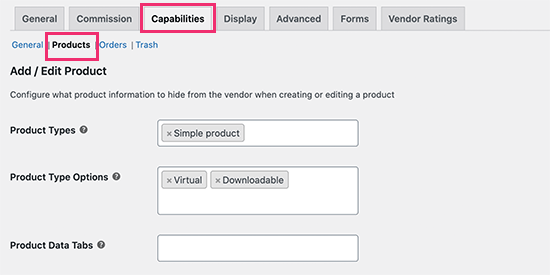
Next, click on the ‘Products’ link at the top and select which type of products vendors can add.

What types of products educators can add

You can choose Simple Product type with Virtual and Downloadable product type options. This would allow teachers to upload their resources in downloadable format which other teachers can buy.

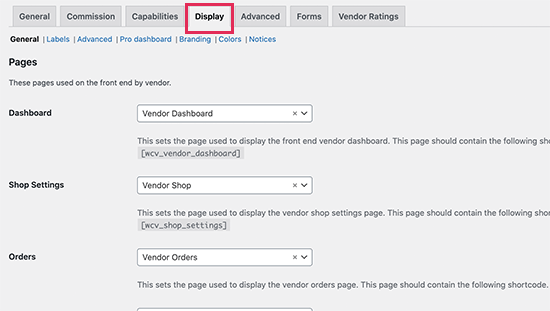
Next, you need to switch to the Display page. From here, you will need to set up pages that will be used for crucial sections of your marketplace platform.

Add shortcode to pages

For each option, you need to copy the shortcode shown below it. After that, create a new page in WordPress and paste the shortcode in the content area.

For instance, we created a page called Vendor Dashboard and then placed the shortcode [wcv_vendor_dashboard] inside it.

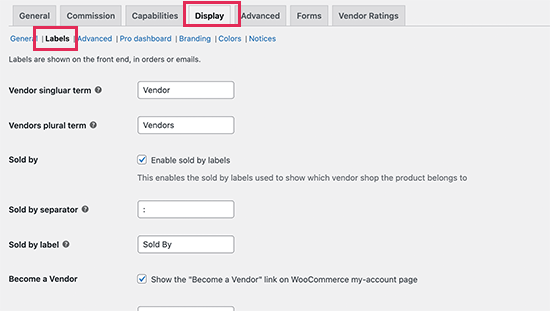
Don’t want to use ‘Vendors’ as label for sellers? Don’t worry you can name your pages whatever you like. You can also tell the plugin what label to use by clicking on the Labels link.

Change labels

Don’t forget to click on the Save changes button to store your settings.

Step 3. Adding Links to Your Marketplace in Navigation Menus

Now that you have set up an online marketplace for teachers, you can go ahead and the links to the signup and account management pages to your website.

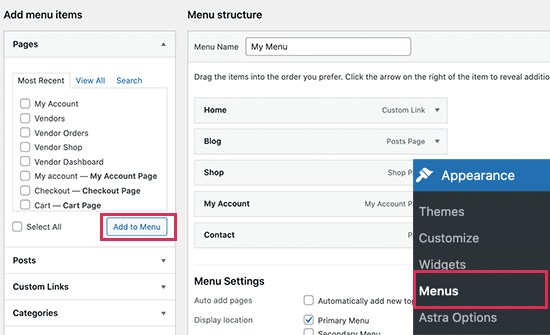
Simply go to the Appearance » Menus page and add the My Account page to your navigation menu.

Add marketplace links to your navigation menu

You can change the label of My Account page to anything you want and even add it as a button in navigation menu.

Additionally, don’t forget to add shop page to your navigation menu where users can view available resources that they can buy.

Once finished, click on the Save Menu button to store your changes.

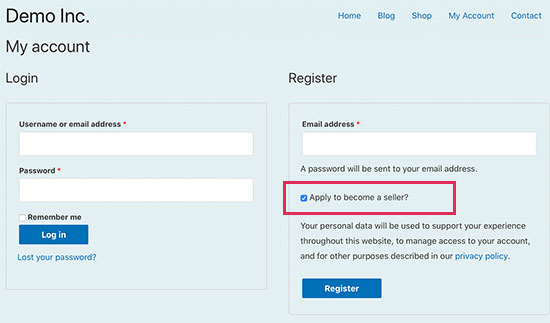
You can now preview your website to see your navigation menu in action. Clicking on the My Account page will take the non-logged in users to Login / Registration page.

Seller registration page

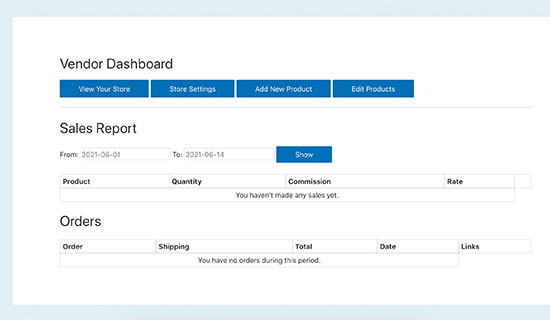
Users can now register on your website and apply to become a vendor or seller. After that, they will be able to access their Vendor dashboard and add their own products to be sold on your website.

Seller dashboard

Step 4. Approving Products Submitted by Sellers

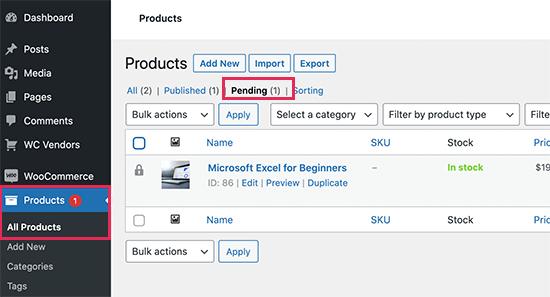
As users register and submit their own resources to be listed as products on your website, you will see a notification on the Products label in your WordPress dashboard.

Pending products

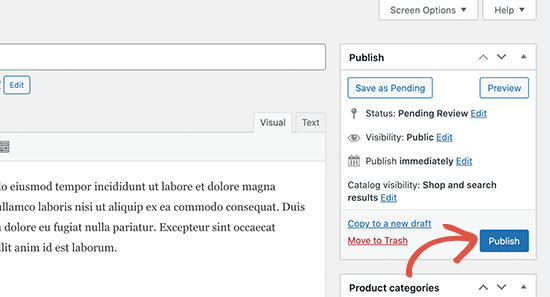
From here you can edit a pending product and review its description and details. If everything looks ok, then you can go ahead and publish the product to be listed on your website.

Publish pending product

These resources will now appear as product on your Shop page with a ‘Sold by:’ label with the seller’s name.

Seller products listed in your store

Users can now buy these resources from your website like they would buy any other product.

Step 5. Paying Sellers on Your Website

As the platform service provider, you’ll be accepting online payments from your customers. WooCommerce provides a bunch of payment gateways including PayPal and Stripe to accept payments.

Once you have sold enough products, you will need to set up a payment solution to pay the vendors their commission.

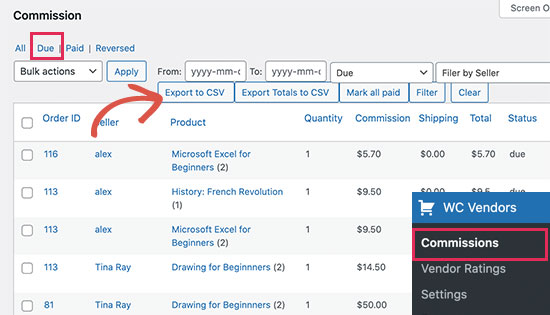
The easier and more reliable method is to export all unpaid transactions to a CSV file by visiting WC Vendors » Commissions page.

Paying the sellers

You can then process the payments manually using PayPal or Bank transfers.

This allows you to see how each seller is doing on your website and allows sellers to make enough sales and ratings before they get paid.

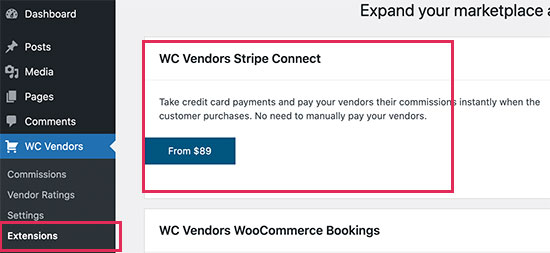
You can also automate this process by installing plugin’s Stripe Connect extension. Go to the WC Vendors » Extensions page and to install the WC Vendors Stripe Connect extension.

Connect Stripe to pay vendors

Step 6. Promoting Your Marketplace to Grow Your Business

Now that your marketplace for teachers and educators is set up, the final step is to start promoting your website.

There are multiple tools and plugins that you can use to grow your business online. Here are some of the must have tools and plugins that you can start using rightaway.

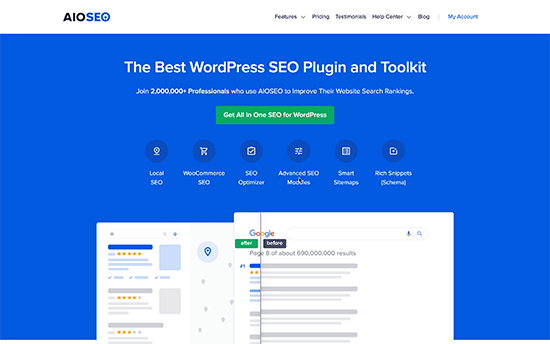
1. All in One SEO for WordPress

All in One SEO for WordPress

All in One SEO for WordPress is the best WordPress SEO plugin on the market. It allows you to easily optimize your website for search engines and social media platforms.

It comes with built-in WooCommerce SEO support for your products. It includes powerful schema markup which makes your search listings appear with rich snippets leading to higher organic click through rates.

2. OptinMonster

Get OptinMonster

OptinMonster is the #1 conversion optimization and lead generation software in the world. Basically, it helps you convert website visitors into paying customers.

It comes with tools like lightbox popups, countdown timers, spin to win, header and footer banners, and more. All of them help you nudge visitors into making a purchase.

3. SeedProd

SeedProd website

SeedProd is the best WordPress page builder plugin on the market. It allows you to quickly create professional looking web pages for your website regardless of which WordPress theme you are using.

Plus, it works really well with WooCommerce allowing you to create highly optimized product pages, landing pages, sales and marketing pages. It is really easy to use with an intuitive drag and drop interface.

4. MonsterInsights

MonsterInsights

MonsterInsights allows you to easily track your website visitors using Google Analytics. It comes with powerful eCommerce tracking feature which helps you see which products are performing well on your eCommerce marketplace.

It also helps easily track conversions which gives you a clear picture of what’s working on your website. You can then plan and adjust your marketing strategy accordingly.

We hope this article helped you learn how to easily create a Teachers Pay Teachers like eCommerce marketplace using WordPress.

You may also want to see our complete WordPress SEO guide and take a look at these practical tips to easily grow your website traffic.

If you liked this article, then please subscribe to our YouTube Channel for WordPress video tutorials. You can also find us on Twitter and Facebook.

The post How to Set Up a Site Like Teachers Pay Teachers with WordPress appeared first on WPBeginner.


June 24, 2021 at 04:00PM

Wednesday, June 23, 2021

How to “Easily” Create Custom WooCommerce Thank You Pages

Do you want to easily create a custom WooCommerce thank you page?

A custom thank you page for order confirmation is a great way to connect with your new customers and even get additional sales.

In this article, we’ll show you how to create a custom WooCommerce thank you page, step by step.

How to easily create custom WooCommerce thank you pages

Why Customize a WooCommerce Thank You Page in WordPress?

Creating a custom WooCommerce thank you page gives you a way to connect with your customers when they make a purchase.

The order confirmation or thank you page may seem like a small part of your online store, but it can actually be a very valuable part of your sales process.

The problem is that default WooCommerce thank you page isn’t really optimized for conversions.

This is why smart business owners build a well-designed and high-converting thank you page to replace the default option.

Thank you page example

There are a lot of ways you can use WooCommerce thank you pages:

  • Recommend upsell products and make more sales
  • Offer coupon codes for repeat purchases
  • Highlight your best selling products
  • Direct customers to your most useful content

With that said, let’s show you how to easily create a custom WooCommerce thank you page, step by step.

How to Easily Create Custom WooCommerce Thank You Pages

SeedProd is the best drag and drop WordPress page builder used by over 1 million websites. It lets you easily create a custom WooCommerce thank you page to boost sales and grow your customer relationships.

The first thing you need to do is install and activate the plugin. For more details, see our step by step guide on how to install a WordPress plugin.

Note: there is a free version of SeedProd available, but we’re going to use the Pro version since it includes the WooCommerce blocks we need.

Once the plugin is activated, you need to go to SeedProd » Settings and enter your license key.

Enter SeedProd license key

If you don’t have this ready, then you can find your key in the account section of the SeedProd website.

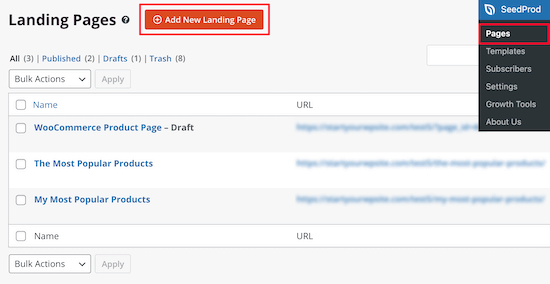
After that, navigate to SeedProd » Pages and click the ‘Add New Landing Page’ button to create your new thank you page.

Add new SeedProd landing page

On this page, you’ll need to choose a template. You’ll find dozens of professionally designed thank you page templates to choose from.

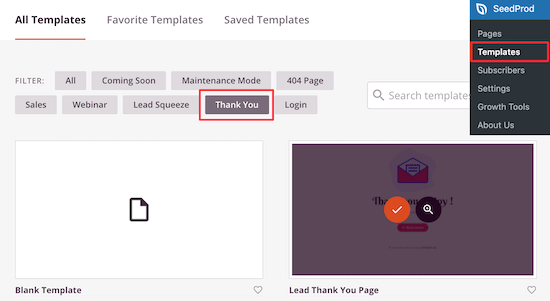
Simply select the’ Thank You’ page filter and find the ‘Order Completed Thank You Page’ template.

Select thank you page filter

Then, hover over it and click the ‘Checkmark’ icon.

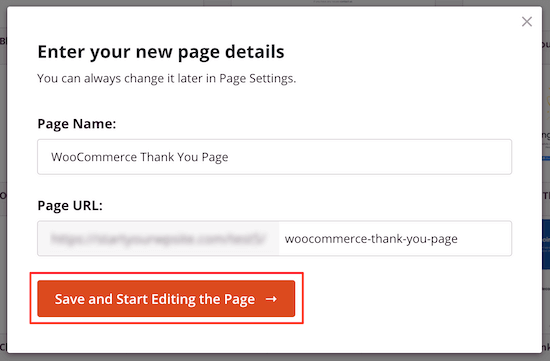
After that, you need to name your new thank you page and then click ‘Save and Start Editing the Page’. The name you give the page will also be the URL.

Name thank you page

Now, it’s time to start editing your thank you page with the drag and drop builder.

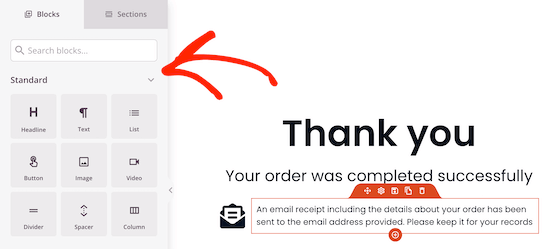
You’ll see a live preview of your page on the right. To edit the page element, simply click on the item, and an editing menu will appear on the left.

The left hand options panel has elements you can drag and drop onto your order confirmation page.

Thank you page editor

Now, we’ll start adding a few blocks and making some customizations to make it more like a WooCommerce thank you page.

First, we’ll add an upsell block to cross-promote another product. This is a great way to generate more sales for your store.

When someone completes a purchase, they’re more likely to buy again, especially if it’s related to what they just bought.

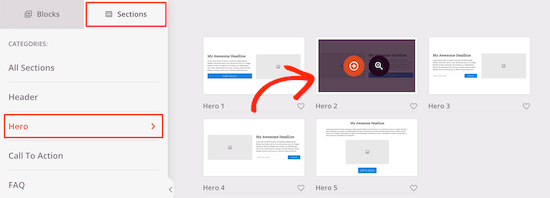
To do this, click on the ‘Section’ option in the left hand menu. This will bring up a screen that has different content sections. Select the ‘Hero’ option and then choose ‘Hero 2’ by clicking the ‘Plus’ icon.

Select hero 2 block

This will insert the section into your page.

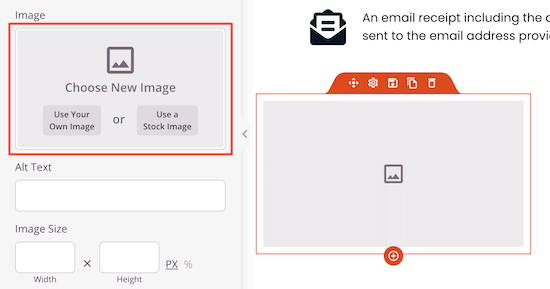
Now, click the image icon and insert an image of the product you want to promote.

Insert image upsell

Then, do the same for the product title and the product copy.

After that, delete the button by hovering over it and clicking the ‘Delete Block’ icon.

Delete button block

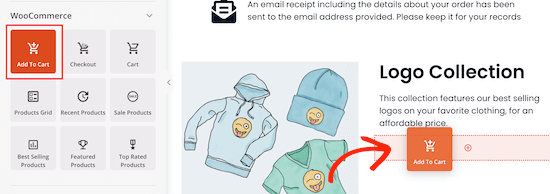
Next, drag over the ‘Add To Cart’ block in the ‘WooCommerce’ section.

This replaces the old button with one that connects to your WooCommerce product.

Drag add to cart block

After that click the ‘Add To Cart’ button to bring up the editing menu. You need to enter your ‘Product ID’, so it will automatically be added to your customer’s cart.

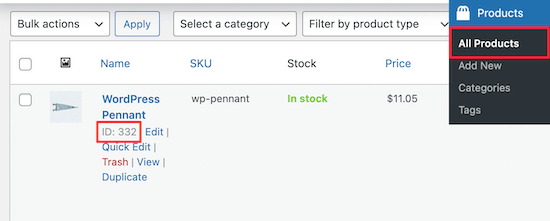
If you don’t know your product ID, then you can find it by navigating to Products » All Products and locating your product.

Locate product ID

Then, navigate back to the editor, enter your product ID, and turn on the ‘Direct to Checkout’ slider.

You can also fully customize the button’s appearance, add sub text, change the color, and more.

Enter product ID to checkout

After that, add a heading to promote your upsell product.

Click on the ‘Headline’ block and drag it above your upsell product. Then, add your enticing tagline.

Add headline block

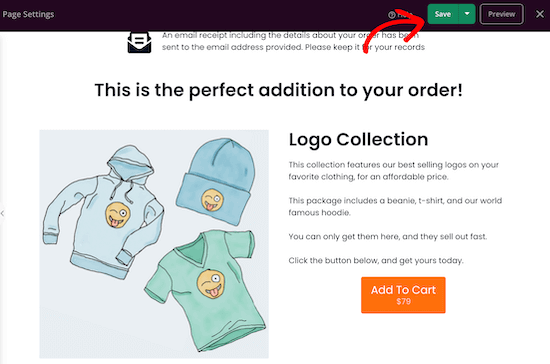
Once you’re done making changes make sure to click ‘Save’, or the drop down to ‘Publish’, if you want to make your page live.

Save or publish changes

Add a Repeat Purchase Coupon Code in WooCommerce

You can give your customers a unique coupon code that offers them a discount for rebuying the product.

Coupon codes are one of the best ways to get your customers to make another purchase. WooCommerce has standard coupons, but they’re pretty limited.

We recommend using the Advanced Coupons plugin. It’s the best WordPress coupon code plugin for your online store and is very beginner-friendly.

For more details on setting up the plugin, see our guide on how to create smart coupons in WooCommerce.

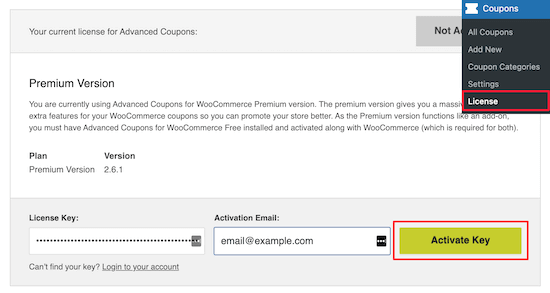
Upon activation, navigate to Coupons » License and enter your product license key and activation email, then click ‘Activate’.

Activate Advanced Coupons

Then, navigate to Coupons » Add New to create a new coupon.

First, you can click ‘Generate coupon code’ or create your own coupon code name.

Add new coupon code

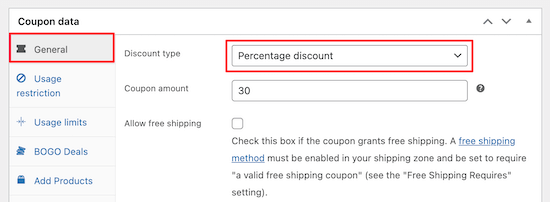
Once you’ve done that, locate the ‘General’ tab, here you’ll create your discount.

Select the ‘Percentage discount’ option and enter the percentage discount.

Choose percentage discount

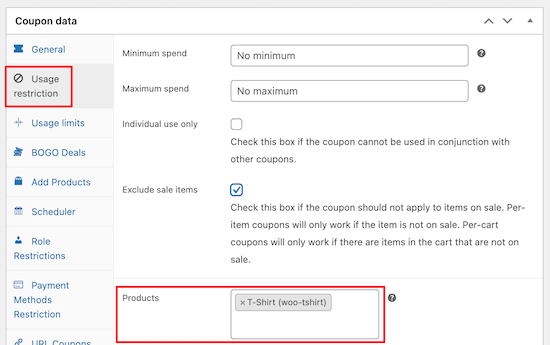
Next, you need to click on the ‘Usage restriction’ tab.

Then, select the product you want the discount to apply in the ‘Products’ box.

Select coupon product

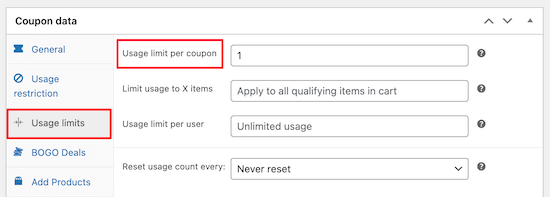
After that, click the ‘Usage limits’ tab.

In the ‘Usage limit per coupon’ box, enter 1. This limits how many times the coupon can be used.

Limit coupon use

Make sure you click ‘Publish’ or ‘Save’ before exiting the screen.

Once you’ve done that, go back to the SeedProd editor.

You can add the coupon code to your existing WooCommerce thank you page or create a new thank you page.

We will add the coupon code to our existing thank you page to give our customers another bonus.

In the page editor, click on the new block section and then choose your layout.

Choose block layout

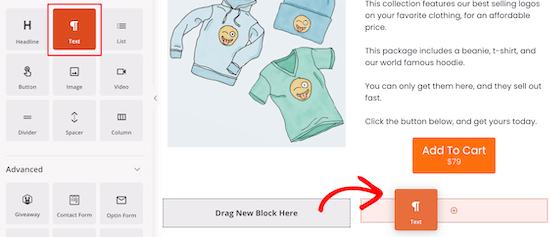
Next, select the ‘Text’ block and drag it onto the page.

Here is where you’ll enter your coupon code text.

Select text block

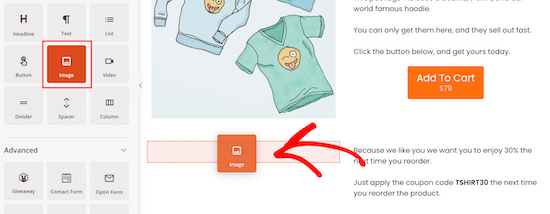
In the other block, you can add an image of the product they just purchased.

Simply drag the ‘Image’ block into the page editor and then upload your product image.

Select image block

After that, you need to add a headline block so your customers know about the coupon code.

Just drag over the headline block and add your headline.

Select headline block

Here’s how the coupon code will display.

You can continue to customize this as much as you’d like.

Display coupon code

Add a Best Selling Products Grid in WooCommerce

By adding your best selling products to your thank you pages, you can make more sales easily.

These products are proven to sell, so there’s already a good chance your customers are ready to buy.

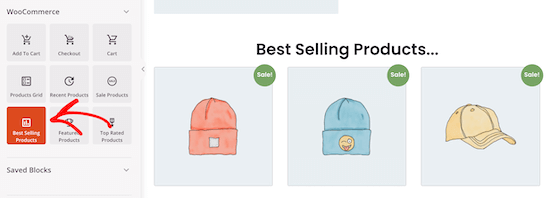
To do this, simply drag over the ‘Best Selling Products’ block from the ‘WooCommerce’ section.

Select best selling products block

There are many other types of product grids you can add, like sale products, top rated products, recent products, and more.

For more details on adding best selling products in WooCommerce, see our guide on how to display popular products in WooCommerce.

Pro tip: you can setup WooCommerce conversion tracking to monitor clicks and conversions to make even more sales from your WooCommerce thank you pages.

Redirect the Default WooCommerce Thank You to Your New Page in WordPress

Once you’ve published your thank you page live you need to redirect this page in WooCommerce.

That way, when your visitors complete a purchase they will actually be redirected to your new page.

You can do this by modifying your WordPress theme files. However, the easiest way is using a WordPress plugin.

We recommend using the free Thanks Redirect for WooCommerce plugin, it’s very simple to use and will help you add the redirect simply.

First thing you need to do is install and activate the plugin. For more details, see our step by step guide on how to install a WordPress plugin.

Upon activation, navigate to WooCommerce » Settings and then click on the ‘Products’ tab.

Go to thanks redirect options

After that click the ‘Thanks Redirect for WooCommerce’ link.

Once you’ve done that, click the ‘Enable Global Redirect’ box and enter your new WooCommerce page URL into the ‘Thanks Redirect URL’ box.

Enter URL and save new page

Then, click ‘Save Changes’ and your new thank you page will redirect when your customers complete an order.

We hoped this article helped you create custom WooCommerce thank you pages. You may also want to see our list of the best WooCommerce plugins for your store and our WooCommerce SEO guide to get more traffic.

If you liked this article, then please subscribe to our YouTube Channel for WordPress video tutorials. You can also find us on Twitter and Facebook.

The post How to “Easily” Create Custom WooCommerce Thank You Pages appeared first on WPBeginner.


June 23, 2021 at 04:00PM