Wednesday, November 24, 2021

How to Add a Search Form in a WordPress Post With a Shortcode

Do you want to add a search form to a WordPress post?

Adding a search form to your post or page content is a good way to encourage your visitors to find more content and stay on your website longer.

In this article, we’ll show you how to add a search form in your posts and pages using a WordPress search shortcode.

How to Add Search Form in Your Post with a WordPress Search Shortcode

Why Add a Search Form to Your Posts and Pages?

If a visitor has enjoyed reading a post on your WordPress blog, then they will likely want to read more. Offering a search form in the post will help them find more of your content that they are interested in.

When you make it easy for users to spend more time on your website, you can increase your pageviews and reduce your bounce rate.

Your visitors are also more likely to join your email list, leave a comment, make a purchase, and follow you on social media.

In this tutorial, we’ll show you how to add the standard WordPress search form to your posts. If you want to add a custom search form, then see our step by step guide on how to create a custom WordPress search form.

We’ll show you two methods to add a search form to your posts, and the first is the simplest. Use the links below to jump to the method you’d like to use.

Method 1: Adding a Search Form with a Plugin

The easiest way to add a search form to your posts is by using the SearchWP plugin. It’s the best search plugin for WordPress used by over 30,000 sites.

Setting Up SearchWP

The first thing you need to do is install and activate the plugin. For more details, see our step by step guide on how to install a WordPress plugin.

Upon activation, you need to visit the Settings » SearchWP page and then click on the ‘License’ menu option.

Enter SearchWP license key

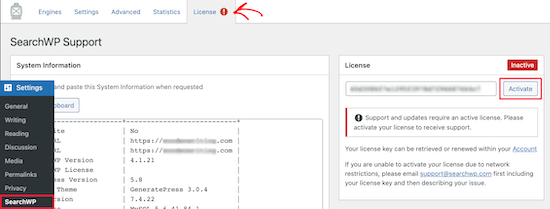
You then need to enter your license key in the License box. You can find this information in your account on the SearchWP website. After that, you should click the Activate button.

Next, you need to click on the Engines menu option. This brings you to a screen where you can choose your search engine settings.

SearchWP engines settings

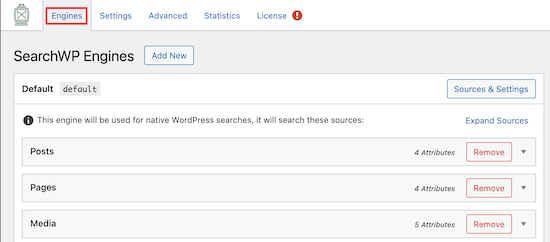
Here you need to create a site-wide search engine. You can adjust your search engine settings by clicking on the Posts, Pages and Media drop downs.

The Attribute Relevance sliders in each section adjust how the search engines value and rank content. For example, if you want to value the post title higher than the content, then you can adjust the sliders accordingly.

Adjust SearchWP slider settings

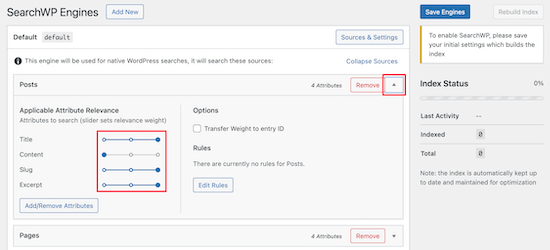
After you’ve finished adjusting the settings, make sure to click the ‘Save Engines’ button to save the default search engine.

Adding a Search Form to a Post

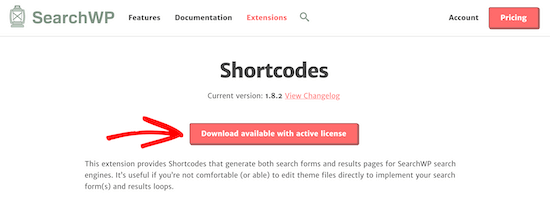
Now you need to download the SearchWP shortcodes extension to easily add your new custom post search form to WordPress.

You’ll need to visit the SearchWP Shortcodes Extension website and then click the ‘Download available with active license’ button.

Download SearchWP Shortcodes extension

After that, you need to install and activate the extension the same way you installed the plugin above. Now you can add a search form in your posts.

Simply edit the post and place your cursor where you want to add the search form. After that, click the plus ‘Add Block’ icon to bring up the blocks menu.

Insert a Custom HTML Block

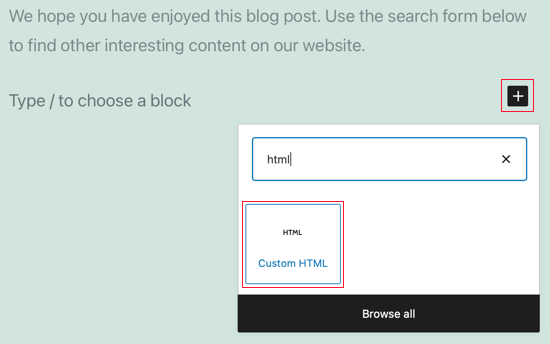
Next, type ‘html’ into the search box. Then, select the ‘Custom HTML’ block.

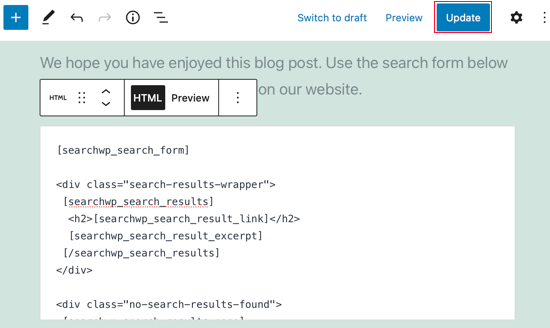
Once you’ve added the new block, you can add the following shortcodes and HTML to your page. If you need more help, then see our guide on how to add a shortcode in WordPress.

[searchwp_search_form]
   
<div class="search-results-wrapper">
 [searchwp_search_results]
  <h2>[searchwp_search_result_link]</h2>
  [searchwp_search_result_excerpt]
 [/searchwp_search_results]
</div>
   
<div class="no-search-results-found">
 [searchwp_search_results_none]
 No results found, please search again.
 [/searchwp_search_results_none]
</div>
   
<div class="search-results-pagination">
 [searchwp_search_results_pagination direction="prev" link_text="Previous"]
 [searchwp_search_results_pagination direction="next" link_text="Next"]
</div>

This code will add a search form to the post, create a section to display the search results, show a no results message if necessary, and add pagination if the results go into multiple pages.

Make sure you click Publish or Update to save your post and make it live.

Click Publish or Update to Save Your Post

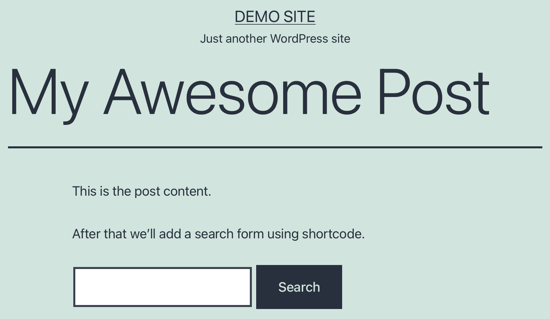
To see the search form in action, simply view the post on your WordPress website. This is how it looks on our demo site running the Twenty Twenty-One theme.

SearchWP Form Preview

For more tips on customizing your search, see our guide on how to improve WordPress search with SearchWP.

Method 2: Adding a Search Form Using Code

You can also add a search form to your WordPress posts by use of a code snippet. This method is not recommended for beginners, so if you’re not familiar with code, then you should use Method 1 instead.

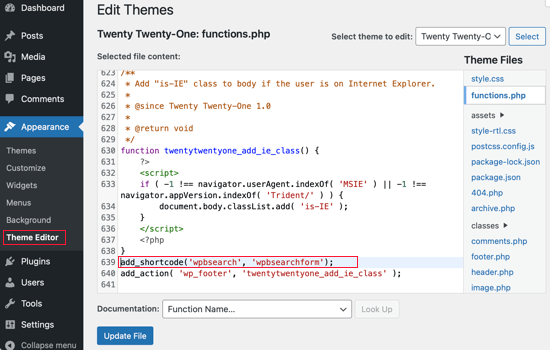
In this method you will have to edit your theme’s functions.php file.

If you have not edited the functions.php file before, then take a look at our beginner’s guide on pasting snippets from the web into WordPress.

All you have to do is open your theme’s functions.php file or a site-specific plugin and paste the following code:

add_shortcode('wpbsearch', 'get_search_form');

Here is how it looks on our demo website when using the WordPress Theme Editor to add the snippet to the Twenty Twenty-One theme’s functions.php file.

Editing functions.php in the Theme Editor

After that, you simply add the shortcode [wpbsearch] to the post or page where you would like the search form to appear.

Search Form Shortcode

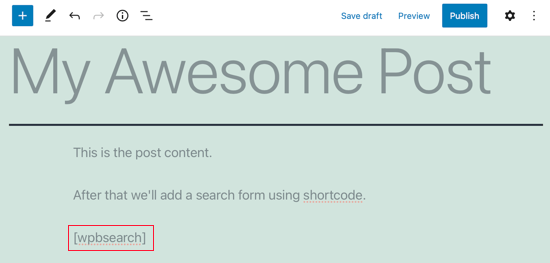
This will display the default search form. To see the search form, simply view the post on your WordPress website.

Search Form Preview

If you would like to display a custom search form, then you should use this code instead.

function wpbsearchform( $form ) {
  
    $form = '<form role="search" method="get" id="searchform" action="' . home_url( '/' ) . '" >
    <div><label class="screen-reader-text" for="s">' . __('Search for:') . '</label>
    <input type="text" value="' . get_search_query() . '" name="s" id="s" />
    <input type="submit" id="searchsubmit" value="'. esc_attr__('Search') .'" />
    </div>
    </form>';
  
    return $form;
}
  
add_shortcode('wpbsearch', 'wpbsearchform');

Feel free to modify the code to customize the search form as you would like.

We hope this tutorial helped you learn how to add a search for in your post with a WordPress search shortcode.

You may also want to learn how to create a free business email address, or check out our list of reasons why you should use WordPress for your website.

If you liked this article, then please subscribe to our YouTube Channel for WordPress video tutorials. You can also find us on Twitter and Facebook.

The post How to Add a Search Form in a WordPress Post With a Shortcode first appeared on WPBeginner.


November 24, 2021 at 03:39PM

Tuesday, November 23, 2021

How to Unpublish a WordPress Page (4 Simple Ways)

Do you want to unpublish a page on your WordPress site?

Sometimes you want to unpublish WordPress pages for editing and privacy reasons. Or, you need to hide specific pages from groups of users.

In this article, we’ll show you how you can easily unpublish a WordPress page, step by step.

How to unpublish a WordPress page (4 simple ways)

Why Unpublish a WordPress Page?

When you’re building a WordPress website, you create and publish pages to make them live for your website visitors.

But there maybe times when you’ll want to unpublish these pages so they’re not visible by others.

For example, maybe you’ve changed your mind about certain pages and want to take your site in a new direction. Or, you accidentally published a page that you don’t want your visitors to see.

WordPress makes it easy to unpublish pages, hide them from your visitors, make them accessible to only certain visitors, and more.

With that said, let’s take a look at a few different ways you can unpublish a page on your WordPress website. Simply use the quick links below to go to your preferred method for unpublishing a page.

Method 1: Unpublishing a Single WordPress Page

Unpublishing a page lets you remove it from your website while still giving you the option to edit the page and republish later on.

The simplest way to do this is to switch the page to a draft. This hides the page from your website visitors, but logged in users can still view and edit the page from the page dashboard.

If you’ve noticed errors on the page, or want to improve the content, then this is a great option.

To do this, navigate to Pages » All Pages and then hover over the page and click the ‘Edit’ link.

Edit WordPress page

This will bring you to the page editor screen.

Then, click the ‘Switch to draft’ link at the top of the page.

Click switch to draft

This brings up a popup that will confirm if you want to switch the page to a draft.

Simply click the ‘OK’ button.

Confirm unpublish page

This will automatically update your page to a draft.

If you no longer need the page on your site, or it’s outdated, then you can completely delete the page.

This is similar to adding your page to the recycle bin or trash bin on your computer.

To do this, click the ‘Move to trash’ button in the right hand menu, and your page will be moved to the trash.

Move page to trash

Note: If the page you’re deleting ranks in the search engines and is bringing you traffic, then you’ll want to redirect the URL to another relevant page, so you don’t lose SEO rankings. For more details, see our beginner’s guide to creating 301 redirects in WordPress.

Method 2: Unpublishing Multiple WordPress Pages at Once

If you’re redesigning or moving a website to a new domain, then you might have a bunch of pages that you no longer need or just want to edit. Instead of going through these one at a time, you can unpublish or delete them all at once.

To do this, navigate to Pages » All Pages and then check the box next to the pages you want to unpublish.

Select multiple pages

This will give you an option box where you can set multiple pages as draft. Simply click the ‘Bulk actions’ drop down and select ‘Edit’, then click ‘Apply’.

Next, select ‘Draft’ from the ‘Status’ drop down box and click ‘Update’

Make multiple pages draft

You can also move multiple pages to the trash by selecting ‘Move to trash’ in the ‘Bulk options’ drop down.

Then, click ‘Apply’.

Move multiple pages to trash

You can view your pages in the trash by clicking the ‘Trash’ menu option.

Then, check the box next to the pages you want to completely delete and select ‘Delete permanently’ from the ‘Bulk actions’ drop down.

Delete pages permanently

After that, click the ‘Apply’ button.

This permanently removes pages from your website and can’t be restored, so only delete pages you’re sure you won’t need in the future.

Method 3: Making a WordPress Page Private or Password Protected

Password protecting a WordPress page allows you to keep certain areas of your WordPress blog private.

This can be helpful if you want to create a separate area of your website for clients or team members. It can also be useful if you want to hide certain pages of your site that you’re still building.

First, you need to open up the page you want to password protect. Next, click on ‘Public’ in the ‘Visibility’ section, in the right hand menu.

Then, select the ‘Password Protected’ option and enter your password in the box.

Password protect page

After that, click the ‘Update’ button to save your changes.

Now, when your visitors go to your page, they’ll be prompted to enter a password.

Password protect page example

Another option is to make your page private, so it’s only visible to admins and editors of your site when they’re logged in.

To do this, simply select the ‘Private’ option from the ‘Visibility’ section.

Make page private

Then, there will be a popup that will ask you to confirm if you want to make the page private.

Simply click the ‘OK’ button and it will automatically update.

Confirm private WordPress page

If you want to view pages that are private and password protected, then you can go back to your WordPress page dashboard.

This shows all of your published, draft, password, and private pages at a glance.

View password and private pages

Method 4: Making a WordPress Page Members Only

You can also unpublish a page and make it visible to users with the right membership level. Visitors who aren’t members can sign up to view the page. This can be a great way to grow your email list and make money online from your website.

The best way to do this is with the MemberPress plugin. It’s the best WordPress membership plugin and lets you easily add membership functionality to any site.

MemberPress

The plugin is very easy to use, and lets you sell online courses, premium downloads, drip content, and much more.

There are powerful access control features that let you restrict access to specific WordPress pages with a couple of clicks.

Members only pages

For more details on restricting access to certain pages, see our guide on how to create a paywall in WordPress.

We hope this article helped you learn how to unpublish a WordPress page. You may also want to see our guide on how to register a domain name and our expert picks of the best AI chatbots software for your website.

If you liked this article, then please subscribe to our YouTube Channel for WordPress video tutorials. You can also find us on Twitter and Facebook.

The post How to Unpublish a WordPress Page (4 Simple Ways) first appeared on WPBeginner.


November 23, 2021 at 05:30PM

Monday, November 22, 2021

How to Disable New User Notifications in WordPress

Do you want to stop receiving new user email notifications in WordPress?

If you have enabled user registration on your site, then WordPress sends a notification email to the admin email address every time a new user registers. On sites where many users join every day, these emails can become annoying.

In this article, we will show you how to disable new user notifications in WordPress.

How to Disable New User Notification in WordPress

Why Disable User Notification Emails in WordPress?

Allowing user registration in WordPress has a lot of benefits. If you have a multi-author blog, online store, or membership website, then user registrations are necessary.

However, there is also a downside. WordPress will send an email by default to the admin email address notifying you whenever a new user registers.

While these emails are good for keeping an eye on who is registering on your website and keeping out spam registrations, they can be annoying to deal with if you have several people joining each day.

Having a lot of new user notifications can clutter your email inbox, making it difficult to spot important emails from your clients and customers.

This is where disabling emails about new users can come in handy. Let’s take a look at how you can disable new user notifications in WordPress.

Disable New User Notifications using WP Mail SMTP

WP Mail SMTP is the best WordPress SMTP plugin on the market and it dramatically improves your email deliverability.

The plugin fixes the problem of emails not being delivered to your customers. That means that all your users will be sure to receive any emails from your site, instead of ending up in their spam folder or blocked completely.

WP Mail SMTP also offers different settings to take control of your WordPress emails, such as disabling automatic update notifications. Among these settings is the option to disable new user notification emails sent to the admin’s email.

WP Mail SMTP

For this tutorial, we’ll be using the WP Mail SMTP Pro version since it includes the Email Control options. There is also a free version of WP Mail SMTP that you can use to fix email deliverability issues on your site.

First, you’ll need to install and activate the WP Mail SMTP plugin on your WordPress site. If you need help, then follow our step-by-step guide on how to install a plugin.

Upon activation, you can go to WP Mail SMTP » Settings from your WordPress admin panel and then enter your license key. You can find the license key in your WP Mail SMTP account area.

WP Mail SMTP license

After entering the key, go ahead and click the ‘Verify Key’ button. You’ll now see a popup showing that you’ve successfully verified the key, and the site will receive automatic updates.

Successfully added license key

Next, you can head over to the ‘Email Controls’ tab from the menu on the top in WP Mail SMTP.

Email controls tab in WP Mail SMTP

After that, simply scroll down to the New User section and click on the toggle to disable the ‘Create (Admin)’ option.

Disable new user notifications

Once this setting is toggled off, you as the admin won’t receive an email. However, the new user who registered will still get an email confirmation.

Now go ahead and click the ‘Save Settings’ button.

That’s it! You’ve successfully disabled new user notification emails for admins using the WP Mail SMTP plugin.

We hope this article helped you disable new user notification emails in WordPress. You may also want to see our expert comparison of the best email marketing services and best business phone services for small businesses.

If you liked this article, then please subscribe to our YouTube Channel for WordPress video tutorials. You can also find us on Twitter and Facebook.

The post How to Disable New User Notifications in WordPress first appeared on WPBeginner.


November 22, 2021 at 03:00PM

Friday, November 19, 2021

18 Best Membership Site Examples That You Should Check Out in 2021

Are you looking for the best membership site examples to get inspiration?

WordPress is used by some of the biggest and most popular membership sites in the world. By looking at successful membership sites you can learn what they’re doing and improve your site.

In this article, we’ll share some of the best membership site examples that you can use for inspiration and direction.

18 best membership site examples that you should check out

What Do You Need to Build a WordPress Membership Website?

WordPress makes it easy to build nearly any kind of membership website. For example, you can put content behind a paywall, run an online community with a forum, sell pay-per-view content, bundle online courses, and more.

A membership site can be an addon to your existing WordPress blog, or be a standalone online business.

To get started with your own membership site you’ll need four main things:

  • A domain name: This is the address for your website (ours is wpbeginner.com)
  • Web hosting: This is where you’ll store your website files, and visitors can access your site
  • A website builder: This lets you easily build a membership website without code.
  • A membership addon: This will add membership functionality to your WordPress site.

Usually, a domain name will cost around $15-20 per year, and web hosting starts from $7.95 per month. When you’re just starting, this can be a big investment.

Luckily, Bluehost has agreed to offer our readers a huge discount on web hosting, along with a free domain name, and a free SSL certificate. You can get started for as low as $2.75 per month.

→ Click Here to Claim This Exclusive Bluehost Offer ←

Next, you need to make sure you’re using the right version of WordPress. We recommend using the self-hosted WordPress.org version because it gives you access to all the features you need right out of the box. For more details, see our comparison of WordPress.com and WordPress.org.

You also need a high quality WordPress membership theme and WordPress membership plugin.

If you want to sell subscriptions, paid content, or digital downloads, then a feature rich membership plugin, like MemberPress, is a great option.

MemberPress site creators around the world are expected to earn over $600 million this year alone.

To have your site up and running as fast as possible, see our ultimate guide to creating a WordPress membership site.

With that said, let’s look at some of the best membership site examples that you can use as inspiration when building your own membership site.

1. Book Riot

Book Riot

Book Riot is one of the biggest and most popular book blogs in the world. There’s all kinds of content for book lovers, including reviews, podcasts, author interviews, and more.

Readers can join a unique membership program called Book Riot Insiders, an online book club with access to exclusive podcasts, email newsletters, deals, giveaways, and much more.

2. Copyblogger

Copyblogger

Copyblogger is a long-running WordPress blog that offers all kinds of valuable articles on content marketing, improving writing skills, growing an online business, and much more.

It uses a membership program to power its writing service and academy for new writers.

3. The Script Lab

The Script Lab

The Script Lab is a very useful online platform for screenwriters. There’s an active blog, screenplay competition listings, and a massive script library.

To get access to the script library, readers will need to become a member. There are multiple membership levels to get access to different features.

4. Nomadic Matt

Nomadic Matt

Nomadic Matt is a very popular travel blog for people looking to travel longer while on a budget. The site provides valuable travel tips, resources, virtual events, and more.

Beyond the helpful free content, there’s a paid membership community that gives readers access to courses, guidebooks, discounts, giveaways, and much more.

5. 40 Aprons

40 Aprons

40 Aprons is a high traffic food blog that provides healthy recipes for families. There are recipes for all types of diets and cuisines.

Members get access to an ad free reading experience along with premium content, recipes, resources, and more.

6. Copyhackers

Copyhackers

Copyhackers is one of the most popular and well known websites for copywriters. It provides a variety of articles, videos, and resources for copywriters and business owners looking to improve their craft.

There’s a paid membership program called Copy School that offers members the best training on ads, emails, funnels, and more.

7. Mark Manson

Mark Manson

Mark Manson is one of the most popular personal development blogs with millions of monthly readers. The popularity of the blog led to multiple New York Times and Amazon best-selling books.

There’s also a paid membership component where members can access exclusive articles and audio, a course catalog, ebooks, and more.

8. The Measured Mom

The Measured Mom

The Measured Mom is a website that provides math and literacy resources for child educators. There are all kinds of useful articles, printables, book lists, a podcast, and more.

The site is monetized with digital downloads and a premium membership program to access the resource library, discounts, courses, and more.

9. BiteSize Bio

Bitesize Bio

BiteSize Bio is an online resource for everything related to biology, genes, biochemistry, and much more.

There’s also a membership community aspect, where readers, researchers, and mentors can engage with each other. Dedicated experts can also host webinars, publish articles, and more.

10. SkillCrush

SkillCrush

SkillCrush is an online coding and design school to help people break into a career in tech. It provides free content with a simple online course and a blog.

It’s monetized by a huge membership academy that provides a ton of online courses and career and education paths.

11. Be More with Less

Be More with Less

Be More with Less is a blog and online community dedicated to minimalism. The website offers blog posts, courses, podcasts, and more.

It’s monetized with an exclusive VIP membership program that offers members an exclusive community, a resource library, virtual calls, and more.

12. Hauptman-Woodward Medical Research Institute

HWM Research Institute

The Hauptman-Woodward Medical Research Institute at the University of Buffalo provides helpful information about the research institute and its contributions to the field of biology.

There’s a membership program for donors who want to contribute. High level donors get access to a VIP platform where they get benefits like members-only events, behind the scenes information, and more.

13. Teach Beside Me

Teach Beside Me

Teach Beside Me is an online community for homeschoolers looking for creative teaching ideas. There’s all kinds of free content, including an active blog and podcast.

Premium members can get access to done for you teaching ideas and free access to the growing premium content library.

14. Booooooom

Booooooom

Booooooom is one of the most popular online platforms for new artists to get discovered. It’s helped to launch the careers of many artists across the globe.

There’s a paid membership program where artists can apply for open calls, submit their work to be featured, and get discounts in the online store.

15. Toolshero

Toolshero

Toolshero is a global online community dedicated to helping its user learn new skills. There are all kinds of valuable resources to help support professional development, like articles, original research, and videos.

There’s a premium membership plan where users can access professional articles, worksheets and templates, questionnaires, an ad free reading experience, and more.

16. The Sweet Spot

The Sweet Spot

The Sweet Spot is a local business that offers customers an interactive Topgolf experience. It has activities like golf and sports simulators, golf lessons, and more.

Customers get different perks like discounts, reservations in advance, and more, depending on the membership level.

17. Bulletproof Musician

Bulletproof Musician

Bulletproof Musician is a WordPress website dedicated to helping musicians perform better under pressure. There are all kinds of free resources like articles and introductory courses.

It makes money by selling one on one coaching, group coaching, and in-depth courses powered by a membership program.

18. See JH

See JH

See JH is a travel website that provides all kinds of helpful information and live stream videos of the Jackson Hole region.

There’s also a membership portion where users can access discounts, high-quality live cams to see the weather conditions, and more.

We hope this article helped you find some of the best membership site examples using WordPress. You may also want to see our picks of the must have WordPress plugins and tools for business sites and our guide on how to choose the best domain name registrar.

If you liked this article, then please subscribe to our YouTube Channel for WordPress video tutorials. You can also find us on Twitter and Facebook.

The post 18 Best Membership Site Examples That You Should Check Out in 2021 first appeared on WPBeginner.


November 19, 2021 at 01:10PM