Friday, December 24, 2021

6 Best File Upload Plugins for WordPress (Free & Paid)

Do you want to allow your visitors to easily upload files on your WordPress site?

A WordPress file upload plugin lets your users upload documents, images, PDFs, spreadsheets, and other files without having to login to your website.

In this article, we’ll share our expert pick of the best WordPress file upload plugins.

Best file upload plugin for WordPress

Why Use a WordPress File Upload Plugin?

By default, only WordPress site users can upload files by logging in to the dashboard. That means that if you want someone to be able to upload a file to your site, then you’d have to create a new user account and let them log in to your website.

This can be time-consuming and a potential security risk.

However, you can easily accept file uploads on the front end of your WordPress website by using the right plugin.

Accepting documents, images, and other files can help you to get more information from your users when providing customer support.

It also makes it super easy to receive guest posts, resumes, quotations from clients, images, videos, and other content from your visitors.

That being said, let’s look at some of the top file upload plugins for WordPress.

1. WPForms

WPForms

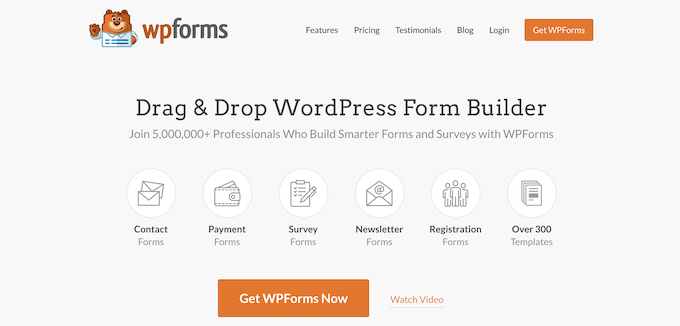
WPForms is the best contact form plugin for WordPress, and it’s super easy to use. The plugin has a drag and drop builder that lets you create any type of form for your website including file upload forms.

It also offers prebuilt templates, so you can quickly get started and add forms to your website. Each template is fully customizable.

There are two different options for file upload fields: a classic file upload for just one file, or a more modern drag-and-drop file upload field that can accept multiple files at once.

WPForms file upload field

With WPForms, you can accept images, videos, documents, spreadsheets, PDFs, presentations, and much more. You can choose whether or not you’d like to save the file uploads in your WordPress media library.

There are also options to restrict different file types to keep your website safe, and you can even increase the maximum upload size, so you can accept larger files if needed.

Besides file uploads, WPForms also offers spam protection, multi-page forms, and conditional logic. It is also compatible with different email marketing services and payments services to create online payments and donations forms.

2. File Upload Types by WPForms

File upload types by WPForms

File Upload Types by WPForms is a free file upload plugin for WordPress. It lets you accept additional file types in WordPress which aren’t available by default.

WordPress allows specific file extensions that your users can upload. If someone tries to upload content outside the permitted file types, then they’re shown an error saying, ‘Sorry, this file type is not permitted for security reasons.’

To overcome this issue and fix the error, you can use the File Upload Types by WPForms plugin.

The plugin is beginner-friendly, and you can manage which file extensions to allow on your website from your WordPress dashboard. Simply enable or disable the extensions from your WordPress admin area.

Some common file extensions the plugin lets you add to WordPress include .zip, .ai, .xml, .svg, .csv, and more.

This free plugin is great for allowing additional file types in WordPress, but it doesn’t have any front-end file upload form. That’s why it must be used in combination with WPForms or any of the other plugin in our list.

3. Formidable Forms

Formidable Forms

Formidable Forms is another popular file upload plugin for WordPress. Using its drag and drop builder, you can create a file upload form for your website.

Users can add a file or drag and drop the file into the form field. The uploaded files are then stored in the WordPress Media Library, so you can easily access them when you want.

The plugin lets you accept multiple files from your visitors in the same form instead of requiring people to fill out numerous forms. Other than that, you can select which file types to allow on your form and set the maximum file size limit.

Aside from creating a file upload form, Formidable Forms also helps build complex forms like mortgage calculators and payment forms. The plugin offers prebuilt templates and multiple customization options as well.

4. WordPress File Upload

WordPress File Upload

WordPress File Upload is a free WordPress plugin that allows visitors to upload any content to your website. The plugin lets you accept file uploads from any blog post, landing page, or sidebar widget by using a shortcode.

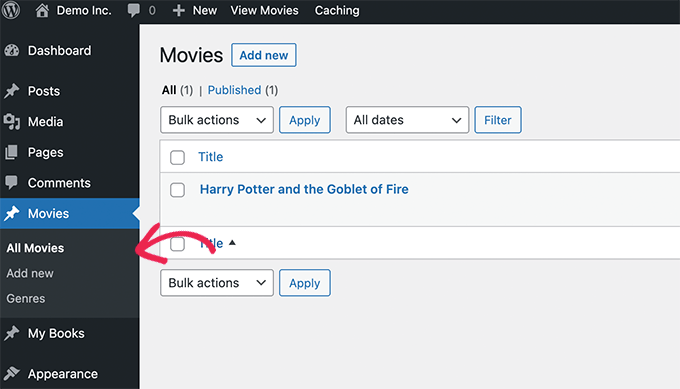
Once a user uploads a file, you can view them inside your WordPress dashboard under the Uploaded Files menu. This makes it easy to organize and manage different content uploaded by your users.

On the downside, the plugin is a bit more complex to use. However, you can create file upload filters for different user roles in WordPress, limit file extensions that can be uploaded, and set an allowed file upload size in the plugin settings.

It also offers different customization options for your file upload form. You can add or remove existing form fields, change their colors, labels, dimensions, and add additional custom fields.

5. MemberPress

MemberPress

MemberPress is the best WordPress membership plugin. It allows you to upload files and have full access control over file permission.

For example, you can upload file in WordPress and restrict permissions, so only logged in users with paid subscription can access the file. This is great for selling online courses, eBooks, or other files.

You can also restrict permissions, so only select users can upload files. This can be helpful if you’re running a membership association where only members with a certain level of paid subscription can add files on their user profiles or submit guest posts, and more.

MemberPress has everything you need to create registration forms, set up membership subscriptions, manage transactions, and more.

6. Easy Digital Downloads

Easy Digital Downloads

Easy Digital Downloads is one of the best WordPress eCommerce plugins that allows you to sell digital products including eBooks, PDF files, music, software, and more.

It allows you to upload WordPress files to cloud platforms like AWS, Dropbox, and others. You can then password protect the files and only allow download access to those with active user licenses.

Easy Digital Downloads also comes with a multi-vendor marketplace functionality, so you can allow users to upload and sell files through your website. This basically lets you make your own marketplace like Envato or CreativeMarket.

BONUS: MonsterInsights

MonsterInsights

MonsterInsights is the best analytics solution for WordPress, and it helps you track form submissions and file downloads on your website.

Abandoned forms mean less conversions and revenue. MonsterInsights helps you to understand when and why your users abandon your forms, so you can optimize them for more conversions. For more details, see our guide on how to track and reduce form abandonment in WordPress.

If you offer content that users can download from your website like PDFs, videos, spreadsheets, and other documents, then it’s important to know which files get the most downloads.

With MonsterInsights, you can automatically track file downloads in Google Analytics without editing code. The plugin lets you track any file extension inside Google Analytics.

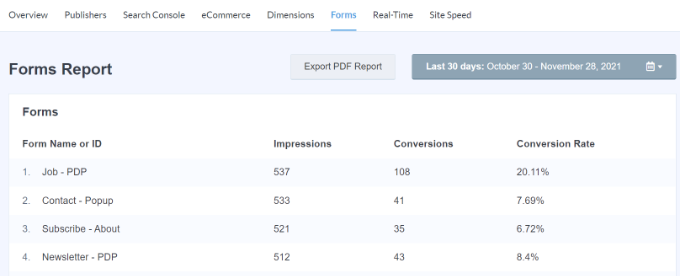
You also get to see the form tracking and file download reports right inside your WordPress dashboard.

We hope that this article helped you find the best file upload plugin for WordPress. You may also want to check out our guide on the best managed WordPress hosting and how to start your own podcast.

If you liked this article, then please subscribe to our YouTube Channel for WordPress video tutorials. You can also find us on Twitter and Facebook.

The post 6 Best File Upload Plugins for WordPress (Free & Paid) first appeared on WPBeginner.


December 24, 2021 at 05:00PM

Thursday, December 23, 2021

How to Create a Live Sale Notification for WooCommerce

Do you want to create live sale notifications for WooCommerce?

Live sale notifications let your visitors know about all the real-time sales happening on your online store. It’s a powerful form of social proof that can increase your overall sales.

In this article, we’ll show you how to create a live sale notification for WooCommerce.

How to Create a Live Sale Notification for WooCommerce

Why Display Live Sale Notifications on WooCommerce?

People feel more comfortable making a purchase when they know others have also bought the same product or service and had a good experience with it.

This is why smart WooCommerce store owners use social proof in their marketing. You might add reviews and testimonials or display the number of Facebook followers your store has.

Another good strategy is to display live sale notifications. This creates a sense of FOMO, or fear of missing out, among your online store visitors and makes them more likely to take action.

Live Sale Notification Example

By displaying recent customer interactions on your WooCommerce store, you can use social proof to increase sales by up to 15%. You can follow our guide to learn how to

track how user engagement on your online store so you can see the effects on your own site.

That being said, let’s look at how to create a live sale notification on your WooCommerce store.

How to Create a Live Sale Notification for WooCommerce

The first thing you need to do is install the FOMO & Social Proof Notifications by TrustPulse plugin. To learn more, see our step by step guide on how to install a WordPress plugin.

TrustPulse is a powerful social proof plugin that displays recent customer interactions on your website to grow trust, boost conversions, and increase sales.

There is a premium version with more advanced features like analytics notifications, priority support, and sub-accounts, but for this tutorial we’ll be using the free plugin since it offers everything needed to set up basic live sale notifications.

Upon activation, you’ll be taken to the TrustPulse page of your WordPress admin area. Here you can click on a button to create a free account, or connect your existing TrustPulse account if you already have one.

Click on the Button to Create a Free Account

You will need to enter a credit card or debit card number even if you choose a free account. Your account will not be charged at this time, but the details will be used if you decide to upgrade in the future.

Once you’ve signed up for TrustPulse, you’ll be asked to add your website details. You’ll need to enter the name of your site and also its URL. When you’re done, you should click the green ‘Save Site’ button.

Add Your Website Details to TrustPulse

Creating a Live Sale Notification Campaign

Now that you’ve added your WooCommerce site to TrustPulse, the next step is to create a campaign. Simply click the ‘Create Campaign’ button at the top right of the screen.

Click the ‘Create Campaign’ Button

The first thing you need to do is give the campaign a name. We’ll call it ‘Live Sale Notification’.

After that, if you have more than one website connected to TrustPulse, then you’ll need to select the correct online store from the drop down list.

Name Your Campaign

Next, you should scroll down to the section labeled ‘Select Your Campaign Type’ and then select the ‘Recent Activity’ option.

This will create notifications of purchases, registrations, and signups on your online store.

Select the 'Recent Activity' Option

After that, simply click on the ‘Next Step’ button at the bottom right of the screen.

On the next screen, you can customize the design and appearance of your live sale notification. For this tutorial, we’ll stay with the default settings, but feel free to make adjustments to suit your own online store.

Customize the Design and Appearance of Your Live Sale Notification

These settings include the language to use, the way you refer to your visitors, the link that will be used when visitors click on the notification, the size and position of the notification, and much more.

When you’ve finished customizing the notification, you should click on the ‘Next Step’ button.

You’ll now be asked to decide where TrustPulse will find the information to include in the live sale notifications. For this tutorial, we’ll select ‘AutoMagic’. This option is the simplest and works well if you’re a beginner.

The 'Automagic' Option Is Easy to Use and Works Well for Beginners

Next, you should scroll down to the section labeled ‘Where should we watch for activity on this site?’ For this tutorial, we’ll select the default ‘Activity on any page’ for simplicity and to maximize the number of notifications shown.

Select Where TrustPulse Watches for Activity

However, if you want your notifications to be more targeted, then you might select ‘Exact URLs’ instead. You could then enter, for example, the URL of your WooCommerce store checkout page so your notifications will display only purchases.

We’ll also go with the default options for ‘Select an Automagic Activity Type’ and ‘Activity Verification’ TrustPulse is very flexible, so you can set this up however you’d like, and then you should click the ‘Next Step’ button at the bottom of the screen.

The next page allows you to decide how the notifications will be displayed. The first question is ‘Where should we display your notifications?’ We want live sale notifications displayed everywhere on our site, so we’ll go with the default setting ‘Display on any page’.

Select 'Display on Any Page'

If you only want to show live sale notifications on certain pages, then you can choose to display them on certain URLs, or URLs containing certain text or matching a pattern.

After that, you should scroll down to the ‘Notification Settings’ section. Here you can decide how long to delay your notifications and how long to display them.

Scroll Down to the 'Notification Settings' Section

You can also decide whether to show them on mobile and whether to loop them.

In this tutorial, we’ll stay with the default settings, but you can make any changes you like. After that, you’ll need to click the ‘Next Step’ button and we’re almost finished.

Publishing the Live Sale Notification Campaign

The last step is to publish your live sale notification to your online store. On this page, you will see a confirmation that your website is connected, and a preview of your campaign will be displayed.

All you need to do is click the ‘Launch your TrustPulse campaign’ button to push it live.

Click the ‘Launch Your TrustPulse Campaign’ Button
Note: Sometimes it takes a few minutes to complete the connection to your site. You can test whether your site is connected by clicking the green ‘Check Now’ button.

Congratulations! Your customers can now see live notifications when other customers purchase items from your store. If you’d like to make any changes to the campaign, then you can go back and change the settings at any time.

We hope this tutorial helped you learn how to create a live sale notification for WooCommerce. You may also want to learn how to create an email newsletter the right way, or check out our expert pick of the best WooCommerce plugins for your store.

If you liked this article, then please subscribe to our YouTube Channel for WordPress video tutorials. You can also find us on Twitter and Facebook.

The post How to Create a Live Sale Notification for WooCommerce first appeared on WPBeginner.


December 23, 2021 at 04:00PM

Wednesday, December 22, 2021

10 Important Metrics to Measure on Your WordPress Site

Are you wondering how is your WordPress website performing?

Measuring important metrics can help you find out what’s working and not working in your business. You can then tweak your content strategy, try new ways to increase website traffic, and optimize your site for higher conversions.

In this article, we’ll show you important metrics to measure on your WordPress site.

Important Metrics to Measure on Your WordPress Site

How to Measure Important Metrics in WordPress

When running a successful business, it’s essential to know your WordPress website’s performance. However, many business owners use their ‘best guesses’ to make decisions instead of working with data.

This is where tracking important metrics can help you make informed decisions and grow your website with confidence.

You can see which strategies are working, which content your visitors like, where they are from, and how you can improve your traffic and WordPress conversions.

The easiest way to measure important metrics in WordPress is using MonsterInsights. It’s the best WordPress analytics plugin and is used by over 3 million websites.

MonsterInsights makes it super easy to properly setup Google Analytics in WordPress, bring important stats inside your WordPress dashboard, display popular posts, and offers advanced tracking features.

MonsterInsights

To start, you’ll first need to install and activate the MonsterInsights plugin. If you need help, then please see our guide on how to install a WordPress plugin.

Editor’s Note: if you want to unlock advanced tracking features like eCommerce tracking and more dashboard reports, then you’ll need the MonsterInsights Pro version. There is also a free version of MonsterInsights that you can use to get started.

Upon activation, you’ll be taken to MonsterInsights welcome screen in WordPress. Go ahead and click the ‘Launch the Wizard’ button.

You can now follow the steps to configure the plugin and connect Google Analytics with your WordPress site.

Set up MonsterInsights

After that, simply head over to Insights » Reports from your WordPress admin panel to view important metrics and get insights to grow your business.

MonsterInsights dashboard reports

That being said, let’s look at some of the most important metrics to measure on your website.

1. Sessions

The first thing you should measure is your website traffic. To do that, you can look at the number of sessions. A session represents a single visit to your site, and it can include many pageviews.

In MonsterInsights, you can easily view the number of sessions by navigating to Insights » Reports and see the ‘Overview’ report.

See the number of sessions

The graph shows a trend from the last 30 days. Simply hover over the graph to see the Unique Sessions on a particular day. You can use this metric to see how many people visit your website and if your traffic is increasing or decreasing.

For example, if you have a WordPress blog, then looking at sessions can show whether the number of readers is rising. If it’s not, then you need to find more ways to increase your blog traffic.

Besides that, you can also look at the average session duration and bounce rate to get more insights into user engagement.

Having a high session duration means people enjoy reading your content and spend more time on your website. Whereas a high bounce rate means users didn’t find what they were looking for and left your site.

2. Top Referrals

The next metric you should be measuring is Referrals. These are websites that link to your content and send traffic to your site, also known as referral traffic.

Top referrals

Since these websites are linking to your articles, it means they’re providing a backlink. Backlinks are an important Google ranking factor, and they give a vote of confidence for your content.

Having backlinks from high authority sites means your content is excellent, and you can see a positive impact on your keyword rankings.

Using the top referrals metric, you get to see which websites are sending visitors to your website. This helps in finding similar sites to get more backlinks and boost your WordPress SEO.

Similarly, you can also uncover which guest post is driving a lot of referral traffic. It helps in choosing the type of content and topic to cover for future guest posts.

3. Top Countries

Ever wonder which country your visitors are from? In MonsterInsights, you get to see which region drives the most traffic to your site by looking at the Top Countries metric.

Top countries

Using the data from the top countries report, you can uncover new content ideas.

Let’s say one region that’s sending the most traffic is India. You can write about the best web hosting services in India if you have tech website or 5 places to visit in India if you have a travel blog.

Besides that, you can also create personalized marketing campaigns and provide a custom user experience for people from different regions. For instance, you can offer free shipping or discount offers to people for a particular location.

You can also check out our ultimate guide to geolocation targeting in WordPress.

4. Top Posts and Pages

Do you know which landing pages and blog posts drive a lot of traffic, engagement, and conversions on your site? A simple way to find out is by measuring the top posts and pages metric.

In MonsterInsights, you can uncover your most viewed pages and posts in the Overview report.

Most viewed pages and posts

If you’re using the MonsterInsights Pro version, then you can unlock the Publishers report and get more insights about how people interact with your most important pages.

Simply head over to Insights » Reports and click on the ‘Publishers’ tab. Next, you can see the Top Landing Pages report and how many visits your pages get along with visit duration and bounce rate.

Top landing pages

Once you know which articles are performing the best, you can create more content on similar topics and grow your traffic. You should also check keyword rankings for these top pages and see if you can improve their rankings to reach the #1 spot in Google.

On these top pages, you can also place your newsletter subscription form and convert visitors into email subscribers to build an email list. If you’re selling products or services, then you can optimize your high-traffic pages to boost sales and conversions.

5. Outbound Links

The next metric you should measure is the outbound link clicks. These are links in your content that are from other websites. When a user clicks on an outbound or external link, they’re taken to another site.

In MonsterInsights Publisher’s report, you can see the Top Outbound Links. Do note that Google Analytics doesn’t track external link clicks by default. However, with MonsterInsights, you get link tracking out of the box.

Outbound links report

Measuring which outbound link is getting the most clicks can help you create new partnership opportunities.

For instance, you can reach out to the sites that you’re sending traffic to and ask for a backlink for your blog as well. You can also build partnerships and join their affiliate marketing program to earn more money.

Aside from that, tracking outbound links can also help you better understand your user’s behavior and come up with new content ideas. Since people are clicking a link to view content on another site, you can create a better version of that article on your own website.

6. Demographics

Another important metric to measure is user demographics. It helps you better understand your audience. You could then offer products that they’d prefer or write content based on their interests.

With MonsterInsights, it’s straightforward to track and measure demographic information. You get to see the age, gender, and interests of your visitors in WordPress.

Demographic reports

Demographics help you find hidden WordPress user data that you can use to make business decisions.

For example, let’s say you have an eCommerce store that sells shoes. If your audience is primarily females, then you can add more women’s shoes to your store compared to men.

Similarly, if you’re writing blogs about the latest tech and one of the top audience interests is smartphones, then you can create more content on smartphones compared to other categories.

7. Top Google Search Terms

Do you want to know which keywords your users use to find your website? You can quickly uncover this insight by measuring the top Google search terms for your website.

MonsterInsights brings your Search Console report inside your WordPress admin area and allows you to see the top 50 keywords people use to look up your site on Google.

You can see our guide on how to add your WordPress site to Google Search Console.

Search console report

By measuring the Google Search Terms metric, you can see which keywords drive traffic to your site. The report shows clicks, impressions, CTR, and average position for each search term.

From the report, you can select keywords that are close to reaching the #1 position in Google and optimize them.

The report also helps identify low-hanging fruits, which are keywords that can easily reach the first page on Google with a little tweak in meta title, internal linking, and keyword optimization.

Besides that, you can also find new keyword ideas to target on your website. For instance, look for similar search terms that are already performing well and optimize them in your content. As a result, you’ll grab keyword rankings for different search terms and grow your organic traffic.

8. Form Conversions

Forms play an important role in running a successful business, whether you’re running a WooCommerce store, a blog, a membership website, or a company website.

Forms help you keep in touch with your visitors. You can easily get feedback from your customers and resolve their queries through contact forms.

However, simply adding a form to your WordPress site isn’t enough. You should track their performance and see how well they’re converting. This is where measuring the form conversion metrics comes in handy.

With MonsterInsights Forms addon, you can easily track form conversions in Google Analytics. It works smoothly with WPForms, Formidable Forms, and any WordPress form plugin.

The best part is that you get to see the report inside your WordPress dashboard. Simply head over to Insights » Reports » Forms to view the report.

Forms report

The report will show the total number of impressions, conversions, and conversion rate for each form.

Using the information from the report, you get to see which forms get the most conversions and which don’t. You can change the low-performing forms’ design, layout, questions, and other elements to improve their conversions.

On the other hand, placing your highly converting forms on the most important pages or in the sidebar can further boost their conversions.

9. Site Speed

Site Speed is another metric you should be tracking in your WordPress website. That’s because Google now considers your site’s loading speed as a ranking factor.

If your website is slow to load and doesn’t provide a great user experience, then Google will not rank your content higher and instead prefer other sites that are faster.

A simple way to measure load time is by using the MonsterInsights Site Speed report.

Site speed report

The report shows an overall site speed score for desktop and mobile along with other metrics to measure page speed. You also get recommendations on how to improve your site’s load time.

You can go through our detailed guide to boost WordPress speed and performance.

10. Custom Dimensions

Custom dimensions are additional pieces of information that you can use to understand how people use your website. They help uncover things like content types, SEO performance, user engagement, and more.

Using MonsterInsights Dimensions addon, it’s very easy to set up custom dimensions in WordPress. You can track popular authors, post type, top categories and tags, and more.

Popular authors dimension

For example, if you’re running a multi-author website, then you can track your most popular authors using custom dimensions. You can also uncover which post category gets the most traffic, so you can optimize it for conversions and find new content ideas to cover.

There are more custom dimensions you can set up with MonsterInsights. The plugin lets you track logged-in users and see which post type your audience likes. For instance, if your readers prefer guides and tutorials, then you can create similar content to get more traffic.

Logged in user and post type

If you’re using the All in One SEO (AIOSEO) plugin, then you can track the TruSEO score of your posts and pages using custom dimensions. Similarly, it also lets you track Focus Keyphrases that you’ve set for each post and find out which keyword gets the most traffic.

Focus keyphrase and TruSEO score

We hope this article helped you find important metrics to measure on your WordPress site. You may also want to see our guide on how to get a free SSL certificate for your WordPress site and the best email marketing services for small businesses.

If you liked this article, then please subscribe to our YouTube Channel for WordPress video tutorials. You can also find us on Twitter and Facebook.

The post 10 Important Metrics to Measure on Your WordPress Site first appeared on WPBeginner.


December 22, 2021 at 04:00PM

Tuesday, December 21, 2021

How to Add Custom Post Types to Your Main WordPress RSS Feed

Do you want to add custom post types to your main WordPress RSS feed?

By default, the WordPress RSS feed only shows your recent blog posts. However, if you are using custom post types for other content, then you may want to include them in your main RSS feed as well.

In this article, we’ll show you how to easily add custom post types to your main WordPress RSS feed.

Easily add custom post types to main WordPress RSS Feed

Why Add Custom Post Types to Main RSS Feed in WordPress?

By default, WordPress comes with two commonly used content types called posts and pages. However, you can also create custom post types to add more content types if needed.

For instance, a movie review website may want to create a custom post type for movie reviews using custom taxonomies suitable for that particular content type.

A custom post type in WordPress

Now, your custom post types can have their own RSS feed which users can access by adding /feed/ at the end of the custom post type archive URL.

https://ift.tt/3EgHgmU
https://ift.tt/3efwbYV

However, the custom post-type feeds are not easily discoverable. If a user enters your website’s URL in their feed reader, then it will show the subscription option for your main WordPress RSS feed.

Feed reader showing main RSS feed at the top

That being said, let’s see how to easily fix that by adding custom post type to your main WordPress RSS feed.

Adding All Custom Post Types to Your WordPress RSS Feed

This method allows you to add all publicly available post types to be included in your main WordPress RSS feed.

You’ll need to add code to your WordPress website. If you haven’t done this before then take a look at our guide on how to easily add custom code snippets in WordPress.

Simply copy and paste the following code to your theme’s functions.php file or a site-specific plugin.

function myfeed_request($qv) {
if (isset($qv['feed']))
$qv['post_type'] = get_post_types();
return $qv;
}
add_filter('request', 'myfeed_request');

This code simply modifies the default WordPress query to fetch RSS feeds by adding all publicly visible post types into the query.

This will allow you to add pages as well as all other custom post types into your main WordPress RSS feed.

Adding Specific Custom Post Types in Main WordPress RSS Feed

This method is more flexible and allows you to choose which post types you want to include into your main WordPress RSS feed.

Simply copy and paste the following code into your WordPress website.

function myfeed_request($qv) {
    if (isset($qv['feed']) && !isset($qv['post_type']))
        $qv['post_type'] = array('post', 'movies', 'books');
    return $qv;
}
add_filter('request', 'myfeed_request');

You can now visit your WordPress RSS feed to see this code in action.

We hope this article helped you add custom post types to your main WordPress RSS feed. You may also want to see our tips to optimize WordPress RSS feeds or see these best WordPress RSS feed plugins for bloggers.

If you liked this article, then please subscribe to our YouTube Channel for WordPress video tutorials. You can also find us on Twitter and Facebook.

The post How to Add Custom Post Types to Your Main WordPress RSS Feed first appeared on WPBeginner.


December 21, 2021 at 05:52PM

Monday, December 20, 2021

What’s Coming in WordPress 5.9 (Features and Screenshots)

WordPress 5.9 Beta arrived a few days ago, and it is expected to be released on January 25th, 2022. It will be the first major release of 2022 and will come with many new features and improvements.

We have been closely monitoring the development and trying out new features on our test sites.

In this article, we’ll give you a sneak peek into what’s coming in WordPress 5.9 with features and screenshots.

Overview of all the features coming in WordPress 5.9
Note: You can try out the beta version on your computer or on a staging environment by using the WordPress Beta Tester plugin.

Full Site Editing

WordPress 5.9 will continue to build upon the site editing features first introduced in WordPress 5.8 earlier this year.

This upcoming release is adding a lot more features to the site editing experience. These new features make it easier to edit your WordPress theme without any code so you can create a website with a unique custom design.

Launching site editor in WordPress 5.9

Still, full site editing will only be available for themes that support this new feature.

New Site-Wide Blocks

WordPress 5.9 will introduce 10 new blocks made specifically for full site editing and located under the ‘Theme’ category.

Site editing blocks

Here is a list of theme blocks introduced in 5.9:

  • Navigation
  • Template Part
  • Header
  • Footer
  • Post Author
  • Next Post
  • Previous Post
  • Post Comments
  • Term Description
  • Archive Title
Tip: Site editor blocks can also be used inside a WordPress post or page if needed.

Add Site-Wide Styles

Another important feature of the site editor is the ability to create new styles for your theme that will be applied across your site. Simply click on the Style icon on the top right corner of the screen when editing any post or page.

Editing theme styles

From here you can change the typography and colors of your website.

Once you are done, you can choose to save those changes for individual templates, template parts, or as a global style for your whole website.

Save template

Change Block Styles

With the site editor, you can also make changes to the styles of individual blocks used on your website.

Simply click on the Style button and then choose Blocks. You’ll see a list of blocks that you can edit and customize.

Edit block styles

This allows you to set styles for individual blocks across your website. For instance, you can change button colors to match your brand colors, change heading font sizes, and more.

A New Way to Add Navigation Menus

WordPress 5.9 introduces a new way to edit navigation menus.

First, you may notice that the ‘Menu’ link has now changed to Navigation Menus.

Navigation menus in WordPress 5.9

If you are using a supported theme, then you can simply add a navigation menu title here.

Blank navigation menus screen

To actually edit the navigation menu and add items to it, you can use the new Navigation Menu block in the site editor.

Navigation menu block

The new navigation menu block allows you to easily create navigation menus, add new links, adjust colors, spacing, alignment, and more.

New Default Theme Twenty Twenty-Two

Since WordPress 5.9 will be the first major release of the upcoming year, it will ship with a brand new default theme called Twenty Twenty-Two.

The new default theme takes advantage of all the cool features available in the new site editor.

Twenty Twenty-Two

It is designed to be the most flexible default WordPress theme ever, providing users immense control over every aspect of design.

Twenty Twenty-Two features a bold yet minimalistic design using Source Serif Pro font for headings.

Twenty Twenty-Two preview

The theme also comes with a bunch of ready-made patterns that you can use in the site editor or the block editor when writing content.

Patterns Twenty Twenty-Two

While the full site editing features are exciting, they still depend on your WordPress theme.

If you need an easier and more flexible option, then you can try SeedProd. It allows you to easily create custom pages for your website regardless of which WordPress theme you are using.

Block Editor Improvements in WordPress 5.9

Most WordPress users spend the majority of their time writing content. That’s why each WordPress release comes with improvements and new features added to the block editor.

Effortlessly Move Sections

Users will now be able to move sections from the List View on the toolbar. Simply click on an item and move it up and down.

Moving items in the block editor

This allows you to easily jump to different parts of the content and move them around so you can quickly readjust your layout.

Navigation Block

The navigation block in the site editor can also be used inside your WordPress posts and pages as well. This allows you to manually create navigation menus in your articles or landing pages.

For instance, you can use it to create a table of contents with links to different areas of an article.

Using navigation block for table of contents

Better Social Icons and Buttons

With previous versions of WordPress, it was a bit difficult to access controls of the parent and child blocks when working with social icons and buttons.

WordPress 5.9 will make it easier by allowing child blocks to use the parent block’s toolbar.

Social icons and button blocks absorb parent toolbar
Better Headings Controls

The headings block now allows you to select a heading level from a vertical dropdown menu. You also have more typography, design, margin, and spacing options for your headings.

Headings block now has more controls

Rich URL Previews in Block Editor

Previously, when you hovered your mouse over to a link in the post editor, you only saw the URL. WordPress 5.9 will now fetch and display rich URL previews for links inside post editor.

Rich URL previews

There are many other improvements to individual blocks in the block editor. All of them enhance user experience by offering more dimensions, spacing, typography, and other tools.

Choose Language During Login

If you have multiple languages installed on your WordPress website, then users will now be able to choose their preferred language on the login screen.

Choose language during login

Under the Hood Changes

WordPress 5.9 will also bring many changes for developers to explore and use in their own themes, plugins, and projects.

Following are some of these under the hood changes:

  • WordPress core PHP Test Suite will now support PHPUnit 8.x via PHPUnit Polyfills library (See details)
  • New function wp_get_post_revisions_url() to get URL for a post revision. (#39062)
  • New wp_list_users() template tag will be introduced. (#15145)

We hope this article gave you a glimpse into what’s coming in WordPress 5.9.

Comment below to let us know what features you find interesting and what you’d look to see in a future WordPress release!

If you liked this article, then please subscribe to our YouTube Channel for WordPress video tutorials. You can also find us on Twitter and Facebook.

The post What’s Coming in WordPress 5.9 (Features and Screenshots) first appeared on WPBeginner.


December 20, 2021 at 02:45PM