Wednesday, April 27, 2022

How to Embed a Google Map in Contact Forms (With Map Pin)

Would you like to display a map on your website’s contact form?

You can use geolocation to pre-fill a user’s address and indicate their location by placing a pin on a map. This makes filling in the form easier and faster thus leading to better completion rate.

In this article, we’ll show you how to embed a Google Map in contact forms with a map pin.
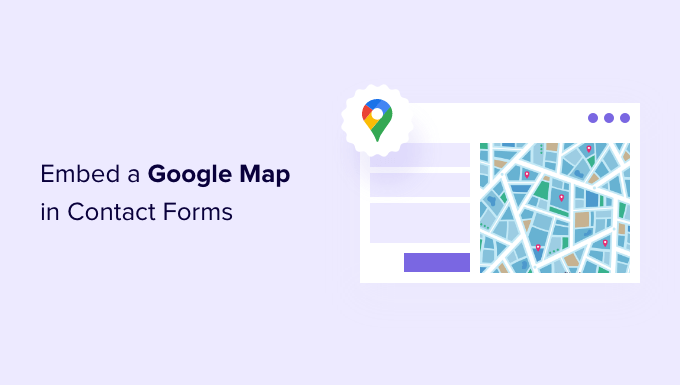
How to Embed a Google Map in Contact Forms (With Map Pin)

Why Embed a Google Map in Your Contact Form?

When you created your WordPress website, chances are that you added a contact form so that visitors can easily get in touch with you about your products and services.

And if your business has a physical location, then you probably also

added a Google Map of your own location to encourage people to visit your store.

What many business owners don’t know is that you can use geolocation to automatically fill in the address field on your contact form and display the user’s location on a map. This improves the overall user experience and helps reduces form abandonment.

Knowing your users’ locations also lets you use geolocation targeting to show personalized content and boost conversion rates.

With that being said, let’s take a look at how to embed a Google Map in contact forms.

How to Embed a Google Map in a Contact Form

For this tutorial, we’ll be using WPForms, the best contact form plugin for WordPress. It lets you easily create any type of form with a simple drag and drop form builder.

There is a free version of WPForms available with all the features you need to create a basic contact form. For this tutorial, however, we’ll use WPForms Pro since it include the Google Map addon.

The first thing you need to do is install and activate the WPForms plugin. For more details, see our step by step guide on how to install a WordPress plugin.

Upon activation, you need to visit the WPForms » Settings page to enter your license key. You can find this information in your WPForms account area. Make sure you click the ‘Verify Key’ button to activate your license.
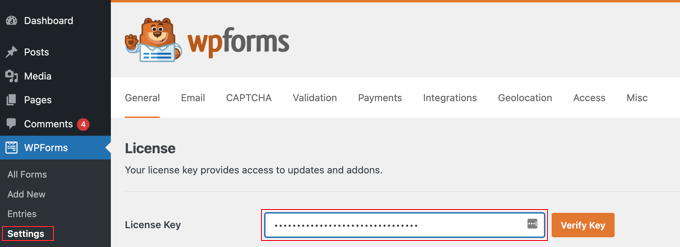
Visit the WPForms » Settings Page to Enter Your License Key

Next, you need to navigate to WPForms » Addons and find the Geolocation Addon. You can use the search option at the top of the screen, or simply scroll through the available addons.

Once you’ve found it, you should install the add-on by clicking the ‘Install Addon’ button.
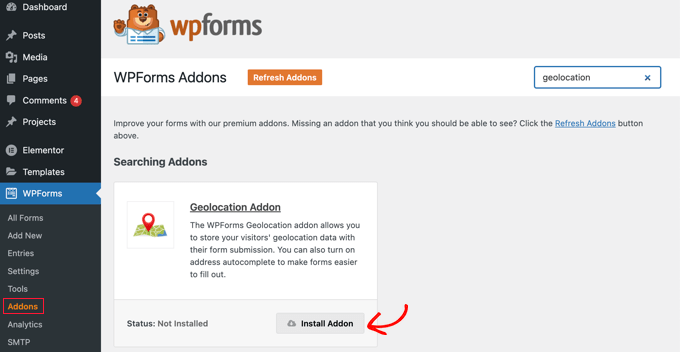
Navigate to WPForms » Addons and Install the Geolocation Addon

Now that the Geolocation addon is activated, you will need to configure its settings. To do that, navigate to WPForms » Settings and click on the Geolocation tab.

On this page, you need to select a geolocation provider. For this article, we’ll choose the Google Places API.
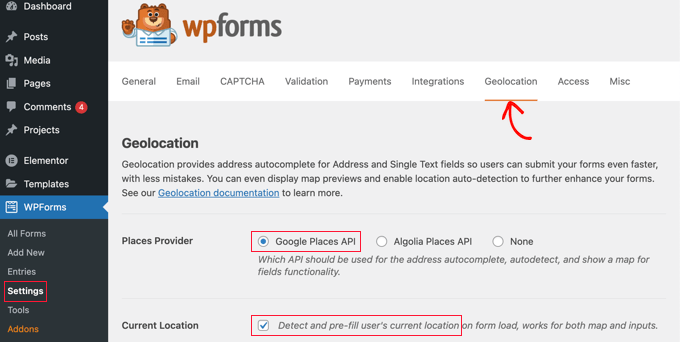
Select a Geolocation Provider

You should also click the ‘Current Location’ checkbox. This will detect and autocomplete the address when users fill in the contact form, saving time and improving accuracy.

Next, you need to scroll down to the Google Places API settings. You will be asked to fill in your Google API key. You can get your key from Google and then paste it into the field. We’ll show you how to do that in the next section.

Scroll Down to the Google Places API Settings

Generating a Google Places API Key

You can obtain an API key for Google Places by going to the Google Cloud Console website.

You’ll be asked to select your country from a drop down menu and agree to the terms of service. In some countries, you may also be offered the chance to sign up for a mailing list.
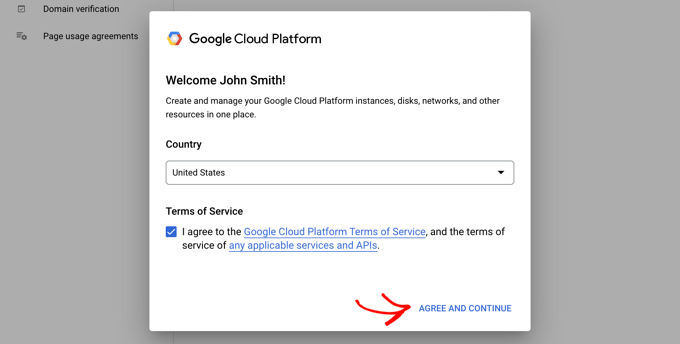
Obtain an API Key for Google Places From the Google Cloud Console Website

When you’re ready to move to the next step, click on ‘Agree and Continue’.

Next, you’ll need to select a project for the API key. Simply click on ‘Select a project’ and click on the project you want to use from the list.
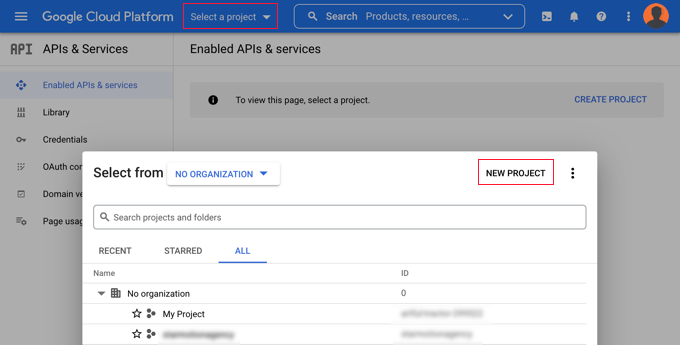
Select a Project or Create a New One

If you haven’t created a project before, or this is a new website you have not yet added to Google, then you should click ‘New Project’ to set one up.

Note: Google will require you to enable billing for that project in order to use the Google Places API. They offer the first $300 for free, which is plenty to cover a simple map embed like we’re creating in this tutorial. Smaller traffic sites won’t need to pay anything, and they’ll ask your permission to upgrade before charging any fees.

You should now be on the ‘APIs & Services’ page where you can enable the APIs needed for displaying Google Maps on your site. You’ll need to click the ‘+ Enable APIs and Services’ button at the top of the page.

Click the 'Enable APIs and Services' Button

This will take you to Google’s API Library where you will need to enable three different mapping APIs.

You can find them by using the search function at the top of the page or by clicking the ‘View All’ link next to the Maps section.
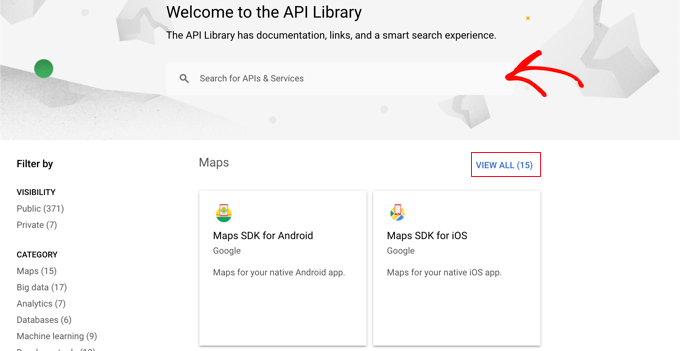
You Need to Enable Three Mapping APIs

First you need to find and enable the Places API. Once you locate it, you will need to click it. On the next page, you should to click the ‘Enable’ button.

After that, you should do the same thing for the Maps JavaScript API and Geocoding API.
Enable the Places API

Now that you have enabled the three APIs, you can create an API key.

In the menu on the left, you need to navigate to APIs & Services » Credentials.

From here you will be able to click the ‘+ Create Credentials’ button at the top of the screen and then select the ‘API key’ option.

Click the ‘+ Create Credentials’ Button

Your API key will be created and displayed on a popup window.

Later in this tutorial, you’ll need to copy that key into WPForm’s settings. For now, let’s take a look at how to place some restrictions on the use of the API key.
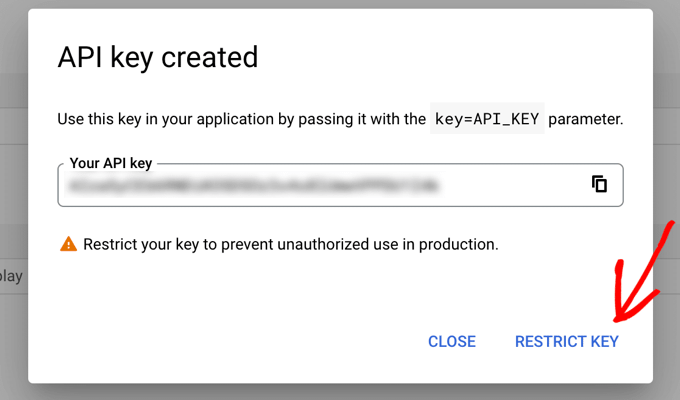
Your API Key Will Be Created and Displayed on a Popup Window

Restricting Your Google Places API Key

Overuse of the API key may move you out of the free plan and cost more than you expect. We recommend that you restrict the key to prevent unauthorized or unexpected use.

To do that, you need to click the ‘Restrict Key’ link at the bottom of the ‘API key created’ popup in the screenshot above.

On the next page, you can set up a number of different restrictions. The first of these is ‘Application restrictions’. In this section, you should click on the ‘HTTP referrers (web sites) option. Then the key will only be used on websites.
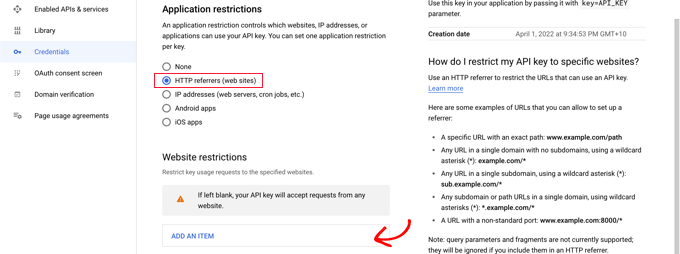
Restrict to HTTP Referrers (Web Sites)

Next, you should make sure it is only used on your own website. To do that, you should scroll down to the ‘Website restrictions’ section and then click the ‘Add an Item’ button.

Now you should type your website domain name into the ‘New item’ field using the pattern *example.com/*.

Type Your Website Domain Into the ‘New Item’ Field Using the Pattern *example.com/*

If you will be using Google Maps on more than one website, then you can click the ‘Add an Item’ button and add as many domains as you need.

Now that you’ve restricted the API key to only your own websites, you can also restrict it to work with only the Google APIs that you added above.

You need to scroll down to the ‘API restrictions’ section of the page and select the ‘Restrict key’ option. This will reveal a drop down where you should check the ‘Geocaching API’, ‘Maps JavaScript API’ and ‘Places API’ boxes.
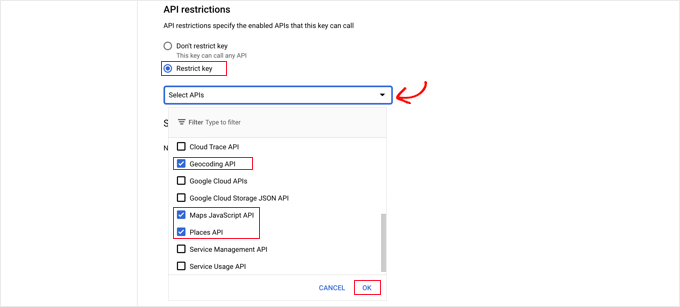
Restrict the API Key to Specific APIs

Once you’ve done that, you should click the ‘OK’ link to store your settings. Finally, make sure you click the ‘Save’ button at the bottom of the page to activate all of the restrictions you have chosen.

Click the ‘Save’ Button to Activate the Restrictions You Have Chosen

Note that it may take up to 5 minutes for the settings to take effect.

Adding the Google API Key to WPForms Settings

You’ll now see the API key listed with any others you have available. You should click the Copy icon so you can add the key to the WPForms Geolocation settings page.

Click the Copy Icon and Add the Key to WPForms

Note that if you ever need to change any of the API’s settings or restrictions, then you can click the Edit icon on the right

Now you need to return to your website which should still be on the WPForms » Settings » Geolocation page.

Once there, paste the key into the Google Places API field in the WPForms settings. Once you’ve done that, make sure you click the ‘Save Settings’ button.

Scroll Down to the Google Places API Settings

Note: Google Places requires you to have an SSL certificate for your site. To learn how to get one, check out our beginner’s guide on how to get a free SSL certificate.

Creating a Contact Form With Embedded Google Map in WordPress

Now that you have configured WPForms and Google Places, you are ready to create a contact form in WordPress. You can get started by following our guide on how to create a contact form in WordPress.

Once you’ve made a basic form, you need to add an address field. You can use either an Address block or Single Line Text field. For this tutorial, we’ll use a Single Line Text field.

Simply drag the Single Line Text block onto the form.
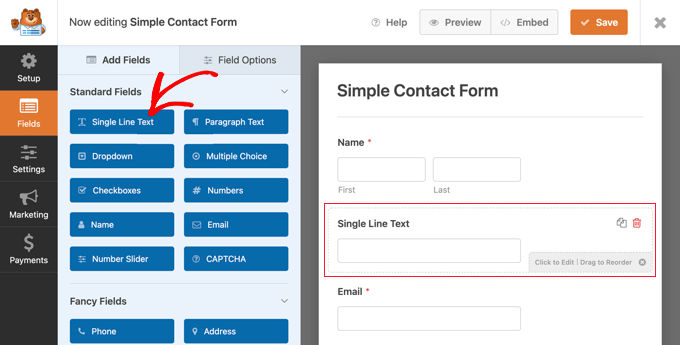
Drag the Single Line Text Block Onto the Form

Next, we’ll customize the field’s settings. To do that, you need to click on the field to display the Single Line Text settings.

First, you should change the field’s label to ‘Address’. This will make it clear to your users what they should type in the field.
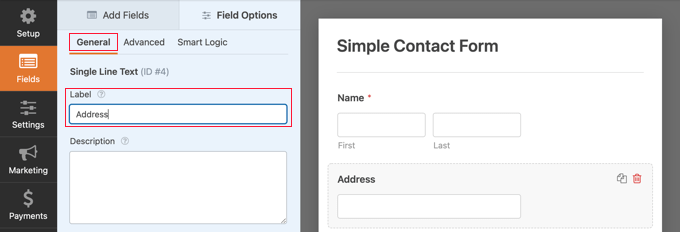
Rename the Field's Label to 'Address'

After that, you need to change the field’s settings so that it displays a map on the form. To do that, you’ll need to click on the Advanced tab.

Once there, you should look for the ‘Enable Address Autocomplete’ option at the bottom of the settings and toggle it to the ‘On’ position. You will then see another option, ‘Display Map’, which you should also enable. You can choose to display the map above or below the field.
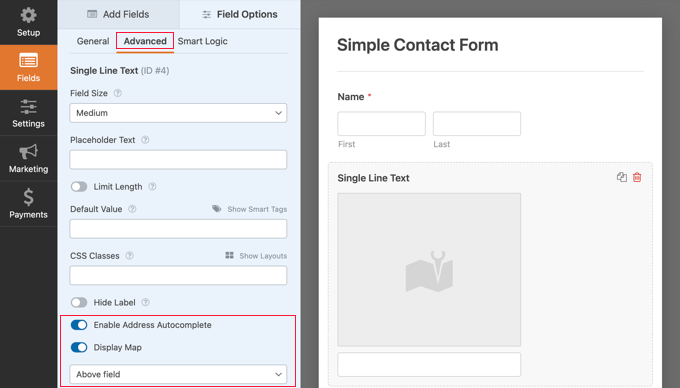
Toggle the ‘Enable Address Autocomplete’ Option On

Adding the Contact Form to Your Website

The simplest way to add the contact form to your website is to click the ‘Embed’ button. You’ll find it next to the ‘Save’ button at the top of the form editor screen.

You’ll be asked whether to add the form to an existing form or create a new page.

Click the 'Create New Page' Button

For this tutorial, we’ll click the ‘Create New Page’ button.

Next, you should give the page a name and then click the ‘Let’s Go!’ button.

Give the Page a Name and Click the ‘Let’s Go!’ Button

A new page with that name will be created, and your contact form will be added automatically.

All you need to do is click the ‘Publish’ button to push the form live.

Click the 'Publish' Button to Push the Page Live

Viewing the Google Map in Contact Form

When a user visits your contact form, they will be asked whether they wish to allow your website to access your location.

The User Will Need to Give Permission for Your Website to Access Their Location

If they click the ‘Allow’ button, then their current location will be entered into the address field, and a pin of that location will be added to the map.

This autocomplete feature will save your visitors time by making it faster and easier to type their addresses.
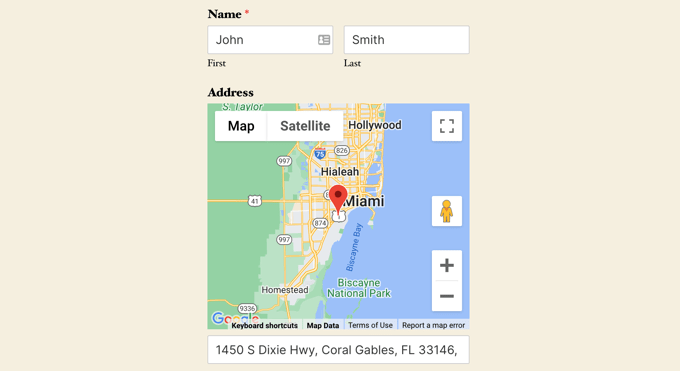
Autocomplete Makes Typing an Address Faster and More Accurate

If they need to change the address, then they can simply type a new one or drag the pin to a different location on the map.

How to View User Location Data on a Form

Once you enable geolocation, WPForms will also record each user’s location when they fill in your form. Knowing the location of your users may help you find better leads.

You’ll need to navigate to WPForms » Entries and then click on your contact form.

Navigate to WPForms » Entries Then Click the Contact Form

You will now see a list of entries filled in by your users for that form.

To view a particular entry, simply click the ‘View’ link on the right.
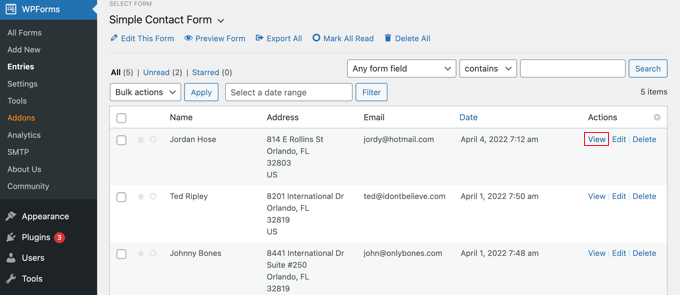
Click the ‘View’ Link to View an Entry

You will now see the form data filled in by the user such as their name, business email, business phone number, along with some location data.

This includes a pin on Google Maps, the user’s location, zip code, and country, as well as their approximate latitude and longitude.
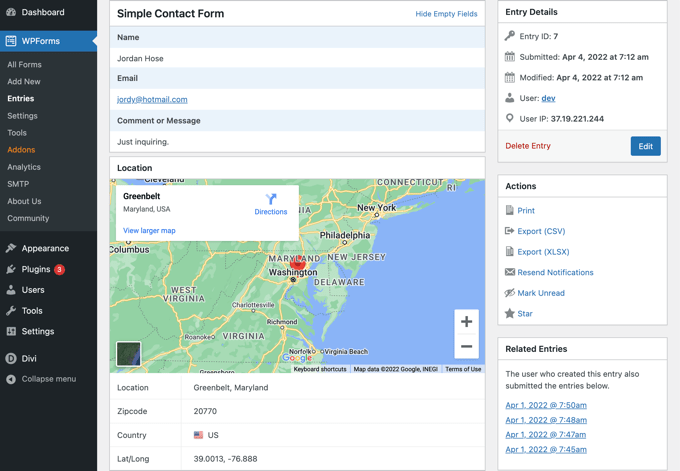
You Will See a Pin on Google Maps With Their Location

Of course, if the user didn’t grant permission for the form to know their location, then no location data will be displayed.

That’s all, you have successfully added a Google Map in your contact form. You can also use WPForms to build surveys in WordPress, create a payment form to accept online payments, and more.

We hope this tutorial helped you learn how to embed a Google Map in contact forms. You may also want to learn how to run a giveaway or contest, or check out our expert pick of the best WordPress plugins for all business websites.

If you liked this article, then please subscribe to our YouTube Channel for WordPress video tutorials. You can also find us on Twitter and Facebook.

The post How to Embed a Google Map in Contact Forms (With Map Pin) first appeared on WPBeginner.


April 27, 2022 at 01:00PM

Tuesday, April 26, 2022

How to Minify CSS / JavaScript Files in WordPress (3 Ways)

Do you want to minify files on your WordPress site?

Minifying your WordPress CSS and JavaScript files can make them load faster and speed up your WordPress site.

In this guide, we will show you how to easily minify CSS/JavaScript files in WordPress to improve performance and speed.

Easily minify CSS and JavaScript files in WordPress

What is Minification and When Do You Need it?

The term ‘minify’ is used to describe a method that makes your website file sizes smaller. It does this by removing white spaces, lines, and unnecessary characters from the source code.

Here is an example of normal CSS code:

body {
margin:20px;
padding:20px;
color:#333333;
background:#f7f7f7;
}
h1 {
font-size:32px;
color#222222;
margin-bottom:10px;
}

After minifying the code it will look like this:

body{margin:20px;padding:20px;color:#333;background:#f7f7f7}
h1{font-size:32px;margin-bottom:10px}

Usually, it is recommended to only minify files that are sent to user’s browsers. This includes HTML, CSS, and JavaScript files.

You can minify PHP files too, but minifying it will not improve page load speed for your users. That’s because PHP is a server-side programming language, meaning it runs on servers before anything is sent to the visitor’s web browser.

The advantage of minifying files is improved WordPress speed and performance, since compact files are faster to load.

However, some experts believe that the performance improvement is very small for most websites and not worth the trouble. Minification only removes a few kilobytes of data on most WordPress sites. You can reduce more page load time by optimizing images for the web.

If you are trying to achieve 100/100 score on Google Pagespeed or GTMetrix tool, then minifying CSS and JavaScript will significantly improve your score.

Having said that, let’s take a look at how to easily minify CSS/JavaScript on your WordPress site.

We’ll go over 3 different options you can choose from:

Ready? Let’s get started with our top recommended method.

Method 1. Minify CSS/JavaScript in WordPress Using WP Rocket

This method is easier and is recommended for all users. It works regardless of which WordPress hosting you are using.

First, you need to install and activate the WP Rocket plugin. For more details, see our step by step guide on how to install a WordPress plugin.

WP Rocket is the best WordPress caching plugin on the market. It allows you to easily add caching to WordPress and significantly improve website speed and page load times.

For more details, see our tutorial on how to install and set up WP Rocket in WordPress.

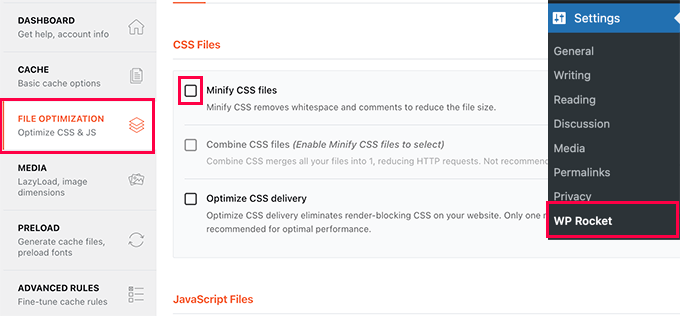
Upon activation, you need to visit the Settings » WP Rocket page and switch to the ‘File Optimization’ tab.

Minify CSS files in WP Rocket

From here, you need to check the Minify CSS files option.

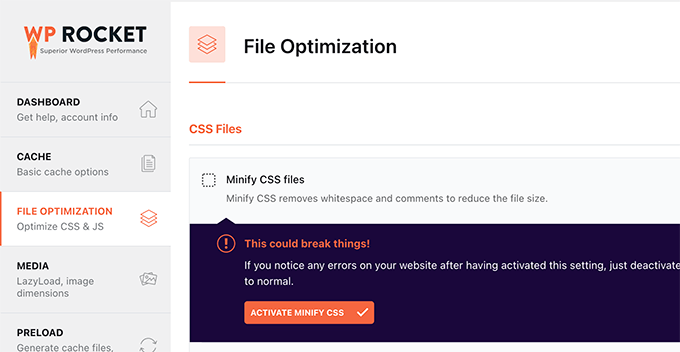
WP Rocket will then show you a warning that this could break things on your site. Go ahead and click on the ‘Activate Minify CSS’ button. You can always deactivate this option if it causes any issues with your website.

Activate CSS minify

Next, you need to scroll down to the JavaScript Files section below.

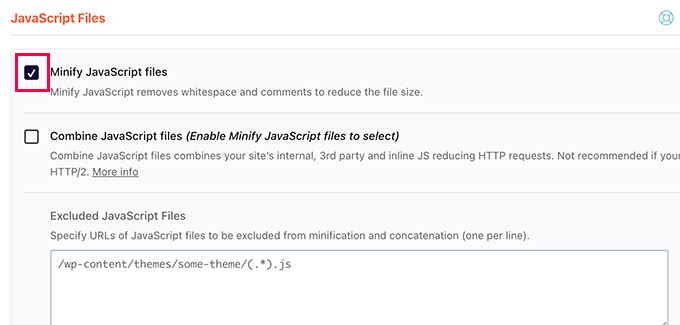
Here, simply check the box next to the ‘Minify JavaScript files’ option.

WP Rocket minify JavaScript files

Again, you’ll see a warning that this could break things on your site. Go ahead and click on the ‘Activate Minify JavaScript’ button.

After that, don’t forget to click on the Save changes button to store your settings.

WP Rocket will now start minifying your CSS and JavaScript files. You can clear your cache in the plugin settings to make sure that it starts using the minified CSS and JavaScript for the next website visitor.

Method 2. Minify CSS/JavaScript in WordPress Using SiteGround

If you are using SiteGround as your WordPress hosting provider, then you can minify CSS files using SiteGround Optimizer.

SiteGround Optimizer is a performance optimization plugin that works on their own platform. It works well with their Ultrafast PHP to improve your site’s loading times.

Simply install and activate the SiteGround Optimizer plugin on your WordPress site. For more details, see our step by step guide on how to install a WordPress plugin.

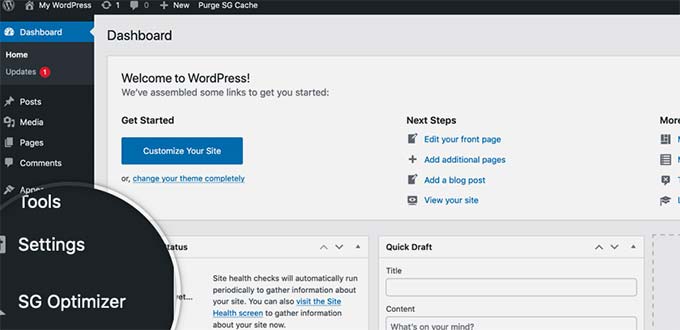
After that, you need to click on the SG Optimizer menu in your WordPress admin sidebar.

SG Optimizer

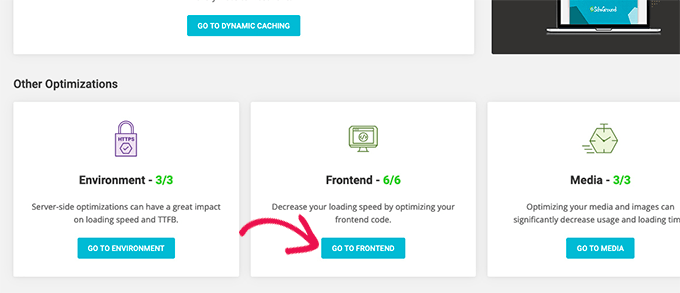
This will take you to SG Optimizer settings.

From here you need to click on the ‘Go To Frontend’ button under ‘Other Optimizations’.

SiteGround frontend optimization

On the next screen, you need to switch on the toggle next to the ‘Minify CSS files’ option.

Minify CSS in SiteGround

Next, you need to switch to the JavaScript tab and turn on the toggle next to ‘Minify JavaScript Files’ option.

That’s all! You can now empty your WordPress cache and visit your website to load minified versions of CSS and JS files.

Method 3. Minify CSS/JavaScript using Autoptimize

This method is recommended for users who are not on SiteGround and not using WP Rocket.

First, you need to install and activate the Autoptimize plugin. For more details, see our step by step guide on how to install a WordPress plugin.

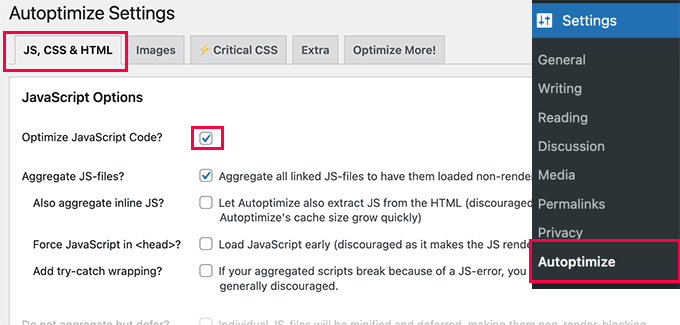
Upon activation, you need to visit the Settings » Autoptimize page to configure the plugin settings.

From here, first you need to check the option ‘Optimize JavaScript Code’ under JavaScript Options.

Autoptimize JavaScript options

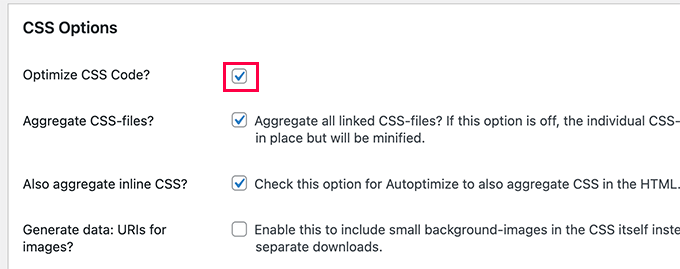
After that, you need to scroll down to the CSS Options and check the box next to the ‘Optimize CSS code’ option.

Autoptimize CSS code

Don’t forget to click on Save Changes button to store your settings.

Then you can click the Empty Cache button to start using your minified files. The plugin can also be used to fix render blocking JavaScript and CSS in WordPress.

We hope this article helped you minify CSS and JavaScript on your WordPress site. You may also want to see our tutorial on optimizing core web vitals in WordPress and follow our ultimate WordPress performance guide.

If you liked this article, then please subscribe to our YouTube Channel for WordPress video tutorials. You can also find us on Twitter and Facebook.

The post How to Minify CSS / JavaScript Files in WordPress (3 Ways) first appeared on WPBeginner.


April 26, 2022 at 03:07PM

Monday, April 25, 2022

What’s Coming in WordPress 6.0 (Features and Screenshots)

WordPress 6.0 Beta arrived a few days ago, and it is expected to be released on May 24th, 2022. It will be the second major release of 2022 and will come with many new features and improvements.

We have been closely monitoring the development and trying out new features on our test sites.

In this article, we’ll give you a sneak peek into what’s coming in WordPress 6.0 with features and screenshots.

Features and screenshots of upcoming WordPress 6.0 (Features and Screenshots)

Note: You can try out the beta version on your computer or on a staging environment by using the WordPress Beta Tester plugin. Please keep in mind that some of the features in beta may not make it into the final release.

Improvements to Full Site Editing

WordPress has been gradually releasing the new full site editing experience.

Basically, with full site editing, you can customize your WordPress themes using the same block editor that you use to create posts and pages.

You can make site wide changes to your theme templates and edit them visually with blocks.

Note: You’ll need a block enabled theme that supports this feature.

WordPress 6.0 is bringing a ton of enhancements and new features to the Theme Editor. Here are some of them.

Effortlessly Switch Theme Styles

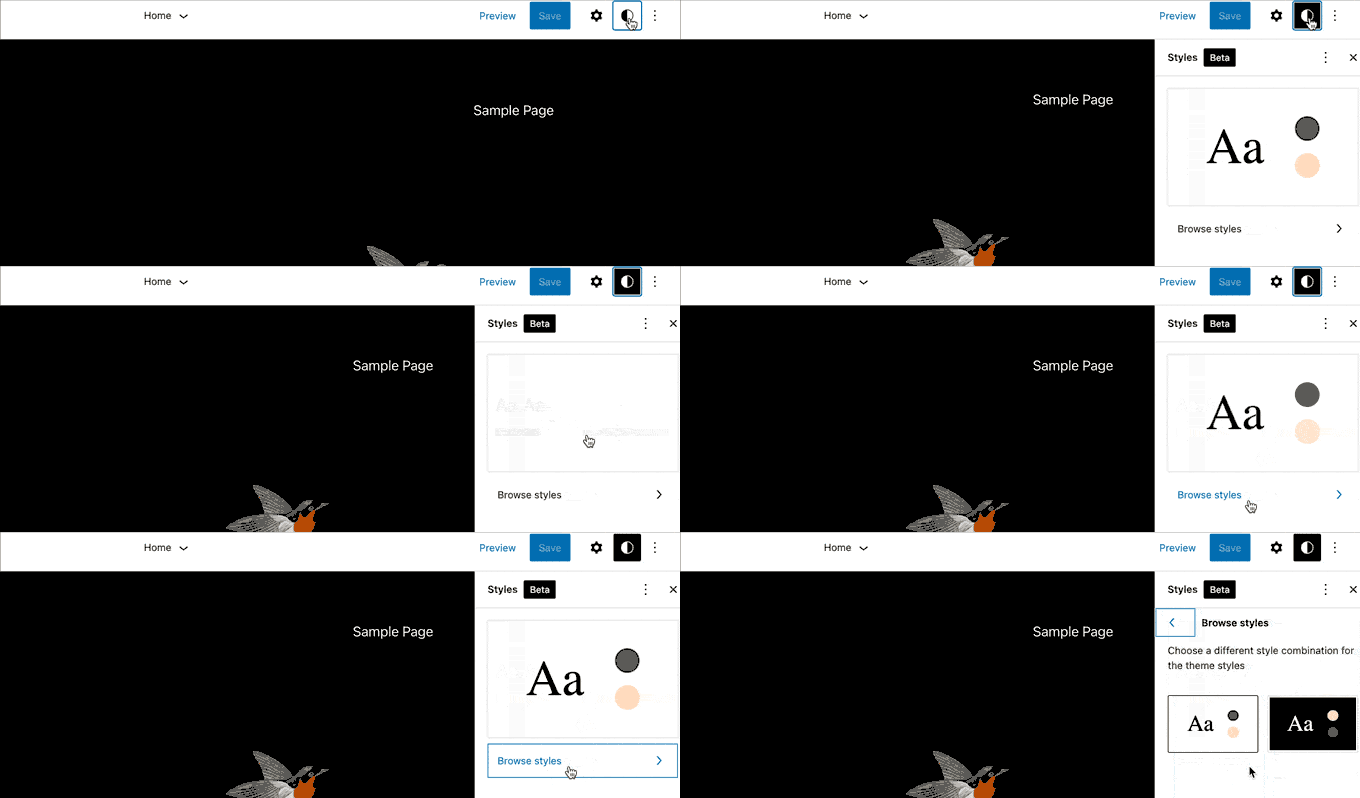
WordPress 6.0 will allow users to easily switch theme styles with one click.

Simply click on the Style button at the top right corner and then switch to Browse Styles tab to see available styles in your theme.

Easily browse and switch styles

This allows theme developers to add multiple style presets to their themes that users can easily switch.

Export Your WordPress Block Theme

The new Theme Editor (Full Site Editor) allows you to create your own templates, customize styles, create beautiful layouts. But what if you wanted to copy all of them to another WordPress site?

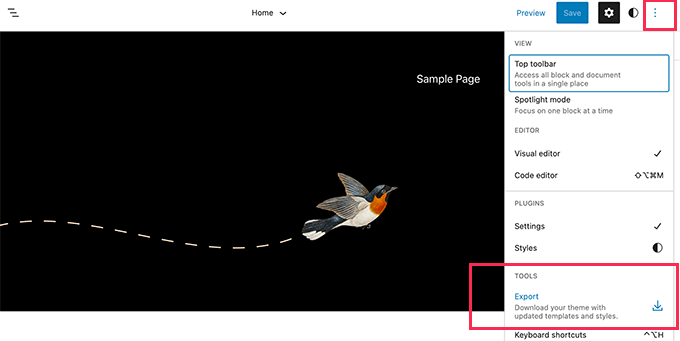
WordPress 6.0 will allow you to easily export your theme with all the changes you made.

Export block theme

You can then simply install this theme on any other WordPress website and it will include all the changes you made to the original theme.

New Blocks in Block Theme Editor

WordPress 6.0 will introduce the following new blocks that you can use in your theme and templates.

1. Comments

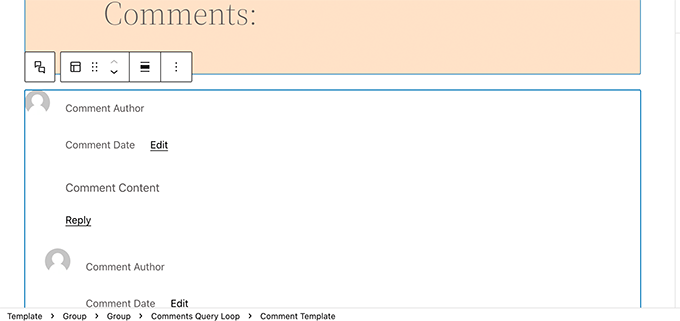
You can now add comments query loop block. It comes with sub-blocks like comment author name, avatar, comment content, edit link, and more. You can edit them individually to make your comments standout.

Comment Query Loop block

2. Read More

While the Excerpt block in WordPress 5.9 allowed you to just enter the text you want to use for ‘Read more’.

WordPress 6.0 will come with a separate block as well. This way you can choose different text, background, and border for the link to make it more prominent.

Read more block

3. No results in Query Loop

When adding a Query Loop block, you can now insert the No Results block inside it. However, the block will only be available if your selected query doesn’t have any results.

No Results block

4. Post Author biography

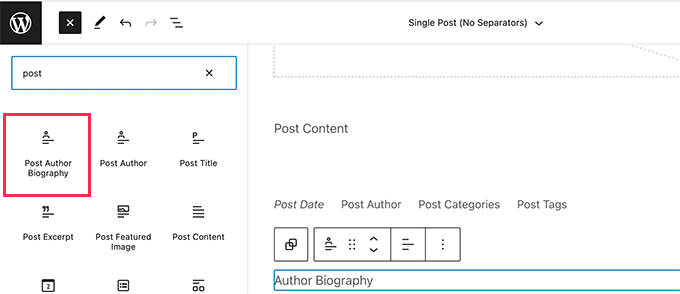
New post author biography block can now be used along with Post Author and Avatar blocks.

Add post author biography

5. Avatar

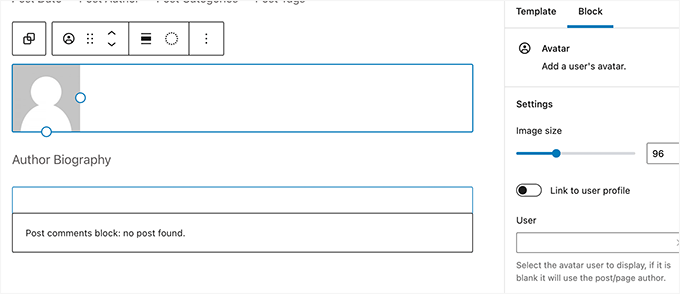
The avatar block allows you to display a user’s Avatar (profile photo). You can choose if you want to display Avatar for a specific user or display current post/page author’s avatar.

Avatar block

While the default theme editor continues to see improvements, it still needs more work to compete with custom theme builder solutions that come as part of the WordPress page builder.

Block Editor Changes in WordPress 6.0

The block editor is where most website owners spend most of their time creating content and pages for their website.

Each WordPress release comes with significant improvements and new features to the content editor. Following are some of the most noticeable changes coming in WordPress 6.0 for the block editor.

Featured Image in Cover Block

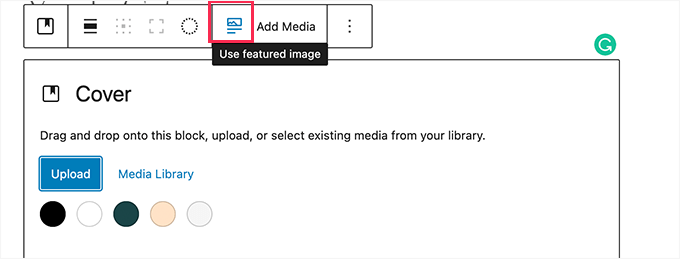
Want to use the featured image for a post in the cover block? With WordPress 6.0. You’ll be able to choose featured image for a cover block and it will automatically display current post/page’s featured image.

Featured image in cover block

Changing featured image will automatically change the image displayed in this cover block.

Easier Text Selection in Multiple Blocks

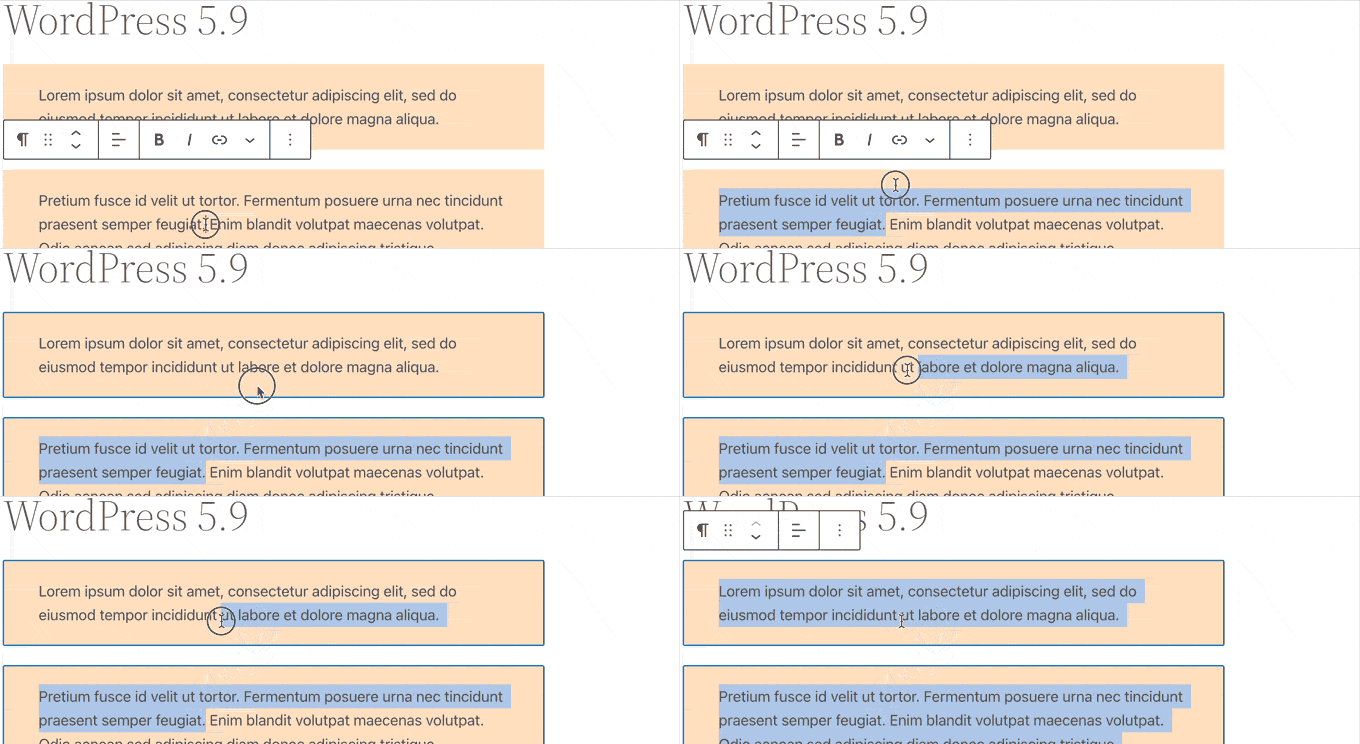
Currently, selecting text across multiple blocks is difficult. Often the block editor ends up selecting all text in the block.

Selecting text across multiple blocks in WordPress 5.9

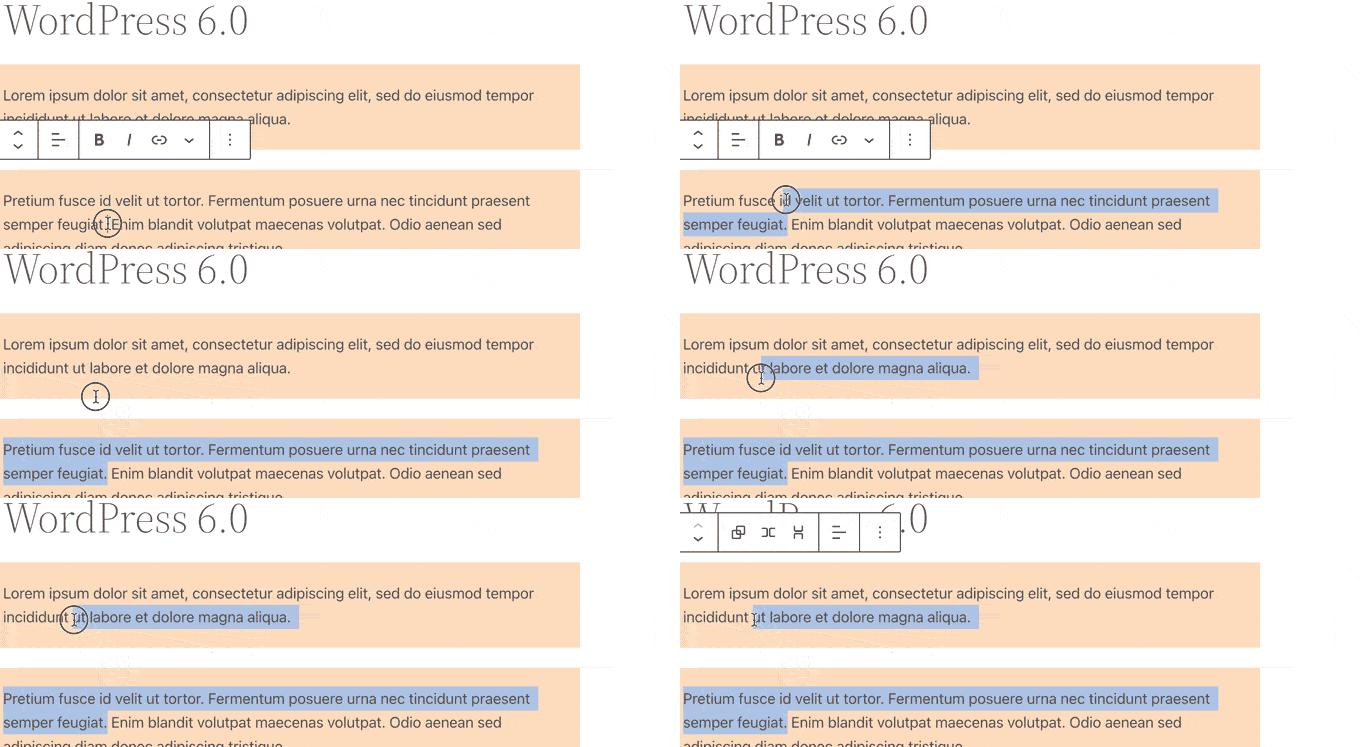
WordPress 6.0 will make it easier to simply select only the text you want to select.

Selecting text across multiple blocks in WordPress 6.0

Lock Reusable Blocks

A major pain point with the reusable blocks is that if any user makes changes to them, then those changes are saved.

To fix this there are already plugins that you can use to lock the reusable block and prevent users from editing it.

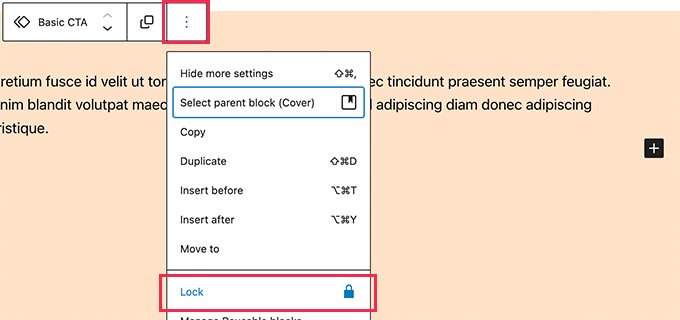
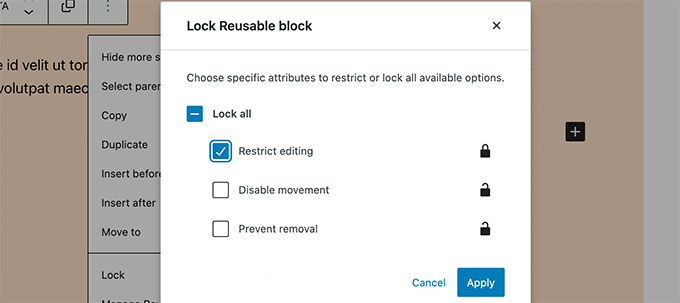
WordPress 6.0 is expected to bring that feature to the core. You’ll be able to simply select Lock Reusable Block option to prevent users from directly editing it.

Lock reusable block

This will bring up a popup where you’ll be able to choose lock restrictions.
You can lock edit, move, or removal of the block.

Lock options for reusable blocks in WordPress

Responsive Group and Row Blocks

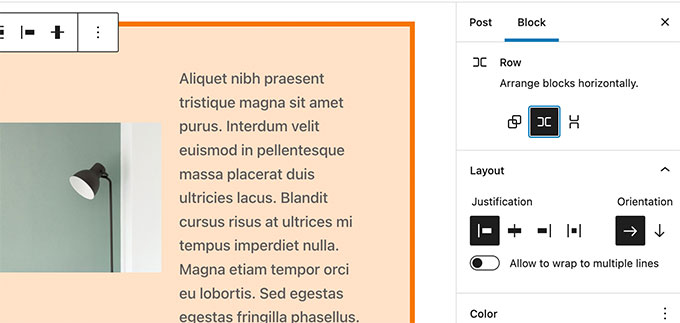
With WordPress 6.0 you’ll be able to choose how you would want blocks to behave on different screen sizes.

For group block, you’ll see the option to display the blocks inside as a row or a stack.

Responsive group blocks

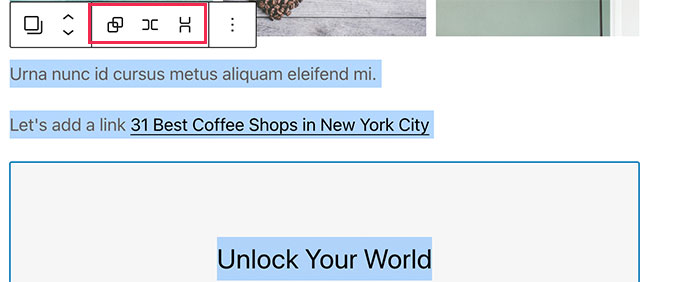
You can also select multiple blocks and then choose between a row or a stack layout.

Multi block row or stack layout

Miscellaneous Block Editor Enhancements

Following are a few more notable enhancements to the block editor in WordPress 6.0.

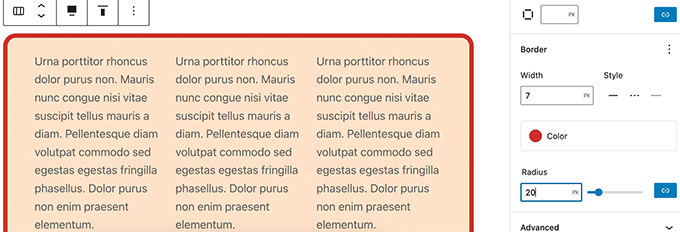
1. Border for Columns Block

You can now add a border around the columns block.

Border around columns block

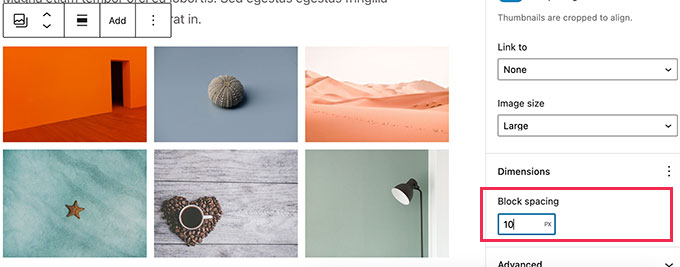
3. Spacing for Gallery Images

You can now adjust the spacing between individual images inside a gallery block.

Gallery spacing

4. Quick Shortcut to Add Internal Links

You can now quickly add links by adding two square brackets followed by the post or page title.

Add link shortcut

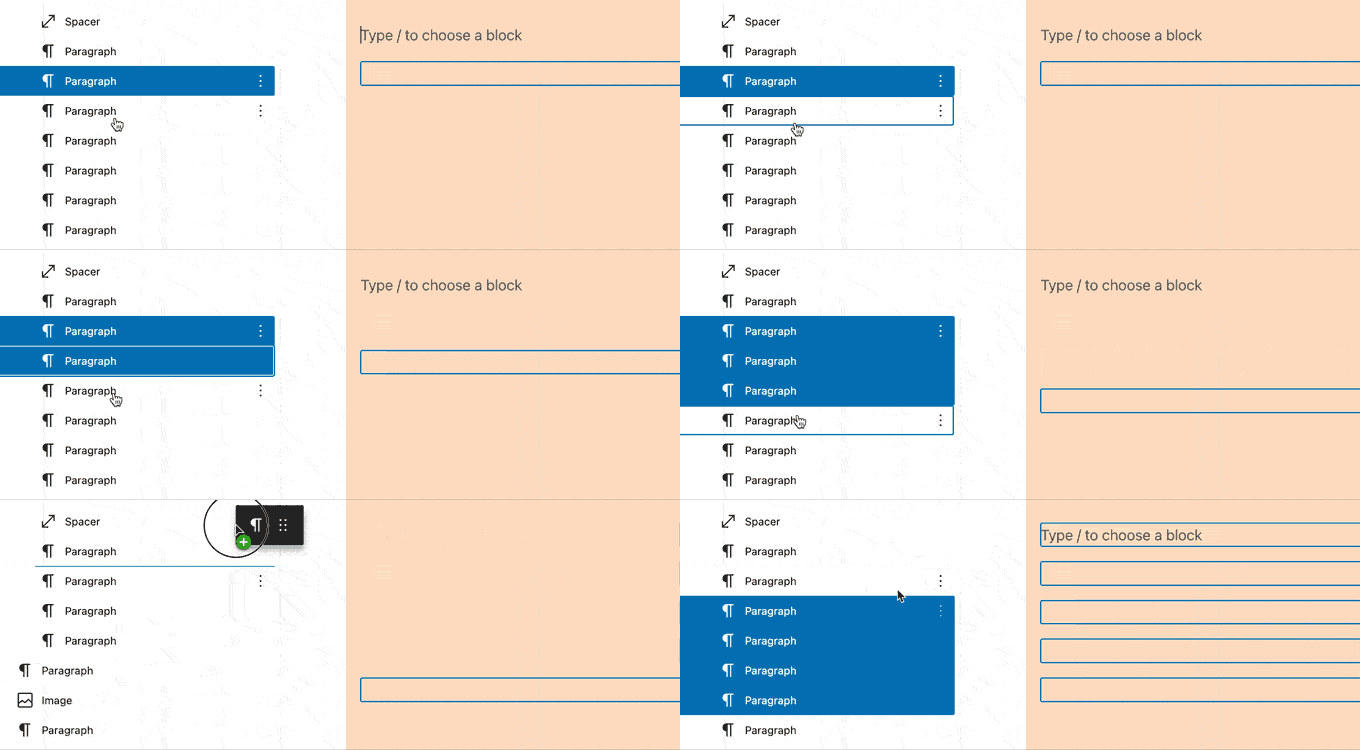
5. Select Multiple Blocks in List View

Users will be able to use SHIFT+Click or Shift+Up+Down keys to select multiple adjacent blocks in the list view. They can then move them up or down or perform other actions.

Move multiple blocks

See a full list of helpful WordPress keyboard shortcuts.

Accessibility Improvements in WordPress 6.0

Each WordPress release continues to improve usability by making it more accessible for users.

WordPress 6.0 will come with a ton of improvements that would improve user experience for users with accessibility needs.

Following are some of the more notable accessibility improvements.

  • Post title will be used as ALT text for featured images if no other ALT text is provided.
  • Better tabbing in blocks with placeholder elements.
  • Search announcement in block search.
  • Read description for blocks with a placeholder setup.
  • Admin bar text labels will be readable by screenreaders on smaller screens.

For a detailed roundup, see accessibility improvements in WordPress 6.0.

Under The Hood Changes

WordPress 6.0 will also bring many changes for developers to explore and use in their own themes, plugins, and projects.

Following are some of these under the hood changes:

  • Webfonts API will provide theme authors a more efficient way to manage local fonts via PHP or theme.json. (See details)
  • An API to prevent blocks from appearing on Widgets screen. (#55301)
  • Make get_the_author_link pluggable. (#51859)
  • Improved sticky post query. (#36907)

We hope this article gave you a glimpse into what’s coming in WordPress 6.0.

Comment below to let us know what features you find interesting and what you’d look to see in a future WordPress release!

If you liked this article, then please subscribe to our YouTube Channel for WordPress video tutorials. You can also find us on Twitter and Facebook.

The post What’s Coming in WordPress 6.0 (Features and Screenshots) first appeared on WPBeginner.


April 25, 2022 at 05:06PM