Do you want to display all your subscriber counts in WordPress?
Displaying the total number of followers on your WordPress site is an easy way to boost your social proof and authority.
In this article, we’ll show you how to grow your audience by displaying all your subscriber counts in WordPress.

Why Display Your Subscriber Count in WordPress?
A subscriber count is the number of people subscribed to a service or platform. You’ll often see subscriber or follower counts on popular social media sites.
Adding your subscriber counts to WordPress is a form of social proof.
If users see that a lot of people are followers or subscribers, then they’re more likely to see your website as an authority in your blogging niche.
For example, here at WPBeginner we display our total number of readers to encourage other visitors to follow or subscribe.

There are all kinds of different subscriber counts you can display on your site including email newsletter subscribers, membership site users, social media followers, and more.
That being said, let’s take a look at how you can display all your subscriber counts in WordPress. Simply use the quick links below to jump straight to the method you want to use.
- Displaying multiple social media follower counts with a WordPress plugin
- Displaying individual social media follower counts in WordPress
- Displaying your email list subscriber count in WordPress
- Displaying total number of registered users in WordPress
Method 1. Displaying Multiple Social Media Follower Counts with a WordPress Plugin
With this method, you can display multiple social media follower counts together on your WordPress website. If you have a large social media following on different networks, then this can be a great way to show your authority.
To do this, we’ll be using the Ultimate Social Icons plugin. It integrates with over 200 platforms and lets you easily display subscriber counts for multiple networks at once.
First thing you need to do is install and activate the plugin. For more details, see our step by step guide on how to install a WordPress plugin.
Upon activation, there will be a new menu option called ‘Ultimate Social Media Icons’ in your WordPress admin panel.
You need to click this to bring up the plugin settings.
Then, click the ‘Which icons do you want to show on your site?’ drop down and check the box for the social icons that you want to display.
Next, click on the ‘What do you want the icons to do?’ drop down. Here, you can configure the actions that visitors can perform when interacting with your icons.
For example, if you selected Facebook, then you have the option for users to like your page, visit your page, and more.
Next, click to expand the ‘Where shall they be displayed?’ section.
Here, you can choose where your icons will appear.
You’ll have multiple options including adding them in a widget, having them hover over your site, using a shortcode, and more.
If you want the flexibility to place the subscriber count anywhere on your site, then check the ‘Place via shortcode’ box.
This gives you a shortcode that you can add anywhere on your WordPress site.
If you’re using the shortcode option, then make sure to copy the shortcode, since we’ll add it to your site at a later step.
Now, it’s time to configure your subscriber counts. Simply click the ‘Do you want to display counts next to your icons’ drop down and then click the radio button for ‘Yes’.
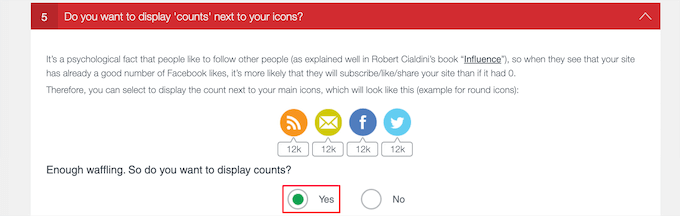
Below that, you may need to enter additional information, depending on the platforms and services you selected earlier.
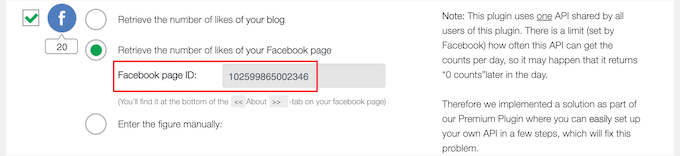
For example, to display your Facebook subscriber count, you’ll need to enter your Facebook page ID.
The plugin does a good job of explaining the actions you need to take, and the information you’ll need to enter for each social network.
Once you’ve finished configuring the plugin settings, scroll to the bottom of the page and click on the ‘Save All Settings’ button.
Now, you can add your social share count buttons to your WordPress blog.
You can add these to any post, page, or widget area. To add it to a post, simply open up the blog post you want to edit.
Then, click the ‘Plus’ add block icon and search for ‘Shortcode’, then select the block.
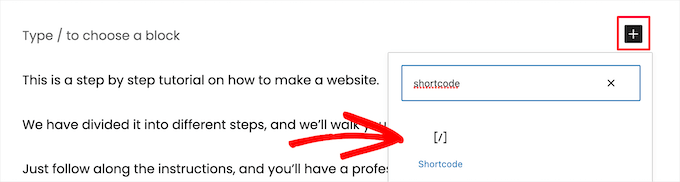
Next, paste the plugin shortcode that you copied earlier.
Then, click the ‘Update’ or ‘Publish’ button to save your changes.

Now, you can visit your website to see your social media follower counts live.
If you want to add the shortcode to a page or widget area, then the steps will be similar.
To learn more, see our beginner’s guide on how to add a shortcode in WordPress.

Method 2. Displaying Individual Social Media Follower Counts in WordPress
This method involves showing individual social media follower counts for Facebook, YouTube, and Twitter.
If you’re very active and have a large following on a specific social media network, then this is a great option.
Display Your Facebook Follower Count in WordPress
If you have a large Facebook following, then you can easily show this follower count to your site.
To do this, you’ll be using the Facebook page plugin. These work similar to standard WordPress plugins, but are created by Facebook.
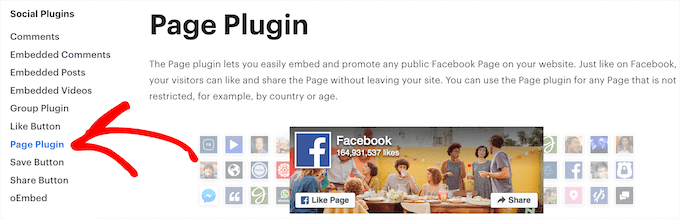
First, you need to head over to the Meta for Developers website to create your plugin embed code. You’ll see a list of all the different Facebook plugins that you can add to your website.
From here, select ‘Page Plugin’ from the left-hand sidebar.
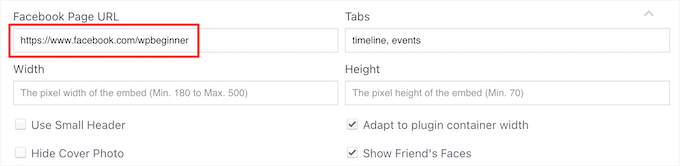
Next, enter the URL of your Facebook page. Then, you need to let Facebook know what content it should display on your website.
Beyond your follower count, you can also show your timeline, events, or messages.
If you want to display multiple types of content, then simply separate each value with a comma. For example, if you wanted to display your timeline plus upcoming events, then you’d type ‘timeline, events’.
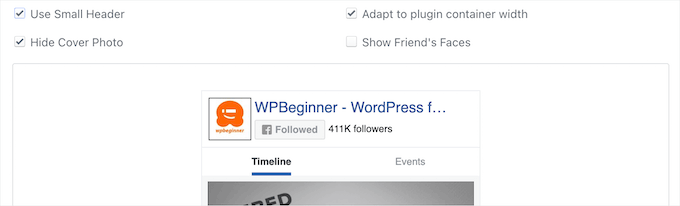
The live preview will update automatically so you can play around with the settings to see what works for you. You can also change the width and height of your Facebook plugin.
If you want to reduce the size of your Facebook content, then you can check the ‘Use Small Header’ box. You can even remove the Facebook cover photo completely, by checking the ‘Hide Cover Photo’ box.
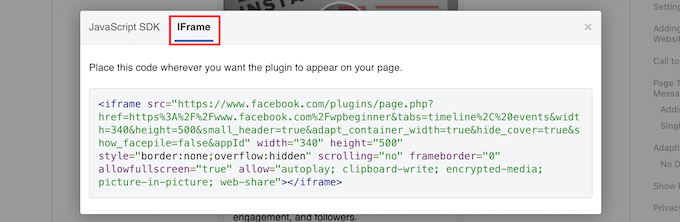
Once you’re happy with what you’re seeing in the preview, you need to click the ‘Get Code’ button. This opens a popup containing all of the different embed codes.
In this popup, select the ‘iFrame‘ tab and copy the code.
Next, you need to open up the post or page where you want to add your Facebook follower count.
Then, click the ‘Plus’ add block icon and search for ‘Custom HTML’, then select the block.
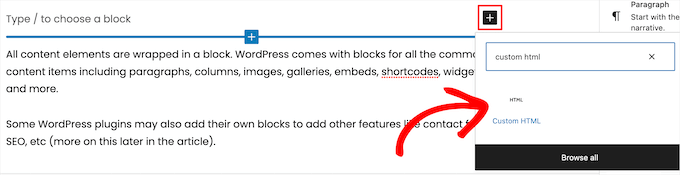
After that, paste your HTML code into this block.
You can also click on the ‘Preview’ option to check if the HTML code is working properly. You should now see your Facebook subscriber count embedded in your WordPress website.
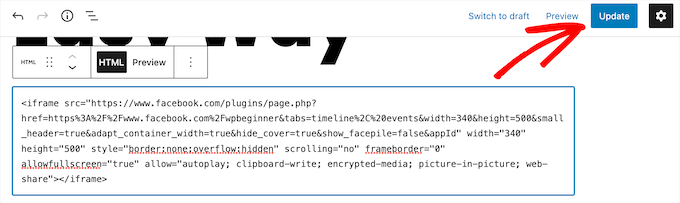
If you’re happy with how it looks, then click the ‘Publish’ or ‘Update’ button to save your changes. To learn more, see our guide on how to easily embed iFrame code in WordPress.
You can also add your Facebook subscriber count to any widget or sidebar area of your site. This can be a great way to display your Facebook subscriber count across your entire website.
To do this, go to Appearance » Widgets. Then, click the ‘Plus’ add block icon and search for ‘Custom HTML’ and then select the widget.
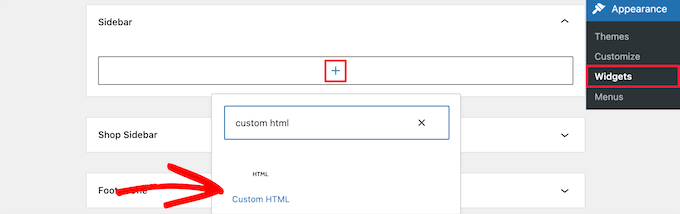
Then, you can paste your HTML code just like above.
Don’t forget to click on the ‘Update’ button at the top of your screen to save your changes.
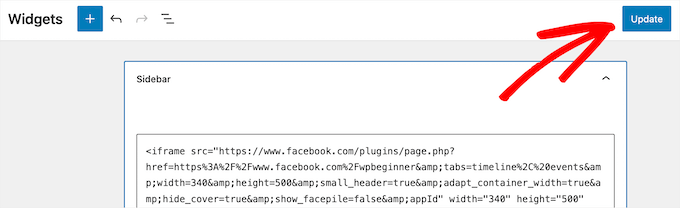
Now, you can visit your website to see your Facebook subscriber count live.

Display Your YouTube Follower Count in WordPress
Similar to Facebook, YouTube has a tool that you can use to display your YouTube subscriber count. This makes it easy for visitors to see your total number of subscribers and follow your channel.
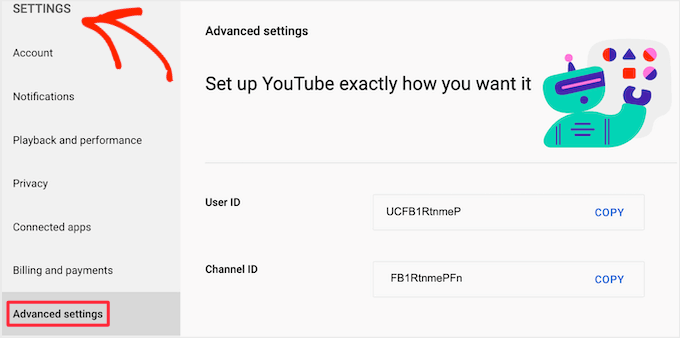
First, you’ll need to know your YouTube channel ID. To find this, head over to YouTube and click on your profile icon in the top right corner.
Next, click on ‘Settings’. Then, in the left-hand menu, click on ‘Advanced Settings’. This opens a screen containing your Channel ID.
Once you have this information, you need to go to the YouTube developers website.
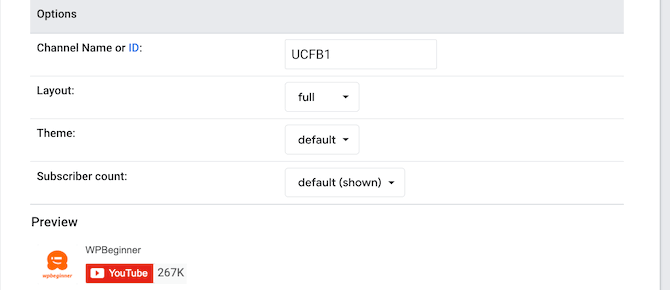
Now, you can enter your ID into the ‘Channel Name or ID’ field.
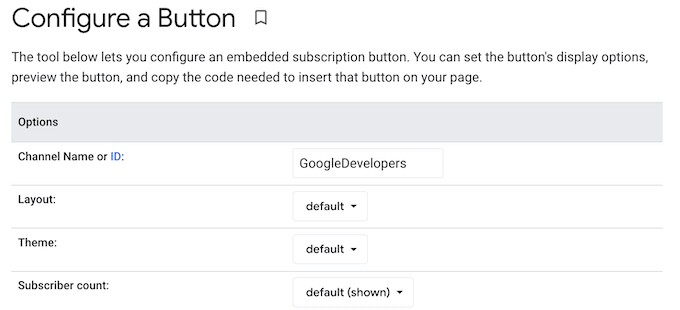
The preview will update to display your total number of subscribers.
There are a few different ways you can style your subscribe button. This includes displaying your profile picture and channel name.
You can try out different settings to see what works best for your site.
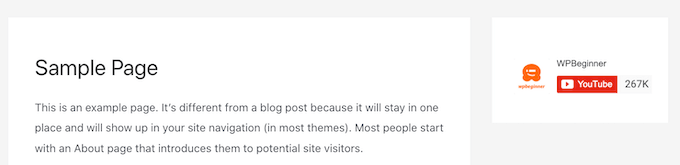
As you customize the button, YouTube will update the embed code automatically. When you’re happy with how your Subscribe button looks, you need to copy this code.
Then, you can paste the embed code into any post, page, or widget area, just like above.
For more details, you can see our guide on how to add HTML in WordPress.
Here’s how it looked on our demo site.
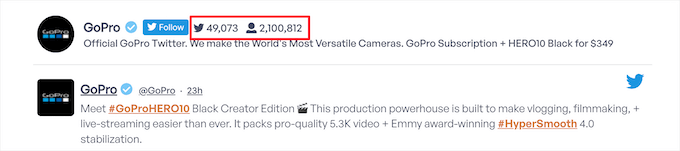
Display Your Twitter Follower Count in WordPress
If you’re active on Twitter and have a large following, then you can display this on your WordPress blog.
The easiest way to do this is by using the Smash Balloon Twitter Feed Pro plugin. It’s one of the best Twitter plugins for WordPress and makes it easy to display your Twitter feed and follower count.

This plugin gives you full control over what Twitter content you want to add to your site. You can display your follower count and feed by using the included block, or adding it as a sidebar widget.
To learn more, see our step by step guide on how to add your social media feeds to WordPress.
Method 3. Displaying Your Email List Subscriber Count in WordPress
Showing your email subscriber count can act as an incentive to get readers to join your email list. If you have a large email list, then displaying the subscriber count on your site can be great social proof.
We’ll be using Constant Contact, however the steps will be similar if you’re using an email marketing service like HubSpot, Drip, Sendinblue, or another provider.
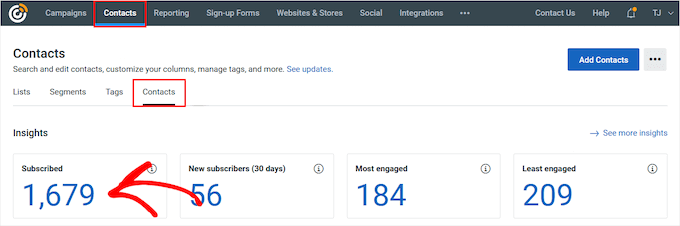
First thing you need to do is login to your account and click the ‘Contacts’ tab, then click the smaller ‘Contacts’ menu option.
This will list the total number of email subscribers you have. You need to take note of this number, since you’ll be adding it to your site.
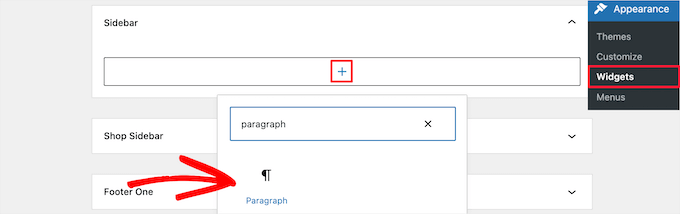
Then, you can add the subscriber count to any page, post, or widget area on your site.
We’ll show you how to add it to a sidebar widget, but the steps will be similar if you’re adding it to another location.
Next, go to Appearance » Widgets, click the ‘Plus’ add block icon and search for the ‘Paragraph’ widget and select it.
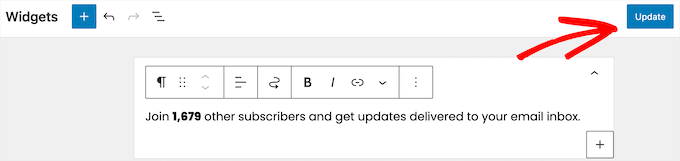
Then you can customize the text however you’d like. You can even add the text above your email subscription forms, desktop and mobile popups, and more.
Once you’re finished, make sure to click the ‘Update’ button to save your changes.
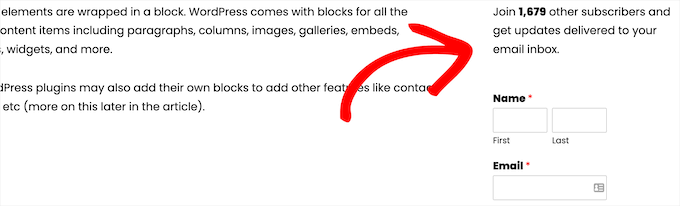
Now, you can visit your website to see your email subscriber totals live.
Although this method isn’t automated, you can easily update your subscriber counts by simply logging into your email marketing provider and making sure your numbers are still accurate.
You can make this a task to update each month or even each quarter.
Method 4. Displaying Total Number of Registered Users in WordPress
Some websites enable user registration so visitors can comment, post, and perform other actions on the site.
Other sites like membership sites, online courses, WordPress forums, and more also allow for user registration during sign up.
If you have a large number of registered users, then you may want to display this number to encourage more sign ups.
This method requires you to add code to your WordPress site. If you haven’t done this before, then see our guide to pasting snippets from the web into WordPress.
Then, you can add the following code snippet to your functions.php file, in a site-specific plugin, or by using a code snippets plugin.
// Function to return user count
function wpb_user_count() {
$usercount = count_users();
$result = $usercount['total_users'];
return $result;
}
// Creating a shortcode to display user count
add_shortcode('user_count', 'wpb_user_count');
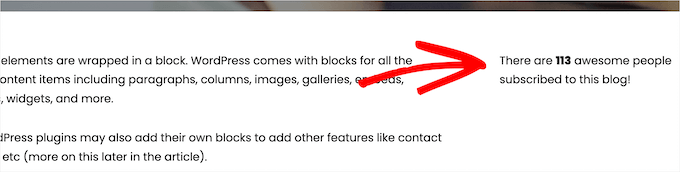
This code snippet creates a shortcode that you can use to display your registered user count anywhere on your WordPress site.
You’ll need to copy the following shortcode:
[user_count]
Then, open up any page, post, or widget area where you want the user count to display.
For this example, we’ll show you how to add it to a widget-ready area of your site. But the steps are similar for any other area of your website.
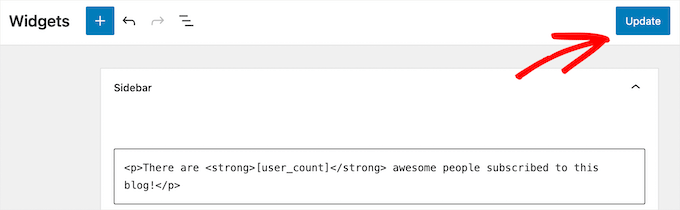
Simply go to Appearance » Widgets, click the ‘Plus’ add block icon and then search for ‘Custom HTML’ and select the block.
Keep in mind, the shortcode displays the number of registered users only. If you don’t provide any context, then this is just a random number.
To make sure visitors understand that is your subscriber count, it’s a good idea to add some supporting text. For example, you can add the following HTML formatting.
<p>There are <strong>[user_count]</strong> awesome people subscribed to this blog!</p>
Once you’re finished customizing, make sure to click the ‘Update’ button to save your changes.
Now, you can visit your site to see your registered user count live.
If you don’t feel comfortable editing your site’s code, then another option is to use a plugin. To learn more, see our guide on how to show total number of registered users in WordPress.
You can also show a list of recently registered users in a list format. To learn more, see our guide on how to display recently registered users in WordPress.
Growing Your Subscriber and Follower Counts in WordPress
Displaying your large subscriber numbers can give your users the push they need in order to convert. However, there is always room to improve your conversion rates by displaying even more social proof.
Here are some of the best WordPress plugins that’ll help you grow your subscribers and followers even further:
- TrustPulse — it uses the FOMO effect and shows a notification bubble of recent user actions to help increase conversions by as much as 15%.
- Smash Balloon — one of the best WordPress social media plugins that displays your social media feeds to increase time spent on site and grow your followers.
- PushEngage — one of the best push notification software to get your visitors to come back to your website and join your email list, follow you on social media, or become a customer.
We hope this article helped you learn how to display all your subscriber counts in WordPress. You may want to see our guide on how to choose the best web design software and our expert picks of best live chat software for small businesses.
If you liked this article, then please subscribe to our YouTube Channel for WordPress video tutorials. You can also find us on Twitter and Facebook.
The post How to Display All Your Subscriber Counts in WordPress (4 Ways) first appeared on WPBeginner.
May 26, 2022 at 04:00PM