Tuesday, June 28, 2022

How to Disable wp-cron in WordPress and Set Up Proper Cron Jobs

Are you having problems with scheduled actions not working in WordPress?

WordPress has a scheduling system called wp-cron, but it sometimes misses a scheduled task like publishing scheduled posts, sending triggered emails, etc. Proper cron jobs run by your server’s operating system are often more reliable.

In this article, we’ll show you how to disable wp-cron in WordPress, and cover two ways you can set up proper cron jobs.
How to Disable wp-cron in WordPress and Set Up Proper Cron Jobs

Why Disable wp-cron?

Your WordPress website has a built-in scheduling system called wp-cron. It performs time-sensitive tasks such as checking for updates, publishing scheduled posts, automatically creating regular backups, sending triggered emails, etc.

You can learn more in our guide on how to view and control WordPress cron jobs.

Viewing Scheduled Tasks in WordPress

The problem is that WordPress is only prompted to check for scheduled jobs when someone visits your website. This works well enough for most sites, but sometimes it can cause problems for smaller ones.

For example, if your site has low traffic, then your scheduled posts may not be published on time. And if your website gets a lot of traffic, then wp-cron will be checked frequently, which may impact your website’s performance.

Now if you just want to fix the missing scheduled posts error, then you can use the free plugin Missed Scheduled Publisher, but if you want to solve all scheduled action issues, then you need a real cron job.

A real cron job is run by your web hosting server’s operating system, not by WordPress. You can set it up to check for scheduled tasks more

reliably. By default, WordPress doesn’t have access to set this up on the server level, but you can easily do it by following our tutorial.

With that being said, let’s take a look at how to disable wp-cron and set up a proper cron job. Here’s what we’ll cover in this tutorial:

Disabling wp-cron in WordPress

To disable wp-cron, you need to edit wp-config.php, which is a core WordPress configuration file. It’s located in your WordPress site’s root folder, and you will need to use an FTP client or the file manager in your web hosting control panel.

This file contains a lot of sensitive information, and making the wrong changes can break your WordPress site. We recommended making a backup of the file first, just in case. You can learn how by following our guide on how to edit wp-config.php in WordPress.

You’ll need to paste the following code into the wp-config.php file just before the line that says ‘That’s all, stop editing! Happy blogging.’

define('DISABLE_WP_CRON', true);
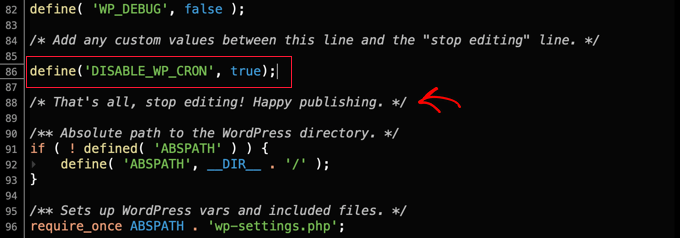
Pasting Code into wp-config

After that, you need to save the file and upload it back to your website.

WordPress will no longer trigger wp-cron when someone visits your website.

Setting Up a Proper Cron Job on Your WordPress Host

Now you’ll need to set up a proper cron job to run your scheduled tasks. The way you do this will vary depending on the tools provided by your WordPress hosting provider.

The easiest way to set up cron jobs is using cPanel, a popular website control panel included with many web hosting plans, including Bluehost. We’ll use the Bluehost cPanel in this tutorial.

Note: Some web hosts don’t use cPanel and some may not even allow you to create cron jobs. If in doubt, you should contact your hosting provider or consult their support documentation. You can always use a third party cron service (below).

Once you log into your hosting account and navigate to cPanel, you should scroll down until you find ‘Cron Jobs’ and then click on it.

You may find it in the ‘Advanced’ section, but this can vary depending on your hosting provider.
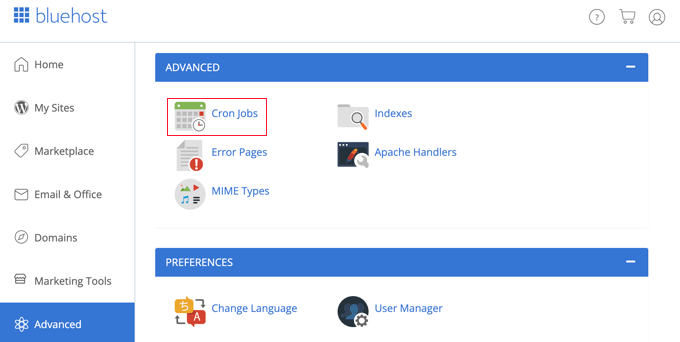
Find 'Cron Jobs' in cPanel

This will take you to a new page where you can create new cron jobs.

Don’t worry about the warning you’ll see about needing a good knowledge of Linux commands. Only one command is necessary, and we’ll show you exactly what it is below.
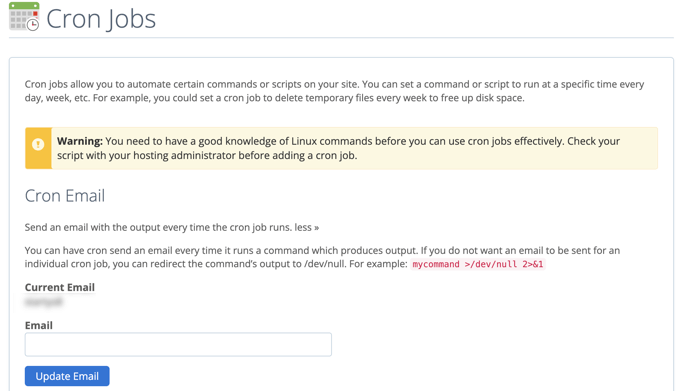
The cPanel Cron Jobs Page

If you need to, you can change the email address where cron job notifications will be sent. The default address is the one you used when you signed up for your web hosting, and this will work fine on most websites.

Now, let’s scroll down to the ‘Add New Cron Job’ section and set up a cron job.

First, you need to decide how often the cron job will be run. This can be anything you like, but we recommend 30 minutes interval.

You will need to click the ‘Common Settings’ button and select a time interval from the dropdown. ’Twice Per Hour’ is a good choice for most sites if you’re not sure.
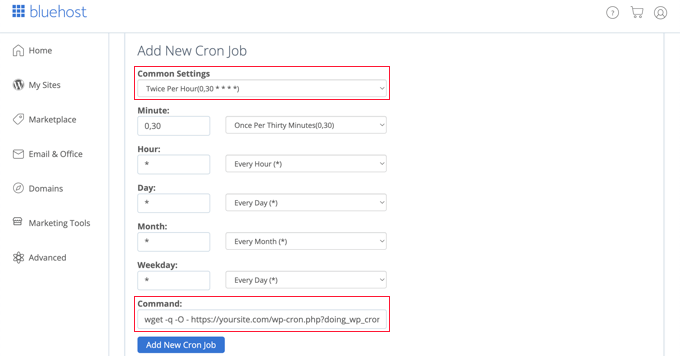
Creating a New Cron Job in cPanel

Now you can enter the command that will ask WordPress to run its scheduled tasks. You need to paste the following code into the ‘Command’ field:

wget -q -O - https://example.com/wp-cron.php?doing_wp_cron >/dev/null 2>&1

Make sure you replace ‘example.com’ with your own website’s URL.

Once you’ve done that, make sure you click the ‘Add New Cron Job’ button, and you will see the new cron job added to the list below.

Viewing the List of Cron Jobs in cPanel

WordPress will now check for and run scheduled tasks every 30 minutes instead of when someone visits your website.

Setting Up a Proper Cron Job Using a Third Party Service

If your hosting plan doesn’t offer proper cron jobs, or they are difficult to set up, then you can use a third party cron service instead.

These are dedicated services that allow you to set up cron jobs using a simple interface. Here are a few of the better ones:

For this tutorial, we’ll use EasyCron because it is easy to use, and the free plan is suitable for most beginner use cases.

Once you create a free account, you can create a new cron job by clicking the ‘+ Cron Job’ button on the left.

Creating a New Cron Job in EasyCron

This will pop up the ‘Create Cron Job’ screen. First, you need to paste the following URL into the ‘URL to call’ field.

https://example.com/wp-cron.php?doing_wp_cron

Make sure you replace ‘example.com’ with your own site’s URL.
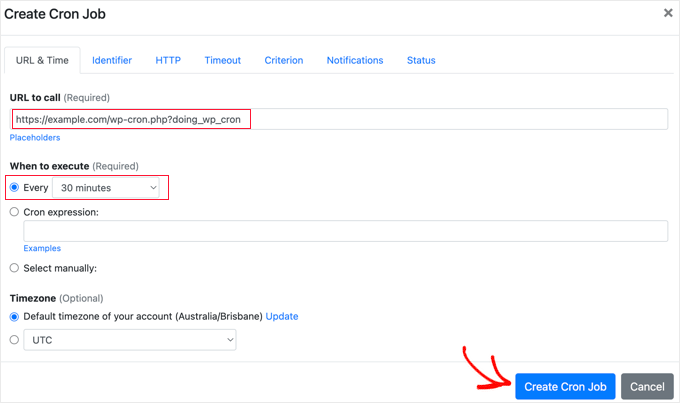
Creating a New Cron Job in EasyCron

After that, you should choose ‘Every 30 minutes’ from the ‘When to execute’ drop down. When you’re finished, don’t forget to click the ‘Create Cron Job’ button to store your settings.

The new cron job will be added to the list, and run wp-cron on your website every 30 minutes.
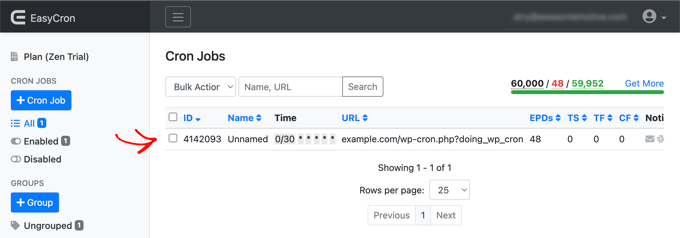
Viewing the List of Cron Jobs in EasyCron

We hope this tutorial helped you learn how to disable wp-cron in WordPress and set up proper cron jobs. You may also want to see our step by step guide to WordPress SEO, or check out our list of common WordPress errors and how to fix them.

If you liked this article, then please subscribe to our YouTube Channel for WordPress video tutorials. You can also find us on Twitter and Facebook.

The post How to Disable wp-cron in WordPress and Set Up Proper Cron Jobs first appeared on WPBeginner.


June 28, 2022 at 04:00PM
Monday, June 27, 2022

How to Automatically Publish from WordPress to Instagram

Do you want to automatically publish from WordPress to Instagram?

Instagram is one of the largest social media sites in the world with about a billion active users. By sharing your blog posts to Instagram, you can reach more people and get them to visit your website.

In this article, we will show you how you can automatically post to Instagram whenever you publish a new WordPress post.

How to automatically publish from WordPress to Instagram

Why Automatically Publish From WordPress to Instagram?

As one of the largest social media websites in the world, many WordPress website owners use Instagram to connect with potential new readers, website visitors, and customers.

Once you have some followers on Instagram, you can use this social networking site to promote your WordPress blog. Every time you publish a blog post, it’s a good idea to let your Instagram followers know about your new content.

To make your blog post stand out on Instagram, you’ll need to add an eye-catching image and an interesting caption. While Instagram doesn’t allow clickable links in captions, you can link to your blog from your Instagram bio, so your followers can easily find your latest posts.

You can also add a link in bio page which lets you showcase more than link to your Instagram bio.

Since running an engaging Instagram account takes time and effort, you can save some of that time by automating the process of publishing to Instagram automatically.

That being said, let’s see how you can automatically post to Instagram whenever you publish a new WordPress blog post.

Automatically Publish from WordPress to Instagram

Uncanny Automator is the best WordPress automation plugin that helps you create automated workflows without having to write code.

It connects with more than 80 plugins and third-party apps, so you can build smart automation workflows that saves you time. For example, you can integrate Slack with WordPress, create a workflow that automatically posts to Facebook from WordPress, and much more.

The free version of Uncanny Automator comes with over 100 automation triggers and actions.

In this guide, we’ll be using the free version, so you can automatically publish from WordPress to Instagram even if you’re on a tight budget and just getting started. If you want to build more powerful and advanced workflows, then Uncanny Automator Pro includes over 400 triggers and actions.

The first thing you need to do is install and activate the Uncanny Automator plugin. For more details, see our step by step guide on how to install a WordPress plugin.

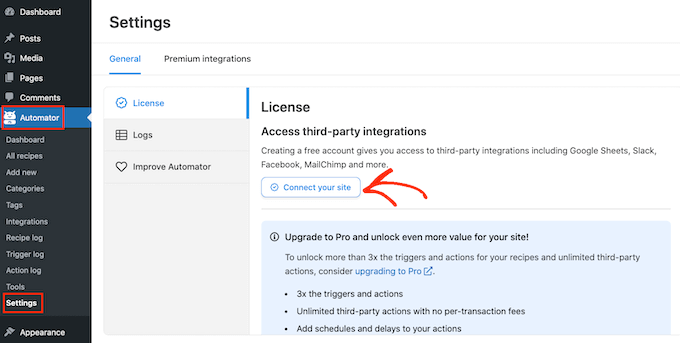
Upon activation, go to Automator » Settings. Then, simply click on ‘Connect your site.’

Adding a license to Uncanny Automator

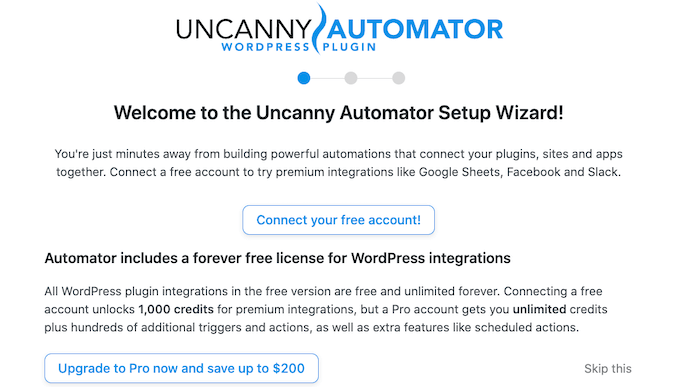
Uncanny Automator will now ask whether you want to upgrade to get more credits, triggers, and actions. If you do want to upgrade, then click on the ‘Upgrade to Pro now…’ button and follow the instructions to buy Uncanny Automator Pro.

If you want to automatically publish from WordPress to Instagram using the free version of Uncanny Automator, then simply click on ‘Connect your free account.’ You can always upgrade to Uncanny Automator Pro at a later date.

The Uncanny Automator setup wizard

Uncanny Automator will now show a popup where you can create an account by typing in your name, email address, and the password that you want to use. After typing in this information, click on ‘Sign Up.’

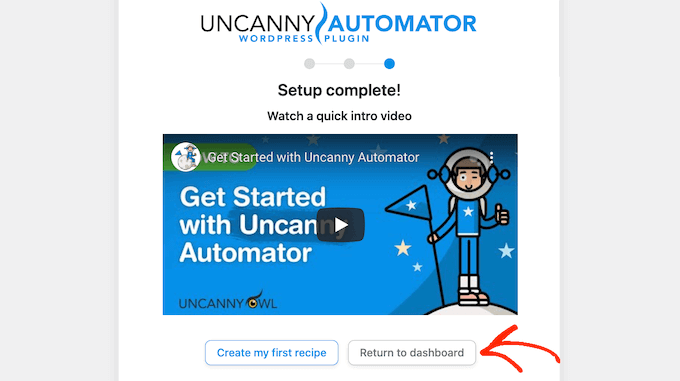
After a few moments, Uncanny Automator will show a message confirming that you’ve set up the plugin.

Next, you need to click on ‘Return to dashboard.’

The Uncanny Automator setup wizard

Before you can start automatically publishing from WordPress to Instagram, you’ll need to connect your Instagram account to Uncanny Automator.

Note: To post automatically, you’ll need an Instagram Business account that’s connected to a Facebook page for your business. Don’t already have an Instagram Business account? The good news is that it’s free. Here’s Instagram’s guide on how to convert a standard account into an Instagram Business account.

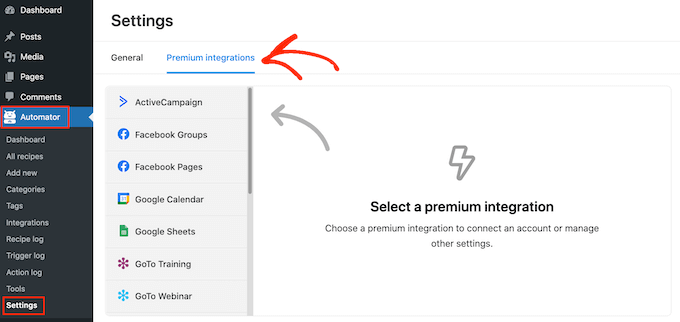
To connect Uncanny Automator to your Instagram account, go to Automator » Settings. Then, click on the ‘Premium integrations’ tab.

Uncanny Automator's premium integration

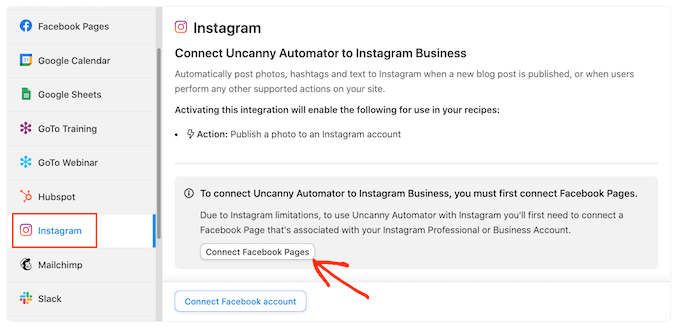
In the left-hand menu, go ahead and click on ‘Instagram.’

Since Instagram is owned by Facebook’s parent company, you’ll need to connect to the Facebook page that’s linked to your Instagram Business account.

To get started, click on the ‘Connect Facebook Pages’ button.

Connecting Uncanny Automator and Facebook

Uncanny Automator will now guide you through the process of connecting to your Facebook page. Once you’ve done that, Uncanny Automator will ask you to select the Instagram account that you want to use.

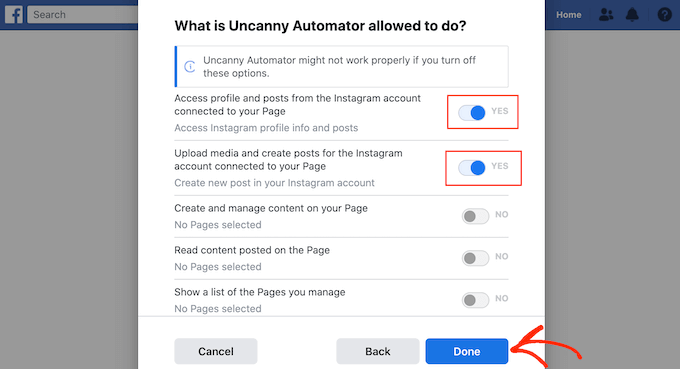
After choosing an account, you’ll need to select the actions that Uncanny Automator can take, and the information it can access on Instagram. Since we want to automatically publish from WordPress to Instagram, you’ll need to enable the first two options:

  • Access profile and posts from the Instagram account connected to your Page.
  • Upload media and create posts for the Instagram account connected to your Page.

After that, go ahead and click on the ‘Done’ button.

Instagram's permission settings

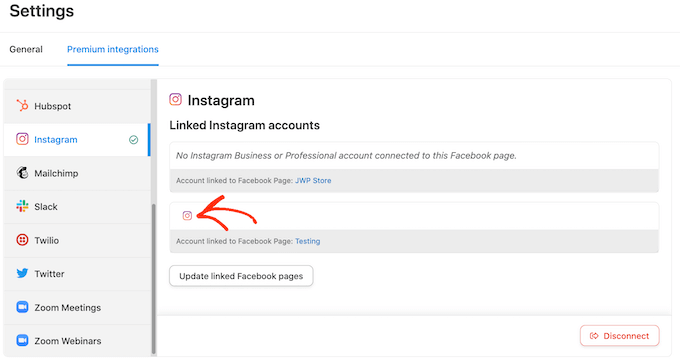
Once you’ve done that, Uncanny Automator will take you back to the WordPress dashboard.

You should now see that Uncanny Automator is connected to your Instagram account.

Connecting Uncanny Automator and Instagram

The next step is creating the workflow that will automatically publish from WordPress to Instagram. Uncanny Automator calls these workflows ‘recipes,’ and they’re made up of actions and triggers.

To build a recipe, go to Automator » Add New.

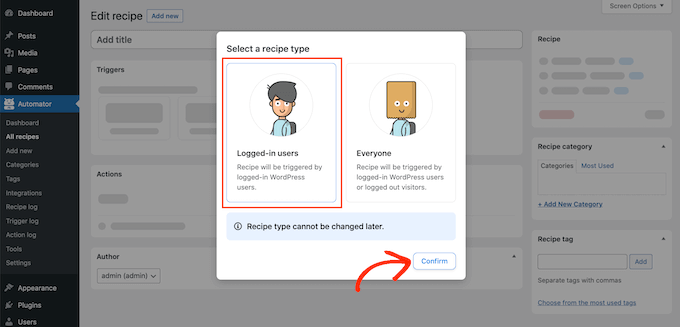
On this screen, you’ll be asked to select whether you want to create a ‘Logged-in’ recipe or an ‘Everyone’ recipe.

Blog posts can only be published by a user who has a WordPress account. With that in mind, click on ‘Logged-in users.’ Then, just click on the ‘Confirm’ button.

Creating a logged-in users recipe

You can now start to build your Uncanny Automator recipe.

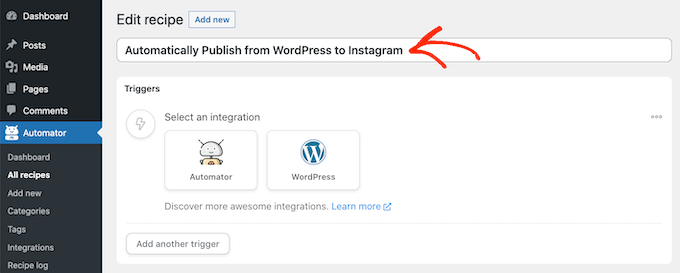
First, you’ll need to add a title by typing into the field that shows ‘Add Title’ by default.

We’ll call the recipe ‘Automatically Publish from WordPress to Instagram’, but you can use anything you want.

Creating a recipe to automatically post to Instagram

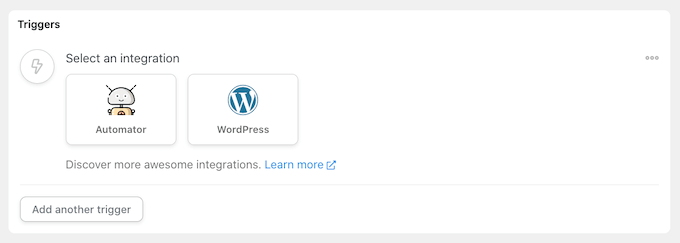
Next, you need to define the condition that will trigger the action. For our recipe, the trigger is someone publishing a new blog post.

To add a trigger, simply click on the WordPress button in the Triggers section.

The WordPress automated workflow triggers

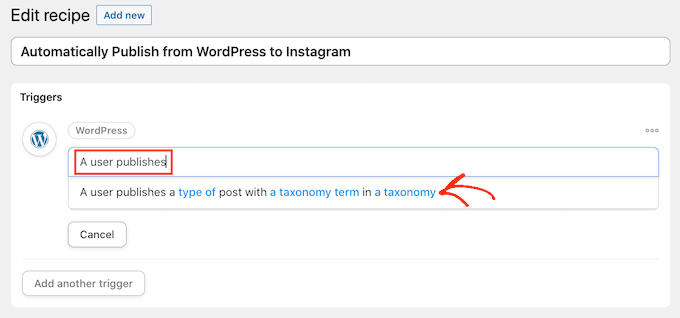
You’ll now see a list of all the Uncanny Automator triggers.

In the ‘Search for triggers’ field, start typing the following: ‘A user publishes a type of post with a taxonomy term in a taxonomy‘.

When the right trigger appears, click on it to add it to your Uncanny Automator recipe.

Automatically posting from WordPress to Instagram

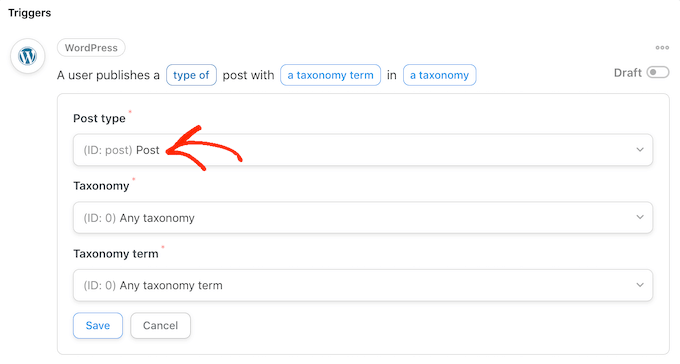
Next, you’ll need to decide the type of content that will trigger the recipe. Simply click on the Post Type dropdown and then choose between post, page, media, or any post type.

Since we want to post to Instagram every time someone publishes a new blog, you’ll typically want to click on ‘Post.’

Creating an automated workflow for Instagram

At this point, you can tell Uncanny Automator to only run this recipe for posts that have a certain category or tag. For example, you may only want to automatically post when a blog has the ‘announcement’ tag.

This gives you more granular control over the content that gets published to your Instagram account, while still getting the time-saving benefits of an automated workflow.

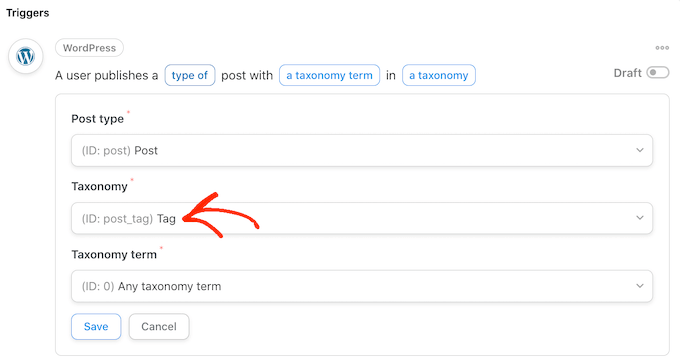
To limit this recipe to a specific tag or category, open the ‘Taxonomy’ dropdown. Here, you can click on either ‘Category’ or ‘Tag’

Adding categories and tags to an automated workflow

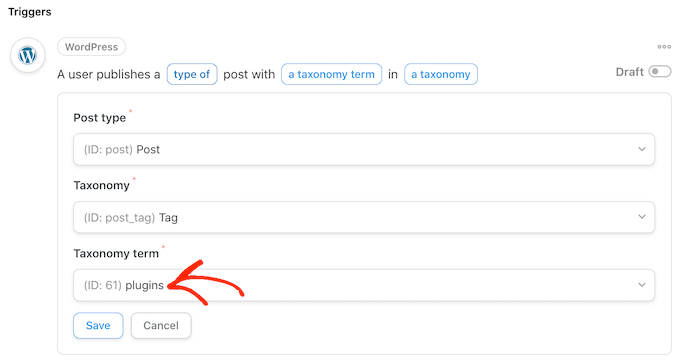
Once you’ve done that, click on the ‘Taxonomy term’ dropdown.

You can now click on any of the categories and tags to add them to your recipe.

Choosing a tag in Uncanny Automator

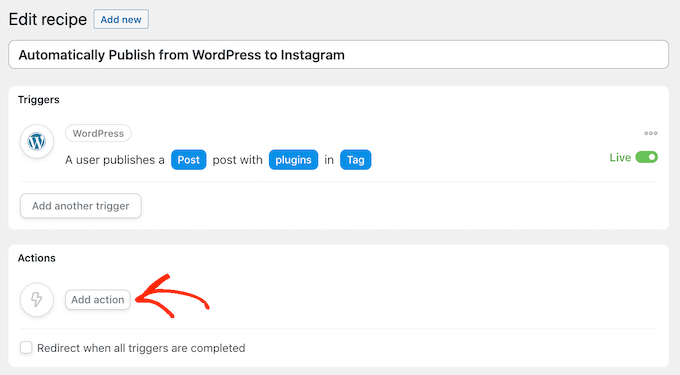
When you’re happy with the information you’ve entered, click on ‘Save’ to save your changes. Uncanny Automator will now show a summary of the action that will trigger your recipe.

The next step is choosing the action that will happen every time you publish a new WordPress post. Start by clicking on the ‘Add action’ button.

Automatically publish from WordPress to Instagram with Uncanny Automator

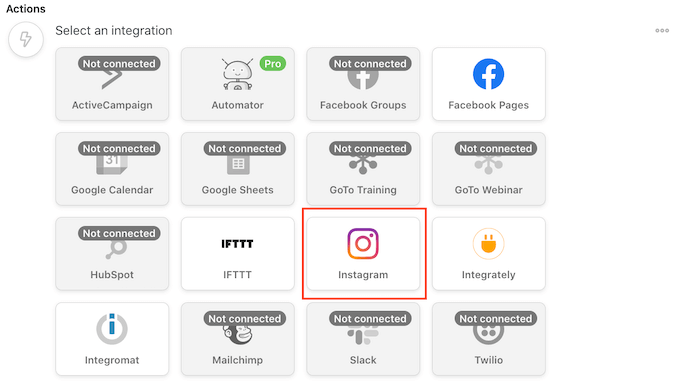
Uncanny Automator will now show all the plugins and apps that you can use for the recipe.

You simply need to find ‘Instagram,’ and give it a click.

Connecting Instagram to WordPress

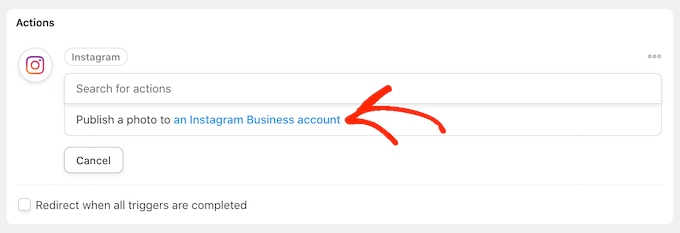
Once you’ve done that, click on the ‘Search for actions’ field. In this field, start typing in ‘Publish a photo to an Instagram Business account.’

When the right action appears, click to add it to your recipe.

Automatically publish a photo to Instagram

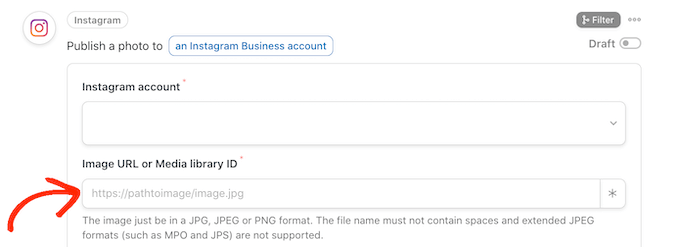
You’ll now see a new set of controls.

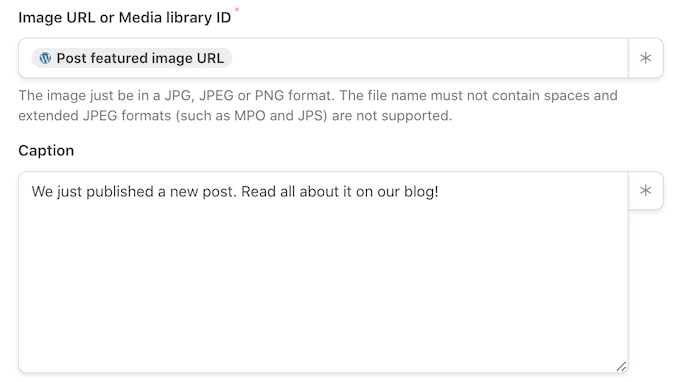
To start, we need to specify the image that Uncanny Automator will post to Instagram every time you publish a new WordPress post.

Sometimes you may want to use the same image for every post. For example, you might have used image editing software to create a special image advertising your website.

To use the same image every time, either type or copy/paste the image’s URL into the ‘Image URL or Media library ID’ field.

Adding an image URL to your automated workflow

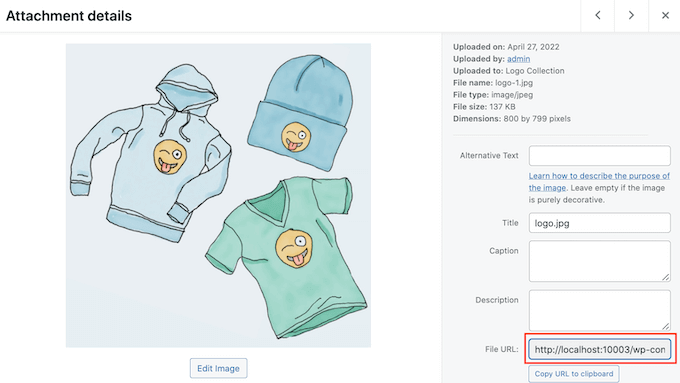
To get an image’s URL, simply find the image in your WordPress media library.

You can then copy the value in the ‘File URL’ field, as you can see in the following image.

The WordPress media library

Another option is to use a different image for every WordPress post, so you’re not posting the same image to Instagram over and over again.

Every time you publish a blog, Uncanny Automator can post the blog’s featured image to Instagram. If you need help adding featured images to your posts, you can see our guide on how to add featured images or post thumbnails in WordPress.

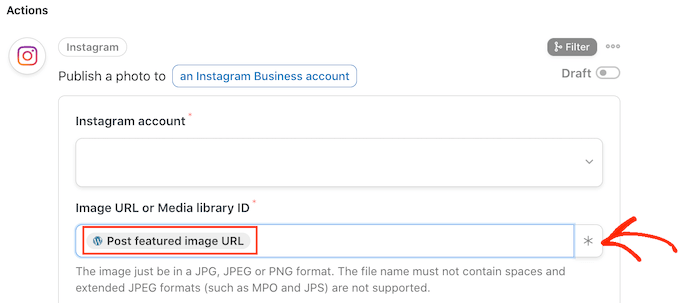
To post the blog’s featured image to Instagram, click on the asterisk button next to the ‘Image URL or Media library ID’ field.

Post a featured image to Instagram from WordPress

Then, simply click on the ‘Search token’ field and start typing ‘post featured image URL.’

When the right token shows up, give it a click to add it to your recipe. Now, Uncanny Automator will get the post’s featured image and post it to Instagram automatically.

The next step is typing in the caption that Uncanny Automator will add to the Instagram post.

One method is to simply type text into the ‘Caption’ box, such as ‘We just published a new post. Read all about it on our blog!’ Uncanny Automator will then use this caption for every single Instagram post.

Posting a caption to Instagram automatically

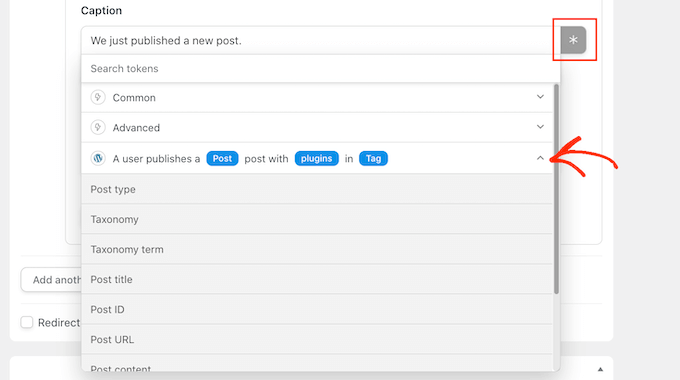
Another option is to add tokens to the caption. Similar to dynamic text, Uncanny Automator will replace the token with a unique value that it gets from the blog post, such as the post’s title or URL.

This allows you to create more engaging and interesting captions, instead of posting the same caption over and over again.

To see all the different tokens that you can use, go ahead and click on the asterisk button.

In the dropdown menu, find ‘A user publishes…’ and then click on the arrow next to it.

Uncanny Automator's tokens

Now, find the token that you want to add to your caption, and click on it.

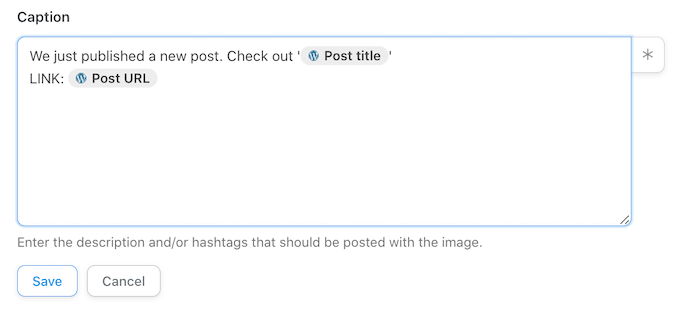
To create more interesting and helpful captions, you may want to use a mix of plain text and tokens, as you can see in the following image.

A mix of plain text and tokens

When you’re happy with your recipe, click on the ‘Save’ button.

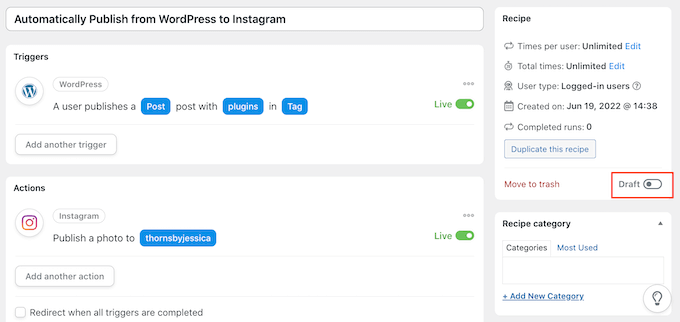
The final step is activating the recipe so that it will start automatically publishing from WordPress to Instagram.

To publish your automated workflow, find the ‘Recipe’ section towards the right side of the screen. Then, simply click on the slider to turn it from ‘Draft’ to ‘Live.’

Publishing an automated workflow in WordPress

Now every time someone publishes a new blog on your WordPress website, Uncanny Automator will make a new Instagram post automatically.

How to Get More Out of Your Instagram Feed

Automatically publishing your blog posts to Instagram is a great way to keep your Instagram content fresh and updated.

To get more attention to their Instagram accounts, often professional bloggers and online store owners will embed their Instagram feed on their websites.

This helps you add social proof, keep visitors longer on your site, increase engagement, and even boost sales.

The easiest way to embed Instagram feeds on WordPress is by using Smash Balloon Instagram Feed. It is the best Instagram plugin for WordPress and allows you to add Instagram content to your website automatically.

There’s a free version of the Instagram plugin that’s used by over 1 million websites.

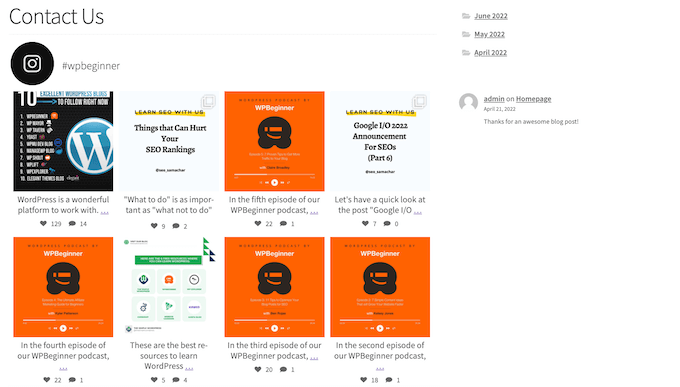
Embedding an Instagram feed in WordPress

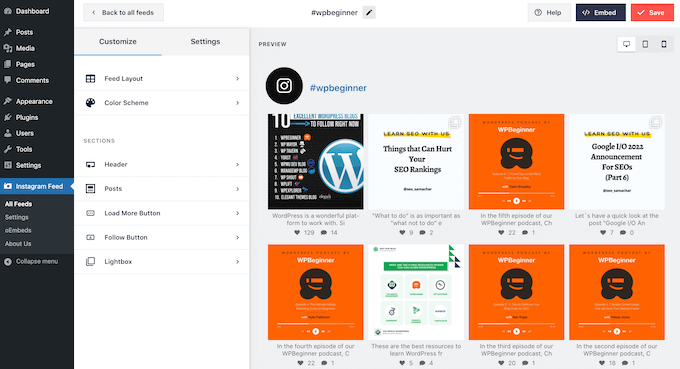
You can use Smash Balloon to customize exactly how your Instagram feed will look on your website, and the content it shows.

You can even sort feeds based on Instagram hashtags, show likes and comments, create a custom Instagram photo feed in WordPress, and more using its simple editor.

The Smash Balloon social plugin

After creating your feed, you can add it to any page, post, or widget ready area simply by using the Instagram Feed block.

For more details, see our guide on how to easily embed Instagram in WordPress.

We hope this article helped you learn how to automatically publish from WordPress to Instagram. Next, you can see our guide on how to embed a Facebook video in WordPress, or see our expert pick of the best social media plugins for WordPress.

If you liked this article, then please subscribe to our YouTube Channel for WordPress video tutorials. You can also find us on Twitter and Facebook.

The post How to Automatically Publish from WordPress to Instagram first appeared on WPBeginner.


June 27, 2022 at 02:00PM
Sunday, June 26, 2022

How to Disable Gravatars in WordPress

Do you want to disable Gravatars in WordPress?

WordPress uses Gravatars to display user profile photos or Avatars. It is a third-party service that allows users to have the same profile photo on different websites.

Gravatars are highly useful, particularly in WordPress comments. However, some users may not want to use Gravatars at all.

In this article, we’ll show you how to easily disable Gravatars in WordPress. We’ll also show you how to use local avatars instead.

Turn off Gravatars in WordPress

Why Disable Gravatars in WordPress

Gravatars are a third-party service that allows users to add a profile photo to their WordPress website and use it across the internet.

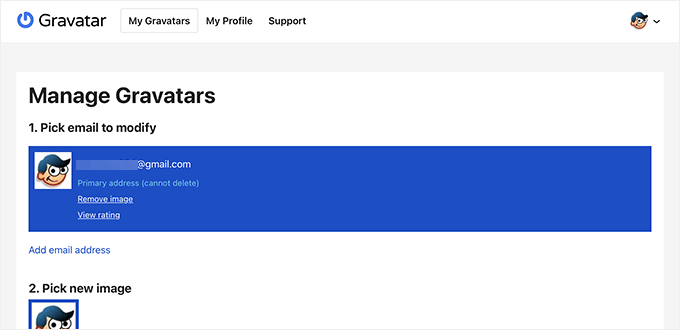
Basically, you create an account and then upload your profile photo.

Managing Gravatar profile

After that, whenever you use that particular email address on a website that supports Gravatar, it will automatically show your profile photo from the Gravatar website.

To learn more see our explainer, What is Gravatar and why you should use it.

However, some website owners may not want to use Gravatars for several reasons.

For instance, they may want to turn it off to improve website performance and speed.

Similarly, some site owners may not want to use Gravatar due to privacy concerns.

That being said, let’s take a look at how to easily disable Gravatars in WordPress.

Disabling Gravatars in WordPress

WordPress makes it super easy to customize or turn off Gravatars on your website.

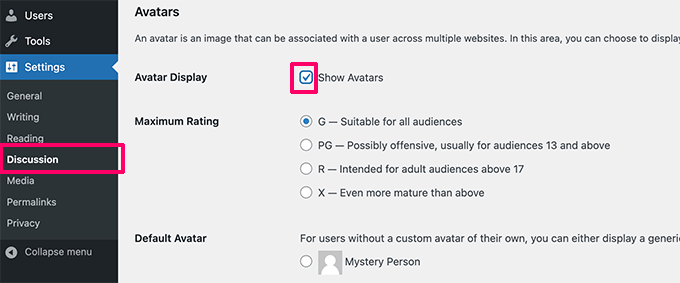
First, you need to login to the admin area of your website and then go to the Settings » Discussion page.

From here, you need to scroll down to the Avatars section and uncheck the box next to ‘Show Avatars’ option.

Turn off Gravatars in WordPress

Don’t forget to click on the Save Changes button to store your settings.

WordPress will now disable Gravatars across your website. You’ll now see a generic user icon in the admin toolbar instead of your Gravatar image.

User profile photo disabled

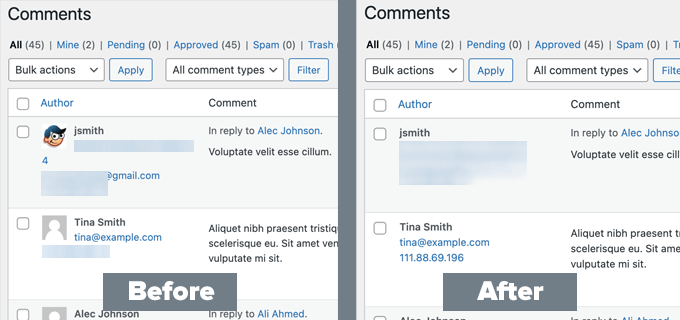
Similarly, the comments page inside the admin area will also stop showing Gravatars.

Comments page without Gravatar images

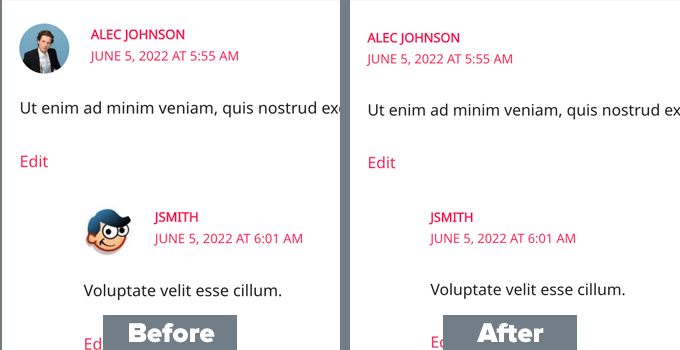
WordPress will also stop showing Gravatar images in the comments area under your posts and pages.

Comments without Gravatars

How to Replace Gravatar with Local Avatars in WordPress?

Some users may want to disable Gravatar but still want to display profile photos under author bios and other places.

This allows you to keep the avatar functionality in WordPress and enable users to upload their own profile photos. At the same time, it disables Gravatars and prevents your website to make any requests to Gravatar website.

To do this, you’ll need to install and activate the WP User Avatars plugin. For more details, see our step by step guide on how to install a WordPress plugin.

Upon activation, you need to visit the Settings » Discussion page and check the box next to the ‘Block Gravatar’ option.

Block Gravatar

Don’t forget to click on the Save Changes button to store your settings.

The plugin will now block any requests to Gravatar.com while allowing you to keep avatar functionality.

To upload profile photos, users will need to upload their own images under their profiles.

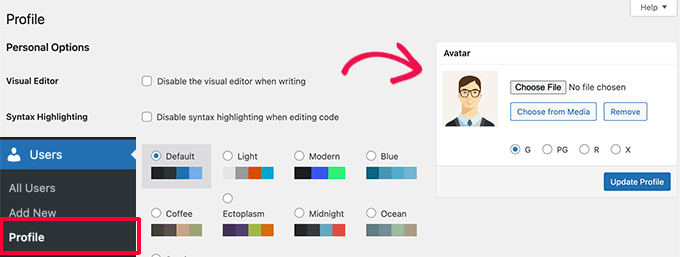
Simply go to Users » Profile page. From here, you can upload an image from your computer or use one from the media library.

Local avatar

Don’t forget to click on the Update Profile button to save your changes.

WordPress will now use custom profile photos instead of Gravatars. For all unregistered users it will show the default avatar image you have set in the settings.

For all registered users, it will use the custom avatar image that they uploaded. If a user hasn’t uploaded their custom avatar image, then the plugin will use the default avatar image.

We hope this article helped you learn how to disable Gravatars in WordPress. You may also want to see our guide on how to make a membership website in WordPress, and our comparison of the best WordPress page builder plugins.

If you liked this article, then please subscribe to our YouTube Channel for WordPress video tutorials. You can also find us on Twitter and Facebook.

The post How to Disable Gravatars in WordPress first appeared on WPBeginner.


June 26, 2022 at 06:00PM
Saturday, June 25, 2022

Where Does WordPress Store Images on Your Site?

Are you wondering where does WordPress store images on your website?

Many WordPress beginners have asked us how does WordPress store images, and what they can to do to organize their media library more efficiently.

In this article, we’ll explain how WordPress stores images on your website. We’ll also share tools and plugins that you can use to organize your images more efficiently.

Where does WordPress store image files (Explained)

How Does WordPress Store Images?

WordPress comes with a built-in system to manage media uploads like images, videos, audio, and documents on your WordPress website.

This system allows you to easily upload images and other media to a specific folder on your WordPress hosting server.

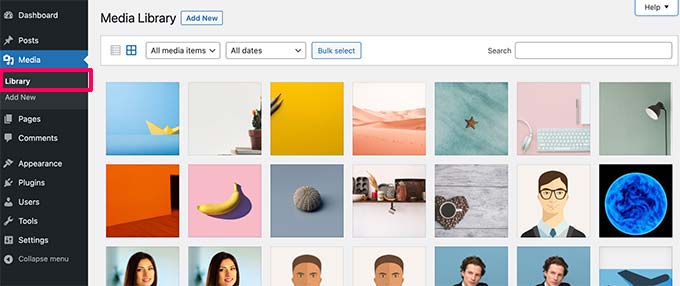
These files are then displayed in your WordPress media library. You can view all your uploads under Media » Library page. From here, you can also edit these files, manipulate them, or even delete them.

WordPress media library

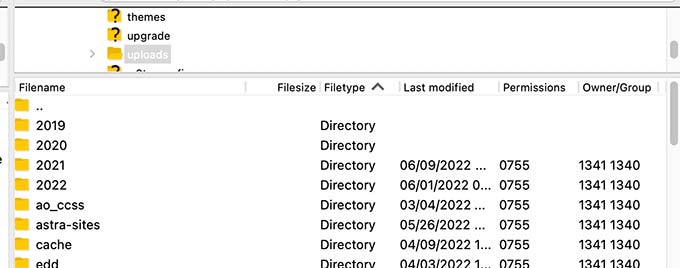
The specific folder where the image files are stored in WordPress is called the uploads folder located inside the /wp-content/ folder.

Uploads folder in WordPress

Inside the uploads folder, your media files are stored by year and month folders. Additionally, you’ll also see folders created by your WordPress plugins to save other uploads.

For instance, all your media files uploaded in June 2022 will be stored in:

/wp-content/uploads/2022/06/

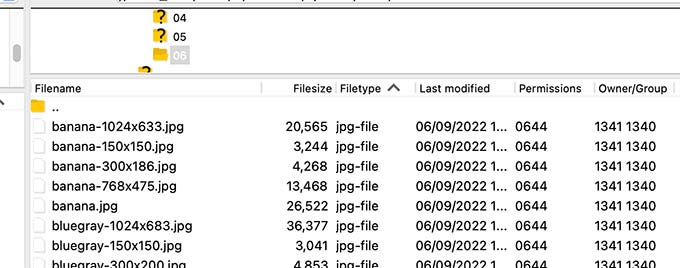
You can view these files and folders by connecting to your WordPress hosting account using an FTP client or via the File Manager app under your hosting account control panel.

Media uploads organized in year and monthly folders

You’ll notice that there are several copies of each image that uploaded on your server. These image sizes are generated automatically by WordPress when you upload an image.

Multiple image sizes

By default, you may see a thumbnail, medium, and large size of the image along with the original upload.

Apart from that, your WordPress theme or plugins may also generate additional image sizes for them to use.

Now you may be wondering how does WordPress display information about these files inside the media library?

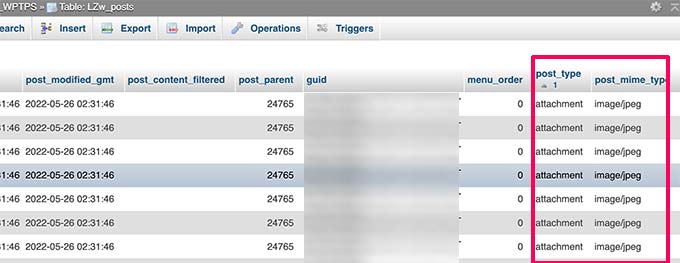
To do that, WordPress also stores information about your image uploads in the database as an attachment post type under the posts table.

Apart from that, WordPress also saves information in the posts meta table when you insert images into posts/pages or any other custom post type.

Meta data for images stored in WordPress database

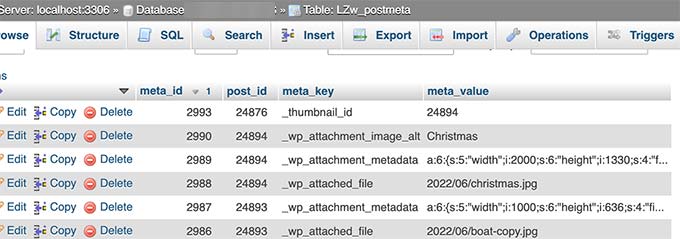
For instance, when you set a featured image, WordPress saves this information as a meta key _thumbnail_id and stores it in the postmeta table of your database.

Image meta data stored in WordPress database

The information inside your database tells WordPress the location of the file on your hosting server. Now if you delete a file from your server using FTP, then WordPress will show those images as broken.

Broken image in WordPress

Similarly, if you delete the reference to an image from your WordPress database, the file will still be intact on your hosting server but not appear in your media library.

Changing How WordPress Stores Images and Media Uploads

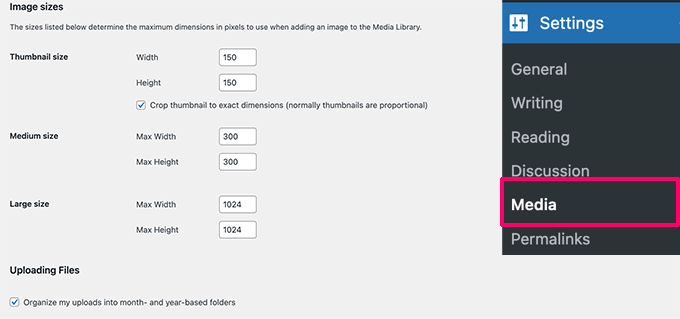
By default, WordPress does not allow you to change the uploads location from the WordPress admin area. The only change you can make is to disable the month and year based folders by visiting Settings » Media page.

Media settings in WordPress

From here, you can also adjust the maximum dimensions in pixels for your image uploads.

Advanced WordPress users can follow our tutorial on how to manually change the default WordPress uploads folder.

Organizing Your Images in WordPress

For most users, the default WordPress media library would work just fine.

However, if images play a more significant role in your WordPress blog, then you may need additional tools to organize your uploads.

For instance, if you run a photography website, then you may want to organize your content in Albums or tags.

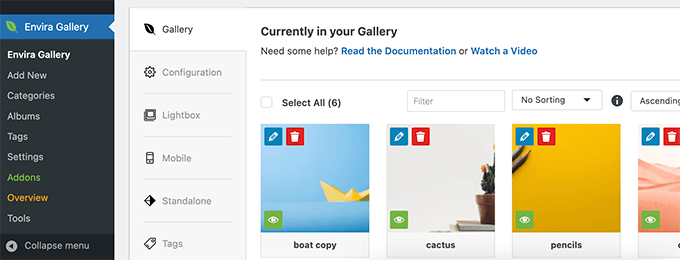
For that, you will need a plugin like Envira Gallery. It is a WordPress image gallery plugin that allows you to organize your images in albums, tags, and galleries.

Envira Gallery provides albums and tags functionality for images

Allowing Users to Upload Images in WordPress

By default, WordPress allows any users who can write posts on your website to upload images. This includes users with the Administrator, Author, Editor, and Contributor user roles.

But what if you wanted other users to upload images on your website without logging into the admin area?

To do that, you’ll need the WPForms plugin. It is the best WordPress form builder plugin and allows you to easily create any kind of forms for your website.

It also comes with a file upload field that allows users to easily upload images, documents, and other files without creating a user account or accessing the WordPress admin area.

First, you need to install and activate the WPForms plugin. For more details, see our step by step guide on how to install a WordPress plugin.

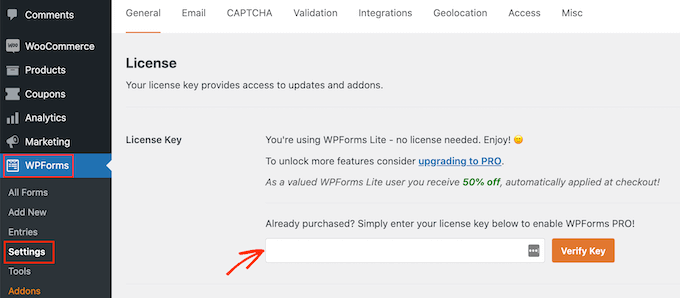
Upon activation, you need to visit the WPForms » Settings page to enter your license key. You can find this information under your account on WPForms website.

Entering your WPForms license key

Next, you need to visit WPForms » Add New page to create your image upload form.

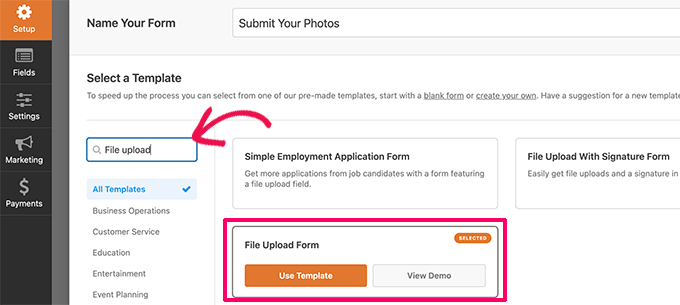
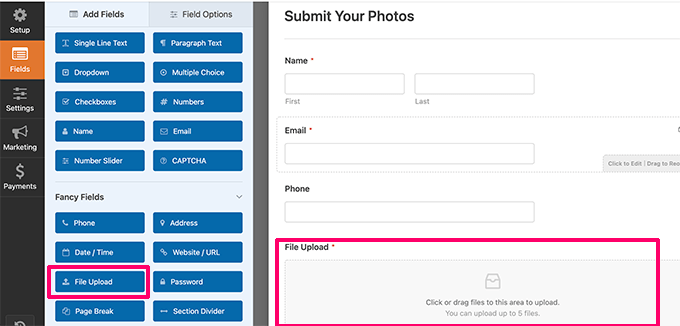
First, you need to provide a title for your form. After that, you can look for File Upload Form template to get started.

File upload form

WPForms will now load the form builder interface and automatically load form fields from the File Upload Form template.

File upload form editing

The form will include a file upload field by default. You can add or remove fields to your form, change their labels, or move them up or down.

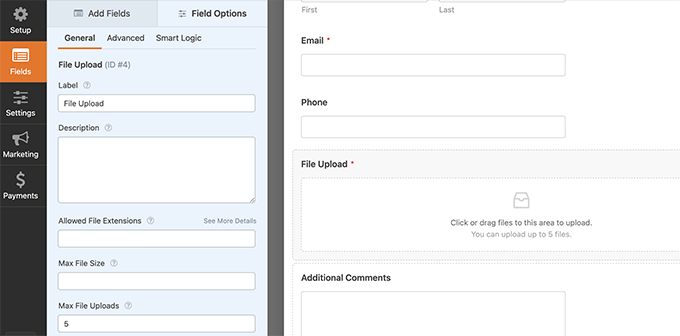
You can click on the File Upload field to change its settings. From here, you can set which file types and how many files a user can upload. You can also set a maximum file size limit.

File upload settings

Once you are finished, you can save your form and exit the form builder.

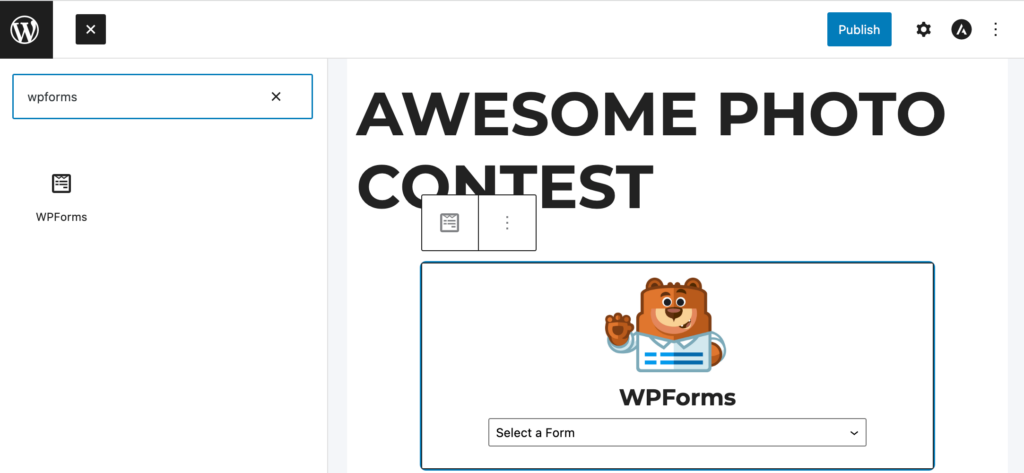
Next, you need to create a new post or page or edit an existing one. On the post edit screen, go ahead and add WPForms block to your content area.

Add form to your WordPress website

From the WPForms block settings, click on the drop-down menu to select the form you created earlier.

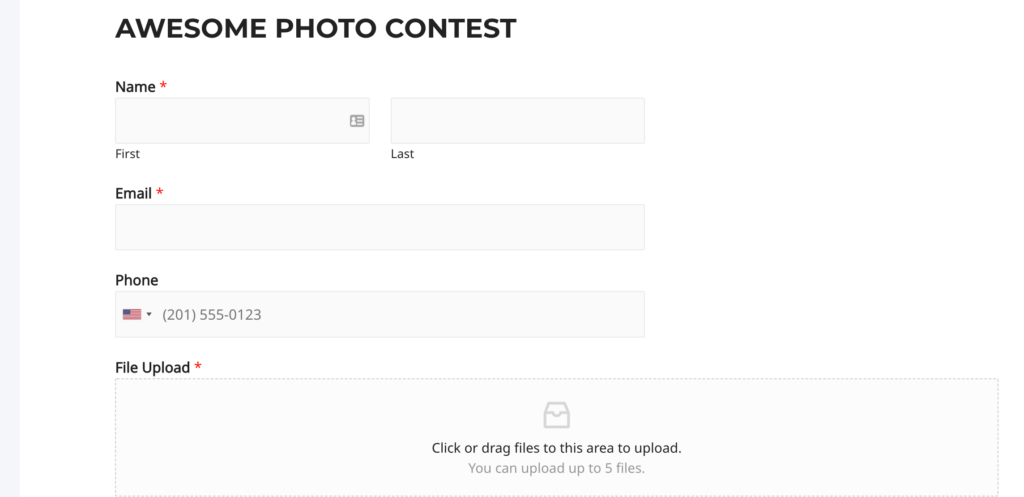
You can now save your changes and preview your post or page to see your file upload form in action.

File upload form

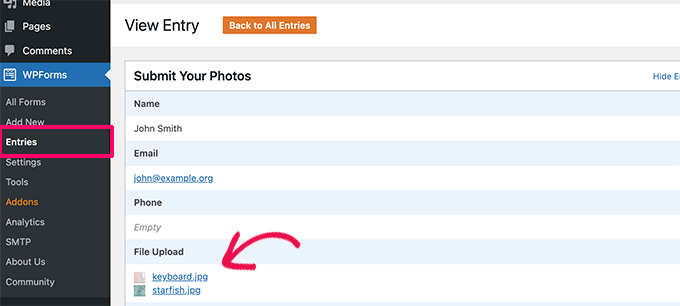
You can view files uploaded by users by visiting WPForms » Entries page and clicking on your File upload form. From here you can view an entry to see the files uploaded.

User entry

For more details, see our complete guide on how to allow users to upload images in WordPress.

Optimizing WordPress Images for Performance

Images are highly engaging thus they make your content more interesting for users. However, they also take more time to load than just plain text.

This means if you have multiple large images on a page, then your webpage will load slower. This slow page speed affects user experience as well as SEO.

Luckily, there are tons of tools to easily optimize your images for the web before uploading them to WordPress.

For instance, you can use a WordPress image compression plugin to automatically optimize each image that you upload to your website.

You can further boost performance by using a CDN (content delivery network). This allows you to load images from a global network of servers instead of your hosting server.

We recommend using Bunny.net which is the best CDN service on the market. It is super easy and comes with its own WordPress plugin for quicker setup.

We hope this article helped you learn where WordPress stores images on your site. You may also want to see our guide on how to find royalty free images for your WordPress blog, or see our beginner guide on how WordPress actually work behind the scenes.

If you liked this article, then please subscribe to our YouTube Channel for WordPress video tutorials. You can also find us on Twitter and Facebook.

The post Where Does WordPress Store Images on Your Site? first appeared on WPBeginner.


June 25, 2022 at 03:00PM