Wednesday, July 27, 2022

How to Add Conditional Logic to Menus in WordPress

Do you want to show different navigation menu items for different pages in WordPress? Or display a different menu for logged in users?

WordPress allows you to show a navigation menu in a specific location in your theme, but by default, it will always show the same menu.

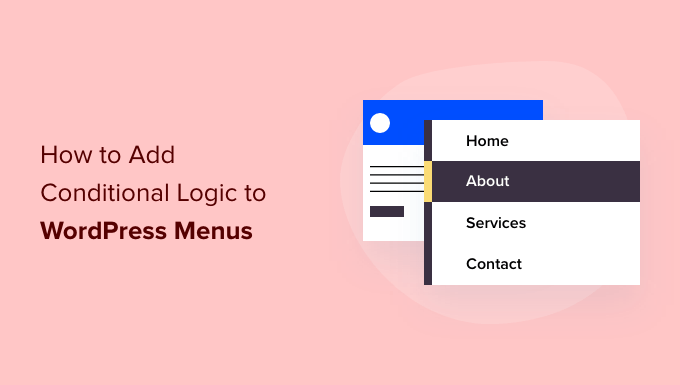
In this article, we will show you how to add conditional logic to menus in WordPress.

How to Add Conditional Logic to Menus in WordPress

Why Add Conditional Logic to Menus in WordPress?

Navigation menus give your WordPress website structure and help visitors find what they’re looking for. By default, your WordPress website will display the same navigation menu to all users and on all posts and pages.

However, there may be times when you wish to display different menus to different users, or on different pages on your website.

Websites like an online store, a WordPress membership site community, or an online learning platform can all benefit from personalized navigation menus.

Using conditional logic, you could add extra menu items for logged in users so they can manage their accounts, renew their subscriptions, or view the online courses they purchased. You can think of it as WordPress menu access control.

With that being said, let’s take a look at how to add conditional logic to menus in WordPress. Here are the topics we’ll cover in this tutorial:

Creating New Navigation Menus in WordPress

The first step is to create the additional navigation menus you wish to display in WordPress. After that, you can use conditional logic to decide when each menu will be displayed.

Simply head over to the Appearance » Menus page in the WordPress dashboard. If you already have a navigation menu that you use on your website for all users, then this can be your default menu.

Main menu

Next, you need to click the ‘create a new menu’ link to create a new menu. For example, you could create one menu to show to logged in users, and another to display on a certain WordPress page or category.

On the left-hand side of the screen, you can see a list of your website pages. Simply check the box next to any page you want to add to your menu and click the ‘Add to Menu’ button.

Logged in menu

You can also drag and drop the menu items on the right side of the screen to rearrange them.

Further down the page, you can choose a location to display your menu. But, you don’t need to assign a location to this menu now. We’ll do that in the next step.

Don’t forget to click on the ‘Save Menu’ button to store your changes.

For more details on creating menus, you can take a look at our beginner’s guide on how to add a navigation menu in WordPress.

Showing a Different Menu to Logged In Users in WordPress

It’s often useful to display different navigation menus to users depending on whether they have logged in to your site or not.

For example, you can include login and registration links for logged out users and add a logout link to your menu for your logged in menu.

Or if you are running a WooCommerce store, then you could include items for your customers that are hidden from the general public.

First, you need to install and activate the Conditional Menus plugin. For more details, see our step-by-step guide on how to install a WordPress plugin.

Upon activation, you need to visit the Appearance » Menus page and switch to the ‘Manage Locations’ tab.

Manage menu locations

From here, you will see the list of available menu locations and the menus that are currently displayed. These will vary depending on the WordPress theme you are using.

For example, on our demo website, it is showing that our Primary Menu location is showing a navigation menu titled ‘Main Menu’.

We can tell the plugin to show a different menu when a certain condition is matched by clicking on the ‘+ Conditional Menu’ link and selecting another menu from the drop down menu. For this tutorial, we’ll select ‘Logged in Menu’.

Select logged in menu

Next, you need to click on the ‘+ Conditions’ link.

This will bring up a popup where you’ll see a bunch of conditions to choose from.

Select logged in user aa the condition

Simply check the box next to the ‘User logged in’ option, and then click on the ‘Save’ button.

You can now visit your website to see the logged in user menu in action. You can log out of your website to see the navigation menu that is shown to all other users.

Different menu for logged in users

For more detailed instructions and to learn how to do this using code, take a look at our guide on how to show different menus to logged in users in WordPress.

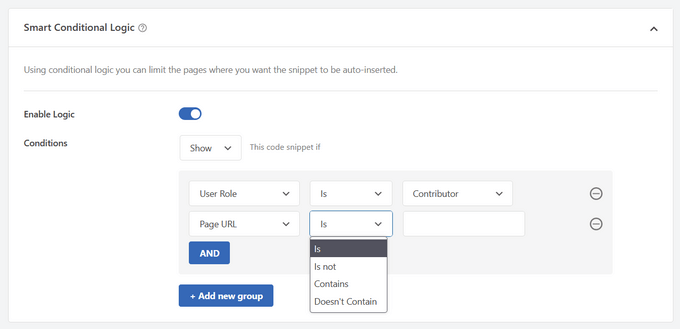
Showing a Different WordPress Menu Depending on User Role

Once a user has logged in, you can also display a different navigation menu depending on the user role you have assigned to them.

For example, you could include extra menu items for an administrator and more limited items for a contributor. Or on a membership site, you could grant different levels of access to different membership levels.

As in the previous section, you need to install and activate the Conditional Menus plugin, then visit the Appearance » Menus page and switch to the ‘Manage Locations’ tab.

Select the Conditional Menu

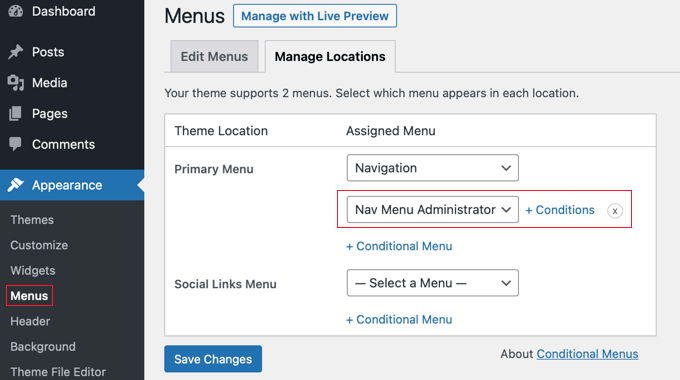
You should add the appropriate conditional menu for the user role you will select. For this tutorial, we’ve selected the ‘Nav Menu Administrator’ menu.

After that, you need to click the ‘+ Conditions’ link so you can choose the user role.

Select the Roles That Should See the Menu

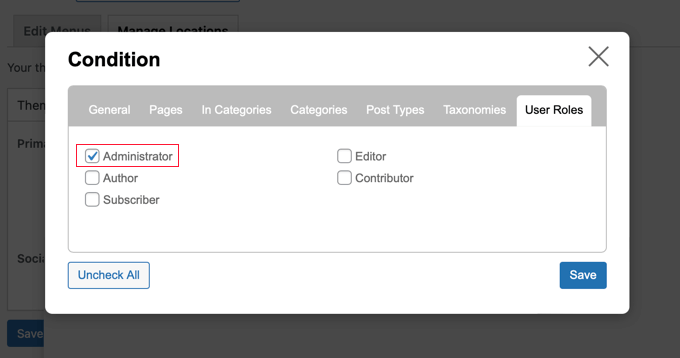
You will need to click on the ‘User Roles’ tab to see checkboxes for each user role on your website. Simply click the user roles that will see this menu, and then click the ‘Save’ button.

Showing a Different Menu for Different Pages in WordPress

You can display a different menu for different pages in WordPress. For example, you could display extra menu items on your privacy policy page, such as a link to your cookie notice.

To do this, you need to install and activate the Conditional Menus plugin, as shown above, then choose the appropriate navigation menu and click the ‘+ Conditions’ link.

This time you should click the ‘Pages’ tab. You will see a list of every page on your website.

Select the Pages Where the Menu Should Be Displayed

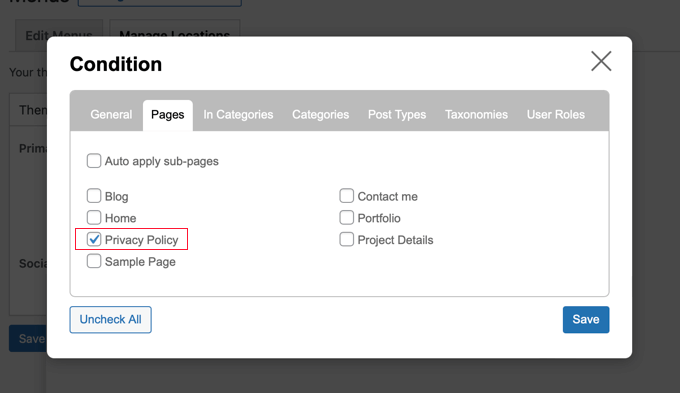
You need to place a checkmark next to each page where you wish to display the navigation menu, then click the ‘Save’ button.

Hiding the Navigation Menu on Landing Pages in WordPress

There may be pages on your website where you don’t want to display a navigation menu at all, such as your landing pages.

A landing page is designed to increase sales or generate leads for a business. On these pages, you will want to minimize distractions and provide users with all the information they need to take a specific action.

In our guide on how to increase your landing page conversions by 300%, we suggest that you can minimize distractions by removing navigation menus and other links from the page.

You can do that using the Conditional Menus plugin. When selecting the conditional menu, this time you need to choose ‘Disable Menu’ from the drop down menu.

Select Disable Menu From the Drop Down

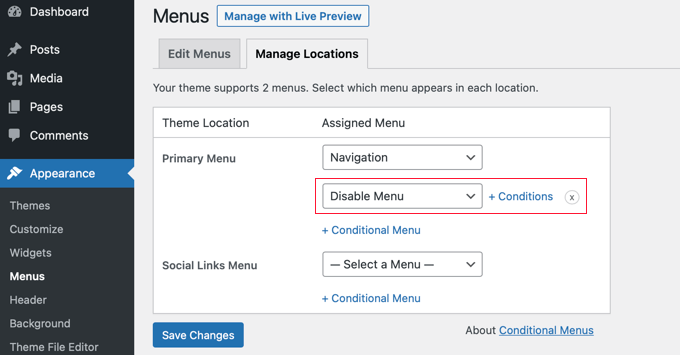
Next, you need to click the ‘+ Conditions’ link to choose when to display the menu.

You should click on the ‘Pages’ tab and place checkmarks next to your landing pages.

Select the Pages Where the Navigation Menu Should Be Hidden

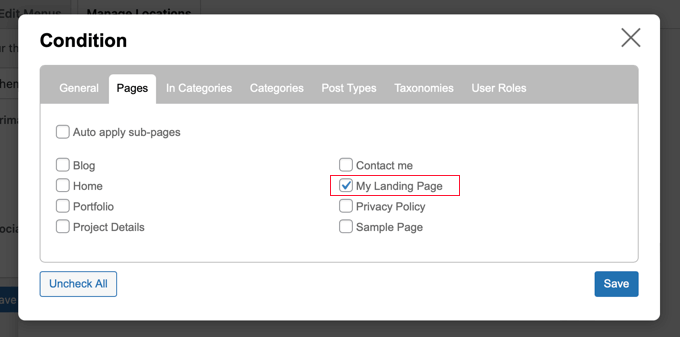
Don’t forget to click the ‘Save’ button to store your settings.

Doing More With WordPress Navigation Menus

Navigation menus are a powerful web design tool. They allow you to point users to the most important sections of your website.

Now that you are showing different navigation menus on different pages and for different users, you may be wondering how you can customize them further.

Try these useful tutorials to extend the functionality of the navigation menus on your WordPress website.

We hope this tutorial helped you learn how to add conditional logic to menus in WordPress. You may also want to learn how to create automated workflows, or check out our list of the best social proof plugins for WordPress and WooCommerce.

If you liked this article, then please subscribe to our YouTube Channel for WordPress video tutorials. You can also find us on Twitter and Facebook.

The post How to Add Conditional Logic to Menus in WordPress first appeared on WPBeginner.


July 27, 2022 at 02:00PM

Tuesday, July 26, 2022

Introducing WPCode – Easy WordPress Code Manager to Future-Proof Your Website Customizations

Have you ever wanted to reduce the number of WordPress plugins you’re using on your website?

Wouldn’t it be nice if there was an easy way that allowed you to add future-proof WordPress customizations through code snippets WITHOUT breaking your website?

If you’re like me and most other smart website owners, then you have at least wished for this solution a couple times in your WordPress journey.

Today, I’m excited to share the launch of my free WPCode plugin which will transform the way you think about WordPress customization.

We built this tool to help you save time and hassle when managing your website customizations. This is like the ultimate Swiss-Army knife tool that will help you replace dozens of existing WordPress plugins while making your website faster.

Introducing WPCode - WordPress Code Snippets Plugin

Background Story

In 2012, I created a free plugin called Insert Headers and Footers.

The goal of this plugin was to make it easy for me and other WPBeginner readers to add code to our WordPress site’s header and footer area without editing theme files!

This would include things like Google Analytics script, custom CSS code, Facebook Pixel, AdSense code, and more.

Over the last decade, this simple plugin grew to over 1 million active installs.

Enter tracking code in header

In the same time period, WordPress grew a lot too with tons of new features and plugins.

Every month, I would get requests from our users to add more functionality such as the ability to conditionally load scripts on certain pages, ability to add code snippets in other areas of the website, and so on.

After a lot of thought and consideration, we have decided to expand this free plugin and make it a full-featured code snippet management solution for WordPress with conditional logic, auto-insertion, and much more.

Using the new plugin you can:

  • Add tracking scripts / various webmaster tool verification meta details in your site with just a few clicks.
  • Add banner ads or other dynamic content elements after first paragraph of every blog post, at the end of each blog post, etc.
  • Remove WordPress features that you don’t want such as REST API, XML-RPC, Comments, etc.
  • Easily copy & paste code snippets from tutorials in your WordPress site without errors.
  • And really this is just scratching the surface.

All of these features are available to you for free!

If you’re a marketer, think of WPCode like a Google Tag Manager but inside WordPress.

If you’re a regular business owner, think of this as a swiss-army knife for your website. It will help you do what you want to do – nothing more, nothing less.

WPCode is by far the MOST POWERFUL plugin you’ll install on your WordPress site, and I’m not exaggerating.

Just give me 5 minutes of your attention, and I’ll show you — keep on reading.

What is WPCode?

WPCode is a powerful WordPress code snippet plugin that makes it easy for you to add custom WordPress features using code snippets without editing your theme’s functions.php file.

It comes with a built-in code snippets library where you can find some of my most popular WordPress code snippets that will help you eliminate the need of separate plugins.

WPCode WordPress Code Snippets Library

For example, there are ready-made snippets that will help you:

  • Disable XML-RPC – this is good for WordPress security
  • Allow SVG File Upload – eliminates the need for separate plugin
  • Disable Gutenberg – eliminates the need for separate plugin
  • Disable Comments – eliminates the need for separate plugin
  • Add Tracking Scripts for Google Analytics, Facebook, AdSense, and other platforms

And there are currently over two dozen other code snippets that you can use to add custom functionality while reducing the number of plugins on your site.

For an average website owner, this plugin will help you reduce at least 6 – 8 other plugins that you might be using right now with just the ready-made snippets that are there.

My plan is to continue to add more custom code snippets there to cover popular use-cases. If you have suggestions, please let us know by filling out the form here.

If you’re a WordPress developer / freelancer that wants to contribute code snippets, please send us your snippet using the form above.

Future-Proof Site Customization & Code Management

Most WordPress customization tutorials will ask you to add code snippets to your theme’s functions.php file. This old way simply makes managing code snippets messy, and it also prevents you from updating your theme.

If you ever update your theme or switch to another theme, then you will lose all custom code functions that you added in your functions.php file.

WPCode solves this by providing you an easy way to insert header and footer scripts along with other code snippets directly from your WordPress dashboard. These code snippets actually run as if they were in your theme’s functions.php file, but we make your customizations future-proof.

Create New Custom Snippet in WordPress

You can safely update themes or switch to another theme without ever losing your important website customizations.

Another problem with adding custom code snippets on your theme’s functions.php file was that even the smallest mistake can break your website and make it inaccessible.

So we created our smart code snippet validation. This helps you prevent common code errors to ensures you never break your website when adding code snippets or header and footer scripts.

You can manage all your header and footer scripts as well as other custom code snippets from a single screen. We even make it easy for you to organize code snippets using Tags and add reminder notes with each code snippet.

WPCode - WordPress Snippets Organized by Tags

Built-in WordPress Code Generators

Aside from our growing code snippets library, we also have WordPress code generators to help you quickly get ready-to-use custom code using the latest WordPress coding standards and API’s.

WPCode Generators for WordPress

Examples of Custom Code Generators with Admin UI include:

  • Custom Post Type Generator – Create custom code snippet for Post Types.
  • Custom Taxonomy Generator – Get custom code snippet for Taxonomies.
  • WP Query Generator – Get custom code snippet for WP_Query to load posts.
  • Custom Sidebar Generator – Create custom code snippet to register custom sidebars or widget-ready areas.
  • Custom Widget Generator – Custom code snippet to register custom widgets.
  • Navigation Menu Generator – Custom code snippet for registering new navigation menu locations in your theme.

Aside from the above, we also have code snippet generator for scheduling a cron job, registering scripts & stylesheets, adding custom post status, and more.

In the past, beginners and intermediate users would use WordPress plugins to create custom post types, taxonomies, etc with an admin UI. The problem is that those are one-time use plugins that in the background are just generating custom code snippets.

Now with WPCode free generators, you can cut out those plugins while still adding the custom functionality that you want with an admin UI.

This will be a huge time-saver for new WordPress developers and web professionals who’re building websites for clients.

Conditional Logic for Code Snippets + Auto Insertion Priority

My goal with WPCode was to create a WordPress code snippets plugin that’s both EASY and POWERFUL.

That’s why aside from our global header and footer scripts, we added advanced features like conditional logic for code snippets and made it easy.

Instead of learning WordPress conditional logic queries, you can use visual conditional logic to decide when a certain snippet would load.

WPCode Smart Conditional Logic

Examples use-cases of WPCode conditional logic:

  • Load code snippets for logged in users only
  • Load PHP code snippets for specific user roles
  • Load PHP code snippets only on specific page URLs
  • Insert header and footer pixel scripts on specific pages
  • Show code snippets based on type of page
  • Run code snippet only on certain post types
  • Load header and footer code snippet based on referrer source
  • and more…

We also added both automatic code insertion and manual output using shortcodes. This way you can add features using a custom shortcode, or simply automatically add certain features on area that you want.

WPCode Auto Insert PHP Code

Our Auto Insert feature allows you to run the code snippet everywhere or choose from custom options like:

  • Run code snippet only on frontend
  • Run code snippet only in WordPress admin area
  • Add header and footer scripts sitewide
  • Insert PHP code snippet before or after post content
  • Insert code snippet before or after specific paragraph
  • Insert code snippet on specific archive pages

Aside from that, we also added a visual code snippet priority system, so you can choose the order for your custom functions to avoid code conflict.

Add code description, tags, and priority in WPCode

What are Some Example Use Cases + Plugins You Can Replace?

WPCode is the one plugin that helps you get rid of dozens of other plugins without losing functionality.

Here are some of the top use-cases :

  • Insert Headers and Footers scripts
  • Insert Google Analytics Tracking Code in Header and Footer
  • Insert PHP Code Snippets or JavaScript code snippet without modifying theme’s functions.php file
  • Insert Facebook Pixels code, Google Conversion Pixels code, and other Advertising Conversion Pixel Scripts in WordPress header and footer with conditional logic
  • Insert Google AdSense Ads code, Amazon Native Contextual Ads code, and other Media Ads code
  • Insert Custom JavaScript, CSS, and HTML code
  • Insert Site Verification Meta tags for Social Media, Google Search Console, and other Domain verification in the header and footer of your site
  • Insert re-usable custom content blocks
  • Insert Ads code in content after specific paragraphs
  • Show or hide custom code snippets based on conditional logic
  • Disable XML-RPC, Disable Rest API, disable comments, allow SVG file uploads, disable Gutenberg and enable Classic Editor without adding extra plugins

Just with our current features and ready-made code snippets library, you can replace several popular plugins including:

WPCode comes with a ready-made code snippets library that allows you to replace several popular plugins including:

  • Disable Comment plugins
  • Disable XML-RPC plugins
  • Disable Rest API plugins
  • Disable Gutenberg plugins
  • Classic Editor plugin
  • Allow SVG File Upload plugins
  • Disable RSS feed plugins
  • Disable Search plugins
  • Disable Automatic Updates plugins
  • Disable Admin Bar plugins
  • Disable Widget Blocks plugin
  • Classic Widgets plugin
  • Remove WordPress Version Number plugins
  • Facebook Pixel plugins
  • Google AdSense plugins
  • Custom Post Types UI plugins
  • Other WordPress Generator plugins

On average, I believe you can easily replace 6 – 8 existing plugins on your website because a typical website often installs these one-off feature plugins.

Now you can remove those plugins, clean up your admin area, and simplify your website management.

What’s Coming Next in WPCode?

Since the Insert Headers and Footers plugin had over 1 million users, getting all these new features for free was a surprise for everyone.

I’m extremely pleased with the community response so far, as everyone is loving the new features.

We have an exciting roadmap ahead of us to make this plugin even more powerful. Some of the things that we’re working on:

  • A larger list of Code Snippet library that is vetted by our WordPress experts
  • Save custom snippets to cloud – this will be great for those creating & managing multiple websites as you can build your personalized snippet library inside the plugin
  • and much more

We’re truly building something special here. If you have ideas on how we can make the plugin more helpful to you, please send us your suggestions.

As always, I want to thank you for your continued support of WPBeginner, and we look forward to continue serving you for years to come.

Yours Truly,

Syed Balkhi
Founder of WPBeginner

P.S. Want us to acquire or invest in your WordPress business? Learn more about the WPBeginner Growth Fund.

The post Introducing WPCode – Easy WordPress Code Manager to Future-Proof Your Website Customizations first appeared on WPBeginner.


July 26, 2022 at 04:00PM

Monday, July 25, 2022

How to Change Fonts in Your WordPress Theme (5 Easy Ways)

Are you looking to change the font on your WordPress theme to something different?

Your website text font plays an important role in your site’s design and brand identity. It can improve the readability of your content and make your site look modern and professional.

In this article, we’ll show you how to change font in WordPress using 5 different ways, so you can easily change fonts using no-code method, or change WordPress font without using any plugin.

How to change font in WordPress

Why Change Fonts on Your WordPress Website?

Fonts are an essential part of your website design and have a huge impact on how your WordPress site will look and feel.

If your website has a difficult font to read, then it will be hard to retain visitors, and they’ll eventually abandon your site.

A font also shows your brand identity. For instance, you can use specific fonts to make your site look more professional, or casual.

WordPress themes come with a default font, font size, and font color for your website. However, you may want to change the default font to something different.

That said, there are several ways of changing fonts in WordPress. We’ll show you several different methods. You can click the links below to jump ahead to any section.

Changing Fonts in WordPress Theme Customizer

An easy way of changing your site’s font is by going to the WordPress theme customizer. It allows you to change the appearance of your website and shows a real-time preview.

Note: If your customizer menu option is missing, then your theme likely has full site editing enabled and you’ll need to use a different method or switch themes.

For this tutorial, we’ll use the Astra theme. However, the options will change depending on the WordPress theme you use. Depending on your theme, you’ll want to look for ‘font’ or ‘typography’ options in the customizer.

First, you can head over to Appearance » Customize from your WordPress dashboard.

Go to appearance menu

This will launch the WordPress theme customizer.

The Astra theme has a ‘Global’ section with options to change site-wide styles. To change the font on your whole website, you can click the ‘Global’ option from the menu on your left.

Go to Global settings

On the next screen, you’ll see options like typography, colors, container, and buttons.

Go ahead and click the ‘Typography’ option.

Open typography settings

From here, you can choose different fonts under the ‘Presets’ section.

These are default fonts offered by the theme and selecting a preset will change the font on your entire website.

Change font in theme customizer

Besides that, you can also change fonts for individual elements on your theme.

For example, you can use a different font for body and headings. There are even options to use separate fonts for each heading level.

To start, simply choose a font from the ‘Font Family’ dropdown menu for any individual element.

Change font of individual elements

Besides that, there are more options to change the font size, weight, select variants, and more.

When you’re done, don’t forget to click the ‘Publish’ button.

You can now visit your website and see the new font. For instance, we changed the body font to Roboto and the heading font to Helvetica on our demo site.

Font change preview

It’s important to note that not all WordPress themes will offer the same features and customizations that Astra is offering. If your theme doesn’t offer that, then continue reading to the next step.

Changing Fonts in WordPress Full Site Editor

If you’re using a block-based WordPress theme like Twenty Twenty-Two, then you can change your site’s font using the full site editor (FSE).

The full site editor allows you to customize your WordPress theme using blocks, just like when editing posts or pages using the WordPress content editor. However, FSE is currently in beta and only a handful of themes support it.

For the sake of this tutorial, we’ll use the Twenty Twenty-Two theme.

To get started, you can head over to Appearance » Editor from the WordPress admin panel.

Go to full site editor

This will open the full site editor for your WordPress theme.

Next, you can click the Styles icon in the top right corner and then click on the ‘Typography’ option.

Open the style settings

After that, you can select elements like text and links to change their typography.

We’ll select Text as the element and then click on the ‘Font Family’ dropdown menu to change its font.

Change font in FSE

When you’re done, simply click the ‘Save’ button.

You’ve successfully changed the font using the full site editor. You can also add custom fonts to your WordPress site as well and then change them in the full site editor.

Change WordPress Fonts Using a WordPress Plugin

Another way of changing WordPress fonts is by using a WordPress plugin like Easy Google Fonts.

It’s a free WordPress typography plugin that lets you add over 600 Google fonts and different font variants to your website.

First, you’ll need to install and activate the Easy Google Fonts plugin. If you need help, then please see our guide on how to install a WordPress plugin.

Upon activation, you will see the Easy Google Fonts welcome screen in your WordPress dashboard. You can scroll down and click the ‘Go to Settings → Easy Google Fonts’ button.

Go to easy google fonts settings

On the next screen, you will see different plugin settings.

Go ahead and click the ‘Manage with Live Preview’ button at the top.

Click manage with live preview

This will open the WordPress theme customizer, and you be in the ‘Typography’ tab.

Another way of accessing fonts added by the plugin is by going to Appearance » Customize from your WordPress dashboard and then clicking the ‘Typography’ tab.

Go to the typography tab

On the next screen, you’ll see the ‘Default Typography’ option.

Go ahead and click on it.

Go to default typography

After that, you can change the font of every element on your website.

For example, let’s change the font of Heading 1. Simply click the arrow next to Heading 1 to expand the options. From here, you can click the ‘Font Family’ dropdown menu and select a font.

Select a font using a plugin

You can do the same for other heading levels and paragraphs.

Don’t forget to click the ‘Publish’ button when you’re done.

Change Fonts Using a WordPress Theme Builder

There are many powerful WordPress theme builders that let you create a custom theme without editing code. You can use them to change the font of different elements on your website.

For this tutorial, we’ll use SeedProd. It’s the best landing page and theme builder plugin for WordPress and offers a drag and drop builder to create custom themes without touching a single line of code.

Note that you’ll need the SeedProd Pro version because it includes the theme builder. There is also a SeedProd Lite version that you can use for free.

First, you’ll need to install and activate the SeedProd plugin. For more details, please see our guide on how to install a WordPress plugin.

Upon activation, you’ll see the SeedProd welcome screen. Go ahead and enter your license key and click the ‘Verify key’ button. You can easily find the license key in your SeedProd account area.

SeedProd license key

After that, you can head over to SeedProd » Theme Builder from the WordPress dashboard.

Next, go ahead and click the ‘Themes’ button at the top.

Create your custom theme

From here, the plugin will show you multiple themes to choose from.

Simply hover over a theme you want to use and then click on it. We’ll use the Starter theme for this tutorial.

Choose a starter theme

SeedProd will now generate different theme templates.

You can edit each template and customize your WordPress theme. There’s even an option to manually add a theme template.

Let’s edit the Homepage theme template and change the fonts of different elements. To start, click the ‘Edit Design’ link under Homepage.

Edit homepage design

This will launch the SeedProd’s drag and drop theme builder. You can add new elements from the menu on your left and place them anywhere on the template.

To change the font of any theme section, simply select it. For example, we’ll select the text box under the Starter heading.

Next, go to the ‘Advanced’ tab from the menu on your left and click the ‘Edit’ button in front of Typography.

Select text in theme builder

After that, you’ll see multiple options to edit the typography of your selected section.

You can click on the ‘Font Family’ dropdown menu and choose a font for your text. There are also options to select font weight, adjust the font size, line height, letter spacing, alignment, letter case, and more.

Change font in theme builder

You can now repeat this step and change the font of other elements on your theme.

When you’re done, simply click the ‘Save’ button at the top.

To apply the custom theme and fonts, go to SeedProd » Theme Builder and toggle the switch next to the ‘Enable SeedProd Theme’ option to Yes.

Enable SeedProd theme

If you’re looking to create a WordPress theme from scratch, then see our guide on how to easily create a custom WordPress theme.

Customize Font Appearance in WordPress Content Editor

Using the content editor, you can also change how your fonts appear in specific blog posts and pages.

The downside of this method is that it will only apply the new font to that particular post or page only. You’d have to repeat this step manually for all other posts where you want to apply similar customization.

This can be really handy for post specific customizations, but if you’re looking for a sitewide font change option, then you should consider the other options instead.

With that said, to change the font using WordPress content editor, simply edit a post or add a new one. Once you’re in the WordPress content editor, select the text to change its appearance.

In the settings panel on your right, head to the ‘Typography’ section. Then click the 3 dots in front of Typography and select ‘Appearance’ from the dropdown options.

Open typography settings in content editor

Once you do that, the Appearance settings will be visible under the Typography section.

Simply click the dropdown menu under Appearance and select a style for your font. For example, you can make the font bold, thin, italic, black, bold italic, extra bold, and more.

There are also options to change the font size, choose a letter case, edit the color, enable drop caps, and more.

Choose an appearance style

Don’t forget to update or publish your page when you’re done.

We hope this article helped you learn how to change font in WordPress. You can also see our ultimate WordPress SEO guide for beginners, and check out our expert-pick of the best email marketing services for small businesses.

If you liked this article, then please subscribe to our YouTube Channel for WordPress video tutorials. You can also find us on Twitter and Facebook.

The post How to Change Fonts in Your WordPress Theme (5 Easy Ways) first appeared on WPBeginner.


July 25, 2022 at 03:00PM

Sunday, July 24, 2022

Beginner’s Guide to WordPress File and Directory Structure

Do you want to learn about WordPress files and directory structure?

All core WordPress files, themes, plugins, and user uploads are stored on your website hosting server.

In this beginner’s guide, we’ll explain the WordPress file and directory structure.

WordPress file and directory structure explained for beginners

Why You Should Learn About WordPress File and Directory Structure?

Most users can run their WordPress website without ever learning about WordPress files or directories. However, understanding how WordPress stores files and directories can help you solve many common WordPress problems on your own.

This guide will help you:

  • Learn which WordPress files and folders are core files.
  • Understand how WordPress stores your images and media uploads.
  • Where WordPress stores your themes and plugins.
  • Where configuration files are stored on your WordPress install.

This information also helps you learn how WordPress works behind the scenes and which WordPress files should you backup.

Having said that, let’s take a look at the WordPress file and directory structure.

Accessing WordPress Files and Directories

Your WordPress files and directories are stored on your web hosting server. You can access these files by using an FTP client. See our guide on how to use FTP to upload WordPress files for detailed instructions.

An easier alternative to FTP is the File Manager app that comes built into most WordPress hosting control panel.

File manager app in hosting control panel

Once you have connected to your WordPress site either using FTP or File Manager, you will see a file and directory structure that looks like this:

WordPress files and folders

Inside the root folder, you’ll see the core WordPress files and folders. These are the files and folders that run your WordPress site.

Apart from .htaccess and wp-config.php files, you are not supposed to edit other files on your own.

Here is a list of core WordPress files and folders that you would see in your WordPress site’s root directory.

  • wp-admin [dir]
  • wp-content [dir]
  • wp-includes [dir]
  • index.php
  • license.txt
  • readme.html
  • wp-activate.php
  • wp-blog-header.php
  • wp-comments-post.php
  • wp-config-sample.php
  • wp-cron.php
  • wp-links-opml.php
  • wp-load.php
  • wp-login.php
  • wp-mail.php
  • wp-settings.php
  • wp-signup.php
  • wp-trackback.php
  • xmlrpc.php

The above list is missing .htaccess and wp-config.php files. That’s because those two files are created after WordPress installation.

WordPress Configuration Files

Your WordPress root directory contains some special configuration files. These files contain important settings specific to your WordPress site.

WordPress configuration files
  • .htaccess – A server configuration file, WordPress uses it to manage permalinks and redirects.
  • wp-config.php – This file tells WordPress how to connect to your database. It also sets some global settings for your WordPress site.
  • index.php – The index file basically loads and initializes all your WordPress files when a page is requested by a user.

You may need to edit wp-config.php or .htaccess file sometimes. Be extra careful when editing these two files. A slight mistake can make your site inaccessible. When editing these two files, always create backup copies on your computer before making any changes.

If you don’t see .htaccess file in your root directory, then checkout our guide on why you can’t find .htaccess file in your WordPress root directory.

Depending on how your WordPress site is setup, you may or may not have the following files in your root directory.

  • robots.txt – contains instructions for search engines crawlers
  • Favicon.ico – A favicon file is sometimes generated by WordPress hosts.

Inside The wp-content Folder

WordPress stores all uploads, plugins, and themes in the wp-content folder.

WordPress content folder

It is generally assumed that you can edit files and folders inside wp-content folder. However, this is not entirely true.

Let’s take a look inside the wp-content folder to understand how it works and what you can do here.

Inside wp-content folder

Contents of the wp-content folder may differ from one WordPress site to another. But all WordPress sites usually have these:

  • [dir] themes
  • [dir] plugins
  • [dir] uploads
  • index.php

WordPress stores your theme files in /wp-content/themes/ folder. You can edit a theme file, but it is generally not recommended. As soon as you update your theme to a newer version, your changes will be overwritten during the update.

This is why it is recommended to create a child theme for WordPress theme customization.

All WordPress plugins you download and install on your site are stored in /wp-content/plugins/ folder. You are not supposed to edit plugin files directly, unless you wrote site-specific WordPress plugin for your own use.

In many WordPress tutorials, you will see code snippets that you can add to your WordPress site.

The best way to add custom code to your WordPress site is by adding it to functions.php file of your child theme or by creating a site-specific plugin. Alternately, you can also use custom code snippets plugin to add custom code.

WordPress stores all your image and media uploads in the /wp-content/uploads/ folder. By default, uploads are organized in /year/month/ folders. Whenever you are creating a WordPress backup, you should include the uploads folder.

You can download fresh copies of WordPress core, your theme, and installed plugins from their sources. But if you lose your uploads folder, then it would be very hard to restore it without a backup.

Some other default folders you may see in your wp-content directory.

Many WordPress plugins may also create their own folders inside your wp-content folder to store files.

Some WordPress plugins may create folders inside the /wp-content/uploads/ folder to save user uploads. For instance, this demo website has folders created by Smash Balloon, WooCommerce, SeedProd, and WPForms plugins.

Plugins may create their own folders inside uploads directory

Some of these folders may contain important files. This is why we recommend backing up all such folders as a precaution.

Other folders may contain files that you can safely delete. For example your caching plugins like WP Rocket may create folders to save caching data.

That’s all, we hope this article helped you understand the WordPress file and directory structure. You may also want to see our beginner’s guide to WordPress database management with phpMyAdmin, and our tutorial on how to create a custom WordPress theme without any coding knowledge.

If you liked this article, then please subscribe to our YouTube Channel for WordPress video tutorials. You can also find us on Twitter and Facebook.

The post Beginner’s Guide to WordPress File and Directory Structure first appeared on WPBeginner.


July 24, 2022 at 04:14PM