Monday, February 27, 2023

What’s Coming in WordPress 6.2 (Features and Screenshots)

WordPress 6.2 Beta arrived a few days ago and it is expected to be released on March 28th, 2023. It will be the second major release of 2023 and will come with significant new features and improvements.

We have been closely monitoring the development and trying out new features on our test sites.

In this article, we’ll give you a sneak peek into what features are coming in WordPress 6.2 with details and screenshots.
What new features are coming in WordPress 6.2

Note: You can try out the beta version on your computer or on a staging environment by using the WordPress Beta Tester plugin. Please keep in mind that some of the features in the beta may not make it into the final release.

Here is a quick overview of changes coming in WordPress 6.2:

Full Site Editor Comes Out of Beta

The new full site editor feature in WordPress will come out of beta with the final release of WordPress 6.2.
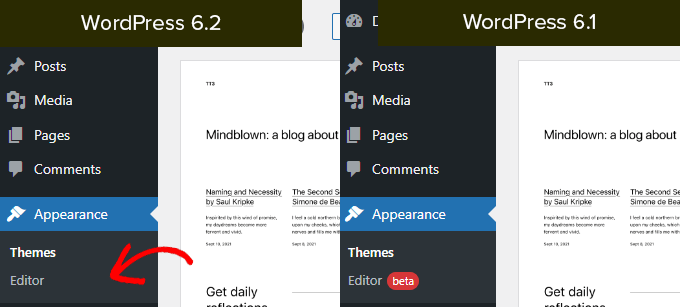
Site editor comes out of beta

This completes a significant part of the WordPress development roadmap.

The site editor feature is now stable for the community to create block-based themes and experiment with their own WordPress websites, plugins, or themes.

Note: Full site editor is available with block themes that support this feature. You can try it out even if you are using the older classic editor with a block-enabled theme.

Browse and Choose Templates to Edit

Previously the Site Editor loaded the Home template of your theme by default. This left many beginners wondering which template or template part they needed to edit.

With WordPress 6.2, the site editor will load the template preview window first. From here, you can browse different templates and see a preview of what it looks like.
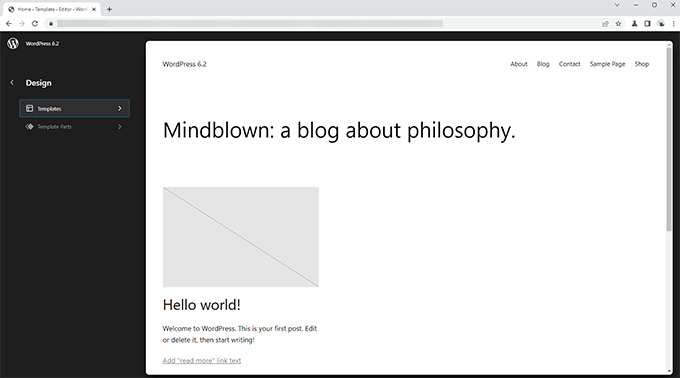
Template browser

Then you can simply click on the Edit button to start working on the selected template.

Once you are done editing the template, don’t forget to click on the Save button to make your changes go live.

After that, you can click on the WordPress logo in the upper-left corner of the screen to bring back the template browser sidebar.
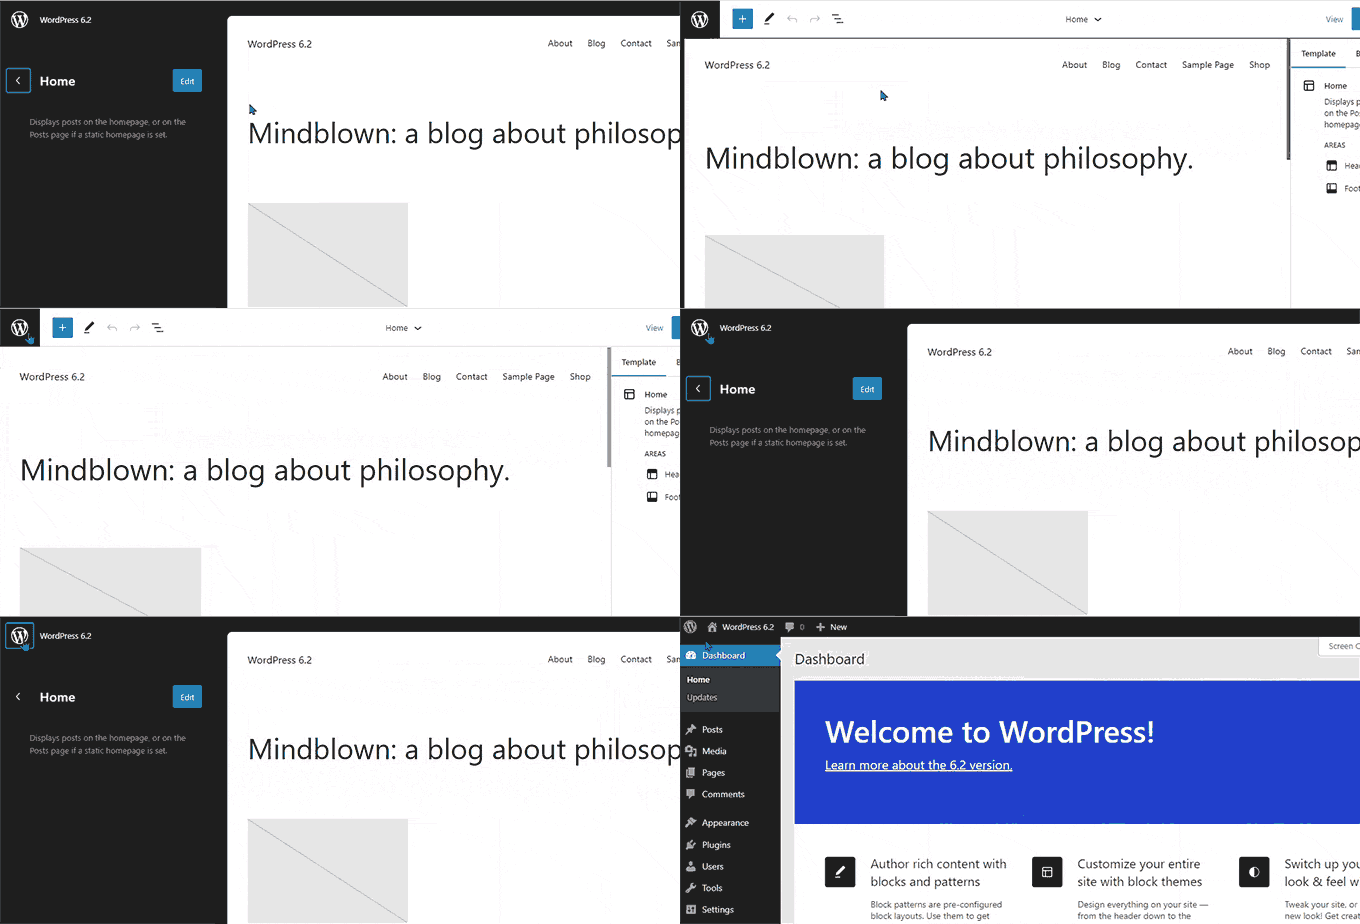
Site editor navigation

Now if you need to edit a different template, then you can choose it from here. Otherwise, you can simply click on the WordPress logo again and exit the Site Editor.

Add Custom CSS to Your Theme or Specific Blocks

In the last few WordPress releases, the site editor hid the ‘Theme Customizer‘ which made it difficult for users to add custom CSS to their themes.

WordPress 6.2 will allow users to switch to the Styles panel and select Custom CSS from the menu.
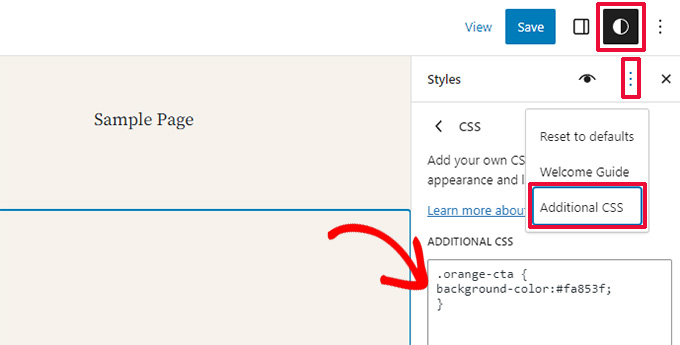
Custom CSS in site editor

From here, users will be able to save Custom CSS that applies to their entire theme.

What if you wanted to save custom CSS that only applied to a specific block?

WordPress 6.2 will also allow you to add custom CSS for specific blocks. From the Style panel, click on the Blocks menu.
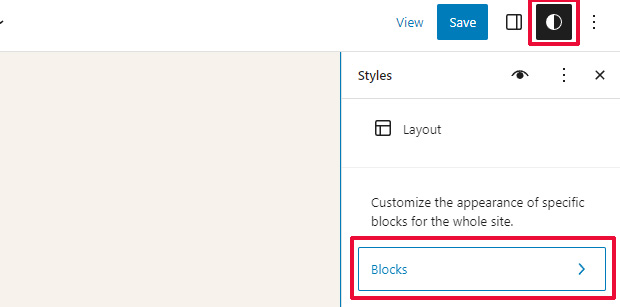
Block styles

On the next screen, you will see a list of blocks. Simply click on the block where you want to apply your custom CSS.

Under the block styles, click on the Additional CSS tab.
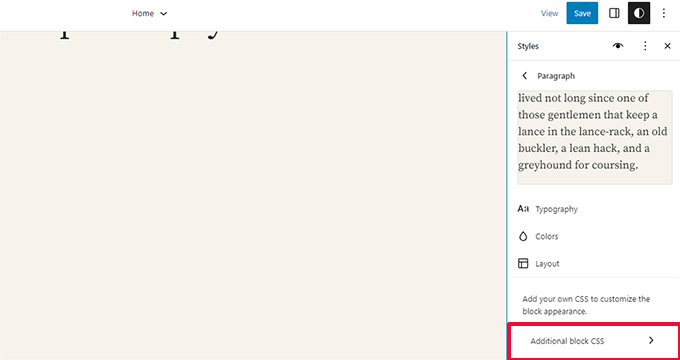
Block styles custom CSS

If you want to conditionally add CSS or keep your custom styles outside of theme specific settings, then we recommend using the free WPCode plugin.

New and Improved Navigation Menus

Adding navigation menus in the full site editor has been a bit difficult for users. WordPress 6.2 will try to solve this by improving the way users can create and manage menus while using the site editor.

First, instead of editing the menu items inline, you can now add, remove, and edit menu items in a subpanel under the Navigation block.
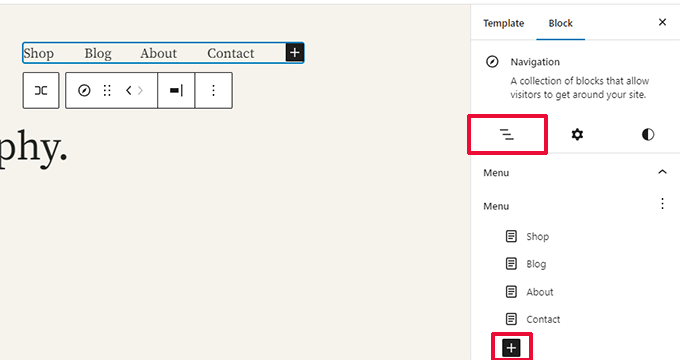
Managing menu items in block panel

From here, you can add a new menu item by clicking on the Add Block (+) button. You can also just drag and drop menu items to rearrange them.

Want to create a new blank menu or reload an older one? Simply click on the three-dot menu and then choose a menu you created earlier or create a new one.
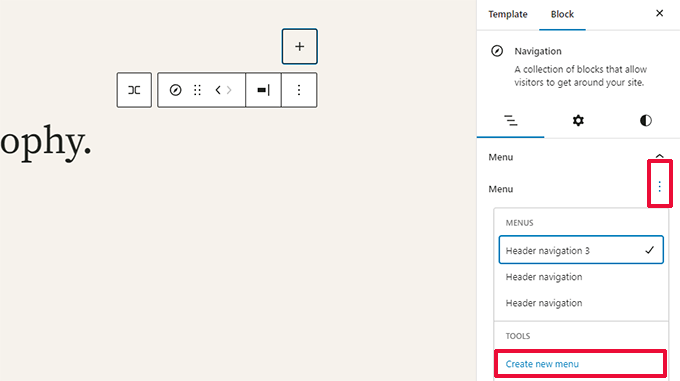
Manage menus

Colors to Indicate Template Parts Being Edited

WordPress 6.2 will also highlight the template part that you are editing, and that changes will be made on a side-wide, global scale.

The element will be bordered in a color and have a template part icon attached.
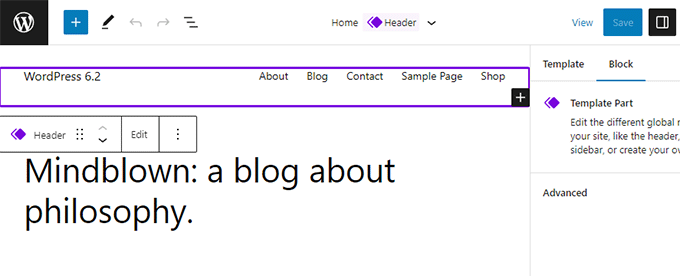
Template part editing in site editor

This will help users realize that instead of editing the specific page or post, they are now editing a template part and this change will affect other pages on their site as well.

See Styles for All Blocks in The Style Book

The site editor in WordPress 6.2 will ship with a ‘Style Book.’ Simply switch to the Styles panel and then click on the style book icon.

This will show you all the blocks, and how they are styled in your theme.
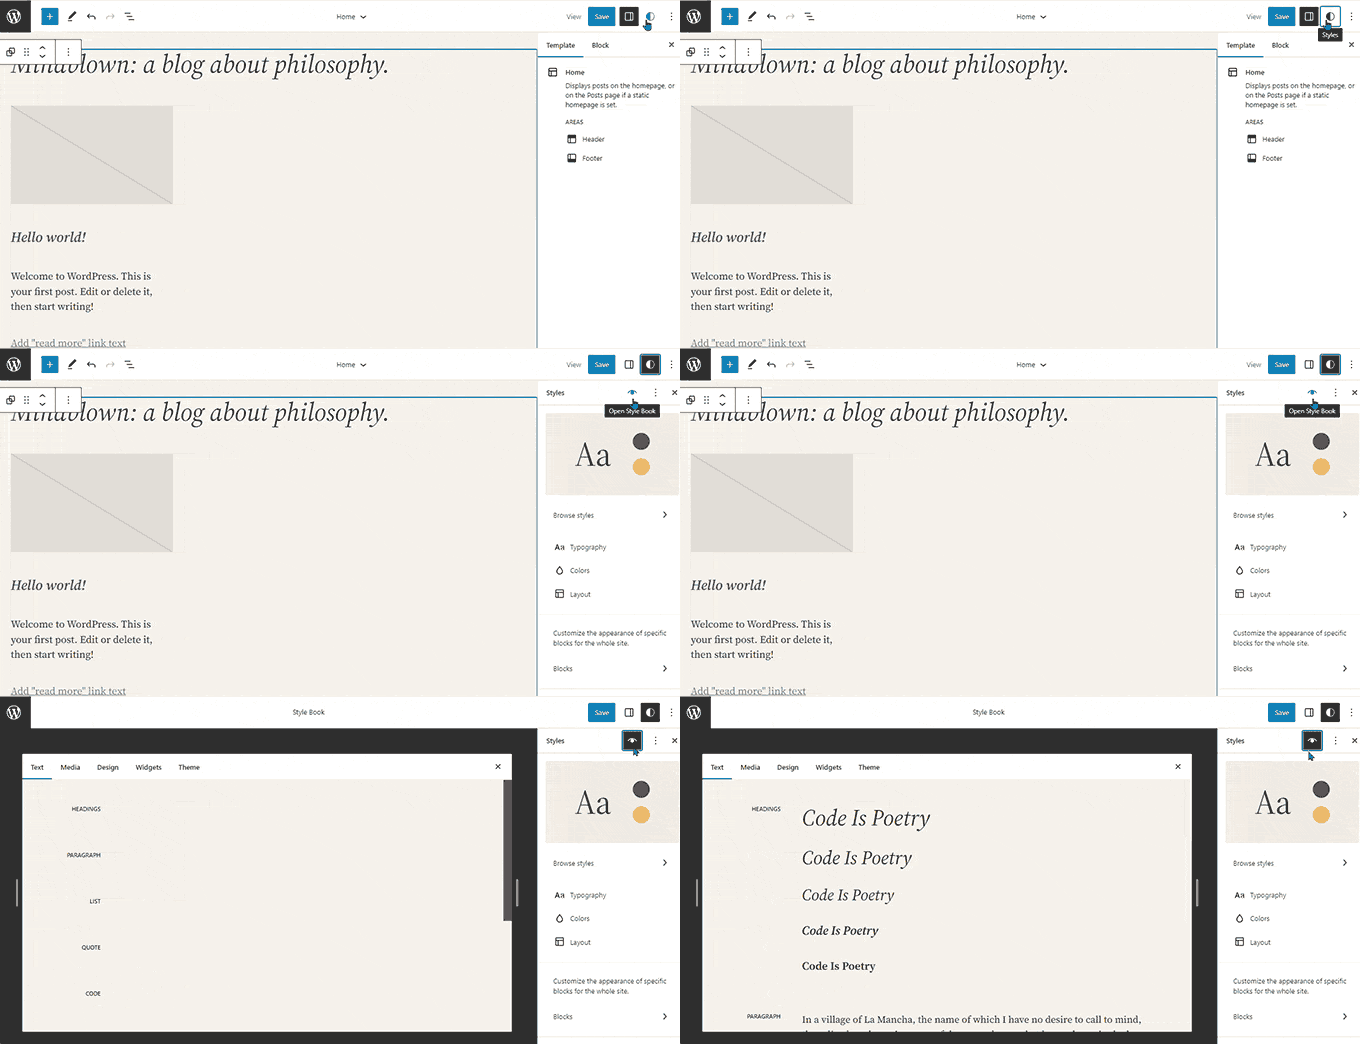
Style book shows all block styles at one place

You can locate a block much more quickly this way, and then click to edit it directly.

After that, you can change its appearance and style and customize it to your own requirements.
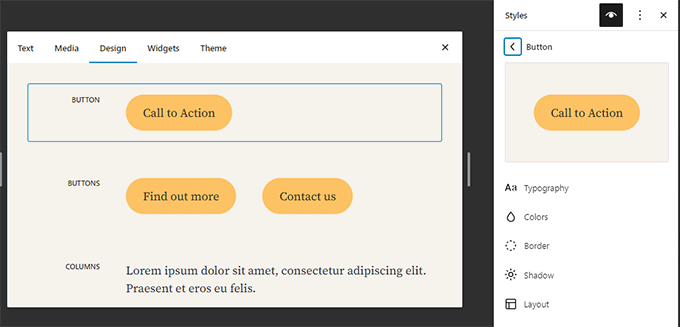
Edit block directly from style book

Copy and Paste Block Styles

Now that editing block styles and appearance has become so much easier, there is a need to easily copy and paste these styles.

WordPress 6.2 will allow you to simply copy block styles by clicking on block options and then selecting ‘Copy Styles’.

Copy styles

After that, you can click to edit a different block and select ‘Paste styles’ from the block options.

Your browser will ask for permission to allow your website to view the contents of the clipboard. You need to click ‘Allow’ to continue.
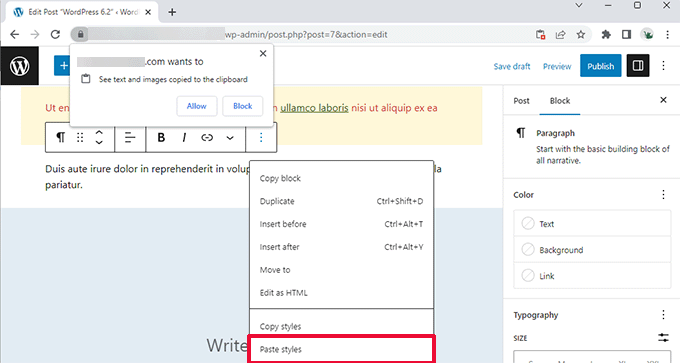
Paste styles

Classic Widgets Import as Template Parts in Block Themes

Users with classic widget themes lost their legacy widgets when they switched to a block theme. WordPress 6.2 will provide a nice fallback to that by converting legacy widgets into special Template Parts when switching themes.

You’ll need to enter the site editor and edit the template where you want to import the widgets. After that, create a new template part by clicking on the Add New Block button (+).
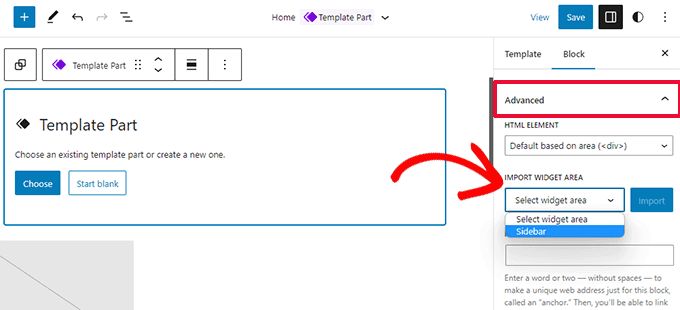
Import classic widgets in block themes

From the template part settings panel, click on the Advanced tab to expand it and you’ll find the option to import a widget area from your previous theme.

Separate Sub Panels for Block Settings and Styles

With WordPress 6.2, the editor will show two sub-panels for a block. One for the block settings and the other one for styles.

This will help users understand where they need to look if they want to change the appearance of a block.
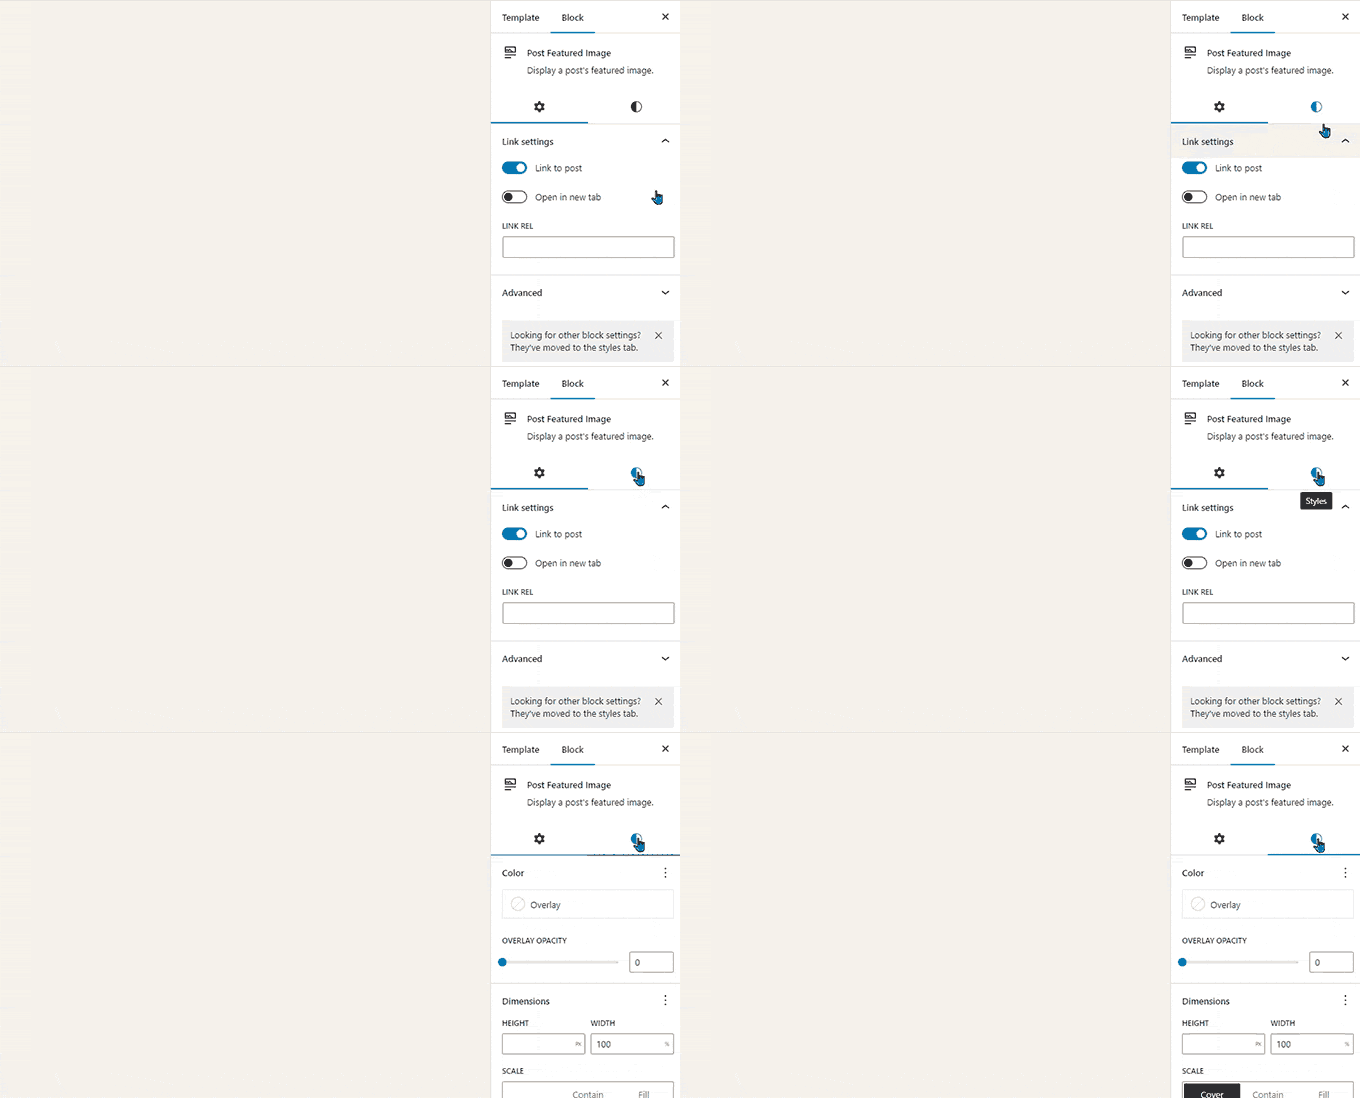
Sub panel for Styles

A New Distraction-Free Mode is Introduced

Historically, WordPress has always provided options to hide the formatting buttons and toolbars on the post editor screen.

However, WordPress 5.4 made the editor full-screen by default. This allowed users to have a much cleaner writing interface, but there was no distraction-free mode.

WordPress 6.2 will remedy that and will come with a completely clean and calm distraction-free mode. Users will be able to choose it from the editor settings.
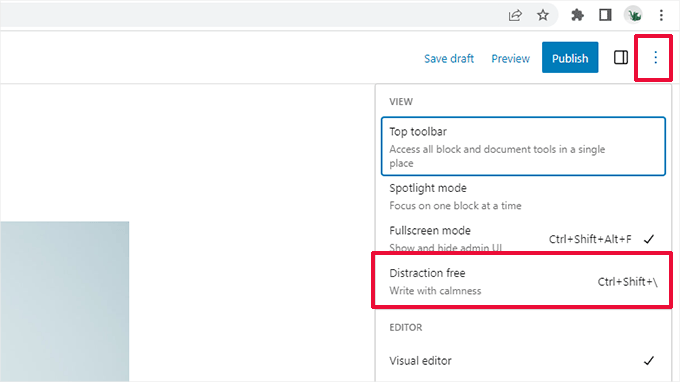
Launch distraction free mode

Once chosen, the distraction-free mode hides all editor control elements.

As you can see below, toolbars, side panels, and the top bar are nowhere to be seen.
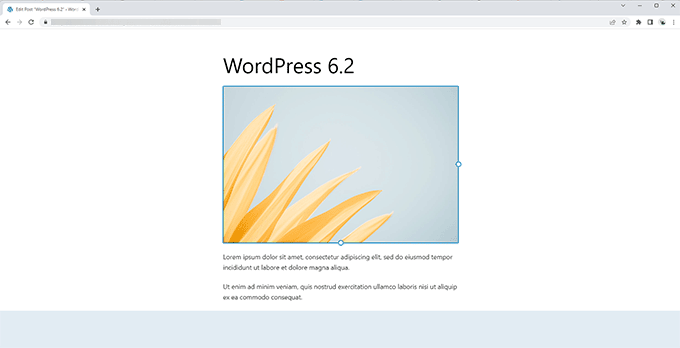
Distraction free editor in WordPress 6.2

Improved Pattern Insertion with New Categories

WordPress 6.2 will simplify the Pattern Insertion panel. Instead of showing previews and a drop-down menu of categories, it will show the categories first.
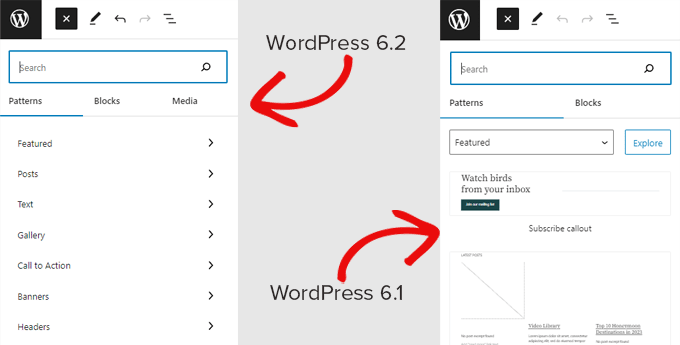
Pattern insertion

There are two new categories of Patterns added for the Header and Footer sections.

Clicking on a category will show you the available patterns that you can use.
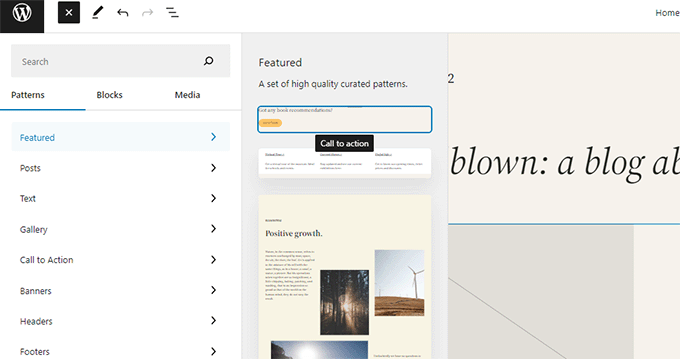
Browse patterns in a category

You can then just click to insert a pattern into your template and start editing it.

For more details, see our tutorial on how to use patterns in WordPress.

Miscellaneous Changes

Download Link For Media Files – The media screen will now show a Download File link in the list view.
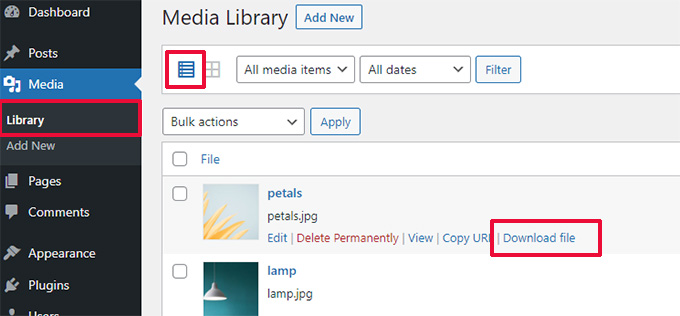
Download file link in the Media Library

Openverse Integration to Add Free Images – Openverse offers royalty-free open-source images.

With WordPress 6.2, users will be able to find and add those images from Add New panel.
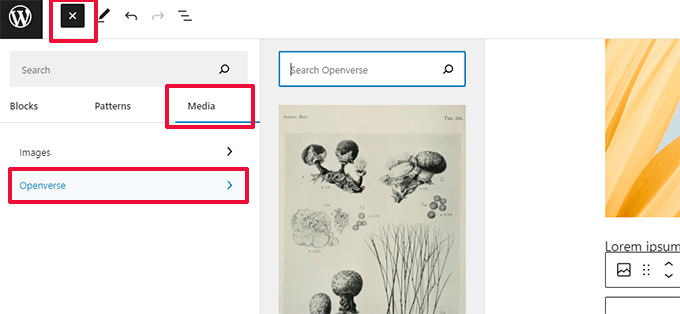
Openverse Integration

New Icon for the Settings Panel – The icon to display the settings panel previously used a gear icon.

It is now represented with a panels icon.
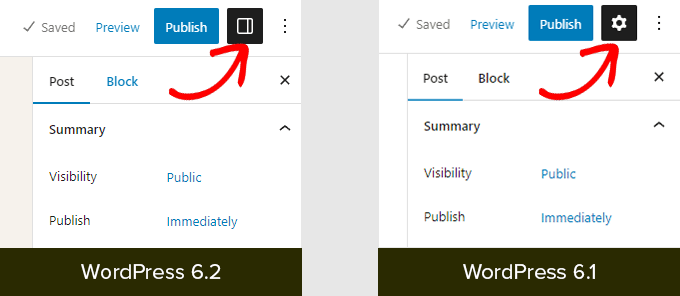
Settings icon

Under The Hood Changes

There are a ton of changes in WordPress 6.2 intended for developers. Here are some of the changes that you will find in the update:

  • Faster updates by moving directories instead of copying them. (Details)
  • A new switch_to_user_locale() function is introduced. (Details)
  • Create autosave revisions only when content is changed. (Details)
  • Add a style variation tag to themes that use style variations. (Details)

Overall WordPress 6.2 beta 1 includes 292 enhancements, 354 bug fixes for the editor, and more than 195 tickets for the WordPress 6.2 core.

We hope this article provided you with a glimpse of what’s coming in WordPress 6.2.

Comment below to let us know what features you find interesting and what you’d look to see in a future WordPress release!

If you liked this article, then please subscribe to our YouTube Channel for WordPress video tutorials. You can also find us on Twitter and Facebook.

The post What’s Coming in WordPress 6.2 (Features and Screenshots) first appeared on WPBeginner.


February 27, 2023 at 03:53PM

Sunday, February 26, 2023

How to Display Author’s Twitter and Facebook on the Profile Page

Want to display your author’s Twitter and Facebook links on their WordPress profile page?

By default, WordPress user profile pages don’t include fields for adding social media profiles such as Facebook or Twitter.

In this article, we will show you how to easily display your author’s Twitter and Facebook profile links in WordPress.

How to Display Author's Twitter and Facebook on the Profile Page

Why Display Author’s Twitter and Facebook Profiles on Your Site?

Social media platforms are an important source of traffic for your WordPress website. That’s why we put together a social media cheat sheet that will help you set up your social media profiles the right way.

Your authors will also have their own social profiles, and you can display them on your site to build credibility with your readers and strengthen your site’s authority.

Your visitors will be able to follow their favorite authors on social media and discover new articles on your site sooner. You can also add their social media profiles to your site’s schema, boosting your site’s trust score on Google and other search engines.

With that being said, let’s take a look at how to display an author’s Twitter and Facebook links on their user profile page.

Some of the best WordPress themes will display an author info box below each article. You can use this feature to display simple links to your author’s social profiles.

Simply go to Users » All Users in your WordPress admin panel and click the name of the author, or the ‘Edit’ link underneath to open the Edit User page.

Click on a User in the All Users List

Next, you should scroll down to the ‘About the user’ section and look for the ‘Biographical Info’ box.

If it is there, then your theme has built-in support for an author box.

Adding HTML Social Links to the User Bio

Here you can type a description of the author using text or HTML. You can manually add HTML links for the author’s Twitter and Facebook profile URLs, like this:

ADD BIO HERE. Follow them on <a href="https:/twitter.com/USERNAME">Twitter</a> and <a href="https://facebook.com/USERNAME">Facebook</a>.

Make sure you add a short biography about the author and change ‘USERNAME’ to their actual Twitter and Facebook usernames.

Once you’re finished, don’t forget to scroll to the bottom of the page and click the ‘Update User’ button to store your settings.

You will now see Twitter and Facebook links with the user’s bio on the posts that they write. Here’s how it looks on our demo website:

Preview of Author Bio with Twitter and Facebook Links

Method 2: Displaying Social Icons With an Author Bio Box Plugin

If your theme doesn’t display an author bio box, or if you want one that is more customizable and displays social icons instead of links, then you can use a plugin.

Simple Author Box is the best free author bio box plugin. It lets you customize nearly every aspect of your author bio box, including adding social media links for your authors.

First, you need to install and activate the Simple Author Box plugin. For more details, see our step-by-step guide on how to install a WordPress plugin.

If you want even more features, then there’s a pro version that lets you display an author box before or after content, add website links, get more social icon styles, include guest authors and co-authors, and more.

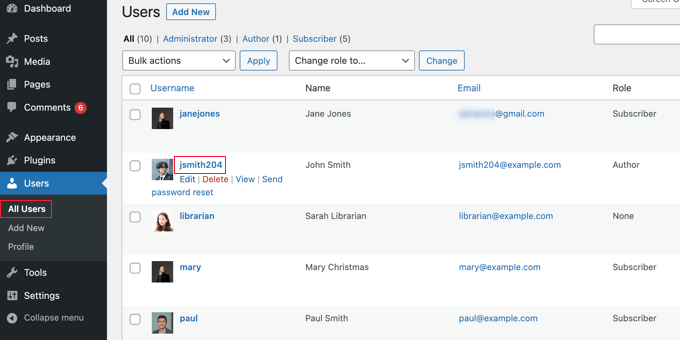
Upon activation, the plugin adds social media fields to each user profile. Simply navigate to the Users » All Users page in your WordPress admin area and click on the author’s name or the ‘Edit’ link below.

Click on a User in the All Users List

Tip: To quickly edit your own user profile, you can go to the Users » Profile page.

When you scroll to the bottom of the author profile, you will notice some new fields that have been added by the Author Bio Box plugin.

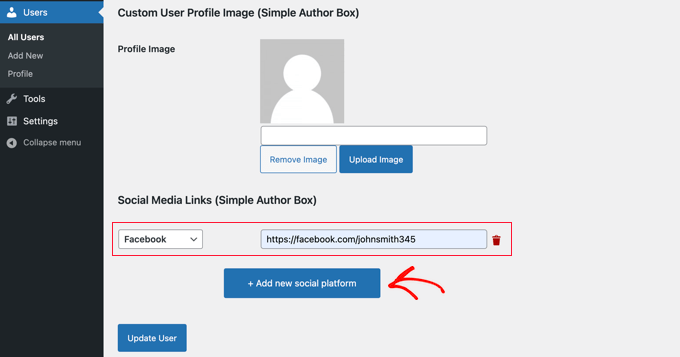
Scroll until you see the section labeled ‘Social Media Links (Simple Author Box).’ Now you need to select ‘Facebook’ from the drop-down menu, and then paste the URL to their Facebook profile into the next field.

Adding a Facebook Profile Using Author Bio Box

Now you can click the button labeled ‘+ Add new social platform.’

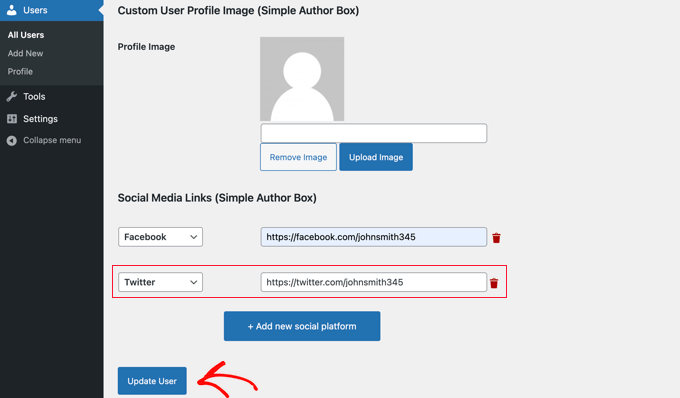
A new drop-down and field will be added where you can add their Twitter URL.

Adding Facebook and Twitter Links Using Simple Author Box

Once you’ve done that, make sure you click the ‘Update User’ button to store your settings.

Note: Don’t worry if the Facebook and Twitter URLs vanish after clicking the button. At the time of writing, there is a minor bug that hides the URLs, but the settings have been saved.

Now Facebook and Twitter icons will be displayed with the author’s profile at the bottom of their posts. Clicking these icons will take your visitors to their social profiles, but these links will open in the same window as your blog.

Preview of Simple Author Box with Social Icons

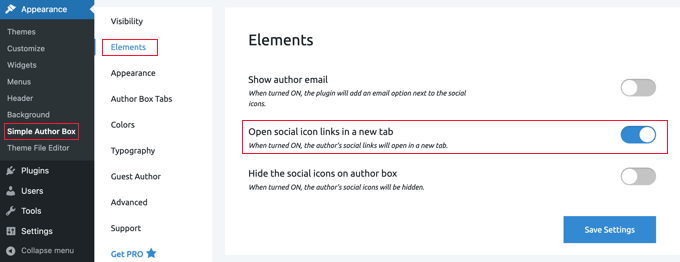
If you would prefer that the links open in a new tab, then you can navigate to the Appearance » Simple Author Box page and then click on the Elements tab. Once there, you need to find the option to ‘Open social icon links in a new tab’ and toggle it to the on position.

Open Simple Author Box Icons in a New Tab

Now the author’s social profiles will open in a new tab.

Method 3: Adding Social Profiles to Your Site’s Schema for SEO

All in One SEO (AIOSEO) is the original WordPress SEO plugin that’s used on over 3 million websites. It can also be used to add social profile fields on the author’s profile page.

Unlike the other methods, this method will improve your website’s SEO since AIOSEO adds these social profiles to your site’s schema markup.

The problem is that AIOSEO does not automatically display them in the author bio. But don’t worry, we will show you how to do that.

For this tutorial, we’ll use the free version of All in One SEO since it allows you to add social profiles for your website and each user. However, AIOSEO Pro offers even more features to help you rank better in search engine results pages.

The first thing you need to do is install the free All in One SEO Lite plugin. For more details, see our step-by-step guide on how to install a WordPress plugin.

Once you have the AIOSEO plugin set up, you need to head over to the Users » All Users page, and then click on the author’s name or the ‘Edit’ link just below.

Click on a User in the All Users List

This will open the Edit User page for that author.

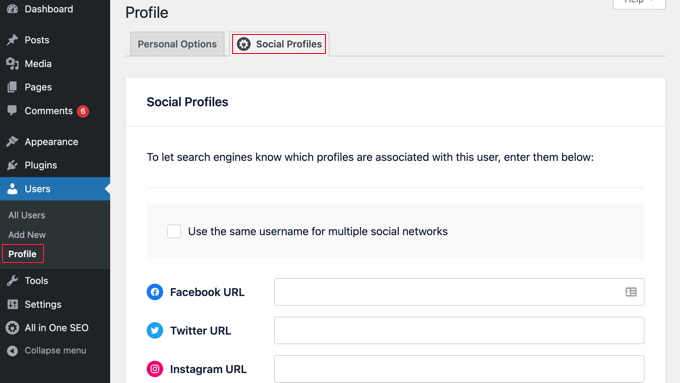
Notice that AIOSEO has added a Social Profiles tab at the top of the page. You need to click on that tab now.

All in One SEO Social Profiles Tab

You can now enter the URL to the user’s social profiles in the boxes provided, such as:

https://facebook.com/johnsmith345
https://twitter.com/johnsmith345

Note that simply adding the username is not enough.

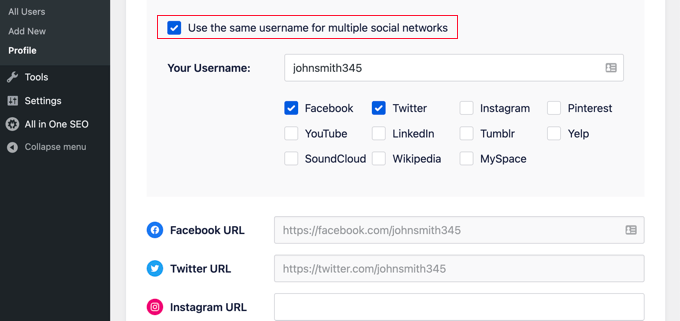
Alternatively, if the author uses the same username on multiple social networks, then you can click the box labeled ‘Use the same username for multiple social networks.’

Quickly Adding Multiple Social Networks With Same Username

You can then type in that username and check the social networks it is used on. For other social networks, you can simply type the full URL as before.

Once you are done, click on the ‘Update User’ button at the bottom of the page to store your changes.

Pro Tip: If you have Twitter and Facebook profiles for your business or website, then you can add these to your site’s schema in a similar way by visiting All in One SEO » Social Networks and adding the links on the Social Profiles tab.

The author’s social media profiles have now been added to your site’s schema, helping search engines understand your site better. But they are not yet being displayed on your website.

Displaying AIOSEO Author Twitter and Facebook Links in Your Theme

Now you need to display these fields as links in your theme.

If you are an advanced user, then you can display links from All in One SEO’s social profiles by editing your WordPress theme files. If you haven’t done this before, then check out our guide on how to copy and paste code in WordPress.

Note: If you’re not familiar with editing your theme’s core files and adding custom code, then we recommend you use AIOSEO to add the social profiles to your site’s schema, and then display them on your website using method 1 or method 2 above.

Advanced users can add the following code to your theme files where you want to display the author profile links.

<?php
$twitter = get_the_author_meta( 'aioseo_twitter', $post->post_author );
$facebook = get_the_author_meta( 'aioseo_facebook', $post->post_author );
echo '<a href="' . $twitter .'" rel="nofollow" target="_blank">Twitter</a> | <a href="'. $facebook .'" rel="nofollow" target="_blank">Facebook</a>';
?>

Save your changes and view a post on your website.

Here’s how it looks on our demo website. We added the code snippet to the biography.php file in the template-parts folder of the Twenty Sixteen theme.

Displaying AIOSEO Social Profiles in Your Theme Using Code

We hope this article helped you learn how to display the author’s Twitter and Facebook profile links in WordPress. You may also want to see our guide on how to display recent tweets or how to display your Facebook timeline in WordPress.

If you liked this article, then please subscribe to our YouTube Channel for WordPress video tutorials. You can also find us on Twitter and Facebook.

The post How to Display Author’s Twitter and Facebook on the Profile Page first appeared on WPBeginner.


February 26, 2023 at 03:21PM
Saturday, February 25, 2023

How to Disable Emojis in WordPress (Step by Step)

Are you looking to disable emojis on your WordPress site?

Emojis are small icons that are used to express feelings or emotions. WordPress loads additional CSS and a JavaScript file to add emoji support and some users may want to remove it to improve performance and speed.

In this article, we’ll show you how to easily disable emojis in WordPress.

How to disable emojis in WordPress 4.2

What Are Emojis?

Emojis are the tiny icons or smileys used on the internet.

Originating from Japan, emojis have made their way into the Unicode character set and are now supported by desktop computers as well as iOS and Android mobile devices.

The emojis feature was first introduced in WordPress 4.2 and the primary reason for adding this feature was to add native support for Chinese, Japanese, and Korean language character sets.

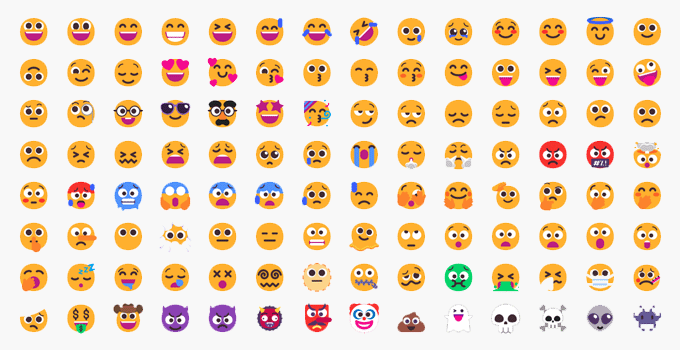
Emojis example

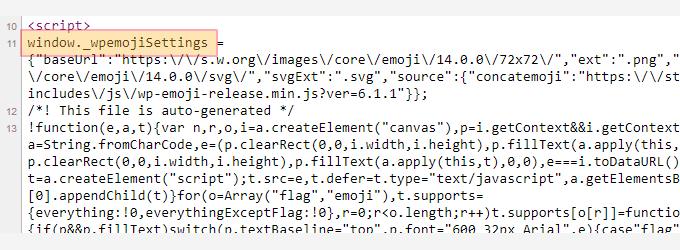
By default, WordPress loads an additional JavaScript file and some CSS to add emoji support.

You can see it by viewing your website’s source code or by using the Inspect tool.

Emoji JavaScript in WordPress

However, some site owners may want to disable this extra emoji support to boost WordPress speed and performance by not downloading additional code and scripts.

Note: When we say disabling Emoji in WordPress, we mean disabling the extra checks and scripts used by WordPress to handle Emojis. You can still use Emoji on your site, and the browsers that support them will still be able to display them.

Having said that, let’s take a look at how to easily disable Emoji support in WordPress.

Method 1. Disabling Emojis in WordPress Using Code

For this method, we’ll be using a custom code snippet to disable emoji support in WordPress.

You can add this code snippet to your WordPress theme’ functions.php file or a site-specific plugin. However, a tiny error in the code could easily break your website and make it inaccessible.

To avoid this, we recommend using WPCode. It is the best code snippets plugin for WordPress and offers the safest way to add custom code to your site without breaking it.

First, you need to install and activate the WPCode plugin. For more instructions, see our guide on how to install a WordPress plugin.

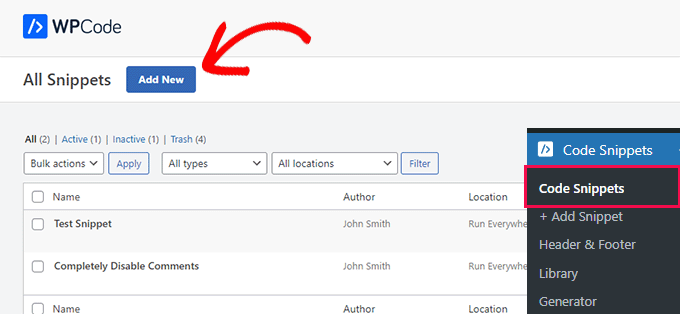
After activation, simply go to the Code Snippets » All Snippets page from the WordPress admin dashboard.

From here, you need to click the ‘Add New’ button at the top.

Add new code snippet

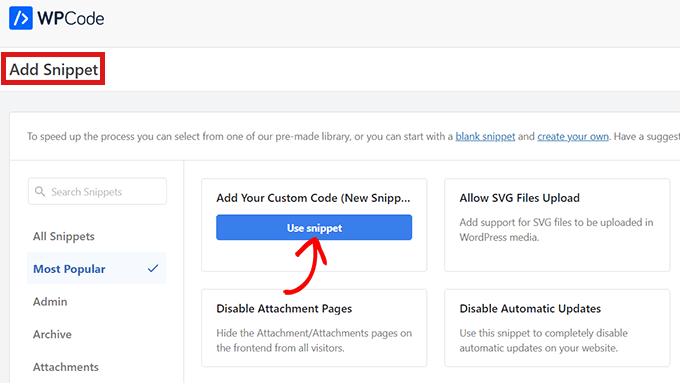
This will take you to the ‘Add Snippet’ page.

From here, take your mouse over to the ‘Add Your Custom Code (New Snippet)’ option and then click the ‘Use snippet’ button.

Click Use Snippet button

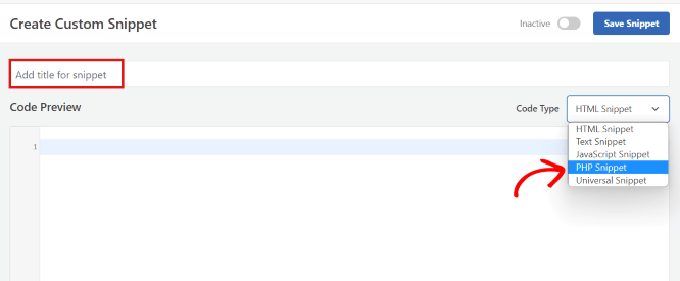
This will bring you to the ‘Create Custom Snippet’ page. You can start by typing a name for your code snippet. It can be anything you like.

After that, you need to select ‘PHP Snippet’ as your ‘Code Type’ from the drop-down menu present in the right corner.

Type a name for your code snippet and choose PHP as code type

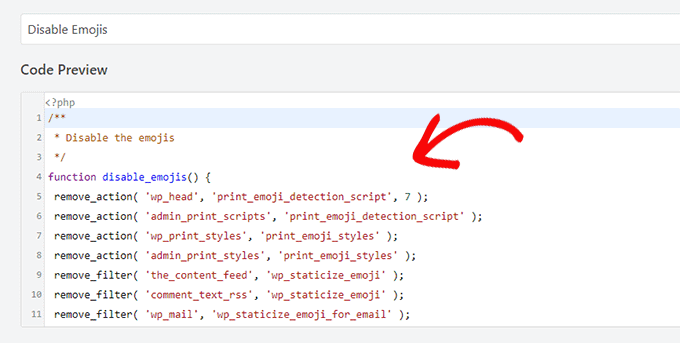
Now all you need to do is copy and paste the following code in the ‘Code Preview’ box.

/**
 * Disable the emoji's
 */
function disable_emojis() {
 remove_action( 'wp_head', 'print_emoji_detection_script', 7 );
 remove_action( 'admin_print_scripts', 'print_emoji_detection_script' );
 remove_action( 'wp_print_styles', 'print_emoji_styles' );
 remove_action( 'admin_print_styles', 'print_emoji_styles' ); 
 remove_filter( 'the_content_feed', 'wp_staticize_emoji' );
 remove_filter( 'comment_text_rss', 'wp_staticize_emoji' ); 
 remove_filter( 'wp_mail', 'wp_staticize_emoji_for_email' );
 add_filter( 'tiny_mce_plugins', 'disable_emojis_tinymce' );
 add_filter( 'wp_resource_hints', 'disable_emojis_remove_dns_prefetch', 10, 2 );
}
add_action( 'init', 'disable_emojis' );

/**
 * Filter function used to remove the tinymce emoji plugin.
 * 
 * @param array $plugins 
 * @return array Difference betwen the two arrays
 */
function disable_emojis_tinymce( $plugins ) {
 if ( is_array( $plugins ) ) {
 return array_diff( $plugins, array( 'wpemoji' ) );
 } else {
 return array();
 }
}

/**
 * Remove emoji CDN hostname from DNS prefetching hints.
 *
 * @param array $urls URLs to print for resource hints.
 * @param string $relation_type The relation type the URLs are printed for.
 * @return array Difference betwen the two arrays.
 */
function disable_emojis_remove_dns_prefetch( $urls, $relation_type ) {
 if ( 'dns-prefetch' == $relation_type ) {
 /** This filter is documented in wp-includes/formatting.php */
 $emoji_svg_url = apply_filters( 'emoji_svg_url', 'https://s.w.org/images/core/emoji/2/svg/' );

$urls = array_diff( $urls, array( $emoji_svg_url ) );
 }

return $urls;
}
Paste your code snippet

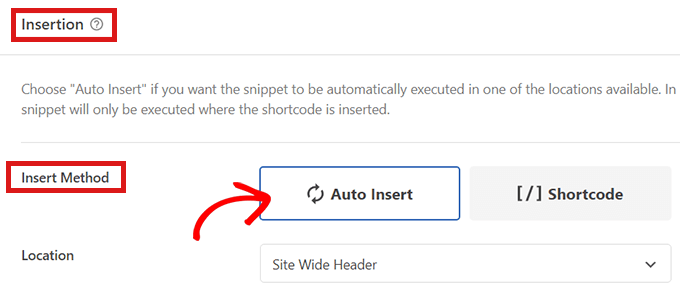
After that, scroll down to the ‘Insertion’ section to choose an insert method for your code.

Simply select the ‘Auto Insert’ mode so that the code can be automatically executed on your site upon activation.

Choose Auto Insert as insert method

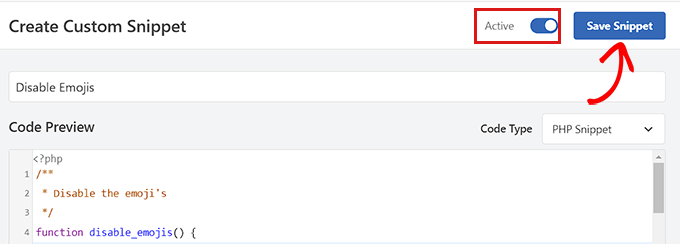
Now go back to the top of the page and toggle the switch on the right from ‘Inactive’ to ‘Active’.

Finally, click the ‘Save Snippet’ button to save your custom code snippet.

Click the Save Snippet button to save changes

That’s all, you have successfully disabled emojis in WordPress.

Method 2. Disable Emojis in WordPress Using a Plugin

For this method, we’ll be using a plugin to disable Emojis in WordPress.

First, you need to install and activate the Disable Emojis plugin. See our guide on how to install a WordPress plugin for more instructions.

The plugin works out of the box and there are no settings for you to configure.

Upon activation, it will automatically disable emoji support from your WordPress site.

We hope this article helped you learn how to disable Emojis on your WordPress site. You may also want to check out our guide on how to create a custom Facebook feed in WordPress and our article on how to add web push notifications to your WordPress site.

If you liked this article, then please subscribe to our YouTube Channel for WordPress video tutorials. You can also find us on Twitter and Facebook.

The post How to Disable Emojis in WordPress (Step by Step) first appeared on WPBeginner.


February 26, 2023 at 03:00AM
Friday, February 24, 2023

How to Create Compact Archives in WordPress

Do you want to create compact archives on your WordPress website?

If you have been blogging for a few years, then the list of your posts might have become too long to fit in your WordPress sidebar. This will make your sidebar look cluttered which won’t be good for your site presentation

In this article, we’ll show you how to easily create compact archives in WordPress.

How to create compact archives in WordPress

Why Do You Need Compact Archives in WordPress?

Adding an archive in WordPress allows you to easily display your previously published content on your website for users to go through.

By default, WordPress offers an ‘Archives’ block and widget that can be added to the sidebar of your WordPress blog.

However, the ‘Archives’ block only allows you to display your archives as a long list or a dropdown menu.

A list will make your site look cluttered while a dropdown can be easily overlooked by users as it isn’t as noticeable.

The default archive block in WordPress

By creating compact archives, you can easily display your archives in the WordPress sidebar without taking up much space. You can also display them on your about page or even create a dedicated Archives section.

That being said, let’s take a look at how to easily add compact archives in WordPress.

How to Add Compact Archives in WordPress

You can easily create compact archives in WordPress using the Compact Archives plugin.

First, you need to install and activate the Compact Archives plugin. For further instructions, check out our guide on how to install a WordPress plugin.

Now, the plugin offers three styles to display compact archives on your website.

Style 1. Relaxed three-letter month initials

Style one of the compact archives

Style 2. Compact Monthly Initials

Style two of compact archives

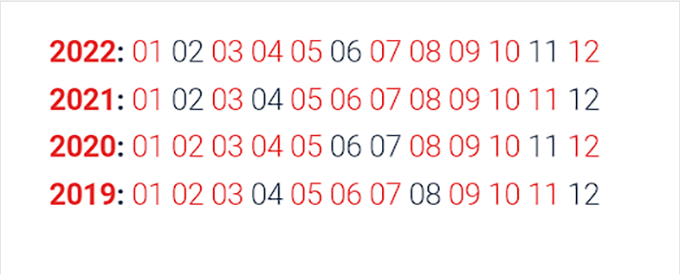
Style 3. Numeric Block

Style three of the compact archives

There are multiple ways to easily display compact archives on your website.

In this tutorial, we will be showing you all four methods and you can choose the one that you like the most.

Method 1. Add Compact Archives in WordPress Posts or Pages

It is super easy to add compact archives to your WordPress page or post because the plugin comes with an easy-to-use block that you can add to your post or page.

For this tutorial, we will be creating a new page for compact archives.

Simply head over to the Pages » Add New page from the admin sidebar. Once a new page opens up in the block editor, you can start by typing a name for your page.

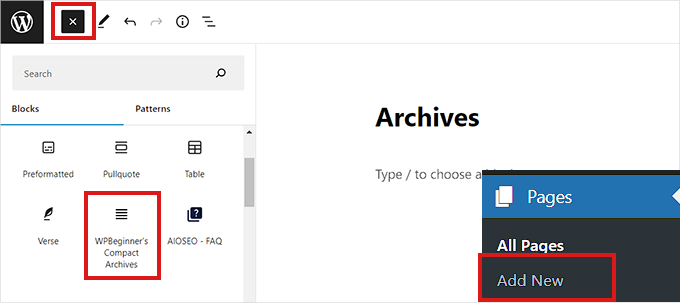
Next, you need to click the ‘Add Block’ (+) button at the top and search for the ‘WPBeginner’s Compact Archvies’ block.

Upon locating it, simply click on the block to add it to your page.

Add the Compact archives block to a page

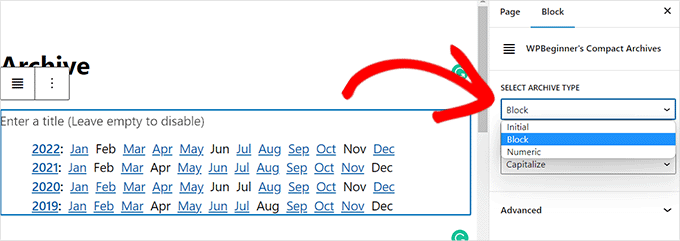
Next, you need to choose a style for your archives from the Block Settings panel on the right corner of the screen.

Simply choose a style of your liking from the dropdown menu below the ‘Select Archive Type’ option.

Select an archive type from the dropdown menu

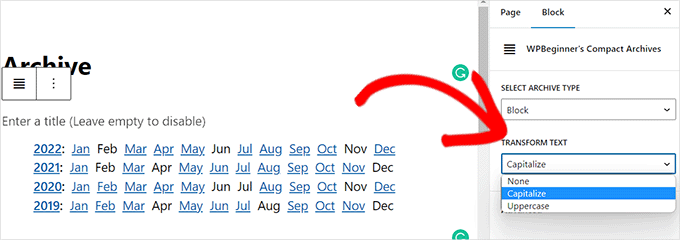
You can also choose if you want your archive text to be capitalized or Uppercase.

For that, you need to open the dropdown menu below the ‘Transform Text’ option.

Select the archive text from the dropdown menu

Once you’re satisfied with your choice, simply click the ‘Publish’ or ‘Update’ button at the top.

This is how your archives page will look.

Archives preview

Method 2. Add Compact Archives as a Widget

You can also display your archive as a widget on your website.

Adding the Compact Archives Block in Full Site Editor

If you’re using a block-based theme on your website, then you’ll have to add the ‘ WPBeginners’ Compact Archives’ block using the full site editor.

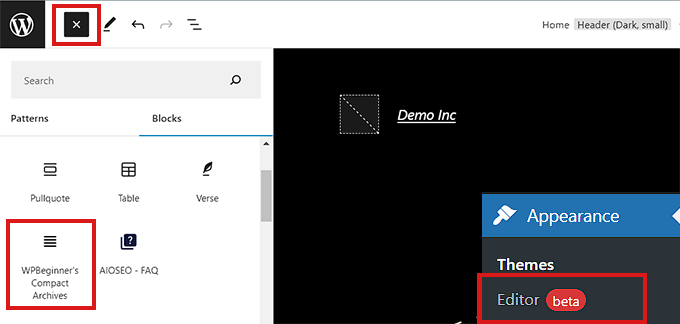
First, you need to visit the Appearance » Editor page from the admin sidebar to launch the FSE.

From here, you need to click the ‘Add Block’ (+) button on the top-left corner of the screen to open up the block menu.

Next, you need to simply locate and add the ‘WPBeginner’s Compact Archvies’ block to your preferred place on the website.

Add the compact archives block in the FSE

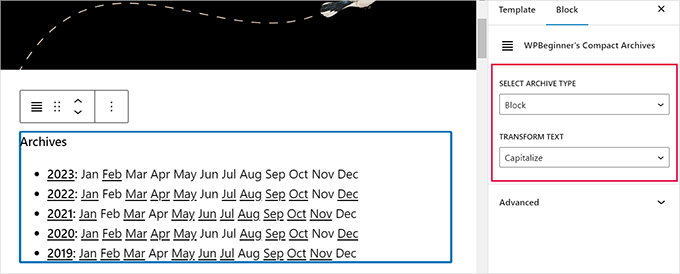
Once you add the block, you can configure its’ style and text settings from the Block Settings panel on the right.

Finally, don’t forget to click on the ‘Save’ button at the top to store your settings.’

Configure the Compact archives settings in FSE

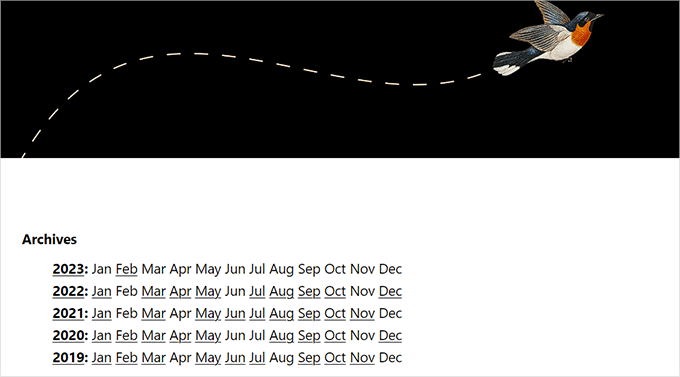
Your compact archives will look like this.

Compact archives in FSE

Adding the Compact Archives Block Using Widgets

If you’re not using a block-based theme, then this method is for you.

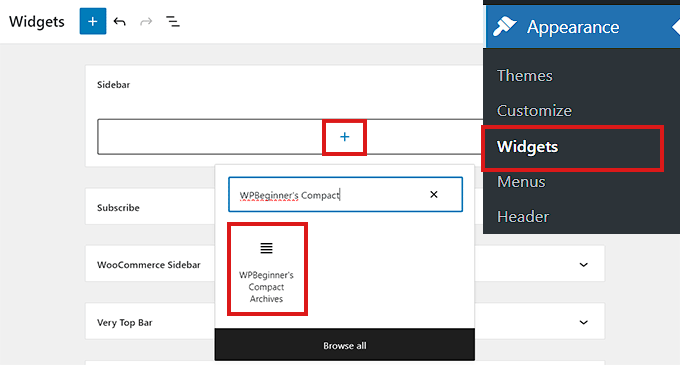
First, you need to visit the Appearance » Widgets page from the admin sidebar.

Once there, simply click the ‘Sidebar’ tab to expand it.

Now, you need to click the ‘Add Block’ (+) button in the sidebar tab.

This will open up the ‘Widget Block Menu’ where you need to search for the ‘WPBeginner’s Compact Archive’ block.

Upon locating it, simply click the block to add it in the sidebar section.

Add the compact archives block in the sidebar

Once the ‘Compact Archives’ block is added you can change the style and text of your archive by configuring the settings from the Block Settings panel on the right.

Don’t forget to click the ‘Update’ button at the top to save your changes.

Configure the block settings of the compact archives and click Update button

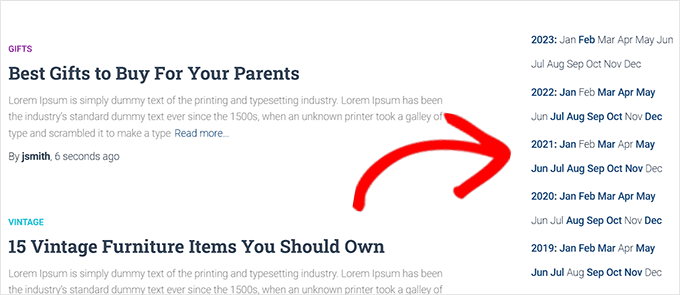
This is how your website sidebar will look upon adding the ‘Compact Archvies’ block.

Compact archive preview in sidebar

Method 3. Displaying Compact Archives in Template Files

If you are making a custom WordPress theme or want to display archives in a theme template file, Compact Archives comes with handy template tags that you can use.

Simply add the following template tag to your code.

<ul> <?php compact_archive(); ?> </ul>

After adding the tag, compact archives will be added to your page.

However, if you want to add a style to your archive, you can do so by adding the following template tag in your code.

<ul>
<?php compact_archive($style='initial', $before='<li>', $after='</li>'); ?>
</ul>

For example, $style == 'initial' will display only month name initials and should fit right inside a sidebar. Using$style == 'block', will fit the main column of a page. Using $style == 'numeric', will display numeric months.

Method 4. Add Compact Archives to Your HTML Sitemap

If you want to create an HTML sitemap page for your in WordPress, then you can also display compact archives on your HTML sitemap page.

First, you will need to install and activate the All in One SEO for WordPress plugin. For more details see our article on how to install a WordPress plugin.

All in One SEO is the best WordPress SEO plugin on the market. It allows you to easily optimize your website for search engines.

It also comes with an HTML sitemap feature that allows you to easily add an HTML sitemap to your WordPress site.

It is a premium plugin but you can also use the free version called All in One SEO Lite. The free version has fewer features but it includes HTML sitemaps.

Upon activation, the plugin will launch the setup wizard. Simply follow the on-screen instructions to set up the plugin or see our guide on how to properly set up All in One SEO for WordPress.

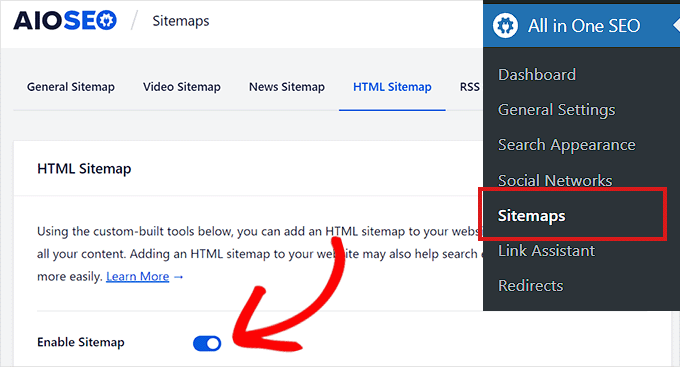
Once finished, you now need to visit the All in One SEO » Sitemaps page from the admin sidebar.

From here, you need to click on the ‘HTML Sitemap’ tab and make sure that the ‘Enable Sitemap’ toggle is turned on.

Toggle the Enable Sitemap switch

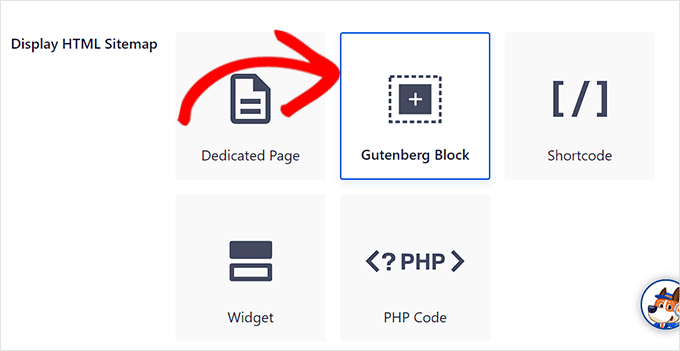
Next, you need to choose how you want to display your HTML sitemap.

For this tutorial, we will be choosing the ‘Gutenberg Block’ option.

If you choose this method, then you’ll have to add the “AIOSEO – HTML Sitemap” block to any page where you wish to display your HTML sitemap.

Choose the Gutenberg block

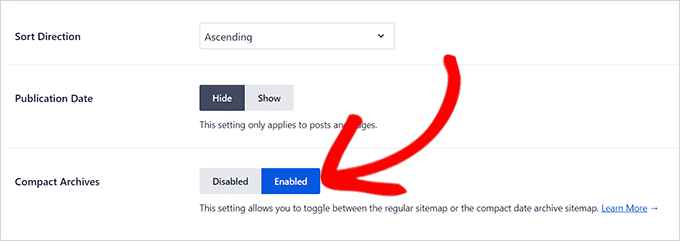
Next, you need to scroll down to the ‘Compact Archives’ option in the ‘HTML Sitemap Settings’ section.

Here, you need to simply toggle the ‘Compact Archives’ switch to ‘Enabled’.

Now your HTML sitemap will be displayed in a compact date archive format.

Toggle the compact archives switch to Enabled

Finally, don’t forget to click on the ‘Save Changes’ button to store your settings.

Next, open up a page where you want to display the HTML sitemap from the admin sidebar.

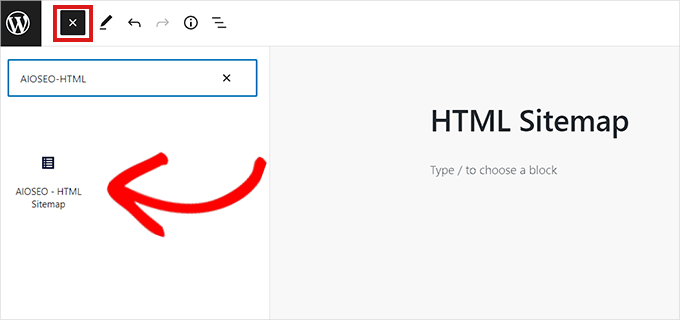
From here, simply click on the ‘Add Block’ (+) button at the top and then add the ‘AIOSEO-HTML Sitemap’ block to your page.

Add the AIOSEO-HTML Sitemap block to your page

Finally, don’t forget to click the ‘Publish’ or ‘Update’ button to save your changes.

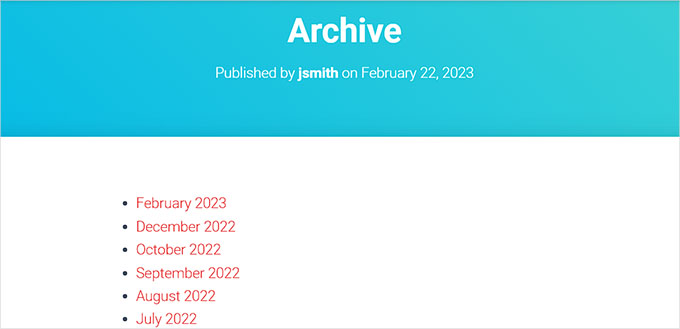
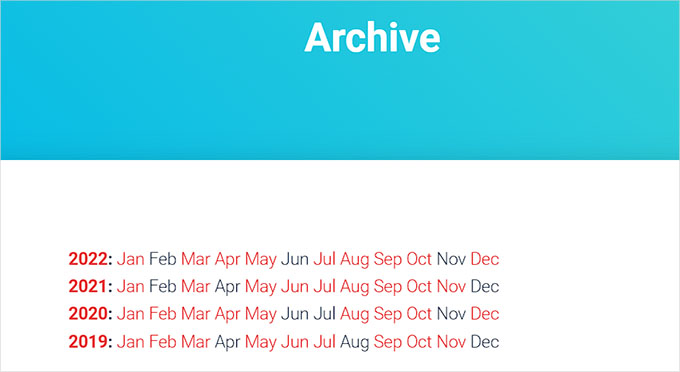
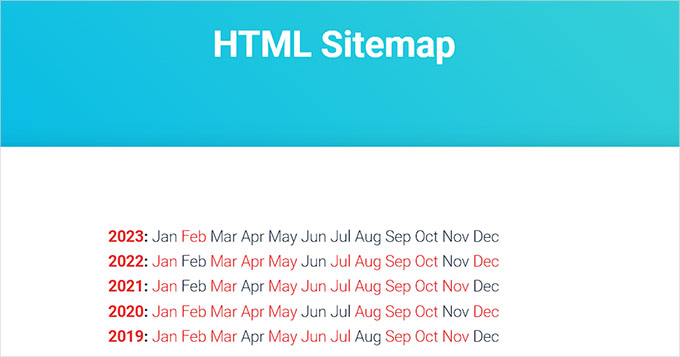
Your compact archives HTML Sitemap will look like this.

We hope this article helped you learn how to easily create compact archives in WordPress. You may also want to see our guide on how to easily create an email newsletter in WordPress and our top picks of the best social media plugins to help promote your website.

If you liked this article, then please subscribe to our YouTube Channel for WordPress video tutorials. You can also find us on Twitter and Facebook.

The post How to Create Compact Archives in WordPress first appeared on WPBeginner.


February 25, 2023