Wednesday, April 26, 2023

How to Create a Searchable Member Directory in WordPress

Are you looking to add a member directory to your WordPress website?

Adding a directory to your membership site can help boost your community engagement. It encourages new members to join and make it easy for them to reach out to each other.

In this article, we will show you how to create a searchable member directory in WordPress.

How to Create a Searchable Member Directory in WordPress

Why Create a Searchable Member Directory in WordPress?

A membership site often brings together users who share common interests. You can create a sense of community on your WordPress website by making it easy for your members to communicate with one another about their shared interests.

You can do this by creating a membership directory. This is a searchable list of the members on your site. It allows your members to see other members’ profiles and contact details.

Member Directory Example

This will boost your website’s credibility and make it more valuable to your members. It may even help your members feel important and recognized.

However, to protect their privacy, you may want to require each member to opt in before their personal information is displayed in the directory.

If you haven’t yet created your membership site, then you can follow our ultimate guide on creating a WordPress membership site.

While you can use any method to create a membership site, we recommend the MemberPress plugin. It offers advanced membership features and integrates well with the Formidable Forms Directory addon used in this tutorial.

How to Create a Searchable Member Directory in WordPress

The best way to create a member directory is by using the Formidable Forms plugin. It comes with advanced features that let you format, filter, and display user-submitted data on the front end of your website, including your members’ profile information.

It is one of the best user registration plugins for WordPress on the market and can help you easily create a member directory using an addon. Plus, it integrates with MemberPress to give you complete control over your directory’s appearance and functionality.

Formidable Forms

You can use Formidable Forms to create a profile form where members can enter their information and opt in to the directory. You can also use it to display the searchable member directory itself.

Besides that, you will also be able to use Formidable Forms for all sorts of other purposes on your website, such as creating a booking form or web directory, allowing your clients to request a quote, and more.

With that in mind, let’s see how to create a searchable member directory using the Formidable Forms plugin.

1. Installing Formidable Forms on Your Membership Site

The first thing you need to do is install and activate Formidable Forms Lite, which is the free version of the plugin. Formidable Forms Lite acts as the base for the advanced features of the Pro version.

For more details, you can read our guide on how to install a WordPress plugin.

Next, you will need to visit the Formidable Directory page and click the ‘Get Formidable Directory’ button. You will then be prompted to purchase the Elite plan, which includes the Directory addon.

The Formidable Forms Directory Page

Before leaving the Formidable website, you will need to copy your license key. You can find it by clicking ‘Account’ at the top of the page.

Now return to your website and navigate to Formidable » Global Settings. Once there, simply click the link that says ‘Click to enter a license key manually’ to paste your license key and then click the ‘Save License’ button.

Enter Formidable Forms license key

You are now ready to create a member directory in WordPress.

2. Creating the Formidable Member Directory Application

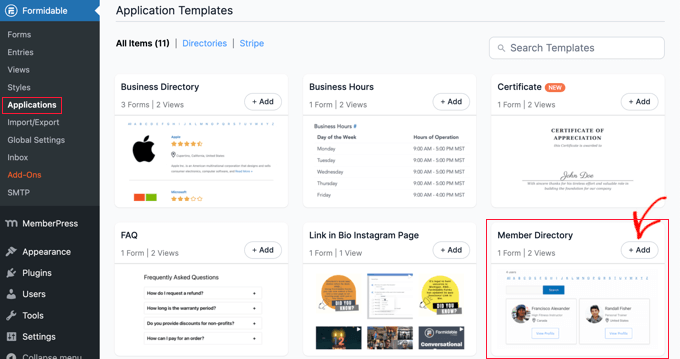
Next, you must navigate to Formidable » Applications from the WordPress admin sidebar. This page will show you the available application templates.

Once there, you need to find the Member Directory application and click the ‘+ Add’ button to install it.

Adding the Member Directory Application

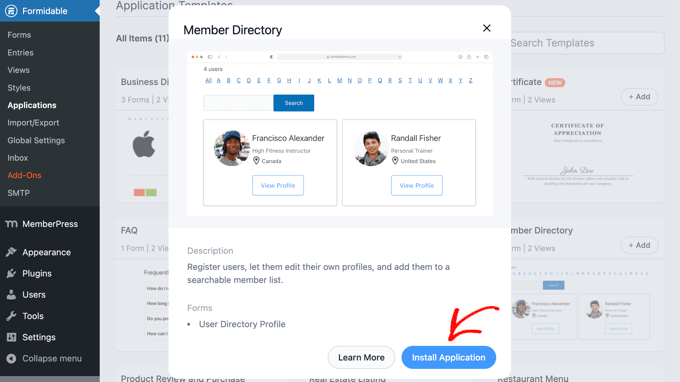
This will open a popup that describes the Member Directory application.

Simply click the ‘Install Application’ button to continue.

Installing the Member Directory Application

Next, you will be asked to give the application a name.

For this tutorial, we will leave the default name, ‘Member Directory’, and then click the ‘Install Application’ button to continue.

Naming the Member Directory Application

Formidable Forms will now create the pages, forms, and views needed for your member directory. The pages are saved as drafts, so you can customize them before they go live.

Opening the Member Directory Application

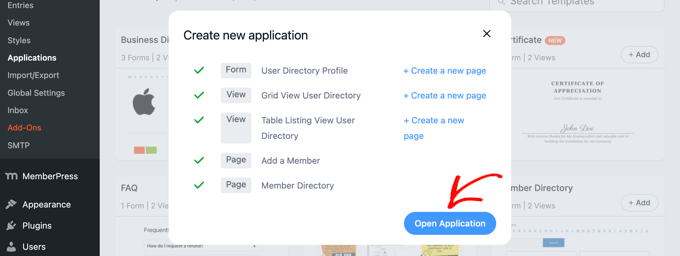
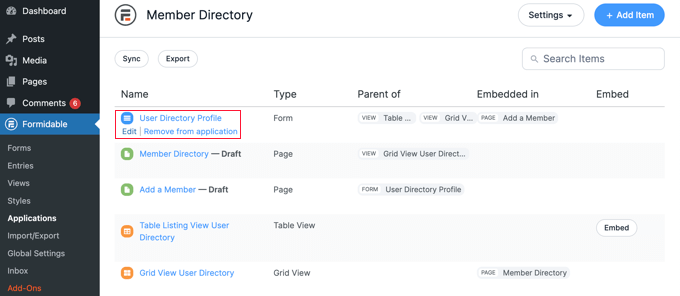
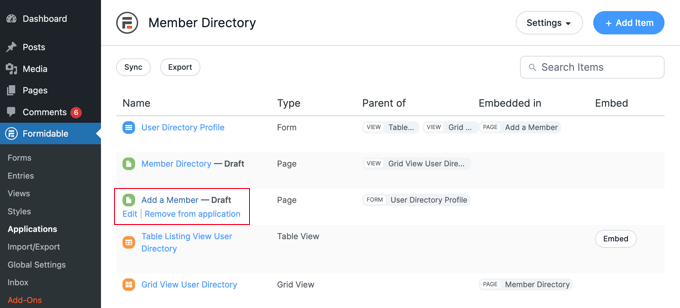
Now you need to click the ‘Open Application’ button. This will open the Member Directory application page, where you can customize and publish your directory.

You have now created a ‘User Directory Profile’ form that your members can fill out on the ‘Add a Member’ page.

There is also a ‘Member Directory’ page where you can view the directory in a table view or grid view.

3. Customizing the Member Profile Form and ‘Add a Member’ Page

Next, you may wish to add or remove some fields from the ‘User Directory Profile’ form. This is the form that your members must fill in to be included in the directory.

You may also want to add some instructions to the page where the profile form is displayed before you publish it.

Customizing the ‘User Directory Profile’ Form

The ‘User Directory Profile’ form contains all of the fields needed for most member profiles. You can customize it by clicking the ‘User Directory Profile’ link or hovering your mouse over it and then clicking on ‘Edit’.

Customizing the User Directory Profile Form

This will open the form editor. You will see a preview of the form on the right and the available fields on the left.

The form includes contact details, social links, and more. Some of the fields will be filled in automatically using information from the member’s WordPress user profile. This includes their name, email address, and bio.

The Formidable Form Editor

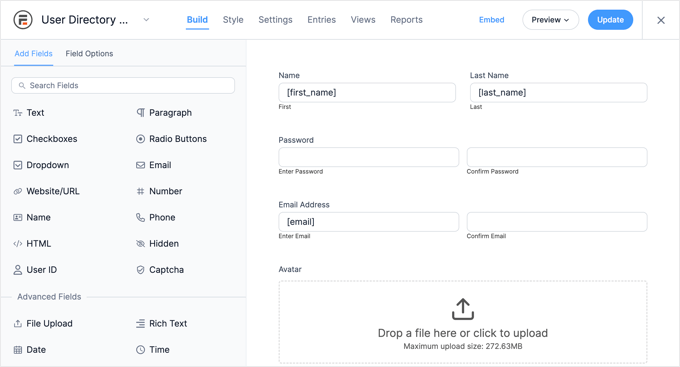
To add new fields, simply drag them onto the form from the ‘Add Fields’ column on the left.

You can change the options of a field by clicking on it. This will open the ‘Field Options’ tab on the left, where you can customize the field by changing its settings.

Customizing the Email Address Field Options

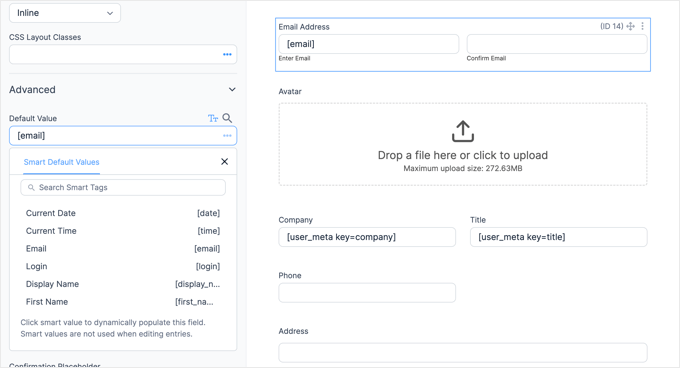
You will find options for the field’s default value in the ‘Advanced’ section. Here you can choose the default value from a list of smart tags. This will take information that the user has already added to their WordPress profile so that it doesn’t have to be entered twice.

When you scroll to the bottom of the form, you will notice it already includes fields for social links and an option where the member can choose to be included in the directory.

Click the Save Profile Button When Finished

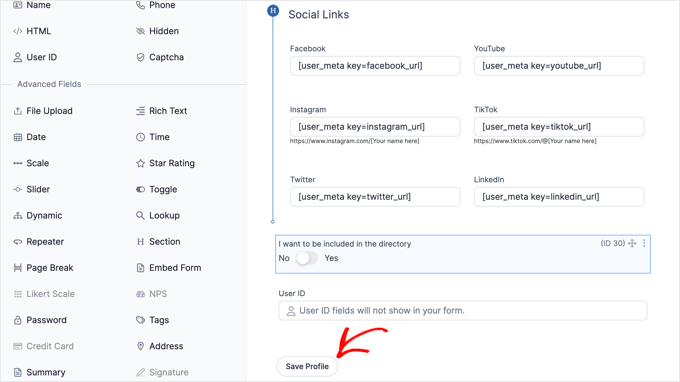
Once you have finished customizing the form, simply click the ‘Save Profile’ button to store your changes.

Customizing the ‘Add a Member’ Page

Next, you will need to customize and publish the ‘Add a Member’ page that will display the profile form on your website.

You may need to navigate back to Formidable » Applications » Member Directory to see the page. Then, simply click the ‘Add a Member’ link, or hover over it and click ‘Edit.’

Opening the 'Add a Member' Page

This will open the ‘Add a Member’ page in the WordPress content editor. It simply contains the page title and the Formidable form that you were just looking at.

If you like, you can give the page a different title, such as ‘Join Our Member Directory’.

If you would like to add some instructions before the form, then you should click on the page title and press the Enter key. This will create a new block where you can type those instructions.

Publishing the Add a Member Page

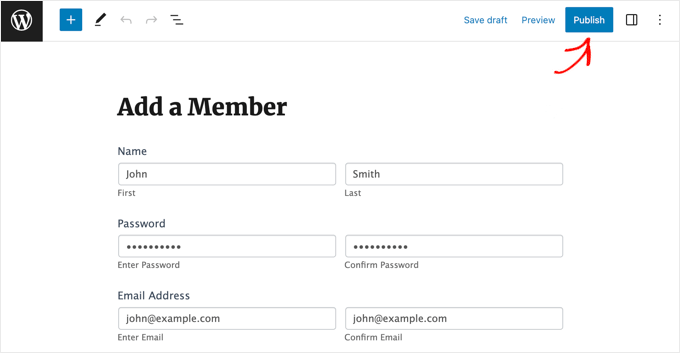
When you are happy with the page, then simply click the ‘Publish’ button at the top of the screen to push the page live on your website.

4. Customizing the ‘Member Directory’ Page

Now you can customize and publish the member directory itself. You will need to choose whether to display the members in a grid or table. Then, you must also publish the page so that it is visible on your website.

Customizing the ‘Member Directory’ Page

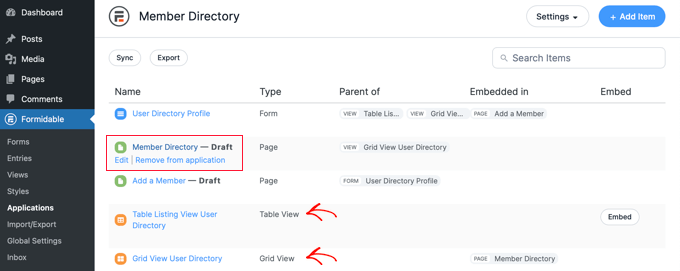
First, just go back to Formidable » Applications and click on your member directory application.

You will need to publish the draft ‘Member Directory’ page. However, before doing that, you can decide whether that page should display the directory in a grid or table format.

Editing the Member Directory Page

Simply click on the ‘Member Directory’ page to open it in the WordPress editor.

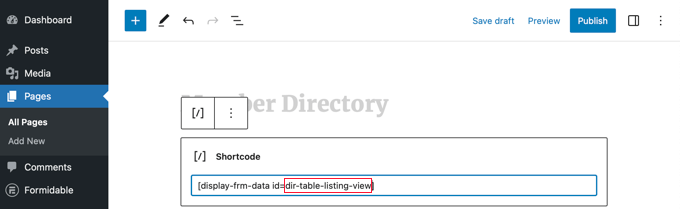
The page contains just the title and the following shortcode that displays the directory:

[display-frm-data id=dir-two-col-grid]
Shortcode to Display the Directory as a Grid

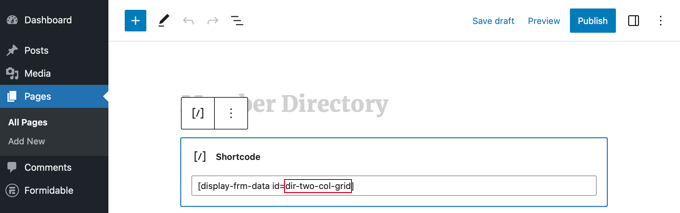
By default, the shortcode will display the directory in a two-column grid.

You can preview the page to see how it will look.

Member Directory Displayed in a Grid

Alternatively, you can display your member directory in a table format.

To do that, you will need to use this shortcode instead:

[display-frm-data id=dir-table-listing-view]
Shortcode to Display the Directory in a Table

You can preview the page again to see the changes.

This time each member will be displayed on a single line with their information in columns.

Member Directory Displayed in a Table

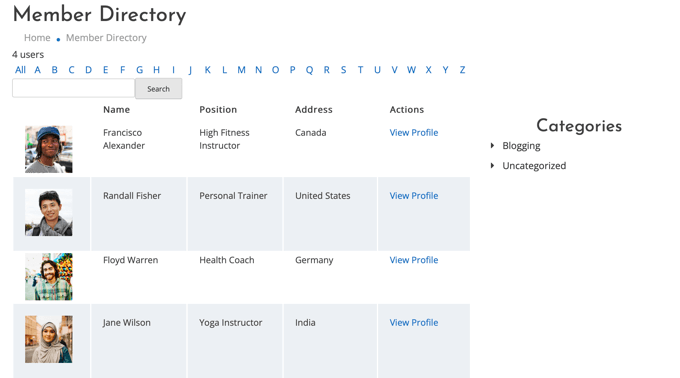
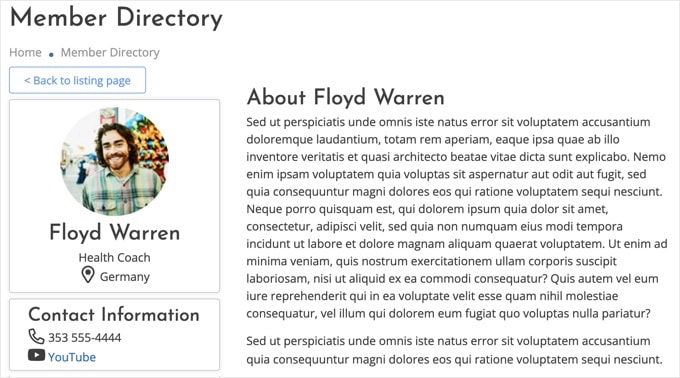
Whichever shortcode you choose, clicking on ‘View Profile’ will show you more detailed information about that member.

Viewing a Member Profile

If you like, you can add additional content to the page. Just make sure to click the ‘Publish’ button to push your member directory live on your website when you are finished.

Adding the Member Directory Pages to Your Navigation Menu

You can make it easier for your members to find or join the directory by adding the ‘Add a Member’ and ‘Member Directory’ pages to your website’s navigation menu.

Simply follow our guide on how to add specific posts to the WordPress navigation menu.

Restricting the Member Directory to Members Only

Also, depending on the type of membership site you have, you may want only your logged-in members to be able to see the ‘Add a Member’ and ‘Member Directory’ pages.

If so, then you will need to create a rule so that only members get access to the pages.

We show you how to do that step by step in our ultimate guide on creating a WordPress membership site. You will just need to scroll down and read Step 6 to learn how to create a MemberPress rule and Step 7 to learn how to add members-only content.

5. Deleting the Sample Data in Your Member Directory

Your member directory contains the sample data that you can see in the screenshots used in this tutorial. This is helpful when setting up your member directory because it lets you see how the profiles will look.

But once you have finished setting up the directory, you will need to delete the sample data.

You need to navigate back to Formidable » Applications » Member Directory and click on the ‘User Directory Profile’ form.

Once the Formidable editor opens, click on the ‘Entries’ tab at the top of the screen to view the sample entries.

Most likely, the only entries listed will be the four sample members. In that case, simply click the ‘Delete All Entries’ button at the top of the screen. All members listed will be deleted.

Deleting Sample Data From the Directory

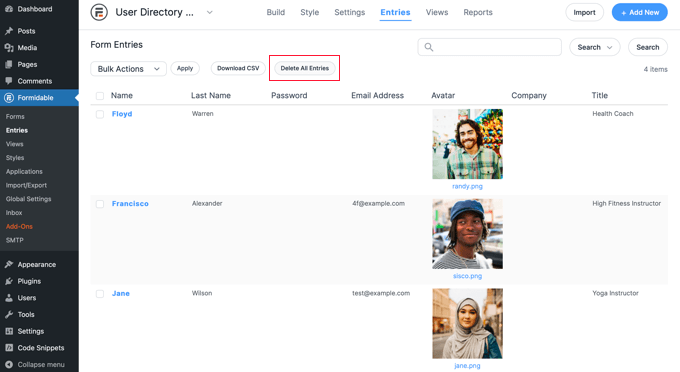
However, if some of your real members have already created profiles, you must select the sample entries manually.

To do this, you will need to click the checkbox next to each sample member. Next, click the ‘Bulk Actions’ button at the top of the list and select ‘Delete’ from the drop-down menu.

Finally, click the ‘Apply’ button to delete the sample data. Your member directory will now only contain profiles from your real members.

We hope this tutorial helped you learn how to create a searchable member directory in WordPress. You may also want to see our guide on how to create and sell online courses with WordPress or our expert picks for the best contact forms for WordPress.

If you liked this article, then please subscribe to our YouTube Channel for WordPress video tutorials. You can also find us on Twitter and Facebook.

The post How to Create a Searchable Member Directory in WordPress first appeared on WPBeginner.


April 26, 2023 at 02:57PM

Tuesday, April 25, 2023

16 Best WordPress Typography Plugins to Improve Your Design

Are you looking for WordPress typography plugins to improve your website design?

Your font choice plays an essential role in your web design. Improving your website typography makes your site easier to read and offers visitors a better experience.

In this article, we’ll show you some of the best WordPress typography plugins you can use with your WordPress site.

16 best WordPress typography plugins to improve your design

Why is Typography Important for Your WordPress Site?

Your website typography is a very important part of your overall design. Choosing beautiful and easy to read fonts will increase your website engagement and boost the time your users spend on your site.

Many of the best WordPress themes come with access to Google Fonts and allow you to tweak the typography to suit your needs.

There are built-in settings within the post and page editor that give you more control over your fonts and layouts.

However, there’s a lot more you can do with your typography, like add subtitles, use drop caps, include footnotes, let users resize fonts, and much more.

By choosing the right WordPress plugins, you can improve the typography on your WordPress website without writing any code.

Having said that, let’s take a look at some of the best WordPress typography plugins that you can try on your website.

1. Google Fonts for WordPress

Fonts Plugin

Google Fonts for WordPress has a library of over 1,455 stylish fonts that you can use on your WordPress site. It comes with a live preview for each font to help you select the font for your headings and content.

The plugin has Adobe Fonts integration and also supports thousands of Google Fonts. You can also upload custom fonts and change font size, color, weight, and line height in the plugin settings.

For more details, see our guide on how to add custom fonts in WordPress.

Deal: If you want to get the premium version of the plugin, then make sure to use our Google Fonts for WordPress coupon for a 20% discount.

2. wp-Typography

wp-Typography

wp-Typography is a free WordPress typography plugin. It gives you more control over special characters like hyphens, ellipses, trademark symbols, fractions, and more.

The plugin supports over 70 different languages and can help to provide an improved reading experience for your visitors.

3. Zeno Font Resizer

Zeno Font Resizer

Zeno Font Resizer gives your visitors the option to change the font size on your website with a couple of clicks. This can improve your user experience for those who prefer larger text.

The plugin makes it easy to add a font resize option to your WordPress sidebar. It also uses jQuery, so your visitors can adjust the font without the page reloading.

4. Page Title Splitter

Page Title Splitter

Page Title Splitter is a unique plugin that lets you split longer post titles into two lines. This lets you use longer and more descriptive post titles while making sure they’re still readable.

This works for all posts, pages, and custom post type titles. It gives you complete control over the layout of your title on desktop and mobile devices.

5. Secondary Title

Secondary Title

Secondary Title is a simple plugin that lets you add subtitles to your posts and pages. This is common with popular websites like Buzzfeed, Medium, Mashable, and more.

Adding secondary titles, or subtitles, lets you explain your title and gives you a better chance to hook your readers and encourage them to read your content.

For more details, see our guide on how to add subtitles for posts and pages in WordPress.

6. Toolkit for Block Theme

Toolkit for Block Theme

Toolkit for Block Theme is a WordPress block editor plugin to customize your theme design and styles. It lets you change fonts, integrate Google Fonts, and use additional global styles to make a perfect website for your business.

It gives you the option to host Google Fonts locally, so you can import any font family and use it on your website. The plugin has several other options for WordPress block themes.

7. Editor Plus

Editor Plus

Editor Plus is an advanced WordPress customization plugin. It comes with typography controls and a panel to manage your font properties.

The plugin lets you change the font weight, font style, font size, letter spacing, line height, and color. You can also control the font display on different screen sizes and devices easily.

8. Text Hover

Text Hover

Text Hover is a plugin that lets you add a text hover box to your content and make your site more interactive.

This can be helpful when displaying phrases, definitions, explanations, acronyms, and more. It helps to give your readers more context when reading your articles.

9. Custom Adobe Fonts

Custom Adobe Fonts

Custom Adobe Fonts lets you add popular Adobe (formerly Typekit) fonts to your website.

The plugin works with the most popular page builders, so you have a larger font library to choose from when customizing your site.

10. Font Awesome

Font Awesome

Font Awesome lets you add icon fonts to your website. Icon fonts are simple pictograms you can use to improve your buttons, feature boxes, navigation menus, and more.

For more details, see our guide on how to easily add icon fonts to your WordPress theme.

11. Use Any Font

Use Any Font

Use Any Font lets you upload custom fonts to WordPress. This is great if you have custom fonts downloaded to your computer that you want to use.

You can also use fonts from the font library, which has over 23,000 different fonts to choose from.

12. Styleguide

Styleguide

Styleguide lets you customize your theme’s fonts and colors in your WordPress theme customizer.

This lets you change the appearance of your fonts without having to add custom CSS to your website. It’s compatible with most WordPress themes.

13. OMGF

OMGF

OMGF is a plugin that will optimize your Google Fonts. It lets you host your fonts locally to speed up loading times.

The plugin helps to minimize DNS requests, reduces layout shifts, and leverages browser caching to improve performance. It’s very beginner friendly and runs quietly in the background.

14. SeedProd

SeedProd WordPress Website Builder

SeedProd is the best WordPress theme and website builder on the market. It comes with ready-made template kits that you can use to launch your website in just a few clicks.

SeedProd is also the best WordPress page builder. With this plugin, you can create custom pages and have complete control over the appearance of your fonts.

You can even use the dynamic text feature to create animated headlines to attract your visitors. Plus, you get access to the entire Google Fonts library to use on your website.

15. Thrive Themes

ThriveThemes

Thrive Themes has a popular WordPress website builder and offers a powerful suite of tools to grow your online business. It’s a 1-stop solution for beginners to set up a business website and add growth tools all at once.

Moreover, it comes with a quiz builder, an A/B testing tool, a testimonial plugin, and more. All their tools work with your WordPress theme seamlessly.

Thrive Builder lets you customize font styling, font size, and font color within the website builder settings. You can also integrate any custom font plugin with Thrive Themes to add more fonts to your WordPress site.

Thrive Builder lets you change the default source to import fonts, and you can add new fonts of your choice easily.

16. WP Rocket

WP Rocket

WP Rocket is the best WordPress caching plugin in the market. It’s very beginner friendly and helps you speed up WordPress.

There’s a unique caching option that will optimize your Google Fonts with a single click. If you run a website speed test, this is one of the most common speed issues users report.

For more details, see our guide on how to install and set up WP Rocket in WordPress.

We hope this article helped you find the best WordPress typography plugins for your website. You may also want to see our expert picks of the best virtual business phone number apps and our guide on how to get a free email domain.

If you liked this article, then please subscribe to our YouTube Channel for WordPress video tutorials. You can also find us on Twitter and Facebook.

The post 16 Best WordPress Typography Plugins to Improve Your Design first appeared on WPBeginner.


April 26, 2023 at 02:00AM

Why Is WordPress So Hard (And How to Make It Easier)

If you’re comparing different website builders, then you may have come across the sentiment that WordPress is hard to use.

WordPress is the world’s most popular website builder powering over 43% of all websites on the internet. However, some people complain that WordPress is more difficult to use than solutions like Squarespace and Wix.

In this article, we’ll address the myth of why WordPress is so hard, and share the tricks, tools, and techniques you can use to harness the full power of WordPress without any difficulties.

Why is WordPress so hard?

Why is WordPress So Hard?

Over 43% of all websites on the internet are built on WordPress. This might make you wonder:

Why are so many people using a difficult platform?

Unlike website builders such as Squarespace, WordPress is completely open source, customizable, and flexible. You can use WordPress in any way you want, which might sound confusing for new users.

This is particularly true if you’ve previously used a website builder like Wix.com. These platforms typically have limited features and control exactly how you use their tools. This might make it seem like that they’re easy to use, but they are also very restrictive.

With the right techniques, tools, and information, WordPress is just as easy as any website builder, but without any of the restrictions.

By choosing WordPress, you’ll get the freedom to use any web host and domain provider, so you can update, customize, and extend your WordPress website in exactly the way you want. 

In the official WordPress repository alone, you’ll find over 60,000 free plugins that can add all sorts of features to your website. Think of plugins like apps in your iPhone except they’re for your websites.

When it comes to designing your site, you can use any free or premium theme, or even use drag & drop page builders to create a completely unique design. 

There are no provider terms and conditions to follow, and you own all the content on your site. 

With that in mind, let’s take a look at why nearly half of all website owners in the world ignore the myth that WordPress is hard to use and choose WordPress as their platform.

WordPress Isn’t Hard (But Here’s How to Make it Even Easier)

At WPBeginner we don’t believe that WordPress is hard. However, if you don’t have the right tools, tricks, and know-how, then WordPress can feel more complex than it actually is.

With that in mind, let’s see how you can make WordPress easier. You can use the links below to jump to any section of the post.

Choose the Right Web Hosting Provider

By choosing the best WordPress hosting, you can set your site up for success. The right host will provide exactly the features you need to build and run a successful WordPress website, even if you have no previous experience.

Some hosts even perform crucial WordPress maintenance tasks such as creating backups, adding security plugins, and installing updates. This will make WordPress feel effortless.

For example, Bluehost is a well-known WordPress hosting provider that automatically installs and set up WordPress for you when you sign up.

The Bluehost web hosting provider

From time to time, you may encounter problems or have questions.

A good host will offer support over email, phone, live chat, and other channels so you’ll have no problems getting your site back on track.

As the world’s most popular CMS, there are lots of companies that offer WordPress hosting. For that reason, we’ve done the research and created a list of the best web hosting companies to help you find the provider that’s right for you.

Here are the top WordPress hosting companies that we recommend:

  1. Bluehost – great for beginners – includes free domain.
  2. Hostinger – growing fast in popularity due to affordable prices, fast speed, includes free domain.
  3. SiteGround – premium WordPress hosting provider, uses Google cloud. Slightly higher prices.
  4. WP Engine – enterprise managed WordPress hosting provider, great for large sites.

Install Must-Have WordPress Plugins

The best part about WordPress is that you can easily add any feature to your site using plugins, without hiring a developer.

There are eCommerce plugins to help you create an online store, plugins that turn WordPress into a membership site so you can sell courses, add smart lead generation forms to grow your business, improve your SEO rankings, and much more.

In fact, there are over 60,000 free plugins in the official WordPress repository alone, so you’ll have no problems finding a plugin that meets your exact needs.

The official WordPress plugin repository

To help you get started, here’s our expert list of the must-have plugins for your WordPress website.

Our top 5 free WordPress plugins that we always recommend include:

  1. WPForms – best drag & drop online form builder for WordPress.
  2. AIOSEO – best WordPress SEO plugin to boost your SEO rankings.
  3. MonsterInsights – easily see your website analytics to make data-driven decisions.
  4. Duplicator – easily create regular backups for your website.
  5. SeedProd – drag & drop page builder to create custom website designs without any code.

Find the Perfect WordPress Theme

WordPress themes control how your site looks and acts. There are themes designed for specific markets like WooCommerce themes and membership site themes, but also multi-purpose themes that you can customize to fit almost any type of site.

Just like plugins, there are countless free themes to choose from. In fact, there are over 10,500 free themes in the official WordPress repository alone.

The WordPress theme repository

You’ll find even more on top WordPress theme providers websites.

This includes Elegant Themes, Astra, StudioPress, and more.

An example of a premium WordPress theme marketplace

It’s important to choose a theme that looks good, has the features you need, and is also high quality. To help you make the right decision, see our guide on how to select the perfect WordPress theme.

If you’re looking for theme recommendations, then check out our expert pick of the most popular and best WordPress themes.

Use a WordPress Page Builder

When building your site, you’ll create posts and pages using the WordPress block editor.

The WordPress block editor

If you’re using a block-enabled theme such as Divi or Astra, then you can also add content using the full-site editor.

This editor allows you to completely change the theme layout and add new sections to your website without writing any code.

The WordPress full site editor (FSE)

This is a great start, but it can be very basic and has a limited number of features.

We still recommend using a page builder plugin such as SeedProd. SeedProd allows you to create completely custom page designs and comes with ready-made blocks that you can drag and drop anywhere on your site.

This includes advanced blocks like countdown timers, contact forms, Google Maps, payment fields, and much more.

Why is WordPress so hard? SeedProd can make it easier

After adding a block to your site, you can customize it using the settings in the left-hand SeedProd menu.

This makes it easy to create custom home pages, landing pages, and more.

Why is WordPress so bad? Page builders can make it easier

For more on this topic, please see our guide on WordPress Block Editor vs Page Builders, as well as our expert tips to master the WordPress content (block) editor.

Use a WordPress SEO Plugin

Most visitors will find your site through search engines like Google. To help search engines show your content to the right people, you’ll need to work on your WordPress SEO.

SEO is a huge topic that often includes technical tasks such as adding rich snippets schema markup to your site.

Thankfully, there’s a WordPress plugin for everything and SEO is no exception. There are lots of different WordPress SEO plugins and tools you can use for individual tasks, but we recommend AIOSEO as it’s the complete SEO toolkit for WordPress.

The AIOSEO SEO WordPress plugin

AIOSEO comes with powerful features including breadcrumb navigation, advanced eCommerce SEO support for WooCommerce, local SEO, an internal link assistant, and much more. This means you don’t have to set up and learn multiple SEO plugins.

AIOSEO also scans your pages and posts as you’re writing them and creates a checklist of ways to improve its SEO.

Why is WordPress so hard? AIOSEO can make it easier

For step-by-step instructions, please see our ultimate guide on how to set up All in One SEO for WordPress correctly.

Use Tools to Improve Site Speed and Performance

To provide a good experience, your website needs to load quickly.

WordPress is already optimized for speed and performance, but there are lots of tricks and tools that can make it run even faster. With that in mind, we’ve created the ultimate guide to boost WordPress speed and performance that has everything you need to know.

Set up an Automated Security Plugin

WordPress is secure software, but hackers are always coming up with new ways to break into sites and steal data. To help new WordPress users keep their sites safe, we’ve created an ultimate WordPress security guide.

We also recommend using Sucuri, which is the best WordPress security plugin.

The Sucuri WordPress security plugin

Sucuri tracks everything that happens on your site, including failed login attempts and any changes to the WordPress files.

It also scans for malware and monitors whether your site appears on any blocklists, as this may mean there’s a problem with your site’s security.

Why is WordPress so bad? Sucuri is one way to make it easier

If it finds an issue, then Sucuri will notify you automatically. In this way, you can protect your site without having to perform any manual checks, or learn complicated security tools.

To learn how we use Sucuri on our own websites, see our complete Sucuri review.

Set up Google Analytics

As a website owner, your goal is to get people to your site and keep them engaged. That’s where Google Analytics comes in.

Analytics allow you to make decisions based on real data. For example, you can track website visitors and see the content that gets the most engagement. You can then create more of this popular content.

An example of Google Analytics data

You can also see how long visitors stay on your site and the bounce rate, which is the percentage of users who exit your site on the first visit. You can use this information to increase pageviews and reduce bounce rate in WordPress.

Google Analytics is an important tool, but it can be complicated to set up. For that reason, we recommend using MonsterInsights.

The MonsterInsights Google Analytics plugin

MonsterInsights is the best analytics solution for WordPress users.

It allows you to easily install Google Analytics on your website and then shows helpful reports directly in the WordPress dashboard.

Why is WordPress so complicated? MonsterInsights can make it easier

To learn more, please see our guide on how to install Google Analytics in WordPress.

Use Comment Filtering and Moderation

All website owners worry about comment spam.

Spambots and malicious third parties can easily flood a site’s comment section with links to malware and low-quality pages. This can hurt your website’s reputation and may even affect its SEO.

You can moderate comments in WordPress directly from the dashboard, including manually approving and blocking comments, or even deleting them completely.

Moderating comments manually can make WordPress more hard

However, moderating every single comment can be time-consuming, especially as your site grows and attracts more visitors.

Thankfully, there are lots of tools to combat comment spam in WordPress. This includes Akismet, which automatically filters all comments through a global spam database.

Moderating comments automatically using Akismet

To learn more, please see our guide to Akismet and why you should start using it right away.

Never Edit Your Theme Files Directly

WordPress is open-source software so anyone can see and edit its code, or even add their own PHP, JavaScript, CSS, and HTML. It may sound complicated, but there are lots of reasons to add custom code to WordPress.

For example, you might use a code snippet to completely disable comments, or remove the WordPress version number. Typically, it doesn’t make sense to install a plugin for these small tasks, so WordPress gives you the option to use code instead.

Many WordPress tutorials will provide a snippet and then ask you to edit your theme’s functions.php file.

The problem is that even a typo or small mistake in the code can cause errors or even break your site completely. You also won’t be able to update your WordPress theme without losing the customization.

This leads many people to think that WordPress is hard, when really the problem lies with their custom code.

That’s why we recommend using WPCode.

The WPCode code snippets plugin for WordPress

WPCode is the best code snippets plugin for WordPress and allows you to add custom PHP, JavaScript, CSS, and HTML without editing any theme files.

WPCode also has a built-in library of snippets that you can add to a site with just a few clicks. Even if you’re a beginner with no coding experience, WPCode makes it easy to add custom code in WordPress in a safe way.

Why is WordPress so complicated? WPCode can make it easier

Keep Your WordPress Site Up-To-Date

It’s important to keep your themes, plugins, and core WordPress software up-to-date. Hackers try to exploit known errors and vulnerabilities in outdated software, so if you fall behind then your site could become an easy target.

Some updates even add features that make WordPress easier to use. For this reason, it’s important to update WordPress core, update your WordPress plugins, and install the latest version of your theme.

Some web hosts will install these updates for you automatically, especially if you’re using a managed hosting provider.

Another option is to enable automatic updates for WordPress and enable automatic updates for plugins and themes. With that done, you’ll always have access to the latest WordPress features and fixes.

Why is WordPress so complicated? Automatic updates can make it easier

Automate Your WordPress Backups

WordPress is secure and reliable software, but it’s still a good idea to create regular backups.

Accidents and mistakes happen, such as deleting important content or editing the wrong page. Malicious third parties may also try to break into your site and delete your content.

By creating regular backups, you can always recover a working and error-free version of your website. Even if the worst happens and you lose all your data, you can simply restore your WordPress website from its latest backup.

They may be important, but many website owners overlook backups until it’s too late.

The good news is there are many free and paid WordPress backup plugins that can do the hard work for you. We recommend using a premium plugin like Duplicator Pro as it can create backups automatically.

For added security, Duplicator Pro will save your backups to popular online storage solutions like Dropbox, OneDrive, or Amazon S3. This means you can log into these services from any location, and get access to a working copy of your website.

Learn WordPress

The right plugins, themes, and techniques will help you run a successful WordPress website with ease. In some cases, you can even completely automate important tasks such as making a WordPress database backup or performing a security audit.

For this reason, many website owners don’t take the time to learn more about WordPress. We think this is a big mistake.

By continuing to learn you can often make WordPress even easier to use. With that in mind, here are just some of the free resources you’ll find on WPBeginner:

  • WPBeginner Blog. This is where we publish our WordPress tutorials, how-tos, and step-by-step guides. We have a huge library of free content, and we’re publishing new information all the time.
  • WPBeginner Dictionary. Complicated terms and technical jargon can make WordPress seem a lot harder than it is. For that reason, we’ve created a directory that covers all the WordPress lingo.
  • WPBeginner Videos. Our step-by-step WordPress 101 video tutorials have everything you need to get started with WordPress.
  • WPBeginner on YouTube. Enjoyed our WordPress 101 series and want to learn more? You’ll find over 900 more videos on our YouTube channel covering everything from SEO, to common WordPress errors and how to fix them, how to embed dynamic social media feeds on your site, and much more.
  • WPBeginner Engage Group. The largest and fastest-growing WordPress group for non-techies and beginners on Facebook. Here, you can connect with over 91,000 WordPress users, ask questions, and get support from the community.

Consider Hiring a WordPress Maintenance Service

The tips and tricks in this guide will make WordPress feel effortless, even if you’ve never created a website before.

However, if you’re looking for the ultimate hassle-free experience then you can always hire a maintenance service to take care of WordPress for you. This includes creating backups, installing updates, performing SEO audits, upgrading your site’s security, finding and fixing broken links, and more.

These services are perfect for first-time WordPress users or anyone who finds that day-to-day website maintenance takes too much time. If you want to hire a WordPress expert, then see our pick of the best WordPress website maintenance services.

We hope this article helped you see why WordPress is not hard, and there’s a good reason that nearly half of all websites on the internet use WordPress. You may also want to see our guide on how much it really costs to build a WordPress website or see the most important reasons to use WordPress.

If you liked this article, then please subscribe to our YouTube Channel for WordPress video tutorials. You can also find us on Twitter and Facebook.

The post Why Is WordPress So Hard (And How to Make It Easier) first appeared on WPBeginner.


April 25, 2023 at 03:02PM